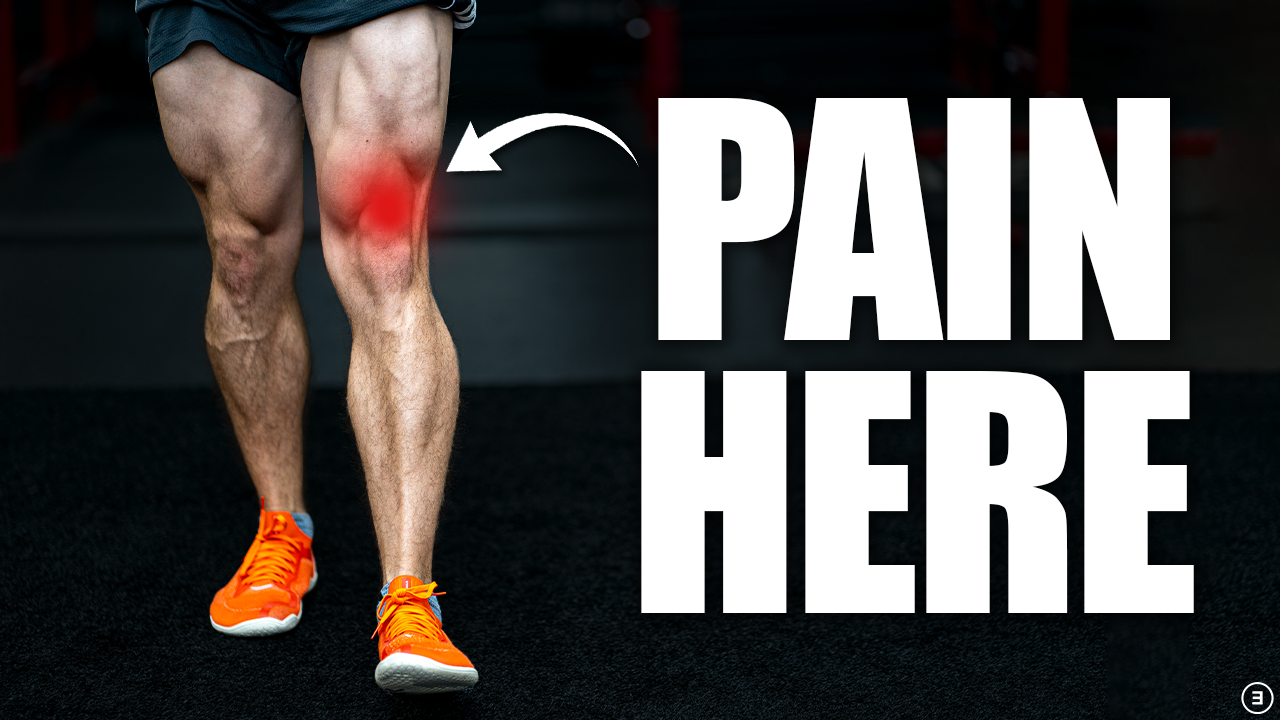
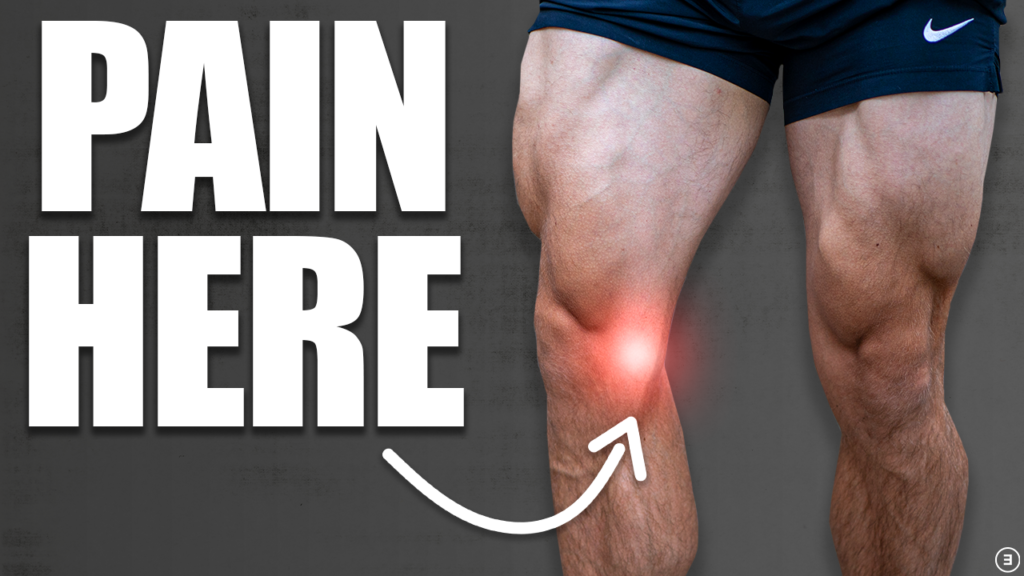
Do you have an MCL injury?
This blog aims to discuss medial collateral ligament (MCL) sprains and provide a comprehensive framework for rehabilitation. This includes mobility, strength, dynamic balance, and plyometric exercises.
Looking to improve your strength, range of motion, and power to enhance your function and performance? Check out our Knee Resilience program!
MCL Anatomy & Function
Your medial collateral ligament, or MCL, is located on the inner part of your knee and consists of a superficial and deep layer. The superficial portion is a long, flat band, while the deep portion is a continuation of your joint capsule with connections to your medial meniscus. Both have attachments on your femur and tibia. In this region, you also have the posterior oblique ligament.
Along with your MCL, these structures primarily act to stabilize your knee against valgus and rotational forces.
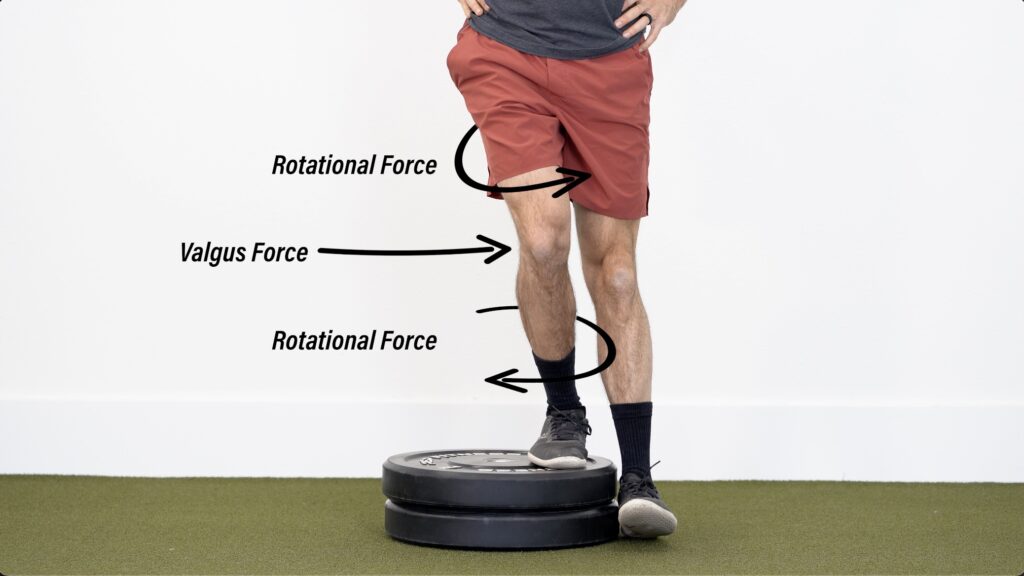
The most common mechanism of injury is a “direct blow to the outside of the thigh or leg while the foot is planted, producing direct valgus movement”. An example is a player getting tackled in football. An injury can also occur when a “valgus stress is coupled with tibial external rotation,” such as during skiing or sports involving cutting and pivoting.
In severe cases, other knee structures can also be injured, including the medial meniscus, lateral meniscus, PCL, and most commonly, the ACL.
MCL Injury Classification
The majority of MCL sprains occur in isolation and are generally graded on a scale from 1-3 based on findings during clinical examination or imaging.
Typically, grade 1 presents with tenderness, minimal to no joint laxity, and a fully intact ligament. Grade 2 has minor joint laxity and partial ligament disruption. And grade 3 has gross joint laxity with complete ligament disruption.
MCL Injury Treatment Options
Regardless of the severity of the injury, an isolated MCL injury can often be treated nonoperatively due to its high intrinsic healing potential.
Shown in the image below is an algorithm for the management of acute MCL injuries, adopted from Encinas-Ullan et al. in 2018 and Gelber et al. in 2018.
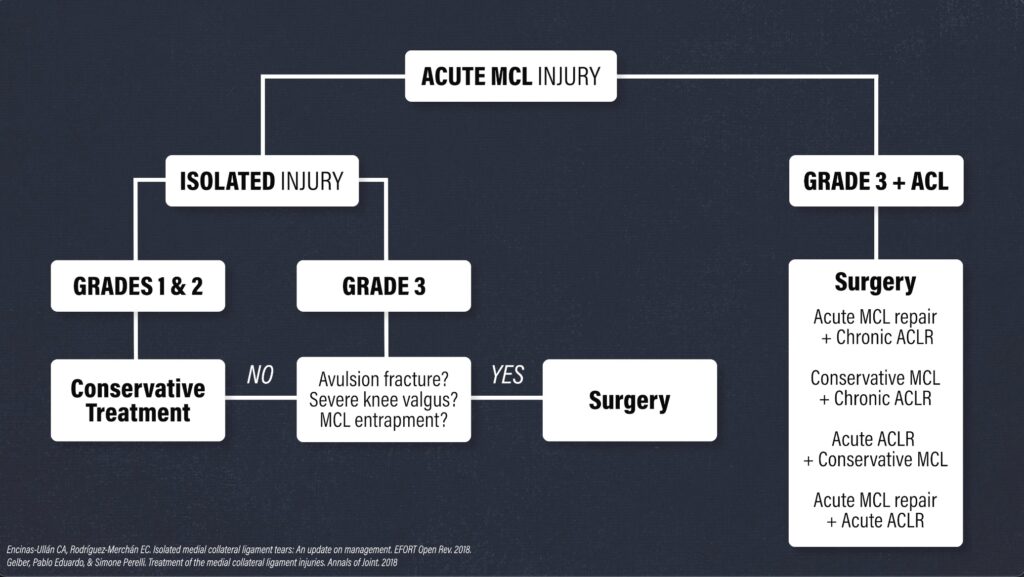
Conservative treatment is the consensus across the literature for a grade 1 and 2 isolated MCL sprain.
For a grade 3 injury, surgery may be considered if there is an avulsion fracture, severe knee valgus alignment, or MCL entrapment. Otherwise, nonoperative management is typically recommended.
If you continue to experience symptoms and instability after completing conservative treatment for an isolated grade 3 injury, surgery might be indicated. Ultimately, this decision is based on a combination of factors, including signs of clinical instability, imaging, duration and severity of symptoms, and your long-term functional goals.
When a grade 3 injury is combined with an ACL tear, surgery is usually indicated. There are multiple options to consider and this decision will vary based on individual needs and surgeon preferences. However, it seems “the general protocol is to rehabilitate the medial knee injury first, allowing it to heal according to the guidelines for isolated medial knee injuries, and then to reconstruct the ACL 5 to 7 weeks after injury, once there is good clinical and/or objective evidence of healing of the medial knee injury.”
Disclaimer: Since most isolated MCL injuries do not require surgery, the rehab principles in this blog are geared toward nonoperative cases. If you had surgery, you will likely have range of motion restrictions and weight-bearing precautions to consider, so it is important you talk to your surgeon or physical therapist before beginning any new exercises.
Bracing for an MCL Injury
The use of a hinged knee brace is commonly used during MCL rehab. This brace may “increase your confidence and protect the ligament against minor stresses that might irritate it.” Furthermore, it can help “stabilize the knee while allowing early range of motion exercises and quadriceps strengthening”, as well as “provide mechanical support”. However, it should be noted that a hinged brace is “not supported by high-quality evidence”, and “there is no consensus on whether or not [it] is even necessary” for more severe injuries.
Regardless, most protocols for grades 2 and 3 include the use of a brace “during the early phases of rehab, then either continuing to use the brace [when returning to sport] or discontinuing 8 to 12 weeks after injury.”
In short, you can use a hinged brace for more severe MCL injuries if it helps you feel more stable and confident, but you do not want to rely on it indefinitely.
MCL Injury Rehab Overview
As I mentioned earlier, the MCL stabilizes your knee against rotational and valgus forces. Therefore, the main goal of rehab is to gradually increase your tolerance to these stressors.
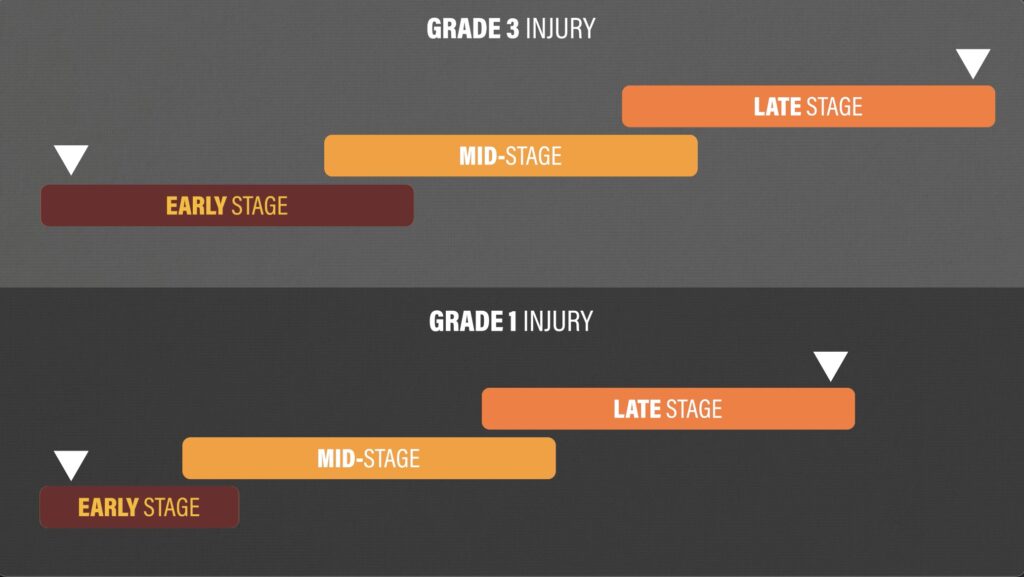
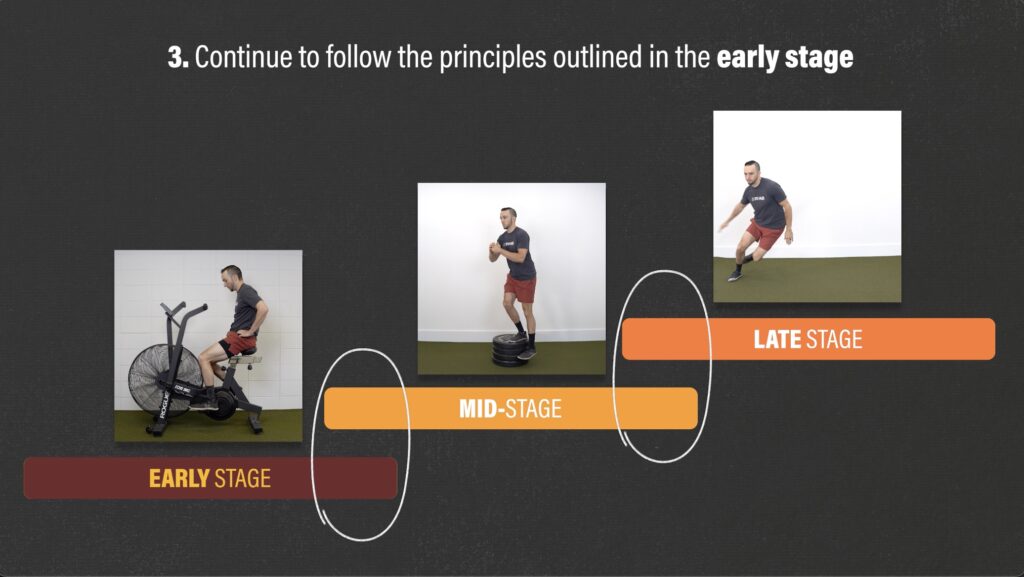
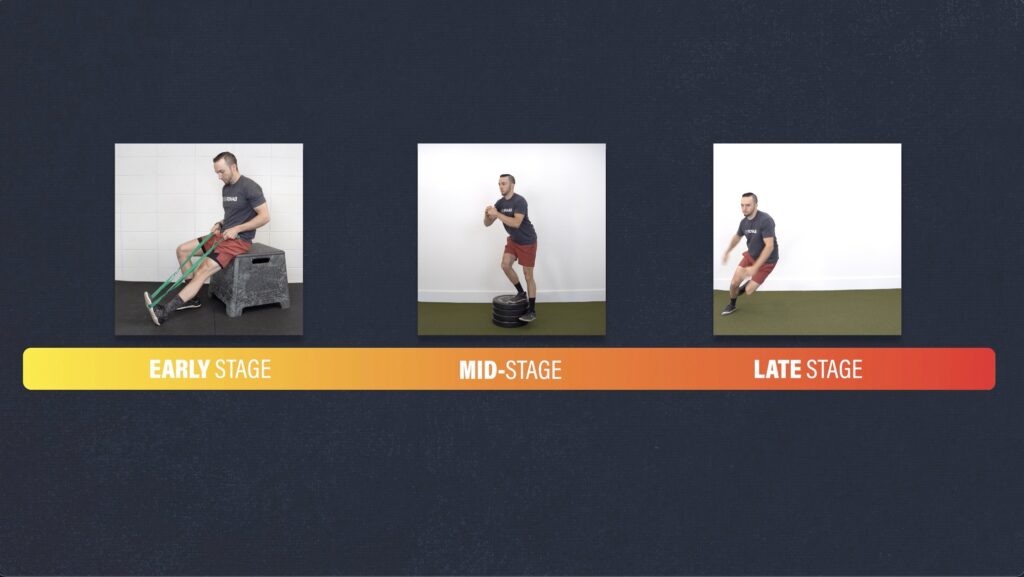
In general, rehab will consist of 3 overlapping stages – early, middle, and late. In the early stage, you will want to minimize and protect against these forces as tissues heal. Then in the later stages, you will slowly increase your exposure to lateral and rotational movements in order to build your capacity and prepare for the demands of your sport.

When you can start each stage, how fast you progress, and your timeline of recovery will vary based on the severity of your injury, symptoms, goals, etc.
For example, if you have a grade 3 MCL sprain, you should expect the early stage of rehab and your timeline from injury to return to sport to last longer than if you have a grade 1 injury.
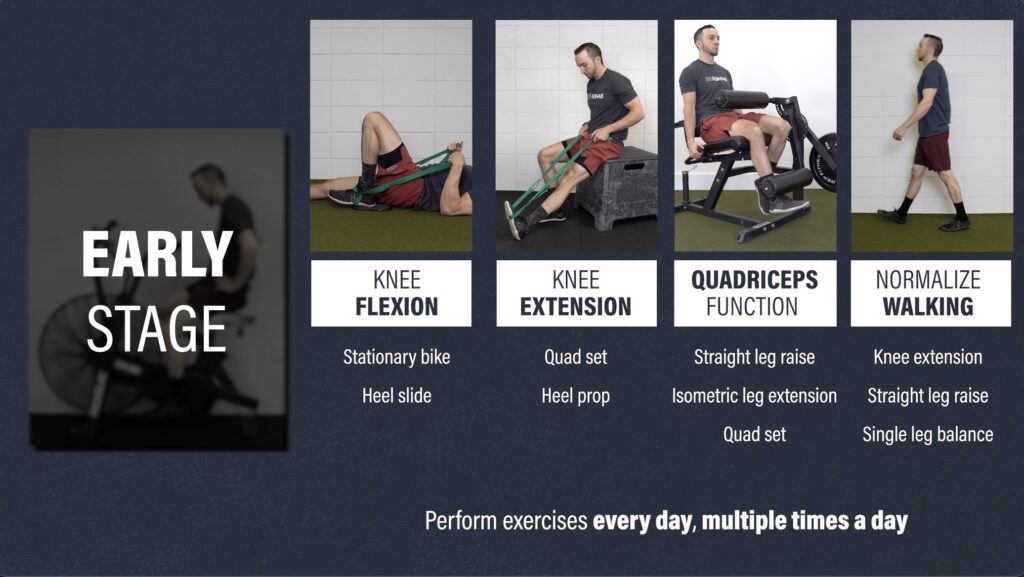
Early Stage for an MCL Injury
The early stage for an acute isolated MCL sprain has 4 main goals:
- Control swelling
- Regain knee range of motion
- Restore quadriceps function
- Normalize walking

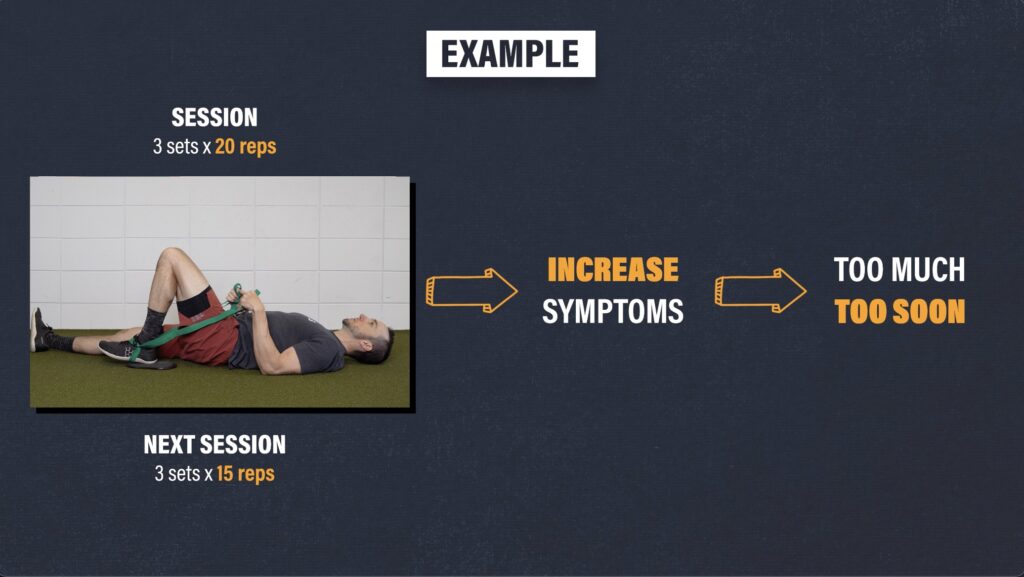
First and foremost, within the initial hours to days after an injury, you will want to protect the injured tissues and allow for acute symptoms to subside. Then, you will gradually integrate exercises for the other goals mentioned while trying to minimize increases in knee pain or swelling.
If the exercises or other activities lead to a notable spike in symptoms, you likely did too much too soon. All this means is that you probably need to scale back the difficulty or amount of exercise you do in subsequent sessions.
The second goal is to restore your knee extension and flexion range of motion.
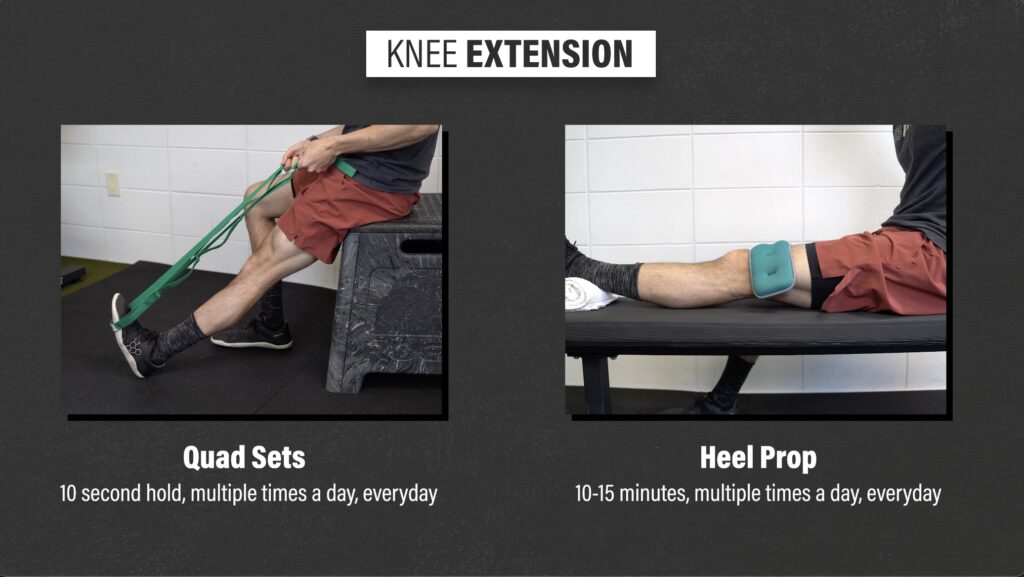
Here are 2 options for improving knee extension:
- Quad Sets. Straighten your leg and squeeze your quad for 10 seconds. Do this multiple times a day, every day. To intensify the stretch, pull up on your foot using a towel or strap.
- Heel Prop. Prop your heel on an elevated surface. If you want to increase the stretch, you can add weight just above your knee. Hold this position for a tolerable 10-15 minutes, every day.
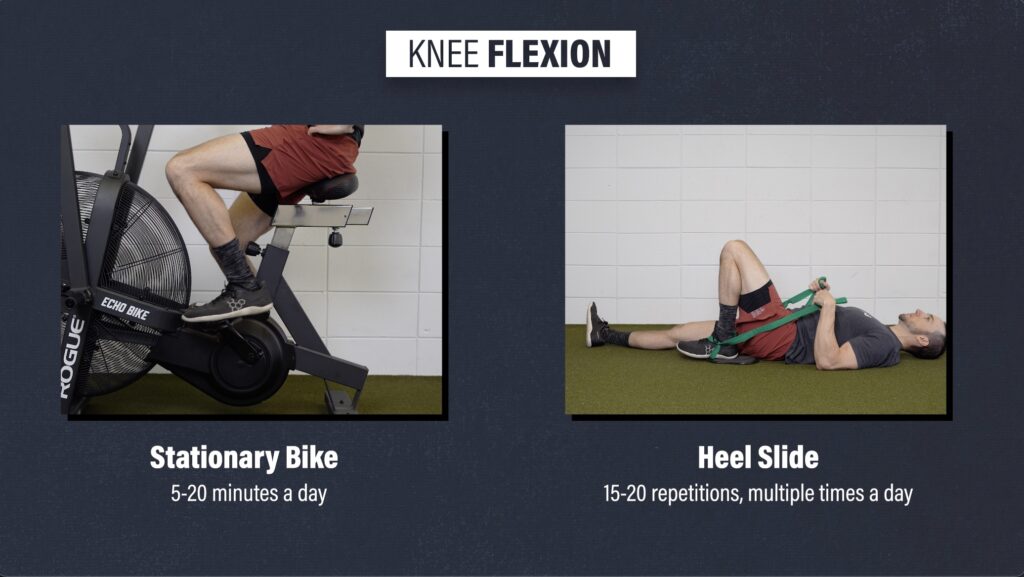
For knee flexion, here are 2 options:
- Stationary Bike. Start with the seat at a higher level and begin with half revolutions. As your range of motion improves, you can expose the knee to more flexion by lowering the seat and completing full revolutions.
- Heel Slide. Place a towel or strap around your foot and bend your knee as far as comfortable. Perform for 15-20 repetitions, multiple times a day.
To improve quadriceps function, common exercises include squats, split squats, and step-ups. Early on, these weight-bearing exercises might not be tolerable, therefore you can try one of these three options:
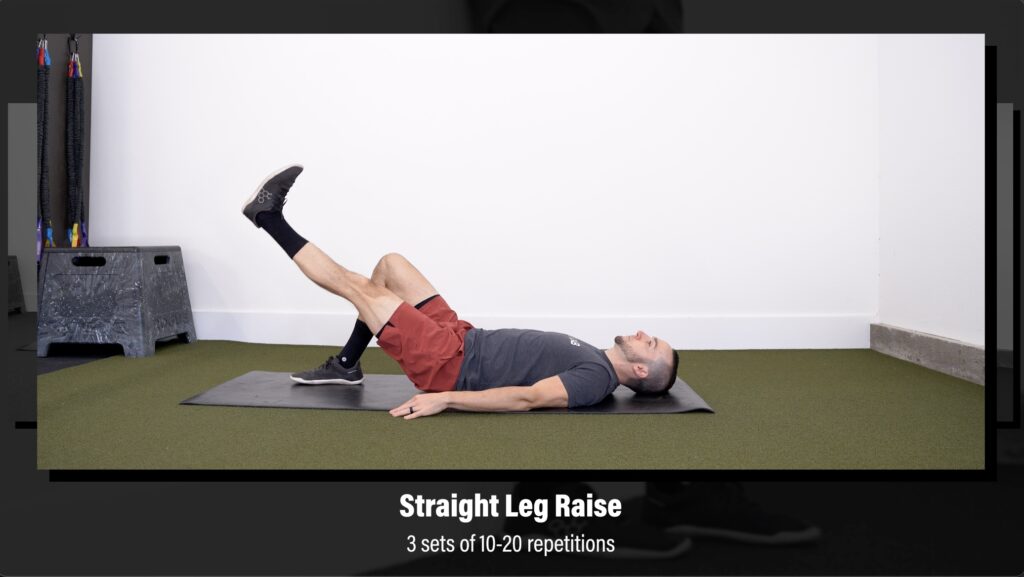
Option 1 – Supine Straight Leg Raise. Squeeze your quad and lift your leg, keeping your knee straight. Work up to 3 sets of 10-20 repetitions.
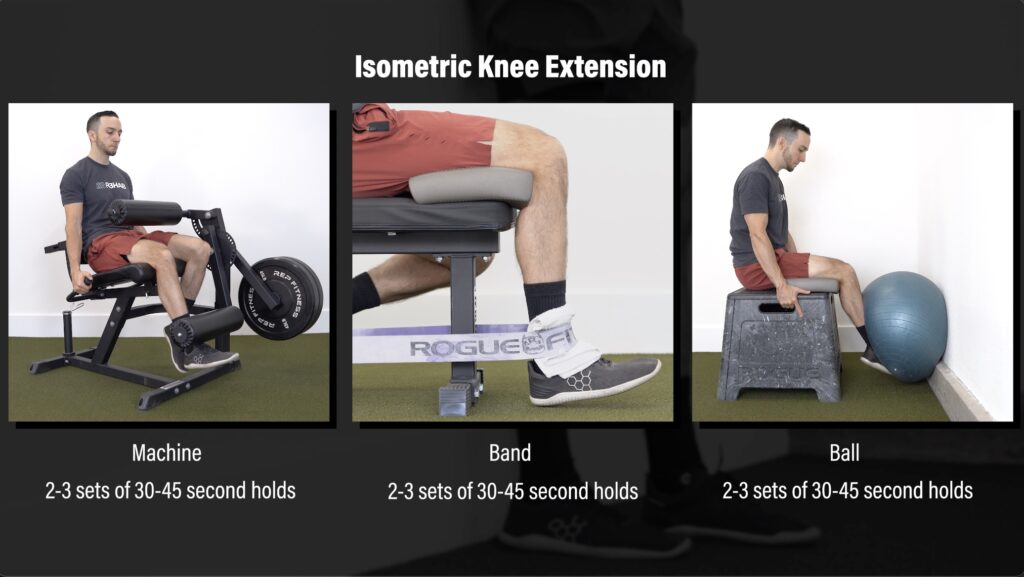
Option 2 – Isometric Knee Extension. You can perform these on a machine, with a band, or using a ball against the wall. Build up to the highest intensity possible with minimal to no pain. If using a single leg variation is too challenging, start with two legs. Aim for 2-3 sets of 30-45 second holds.
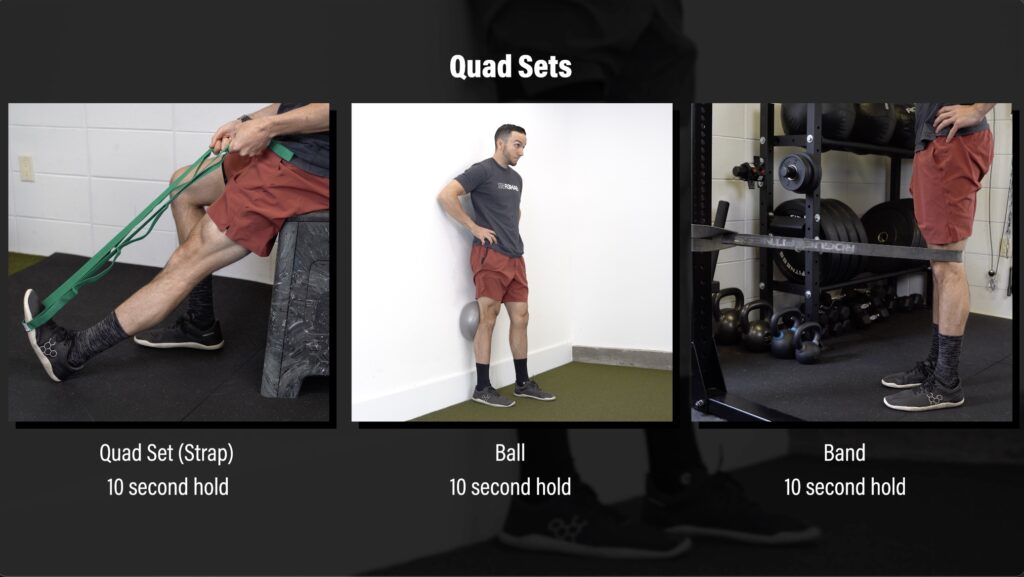
Option 3 – Quad Sets. The quad set mentioned early can be progressed by using a ball against a wall or with a band anchored to an object. Similar to before, squeeze your quad for 10 seconds, trying to straighten your knee completely.
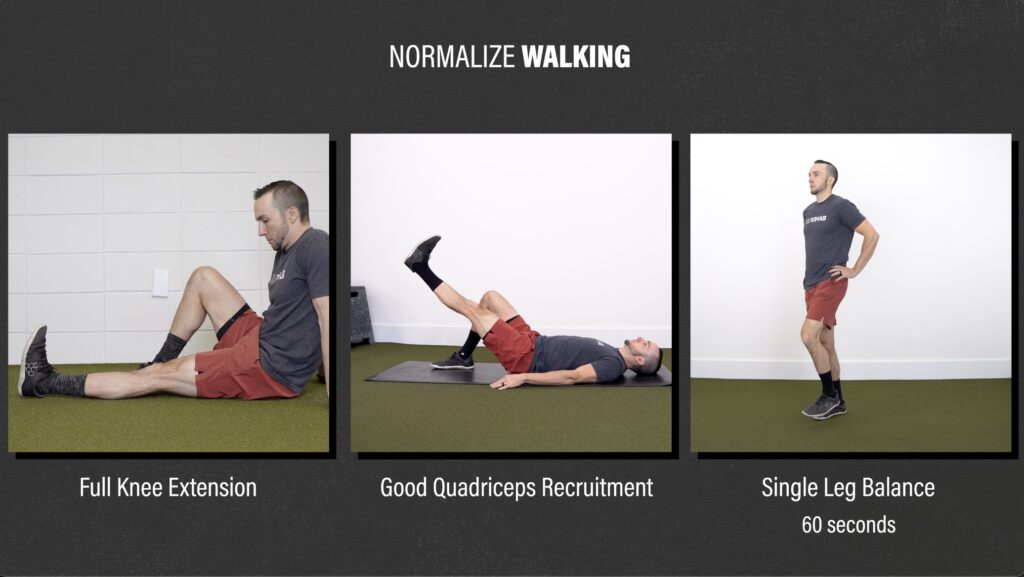
The last goal is to normalize walking which means you can walk unassisted without a limp. This requires full knee extension and good quadriceps recruitment, as demonstrated by your ability to maintain full knee extension during a straight leg raise. You can also practice standing on one leg by incorporating balance exercises. A simple goal is being able to balance on a single leg for up to 60 seconds.
In some severe cases, if full weight bearing during walking is not possible, crutches might be used to initially offload the knee joint.
Mid-Stage for an MCL Injury
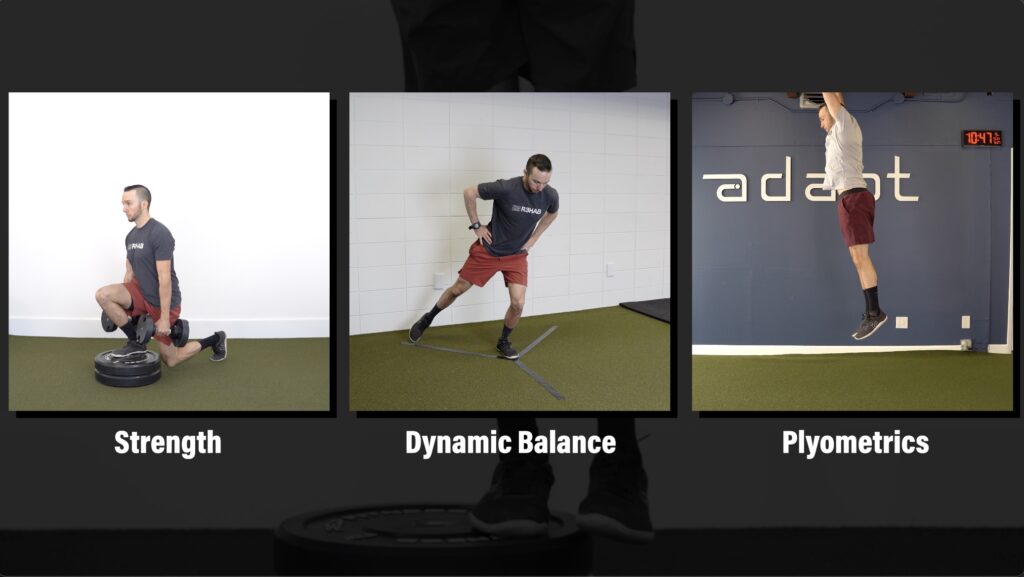
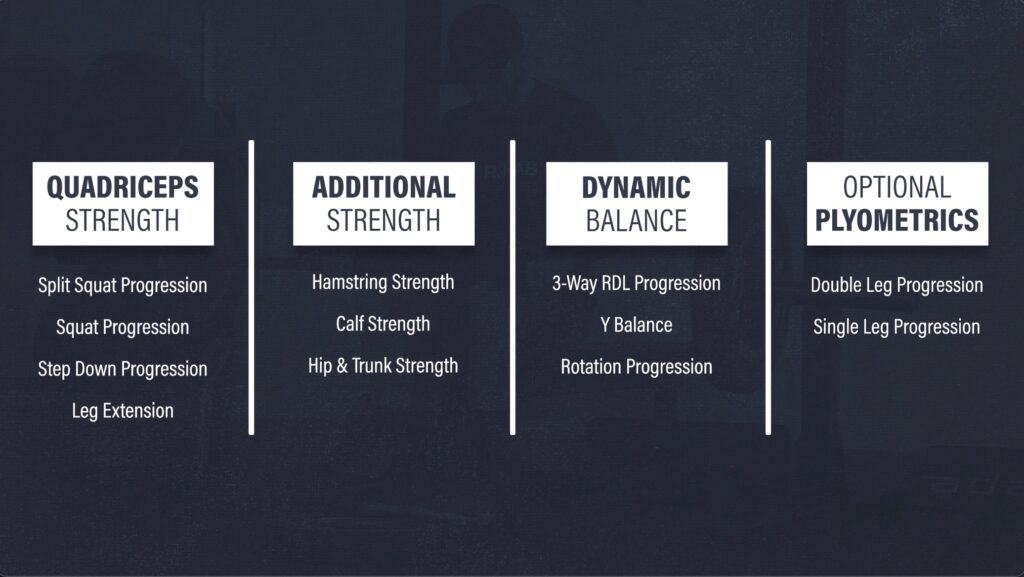
The mid-stage of rehab consists of strength, dynamic balance, and plyometric exercises in order to further increase your knee stability and better prepare you for running and return to sport.
I will review 4 exercise categories, and within each one, I will provide multiple exercise options for you to choose from based on your access to equipment, symptoms, preferences, etc.
Before reviewing these exercises, I want to mention 3 things:
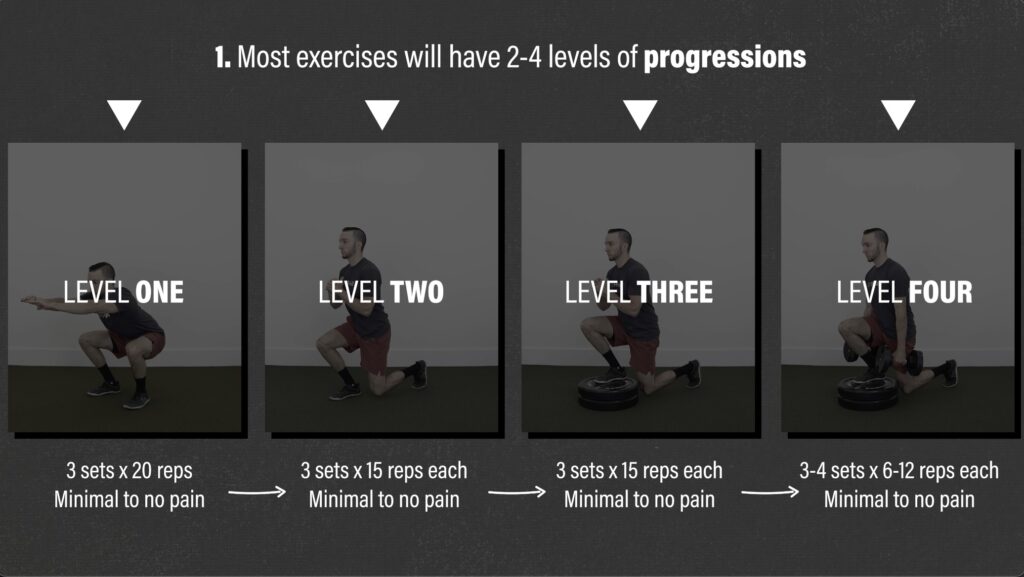
1. Most exercises in this stage will have 2 to 4 levels of progressions that you will work through. You will not progress to the next level until you have met certain criteria with minimal to no pain.
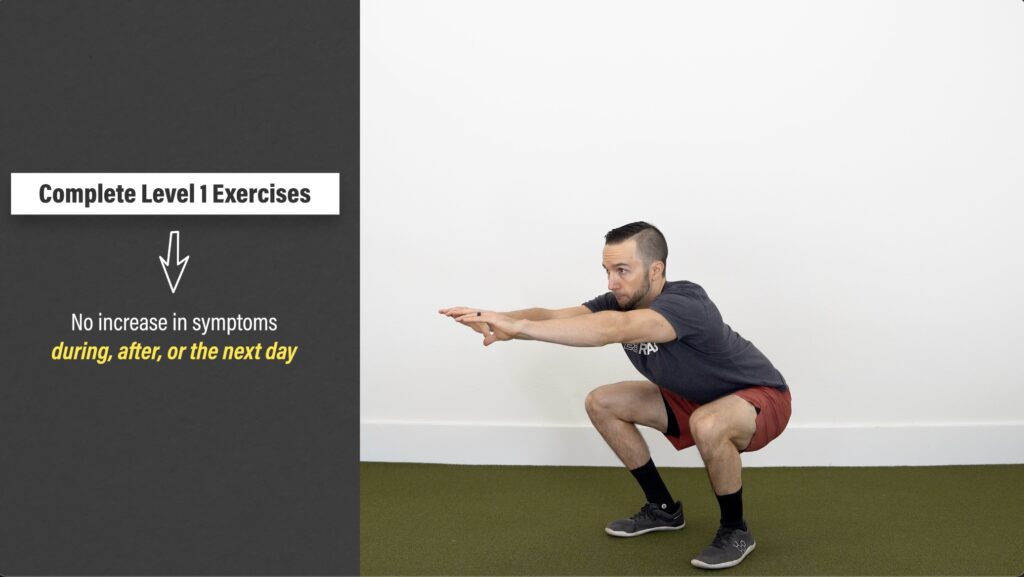
2. Tolerance to the exercises, not time, will determine when you can start mid-stage exercises. Can you perform the level 1 exercises without experiencing a significant increase in swelling or pain during the movement or the next day?
3. Remember, there is overlap between the stages, so even after starting this stage, you will continue to follow the principles outlined in the early stage.
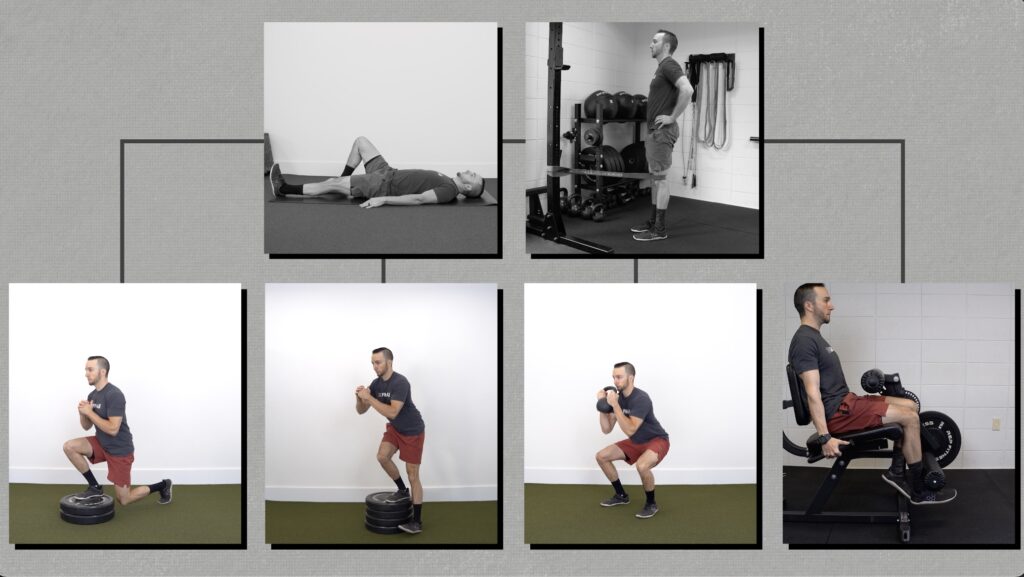
Category 1: Quadriceps Strength
You need to eventually progress the straight leg raise and quad sets from the early stage to more advanced exercises in order to appropriately load your quad muscles.
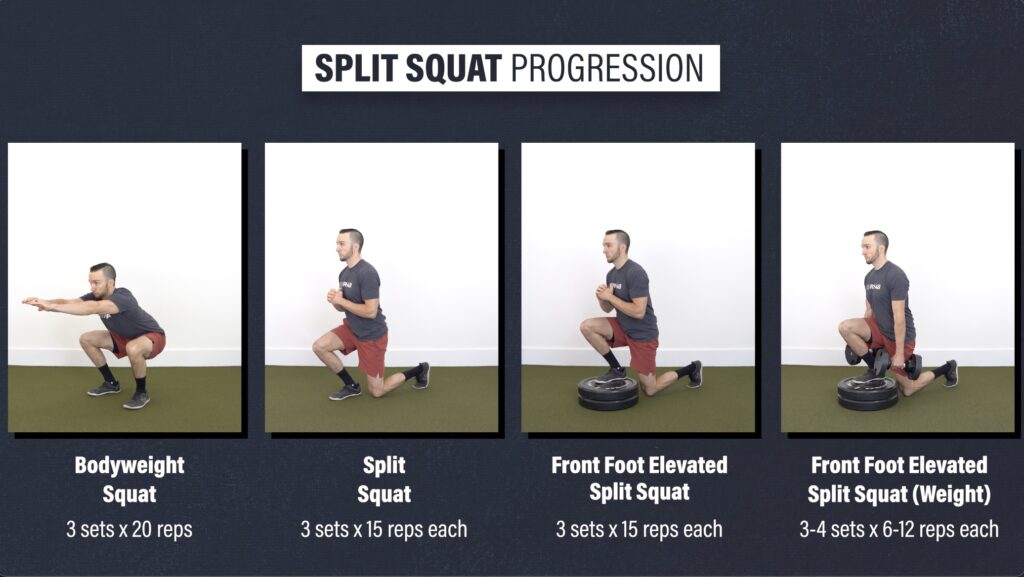
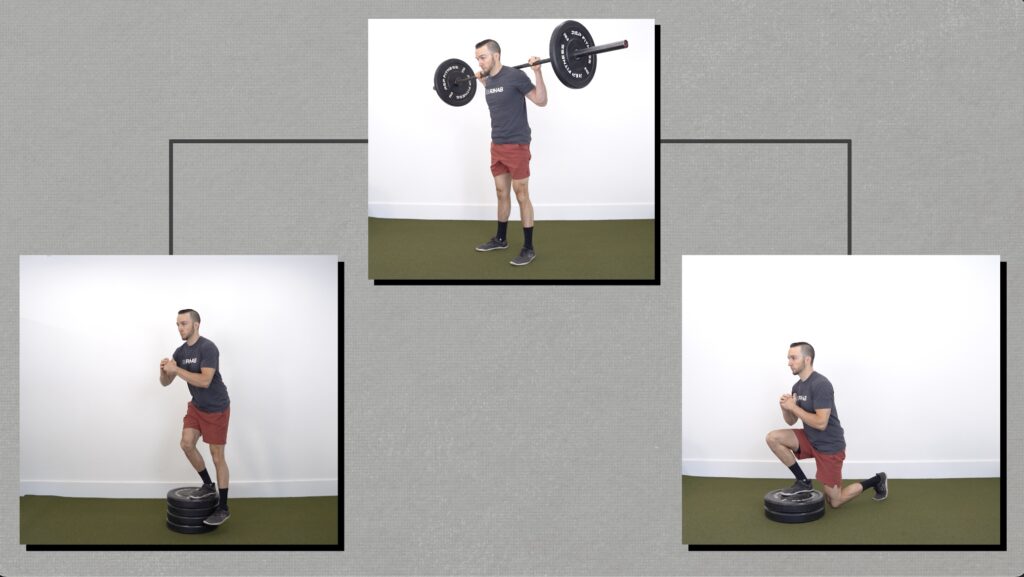
Option #1: Split Squat Progression
Level 1 – Bodyweight Squat. Your goal is to perform 3 sets of 20 repetitions, lowering your hips to at least parallel. If this is too hard, start with an assisted squat to a comfortable depth and build up to unassisted overtime.
Level 2 – Split Squat. Start in a split stance and slowly lower your back knee toward the ground. If this is too hard, you can shorten the range of motion or use your hands for assistance. Before progressing to level 3, your goal is to perform 3 sets of 15 reps through your full range of motion on each leg.
Level 3 – Front Foot Elevated Split Squat. Elevate your front foot on an object 2 to 4 inches high and lower down, driving the front knee forward. Aim for 3 sets of 15 reps on each leg.
Level 4 – Weighted Front Foot Elevated Split Squat. Add weight to the previous exercise by using dumbbells, kettlebells, a barbell, etc. Perform for 3-4 sets of 6-12 challenging reps on each side.
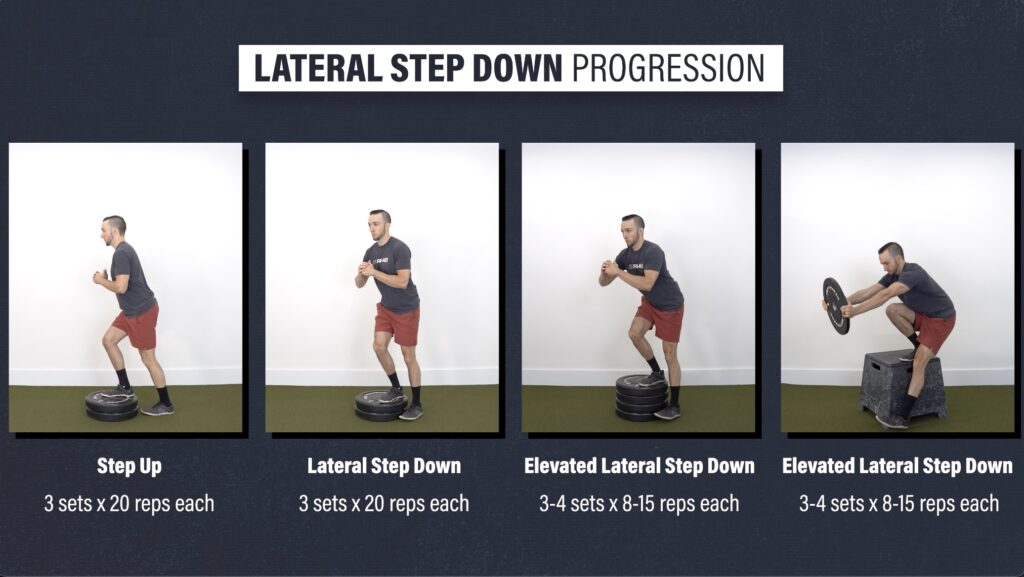
Option #2: Lateral Step Down Progression
Level 1 – Step Up. Use a step or objects stacked 6-7 inches high. Place all your weight through the front leg as you step up, trying not to push off the back leg. If this is too challenging, lower the height or use your hands for assistance. Your goal is 3 sets of 20 reps per leg.
Level 2 – Lateral Step Down. Start with one foot on a step or object, and your other foot off to the side. Squat down until your heel gently taps the floor, and then stand back up. Aim for 3 sets of 20 reps on each leg.
Level 3 – Elevated Lateral Step Down. Increase the height of the objects or perform on a box or bench. To help stay more upright, you can hold a weight as a counterbalance. Perform 3-4 sets of 8-15 reps on each leg.
The previous single leg options require more control and have a greater chance for dynamic knee valgus which will load the affected tissues.
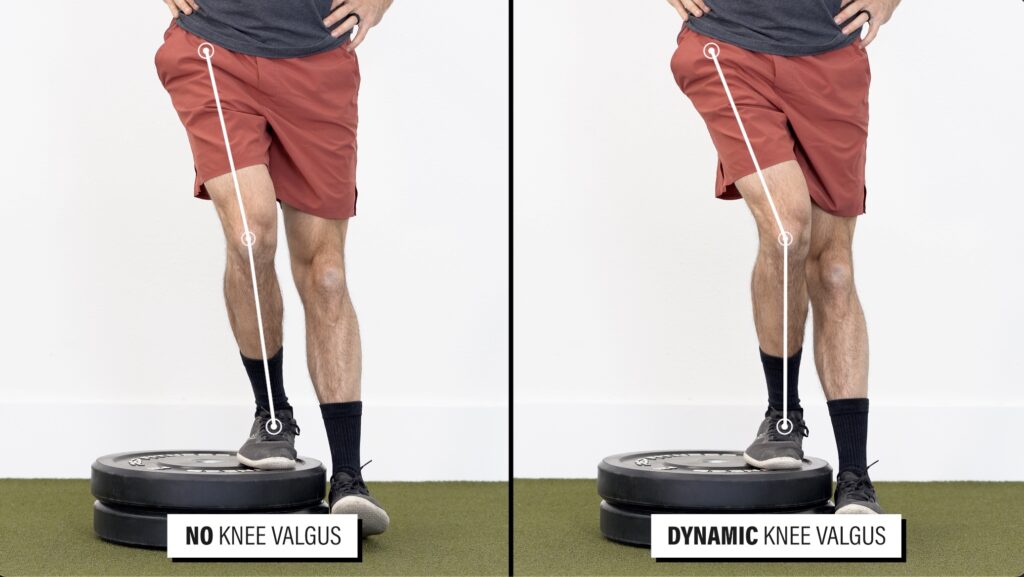
Therefore, you may consider starting with a squat progression.
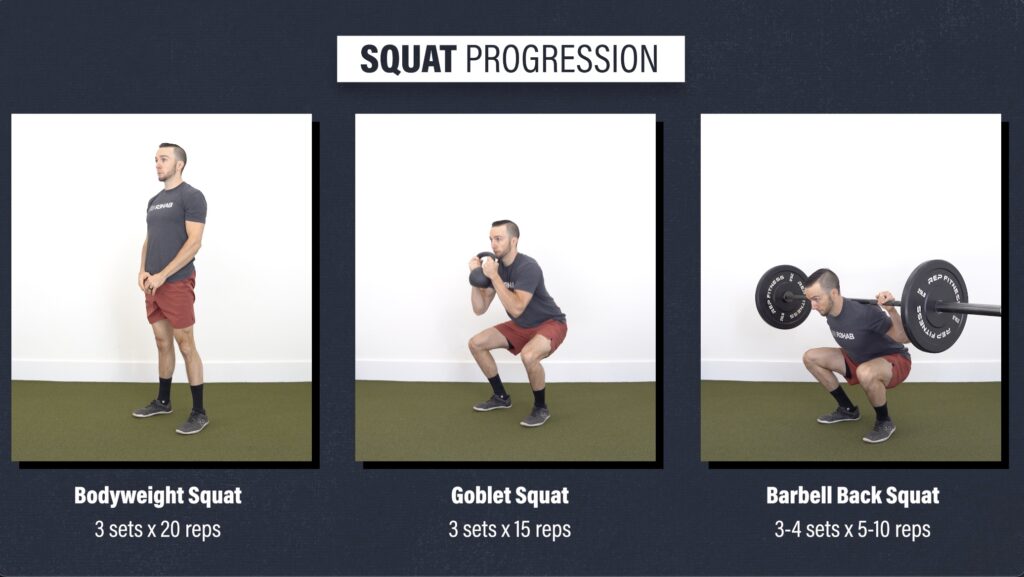
Option #3: Squat Progression
Level 1 – Bodyweight Squat. Aim for 3 sets of 20 repetitions, lowering your hips to at least parallel.
Level 2 – Goblet Squat. Aim for 3 sets of 15 reps using a kettlebell or dumbbell.
Level 3 – Barbell Back Squat. Perform for 3-4 sets of 5-10 reps.
You can continue to program these squats throughout the duration of your rehab, however, you will need to be able to eventually tolerate and control single leg exercises, especially if your goal is to return to sport.
Option #4: Leg Extension
The isometric leg extension from the early stage can be progressed by moving through your full range of motion against resistance. Perform for 3-4 sets of 10-20 repetitions on each leg. If you find this is too hard or uncomfortable at first, you can shorten the range of motion or even perform without weight.

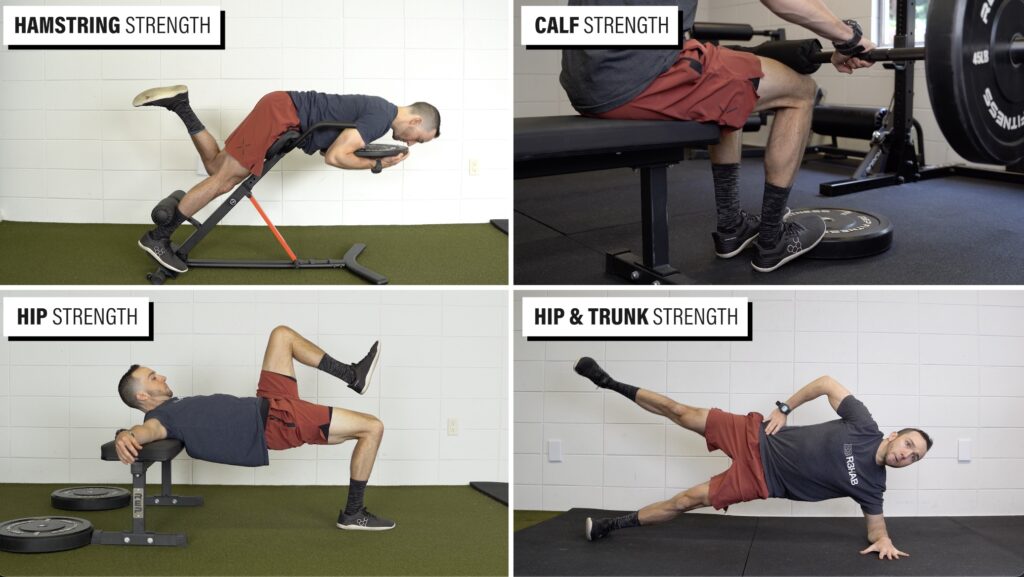
Category 2: Additional Strength Exercises
Your hamstrings, calves, and other hip and trunk muscles are important for running, jumping, and other aspects of sport, and similar to your quadriceps, can further increase your knee stability. Here are some options for each muscle group.
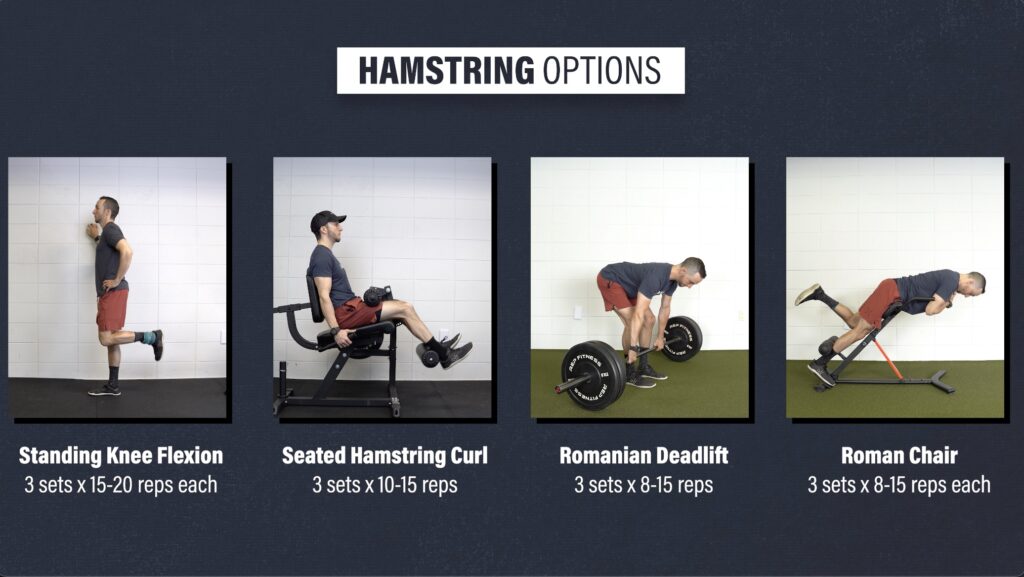
Hamstrings
You can perform knee bent or knee straight variations, such as standing knee flexion with an ankle weight, seated hamstring curls, a Romanian deadlift, or Roman chair variations.
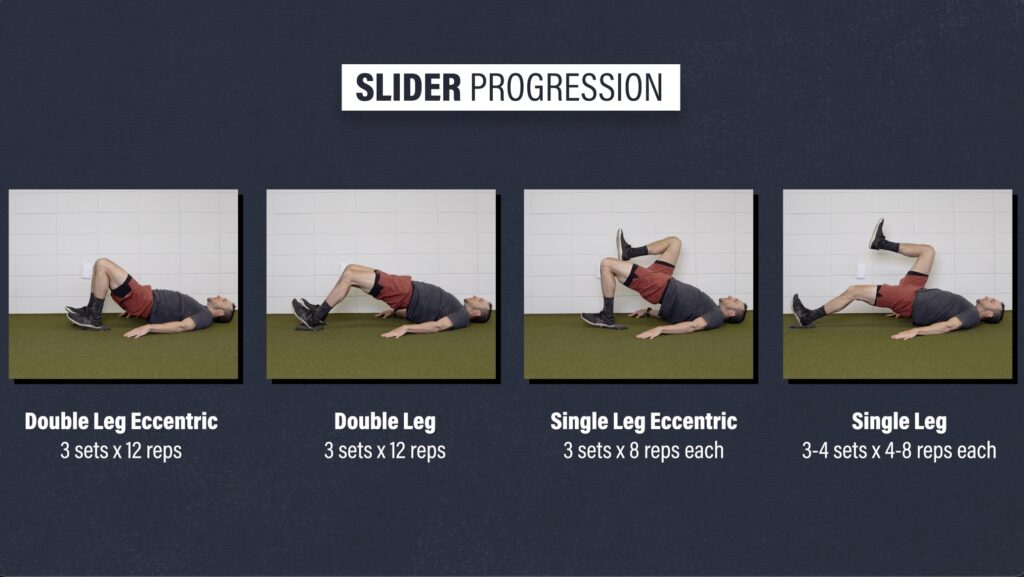
Another option I like is this slider progression:
Level 1 – Double Leg Eccentric Slider. Bridge up and slowly straighten your knees. Lower down and repeat. Build up to moving through your full range of motion for 3 sets of 12 reps.
Level 2 – Double Leg Slider. Keep your hips up the entire time. Aim for 3 sets of 12 reps.
Level 3 – Single Leg Eccentric Slider. Aim for 3 sets of 8 reps each.
Level 4 – Single Leg Slider. Perform for 3-4 sets of 4-8 reps on each leg.
Calves
To emphasize calf strength, here are 2 progressions:
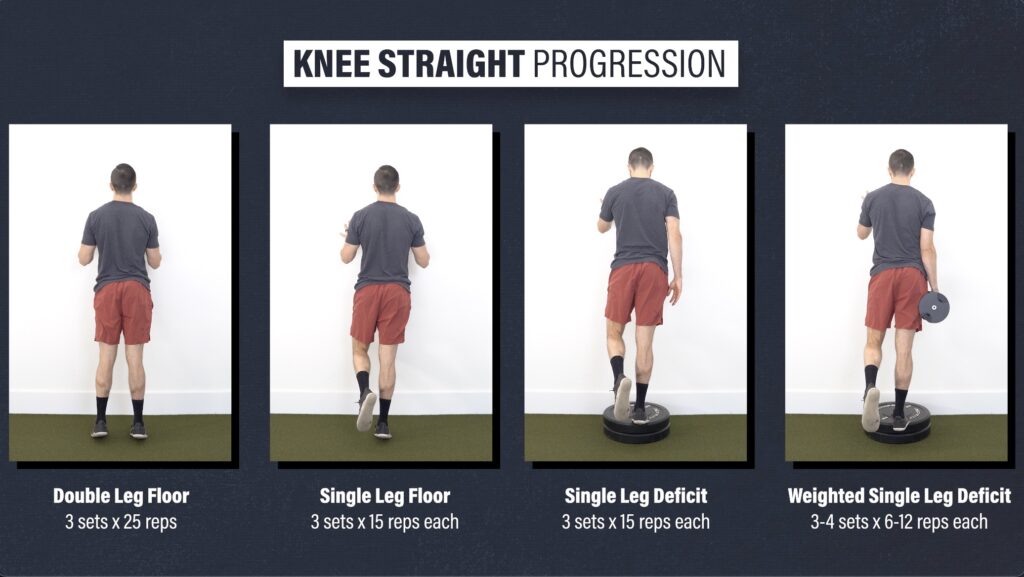
Option #1: Knee Straight Progression
Level 1 – Double Leg Heel Raise Floor. Aim for 3 sets of 25 reps.
Level 2 – Single Leg Heel Raise Floor. Aim for 3 sets of 15 reps on each leg.
Level 3 – Deficit Single Leg Heel Raise. This will increase the range of motion you move through. Aim for 3 sets of 15 reps on each leg.
Level 4 – Weighted Deficit Single Leg Heel Raise. Perform for 3-4 sets of 6-12 reps on each leg.
Option #2: Knee Bent Heel Raise Progression
Level 1 – Seated Heel Raise Floor. From a seated position, place a barbell, dumbbells, or another type of weight just above your knees. Aim for 3 sets of 8-15 reps.
Level 2 – Deficit Seated Heel Raise. Place your fee on an object about 2-4 inches high Perform these with a slow tempo through your full range of motion for 3-4 sets of 8-15 reps.

Hips & Trunk
Lastly, here are 3 progressions that train your glutes, adductors, and associated trunk muscles:
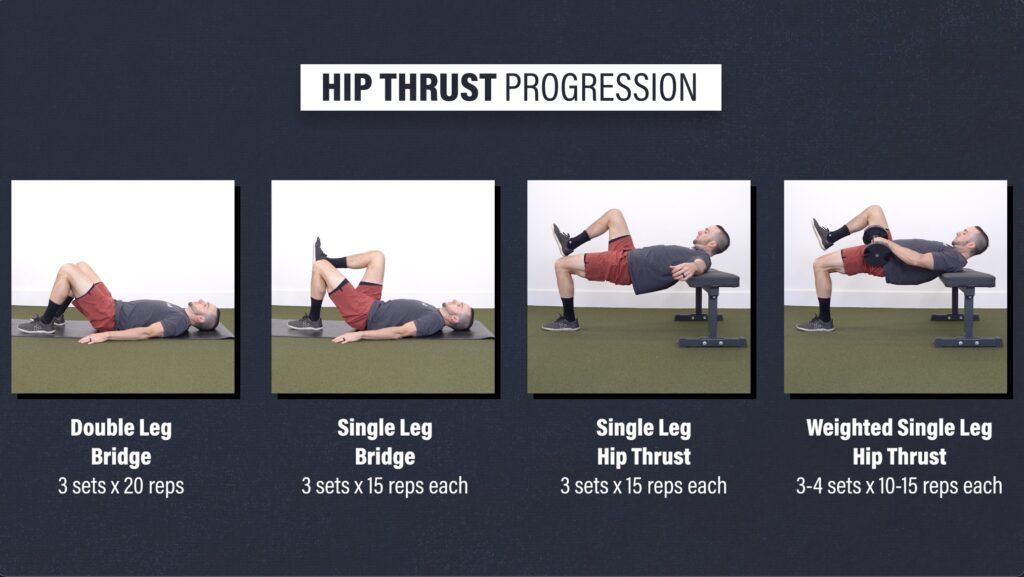
Option #1: Hip Thrust Progression
Level 1 – Double Leg Bridge. Aim for 3 sets of 15 reps.
Level 2 – Single Leg Bridge. Aim for 3 sets of 15 reps on each leg.
Level 3 – Single Leg Hip Thrust. Aim for 3 sets of 15 reps on each leg.
Level 4 – Weighted Single Leg Hip Thrust. Perform for 3-4 sets of 10-15 reps on each leg.
You want to fully straighten your hips and squeeze your glutes at the top of each repetition.
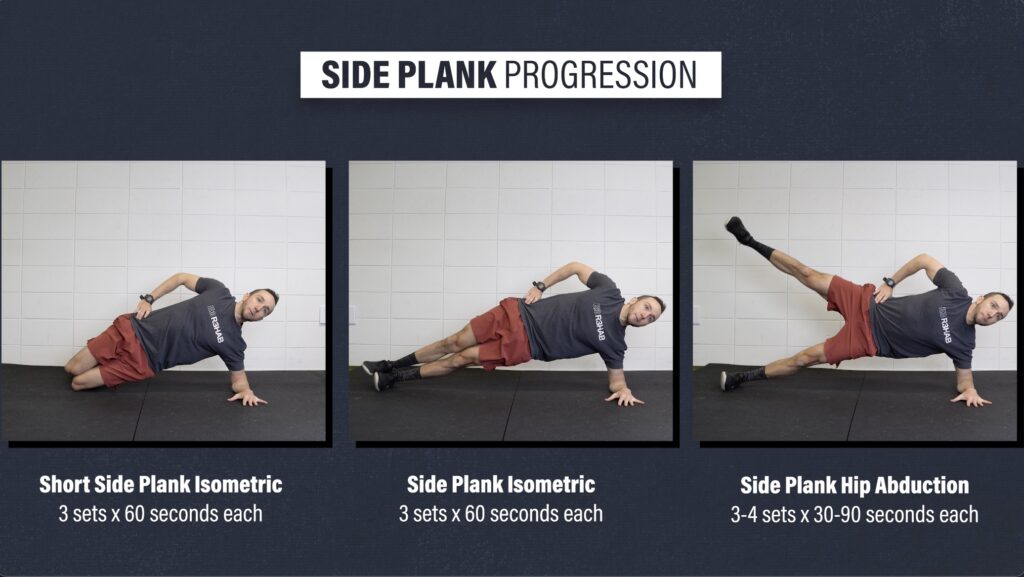
Option #2: Side Plank Progression
Level 1 – Short Side Plank Isometric. Aim for 3 sets of 60 seconds on each side.
Level 2 – Side Plank Isometric. Aim for 3 sets of 60 seconds on each side.
Level 3 – Side Plank Hip Abduction. Slowly lift and lower the top leg under control. Perform for 3-4 sets of 30-90 seconds on each side.
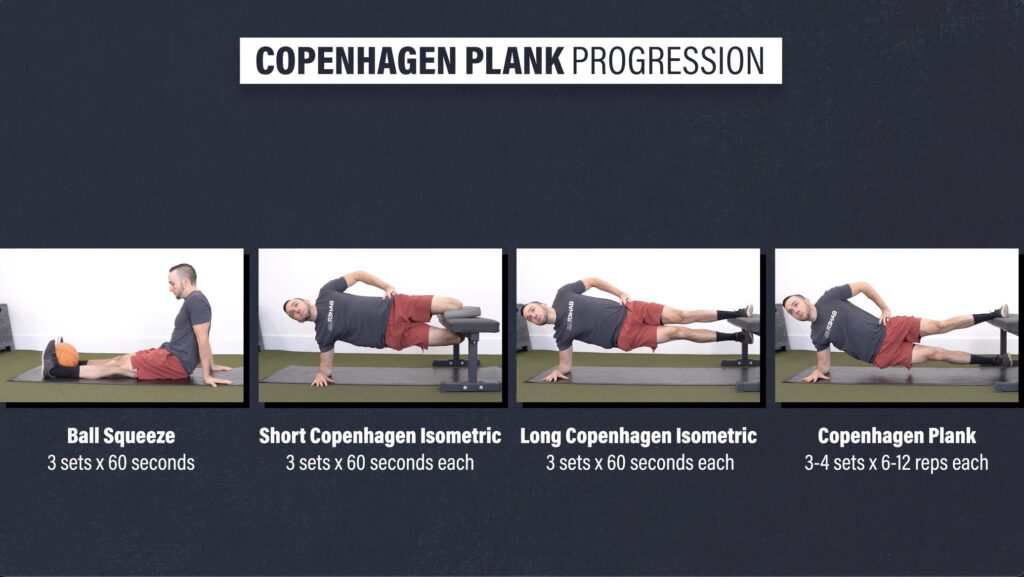
Option #3: Copenhagen Plank Progression
While this might seem intimidating, especially following an MCL injury, it is a safe exercise if progressed appropriately. Furthermore, it can be an effective option for improving your tolerance to lateral forces. Here is a 4-step progression:
Level 1- Supine Ball Squeeze. Lie on your back and squeeze a ball between your knees or ankles. Build up to a maximal effort with minimal to no pain. Aim for 3 sets of 60 seconds.
Level 2 – Short Copenhagen Plank Isometric. Set up in a side plank with your top knee on a bench or chair. If the inside of your knee is sensitive to pressure, you can use a pad or pillow for support. Build up to 3 sets of 60 second holds on each side.
Level 3 – Copenhagen Plank Isometric. Straighten your legs and place your top ankle on a bench or chair. If you find this to challenging or uncomfortable, you can either start with your top leg at shin level or use your bottom leg for support. Build up to 3 sets of 60 seconds on each side.
Level 4 – Long Copenhagen Plank. Lower and lift your bottom hip and leg under control. Perform for 3-4 sets of 6-12 reps on each side.
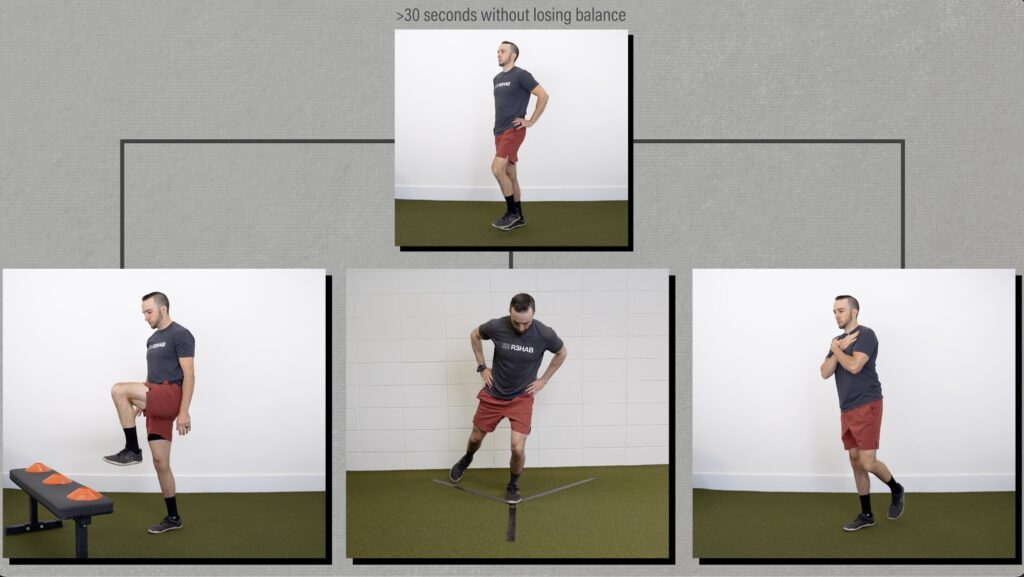
Category 3: Dynamic Balance
Once you can stand on one leg for at least 30 seconds without losing balance, you will progress to dynamic variations that expose your knee to rotational and lateral stress. Here are 3 options.
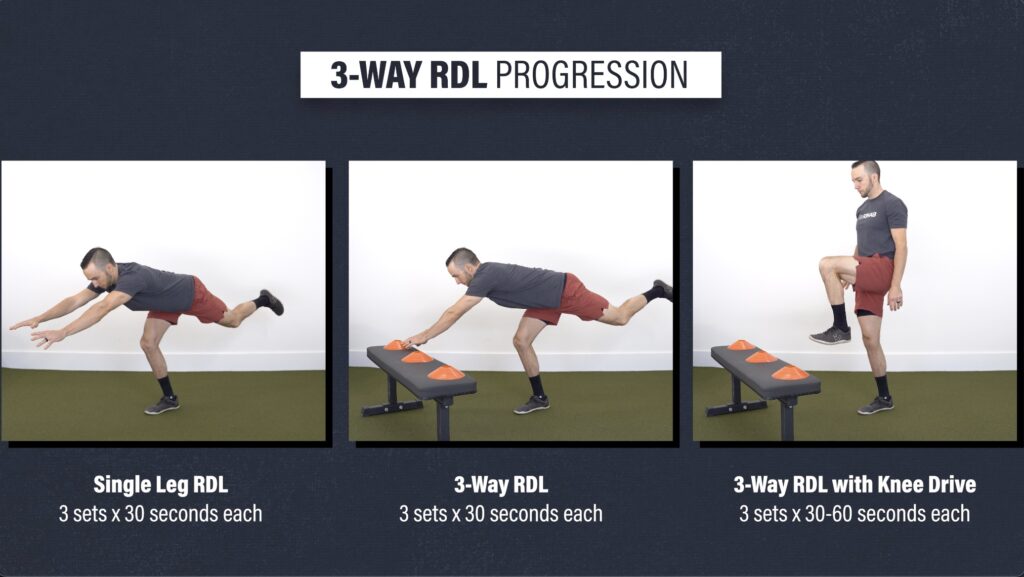
Option #1: 3-Way RDL Progression:
Level 1 – Single Leg RDL. Keep your back relatively flat and try not to let your other foot touch the ground. Aim for 3 sets of 30 seconds on each leg.
Level 2 – 3-way RDL. Reach your arms in 3 directions – to the left, middle, and then to the right. Only reach to the left and right as far as comfortable for your knee. Aim for 3 sets of 30 seconds on each leg.
Level 3 – 3-Way RDL with Knee Drive. Progress the previous movement by adding a knee drive. Perform for 3 sets of 30-60 seconds on each leg.
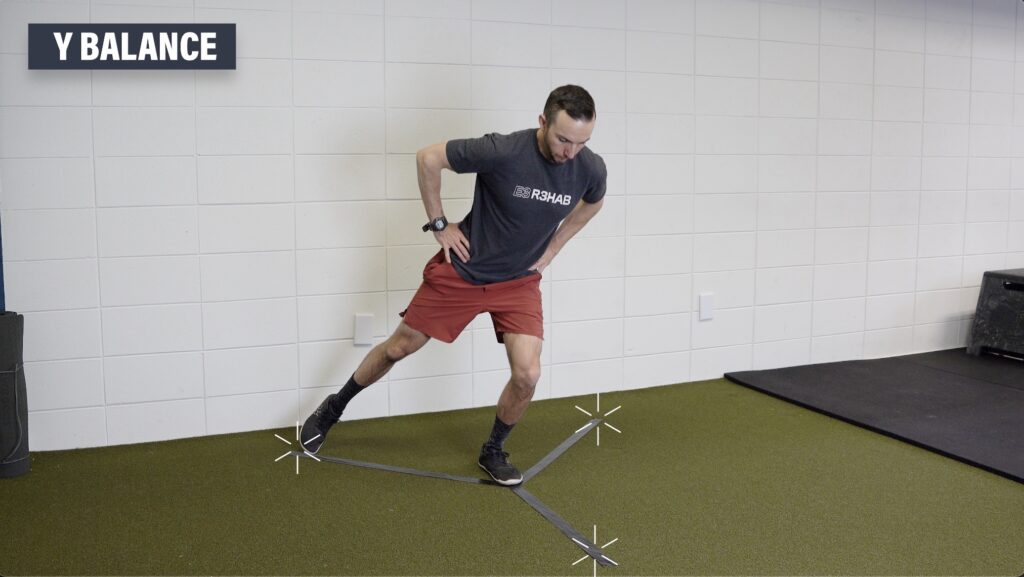
Option #2: Y Balance
Stand on one leg and then reach your opposite foot in three different directions, creating a Y shape. You might start with smaller distances, but eventually, you want to challenge your balance and knee stability by reaching as far as you can in each direction. Perform for 3 sets of 30-60 seconds on each leg.
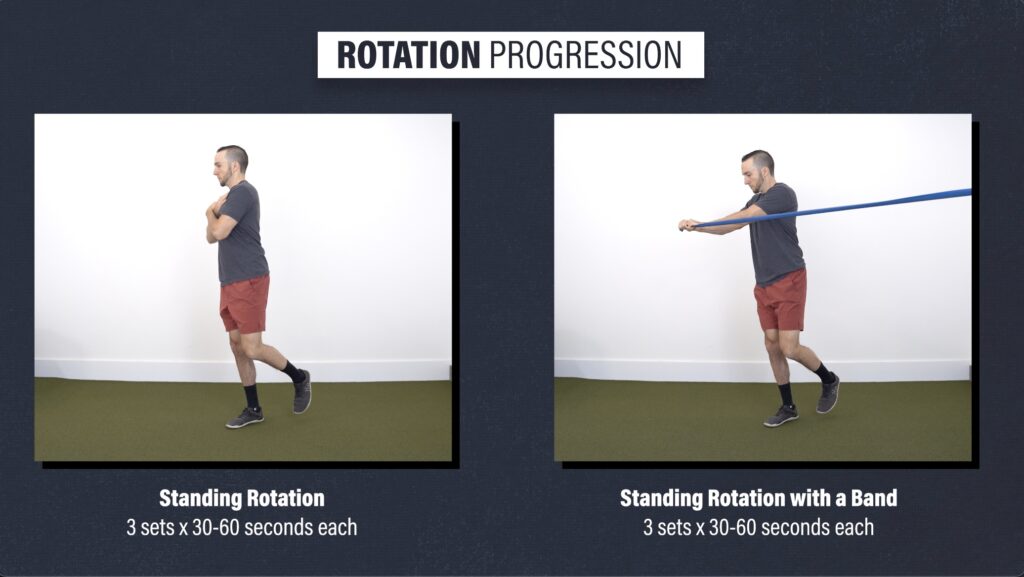
Option #3: Rotation Progression
Stand on one leg, rotate your torso as far as you can in one direction, and then rotate as far as you can in the other direction. Start with small rotations and work up to your full range of motion.
To make this more challenging, you can add resistance by holding a band. Perform these for 3 sets of 30-60 seconds on each leg.
Category 4: Optional Plyometrics
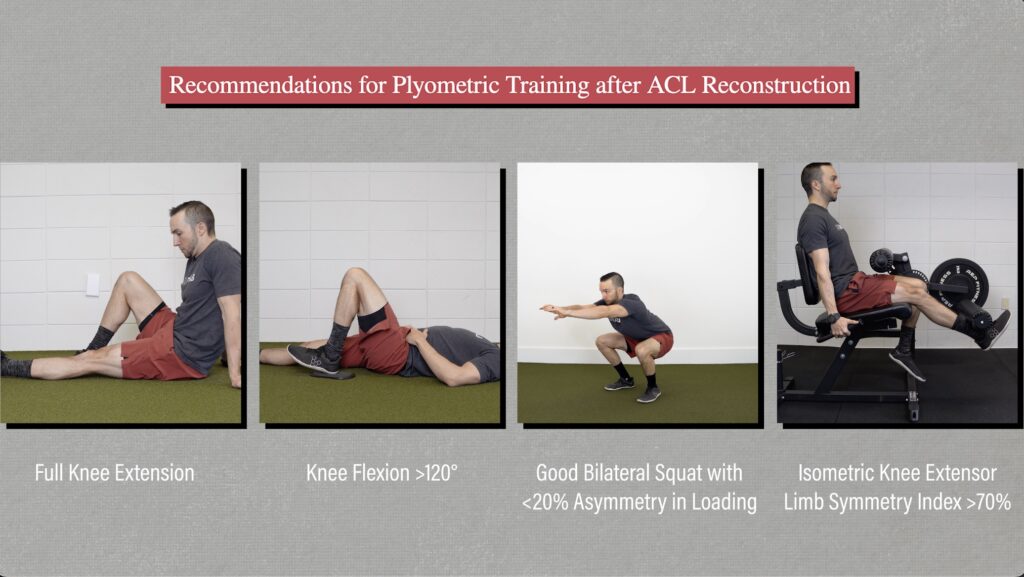
Although there are no specific guidelines for an MCL injury, research examining plyometric training after ACL reconstruction recommends you meet 4 criteria before starting these exercises:
- Full knee extension range of motion
- At least 120° of knee flexion
- Ability to demonstrate a good bilateral squat
- Quadriceps strength of at least 70% compared to the uninjured side.
These jumping and deceleration drills will start with a vertical or forward component and progress to movements that expose your knee to rotational and lateral forces. Here are 2 progressions:
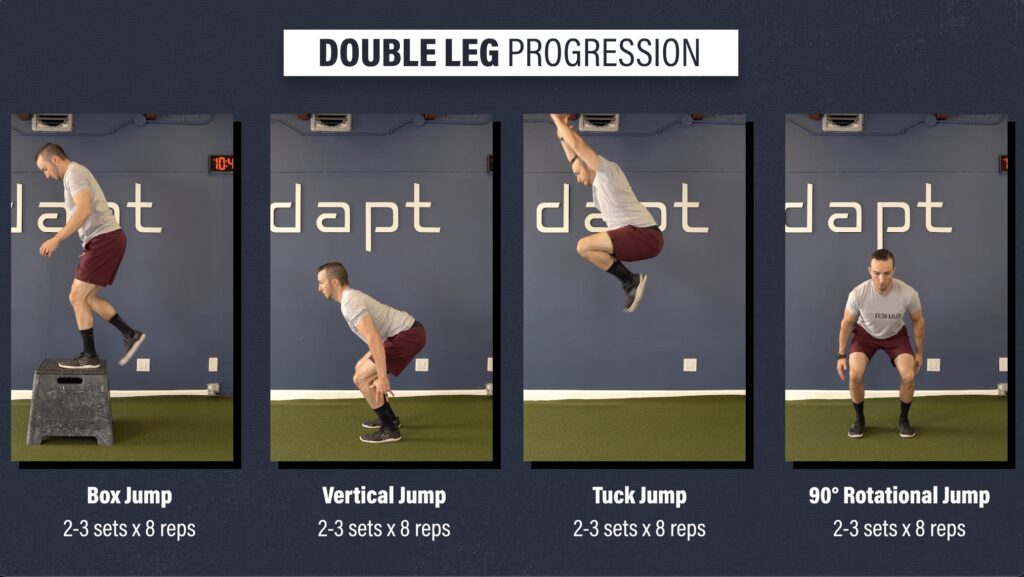
Option #1: Double Leg Progression.
Level 1 – Box Jumps. Jumping to a box or elevated surface will reduce landing impact forces.
Level 2 – Vertical Jumps. Build up to maximal effort each jump
Level 3 – Tuck Jump. This option will further increase landing intensity.
Level 3 – 90° Rotational Jumps.
Emphasize maximal effort for each jump and perform for 2-3 sets of 8 reps at each level.
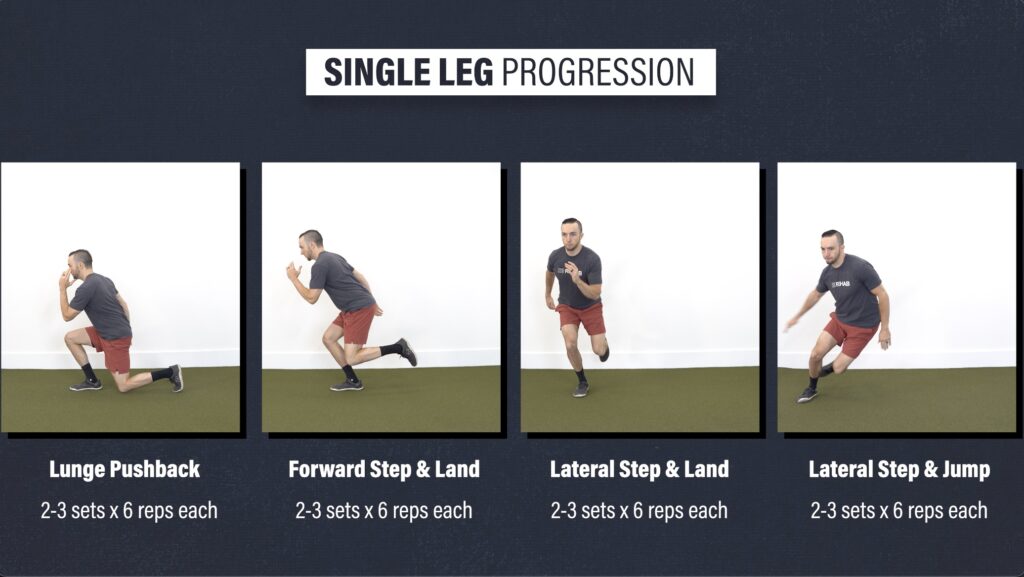
Option #2: Single Leg Progression
Level 1 – Lunge Pushback. Start with your feet together and step forward as if you are performing a lunge. Control the deceleration with your forward foot and then push back to the start.
Level 2 – Forward Step and Land. Jump forward off one leg and land on the other, while demonstrating a controlled landing. Step back and repeat.
Level 3 – Lateral Step and Land. Same as previous but now jump to the side, making sure you stick the landing. Step back and repeat.
Level 4 – Lateral Step and Jump. Jump off one leg, land on the other, and then immediately jump back to the starting leg. Your goal is to land and jump leaving the ground as quickly as possible.
For each level, perform for 2-3 sets of 6 repetitions on each leg.
Other Exercise Considerations for an MCL Injury
Other exercises that often come up in the conversation of MCL rehab are lateral and curtsy lunges. These can be a consideration for improving confidence in lateral and rotational movements involving deeper knee flexion. However, they are likely not the best option for developing strength adaptations due to their mobility requirements and or inability to be sufficiently loaded.
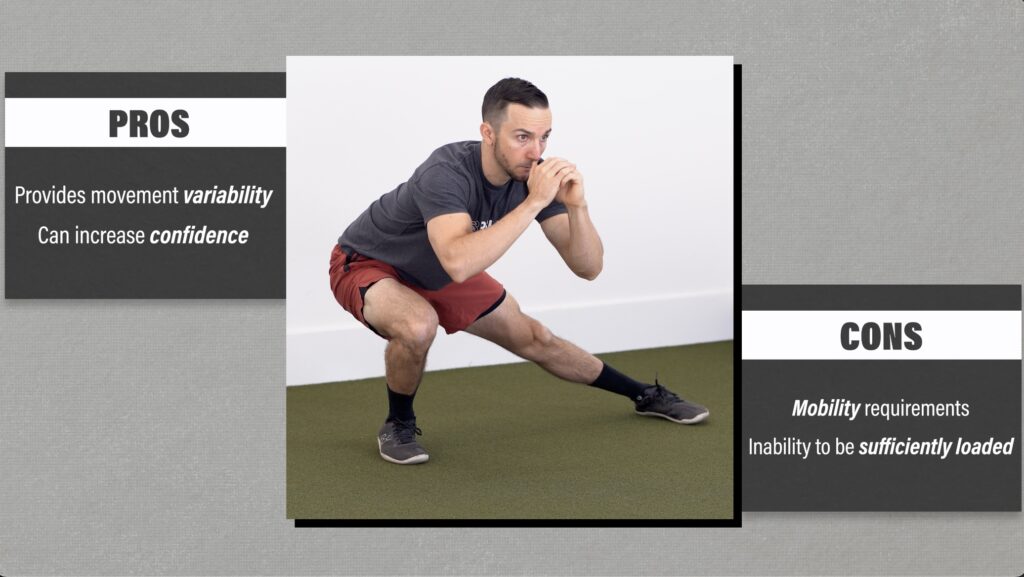
Progressing to lateral and rotational movements are key components of plyometric and return to sport drills, and are probably sufficient for most people.
Late Stage & Return to Sport or Competition for an MCL Injury
If your goal is to return to sport, the previous exercises are a great starting point for improving your tolerance to jumping and landing, as well as developing certain performance attributes. However, before returning back to full competition, there are 2 additional components you will want to implement:
- Linear running. Start with jogging in a straight line, progress to running, and eventually work up to sprinting speeds.
- Cutting and multi-directional drills. These will expose your knee to lateral and rotational forces at progressively faster speeds.
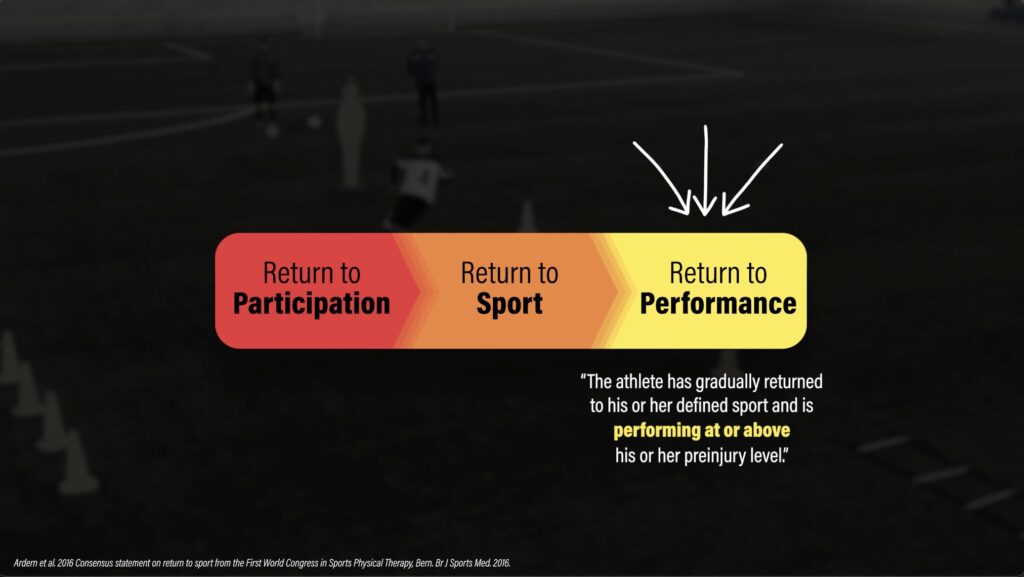
Lastly, understand that return to sport follows a continuum. You will start by engaging in sport-specific drills (return to participation), before eventually progressing back to your sport (return to sport). However, it is not until the final stage (return to performance) that you perform at or above your pre-injury level. Expect this process to take several months in order to safely build up the volume and intensity of your training.
Programming for an MCL Injury
In terms of programming, let’s start with the early-stage. Focus on regaining your knee flexion and extension range of motion, restoring your quadriceps function, and normalizing walking, while constantly monitoring your symptoms. Choose one or two exercise options for each category and perform these every day, multiple times a day.
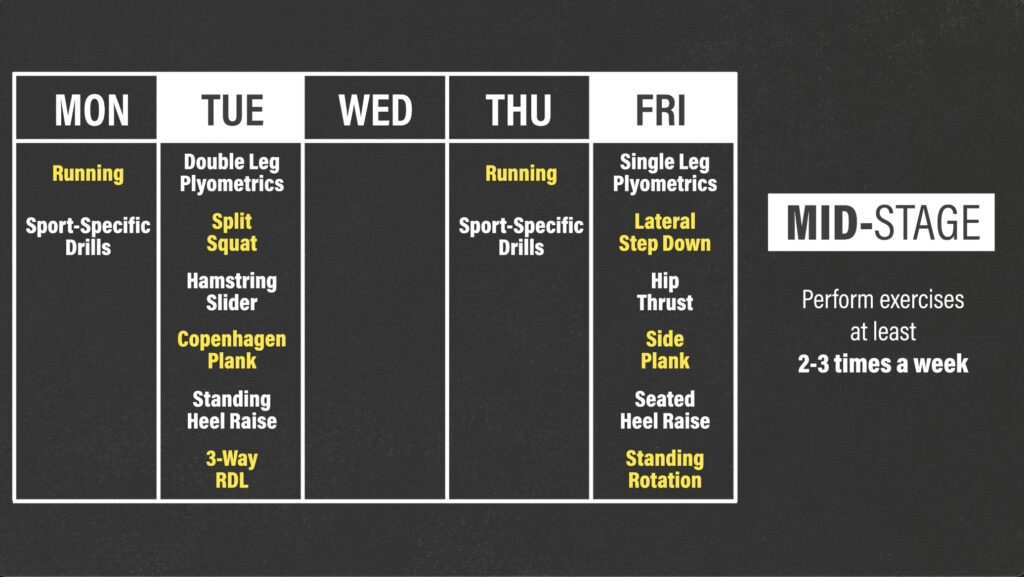
Once symptoms allow, you will begin the mid-stage exercises and perform these at least 2-3 days a week. Here is an example of a 2-day program.
On Tuesday, you can work your way through the split squat, hamstring slider, Copenhagen plank, standing heel raise, and 3-way RDL progressions.
Then on Friday, you can perform the lateral step down, hip thrust, side plank, seated heel raise, and trunk rotation progressions.
You can include the optional plyometrics at the beginning of your workout, once you meet the specific criteria. For example, you can do the double leg progression on Tuesday and the single leg progression on Friday.
Running, cutting, and other sport-specific drills can either be performed on the other days or prior to the resistance exercises.
It is important to remember that there is an overlap between each stage. For example, you will still work on your knee range of motion even after you start the strength, dynamic balance, and plyometric exercises. You will also continue to perform these mid-stage exercises even after you begin sport-specific drills. If it is helpful, you can think of these stages more as a continuum than separate entities.
MCL Injury Summary
I know there was a lot of information packed into this blog, so let me summarize by providing you with the 6 main takeaways:
- Most MCL injuries occur in isolation and are commonly graded on a scale from 1-3.
- Assuming another knee ligament, like ACL, is not involved, nonoperative management is usually recommended as the first line of treatment regardless of severity.
- Rehab will consist of 3 overlapping stages which focus on gradually increasing your exposure to lateral and rotational forces.
- The early-stage will focus on regaining knee extension and flexion range of motion, restoring quadriceps function, and normalizing walking while trying to minimize flare-ups and control swelling.
- In the mid-stage, you will perform strength, dynamic balance, and plyometric exercises 2-3 times a week. These will further improve your knee function and ability to handle various stressors.
- The late-stage is intended to increase the volume, intensity, and complexity of your training, in order to adequately prepare you for return to sport and competition.