
The purpose of this blog is to discuss Patellar Tendinopathy, which is also often referred to as tendinitis, tendinosis, and jumper’s knee.
Looking to improve your strength, range of motion, and power to enhance your function and performance? Check out our Knee Resilience program!
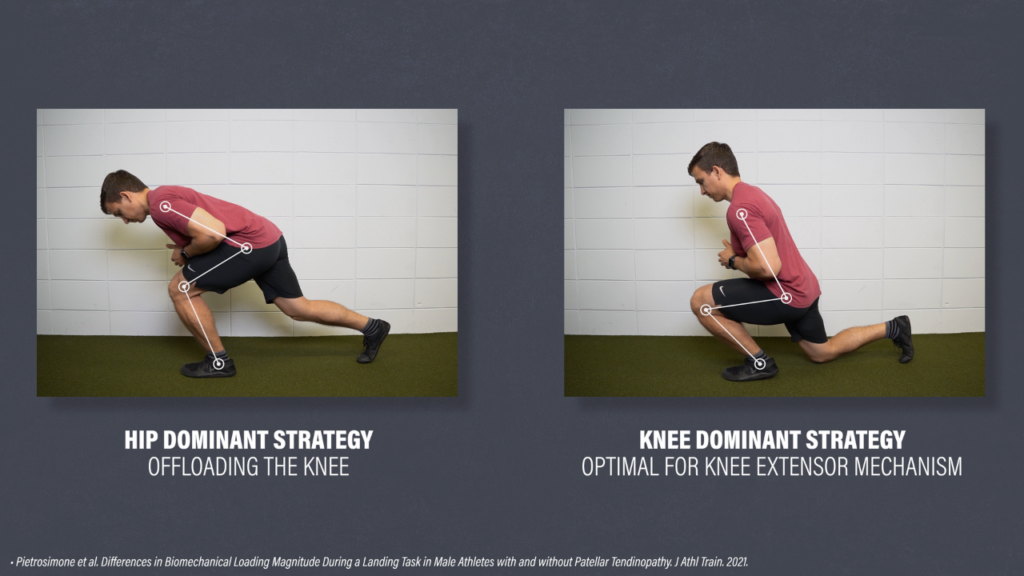
Knee Extensor Mechanism
The quadriceps consists of 4 different muscles – the vastus medialis, vastus lateralis, vastus intermedius, and rectus femoris. All four muscles come together to form the quadriceps tendon that attaches to the patella, or kneecap. They’ll then insert on the tibial tuberosity via the patellar tendon and act to extend, or straighten, the knee. Together, they’re referred to as the knee extensor mechanism. Therefore, any time your quads are working, such as when squatting, jumping, running, and climbing stairs, your patellar tendon is also working.
Patellar Tendinopathy (Not Tendinitis, Tendinosis, or Jumper’s Knee)
According to Scott et al in 2020, “patellar tendinopathy is the preferred term for persistent patellar tendon pain and loss of function related to mechanical loading.”
Tendinitis, used to indicate an inflammatory process, is an inaccurate diagnosis. Although inflammatory markers are present, inflammation is not believed to be the primary driver of the condition and may reflect the normal response to tendon loading and adaptation. Plus, people often associate inflammation with the need for ice and complete rest, which is not recommended for the management of patellar tendinopathy.

Tendinosis, used to indicate a degenerative process, is also not the appropriate terminology. A systematic review by Docking et al in 2021 reported that “the prevalence of asymptomatic patellar tendon abnormalities on imaging ranged from 0% to 83%.” If you have patellar tendinopathy, you’ll have changes on imaging. However, these changes are quite common in the asymptomatic population and imaging alone is unable to diagnose or guide treatment.
Jumper’s knee is also used synonymously with patellar tendinopathy because it’s common in basketball and volleyball athletes, but not all pain in these individuals can be classified as patellar tendinopathy.

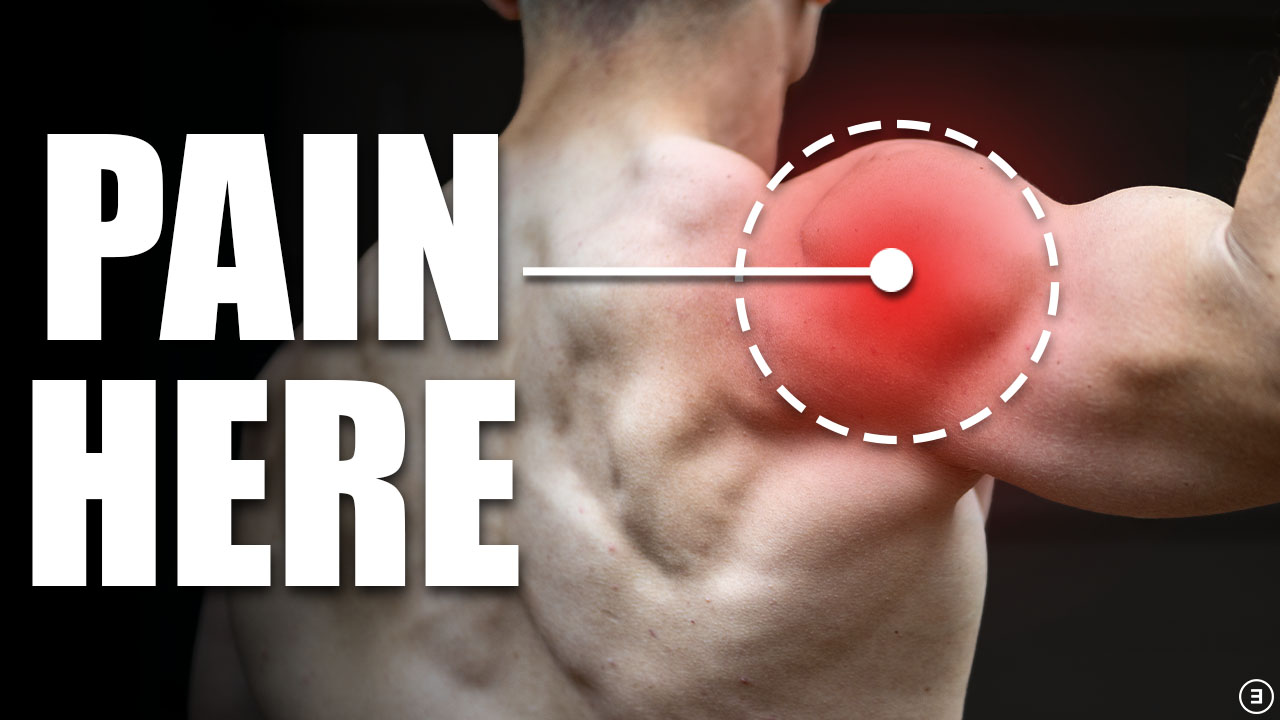
At the most basic level, as I already mentioned, patellar tendon pain and a loss of function related to mechanical loading are required for the diagnosis of patellar tendinopathy. The pain is expected to be localized to the inferior pole of the patella and have a dose-dependent relationship with the magnitude and rate of loading.
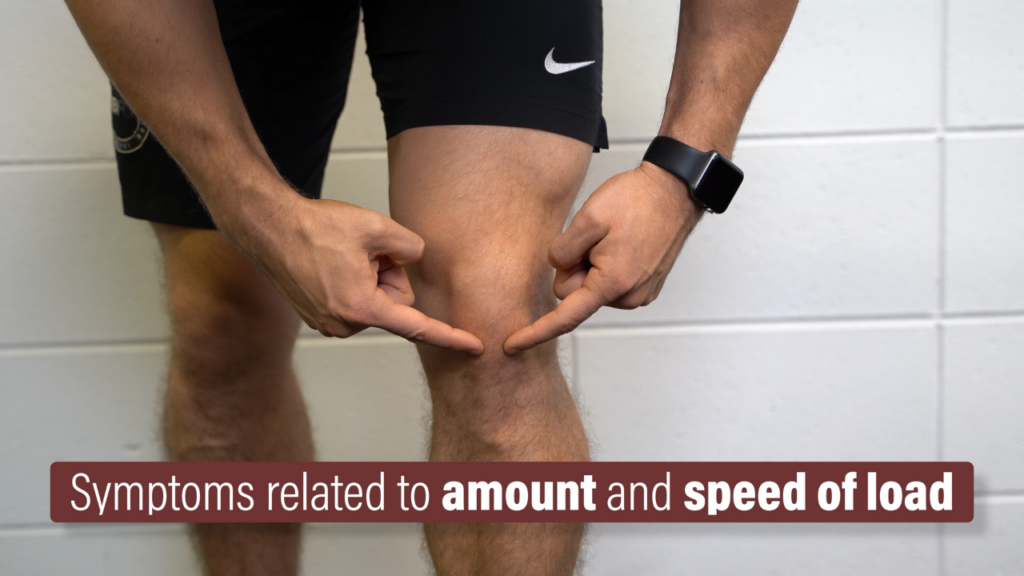
For example, I’d expect a single leg squat to hurt more than a double leg squat. I’d also expect a double leg jump to hurt more than a double leg squat. The patellar tendon is affected more by the speed of the movement, or the rate of loading, and this will be an important consideration for exercise selection and programming.
Goal of Rehab
The goal of rehab is two-fold:
- Improve your tolerance to various forms of loading
- Restore function of the knee extensor mechanism, the rest of the kinetic chain, and you, the person, in general.
Many interventions are aimed at altering the structure of the patellar tendon, but remember that these so-called abnormalities are actually quite normal. A study by van Ark et al in 2018 found that individuals with patellar tendinopathy had an improvement in symptoms with an exercise program despite no significant changes in tendon structure on imaging.
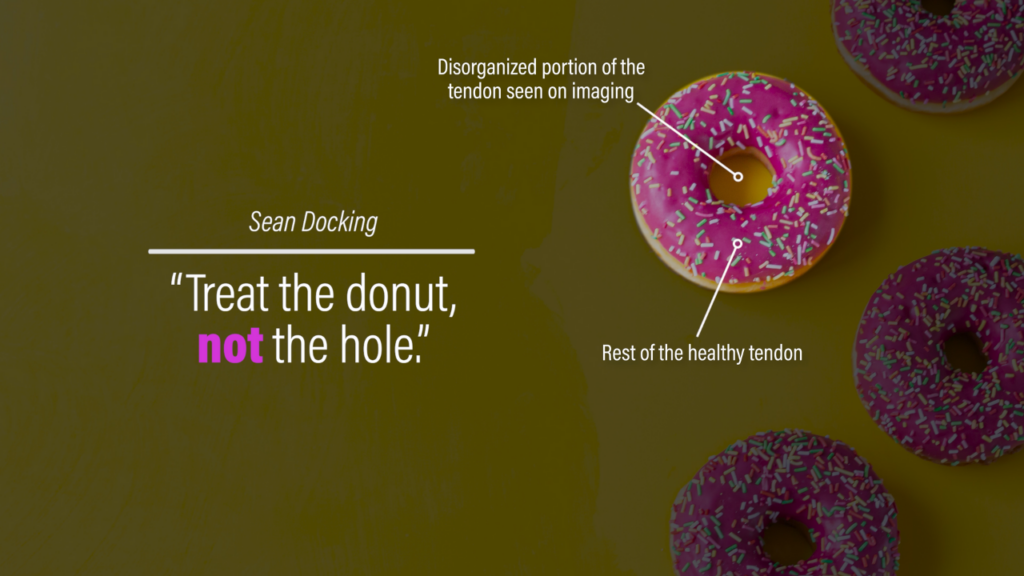
One of the most prolific researchers in this area, Sean Docking, coined the phrase – “treat the donut, not the hole.” The hole is referring to the disorganized portion of the tendon seen on imaging, while the donut is the rest of the healthy tendon. What your tendon looks like on imaging is likely irrelevant to the rehab process.
And if your tendon looks or feels thickened, that’s probably a good thing. Research by Docking et al in 2020 found that abnormal patellar tendons contain similar, if not greater, amounts of organized tendon structure as a compensatory mechanism to maintain tissue homeostasis.
Once again, keep the goals of rehab simple: improve tolerance and restore function.
Understanding & Monitoring Pain
Another fundamental component of rehab is understanding and monitoring pain. Do you have to avoid pain during exercise or is it safe to push into a little pain?
Well, the majority of researched exercise programs use pain-based criteria for progressing exercises. In fact, some papers actually increase the difficulty of an exercise if participants have a decrease in pain.
Silbernagel et al in 2007 helped popularize the model that’s most often used today, which involves exercising to a tolerable level of pain. This is unique to you. One person reading this blog might only be comfortable exercising with slight pain while someone else might be comfortable exercising with moderate pain. There’s not necessarily a right or wrong way to go about it, but there are some strategies that you can do to help find what works best for you.
You’re not only going to monitor symptoms during exercise, but immediately after and the following day. Ask yourself 3 questions:
- Is my pain tolerable during exercise? If it’s helpful for you, you can rate your pain on a scale from 0-10 and determine the highest acceptable number for you. Some physical therapists might recommend staying at a 3/10 pain or less while others might suggest 5/10 pain or less. You get to decide.
- Is my pain better, worse, or the same after exercise? Patellar tendinopathy may exhibit a warm-up phenomenon where symptoms actually improve with physical activity, so it’s possible that you feel better after exercising.
- Is my pain better, worse, or the same the day after exercise? This is the most important question because it gives us an understanding of how you’re responding to the current dosage of exercise. If you feel fine during and immediately after exercise, but you have a significant worsening of symptoms the next day, that’s an indication that you’re doing too much and need to back off a bit.
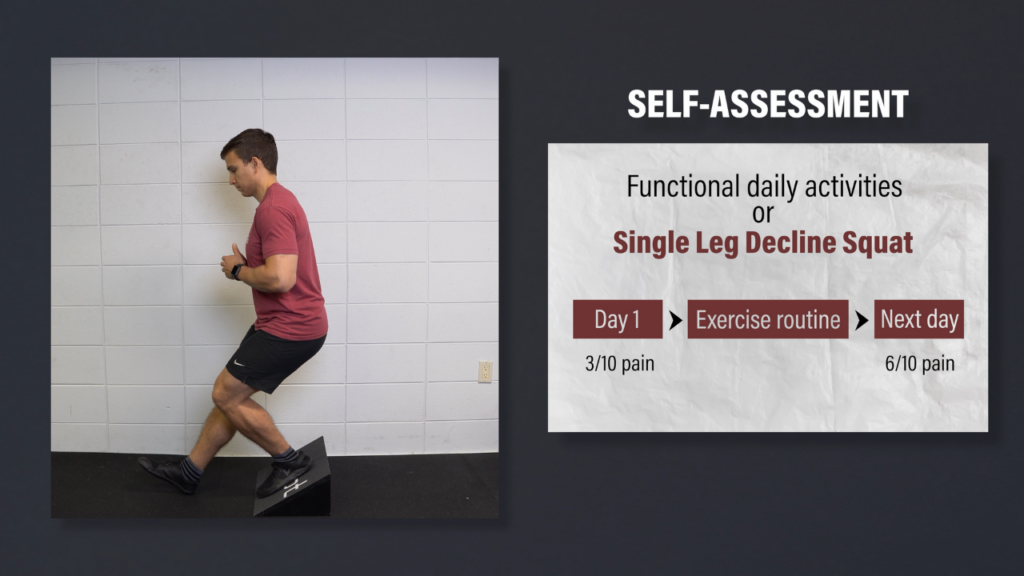
You can assess your next-day symptoms with your normal functional activities or use a specific assessment, such as the single leg decline squat. For example, you rate your pain on day 1 with the single leg decline squat as a 3/10 pain. You then perform your exercise routine within tolerance, go about your day, and go to bed without any major issues. The next morning you perform the single leg decline squat again, but this time you rate your pain as a 6/10. This means that even though your symptoms were tolerable during exercise, you might have done more than what you can currently recover from. You didn’t do any harm, but decreasing the volume or intensity would be recommended.
So, do you have to avoid pain during exercise? Not necessarily. Is it safe to push into a little pain? Yes. However, you’re going to have to find what works best for you.
Load Management & Activity Modifications
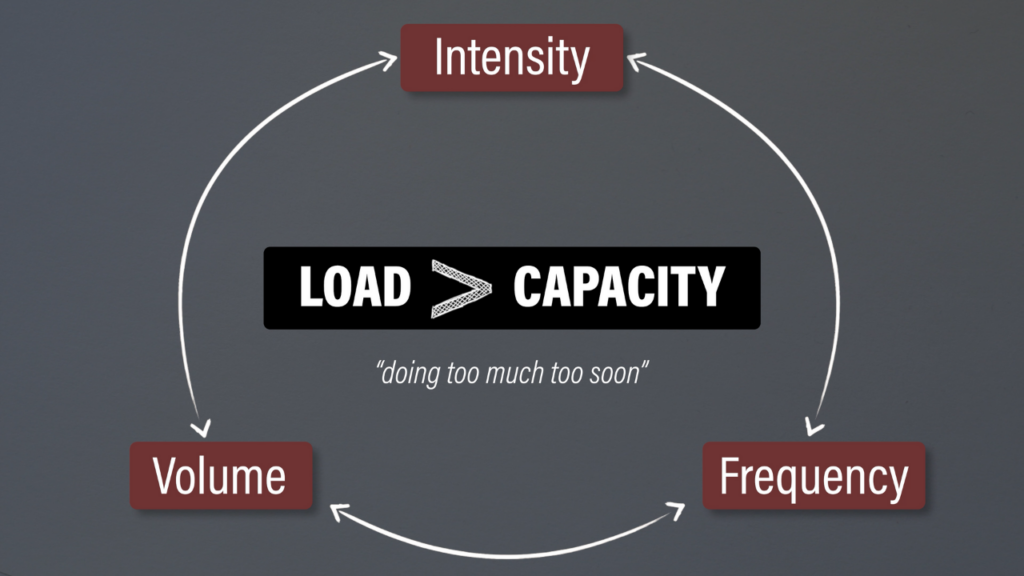
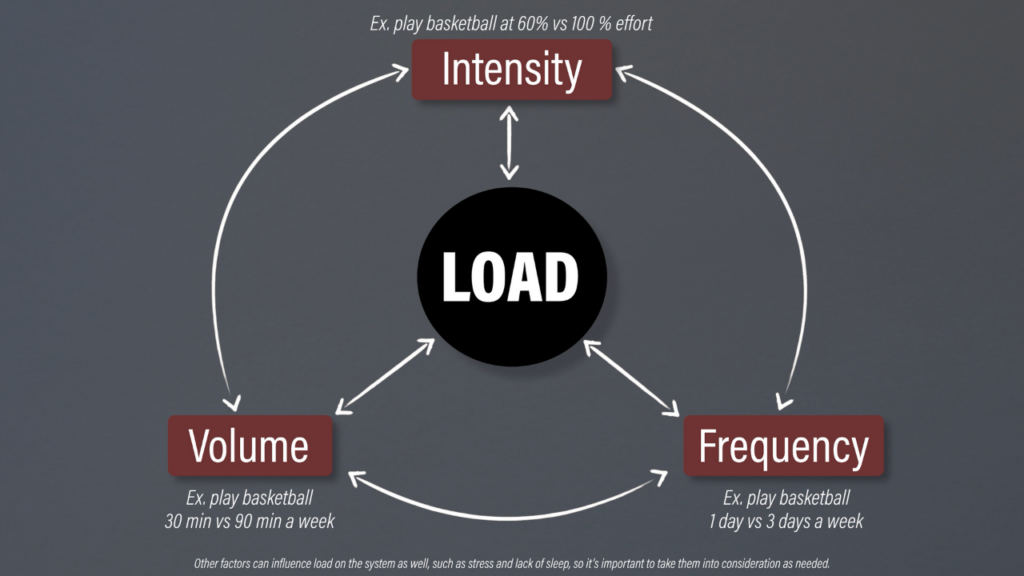
Before outlining the exercises, it’s important to discuss load management and activity modifications. Patellar tendinopathy is thought to occur when the intensity, frequency, and volume of patellar tendon loading exceeds your capacity to recover and adapt appropriately. It often comes down to doing too much, too soon although that’ll look slightly different for more active individuals vs less active individuals.
Let’s tie the goals of rehab, pain monitoring, and load management together by reviewing the boom-bust cycle. Tell me in the comments if it sounds familiar.
You have a spike in activity over the course of a day, week, or month that contributes to symptoms of your knee. You decide to rest completely and your symptoms go away. Excellent! You recognize that you overdid it last time, so you don’t do quite as much this time around. However, you have a flare-up despite doing less of the same activity! You rest again until your pain goes away and repeat this process until your activity level is severely diminished.
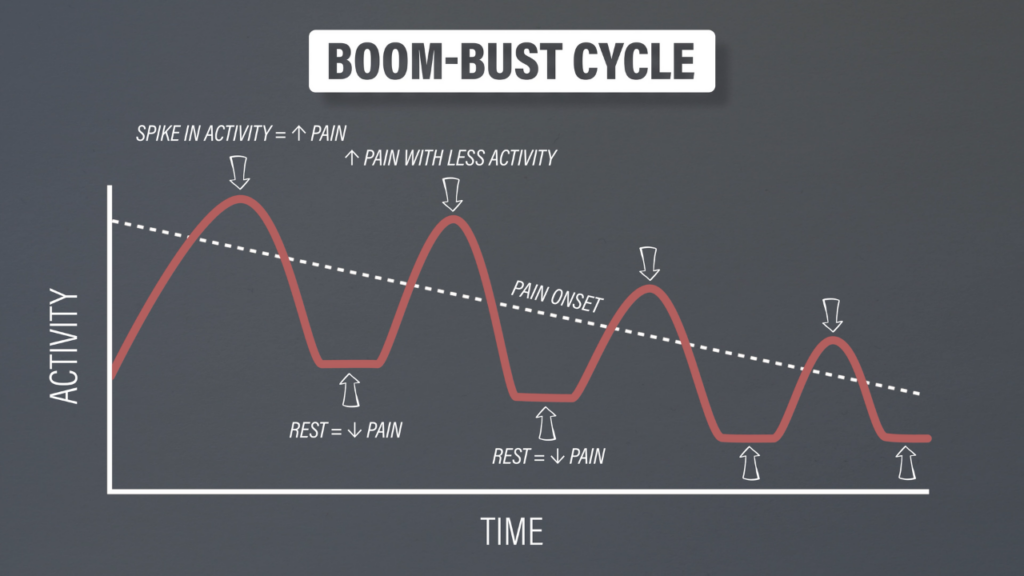
This is not an uncommon cycle. It’s often driven by the belief that pain is bad and rest is good, while also using a reduction in pain as the primary metric for success.
But that’s not the way to approach patellar tendinopathy because rehab can take 3 months, 6 months, or even a year or longer. Symptoms will fluctuate on a day-to-day and week-to-week basis, which is why your focus should be on function while monitoring pain to guide the appropriate amount of physical activity.
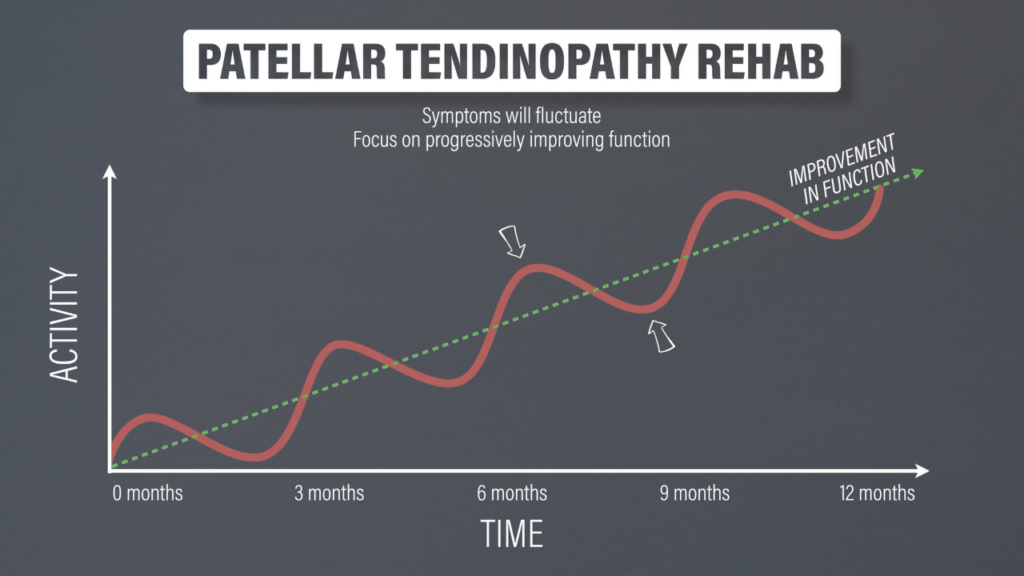
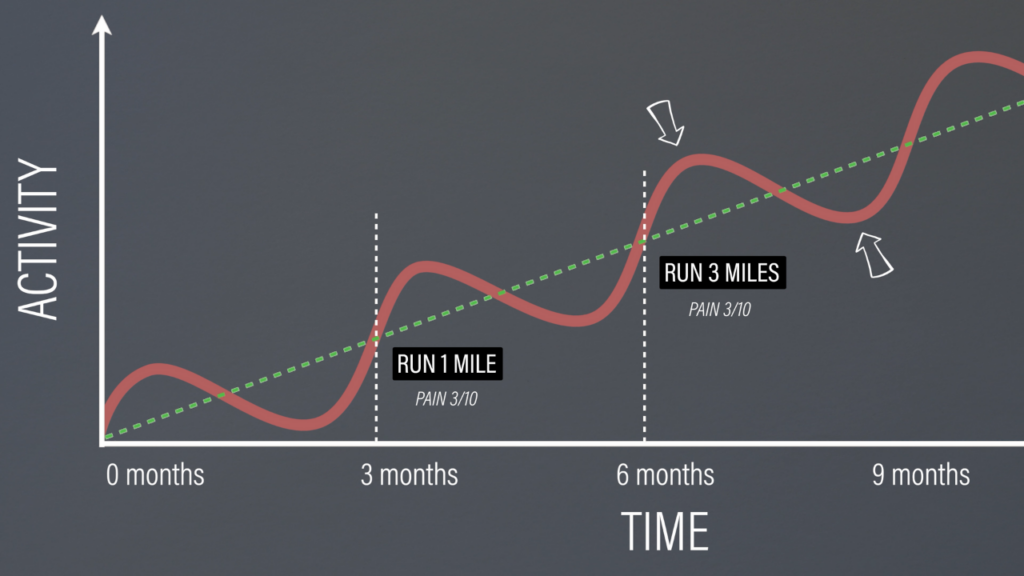
An increase in function will not always correlate with a linear decrease in pain. If you go from running 1 mile with a 3/10 pain to running 3 miles with a 3/10 pain over the course of 3 months, that’s actually significant progress. The pain may seem like it’s staying the same, but technically it’s getting better because it requires more activity to reach the same level of pain that you initially experienced.
Remember, one of the primary goals of rehab is to restore function. You’ll monitor your symptoms during and after exercise to ensure that you’re not exceeding your current capacity, while keeping track of your progress with the various exercises. At the same time, you’ll reduce the frequency, intensity, or volume of activities, such as basketball or volleyball, that are aggravating your symptoms and limiting your functional progress. If needed, you can replace the reduction in that specific activity with a different activity that doesn’t exacerbate symptoms to maintain your fitness.
Okay, time to discuss why you’re here – exercises!
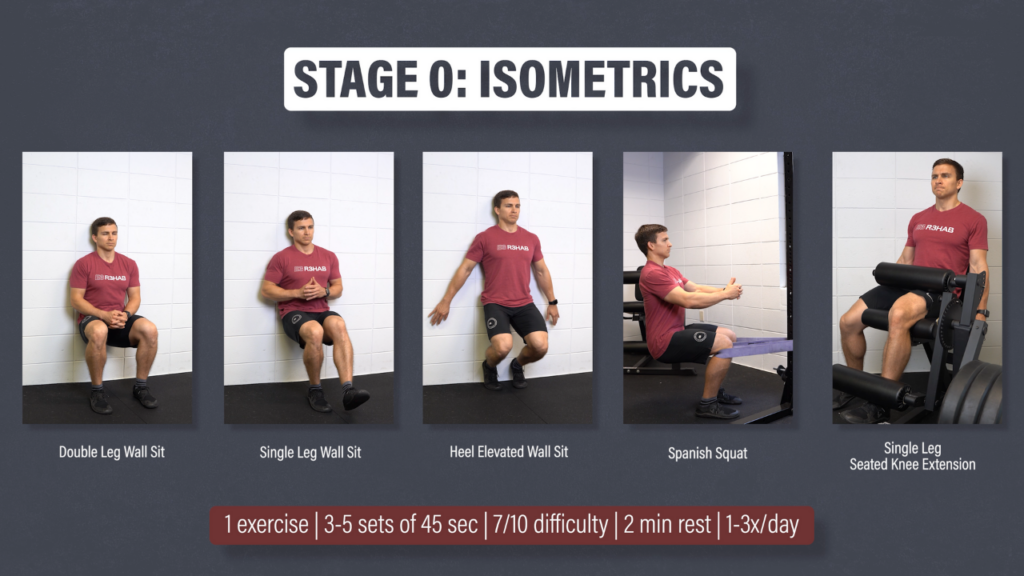
Stage 0: Isometrics
Most tendinopathy protocols actually have isometrics listed as stage 1, but they’re listed here as stage 0 because I don’t think there’s an isometric milestone that you need to pass before performing the next group of exercises. However, they do have the potential to provide an analgesic effect and are typically quite tolerable since little to no movement is occurring.
I am going to provide you with five examples so you can choose what works best for you based on your preference, equipment availability, tolerance, function, etc.
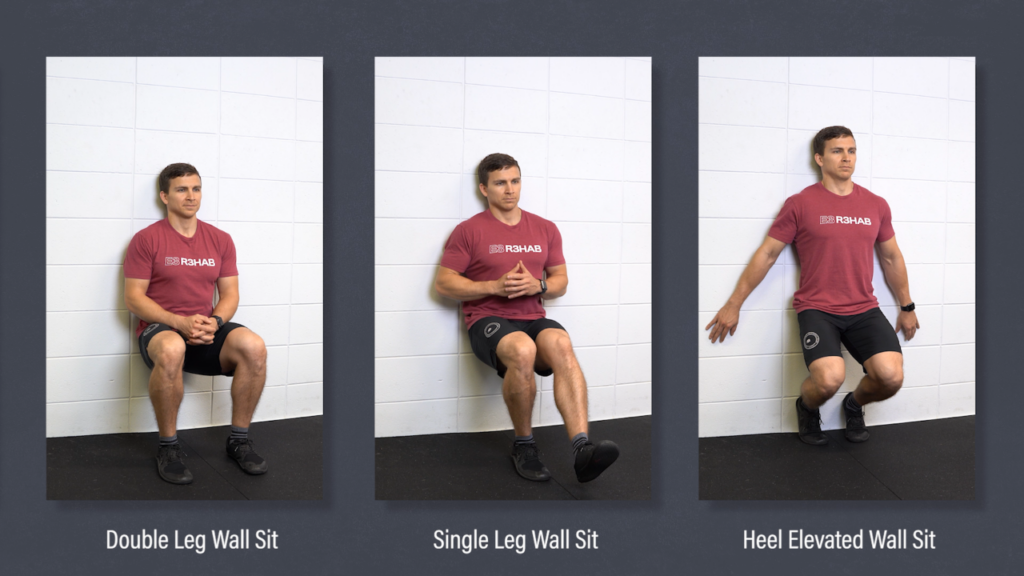
- Double Leg Wall Sit
- Single Leg Wall Sit
- Heel Elevated Wall Sit
The single leg and heel elevated variations are both progressions of the double leg wall sit.
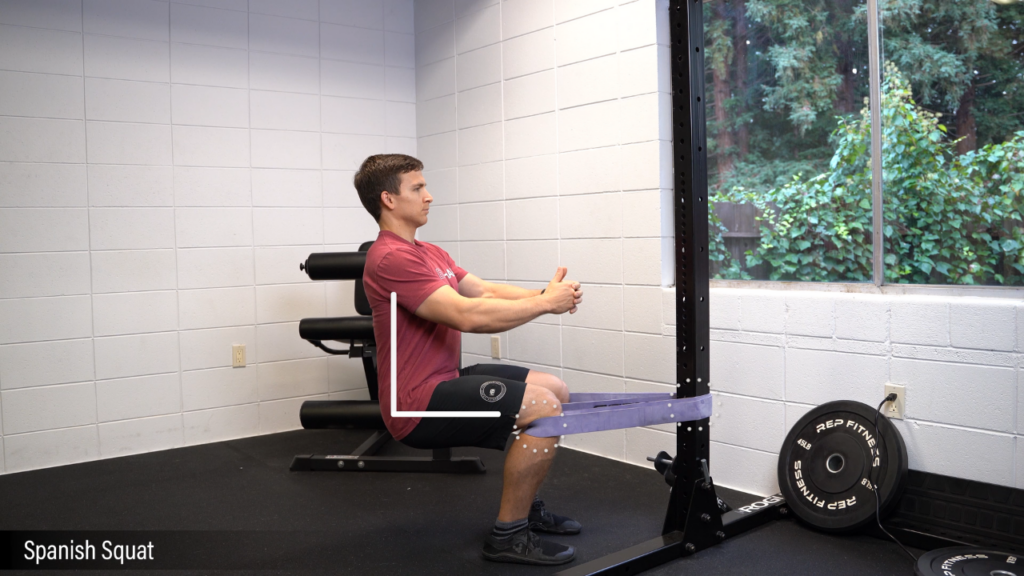
- Spanish Squat. With a strap anchored around your legs and a squat rack, you’ll sit back until your hips and knees are at roughly 90 degree angles.
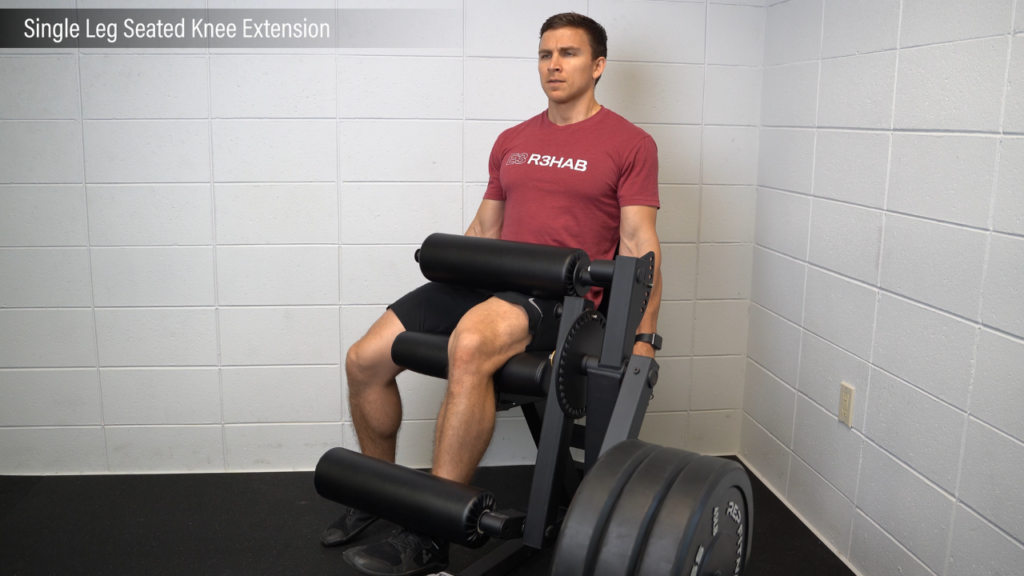
- Single Leg Seated Knee Extension. You can perform this exercise with a machine, band, or some other setup with your knee between 90 and 60 degrees of flexion.
How would you incorporate these into your routine? You can perform them as a warmup prior to your workouts or they can be used as an independent stimulus, completed 1-3 times per day.
You’d pick one option to complete for 3-5 sets of 45 second holds at a 7 out of 10 effort with a 2 minute rest between sets.
Stage 1: Heavy Slow Resistance
As I mentioned earlier, tendons are affected more by the rate of loading than the magnitude of the load. Hence, the isometrics in stage 0 and the slow resistance training in stage 1.
You can pick any exercise in this stage as long as it sufficiently loads the patellar tendon. I’ll provide 4 options.
- Squat. Progressions can be made by increasing the resistance over time or choosing a variation that emphasizes the knee extensors more, such as a heel elevated squat.
- Split Squat. Similarly, progress the resistance, range of motion, or amount of forward knee travel over time.
- Step Down. Progress by elevating the height of the step or your heel, or increase the amount of forward knee travel.
- Single Leg Seated Knee Extension
You can perform 1-2 exercises for 3-4 sets of 6-15 repetitions, 2 to 3 days per week. I’d recommend picking at least one single leg variation.

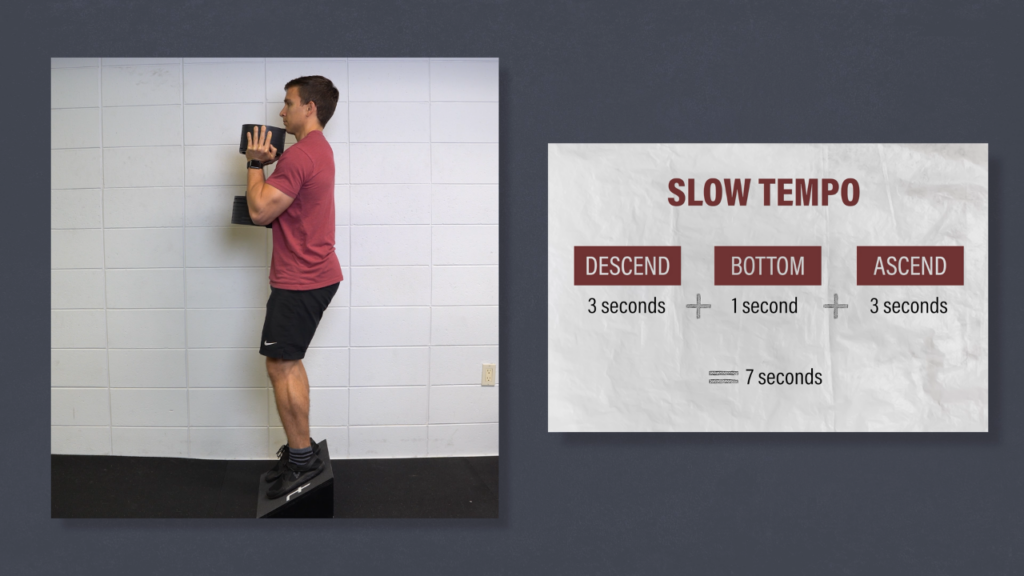
The speed of each repetition should be slow. For example, if you’re performing a squat, descend over the course of 3 seconds, pause for 1 second at the bottom, and ascend for 3 seconds. That’s a 7 second repetition! If you want to ensure consistency with your tempo, you can download a metronome app on your phone.
The last thing that I want to mention is that although this stage is titled “heavy slow resistance,” recent research by Agergaard et al in 2021 suggests that moderate resistance is equally effective. Focus on consistency, gradual progressions, and strategies that align with your goals.
Stage 2: Energy Storage & Release
Along with the isometrics and resistance training, stage 2 includes jumping, landing, plyometrics, and exercises that prioritize a faster rate of loading. These exercises should be performed 2-3 times per week with an emphasis on execution. This isn’t meant to be cardio.
There’s an infinite number of possibilities and loading schemes here, so I’m just going to provide 2 options. You don’t have to follow the exact order of either option.
- Countermovement jump to a box, countermovement jump, bilateral depth drop, bilateral depth jump, single leg depth drop, and single leg depth jump.
- Forward lunge, forward lunge with step back, step and land, step and land with a step back, and running with a step back.

For exercises in this stage, it’s important to intentionally load the knee extensor mechanism as much as tolerable because individuals with patellar tendinopathy may actually unknowingly offload their affected knee.
Stage 3: Return to Sport
There are no distinct exercises that need to be performed in this stage. Instead, this stage is about gradually returning to your preferred sport or activity.
For example, if you’re a marathon runner, you’d train for that marathon over the course of several months as you build up your volume. If you’re a recreational basketball player, the same thought process applies. You can’t expect to just jump back into hours of full court games after doing 3 months of exercises in the gym. You have to build back up to it.
Guidelines, Not Rules
As I always say, these are guidelines, not hard and fast rules. I can’t provide suggestions that will account for each person’s unique circumstances. Not everyone will need to work through all of the stages. If your only goal is to lift weights in the gym, stages 2 and 3 might not be applicable to you. Also, the stages are more of an overlapping continuum as opposed to completely separate categories.
Surgery, Injections, Adjunct Treatments
What about surgery, injections, and other adjunct treatments? Since the goal of rehab isn’t to reduce inflammation or change the tendon structure, many of these interventions don’t make rational sense. And they’re not well supported by research.
A randomized controlled trial by Bahr et al in 2006 found that surgery offered no advantages over strength training.
Another randomized controlled trial by Scott et al in 2019 concluded that platelet-rich plasma, or PRP, is no more effective than saline when either were combined with an exercise program.
Randomized controlled trials by Zwerver et al in 2011, Thijs et al in 2017, and Lee et al in 2020 reported that extracorporeal shockwave therapy (ESWT) is no more effective than placebo or exercise alone.
A randomized controlled trial by Kongsgaard et al in 2009 concluded that corticosteroid injections have poor long-term clinical effects. Research on lateral elbow tendinopathy by Smidt et al in 2002 and Bisset et al in 2006 found that corticosteroid injections were worse than a wait-and-see approach after 1 year.
A study by Fredberg et al in 2004 is often cited for the potential justification of local corticosteroid injections. However, they found a .5 point reduction in pain during walking after 6 months. Not impressed.
In line with the previous research, a systematic review by Dean et al in 2014 states – “This review supports the emerging clinical evidence that shows significant long-term harms to tendon tissue and cells associated with glucocorticoid injections.”
What about foam rolling, massage, icing, or whatever else you can think of? If it’s low cost and low risk, you can pretty much try out anything. However, these things aren’t the focus of rehab and shouldn’t take away from the goal of progressively improving function.
Summary
In summary, patellar tendinopathy is characterized by localized pain at the inferior pole of the patella that has a dose-dependent relationship with the magnitude and rate of loading. It is thought to occur when the intensity, frequency, and volume of patellar tendon loading exceeds your capacity to recover and adapt appropriately.
Inflammation isn’t the primary driver of the condition, so ice and complete rest aren’t the cornerstones of rehab. Degeneration also isn’t the focus, so interventions shouldn’t be aimed at changing the structure of the tendon.
If the onset of symptoms is from doing too much, too soon, then your first goal is to find a Goldilocks level of loading that keeps your symptoms tolerable during, immediately after, and the next day following activity. You’ll then implement exercises for 3 or more months to improve your function and tolerance to various activities.
You can incorporate adjunct treatments that alleviate pain, but they’re not the focus of rehab, especially if they’re high cost or high risk. Unfortunately, there is no quick fix. Patellar tendinopathy takes time, patience, consistency, and dedication to a structured plan.