The purpose of this blog is to discuss peroneal tendinopathy, which is also often referred to as peroneal tendinitis.
Looking to improve the strength, range of motion, and stability of your ankles to enhance your function and performance? Check out our Ankle Resilience program!
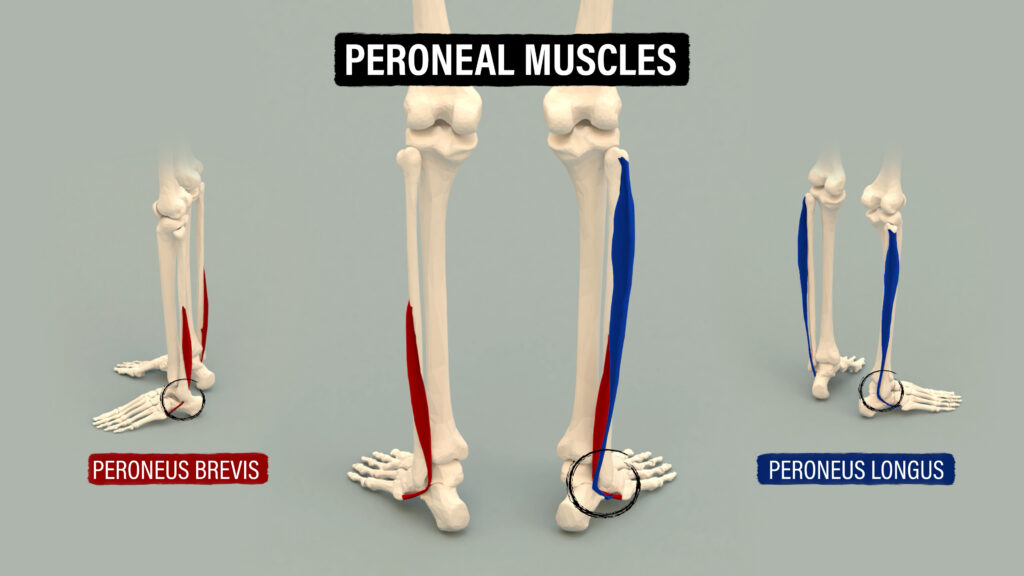
Anatomy & Function
The peroneal muscles are located in the outer compartment of the lower leg. The peroneus brevis originates on the lower portion of the fibula and inserts on the base of the 5th metatarsal. The peroneus longus sits over the top of the peroneus brevis, originates higher up on the fibula, and travels around the bottom of the foot to attach to the plantar aspect of the medial cuneiform and base of the 1st metatarsal. Both tendons wrap around the lateral malleolus, the bump on the outer portion of your ankle, and are held in place by the superior and inferior peroneal retinacula.
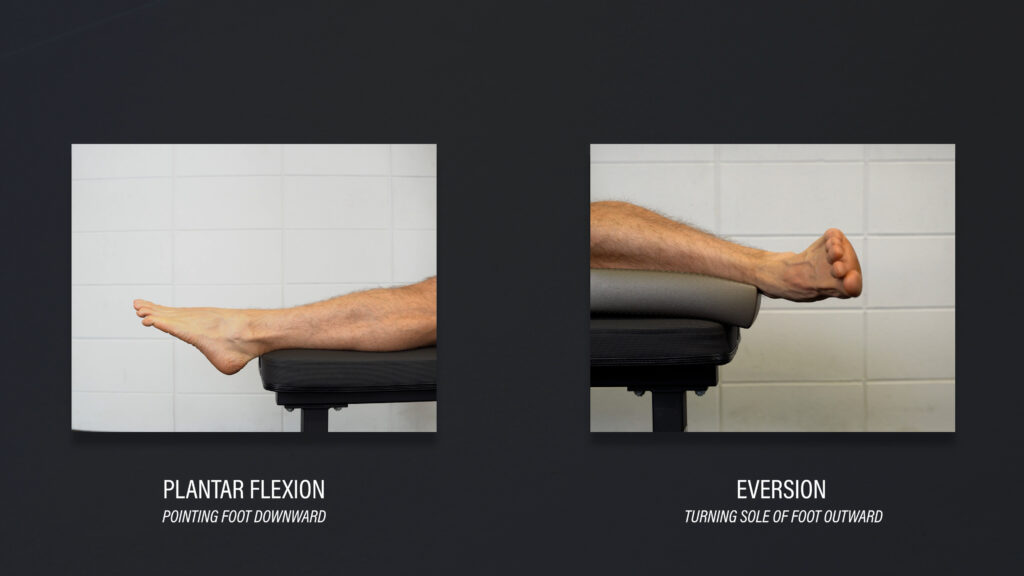
In a non-weight bearing position, the peroneals act as plantar flexors (pointing the foot downward) and evertors (turning the sole of the foot outward).
During walking, the peroneus longus provides stability to the transverse arch of the foot and keeps the first ray in contact with the ground.
Peroneal Tendon Injuries
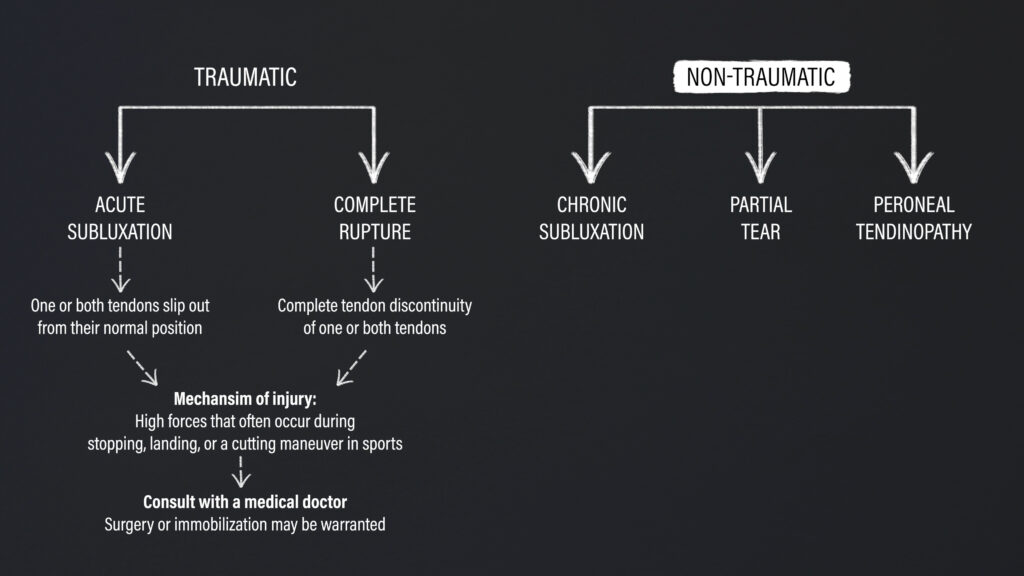
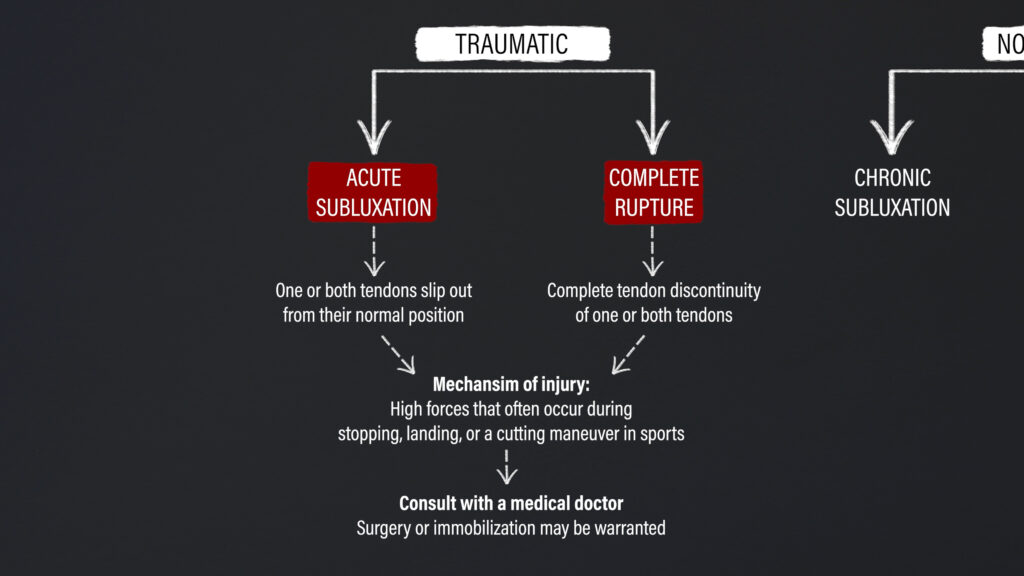
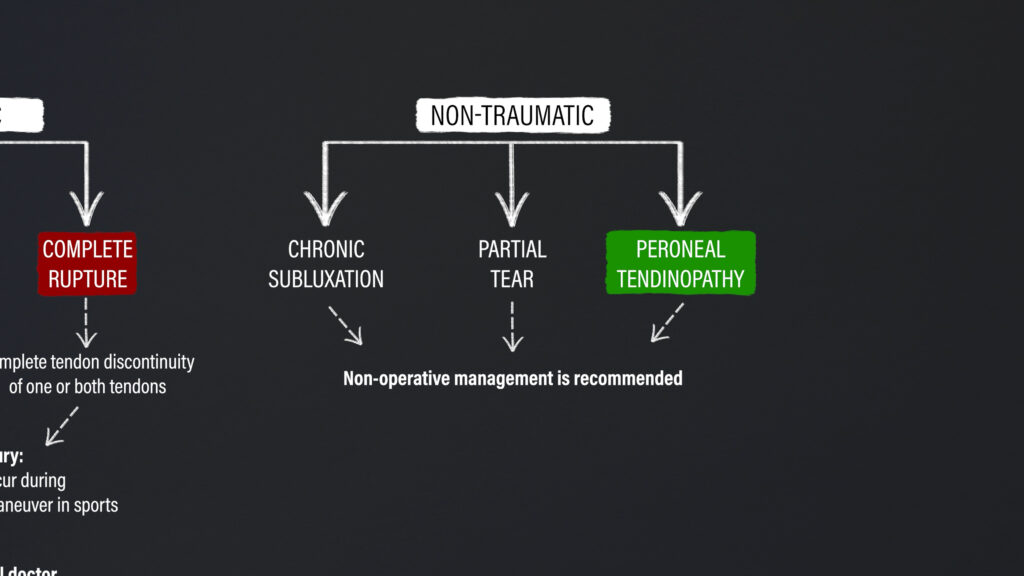
There are three primary types of peroneal tendon injuries that I’m going to categorize as traumatic or non-traumatic. Let’s start by discussing the traumatic category.
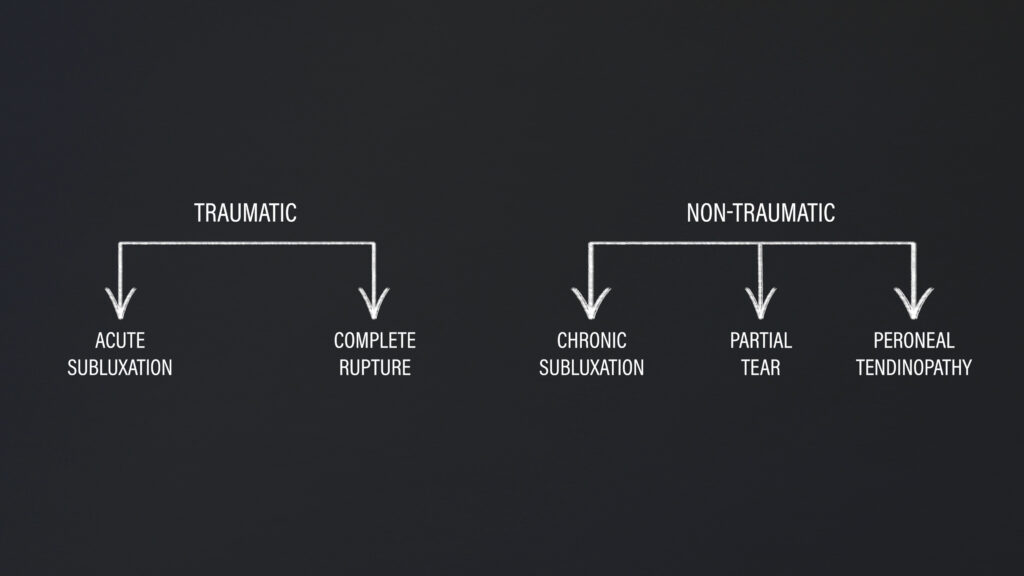
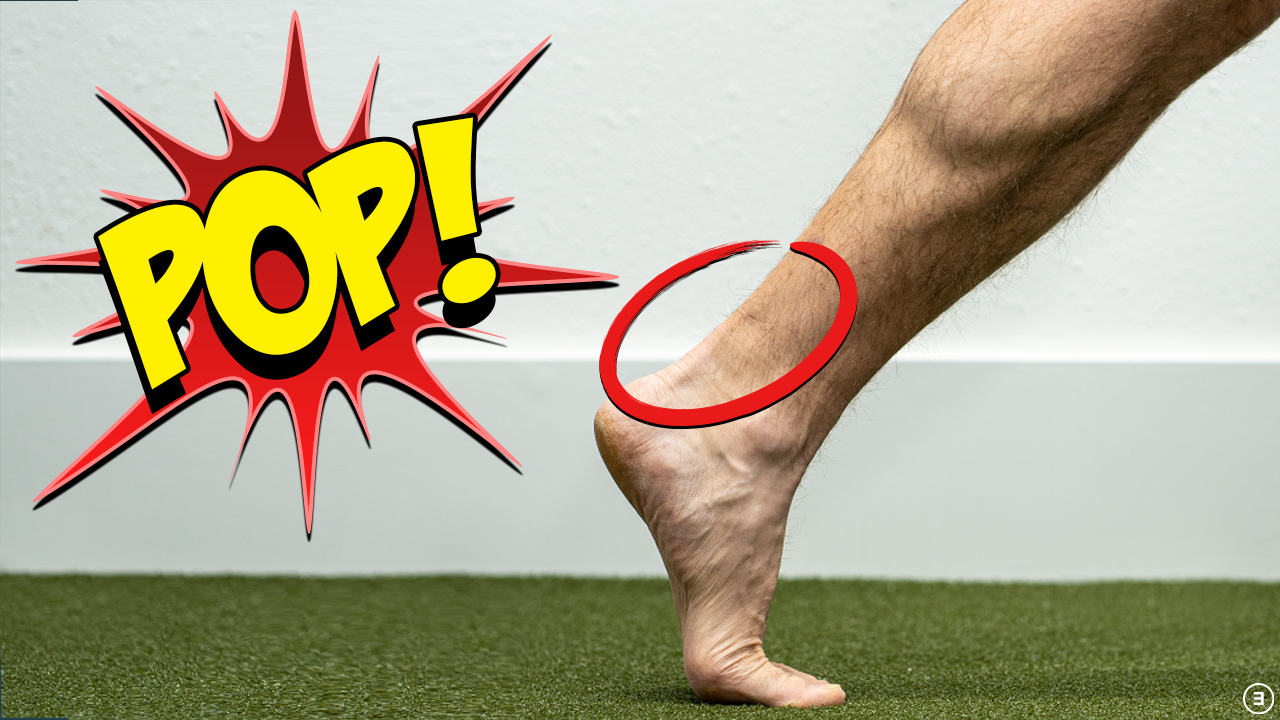
An acute peroneal tendon subluxation, in which the tendon has slipped out of its groove behind the lateral malleolus, may occur when the superior peroneal retinaculum is torn. The mechanism of injury often involves a contraction of the peroneals when the ankle is in a dorsiflexed and nonneutral position during stopping, landing, or a cutting maneuver in sports, such as skiing, gymnastics, soccer, basketball, and football.
Complete rupture of a peroneal tendon may also occur during a high-force mechanism of injury.
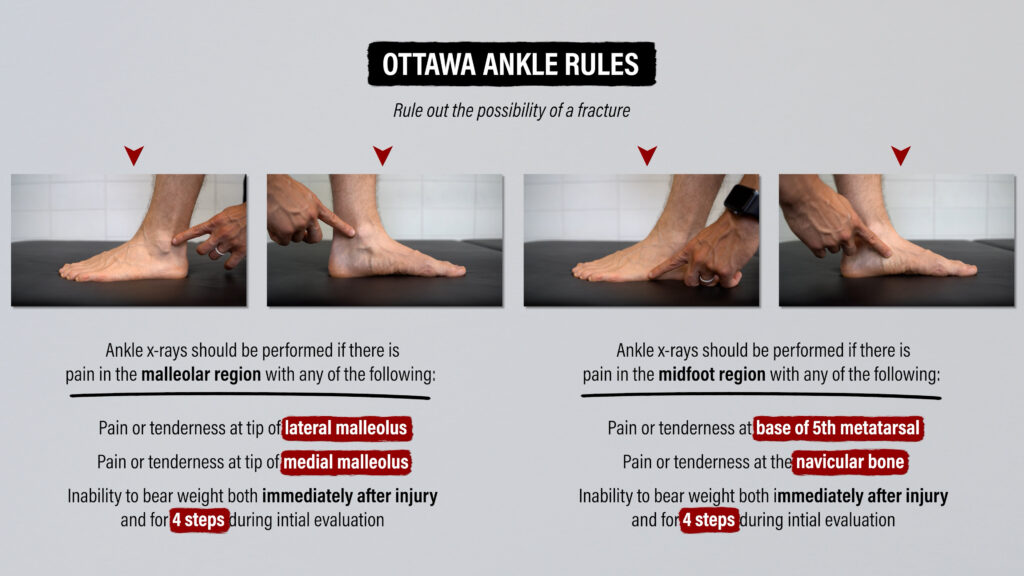
Additionally, after any traumatic injury to the foot or ankle, the Ottawa Ankle Rules will be used by a healthcare professional to rule out the possibility of a fracture. They’ll assess if you have the ability to walk four steps or have tenderness at the lateral malleolus, base of the 5th metatarsal, medial malleolus, or navicular.
If any of these traumatic injuries are suspected, consultation with a medical doctor is recommended immediately because surgery or immobilization may be warranted.
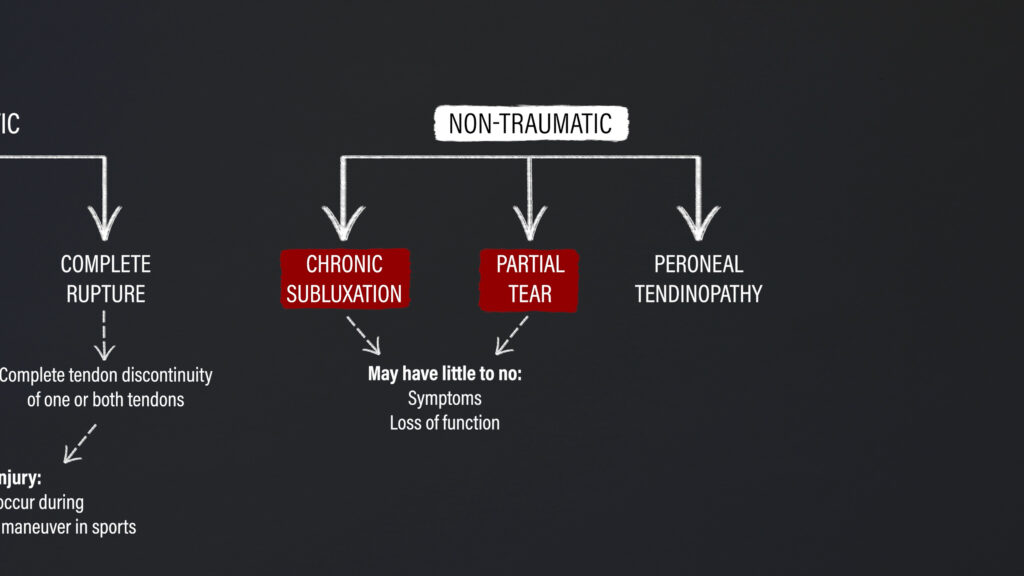
Now let’s discuss the non-traumatic category. And when I say non-traumatic, I’m focusing on injuries that are not acute in nature and don’t require prompt medical attention. For example, it’s possible to have chronic peroneal tendon subluxations or a partial tear while having little to no symptoms or loss of function.
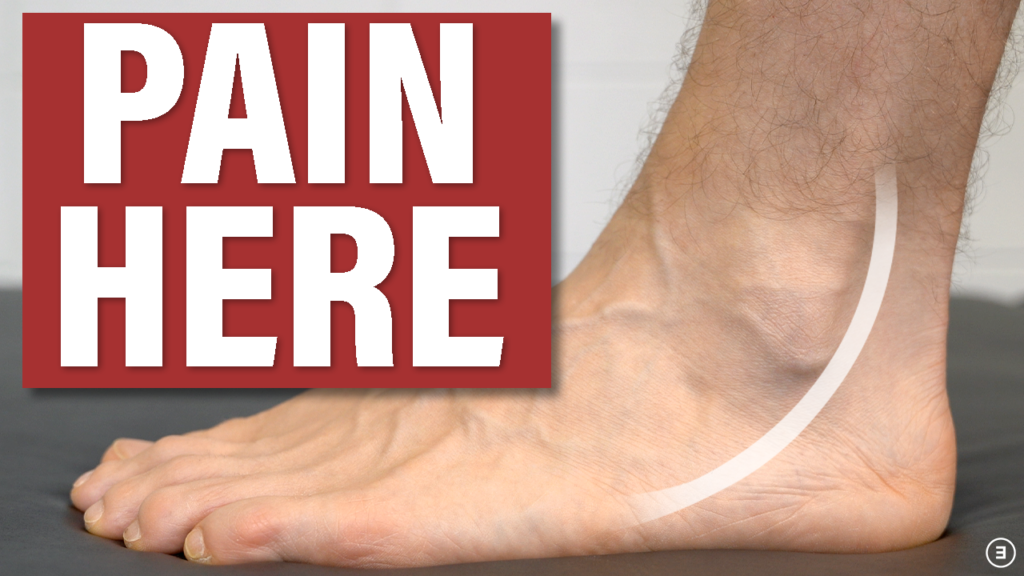
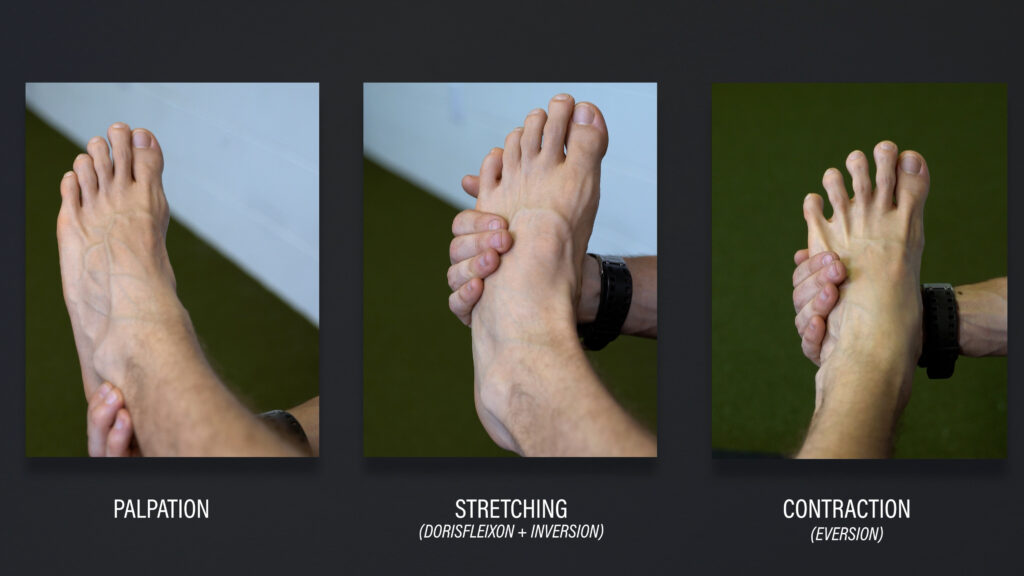
Peroneal tendinopathy refers to pain and loss of function associated with loading of the tendon. This may be an overuse injury related to activities like running or playing sports, or associated with recurring lateral ankle sprains. It’s not uncommon for chronic ankle instability and peroneal tendon issues to go hand-in-hand. Symptoms may be reproduced with palpation of the tendons, stretching of the tendons into dorsiflexion and inversion, or contraction of the tendons into eversion.
The non-traumatic category is the focus of the exercises and recommendations in this video, particularly peroneal tendinopathy.
Peroneal Tendinopathy Exercise Overview
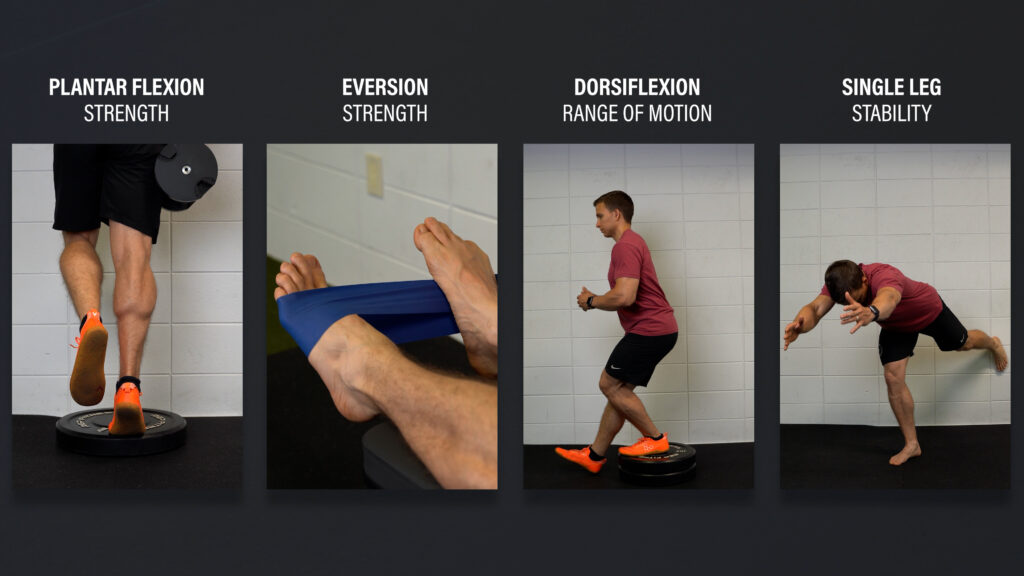
The purpose of the exercise progressions that I’m going to present is to train the function of the peroneals, improve their tolerance to various stressors and positions, and increase the strength and range of motion of the feet, ankles, and legs in general.
Key targets will be plantar flexion strength, eversion strength, dorsiflexion range of motion, and single leg stability during dynamic movements.
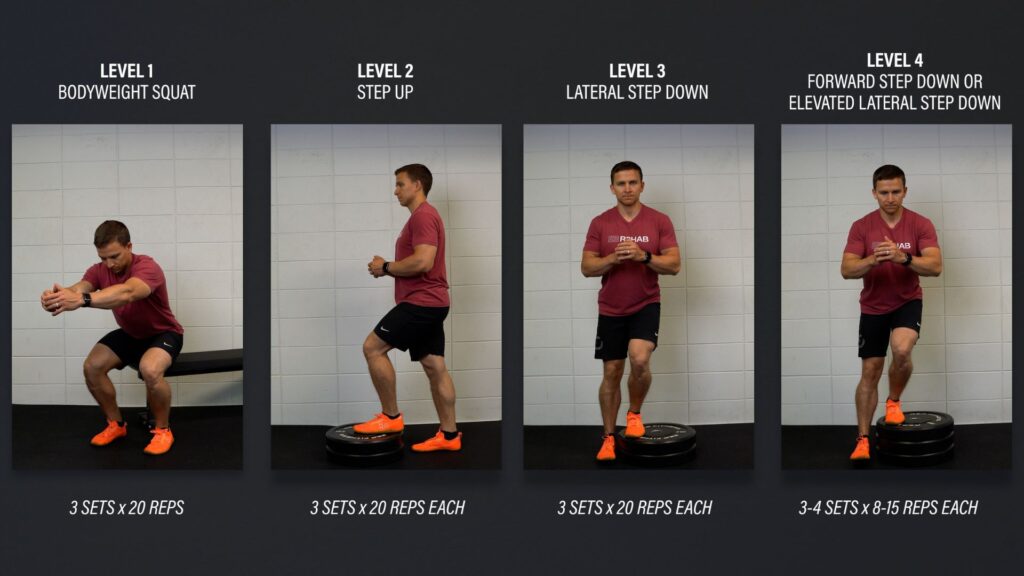
Single Leg Strength Progression
Level 1 – Bodyweight Squat. Gently tap your butt to a chair and stand back up. If it’s too challenging, shorten the range of motion or use your hands for assistance. Aim for 3 sets of 20 reps.
Level 2 – Step Up. Use a stair or objects stacked 6-7 inches high. You don’t want to push off with the back leg, so focus on putting all of your weight through the working leg. If it’s too difficult, decrease the height or use your hands for assistance. Aim for 3 sets of 20 reps per leg.
Level 3 – Lateral Step Down. Same exact cues except this movement will allow for a little more ankle dorsiflexion. Aim for 3 sets of 20 reps per leg.
Level 4 – Forward Step Down or Elevated Lateral Step Down. You can either step forward off the step or continue to perform the lateral step down while gradually increasing the height of the step. Aim for 3-4 sets of 8-15 slow and controlled reps per leg.
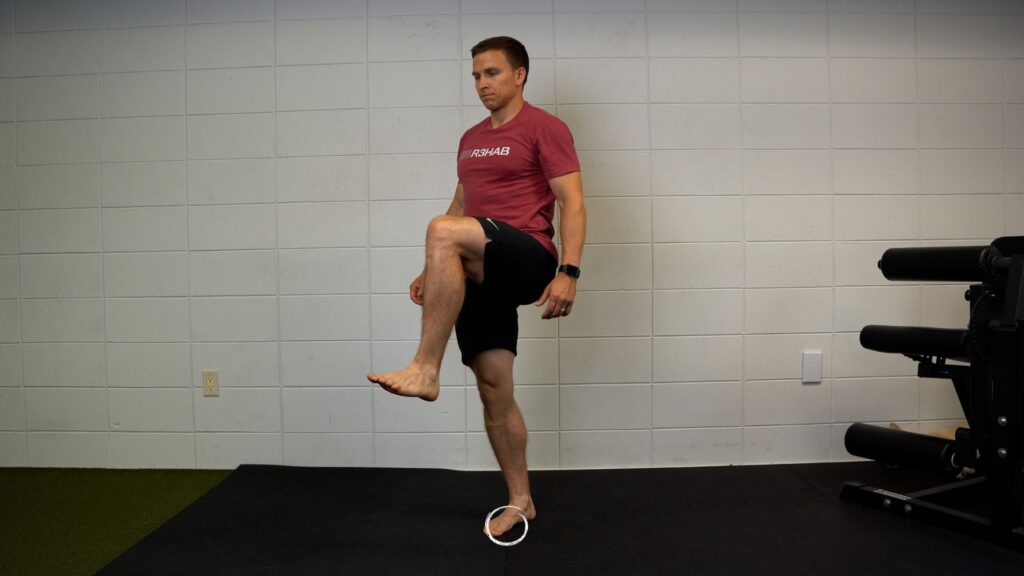
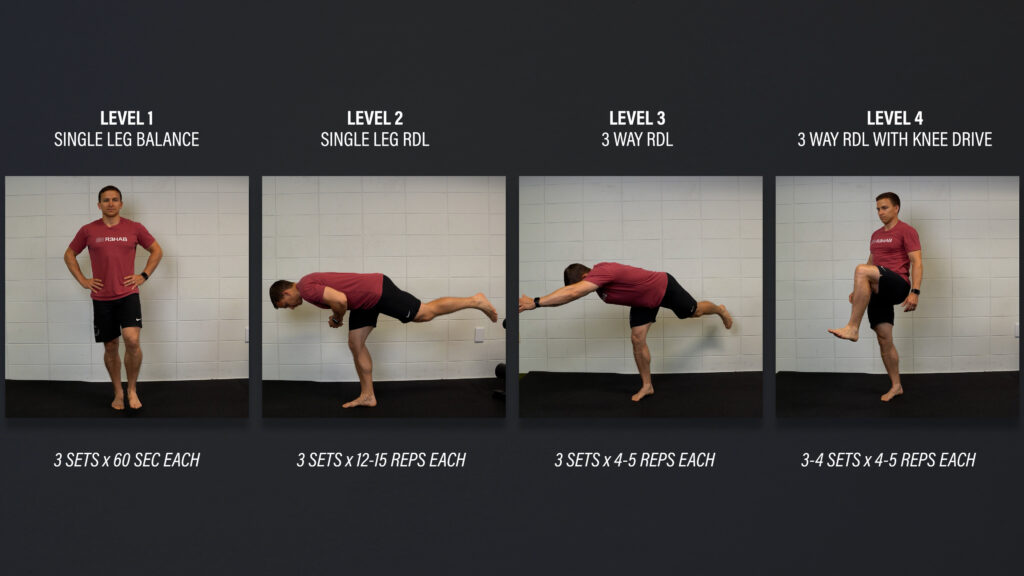
Dynamic Balance Progression
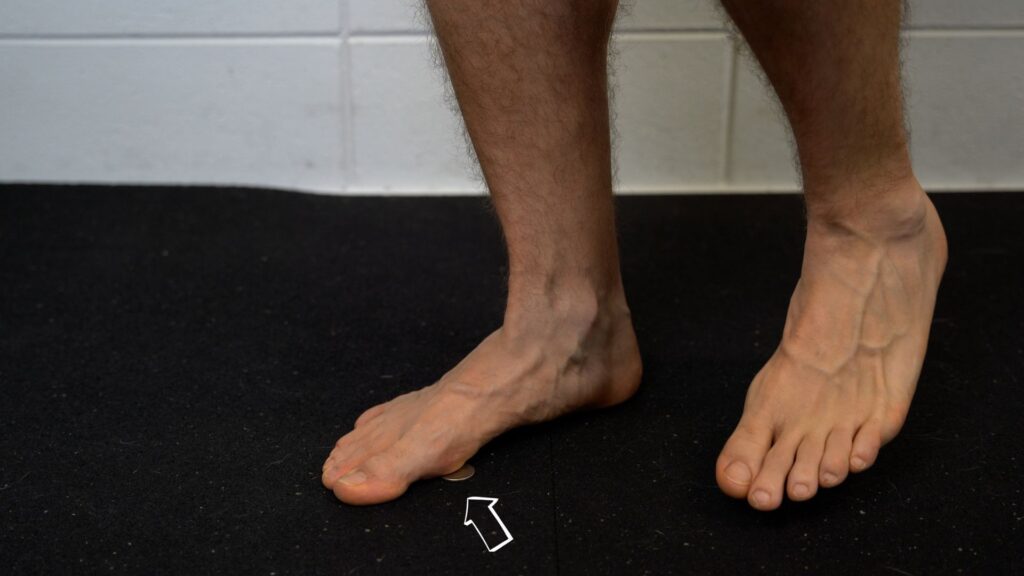
For the dynamic balance progression, you want to ensure that the base of your big toe stays planted on the ground.
If it helps, you can place an object under that area for feedback, such as a coin.
Level 1 – Single Leg Balance. Work your way up to standing on one leg for 3 sets of 60 seconds.
Level 2 – Single Leg RDL. Stand on one leg while keeping a slight bend in both knees, hinge at your hips until your trunk is almost parallel with the ground, and then return to the starting position. Repeat this movement without touching your foot to the ground. If this is too challenging, use your hands to help with balance, shorten the range of motion, or tap your foot to the ground. Aim for 3 sets of 12-15 reps.
Level 3 – 3 Way RDL. Reach your arms in 3 directions – to the left, middle, and then to the right. That counts as 1 rep. Aim for 4-5 reps total.
Level 4 – 3 Way RDL w/ Knee Drive. You can progress the previous movement by adding a knee drive.
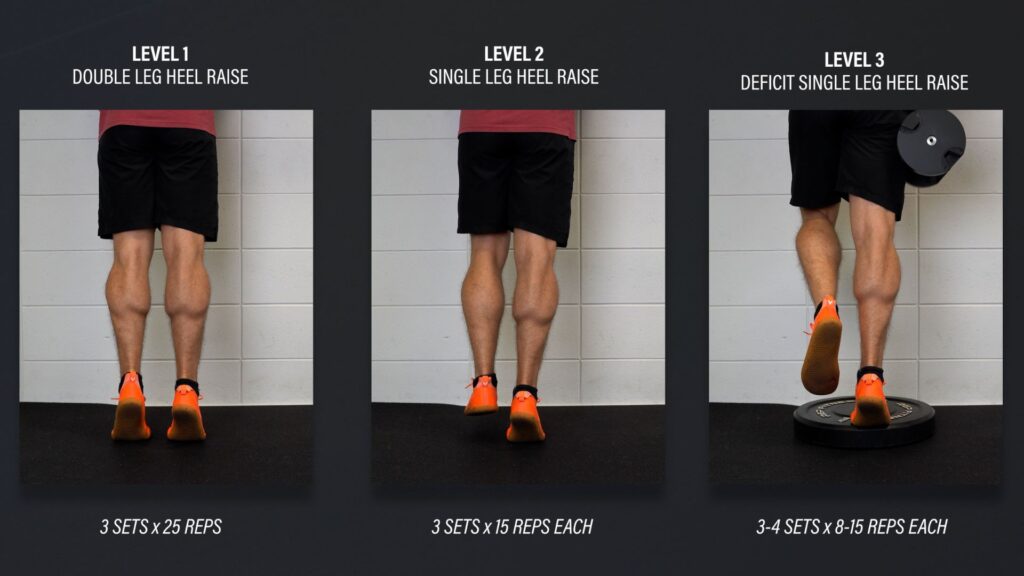
Heel Raise Progression
For the heel raise progression, you want to keep even pressure on the ball of your foot so that you aren’t rolling off the base of the big toe or little toe.
Level 1 – Double Leg Heel Raises on Flat Ground. Aim for 3 sets of 25 slow and controlled reps. Use your hands for balance as needed.
Level 2 – Single Leg Heel Raises on Flat Ground. Aim for 3 sets of 15 reps.
Level 3 – Single Leg Heel Raises on a Step. Aim for 3-4 sets of 8-15 reps. Over time, you can add weight as needed.
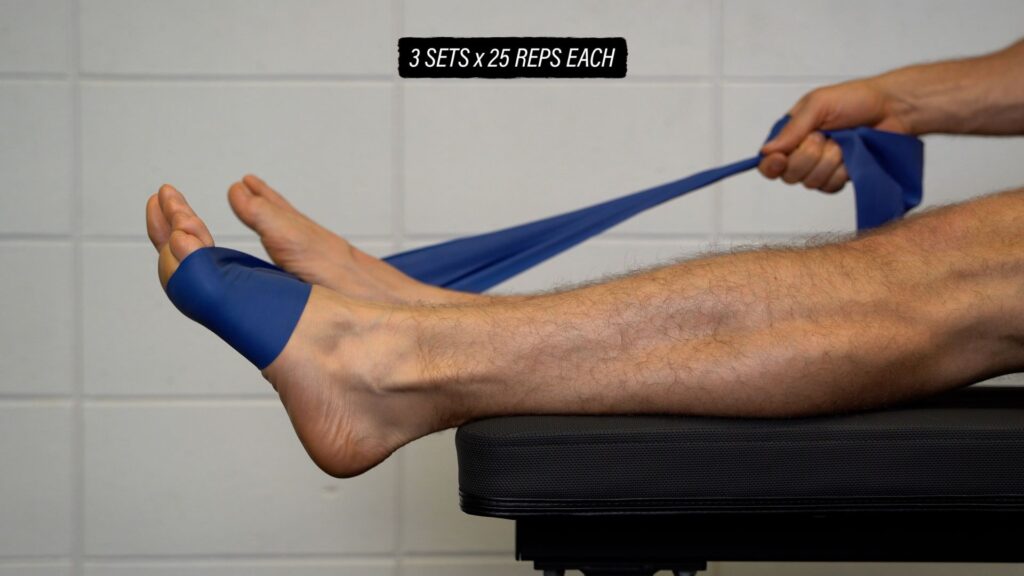
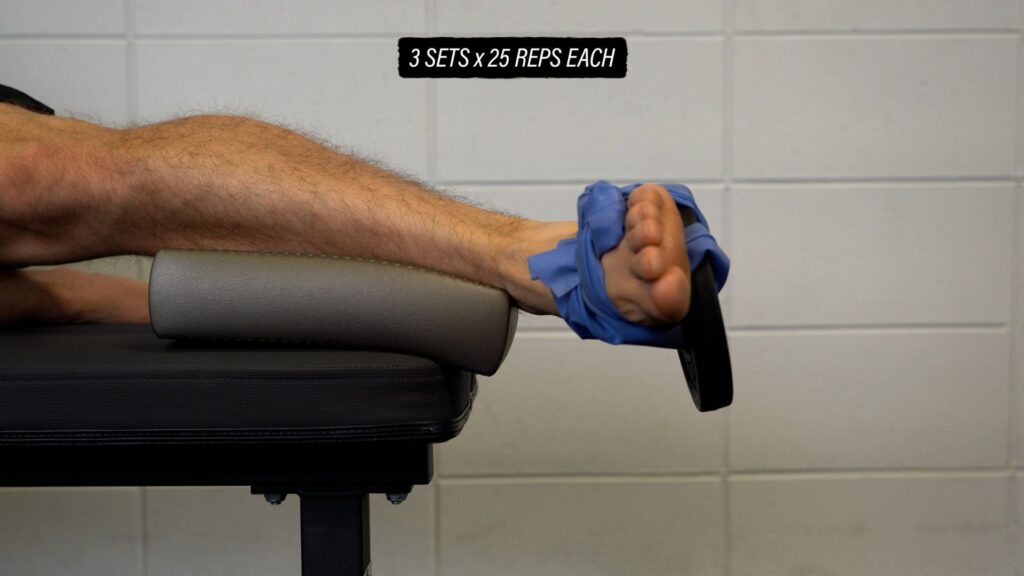
Ankle Eversion
For ankle eversion, you can use a band or a weight attached to your foot in side lying.
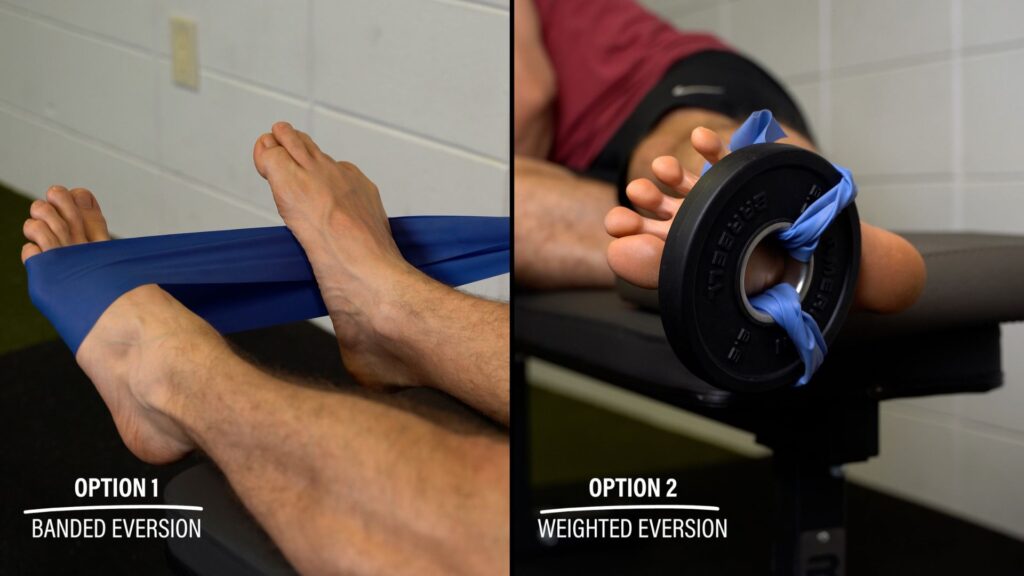
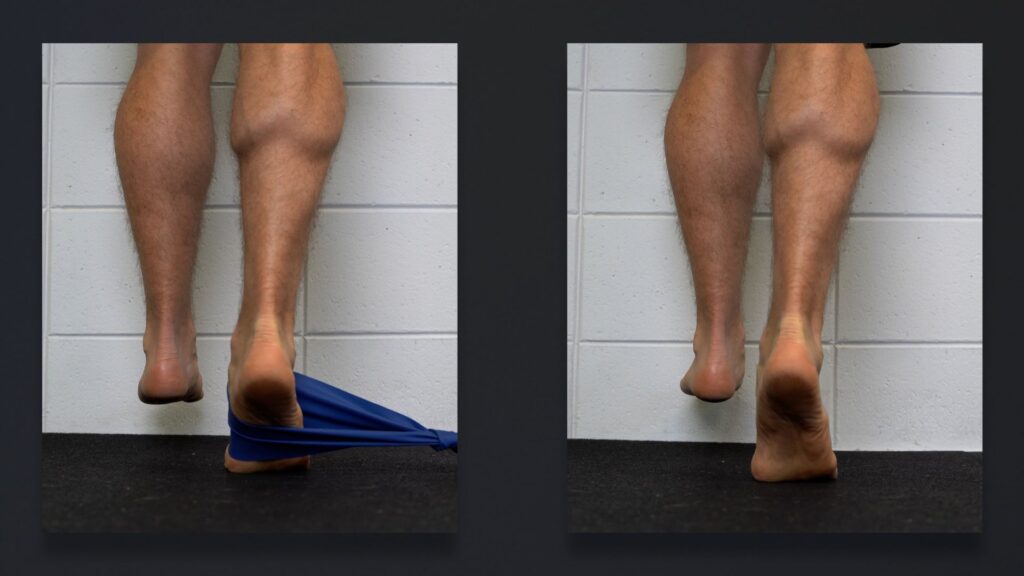
Let’s walk through the set up for ankle eversion on the left leg. Wrap a resistance band around the end of your left foot, bring it across the bottom of your right foot, and hold it firmly with your right hand. Your left hand is going to ensure that you don’t compensate by performing external rotation of the hip as opposed to eversion of the ankle, which involves moving your foot outward. Work up to 3 sets of 25 reps using the most challenging resistance band you can find.
The other option is to lie on your side with your top leg hanging off the bed, bench, or table. Without rotating your hip, bring the outer part of your foot up toward the ceiling, slowly lower down, and repeat. Add an ankle weight if needed and aim for 3 sets of 25 reps.
More complex exercises, like a single leg heel raise with a band pulling outward on the midfoot, are often suggested to simultaneously train the plantar flexion and pronation/eversion actions of the peroneals. Rehab can always get as creative as you want, but I think it’s important to master and progress the basics first.
Programming for Peroneal Tendinopathy Rehab
Before laying out a structured program for you, I want to mention 3 things:
- The exercise progressions are meant to serve as a framework/guideline rather than an individualized prescription for everyone watching this video. It’s important to tailor the exercises to your symptoms, function, and goals.
- The exercises should always be tolerable and not cause a flare-up of symptoms the following day. If they do cause a flare-up, it probably means that you did a little too much and need to scale back at the next session.
- If you intend to return to sport or higher level activities, you’ll need to include additional exercises to help get you there. Examples include hopping, jumping, and running progressions, more challenging single leg exercises that place your ankle in compromising positions, and just a gradual exposure to your desired activity.
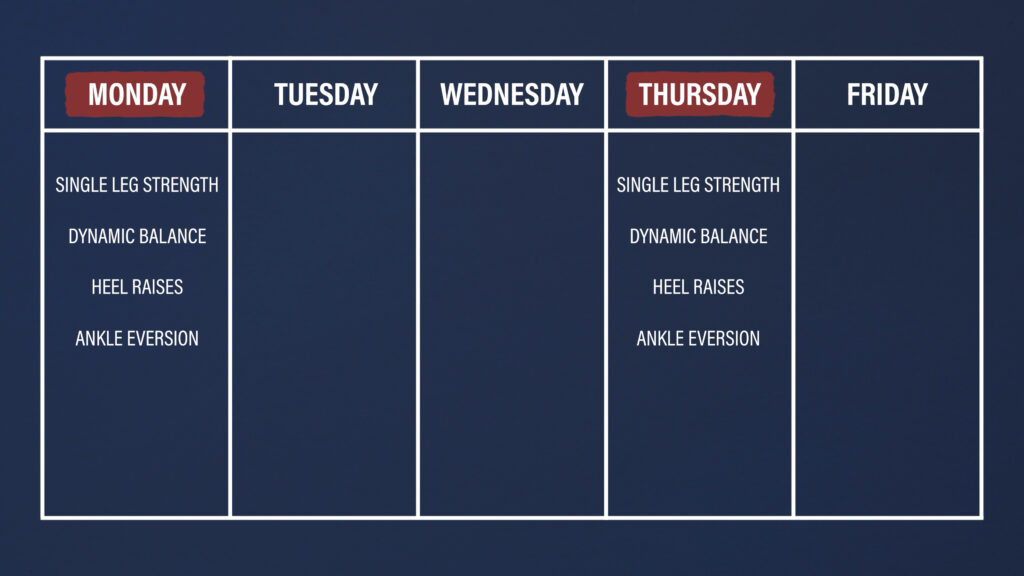
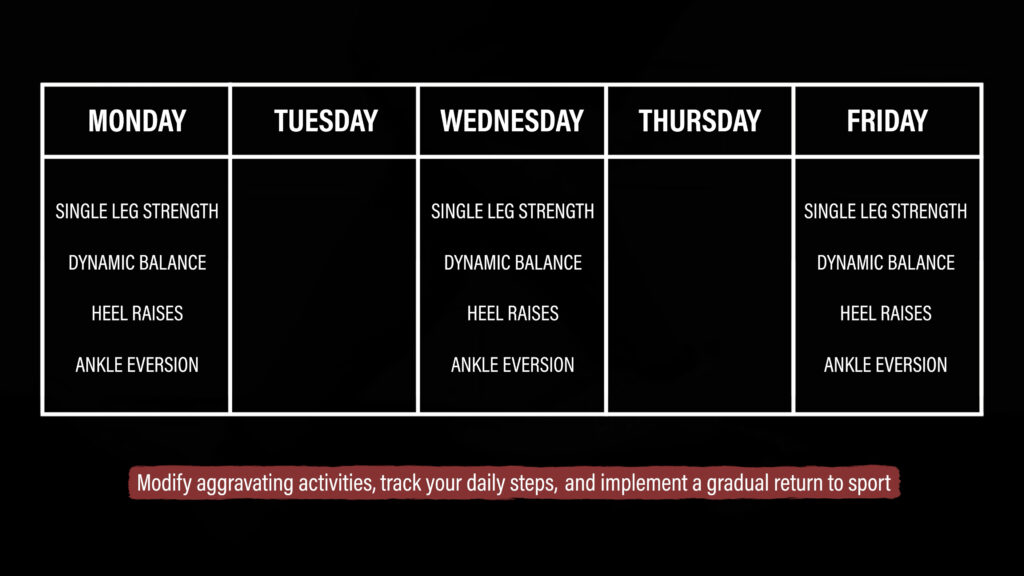
If you do perform the exercises outlined in this video, you’ll likely want to train at least 2 times per week with at least 2 days of rest between sessions. For example, you might go through this routine on Mondays and Thursdays.
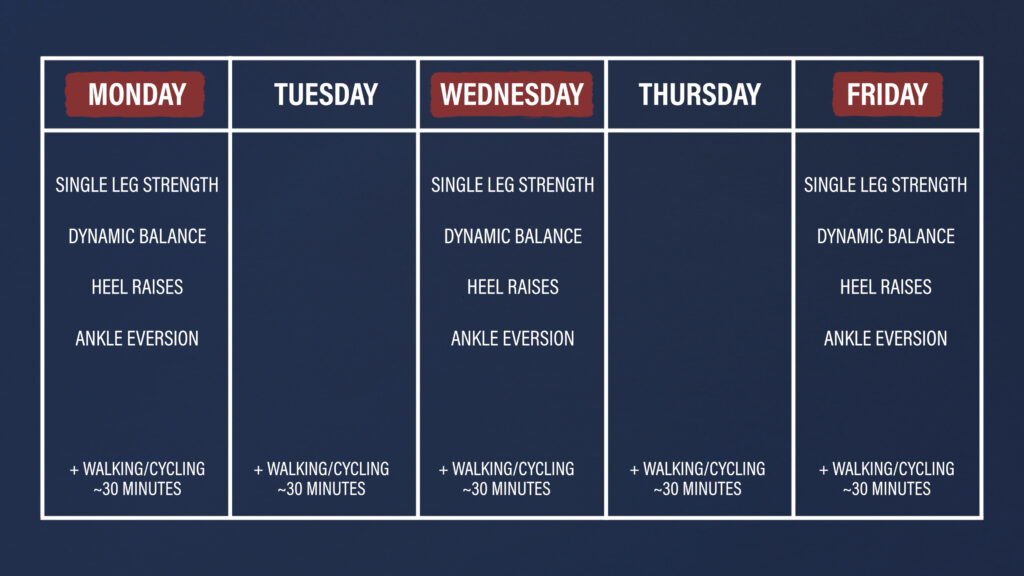
As your tolerance and function improve, you might add a third training day with the same exercises or other exercises that serve a similar purpose. In this example, you might implement the movements on Mondays, Wednesdays, and Fridays.
In either scenario, it’d be helpful to incorporate general physical activity, such as walking or cycling, for up to 30 minutes per day.
Activity Modifications for Peroneal Tendinopathy
As you manage symptoms associated with a peroneal tendon injury, it’s important to modify aggravating activities as needed. For example, if you’re a runner, you may need to lower the mileage, pace, or frequency of your runs. Additionally, it might be beneficial to focus on flat ground running initially rather than trail running or running on sloped/cambered surfaces.
If you have problems with walking and navigating your daily life, tracking your steps is crucial. It’ll help you determine your baseline level of function and tolerance, so that you can slowly improve both over time. Although it seems simple, walking can be a critical component of rehab.
Shoes & Foot Orthoses
What about shoes and orthotics? The main consideration is that you probably don’t want either forcing you into a supinated position, especially if you’ve had previous ankle sprains and perform activities that put you at risk for future ankle sprains. A podiatrist is someone you can consult to discuss this topic further.
Peroneal Tendinopathy Summary
In summary, peroneal tendon injuries can be generally categorized as traumatic or non-traumatic. Traumatic incidents that involve an acute peroneal tendon dislocation/subluxation, complete rupture of the tendon, or a fracture require immediate consultation with a medical doctor as surgery or immobilization may be warranted.
For most non-traumatic issues that are more chronic in nature, such as peroneal tendinopathy, non-operative management is recommended. Rehabilitation may include exercises that train the function of the peroneals, improve their tolerance to various stressors and positions, and increase the strength and range of motion of the feet, ankles, and legs in general. Exercise should be tolerable and performed 2-3x/week.
Additionally, it’s important to modify aggravating activities, track your daily steps, and implement a gradual return to sport or your desired activity.
This blog is meant to serve as a framework/guideline rather than an individualized prescription. It’s important to tailor the exercises to your symptoms, function, and goals, or seek the assistance of a qualified healthcare provider.