The purpose of this blog is to discuss how to assess and improve shoulder range of motion. This includes flexion, extension, external rotation, and internal rotation.
Do you want to improve the strength, range of motion, and control of your shoulders? Check out our Shoulder Resilience Program!
Shoulder Movements
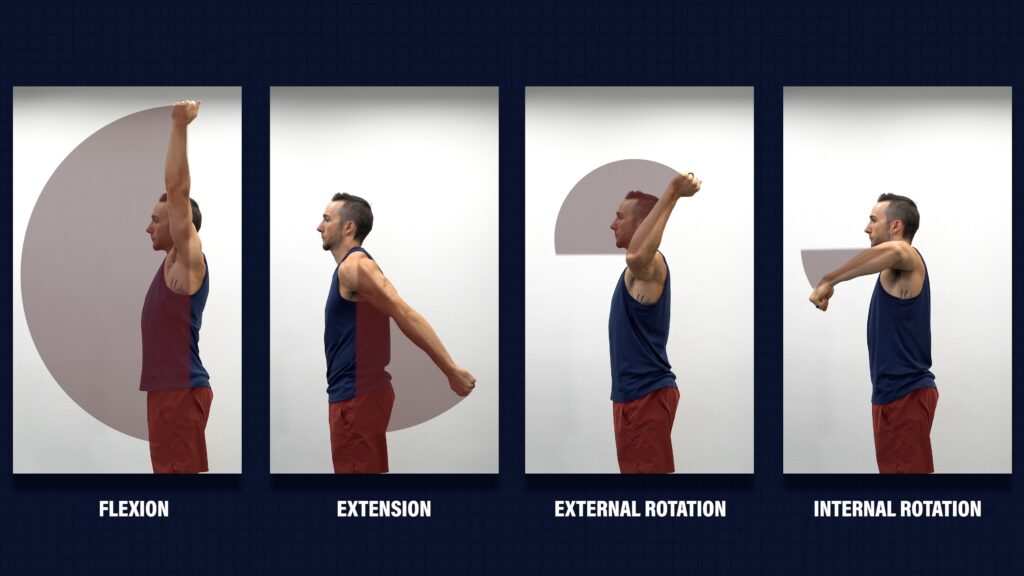
The primary shoulder movements you might want to address are flexion, extension, external rotation, and internal rotation.
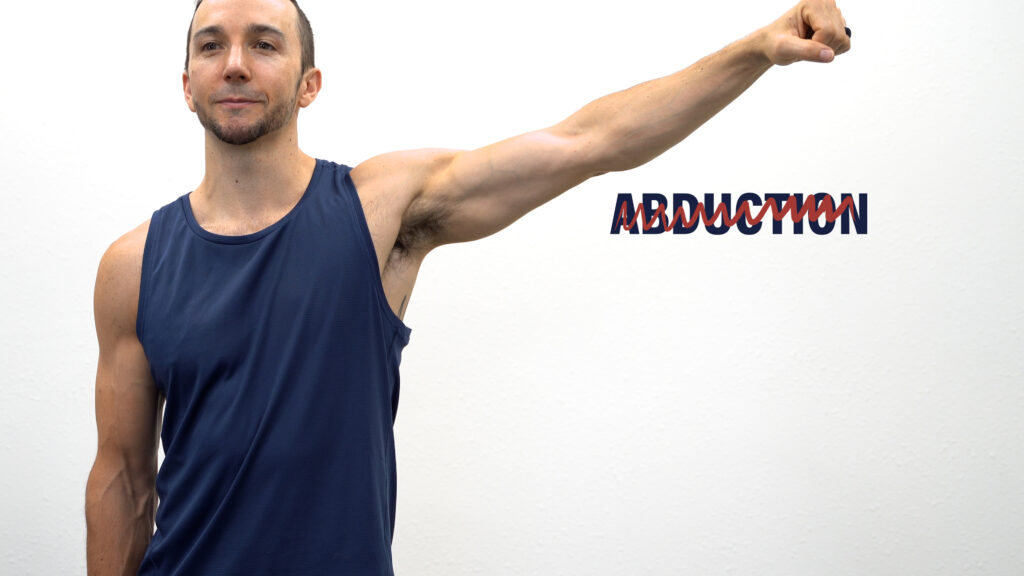
Although your shoulder also moves through abduction, it is unlikely you need to specifically focus on it, since it will likely improve when performing exercises in the other directions.
How Much Shoulder Range of Motion Do You Need?
In terms of how much range of motion you need, a quick Google search online will usually return values similar to the ones shown below.
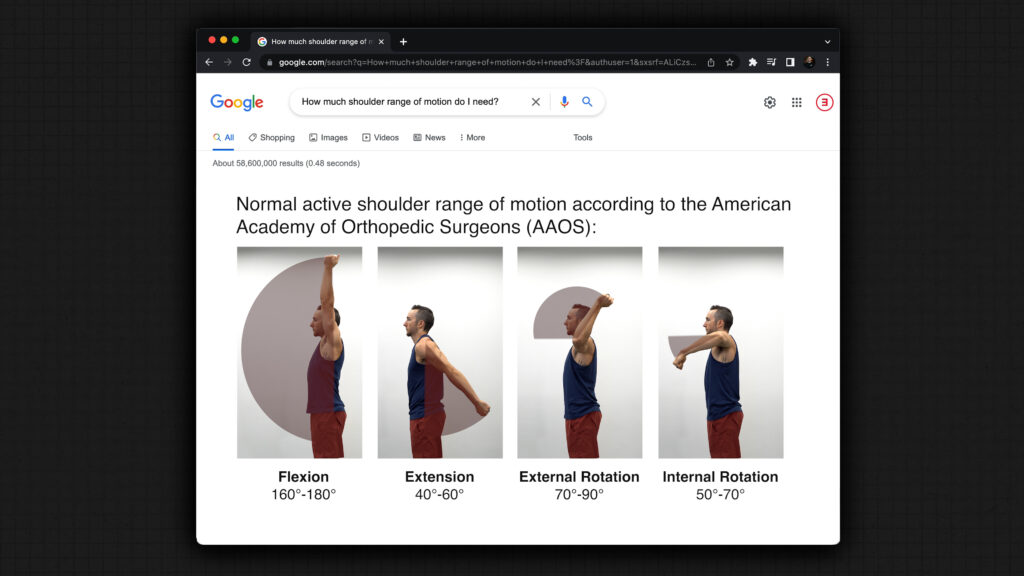
However, these numbers are rather arbitrary. How much you need for each direction is going to be different from that of your friend or family member.
For example, if you are a competitive weightlifter, you are going to need more flexion and external rotation than someone that only wants to perform household tasks. Or, if you want to return to practicing yoga, you will likely need more shoulder movement for various poses than someone that does not do this activity.
Furthermore, these values may not accurately reflect your case. You may end up with less or more motion, depending on your training history, injury, surgery, etc.
So what should you do?
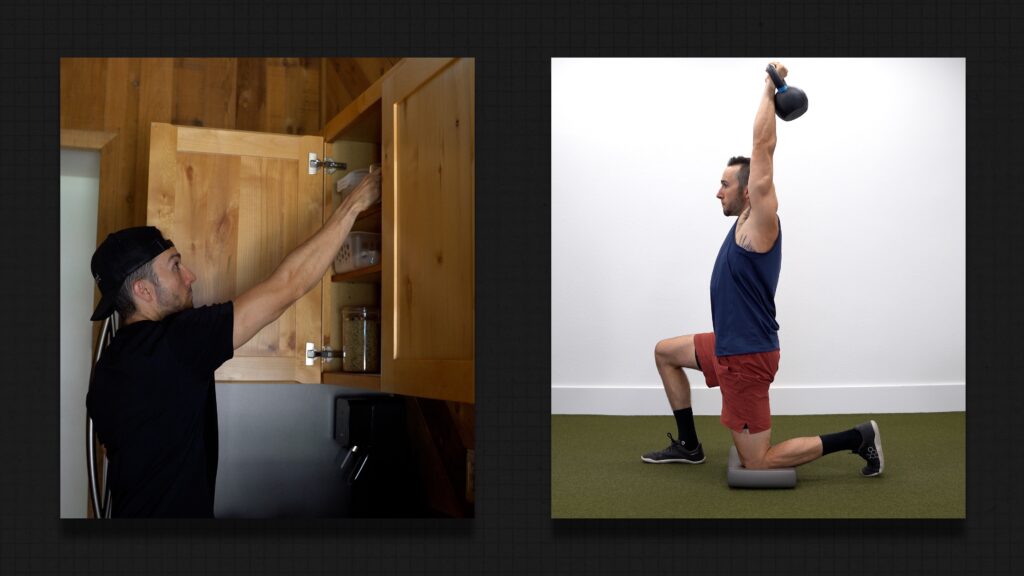
One option is to strive for the same or close to the same amount as your other shoulder. If you had surgery on both sides or your other shoulder is not a good reference due to a prior injury, then you can use the values mentioned previously as a reference. However, it is probably more realistic to work toward what you need for your desired activities or hobbies. Are you simply looking to perform day to day activities with ease, like reaching in a higher cabinet? Or do you want to go to the gym and press weights overhead?
How Do You Assess Your Shoulder Range of Motion?
For individuals, it may be helpful to assess your active shoulder range of motion, assuming you don’t have any pain or precautions against these movements.
For these, all you will need is a phone or camera to record yourself.
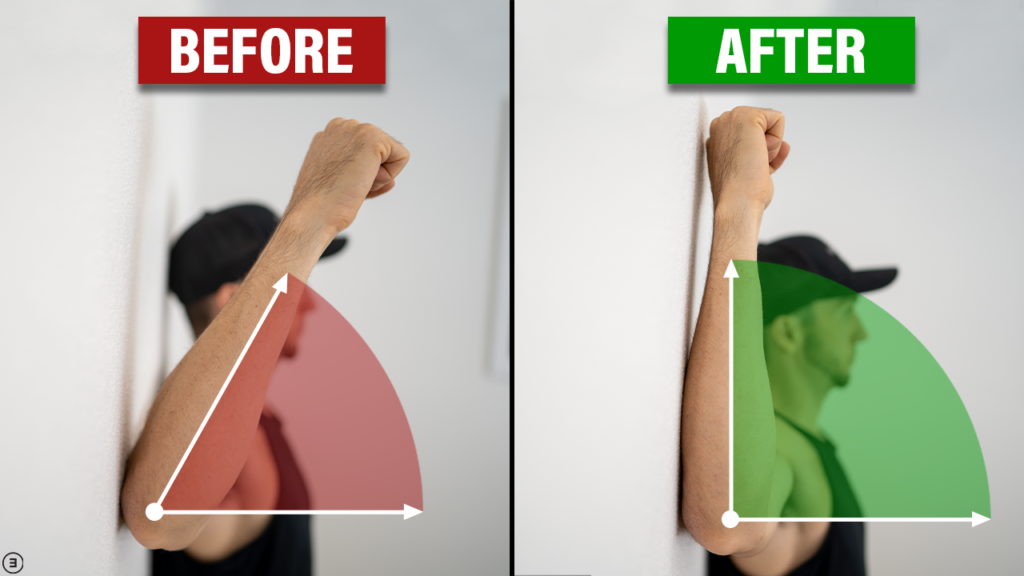
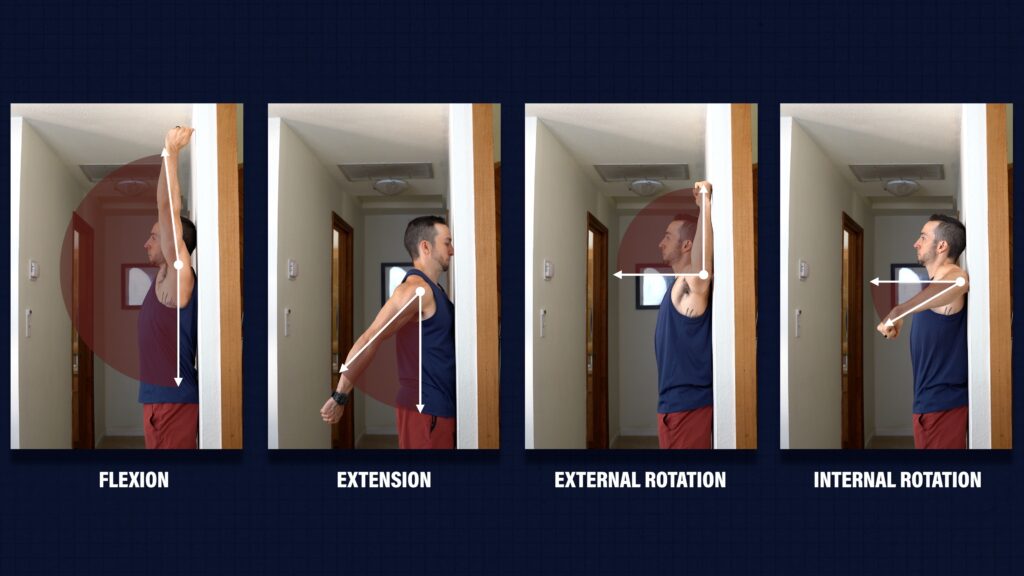
Flexion – Stand tall with your back against a wall and lift your arm in front of you as high as you can, keeping your elbow straight. Measure the angle formed between your torso and upper arm.
Extension – Turn around so your chest and nose are touching the wall, and then reach your arm behind you as far as comfortable. Measure the angle formed between your torso and upper arm.
External and Internal Rotation – Stand with your back against the wall and upper arm at 90° or parallel to the ground. Rotate your arm back for external rotation, and rotate your arm forward for internal rotation. Measure the angle formed between a line parallel to the ground and your forearm.
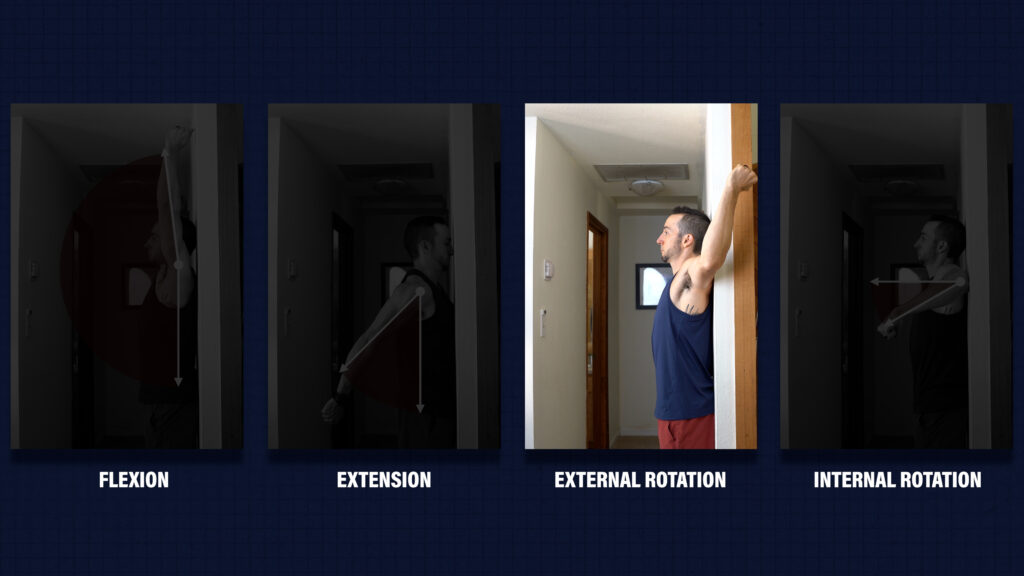
If your sport or activity requires external rotation beyond 90°, you can alternatively perform the self-assessment on a squat rack or door frame.
Write these numbers down, then periodically reassess your range of motion every 4-6 weeks. That way you can objectively measure your progress overtime.
Exercises for Improving Shoulder Range of Motion
For the exercises, I am going to present at least one progression for each shoulder direction, as well as an additional category that can help maximize your shoulder range of motion.
Category 1: Shoulder Flexion
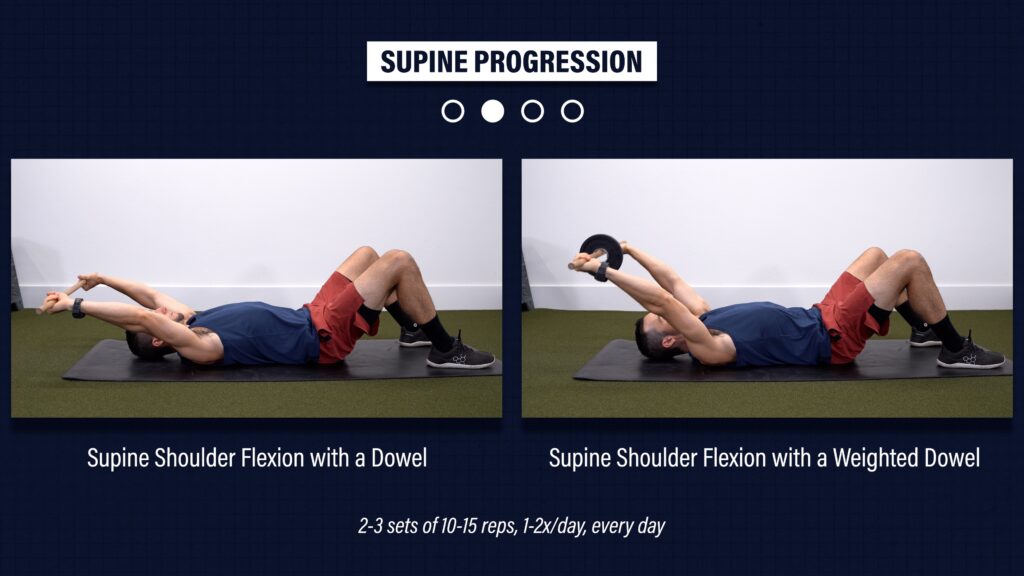
Supine Progression
Level 1 – Supine Shoulder Flexion with a Dowel. Hold a dowel or stick with both hands up toward the ceiling. Slowly move your arms overhead as far as comfortable. Use as much as assistance from the uninvolved side as needed.
Level 2 – Supine Shoulder Flexion with a Weighted Dowel. Add a light weight to help move the shoulder further overhead.
For these, aim for 2-3 sets of 10-15 repetitions, 1-2x a day, everyday, or within tolerance.
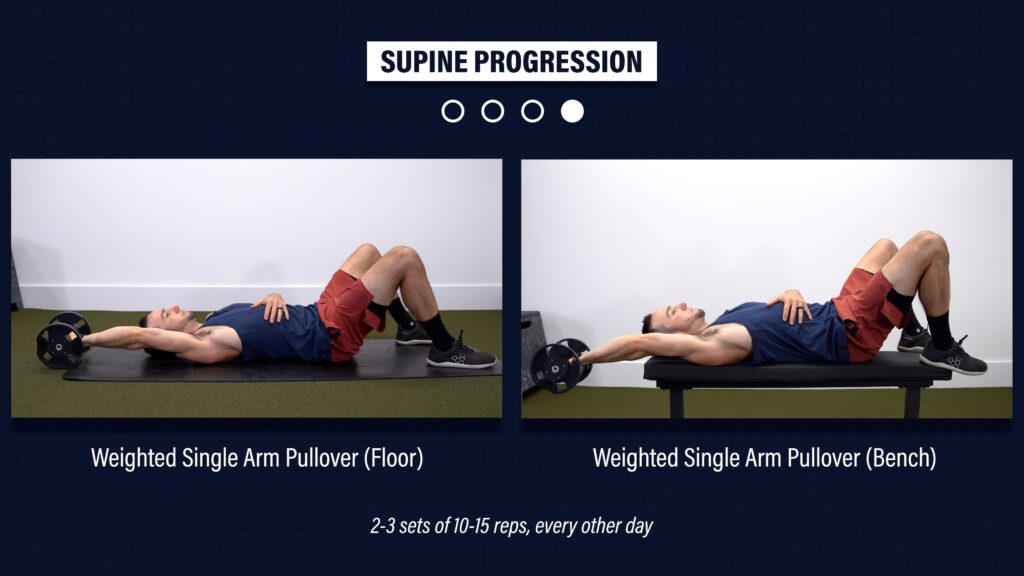
Level 3 – Weighted Single Arm Pullover from the Floor. Bend your knees, keep your back flat to the ground, and slowly pull a weight overhead. Once you are able to consistently reach the weight to the floor, progress to level 4.
Level 4 – Weighted Single Arm Pullover on a Bench. Same movement, but now lie on an elevated surface to increase the amount of shoulder flexion you move through.
For levels 3 and 4, aim for 2-3 sets of 10-15 repetitions, every other day.
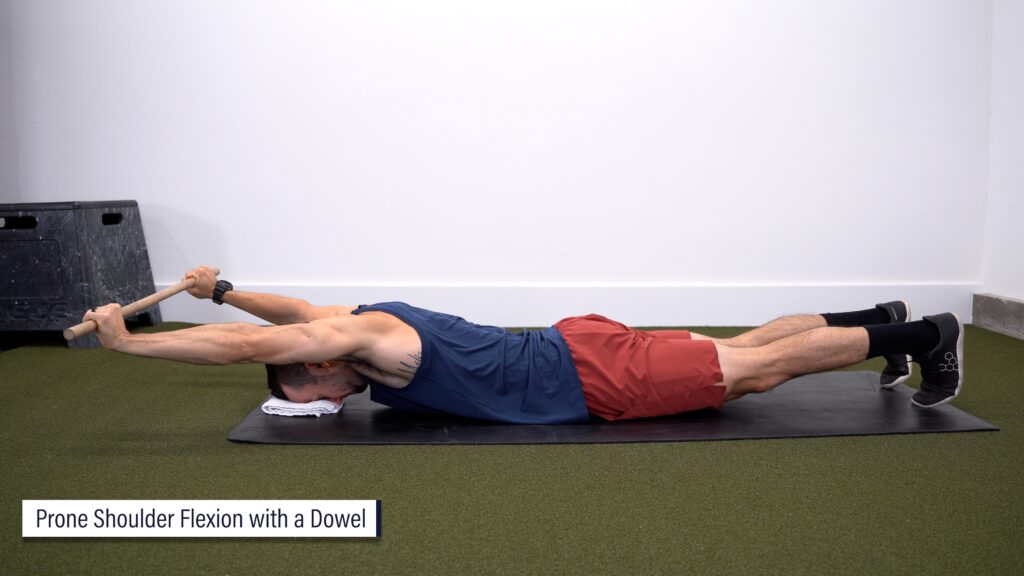
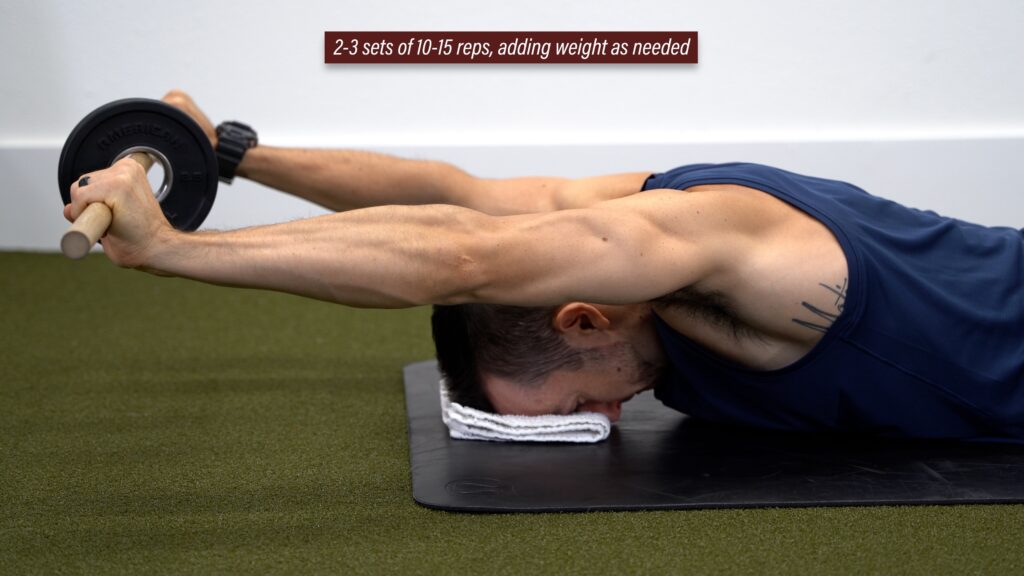
Once you make it to level 4, you can add prone shoulder flexion with a dowel. This will help build strength and control at your end ranges. Your goal is to lift the dowel or stick as high as you can, keeping elbows straight. Hold the top for 2-3 seconds and then slowly lower back down. Perform for 2-3 sets of 10-15 repetitions, and overtime, you can add weight if needed.
Additional Options
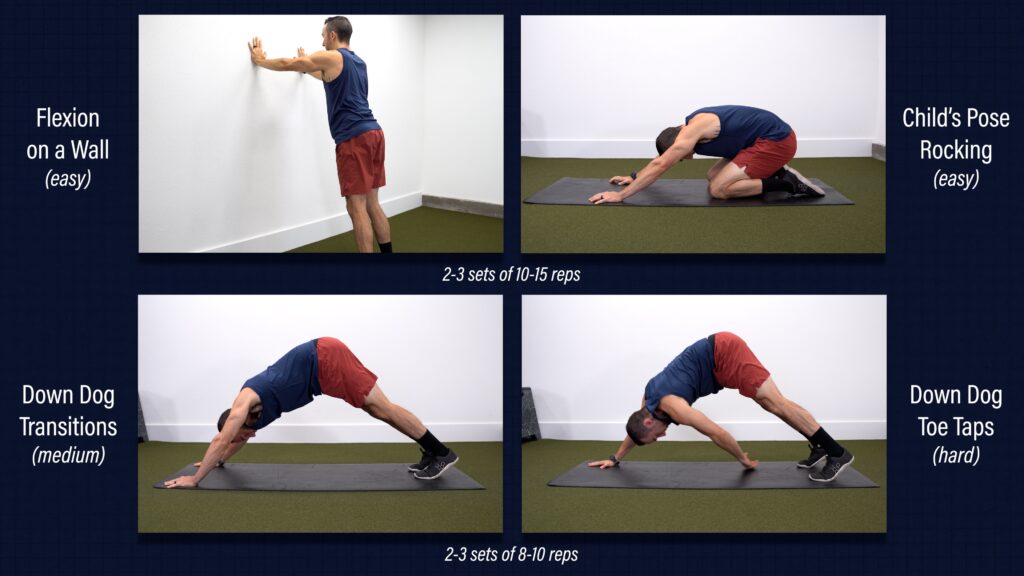
Other options include shoulder flexion on a wall, child’s pose rocking, down dog transitions, and the most advanced of the four, down dog toe taps. For all of these, keep your elbows straight as you move through as much shoulder flexion as tolerated. Perform 2-3 sets of 10-15 reps for the first two, and 2-3 sets of 8-10 reps for the down dog variations.
Category 2: Shoulder Extension
Progression #1
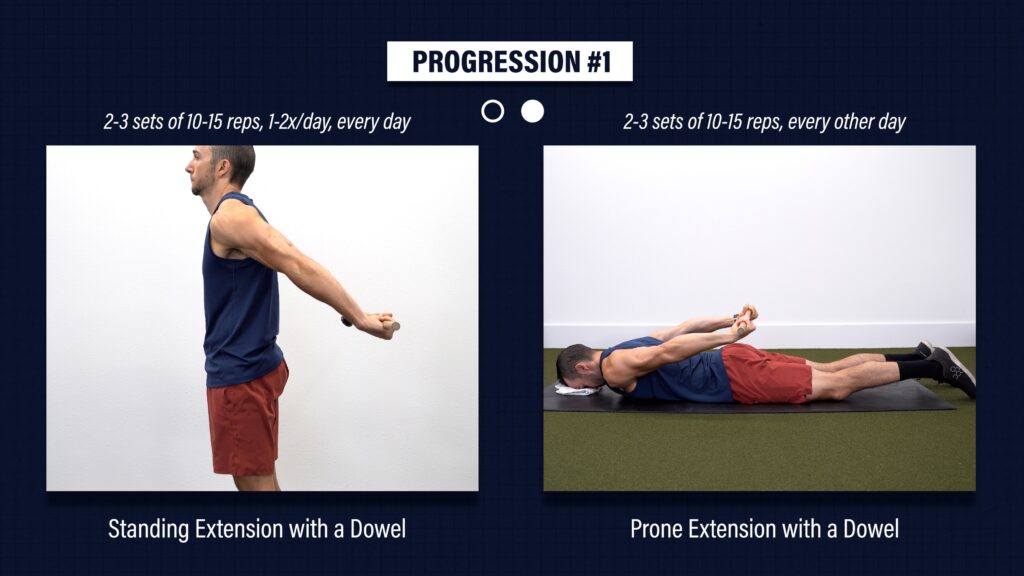
Level 1 – Standing Extension with a Dowel. Start with a stick or dowel on your butt or low back, and reach behind you as far as you can. You want to keep your elbows straight and torso tall throughout each rep. You can have palms facing in either direction. Aim for 2-3 sets of 10-15 repetitions, 1-2x a day, everyday.
Level 2 – Prone Extension with a Dowel. Lie on your stomach and perform the same movement, but now reaching your arms up toward the ceiling. Perform for 2-3 sets of 10-15 repetitions, every other day. Add weight to the dowel if you want to make it more challenging.
Progression #2 (Advanced)
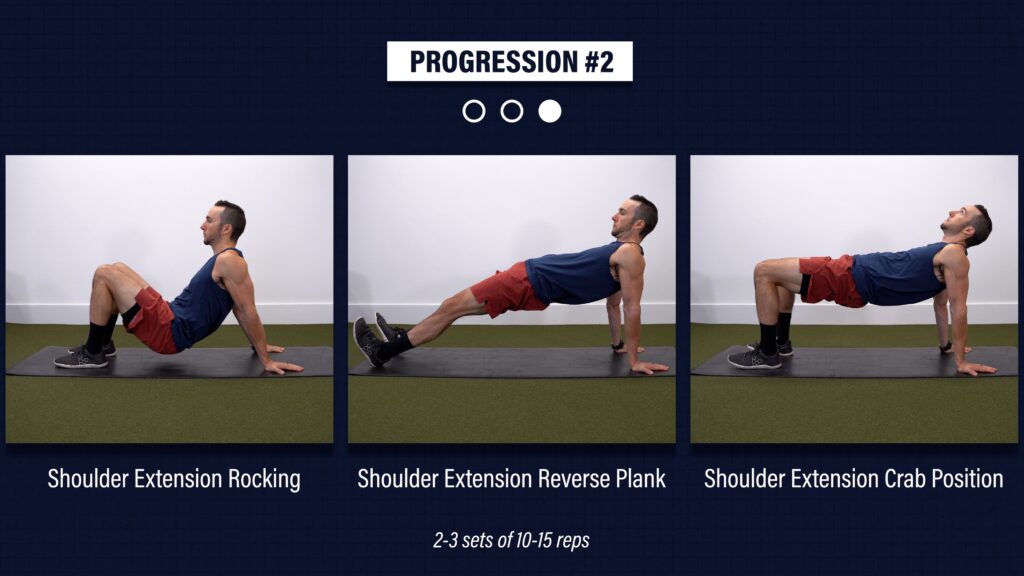
Level 1 – Shoulder Extension Rocking. Sit on the ground with your hands behind you. Lift your butt slightly off the ground and rock it toward your feet, moving your shoulder into extension.
Level 2 – Shoulder Extension Reverse Plank. Straighten your legs, and lift your butt as high as you can. Lower back down and repeat.
Level 3 – Shoulder Extension Crab Position. Bend your legs again, but now lift your butt up as high off the ground as you can.
For all levels, you can point your hands in whatever position is most comfortable and perform for 2-3 sets of 10-15 repetitions.
Category 3: Shoulder External Rotation
Progression #1
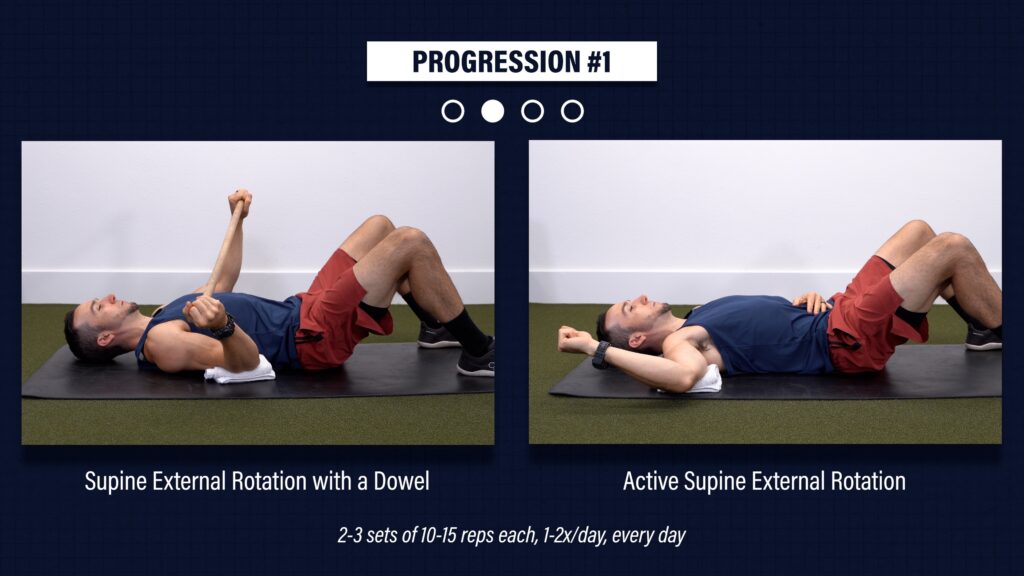
Level 1 – Supine External Rotation with a Dowel. Place the involved shoulder at your side, supported on a towel, and your elbow bent to 90°. Holding a stick or dowel, use the non involved side to move your shoulder in and out of external rotation. Use as much as assistance from the uninvolved side as needed.
Level 2 – Active Supine External Rotation. Same set up but now actively rotate your arm outward. As your motion improves, perform the same movement but with your arm further away from your body, working up to about 90°.
For levels 1 and 2, aim for 2-3 sets of 10-15 repetitions, 1-2x a day, everyday, or within tolerance.
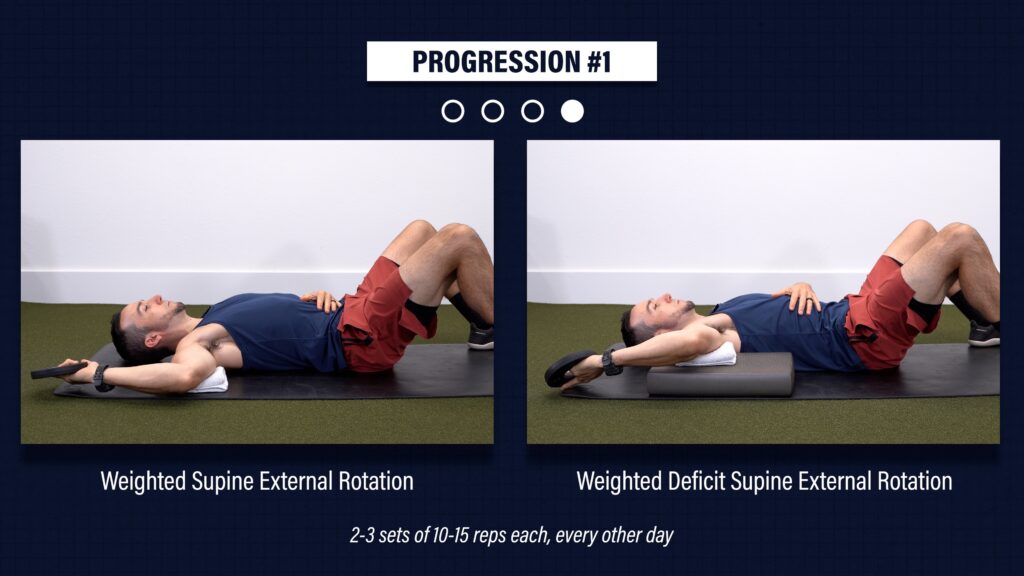
Level 3 – Weighted Supine External Rotation. With your shoulder at about 90°, slowly lower a weight as far back as comfortable. If you need to, start with your arm in a lower position.
Level 4 – Deficit Weighted Supine External Rotation. Place your arm on an object 1-3 inches high so you can move through more range of motion.
For levels 3 and 4, aim for 2-3 sets of 10-15 repetitions, every other day, or as needed.
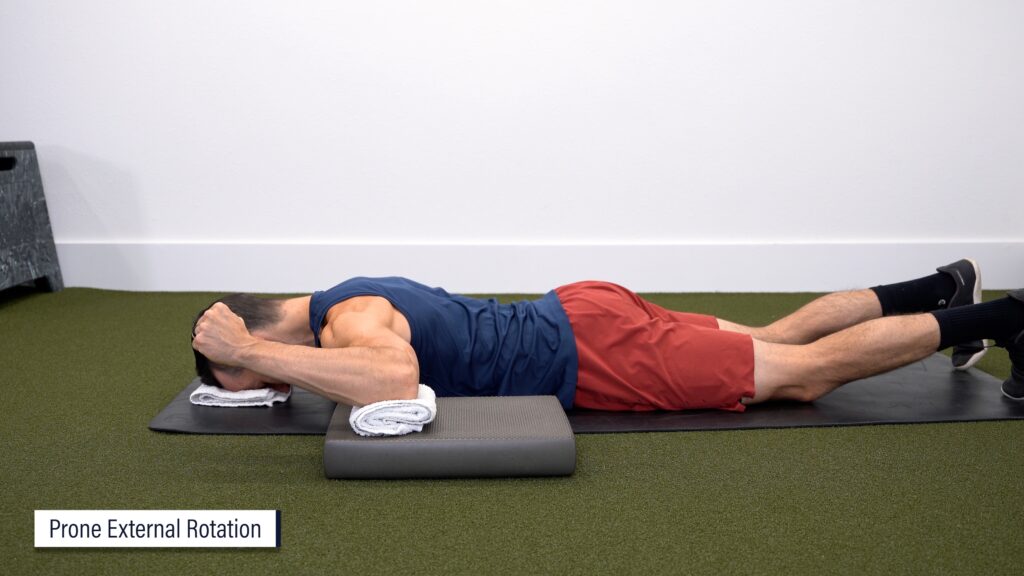
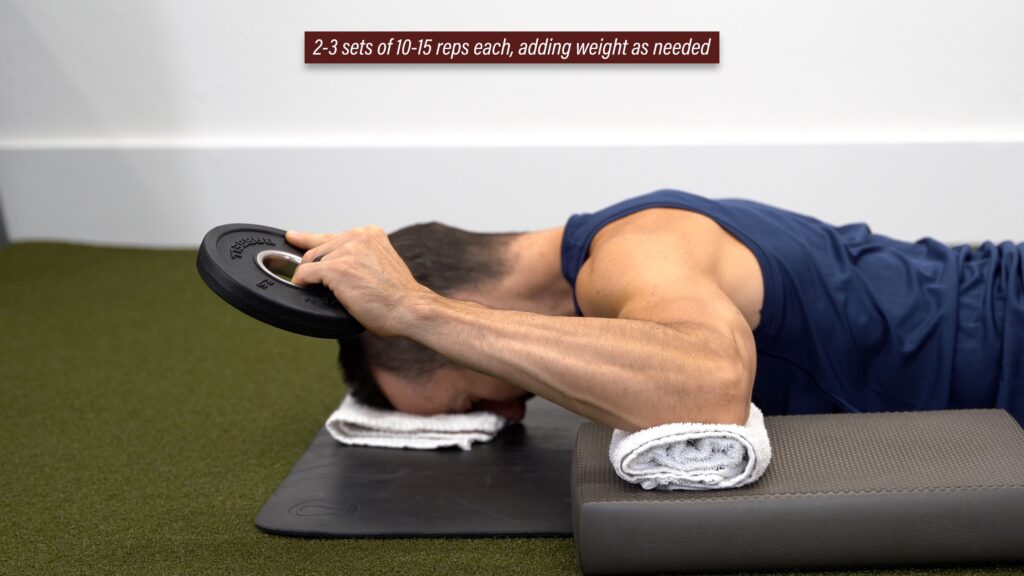
Once you progress to level 4, work on building strength and control by adding in prone external rotations. Lie on your stomach with your elbow and shoulder at 90°, and rotate your hand as high off the ground as possible. Hold the end position 2-3 seconds before lowering back down. Perform for 2-3 sets of 10-15 repetitions, and overtime, you can add weight if needed.
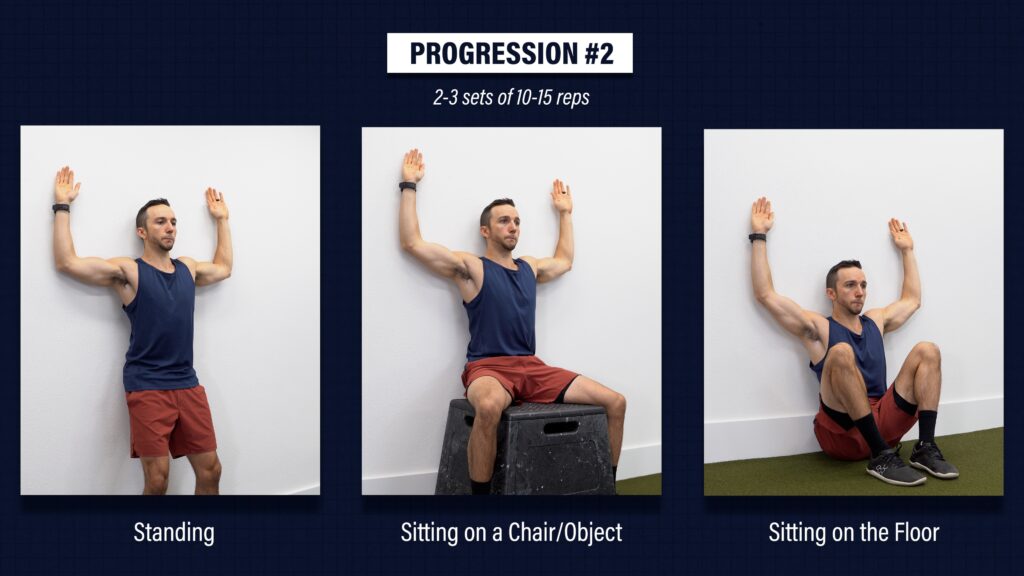
Progression #2 (Advanced)
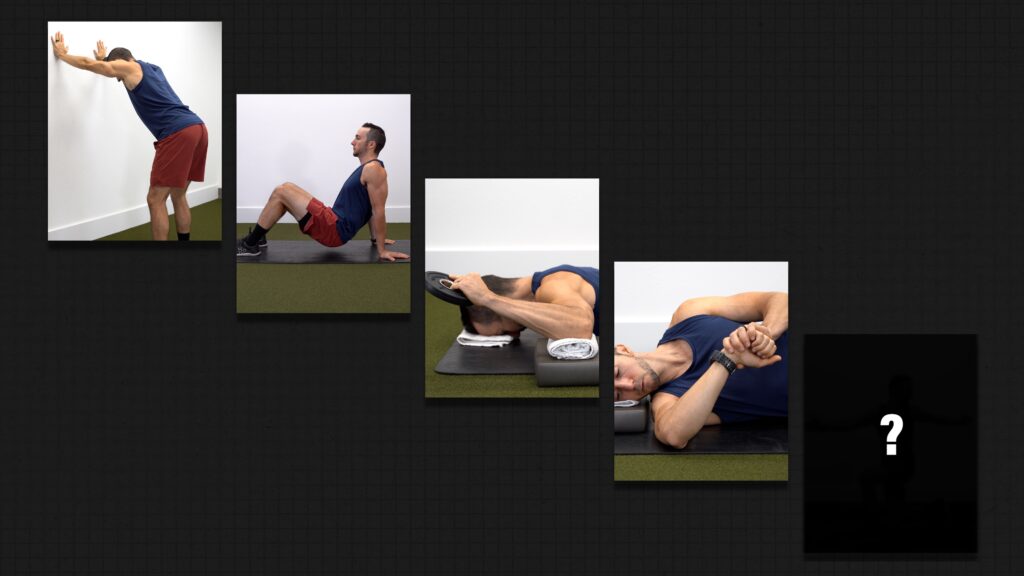
Once you gain more shoulder external rotation range of motion, you can try wall slides. Here is simple progression:
Start standing, then progress to sitting on a chair, and eventually to the floor with knees bent toward your chest. Your goal is to keep your low back, elbows, and wrists in contact with the wall as you slide up as high as tolerated. Move slowly and remember to breathe during the movement. Aim for 2-3 sets of 10-15 repetitions as you work through this progression
Category 4: Shoulder Internal Rotation
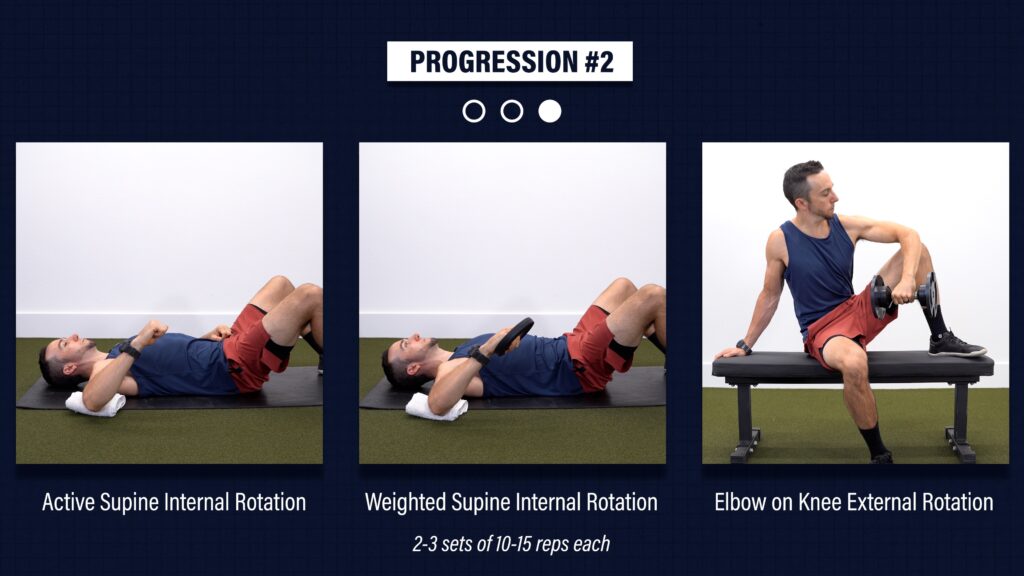
Internal Rotation Progression
Level 1 – Active Supine Internal Rotation. Lie on your back and actively rotate your arm toward your stomach keeping your elbow bent to 90°. As your motion improves, move your arm further away from your body, working up to about 90°.
Level 2 – Weighted Supine Internal Rotation. Hold a weight in your hand as you rotate in and out of internal rotation.
Level 3 – Elbow on Knee External Rotation. Sit with your elbow supported on your knee and slowly lower your arm before returning back to the start. In addition to improving shoulder internal rotation range of motion, this will also increase your external rotation strength.
For all levels, aim for 2-3 sets of 10-15 repetitions.
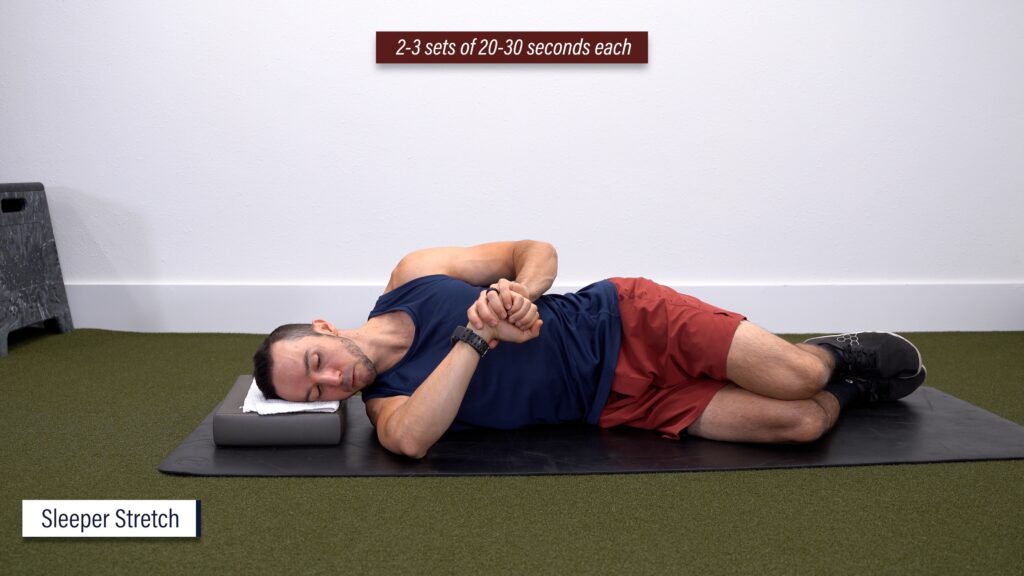
Additional Option
Another option is a sleeper stretch. Lie on your side with your head supported and shoulder and elbow at about 90°. Use your top hand to gently push your other hand down toward the floor. Hold this position for 2-3 sets of 20-30 seconds.
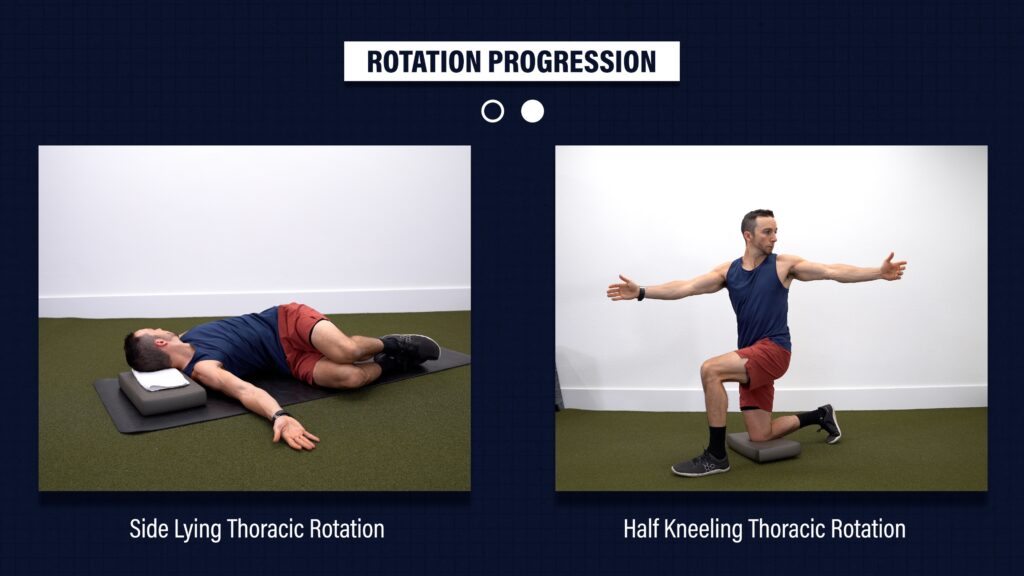
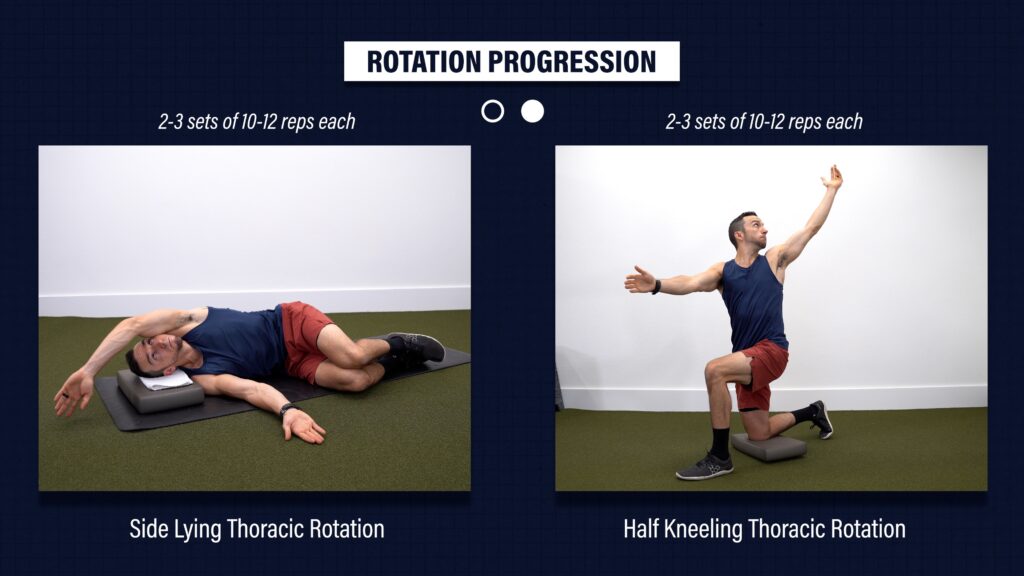
Category 5: Thoracic Spine Range of Motion
If time allows, these can be beneficial for maximizing your shoulder range of motion.
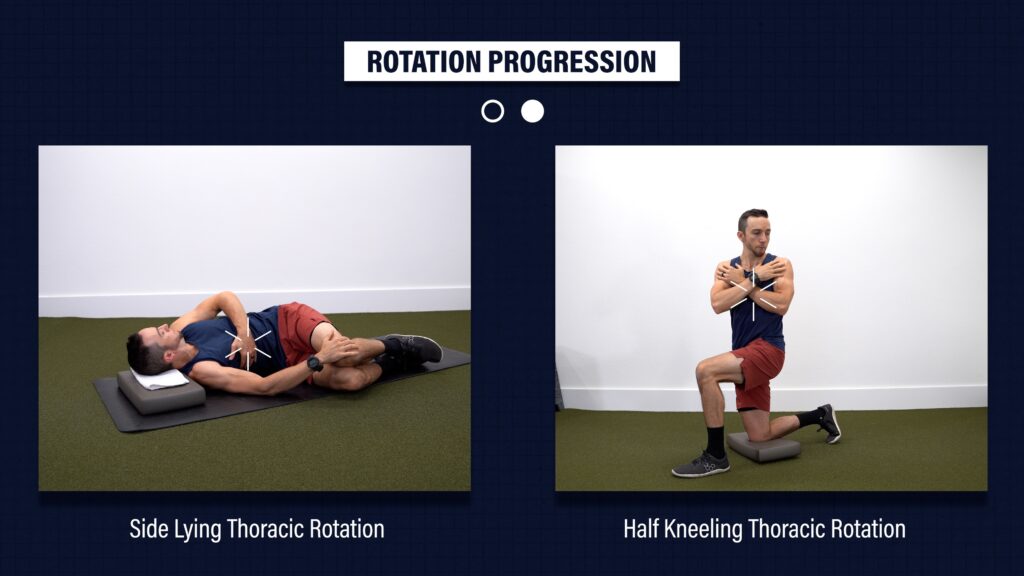
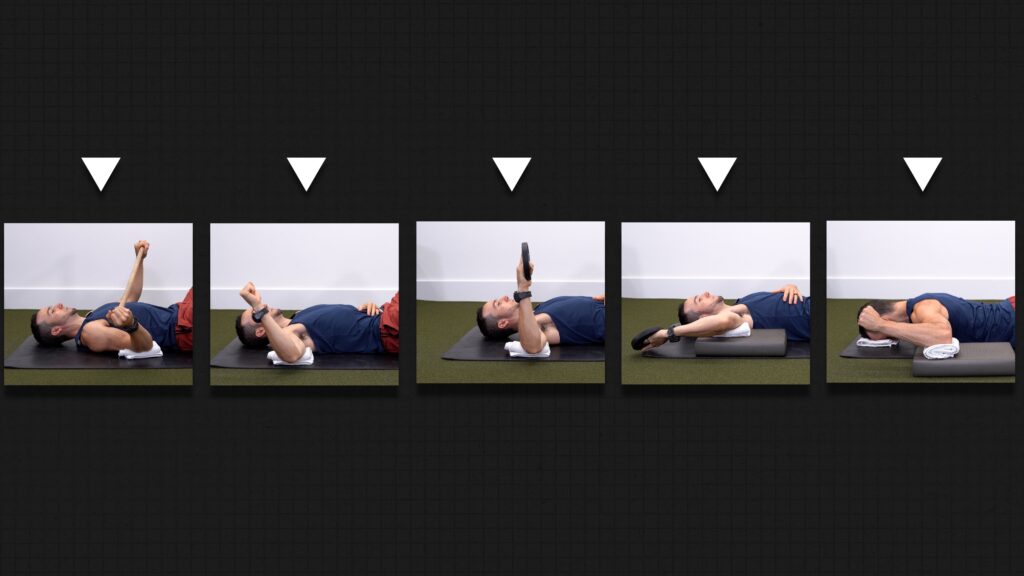
Level 1 – Side Lying Thoracic Rotation. Support your head and bend your hips and knees up toward your chest. Rotate your top arm toward the floor behind you.
Level 2 – Half Kneeling Thoracic Rotation. Set up in a half kneeling position and rotate over the “up” knee, twisting through your middle and upper back. Keep your arms straight as you rotate, reaching as far back as you can.
If this shoulder position is painful or your range of motion is limited, you can adjust either option by placing your arm across your chest.
If you want to make either of these more challenging, progress to a windmill. Make a half circle with the arm, as you rotate through your spine, before returning back to your start.
For either these, perform for 2-3 sets of 10-12 reps on each side, as needed.
Exercise Recommendations
When performing these exercises, I have 3 recommendations:
- You do not need to do all the exercises shown. You can choose one exercise for each direction or focus on the one range of motion you want to improve.
- Keep symptoms tolerable during exercise. It is okay to experience some discomfort, but you do not want the exercises to be unbearable.
- You should not have an increase in pain or discomfort the next day. If you do, decrease the number of sets, reps, frequency, or exercise difficulty the next session.
Additional Considerations
It is important to understand that when you can perform each level in a given category and how fast you move through the progression will vary case by case.
For example, following some surgeries, you might start with level 1 exercises, within a restricted range of motion, in order to protect the healing tissue. Then, over the course of weeks, you will progress to higher levels as tolerated.
On the other hand, if you are someone who experiences general shoulder stiffness from a chronic injury, you can probably perform any or all these exercises right away.
Disclaimer
These exercises are just some options that I have found to be helpful with a wide range of shoulder issues that present along a variable timeframe. What exercises you chose to perform, your timeline, and outcomes, may differ based on your goals, injury, surgery, symptoms, etc.
If you are older, had a shoulder replacement, and your main activity is playing in a weekly bocce ball league, you might only choose lower level exercises. Also, achieving significant amounts of shoulder range of motion may not be realistic or even necessary.
In contrast, if you are younger, had labral repair, and want to compete in Crossfit, you will want to incorporate more advanced options and eventually work toward restoring full shoulder movement.
Shoulder Range of Motion Summary
To summarize here are the 6 main takeaways:
- If you are looking to improve your shoulder range of motion, you should place an emphasis on exercises targeting flexion, extension, external rotation and internal rotation. Thoracic mobility is also a consideration.
- Your goal should be to aim for full range of motion, or very close to it. You can use values similar to the ones mentioned earlier in the blog. However, due to individual variance, other preferred options include using your other shoulder as a reference or working toward numbers based on what you need for your desired activities.
- If appropriate, self assess your range of motion by filming yourself. This will allow you to determine your baseline and objectively measure progress over time.
- Understand that each person will progress at different rates and exercise selection will vary based on the surgery, precautions, history, goals, and so on.
- Improving range of motion takes time. Focus on the quality of your movement, keep exercises tolerable, minimize symptoms the next day, and stay consistent.
- And finally, once again, before starting any exercise program, you should first consult with your doctor, surgeon, or physical therapist.