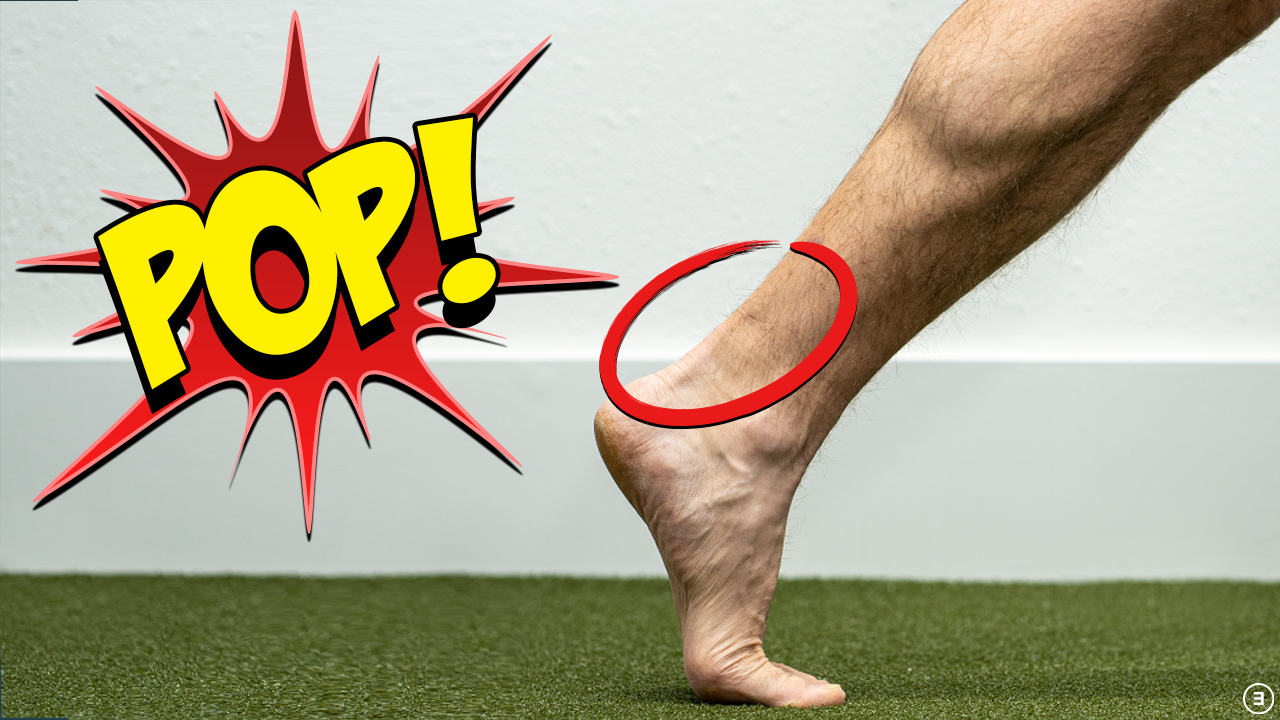

Whether you’ve had surgery after a fracture, you’re experiencing pain from repetitive overuse, or you’re struggling with weight bearing activities, this blog is going to teach you everything you need to know about rehab and training for wrist injuries.
Be sure to also check out our Wrist Resilience Program!
Wrist and Forearm Anatomy
Let’s start with some basic anatomy.
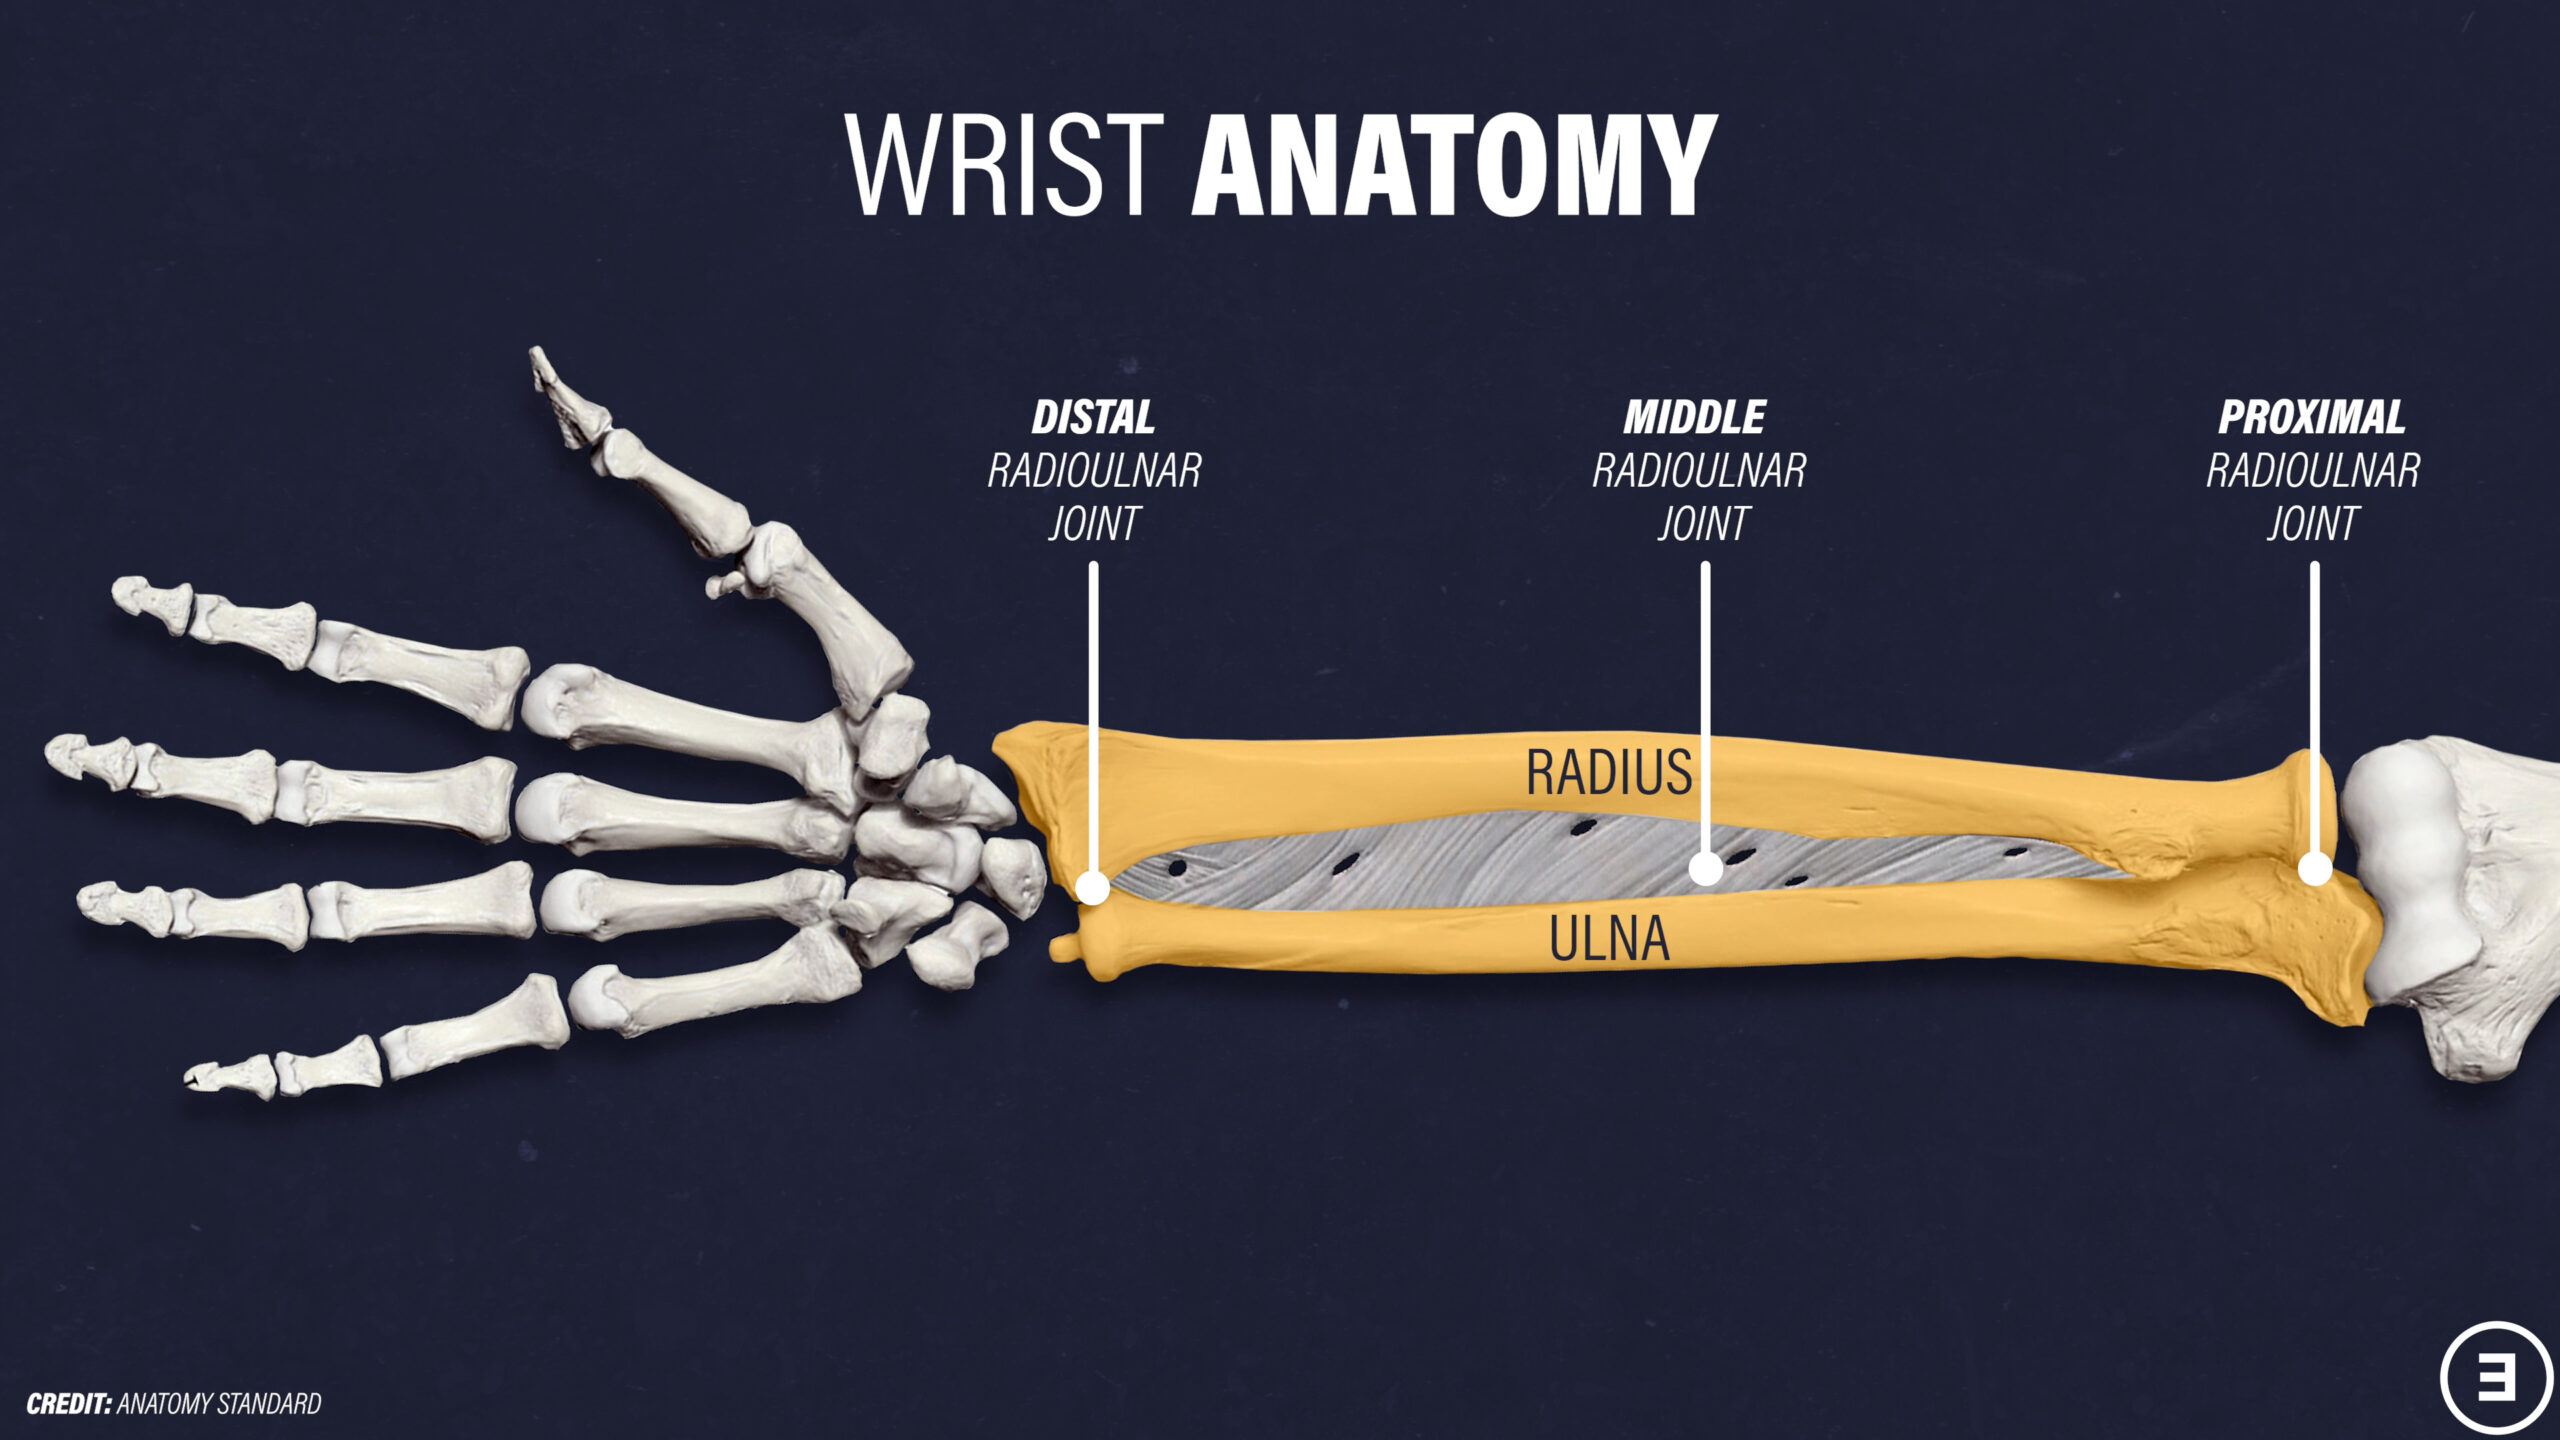
The forearm consists of two bones, known as the radius and ulna, which form three joints: the proximal (located near the elbow), middle, and distal (located near the wrist) radioulnar joints.
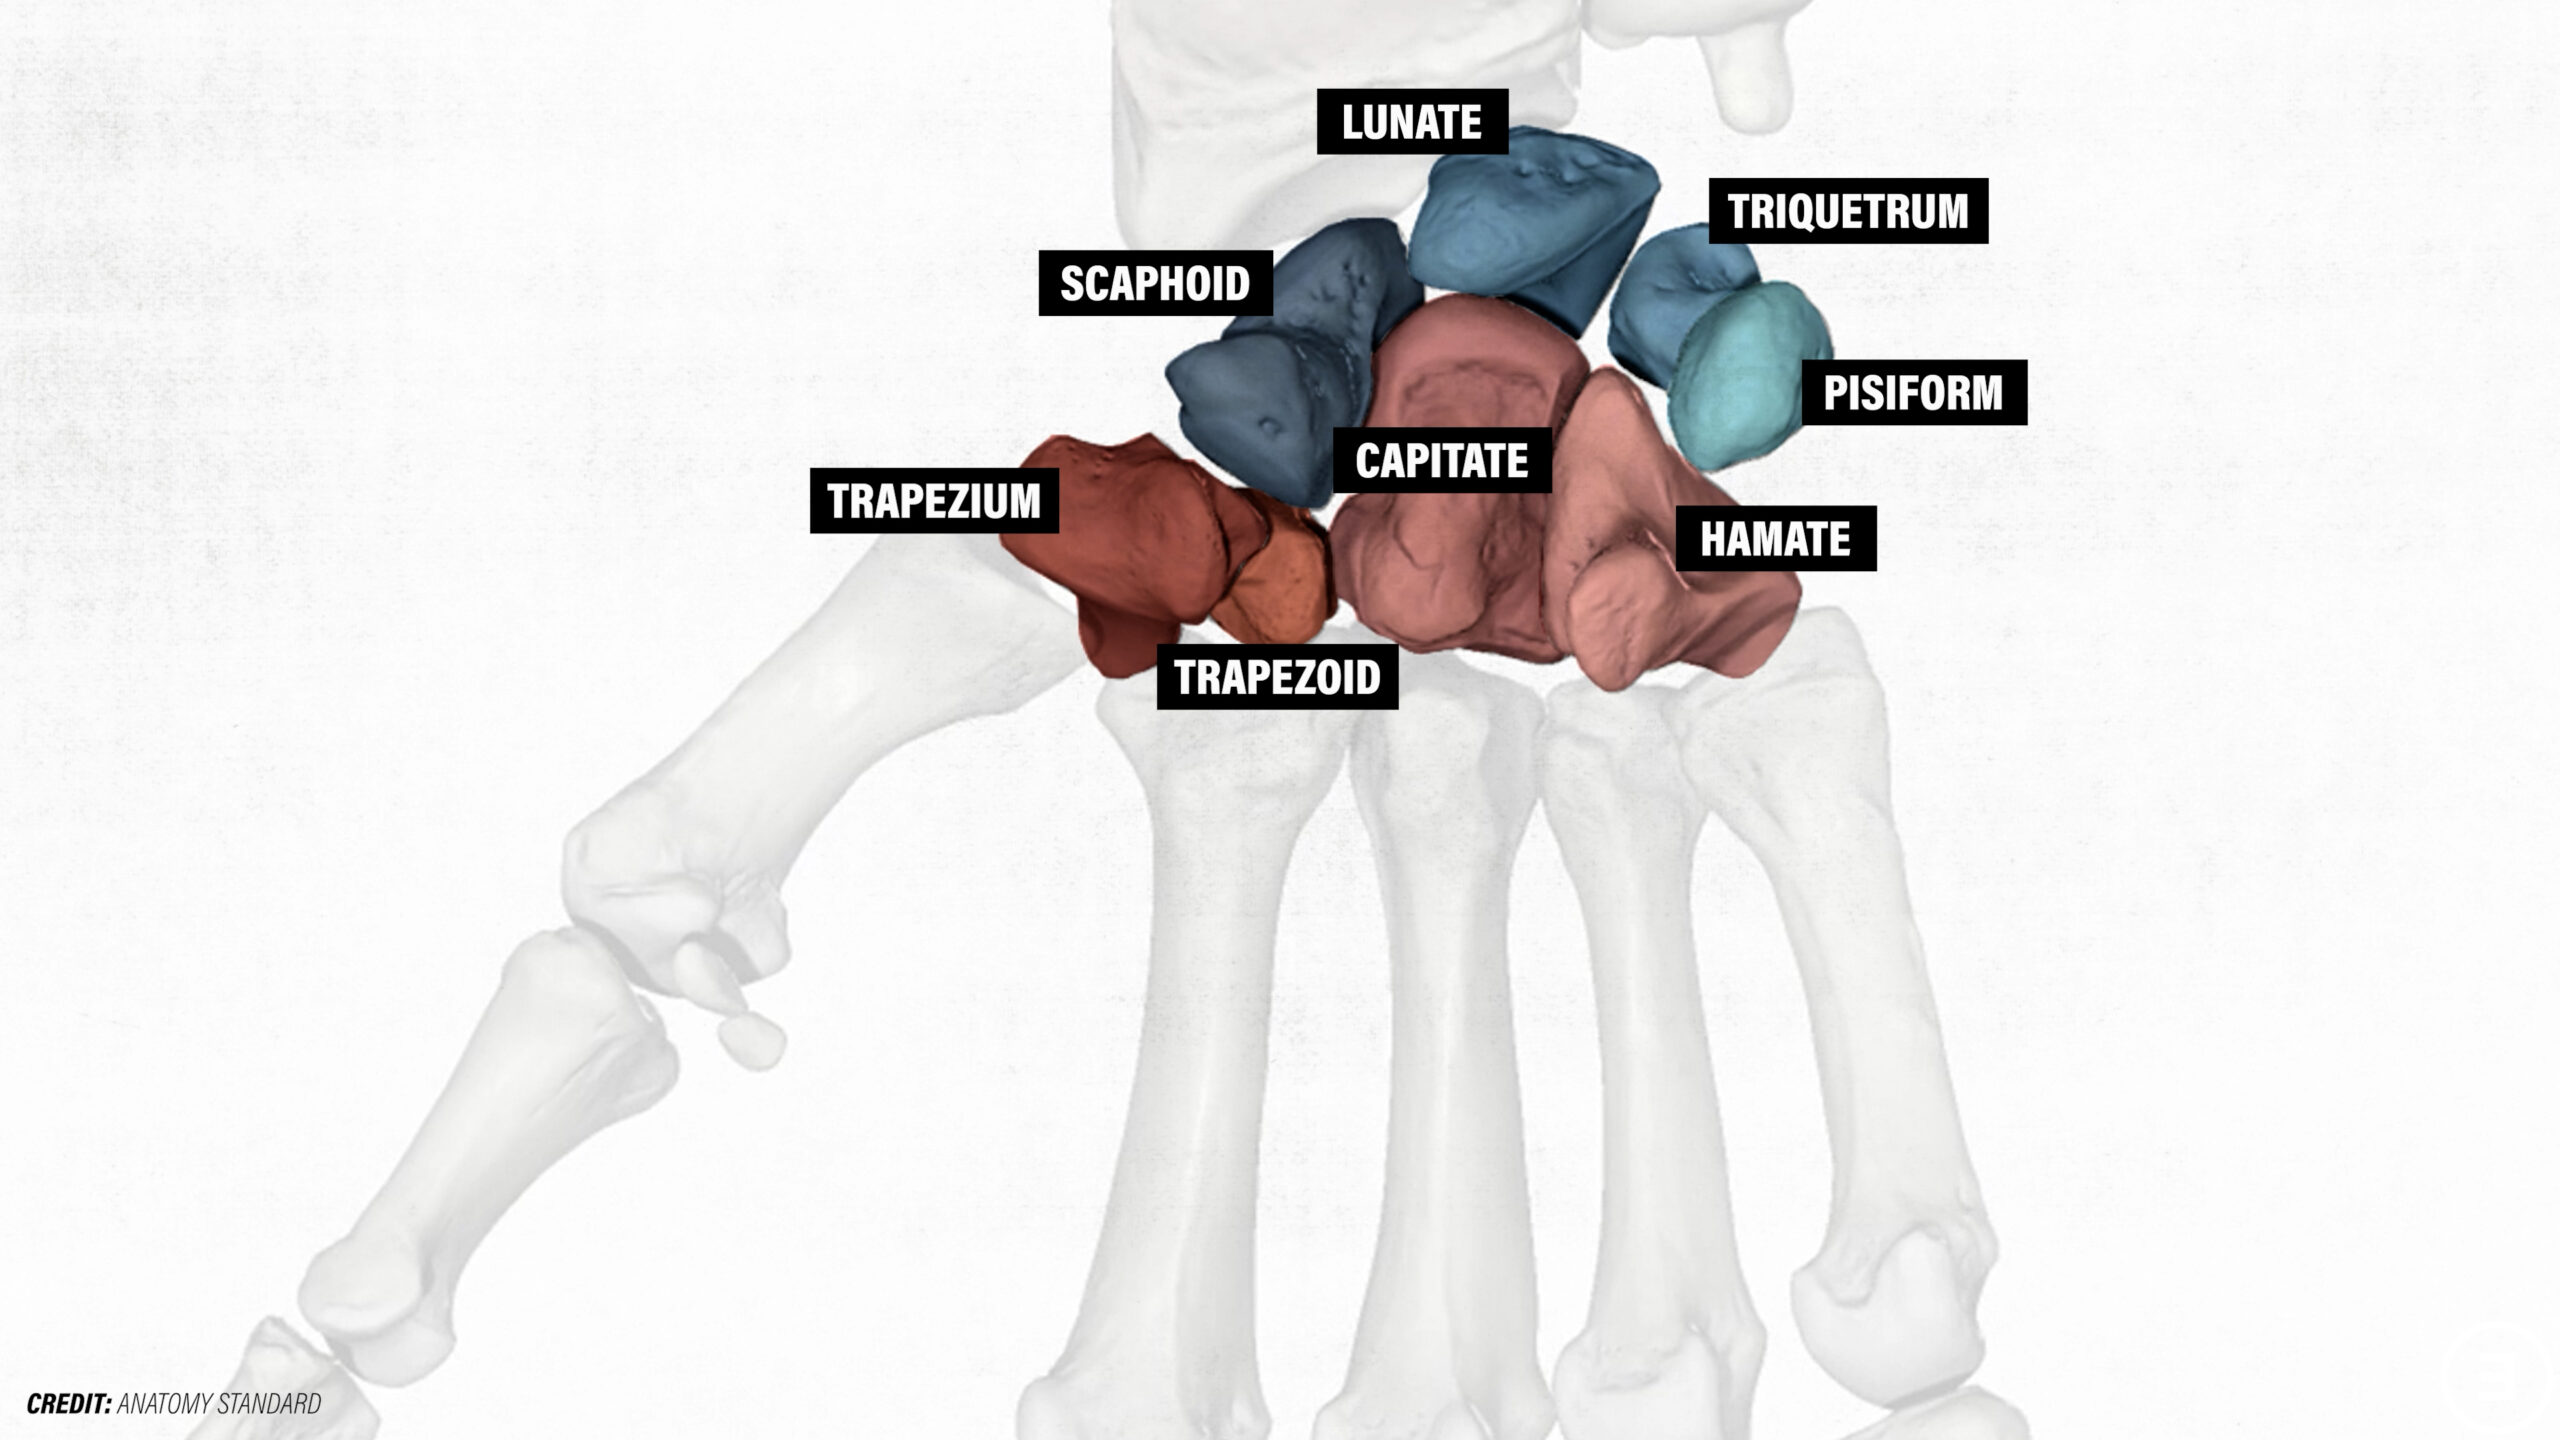
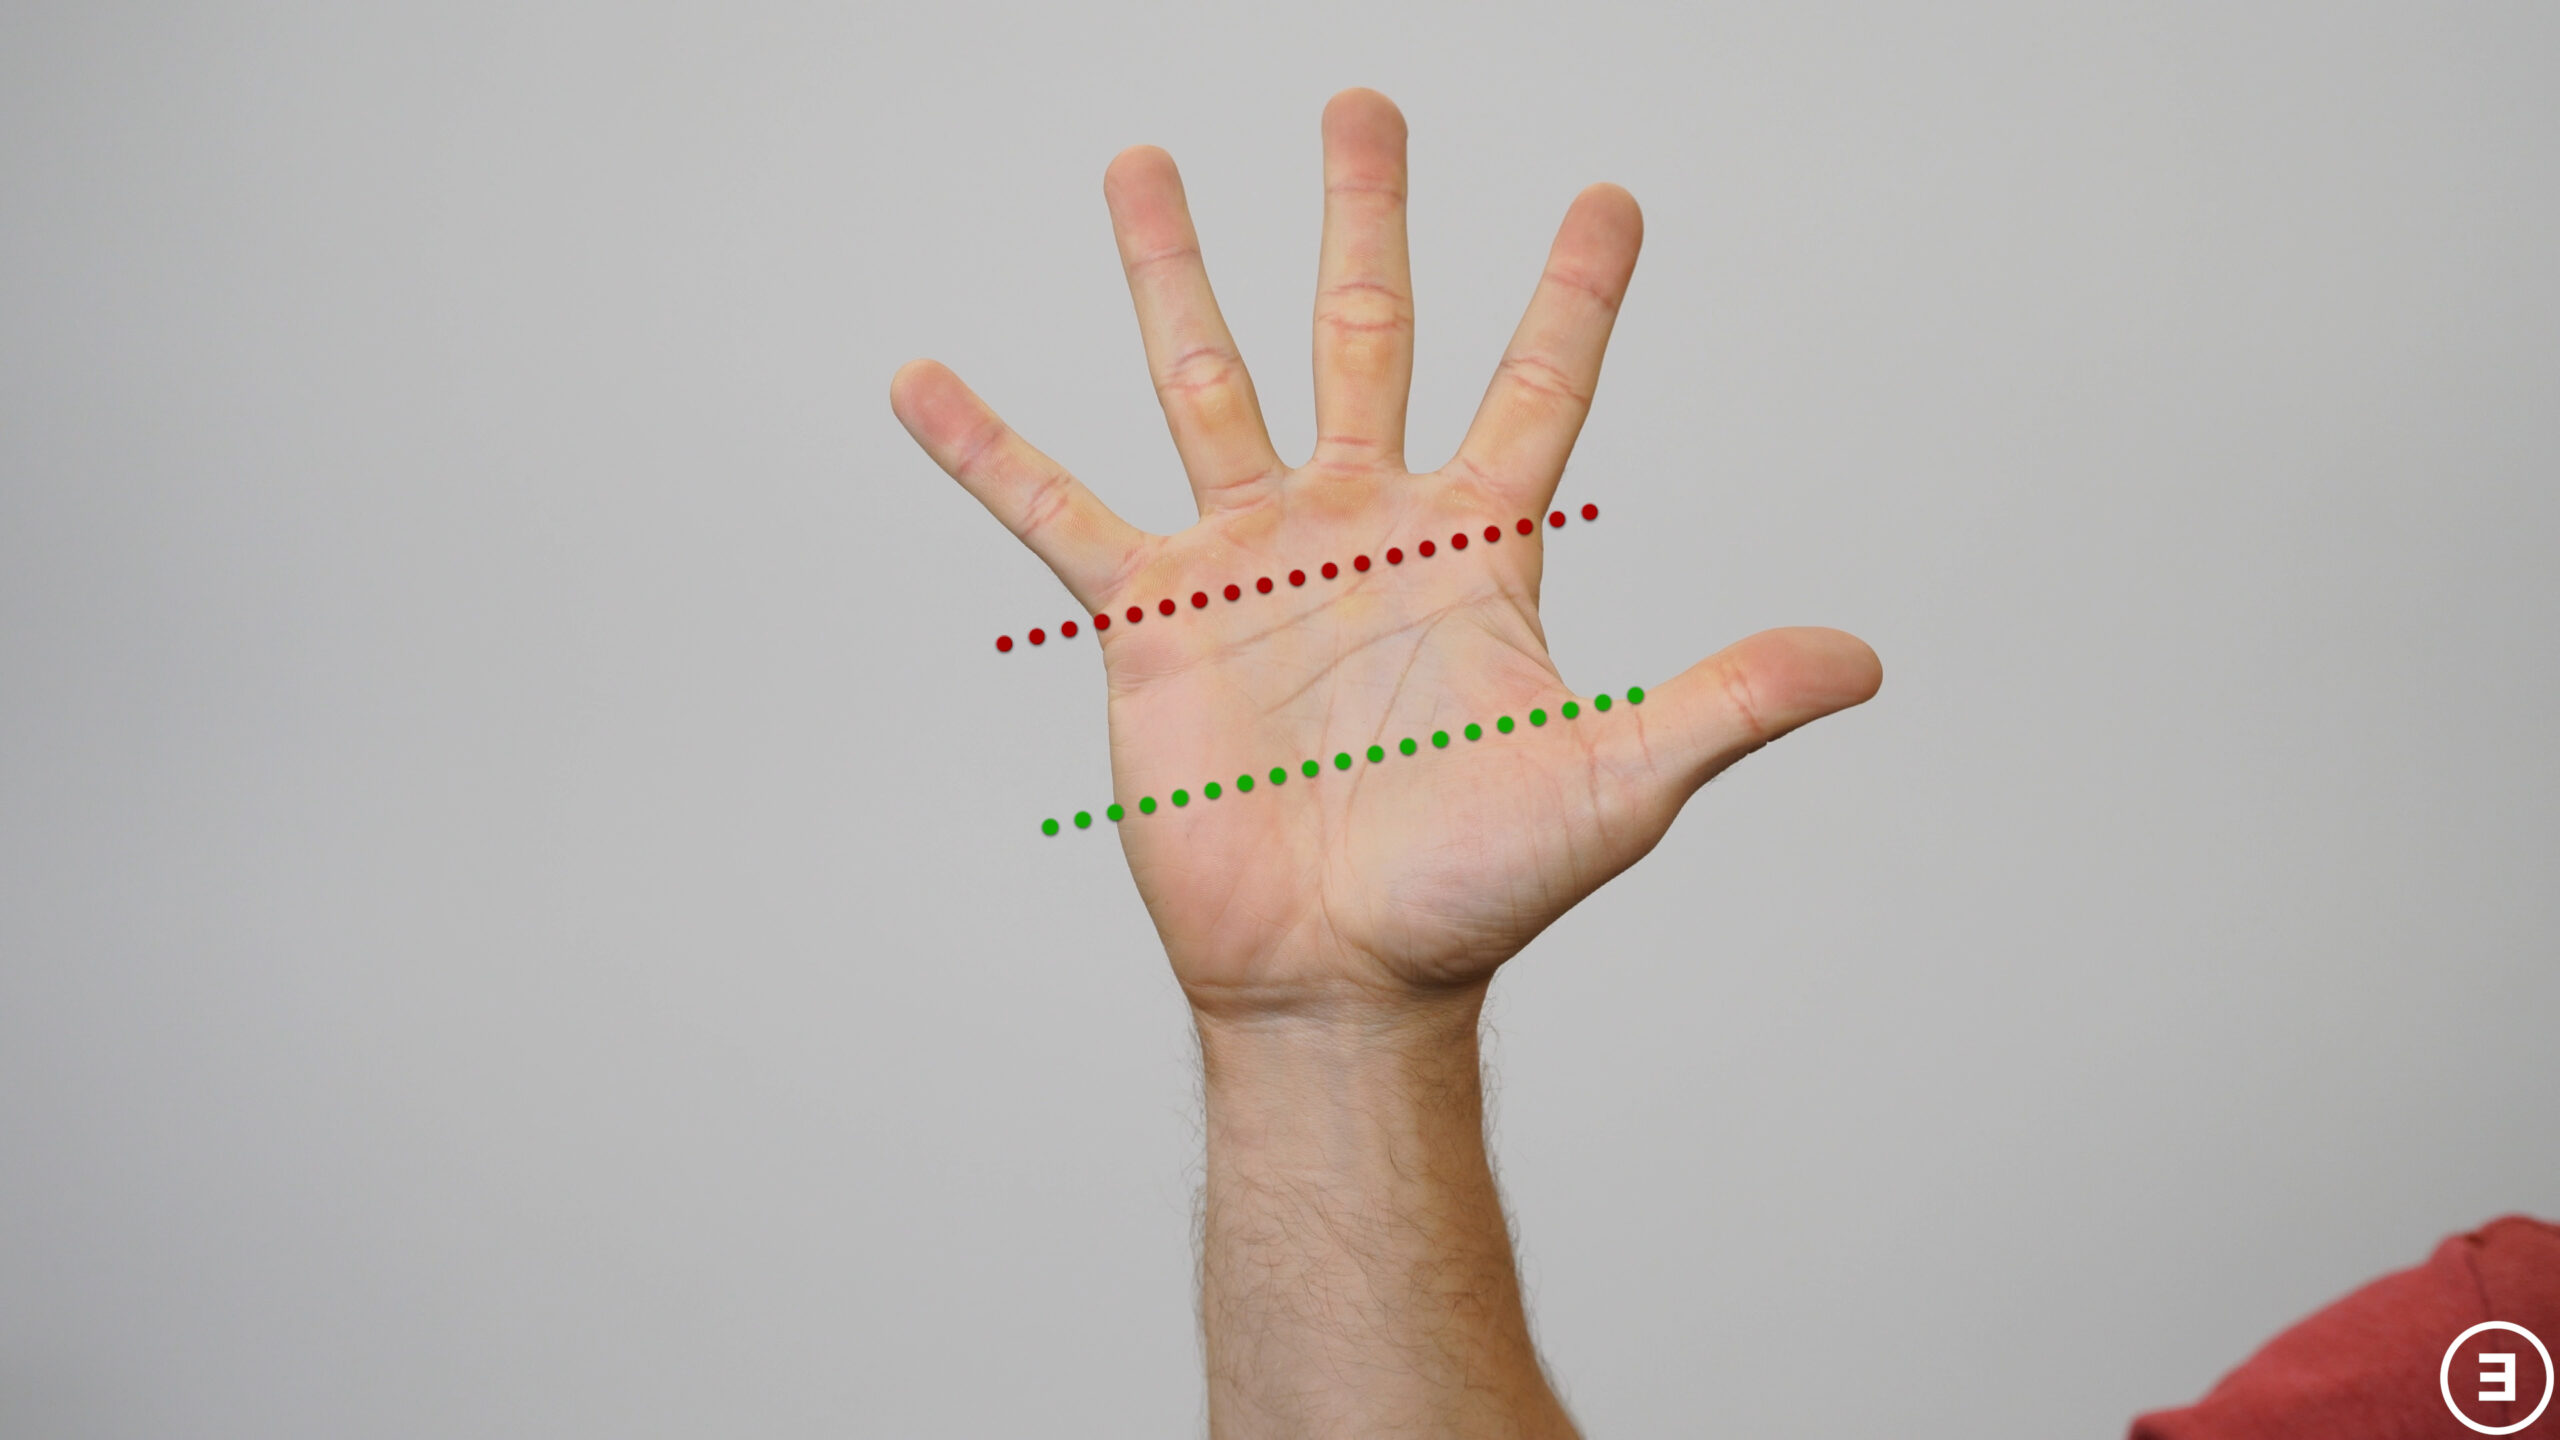
The wrist is composed of the radius and eight carpal bones. The eight carpal bones are typically divided into a proximal row (scaphoid, lunate, triquetrum, pisiform) and a distal row (trapezium, trapezoid, capitate, hamate).
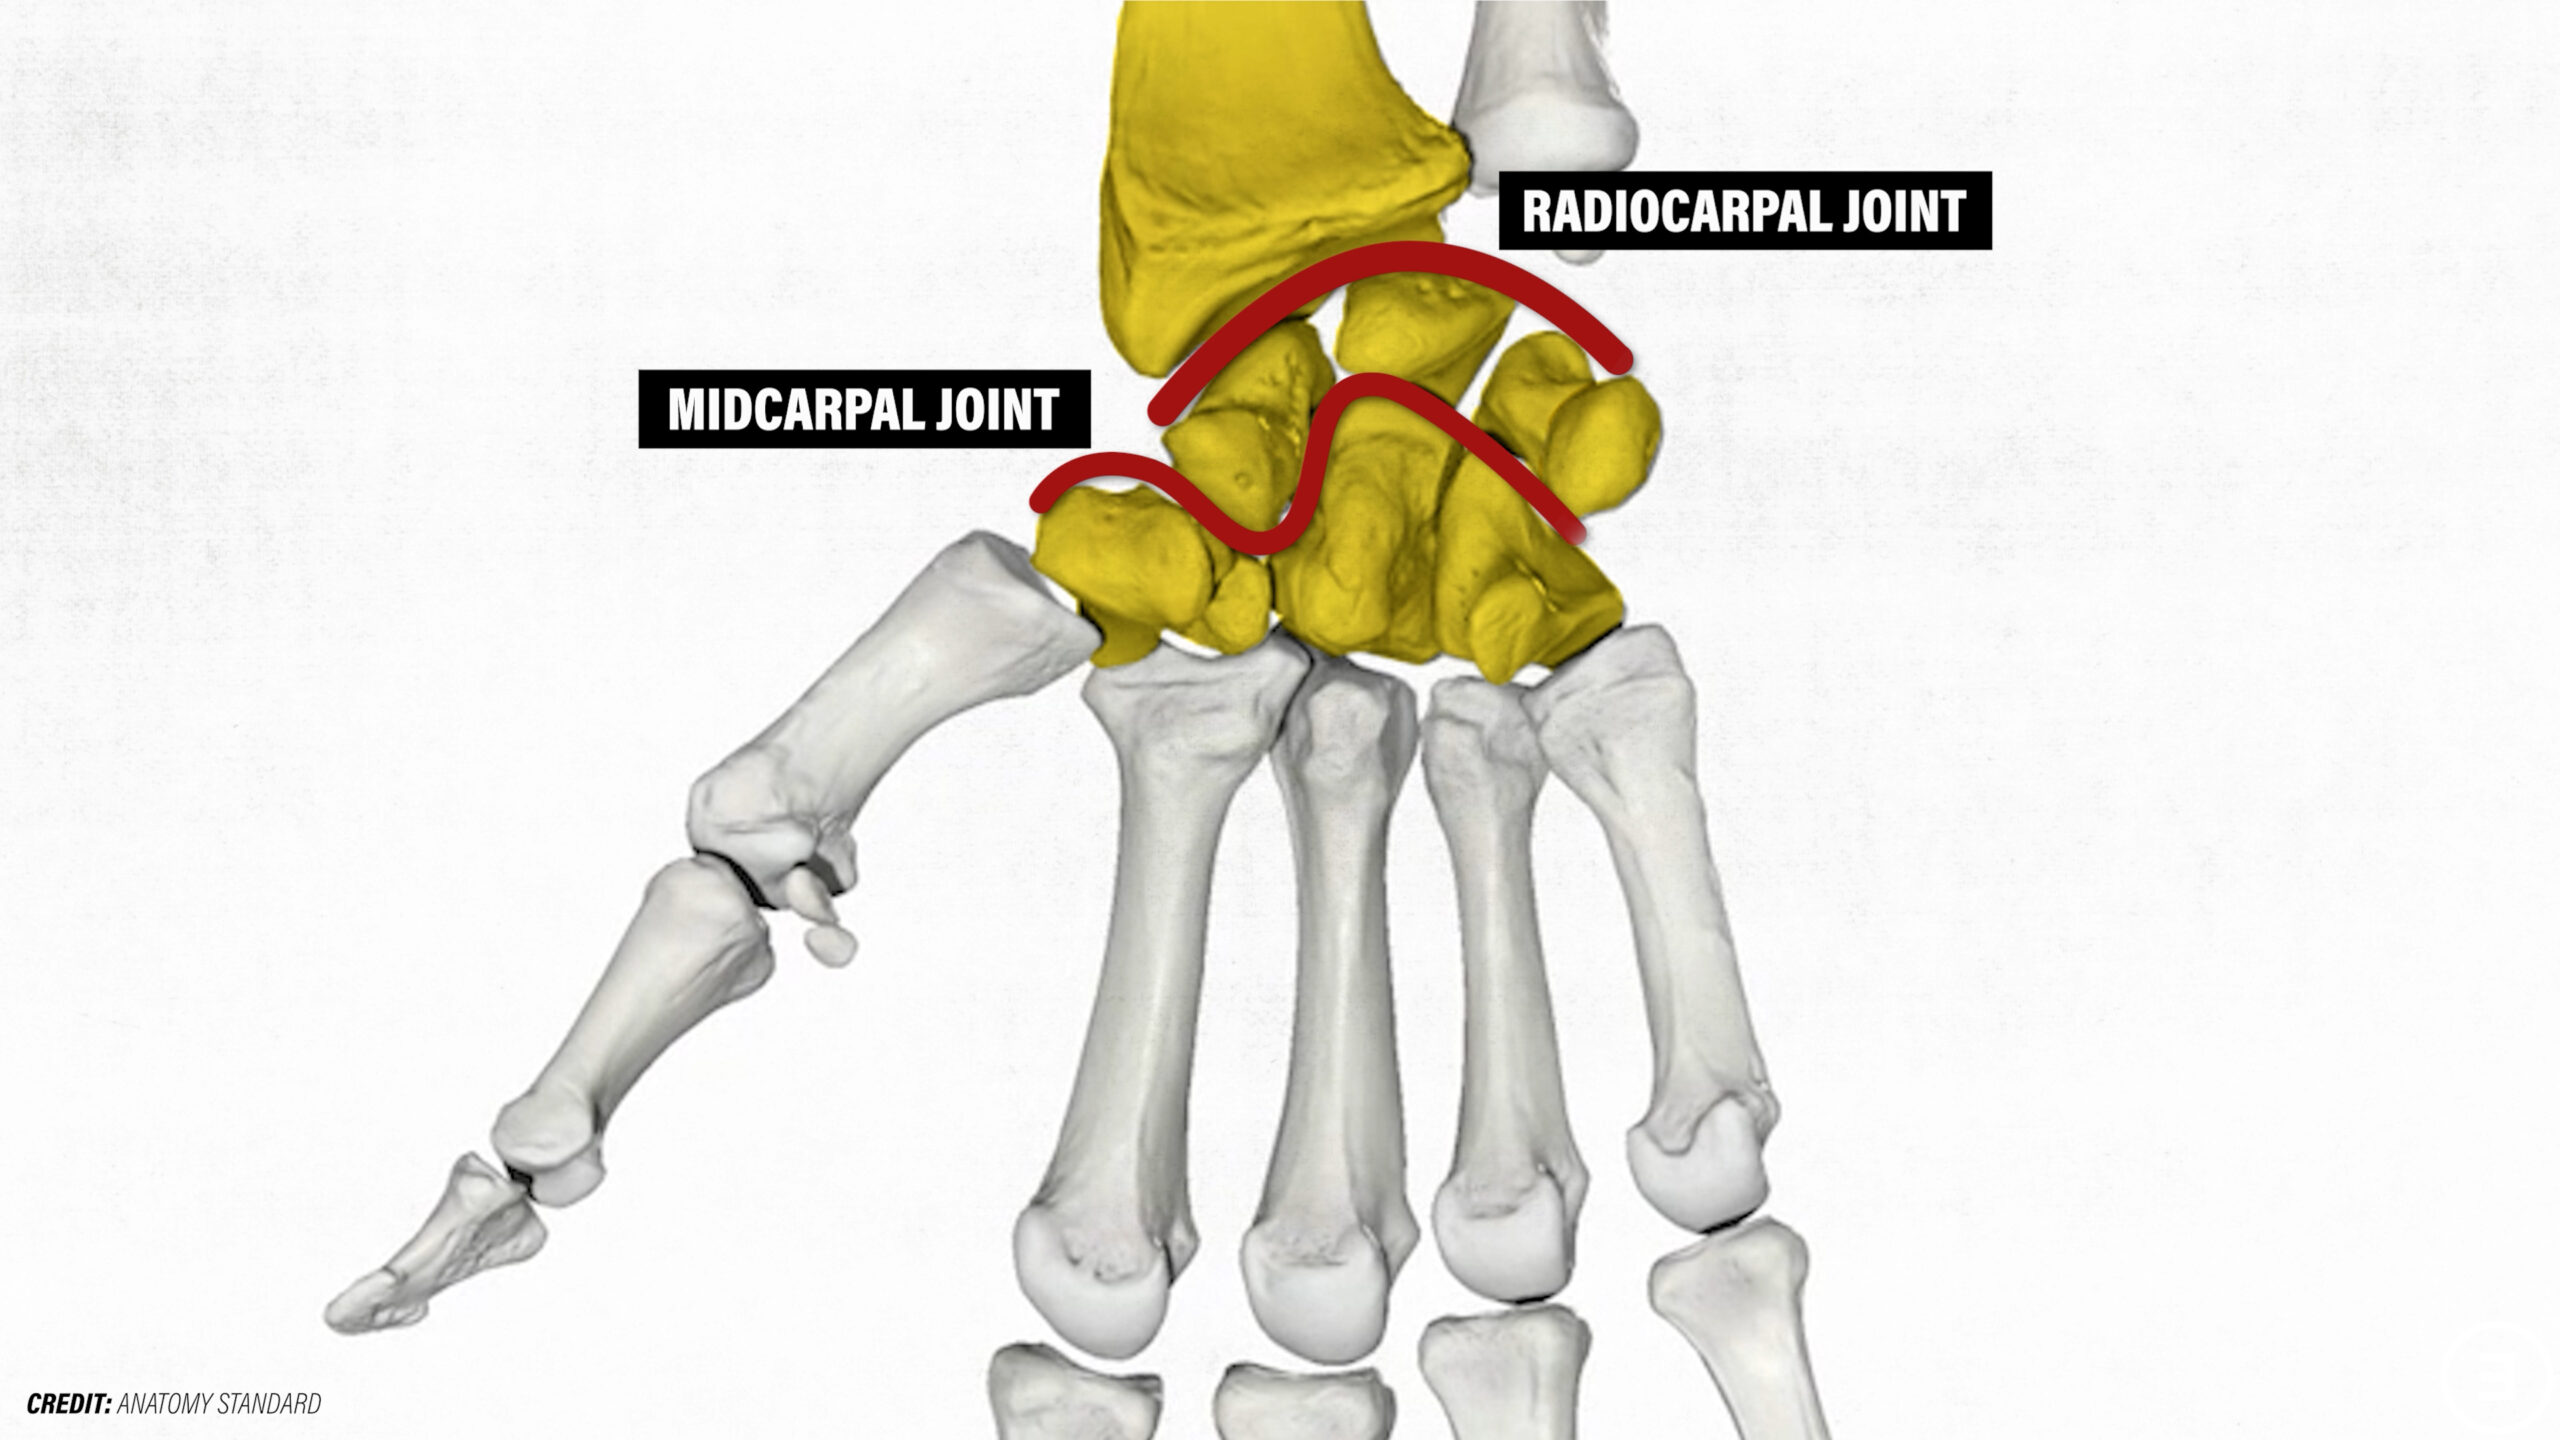
Together, the radius and carpal bones also form three joints:
- Radiocarpal joint, where the radius and an articular disc meet the scaphoid, lunate, and triquetrum.
- Midcarpal joint, where the proximal and distal rows connect.
- Intercarpal joints, where the rest of the carpal bones join together.
Ligaments, which are a type of fibrous connective tissue, attach bone to bone and help provide passive stability to all of these joints. Since the wrist contains so many bones, there are a lot of ligaments in this area.
The Triangular Fibrocartilage Complex, commonly referred to as TFCC, is located on the pinky side of the wrist and consists of the articular disc (also known as the triangular fibrocartilage) and other connective tissue structures, such as several ligaments. The TFCC provides stability to the distal radioulnar joint and pinky side of the wrist, as well as absorbs and transfers compressive forces.
Wrist and Forearm Movements
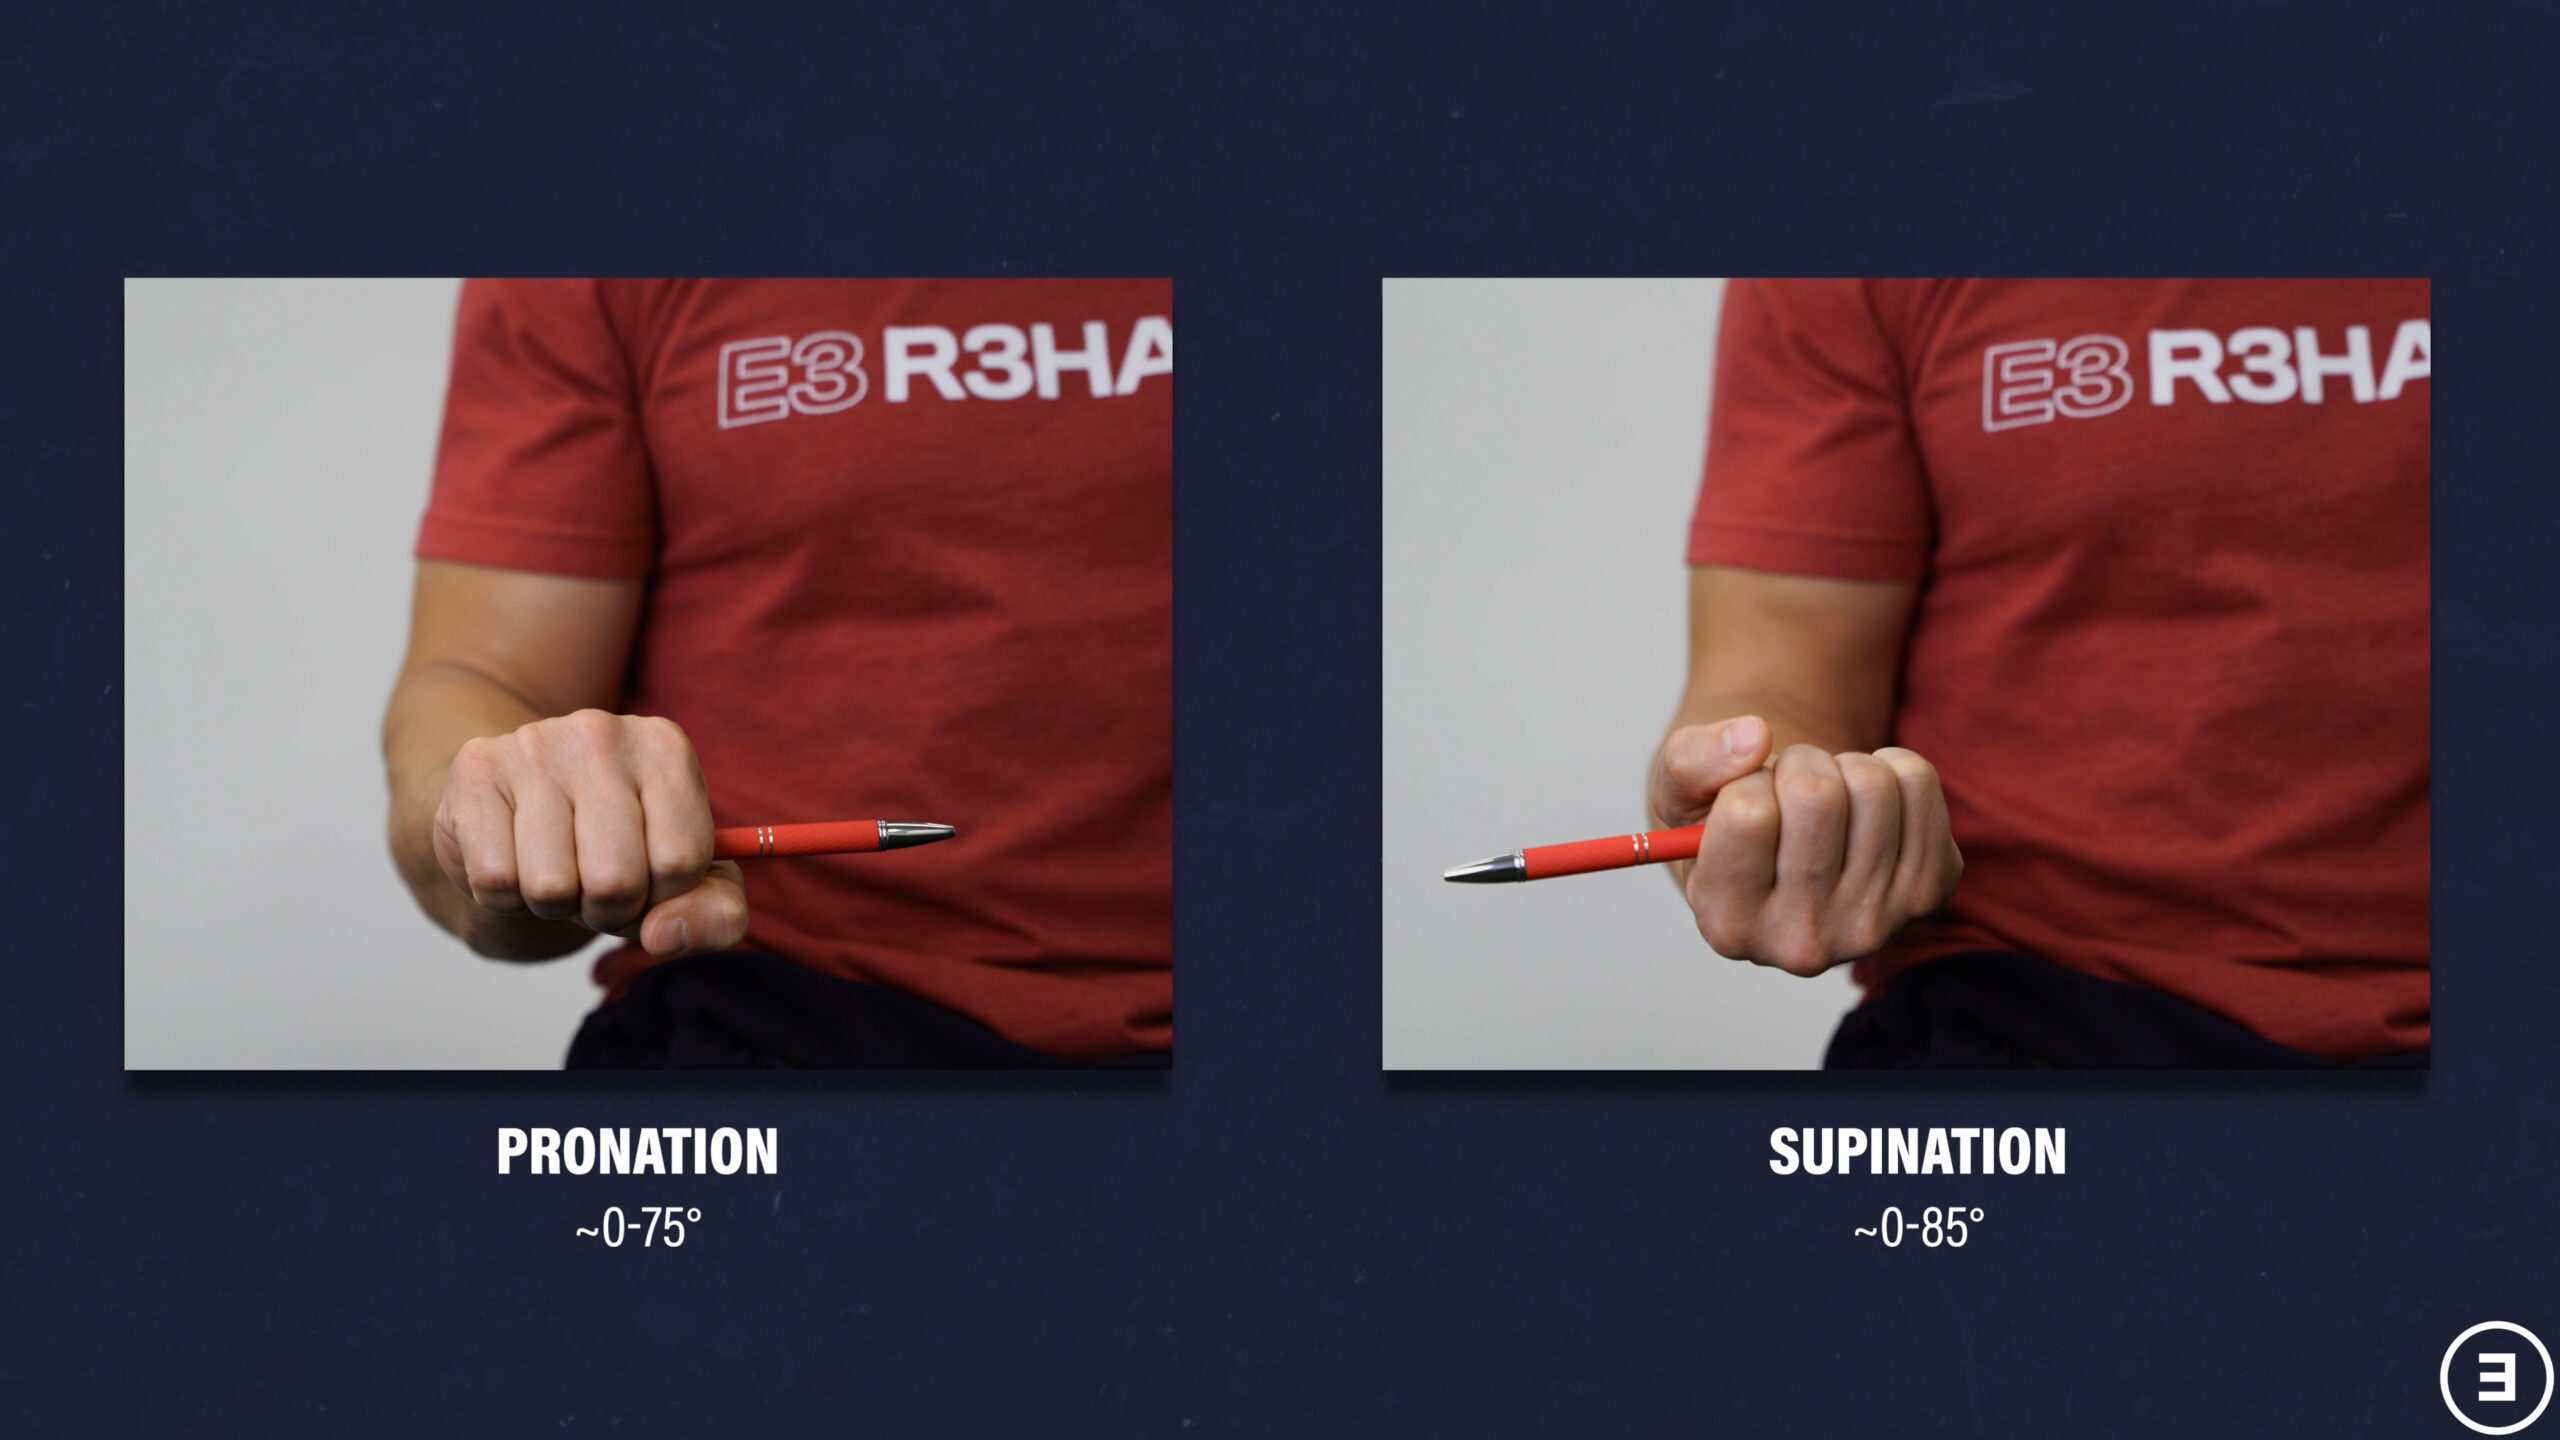
There are two primary movements of the forearm: pronation (~0-75 degrees) and supination (~0-85 degrees). To remember the difference between the two, think about how you would have to SUPinate your forearm to carry a bowl of soup in your hand.
Although pronation and supination are not technically motions of the wrist, they are closely related. Therefore, sufficient pronation and supination mobility and strength are necessary for optimal wrist function.
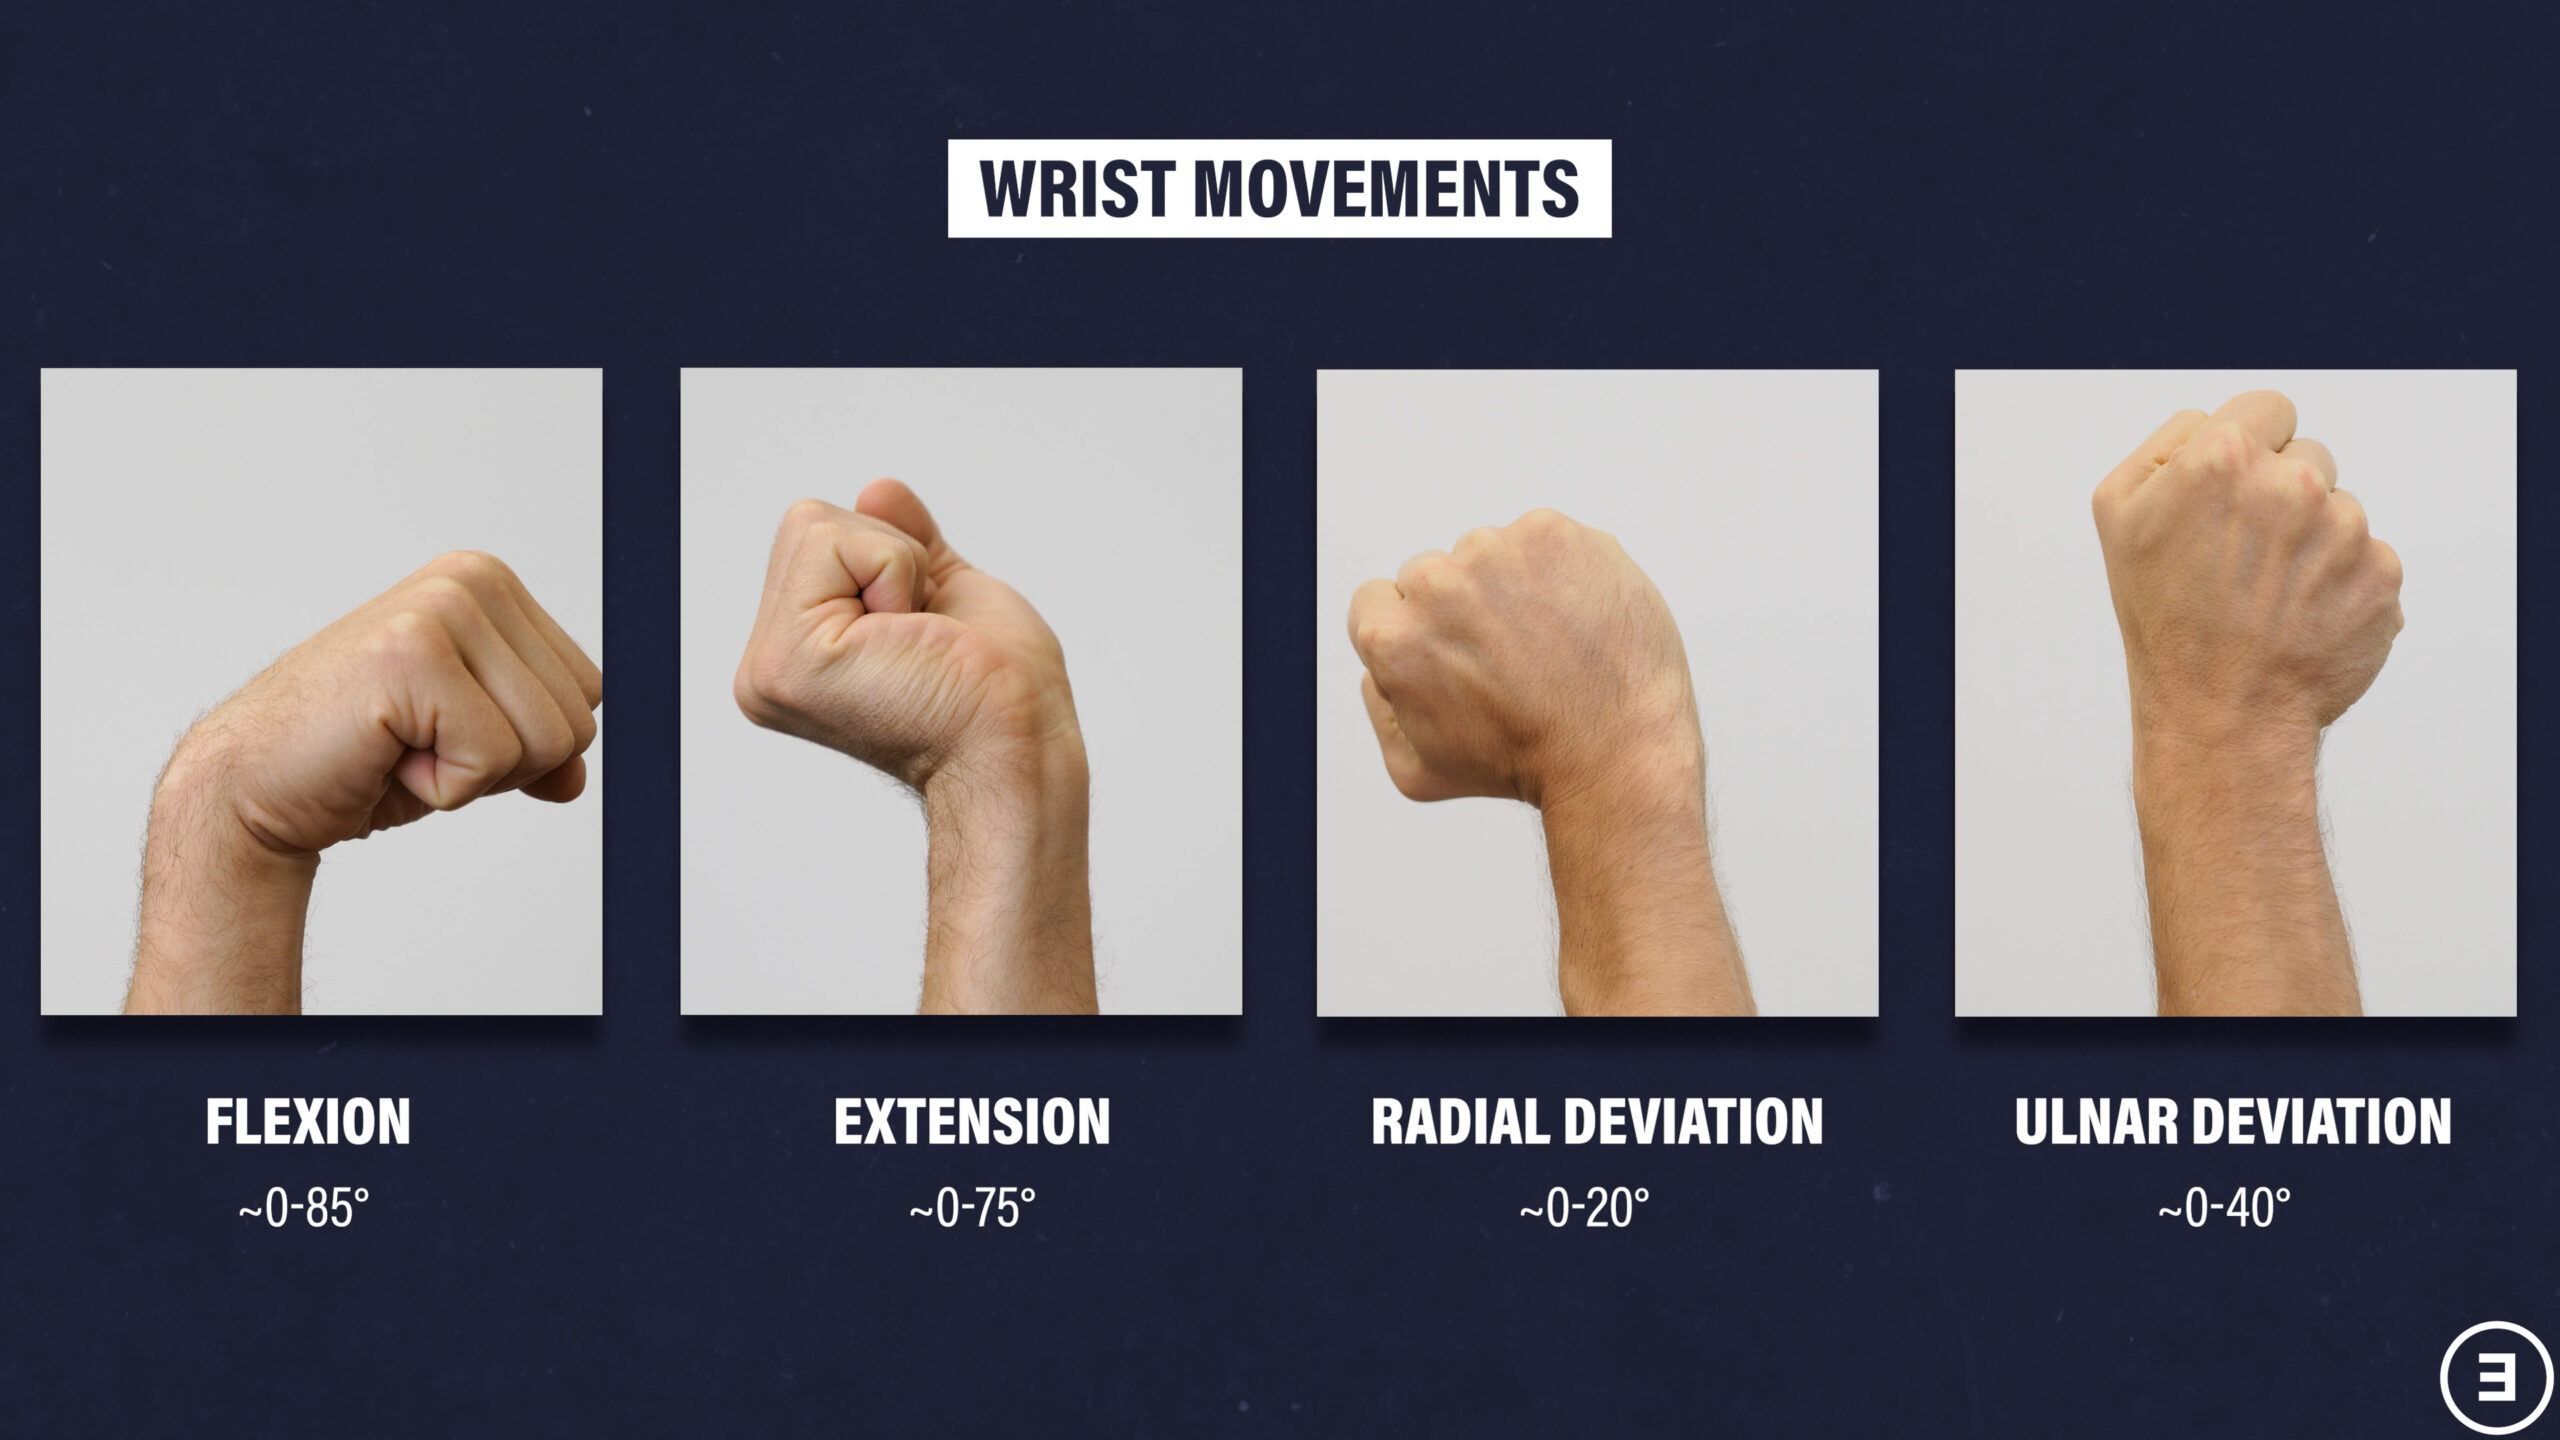
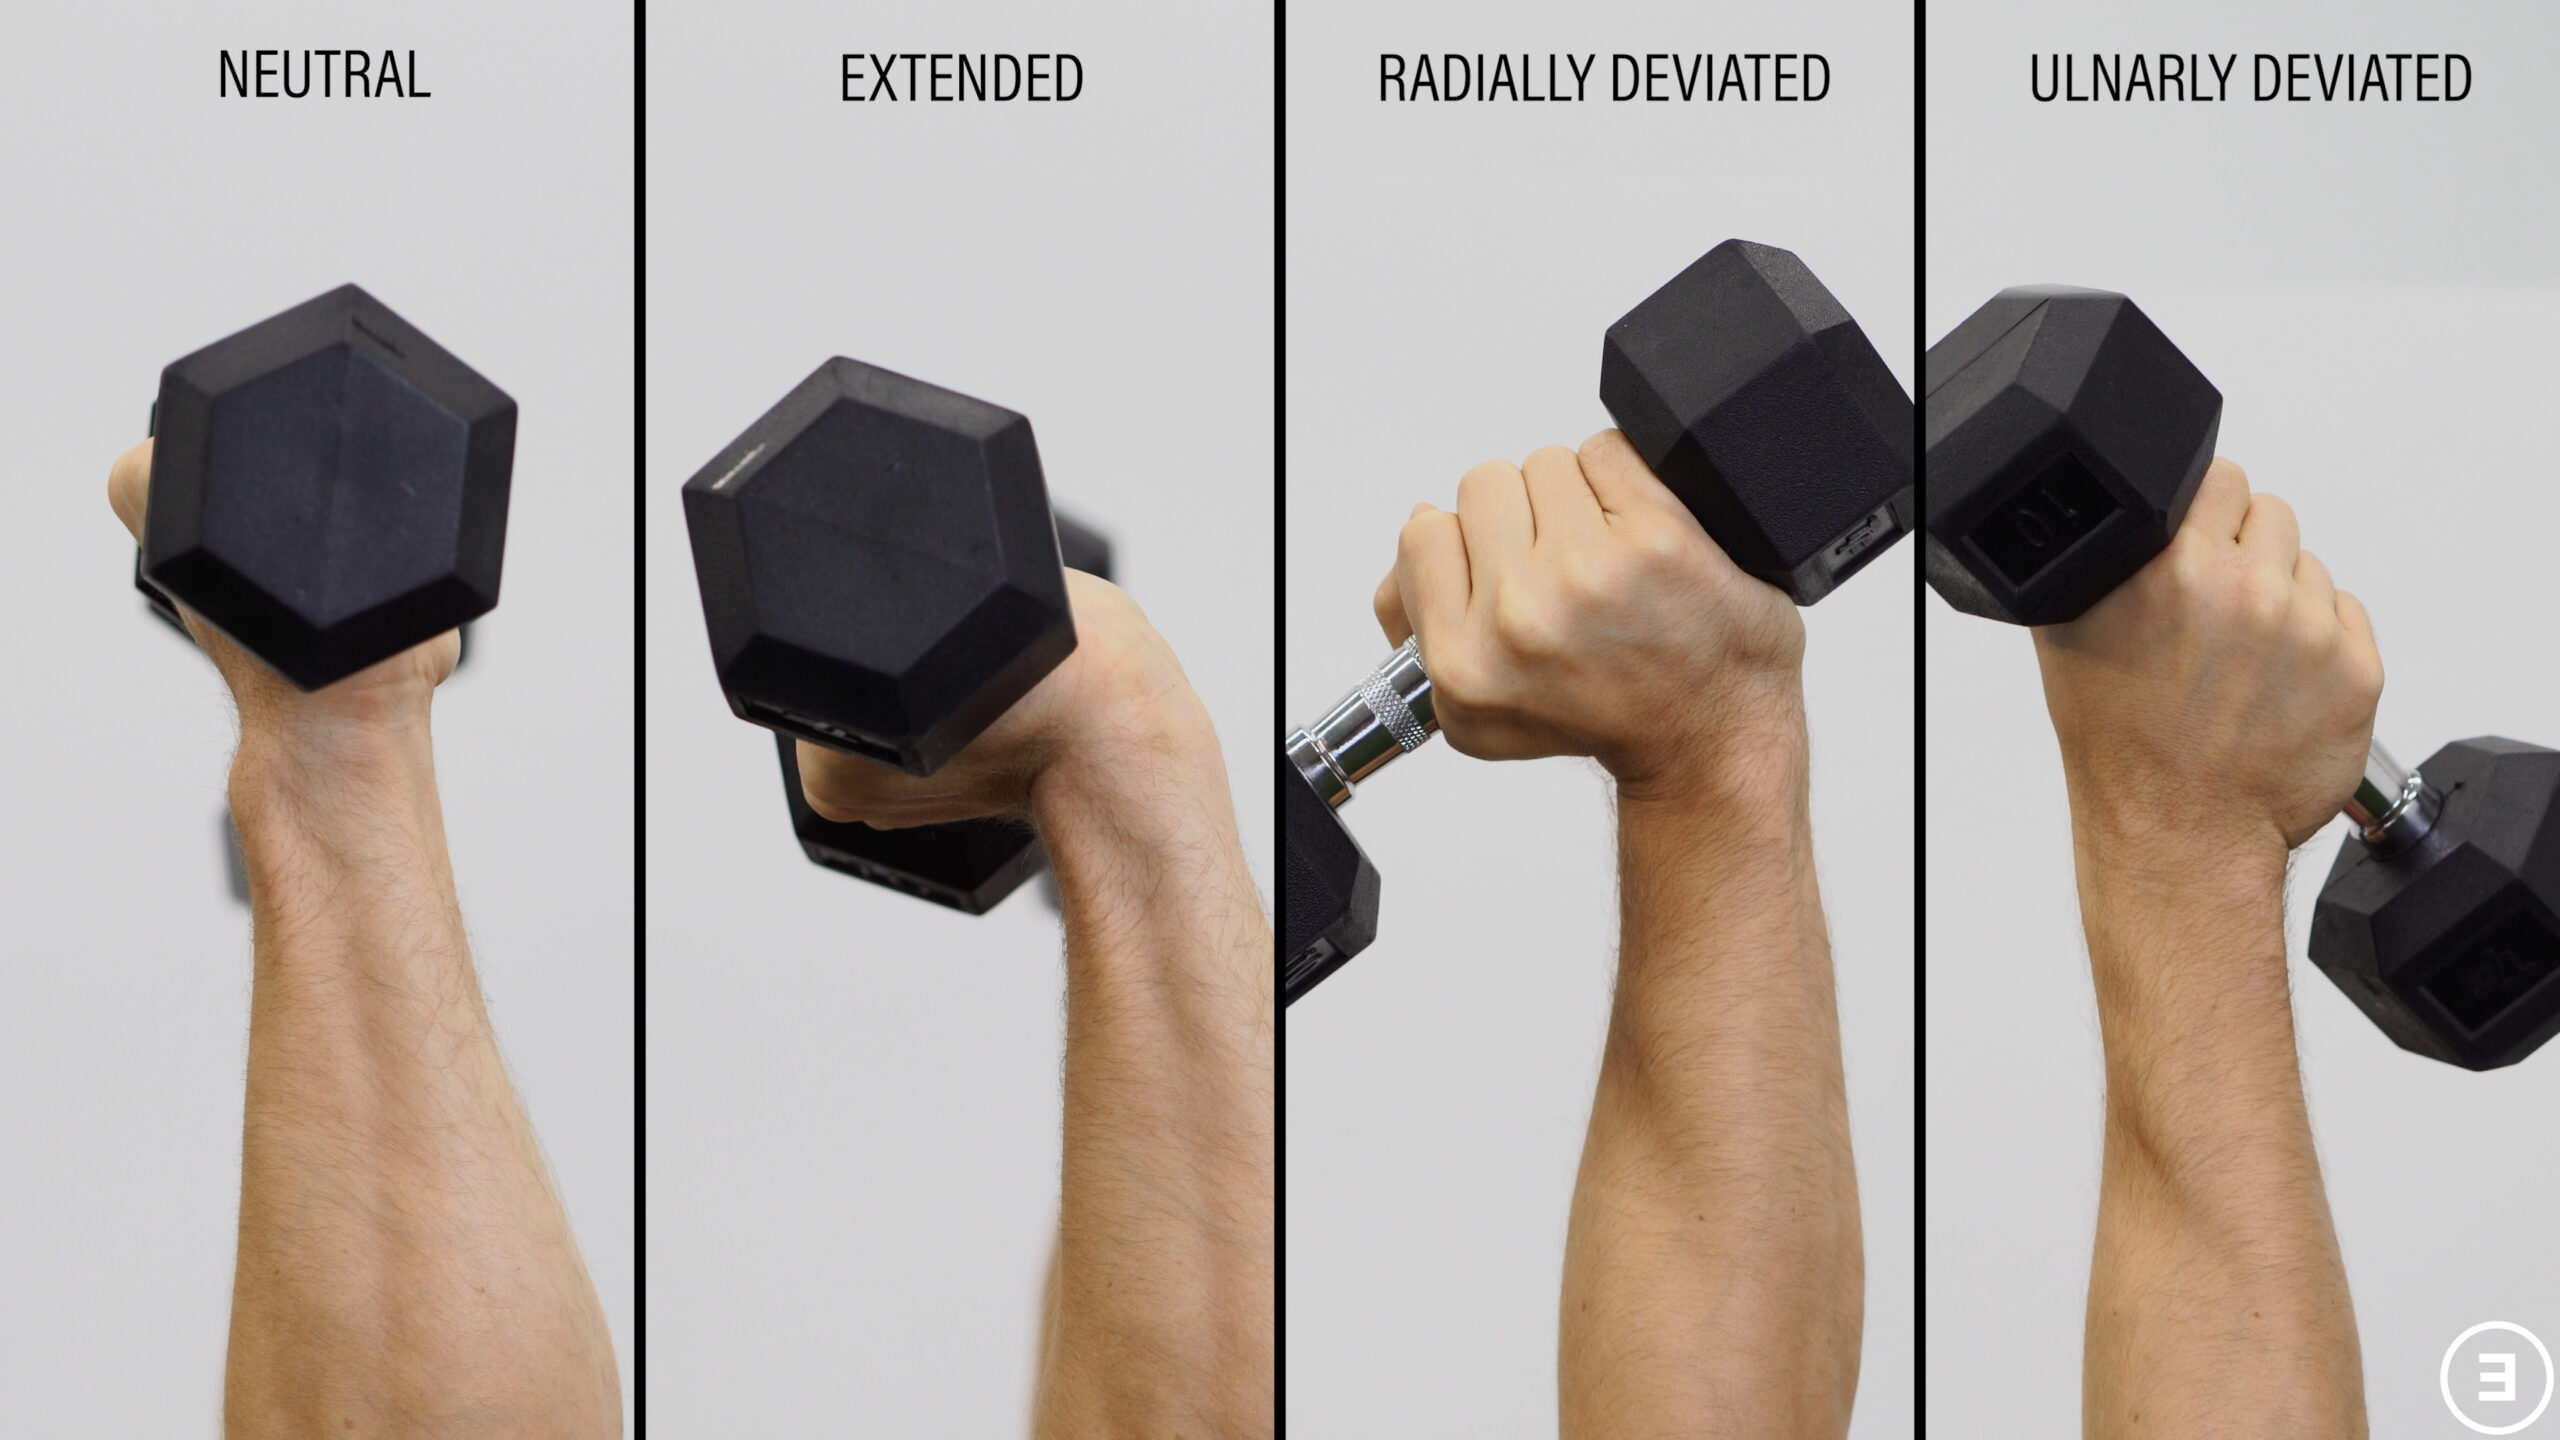
On the other hand (no pun intended), there are four primary movements of the wrist: flexion (~0-85 degrees), extension (~0-75 degrees), radial deviation (~0-20 degrees), and ulnar deviation (~0-40 degrees).
The average range of motion for each movement can vary significantly between individuals, so if you’re attempting to regain any lost range of motion, the goal should be to achieve the same amount as your non-injured side or whatever amount is necessary for the tasks you want to perform.
Due to the structure of the joints, wrist flexion range of motion will generally exceed wrist extension range of motion by 10-15 degrees. Similarly, ulnar deviation will usually exceed radial deviation by 15-20 degrees.
The tendons that cross the wrist, and therefore have actions at the wrist, come from muscles that originate in the forearm and arm. In general, muscles on the front of your forearm flex your wrist and fingers, while muscles on the back of your forearm extend your wrist and fingers. Tendons that cross the thumb side of the wrist contribute to radial deviation, while tendons that cross the pinky side of the wrist contribute to ulnar deviation.
Common Wrist Injuries
Like most injuries, wrist injuries typically occur through one of two mechanisms:
- Trauma, like a FOOSH injury, which is short for falling on an outstretched hand.
- Repetitive overuse/overload, like taking up a 30 day push-up challenge with no prior push-up experience.
Four of the most common categories of wrist injuries include:
- Sprains, which are injuries to the ligaments of the wrist.
- Fractures, which may accompany ligament injuries or be accompanied by a dislocation.
- TFCC injuries, which relate to pain on the pinky side of the wrist with loading of the region, such as with ulnar deviation or pushing yourself up from a chair. These injuries can occur traumatically or happen over time.
- Tendinopathy (frequently referred to as “tendinitis”), which involves repetitive overuse/overload of a tendon leading to pain and impaired function. As a quick note – people often use the word “strain” to describe muscle injuries, but technically there are no muscles that cross the wrist, just the tendons of those muscles.
This blog will not cover carpal tunnel syndrome because it’s a nerve-related issue and we have other blogs on our website dedicated to the topic. This blog is also not specific to De Quervain’s tenosynovitis although you may find many of the strategies and exercises I’m going to present helpful.
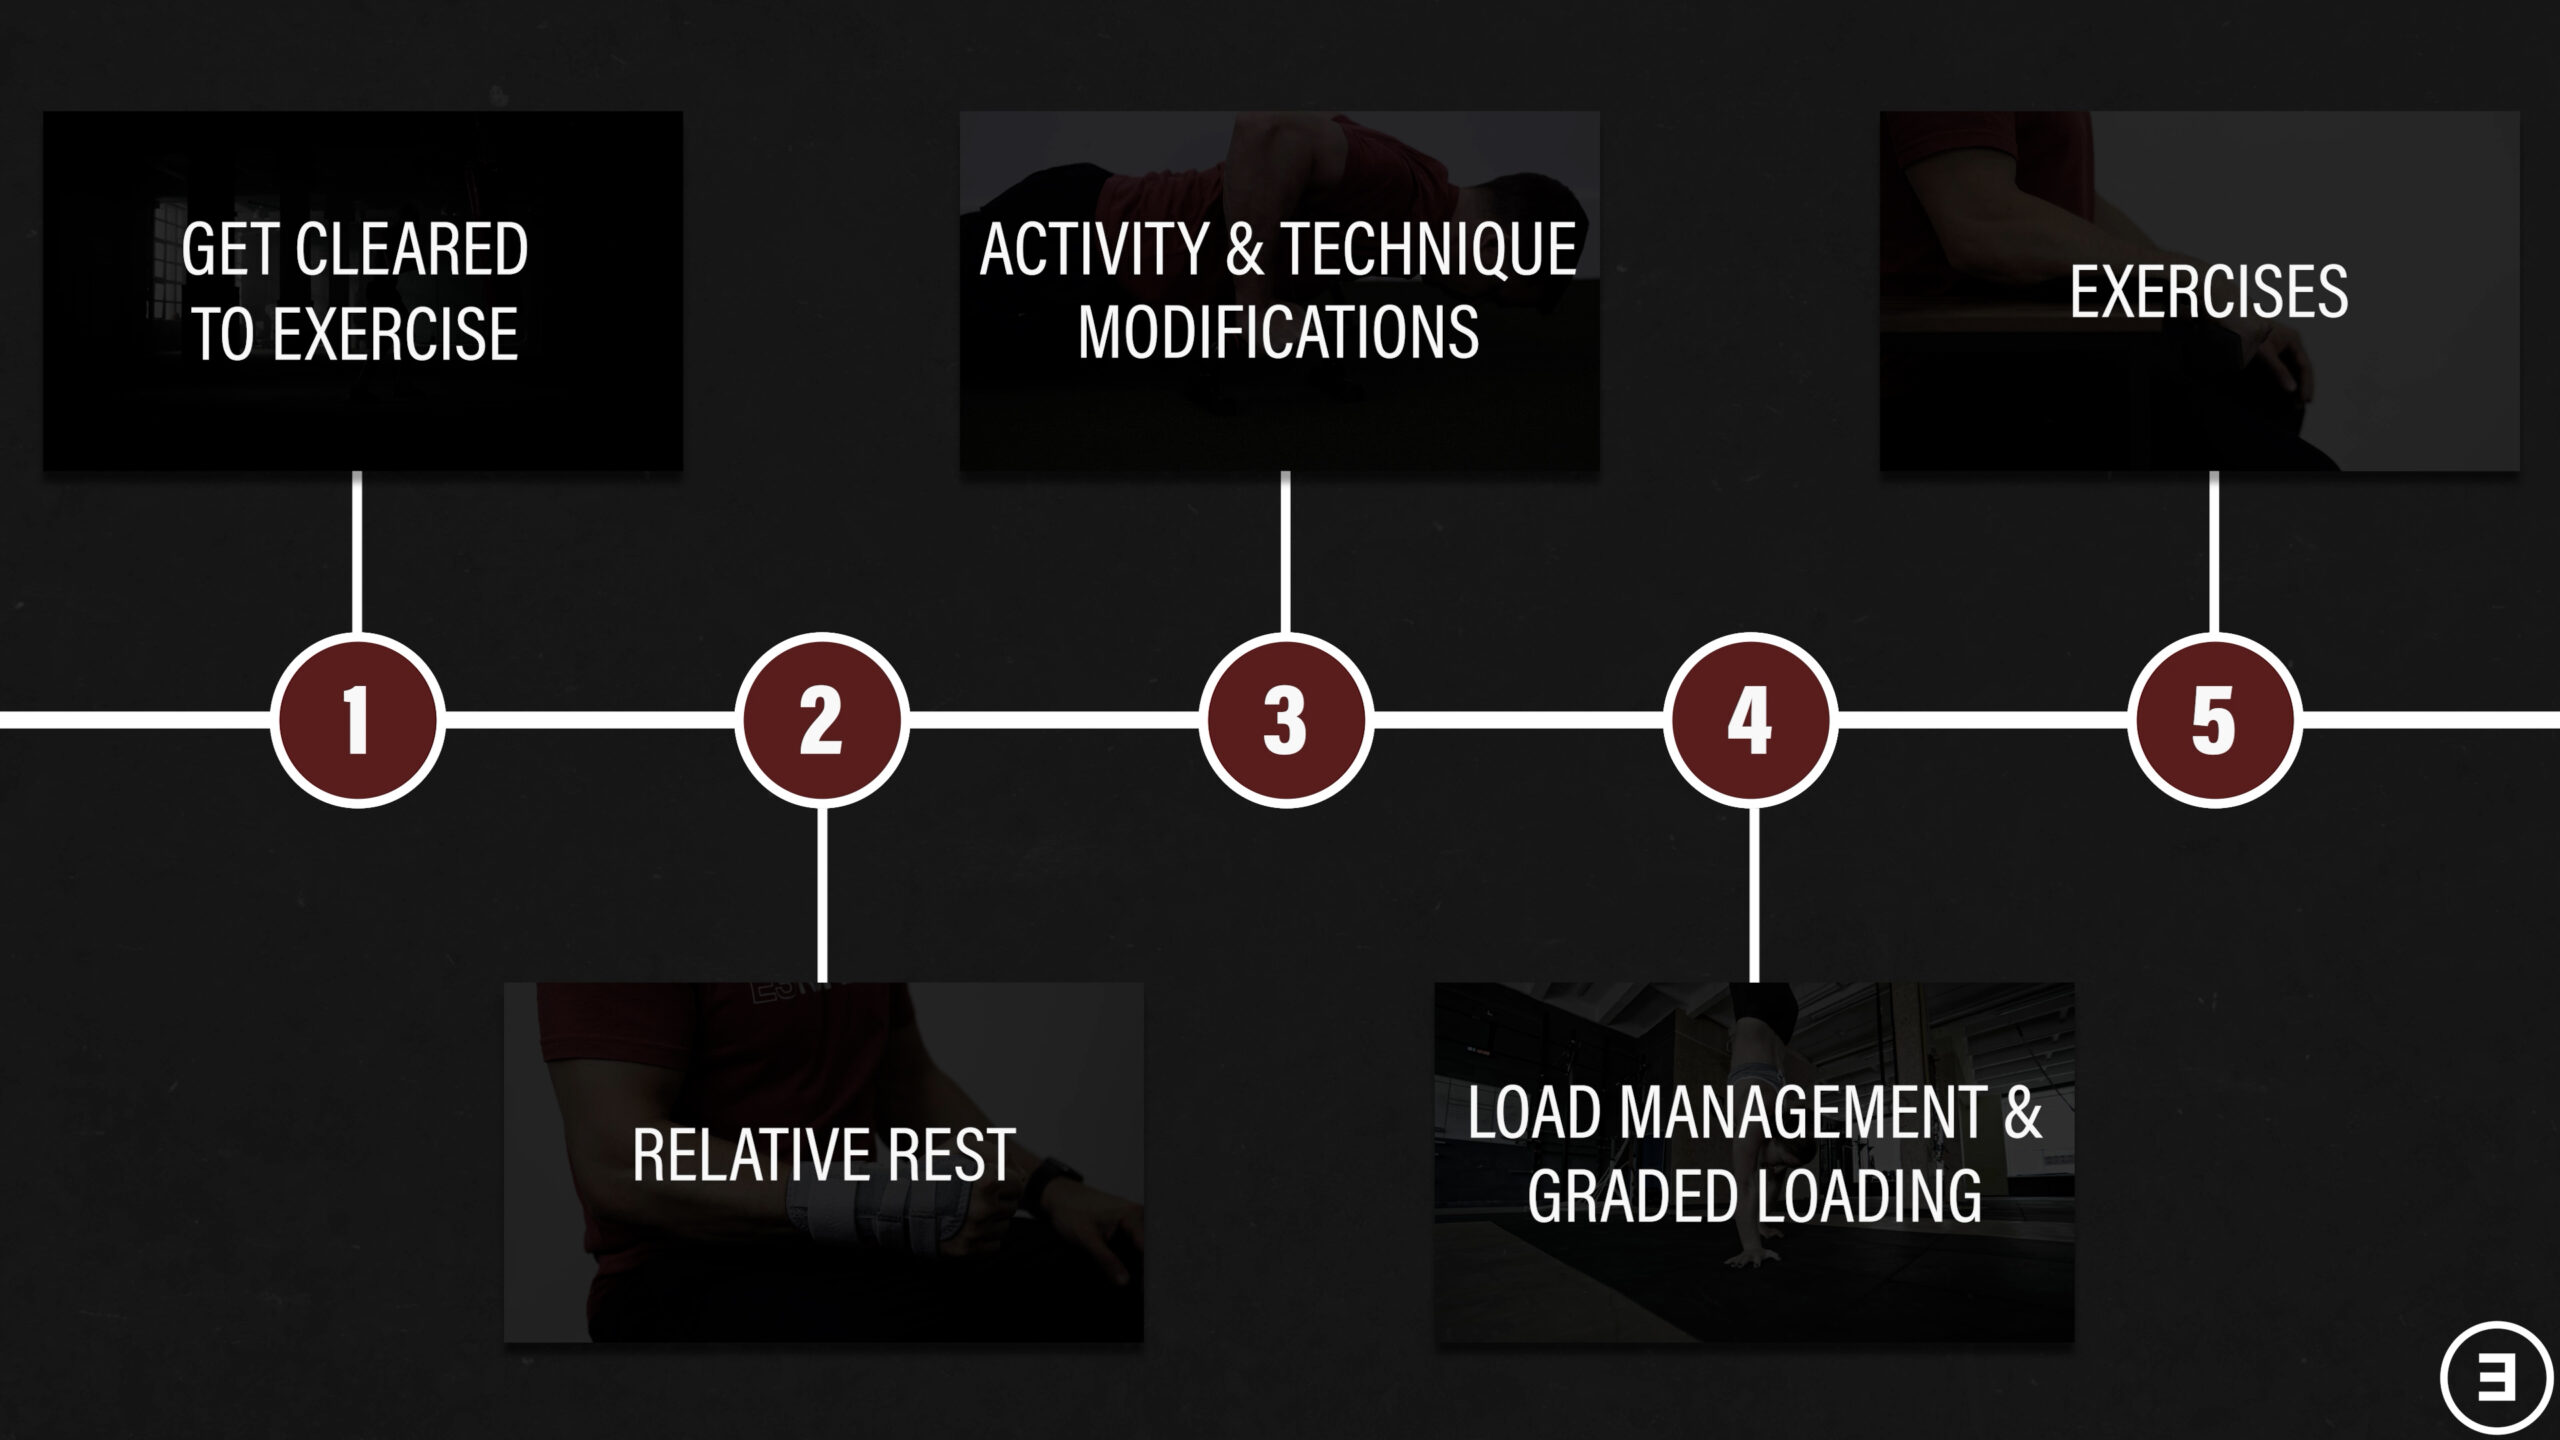
With all that being said, I’m now going to provide you with a 5-step process that will improve the strength, range of motion, and stability of your wrist, while equipping you with the knowledge and tools to feel more confident, capable, and resilient.
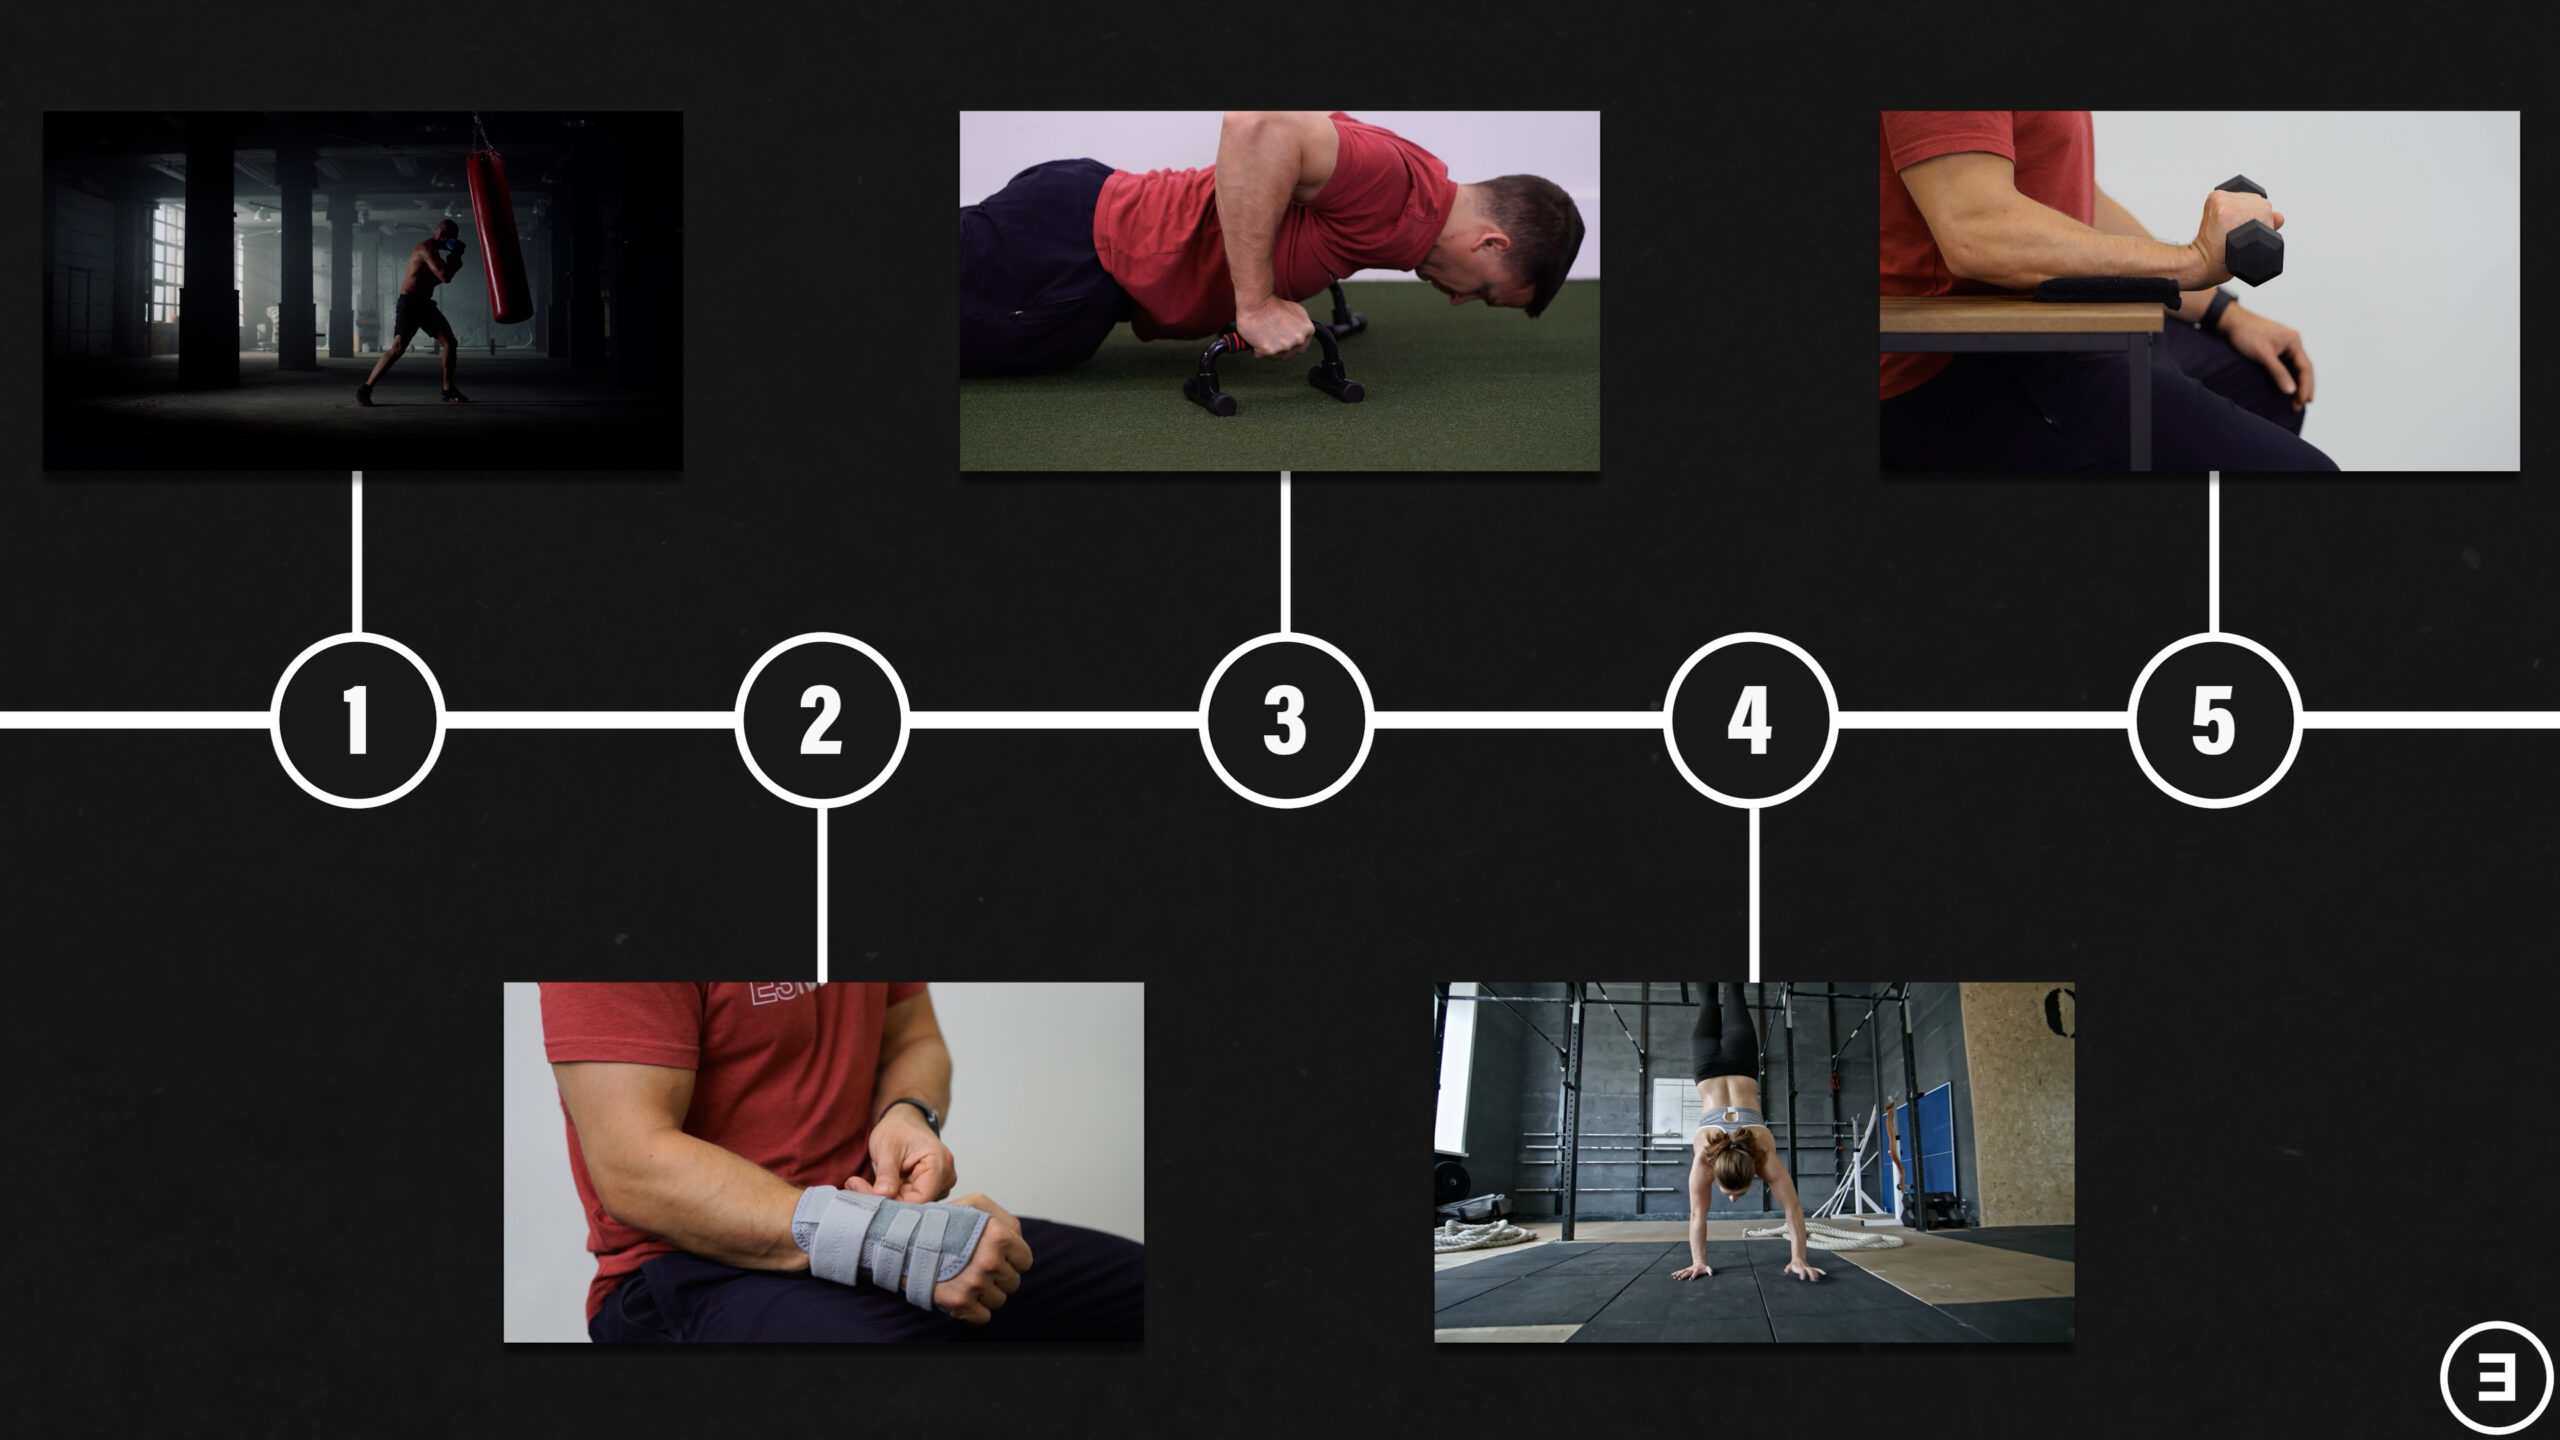
Step #1: Get Cleared To Exercise
If you’ve had a fracture or surgery, or if you’re unsure if a fall on your outstretched hand resulted in a fracture, you need to speak with your medical doctor. You don’t want to do more harm by pushing yourself too soon before your wrist has had a chance to heal appropriately.
It’s also important to point out that fractures are not always traumatic. For example, stress fractures can occur from repetitive activities.
Step #2: Relative Rest
Assuming you don’t have a fracture, you’ve received clearance from your medical doctor, and you have no other contraindications to exercise, you should be ready to jump into full training, right?
Not necessarily.
Consider these two ankle sprain examples:
- Person 1 experiences a minor ankle sprain, takes it easy for a day or two, and then gradually gets their ankle moving and resumes normal activity with no major problems.
- Person 2 suffers a more severe ankle sprain with significant swelling and bruising. Based on their symptoms and function, this person decides to use crutches for a week, an ankle brace for a month, and it takes them longer to fully recover.
At this exact moment, which person sounds more familiar to you?
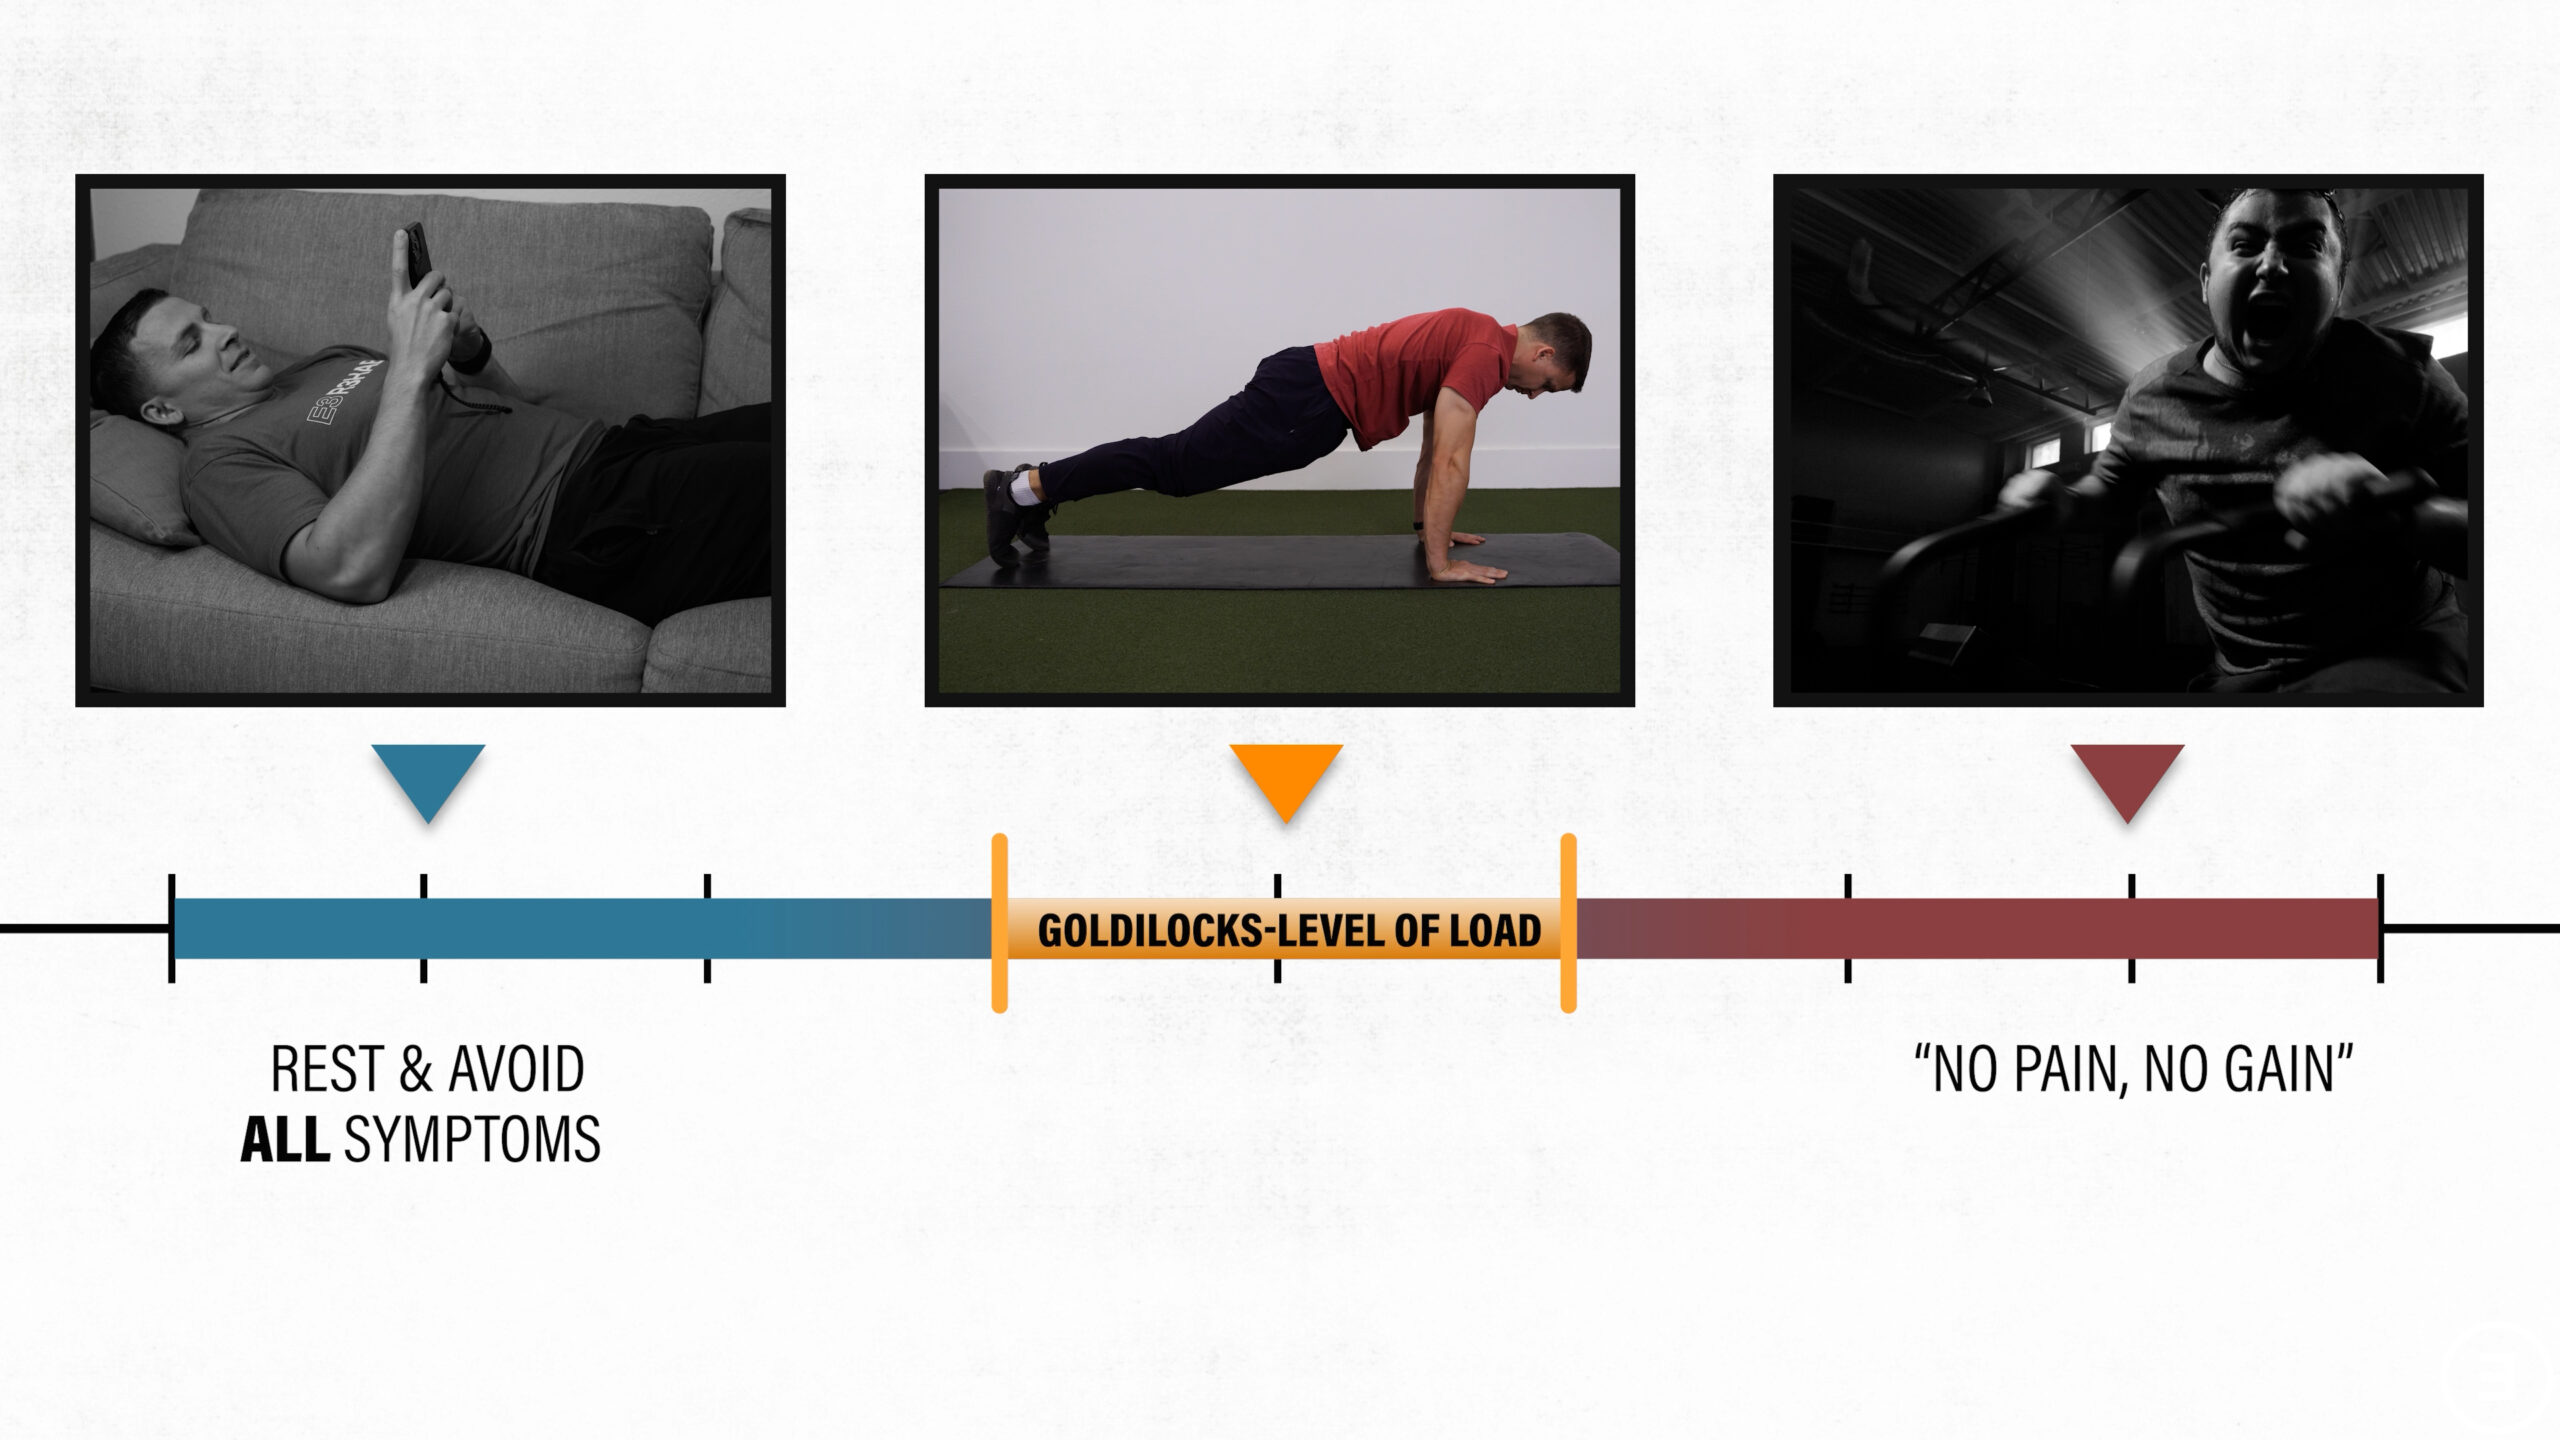
You rarely need to completely rest and avoid all symptoms after an injury, but you also shouldn’t approach rehab with a “no pain, no gain” mentality. Like the ankle sprain examples, some people will need to take it easier longer than others and some may even need to use a wrist brace for a period of time.
Unfortunately, it’s not a perfect science. Relative rest (and the “art” of rehab) is about finding that fine line between doing too much and doing too little. Whether you need more or less relative rest depends on the recency of your injury, your severity of symptoms, and your limitations in function.
Trial and error will be involved, but the following sections should hopefully give you more control of this process.
Step #3: Activity and Technique Modifications
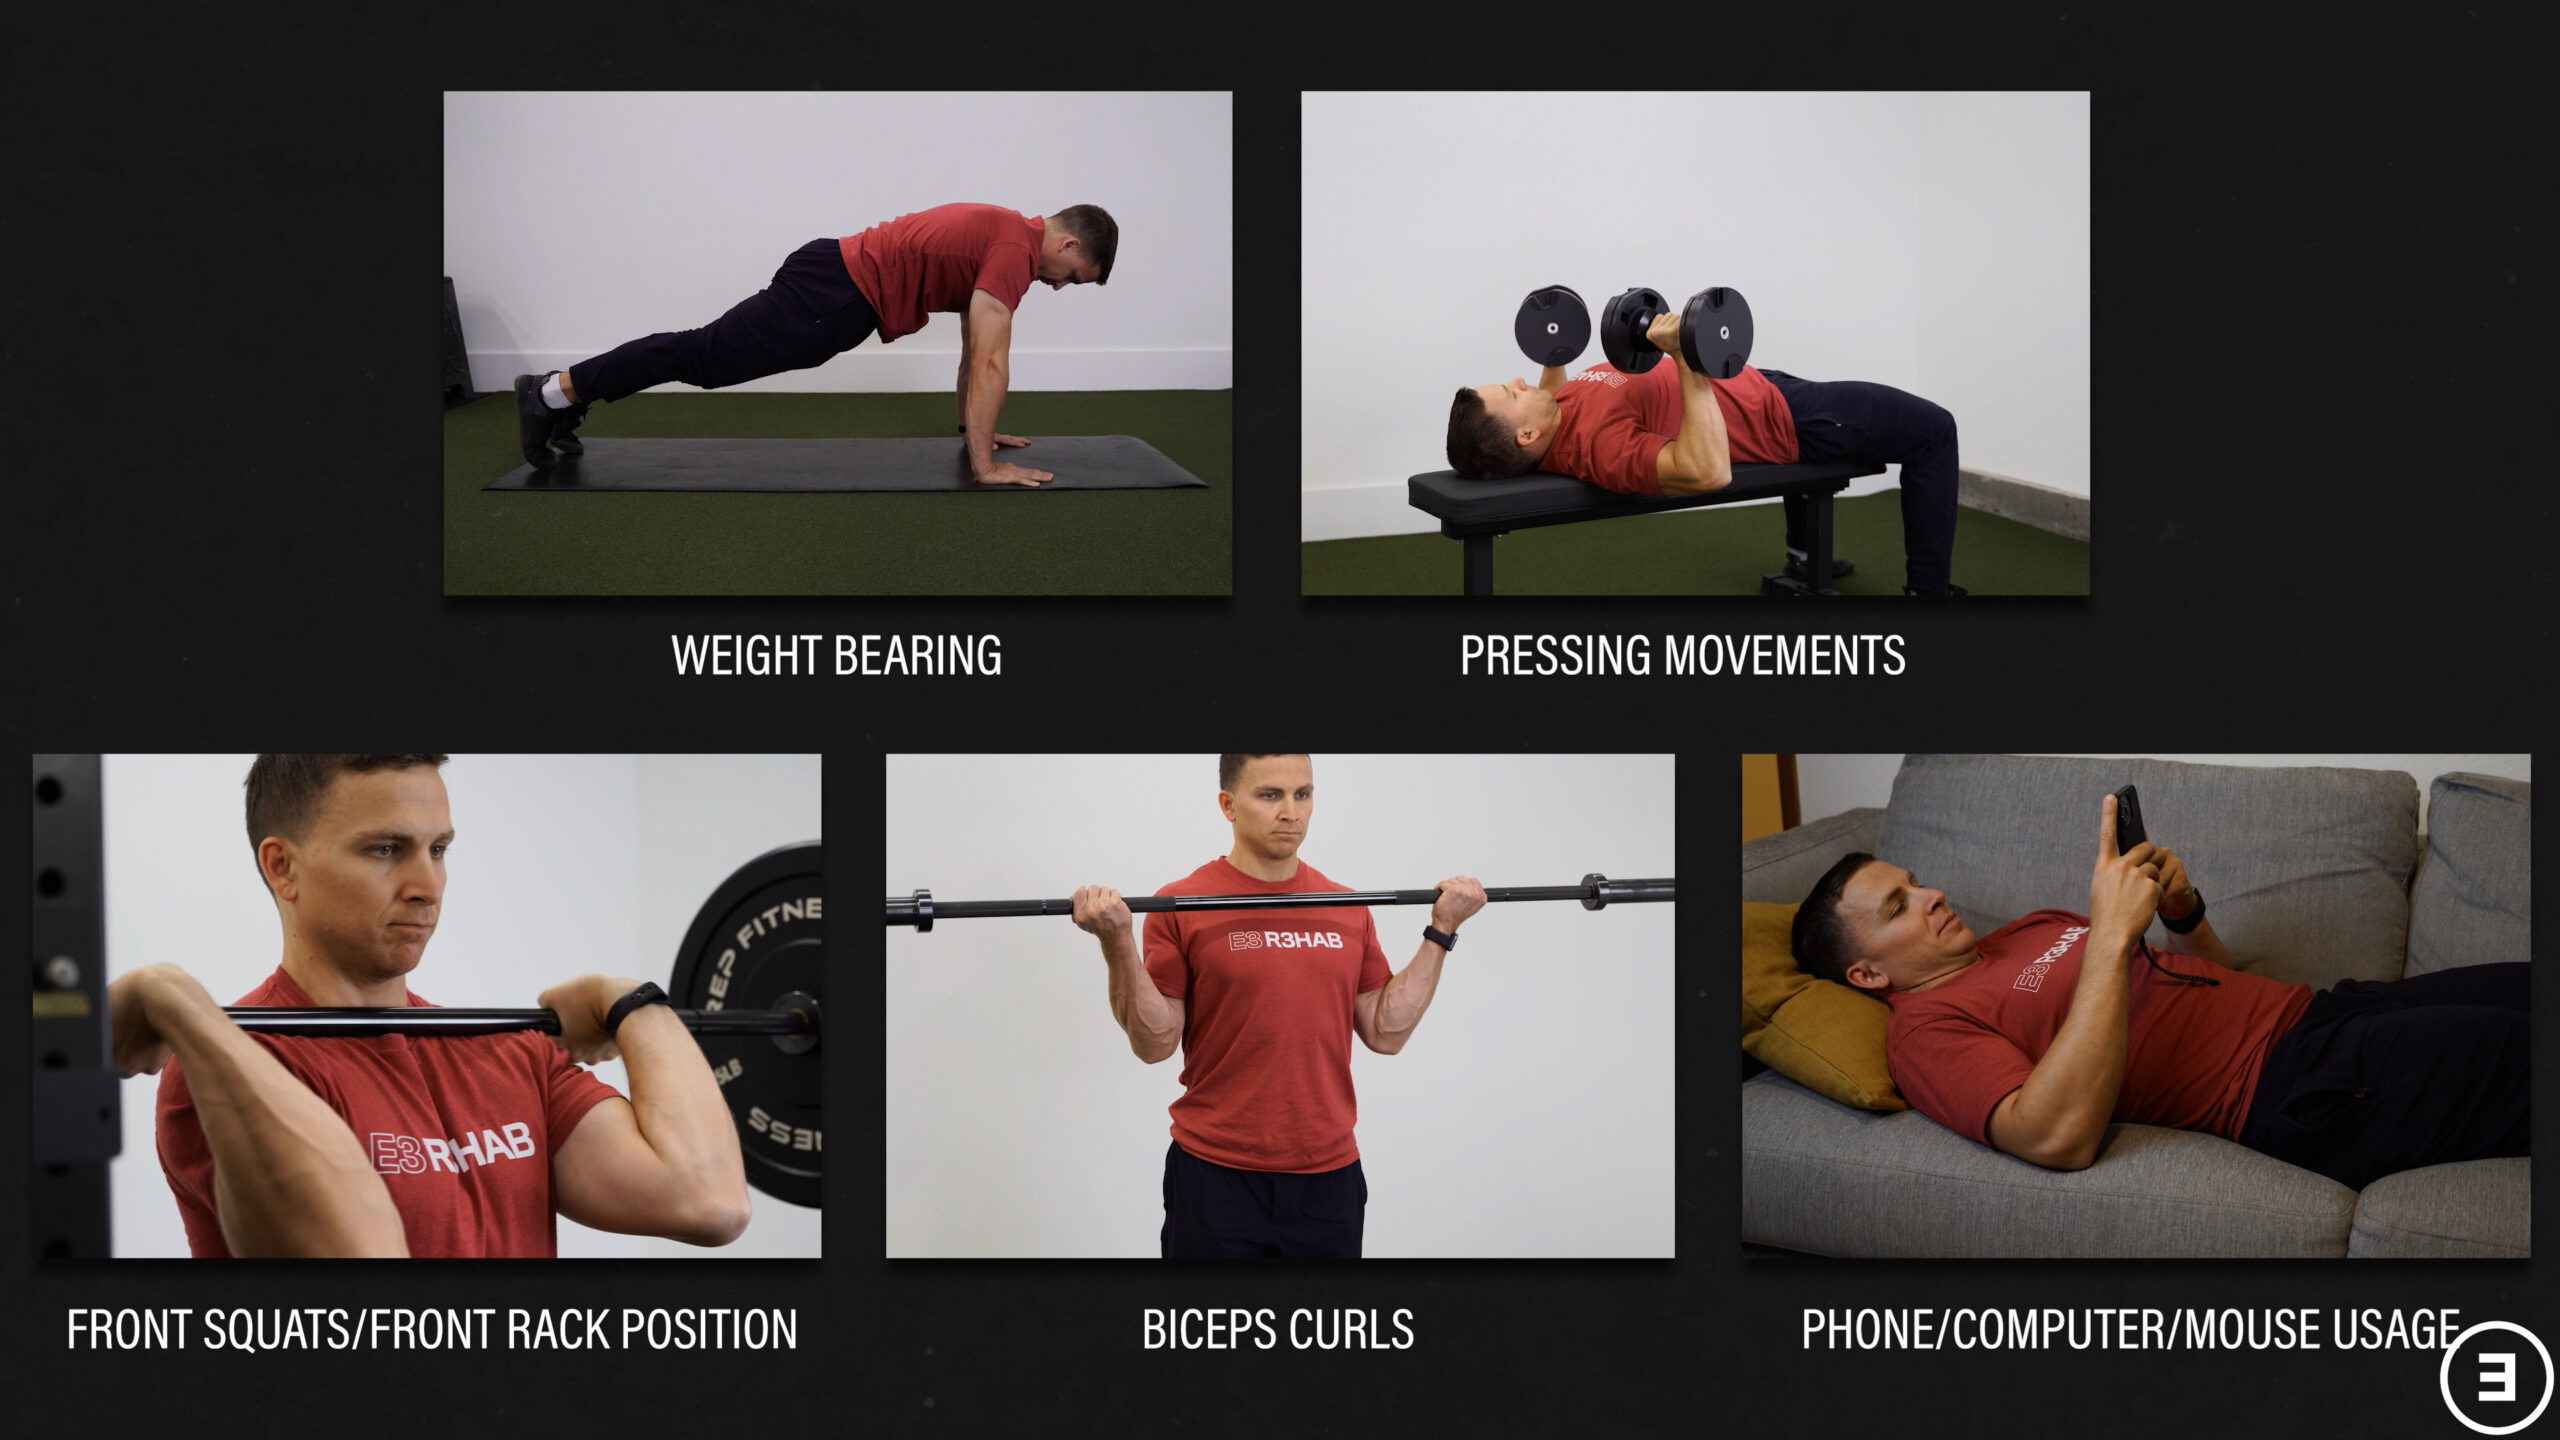
The activities and movements that aggravate wrist pain are not always perfectly predictable, but they’re usually not completely unexpected either. Let me explain how to modify 5 commonly problematic scenarios:
- Weight Bearing
- Pressing Movements
- Front Squats or the Front Rack Position
- Biceps Curls
- Phone/Computer/Mouse Usage
Weight Bearing
Weight bearing is one of the most difficult, frustrating, and uncomfortable activities for individuals with wrist pain, especially when the wrist is in an extended position.
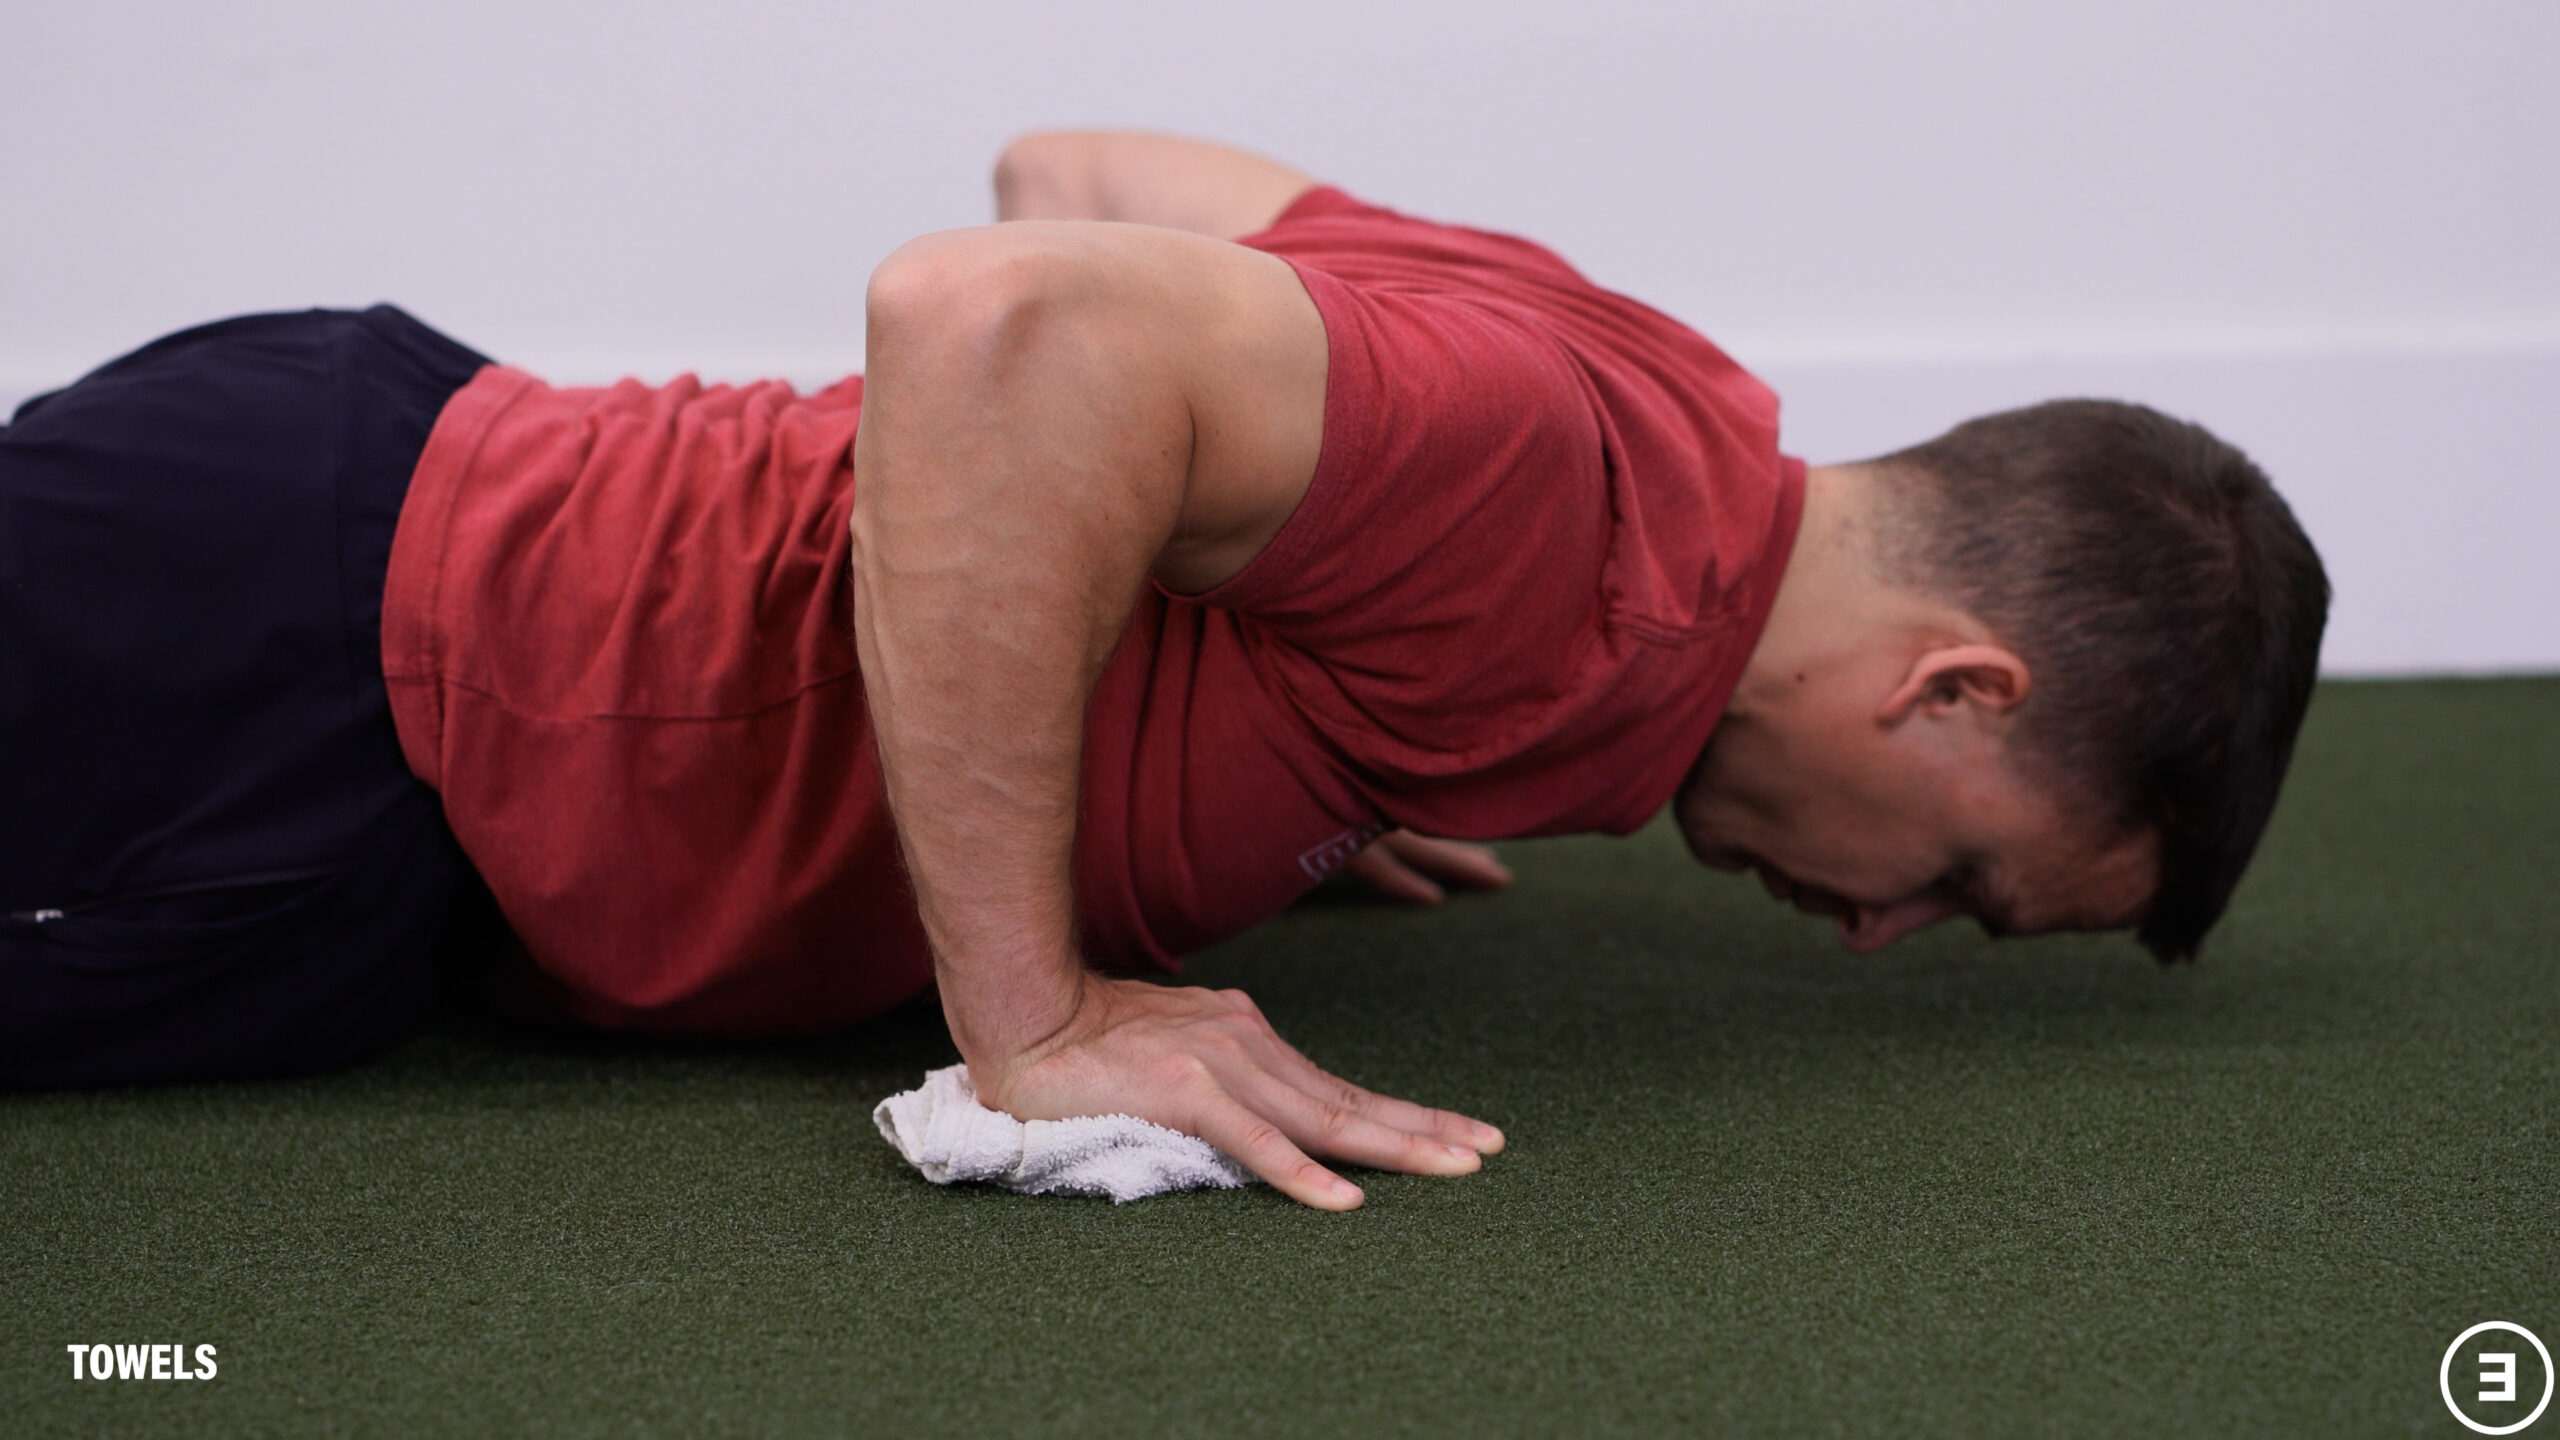
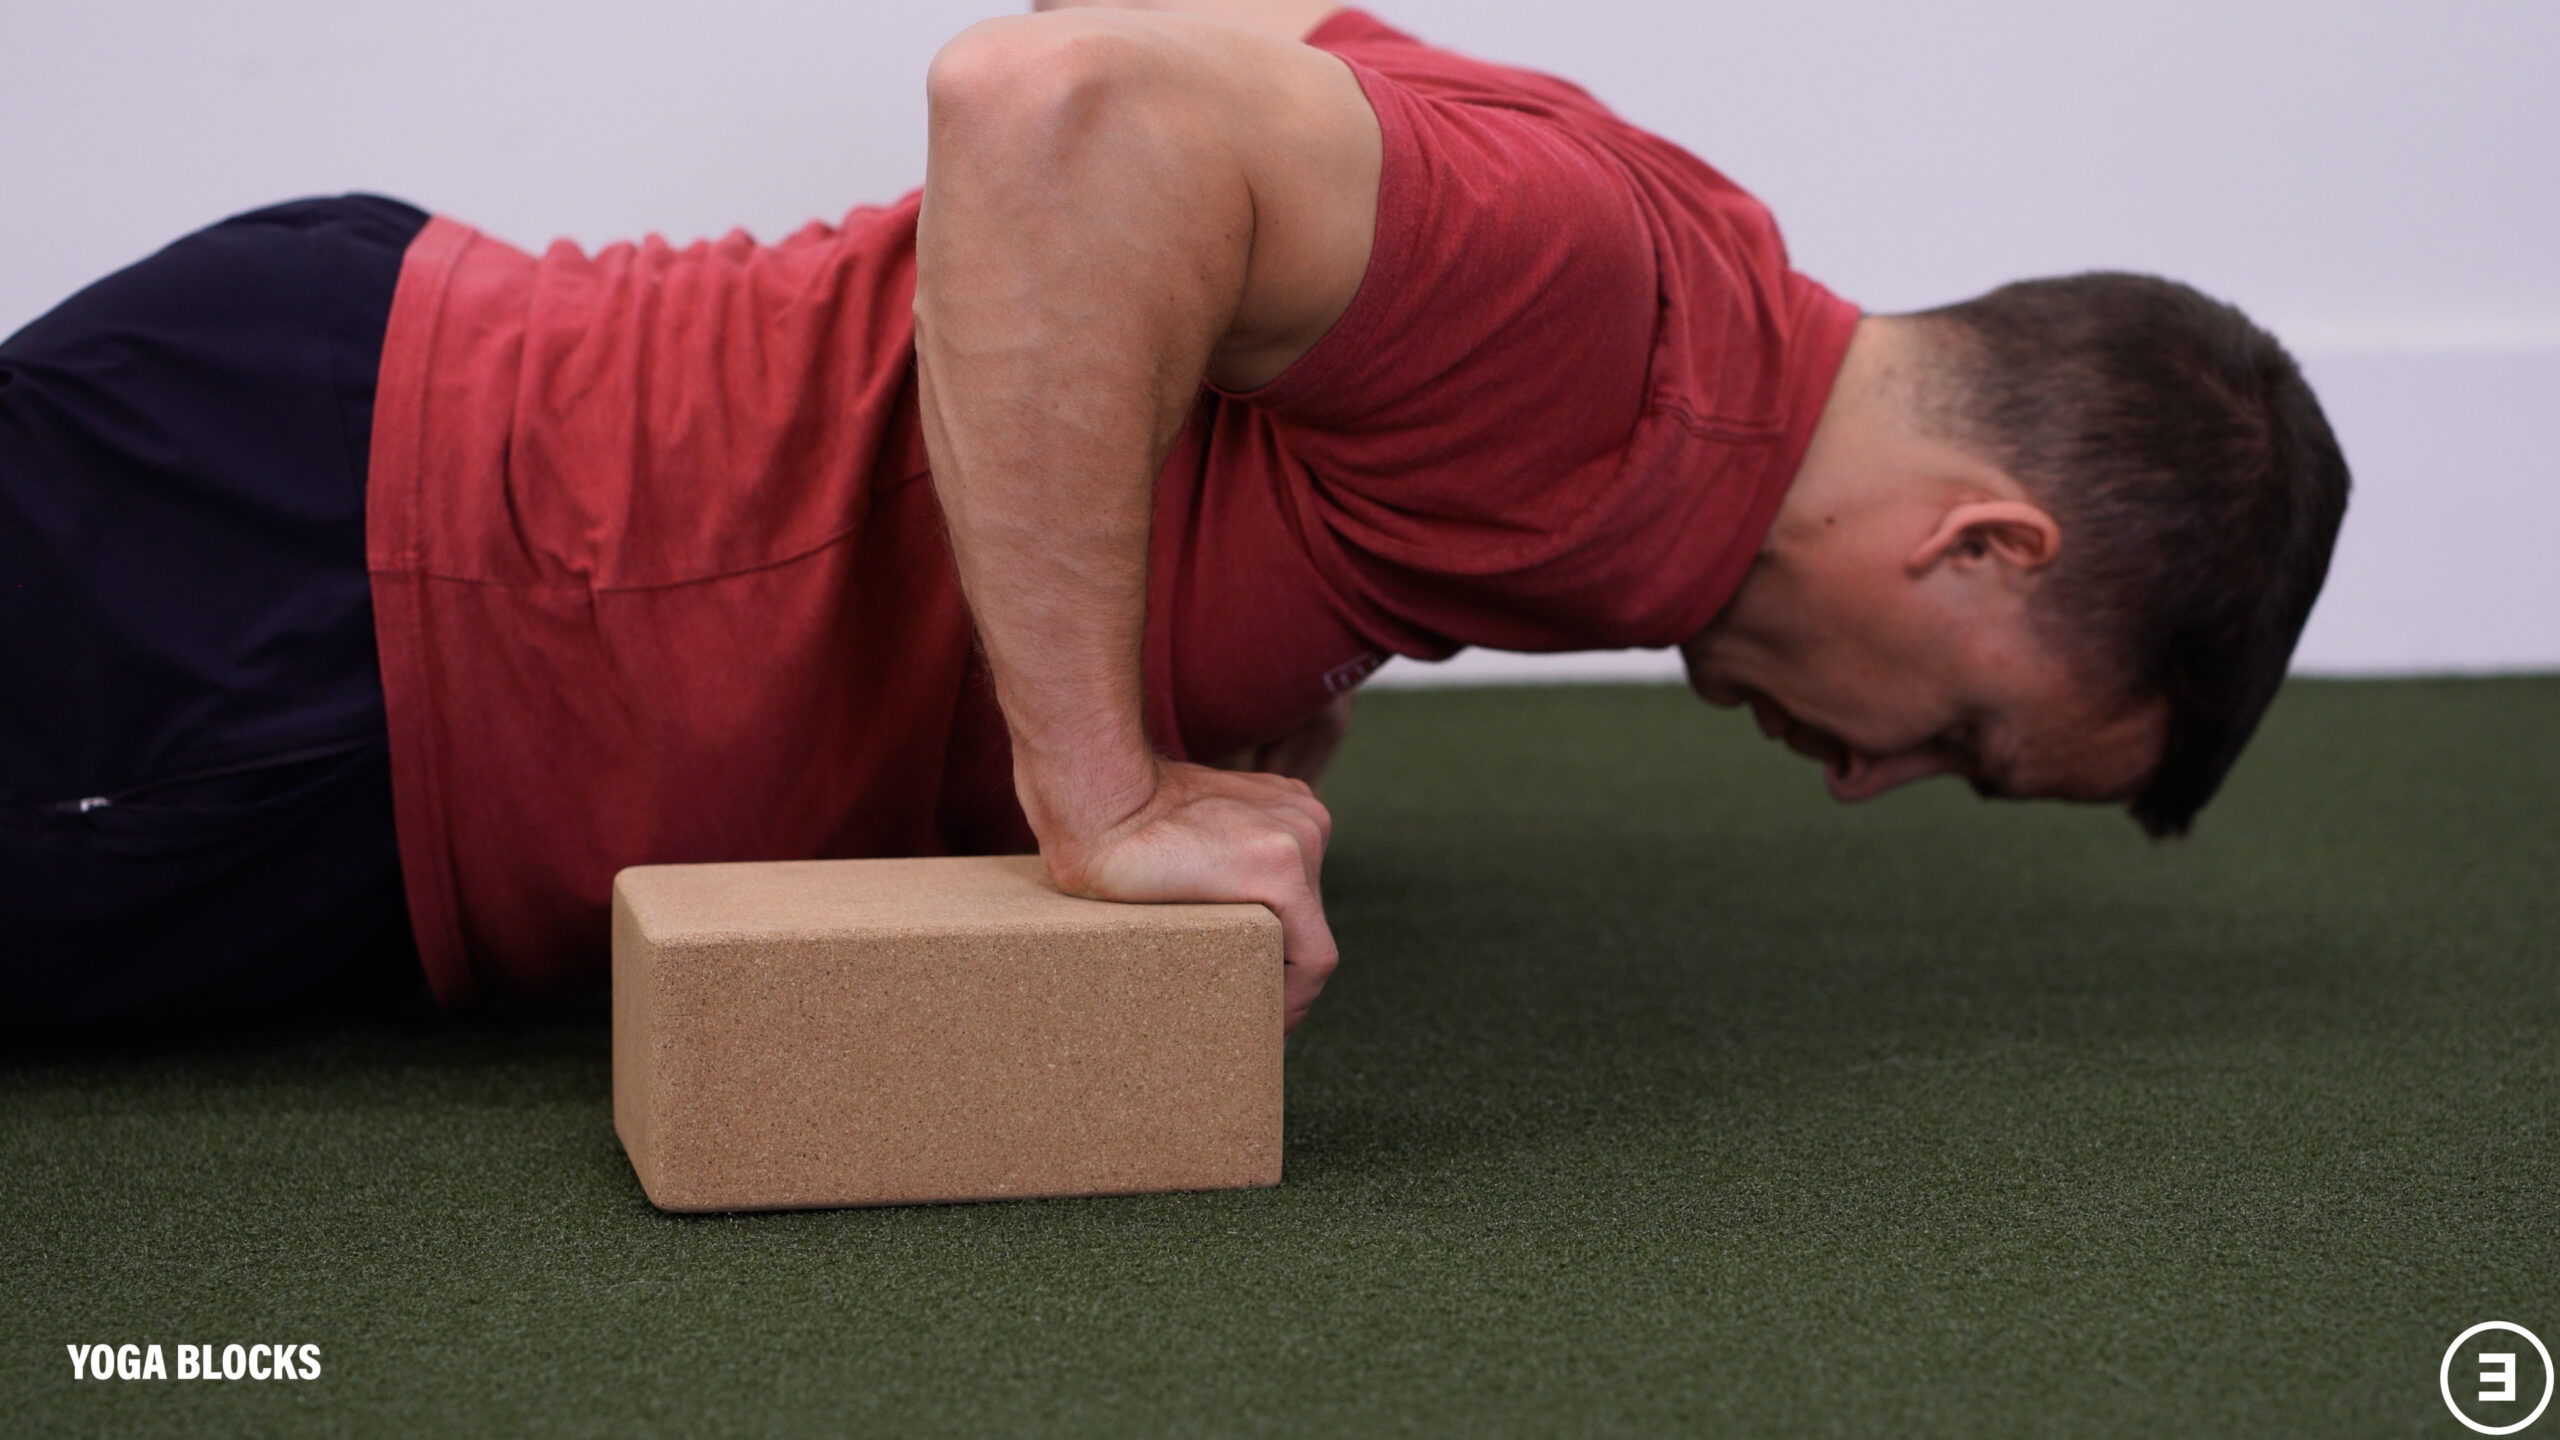
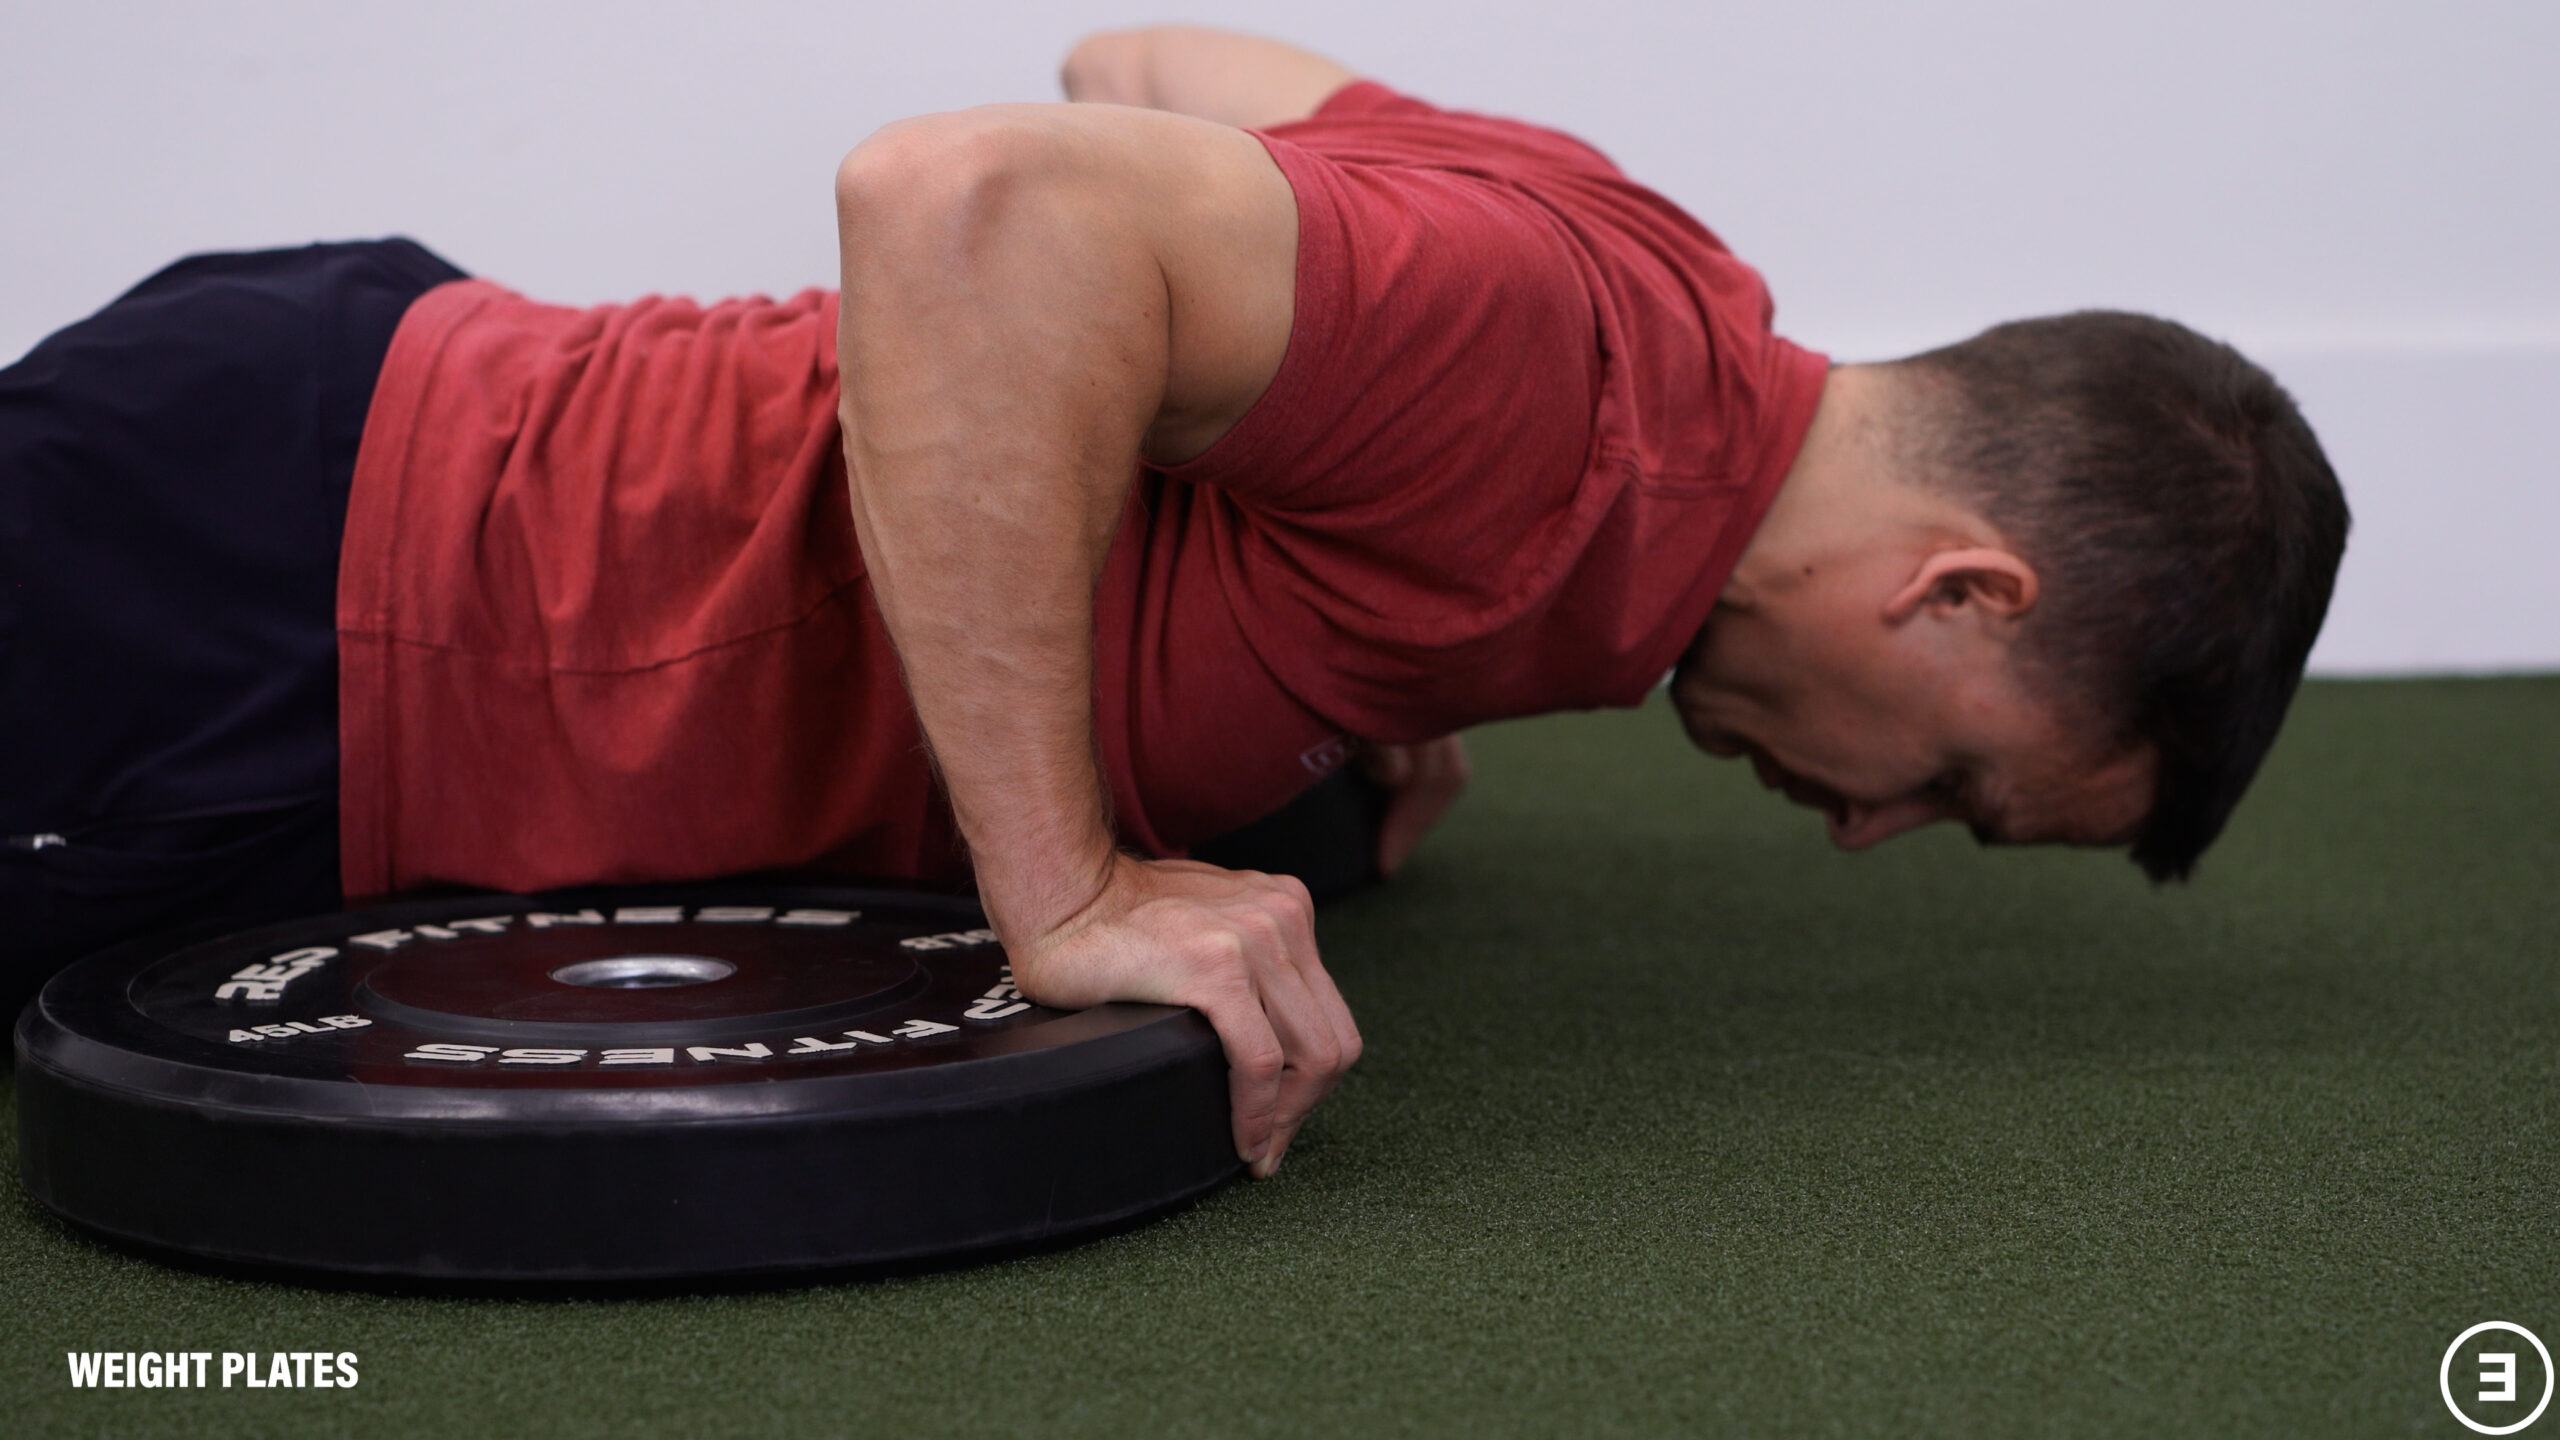
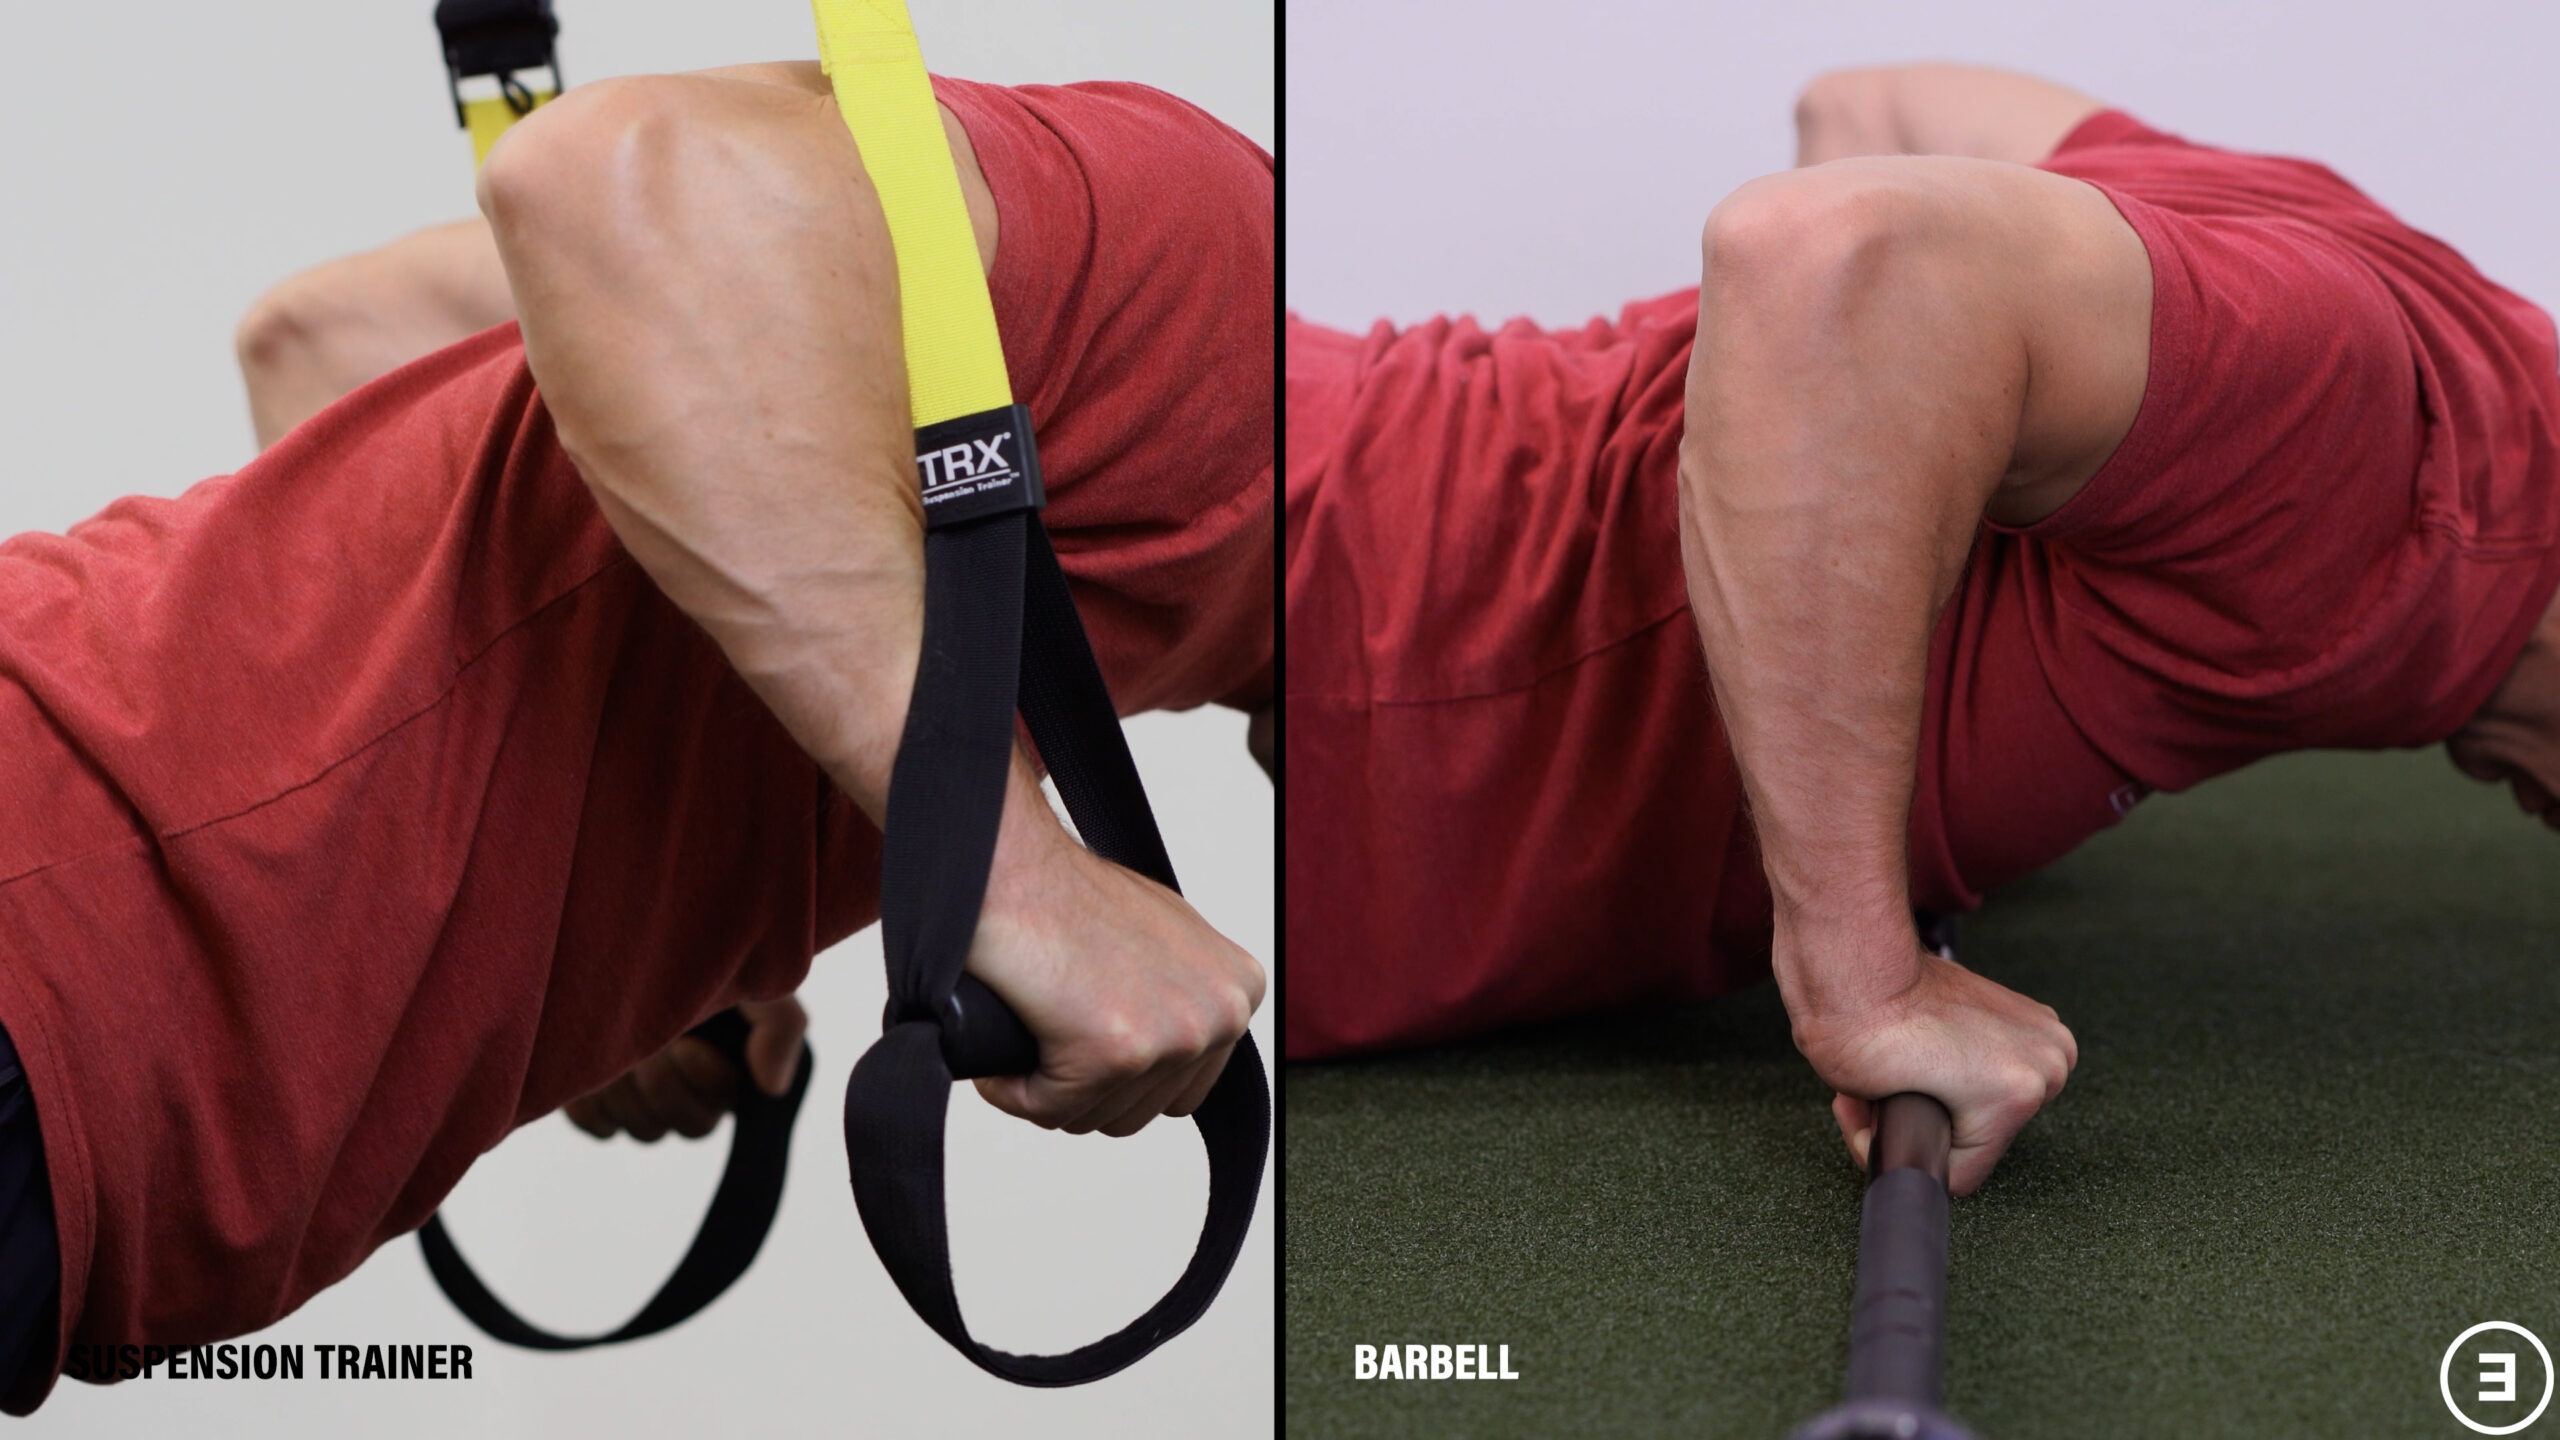
Whether you’re struggling with planks, push-ups, or yoga poses, there are numerous strategies to reduce or eliminate the amount of wrist extension required during weight bearing movements that should help with symptoms. Some options include:

Hex Dumbbells also allow you to keep your wrists in a neutral position and unlike circular dumbbells, hex dumbbells won’t roll.

Towels – by rolling or stacking towels and placing them under the “heels” of your hands, you can significantly reduce the amount of wrist extension required during weight bearing movements.
Yoga Blocks are similar to towels. You can allow your fingers to hang off the edges so the pressure is going through the palm of your hands.
Weight Plates share the same idea.
You can even use rings, a suspension trainer, or a barbell.
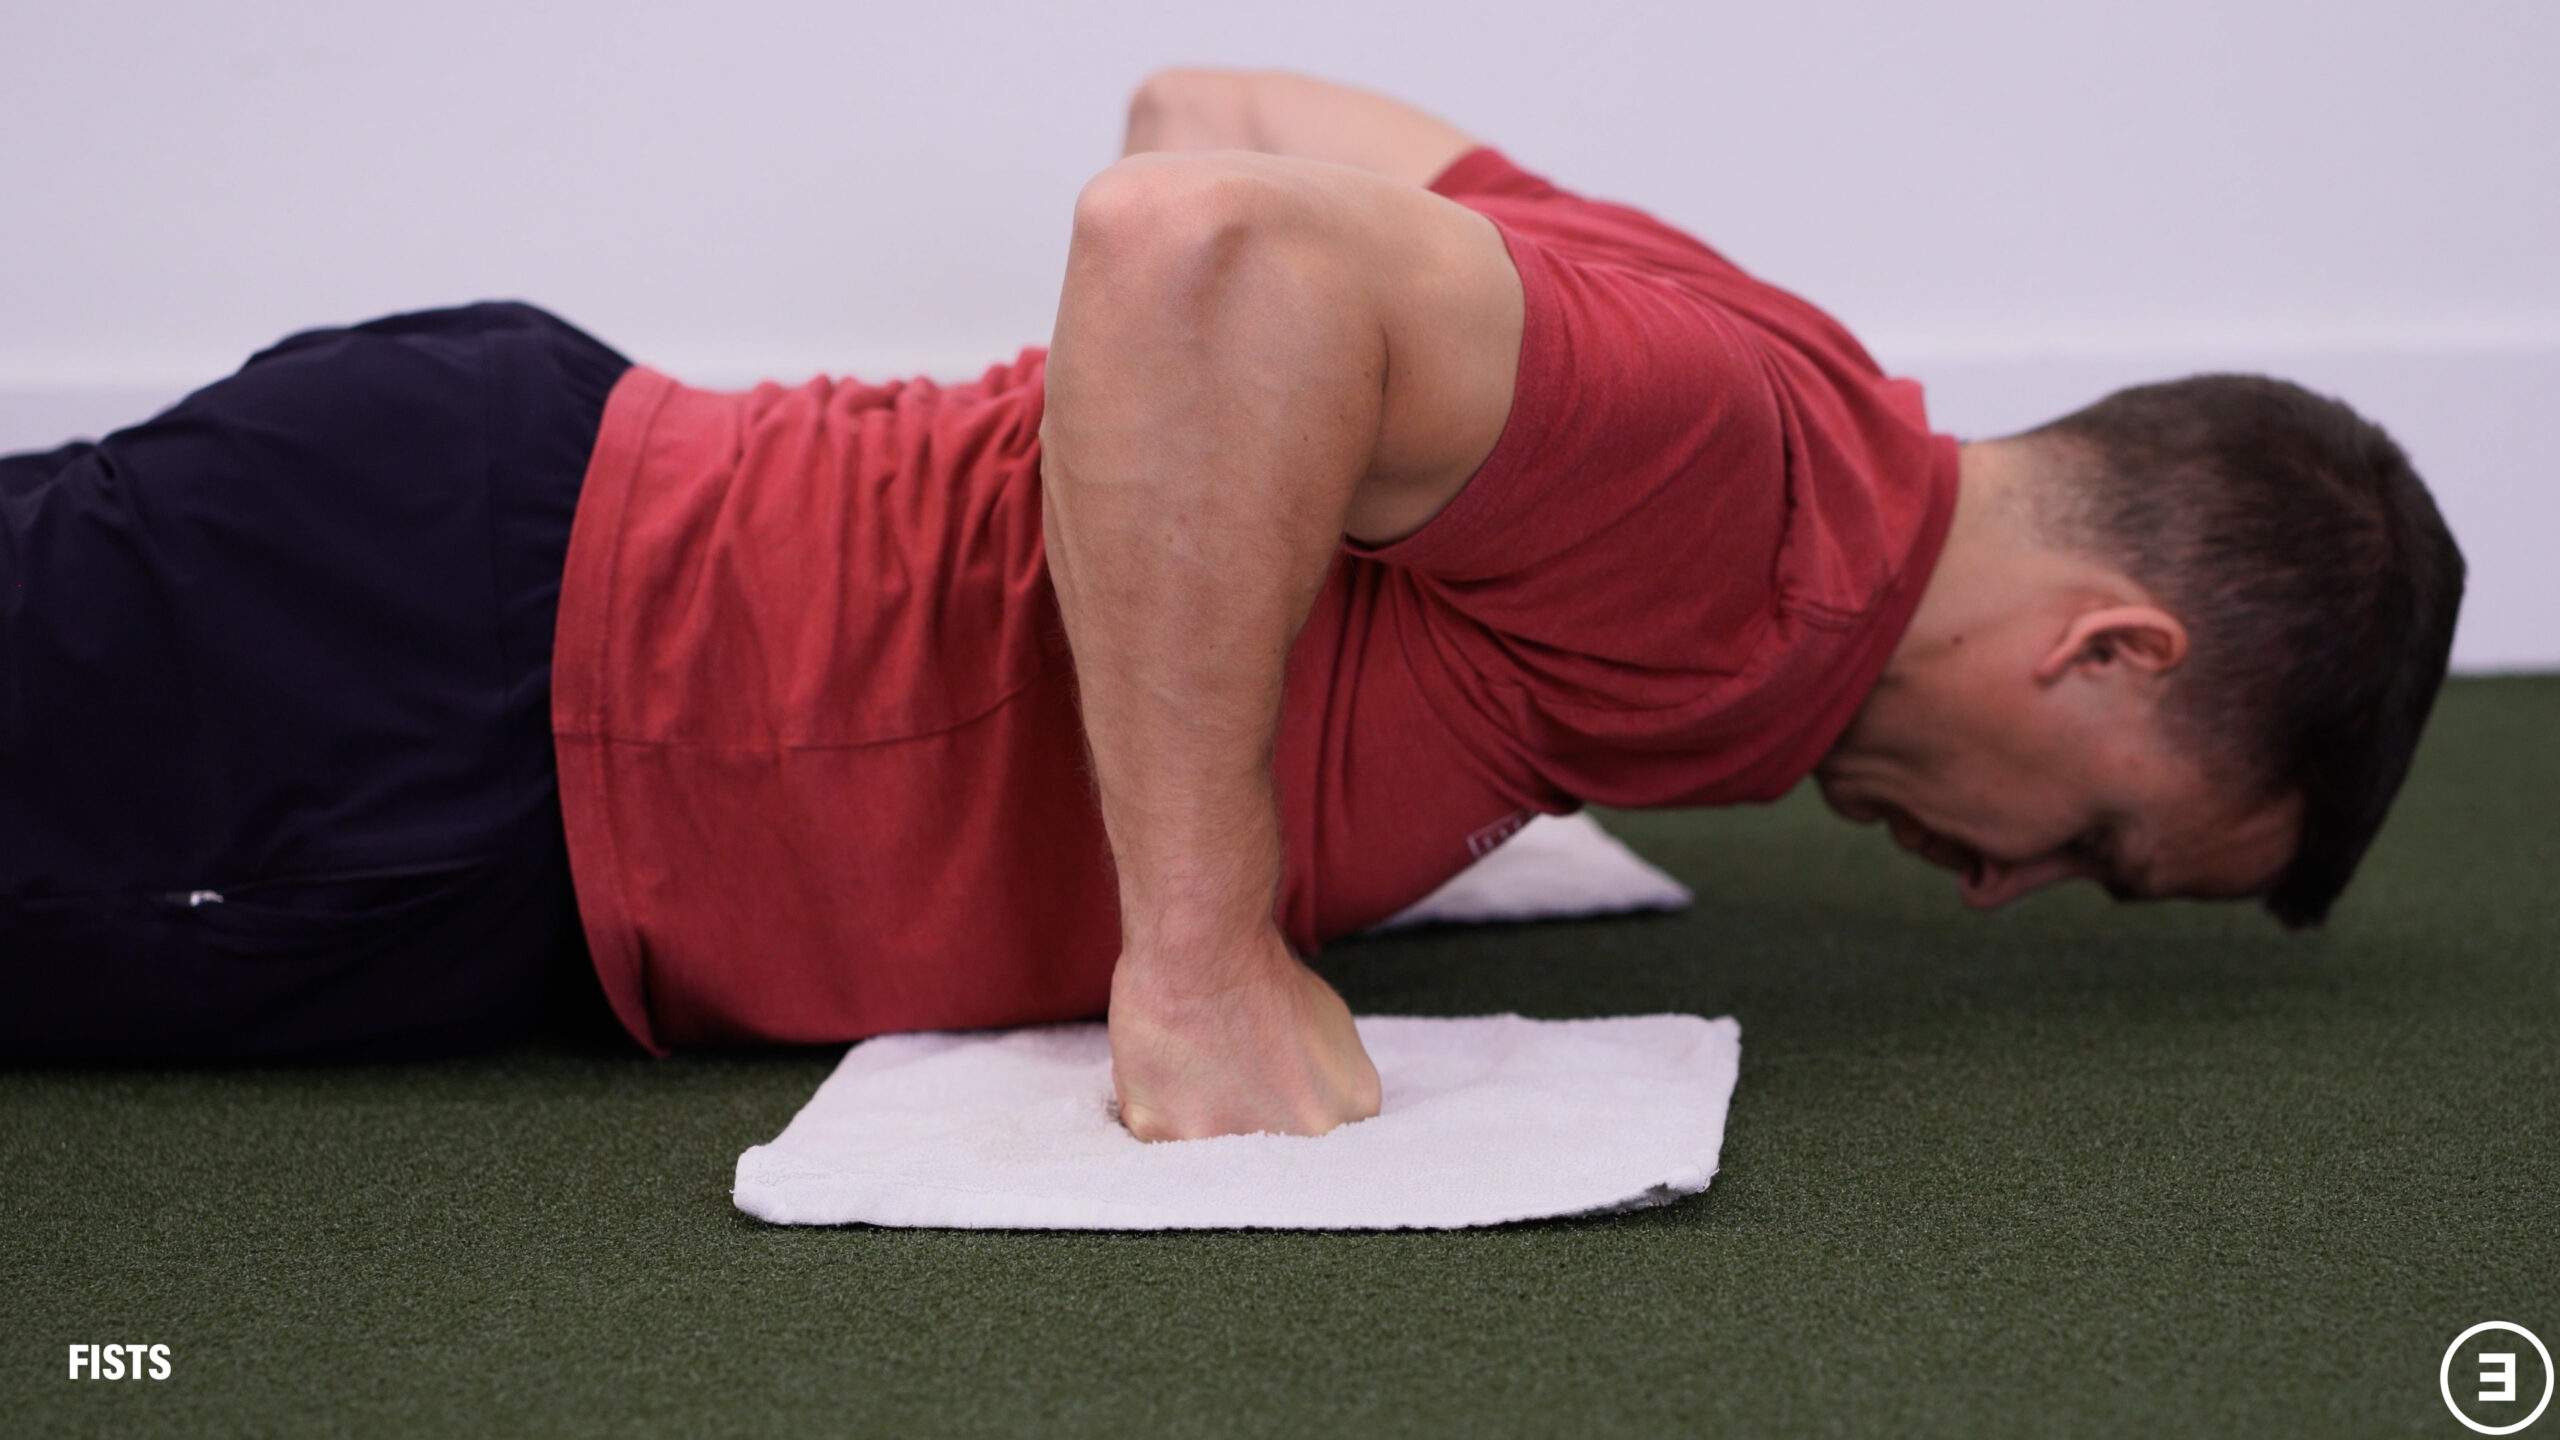
Certain people like to use their fists, but this can be difficult or uncomfortable for some.
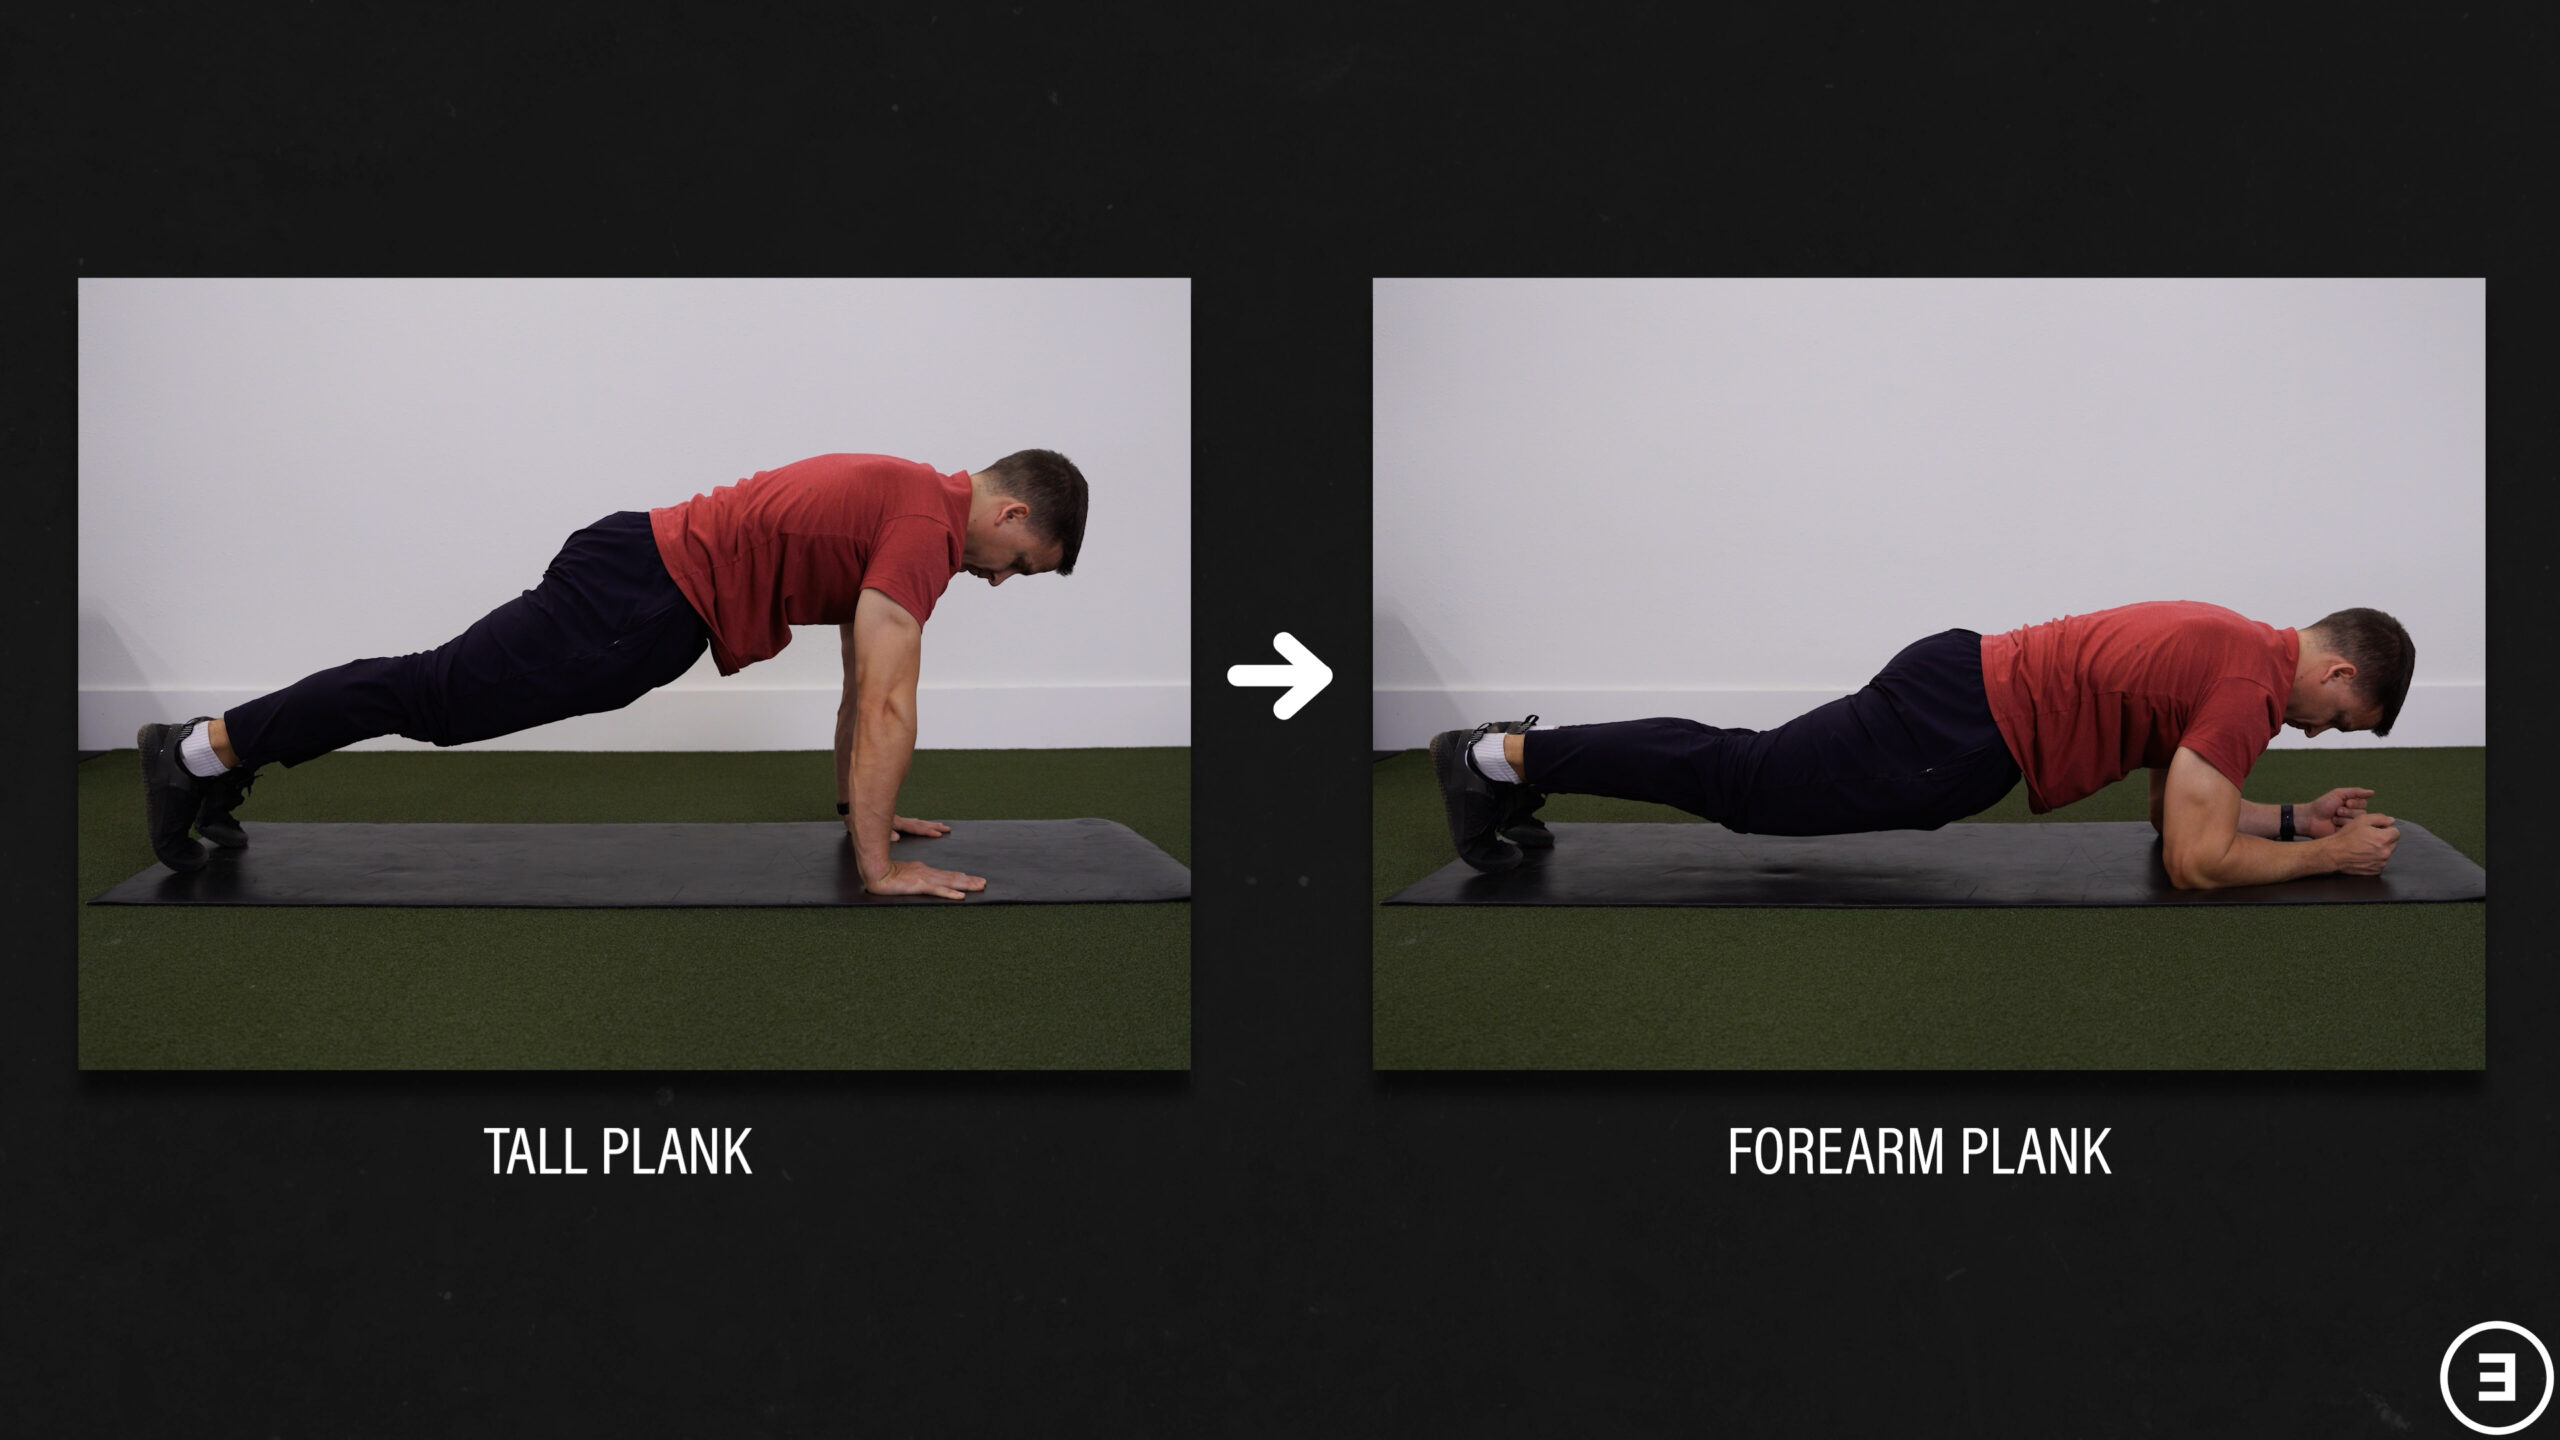
For some movements, such as planks, you can switch to performing them on your forearms (if you weren’t doing so already) as no benefits of the exercise are lost.
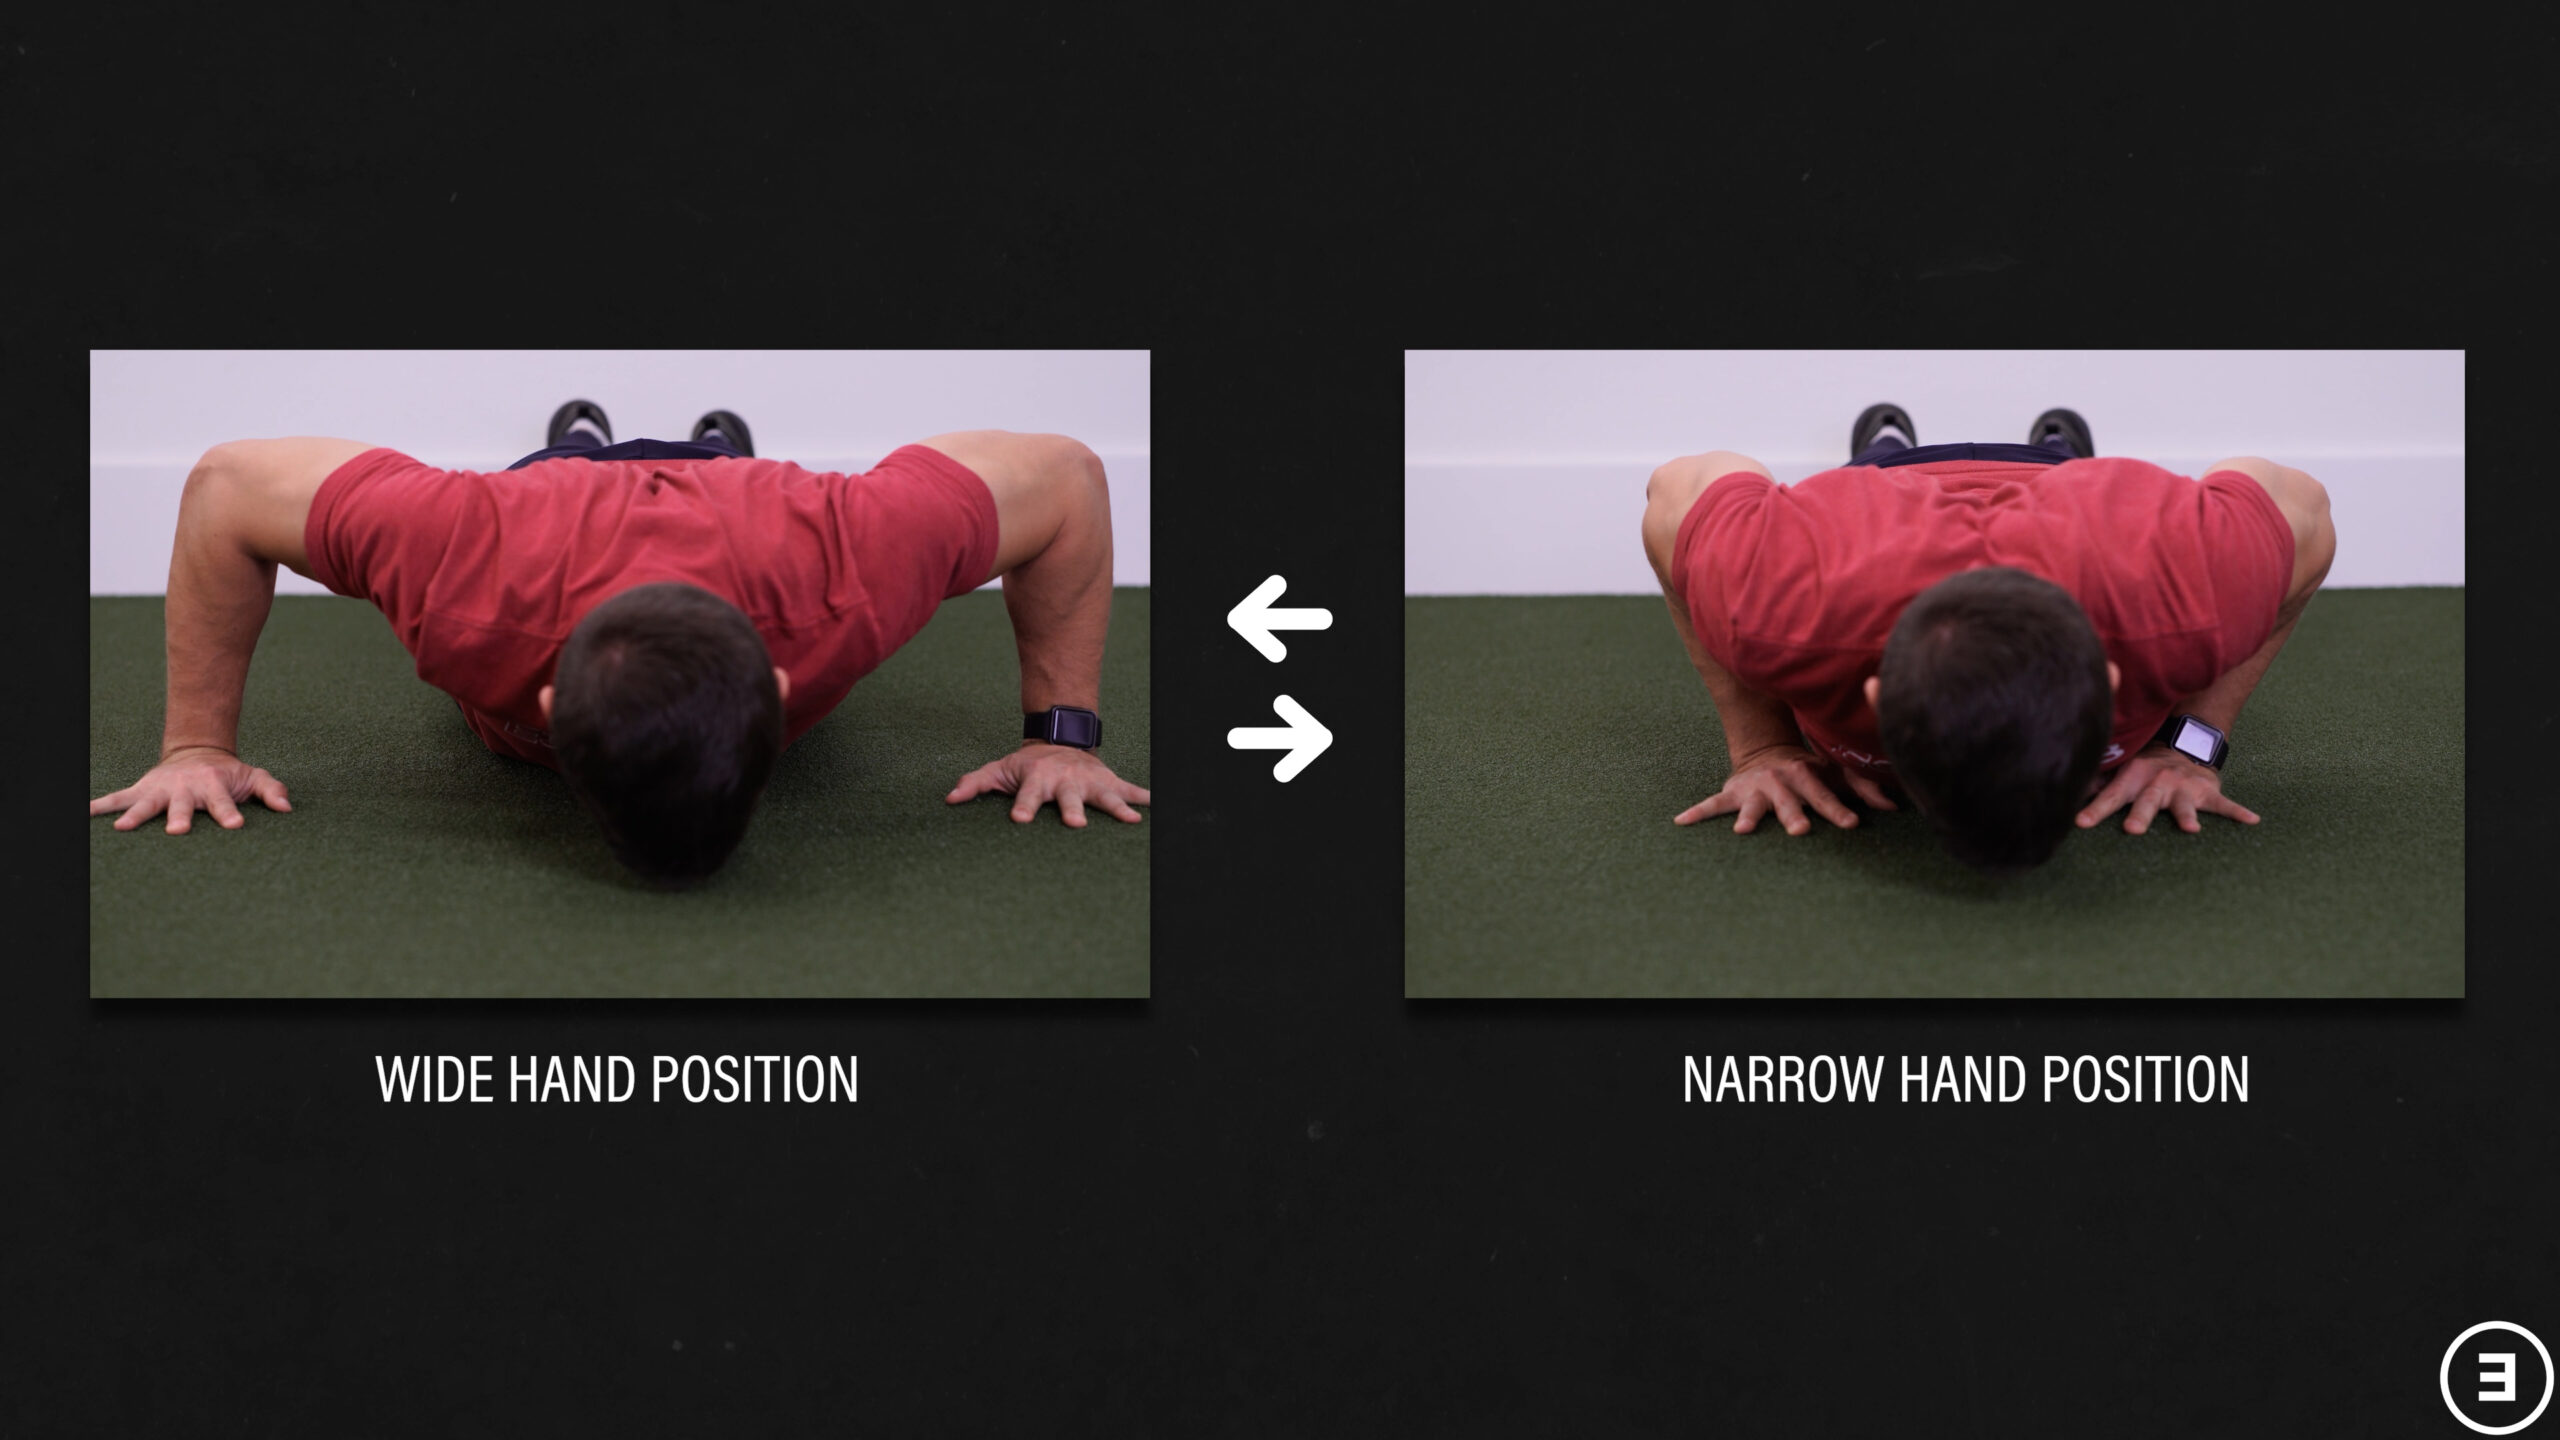
You can also consider changing your technique. For instance, if you do push-ups with a really wide or narrow hand position, try moving your hands closer or further apart. You can also practice spreading and engaging your fingers, which can help to offload the wrist.
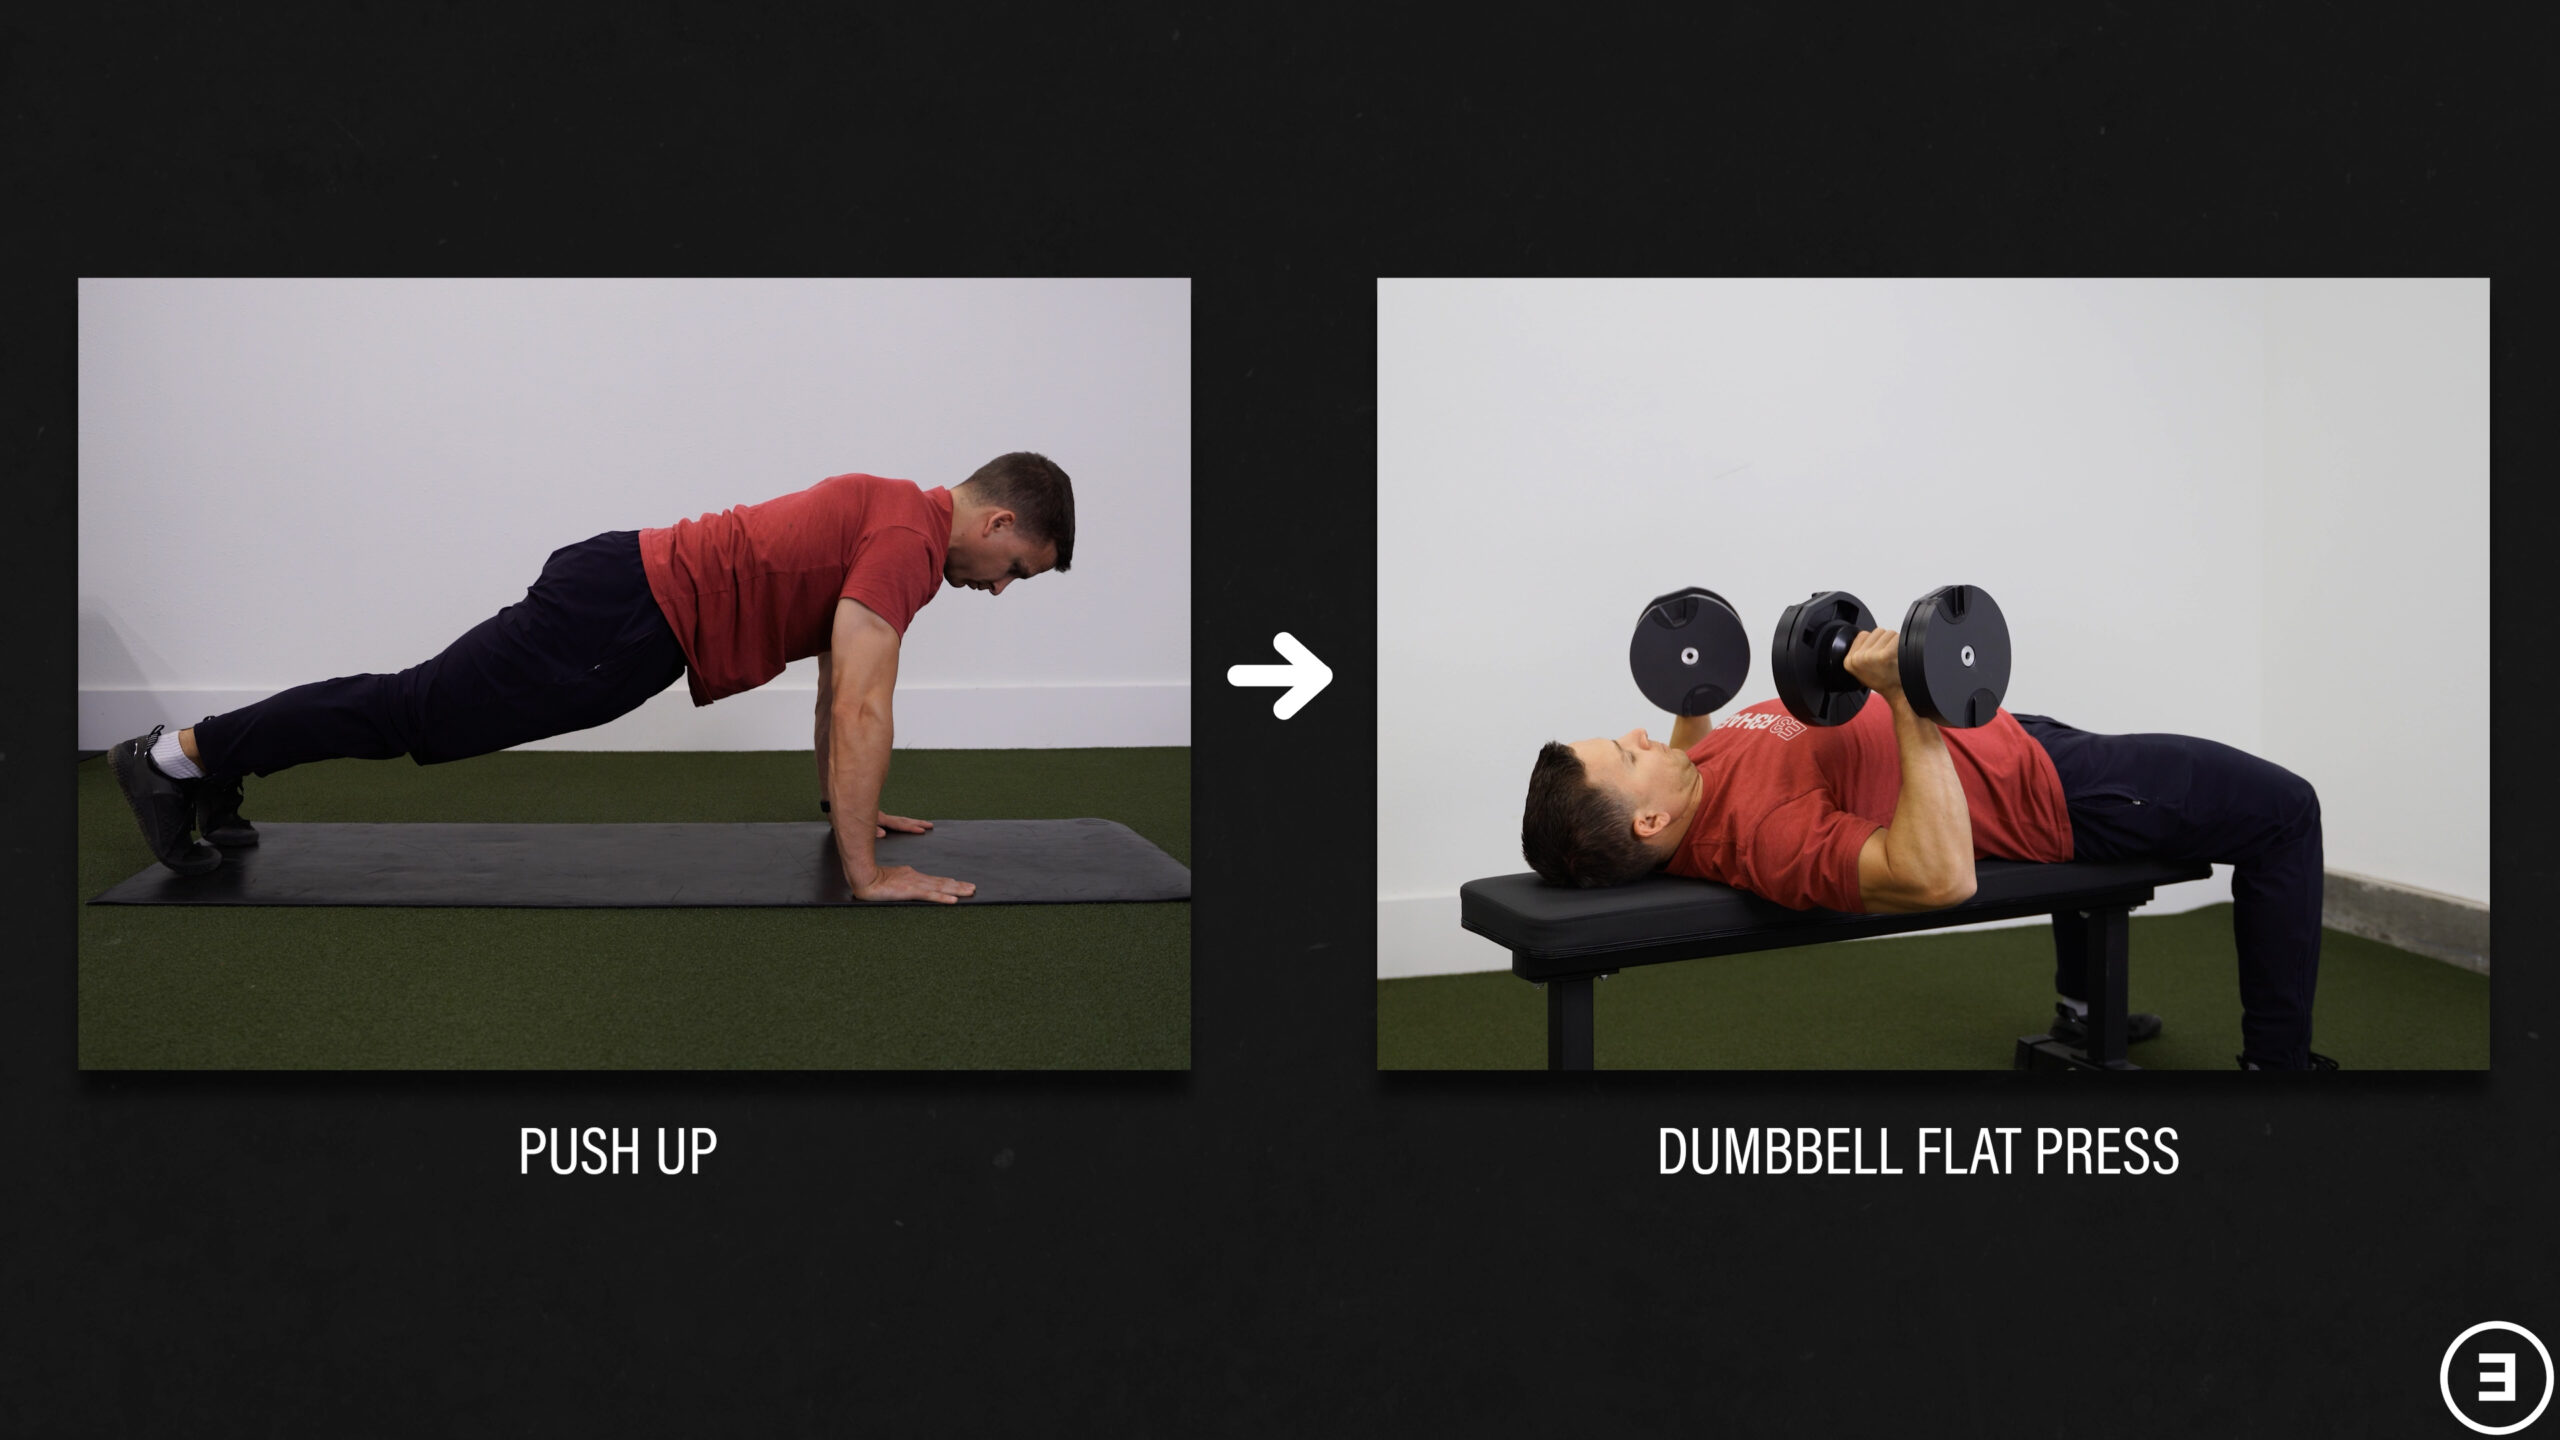
If your goals don’t require you to do a certain exercise, you can swap it out. For example, if you’re just trying to build muscle or strength, there are dozens of other exercises you can do in favor of push-ups.
What if you have pain with day-to-day activities and not specific exercises, like pushing yourself up out of a chair? Well, you might have to make yourself aware of any habits contributing to your symptoms and try to minimize them until your wrist starts to feel better over time.
Pressing Movements
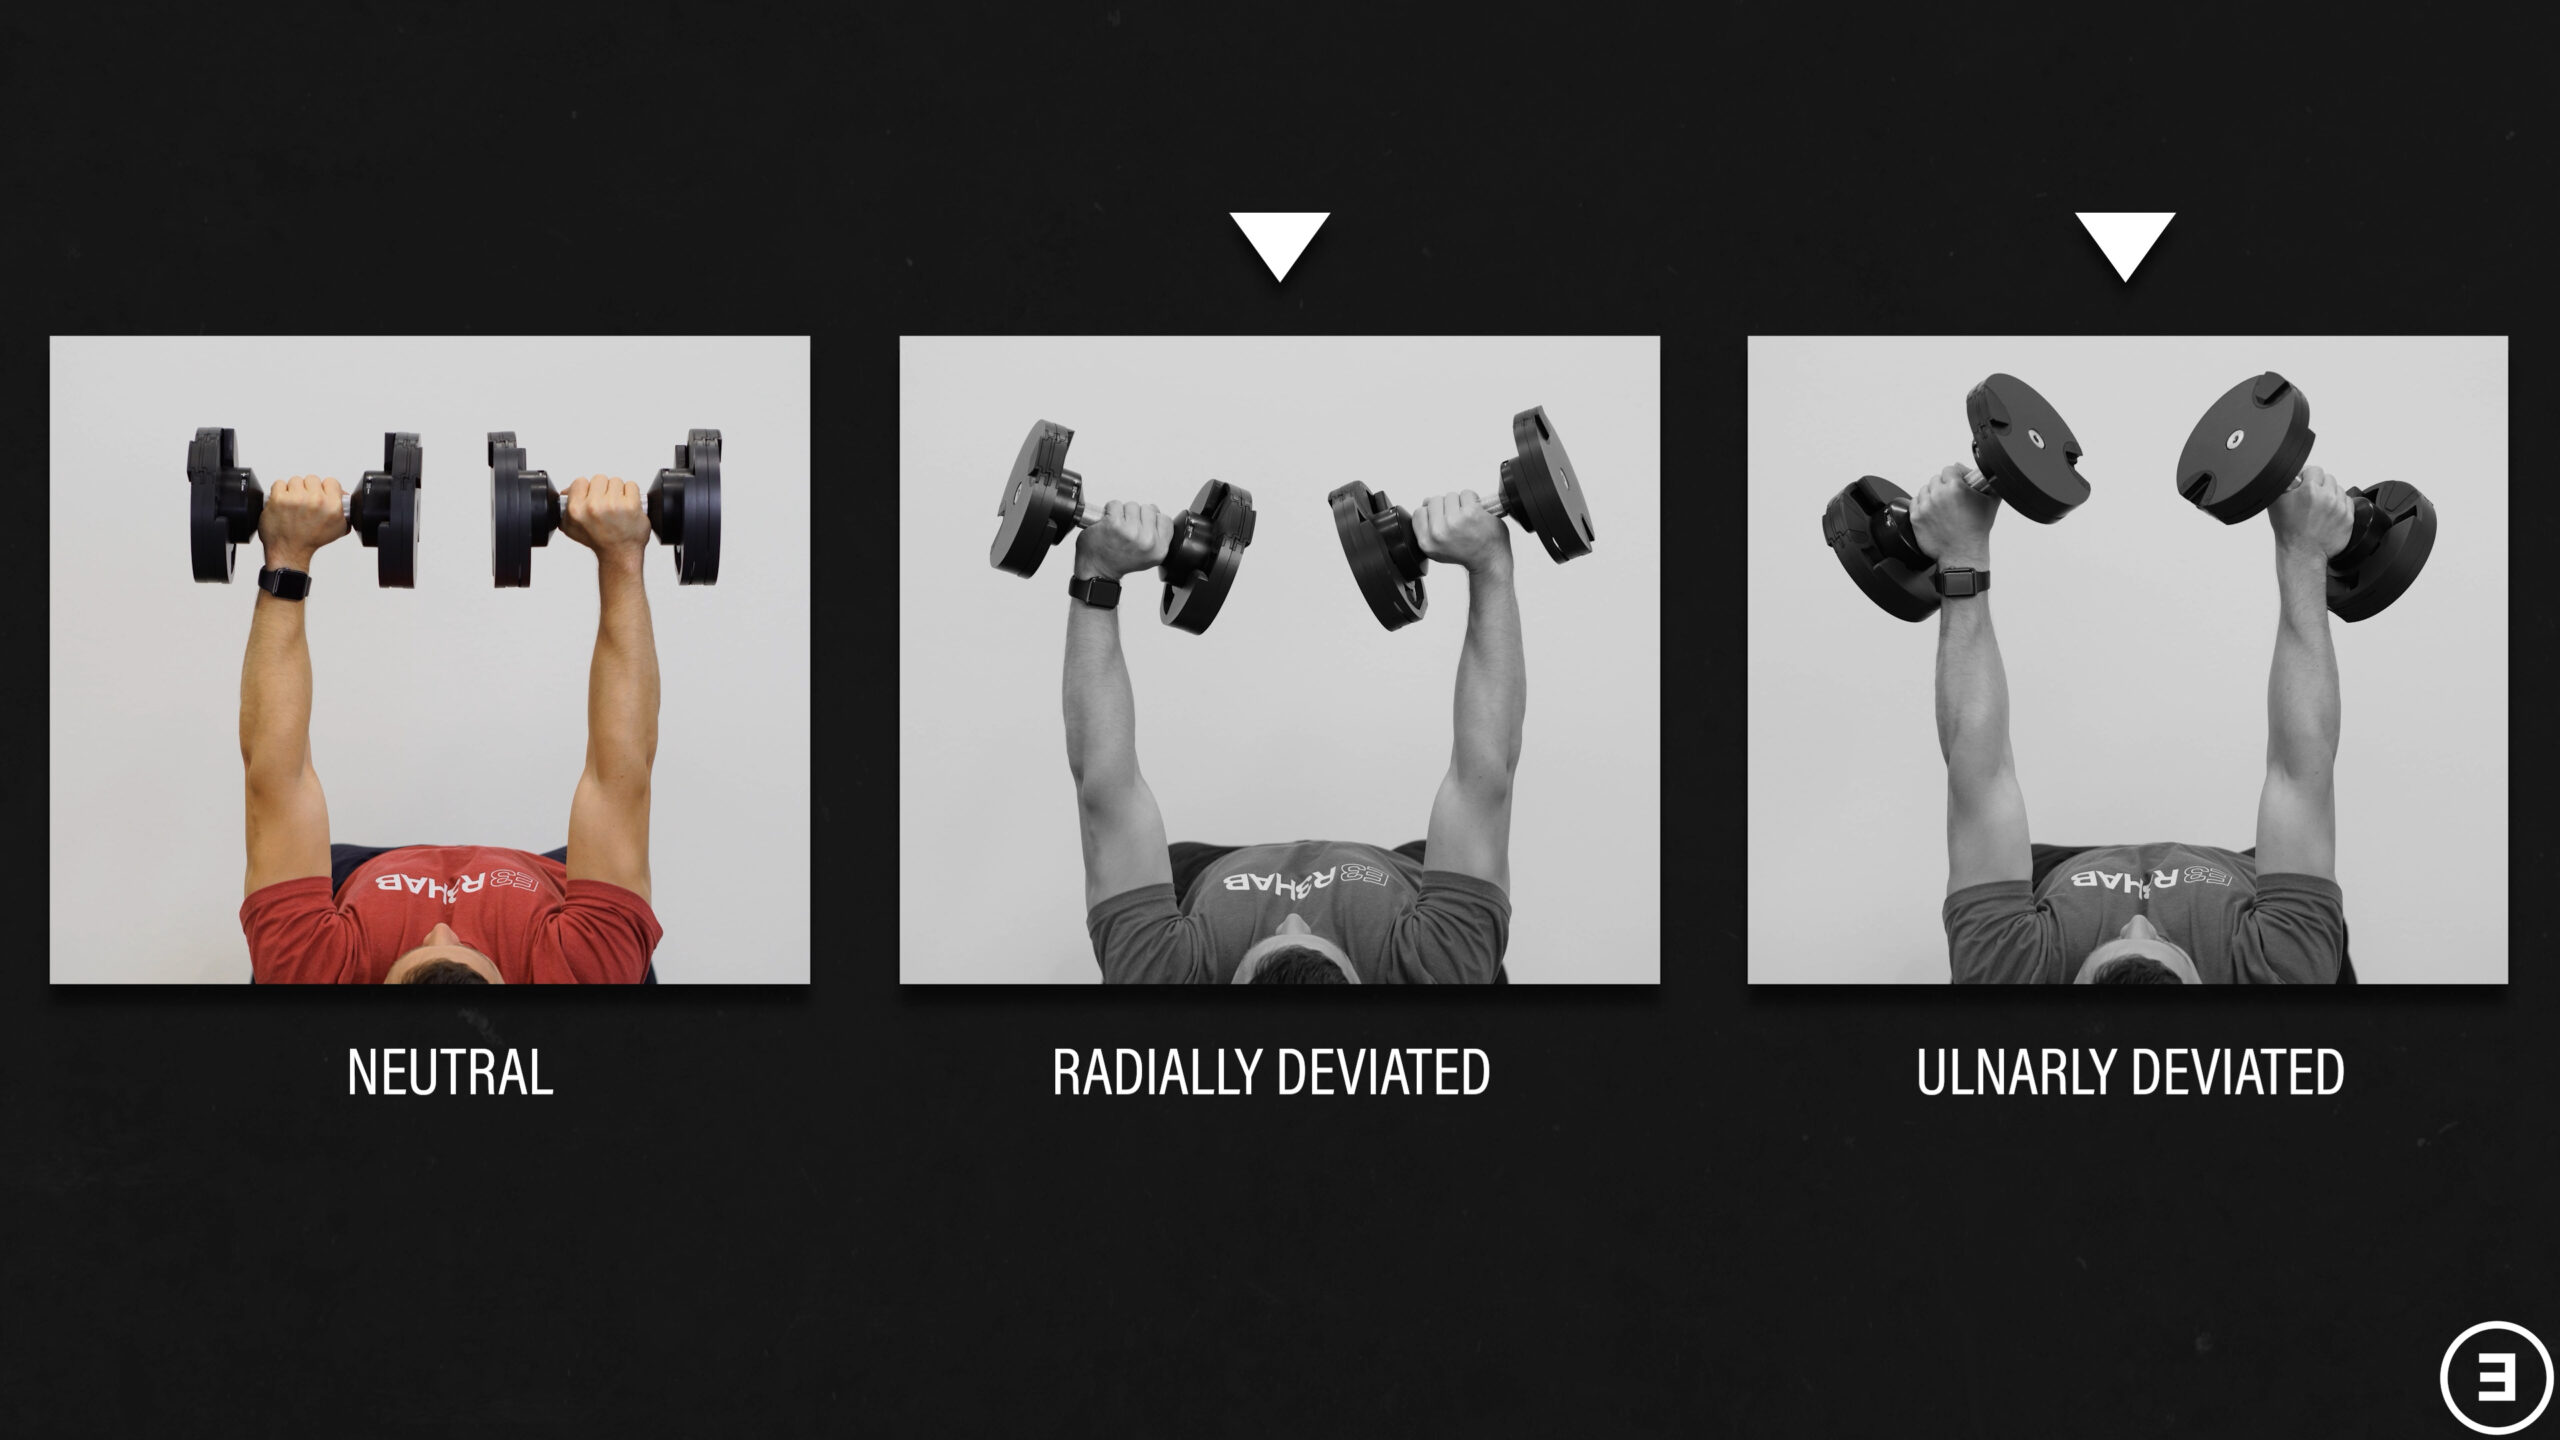
The position of your wrists during pressing movements with dumbbells, kettlebells, or a barbell can also influence symptoms. Whether you’re extended, radially deviated, or ulnarly deviated, aiming for a more neutral position with the weight stacked directly over the center of your wrists can be helpful, at least temporarily.
Sometimes all that’s needed is actively engaging the muscles that control the wrist and slightly modifying the position of your wrists. Other times, changes to your technique may be necessary.
When using dumbbells, try to grab the center of the dumbbells. If you grab off to one side and the weight is unevenly distributed, you may unnecessarily place your wrist in a more radially or ulnarly deviated position.
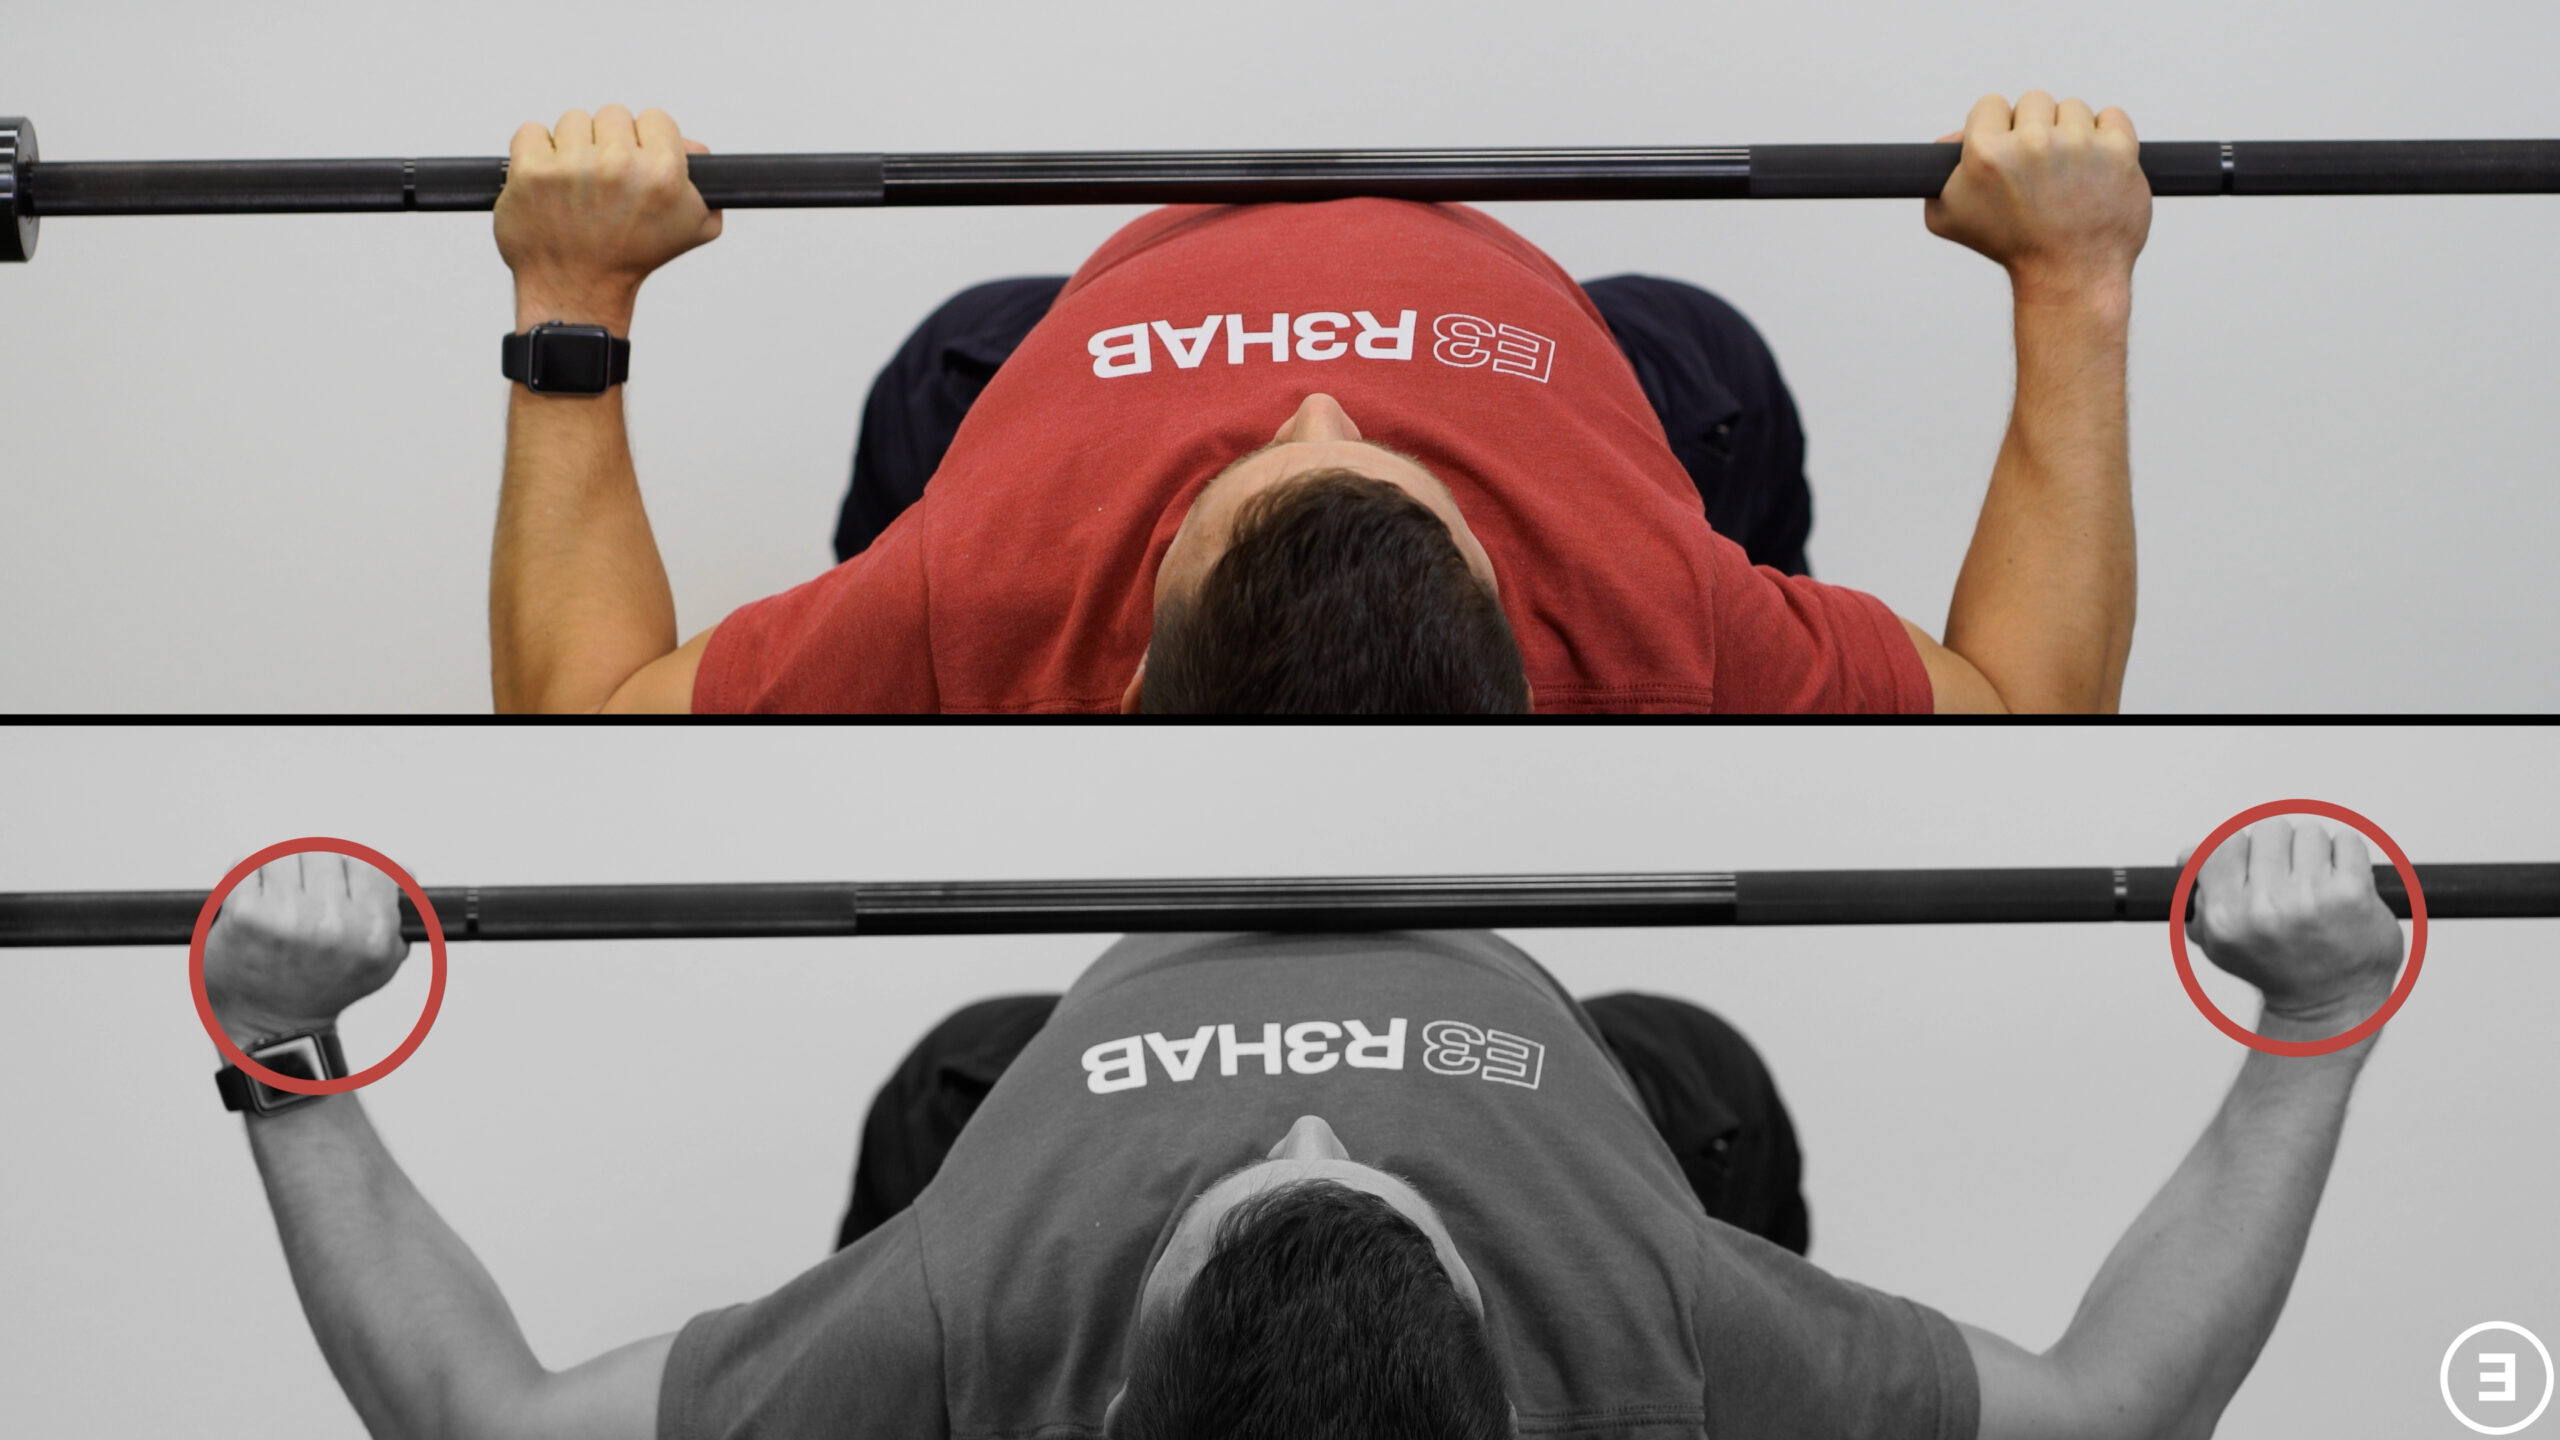
When using a barbell, consider your grip width. With a really wide grip, you may put your wrists in more radial deviation than you can tolerate.
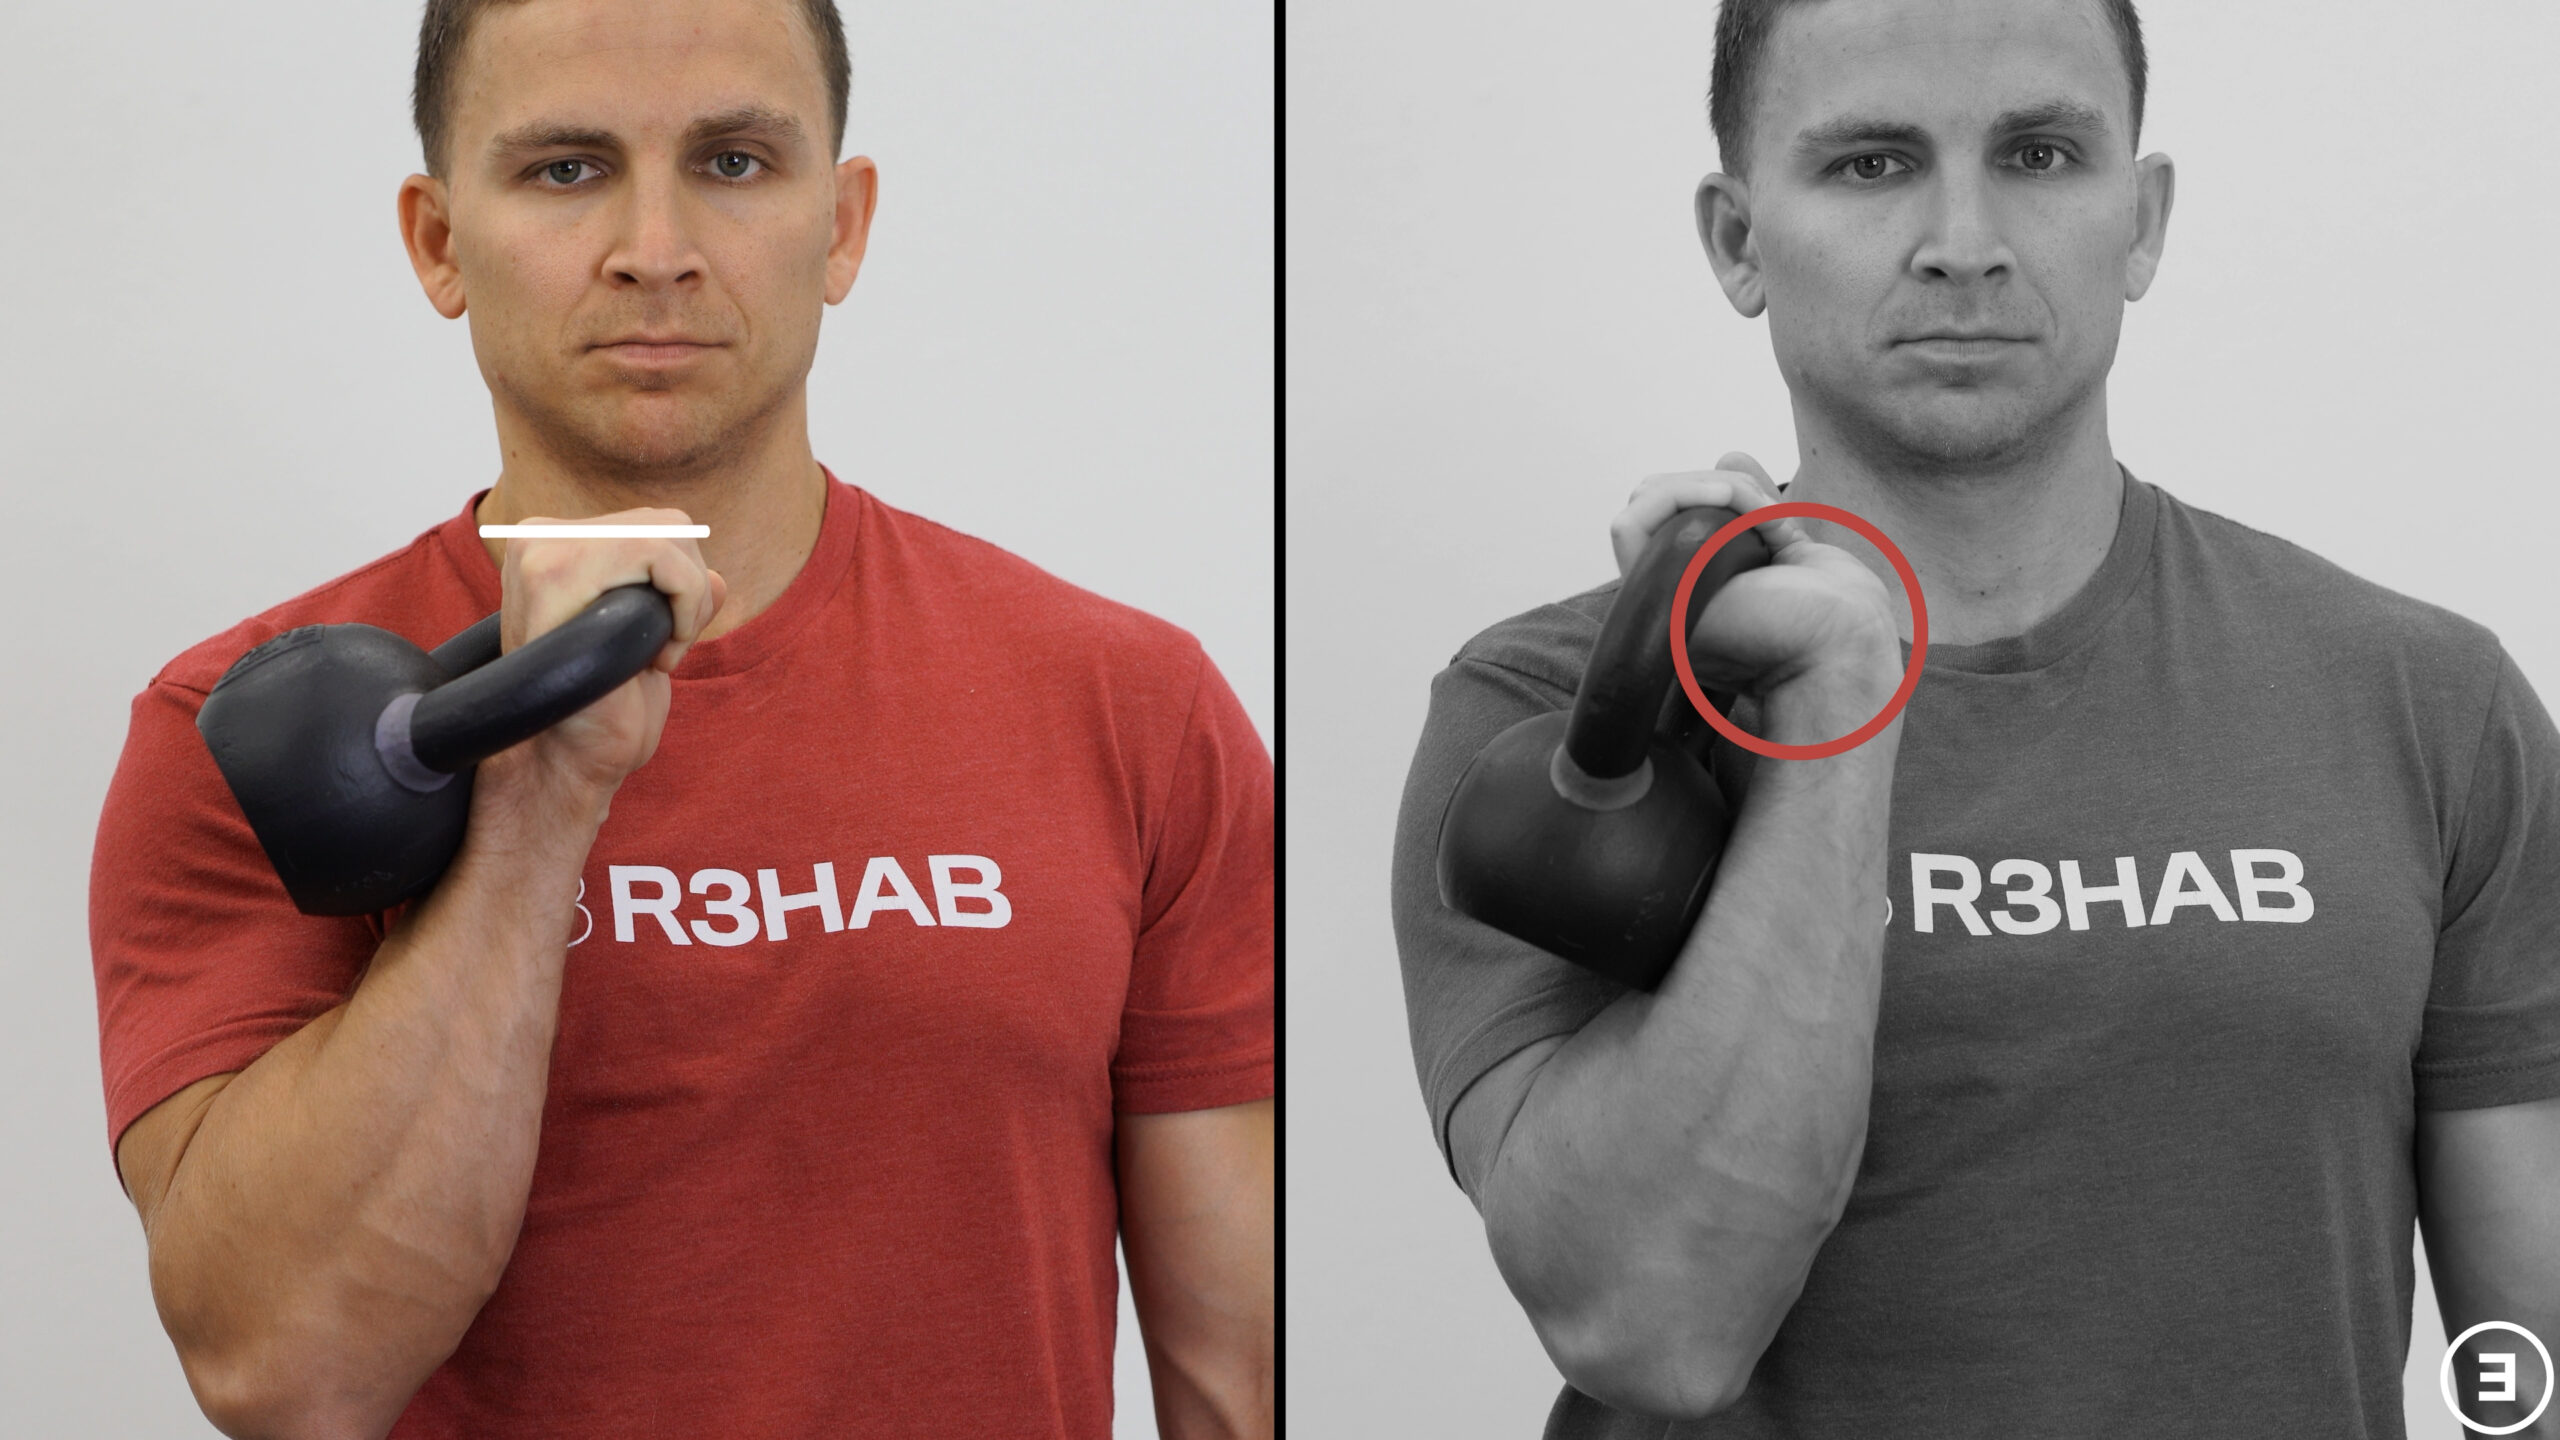
When using a kettlebell in a front rack position, don’t let your wrist flop back. Make sure your knuckles are facing up toward the ceiling.
For all three, keep the weight in the lower portion of the palm where it’s stacked over your wrist. If the weight is higher up in your hand or fingers, it’ll put your wrist into an extended position.
If needed, you can buy wrist wraps for added support. Even the best options should be $20 or less.
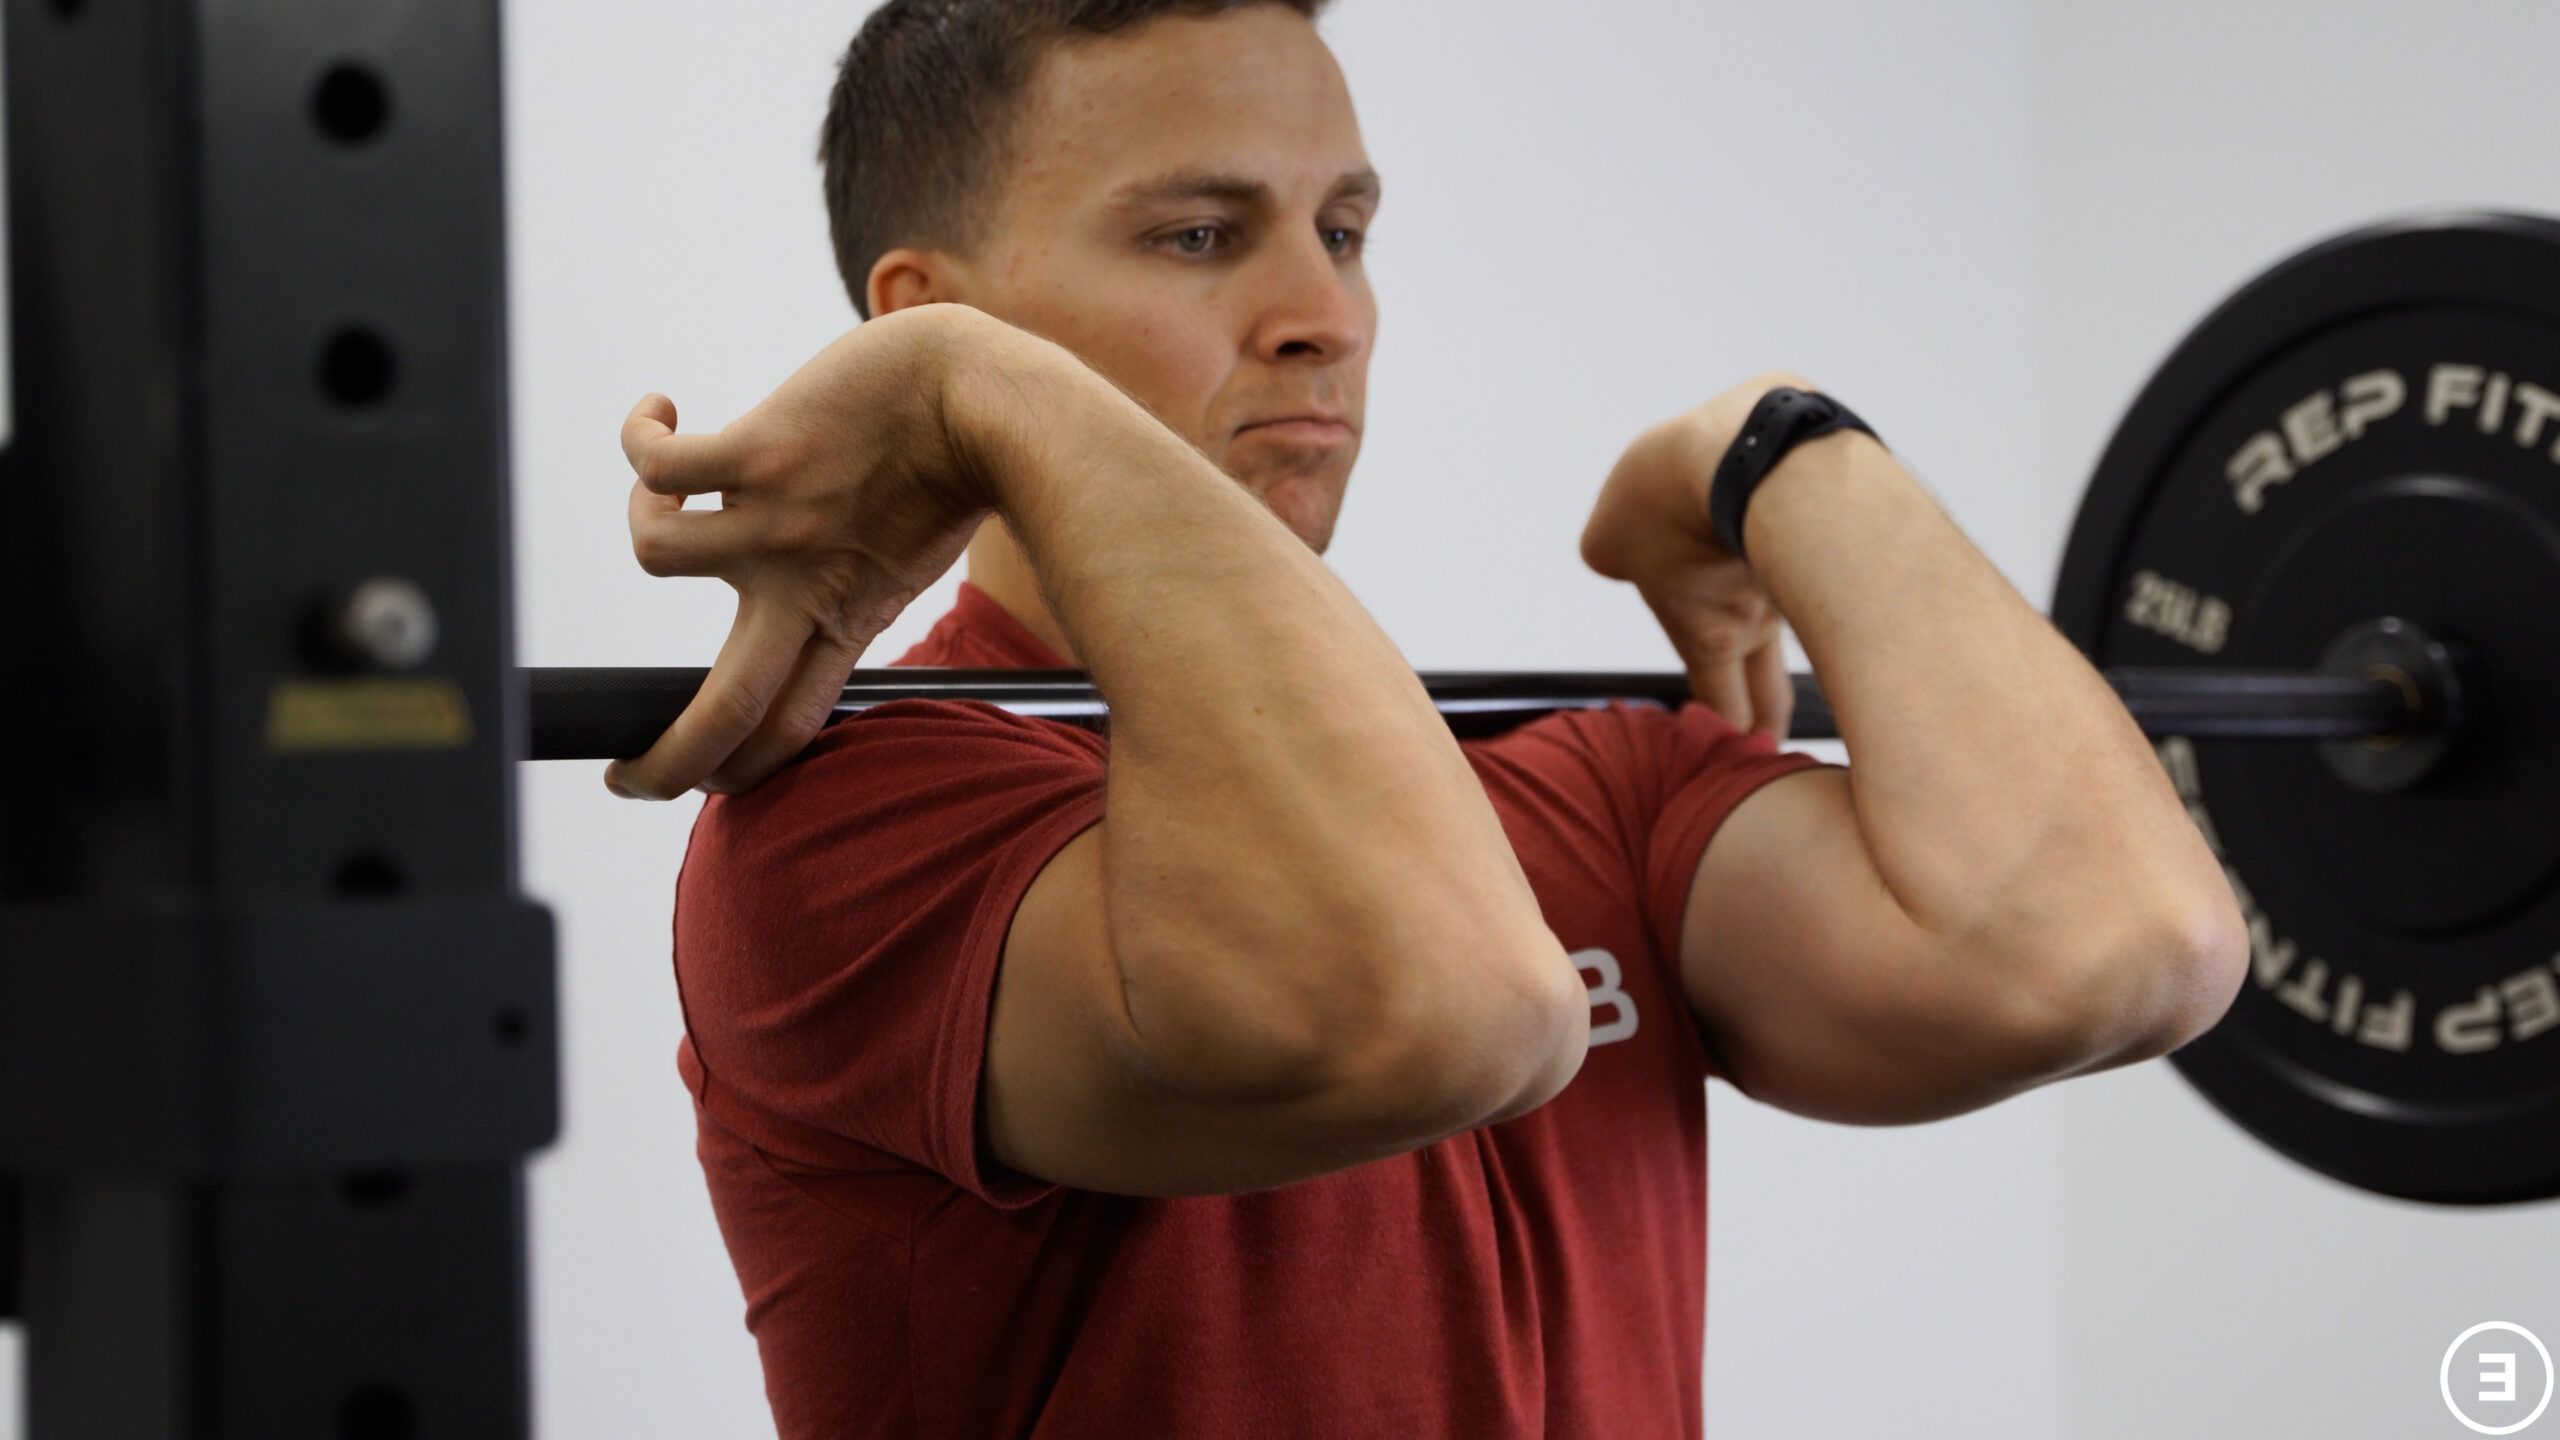
Front Squats or Front Rack Position
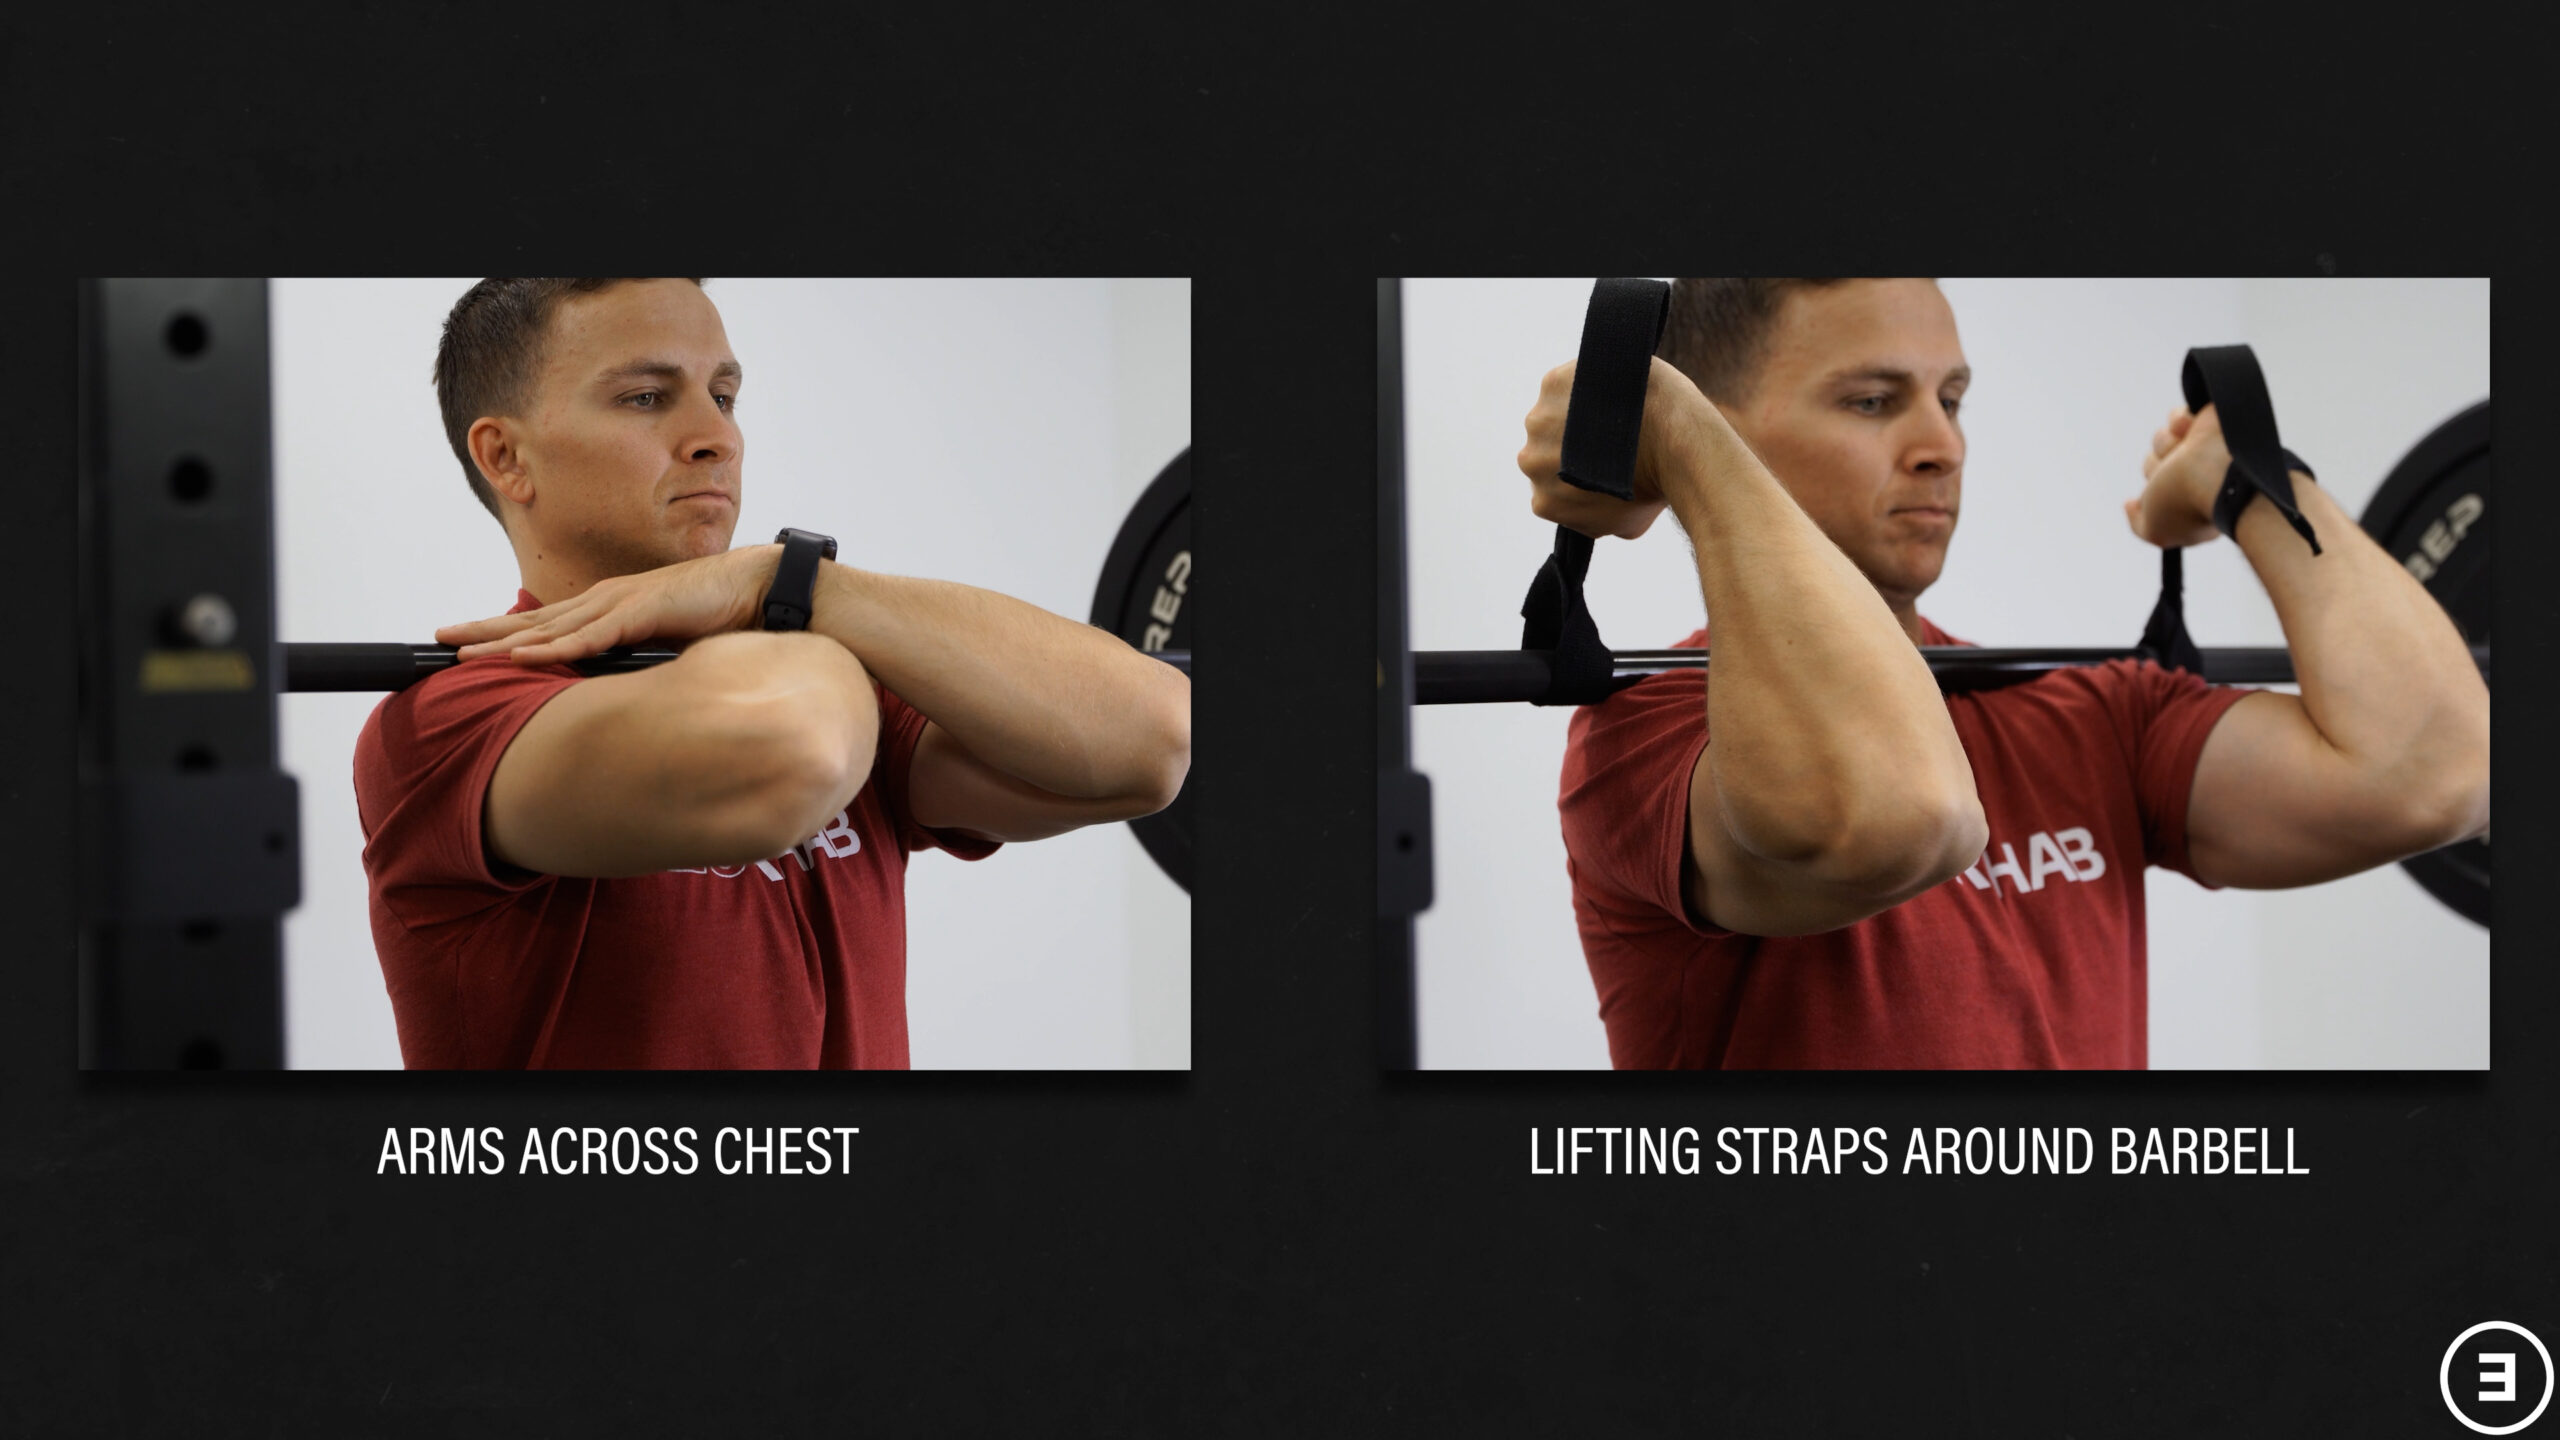
If you can’t get into a full front rack position without wrist pain, these are the two easiest modifications:
- Placing your arms across your chest so no wrist extension is required.
- Using lifting straps around the barbell so, once again, no wrist extension is required.
Can’t you take some fingers off the bar, too? You can, but I think there’s two things to consider:
- If your only goal is to front squat and you don’t care all that much about what your hands and wrists are doing, why not just use the lifting straps?
- If you actually need to get into proper positioning because you perform olympic weightlifting, then you should address the underlying issues.
If you can’t keep your elbows up while standing upright, you likely need to work on your elbow flexion range of motion, shoulder external rotation range of motion, and/or thoracic extension range of motion. If you can keep your elbows up while standing upright but not at the bottom of the squat, you probably need to work on your squat!
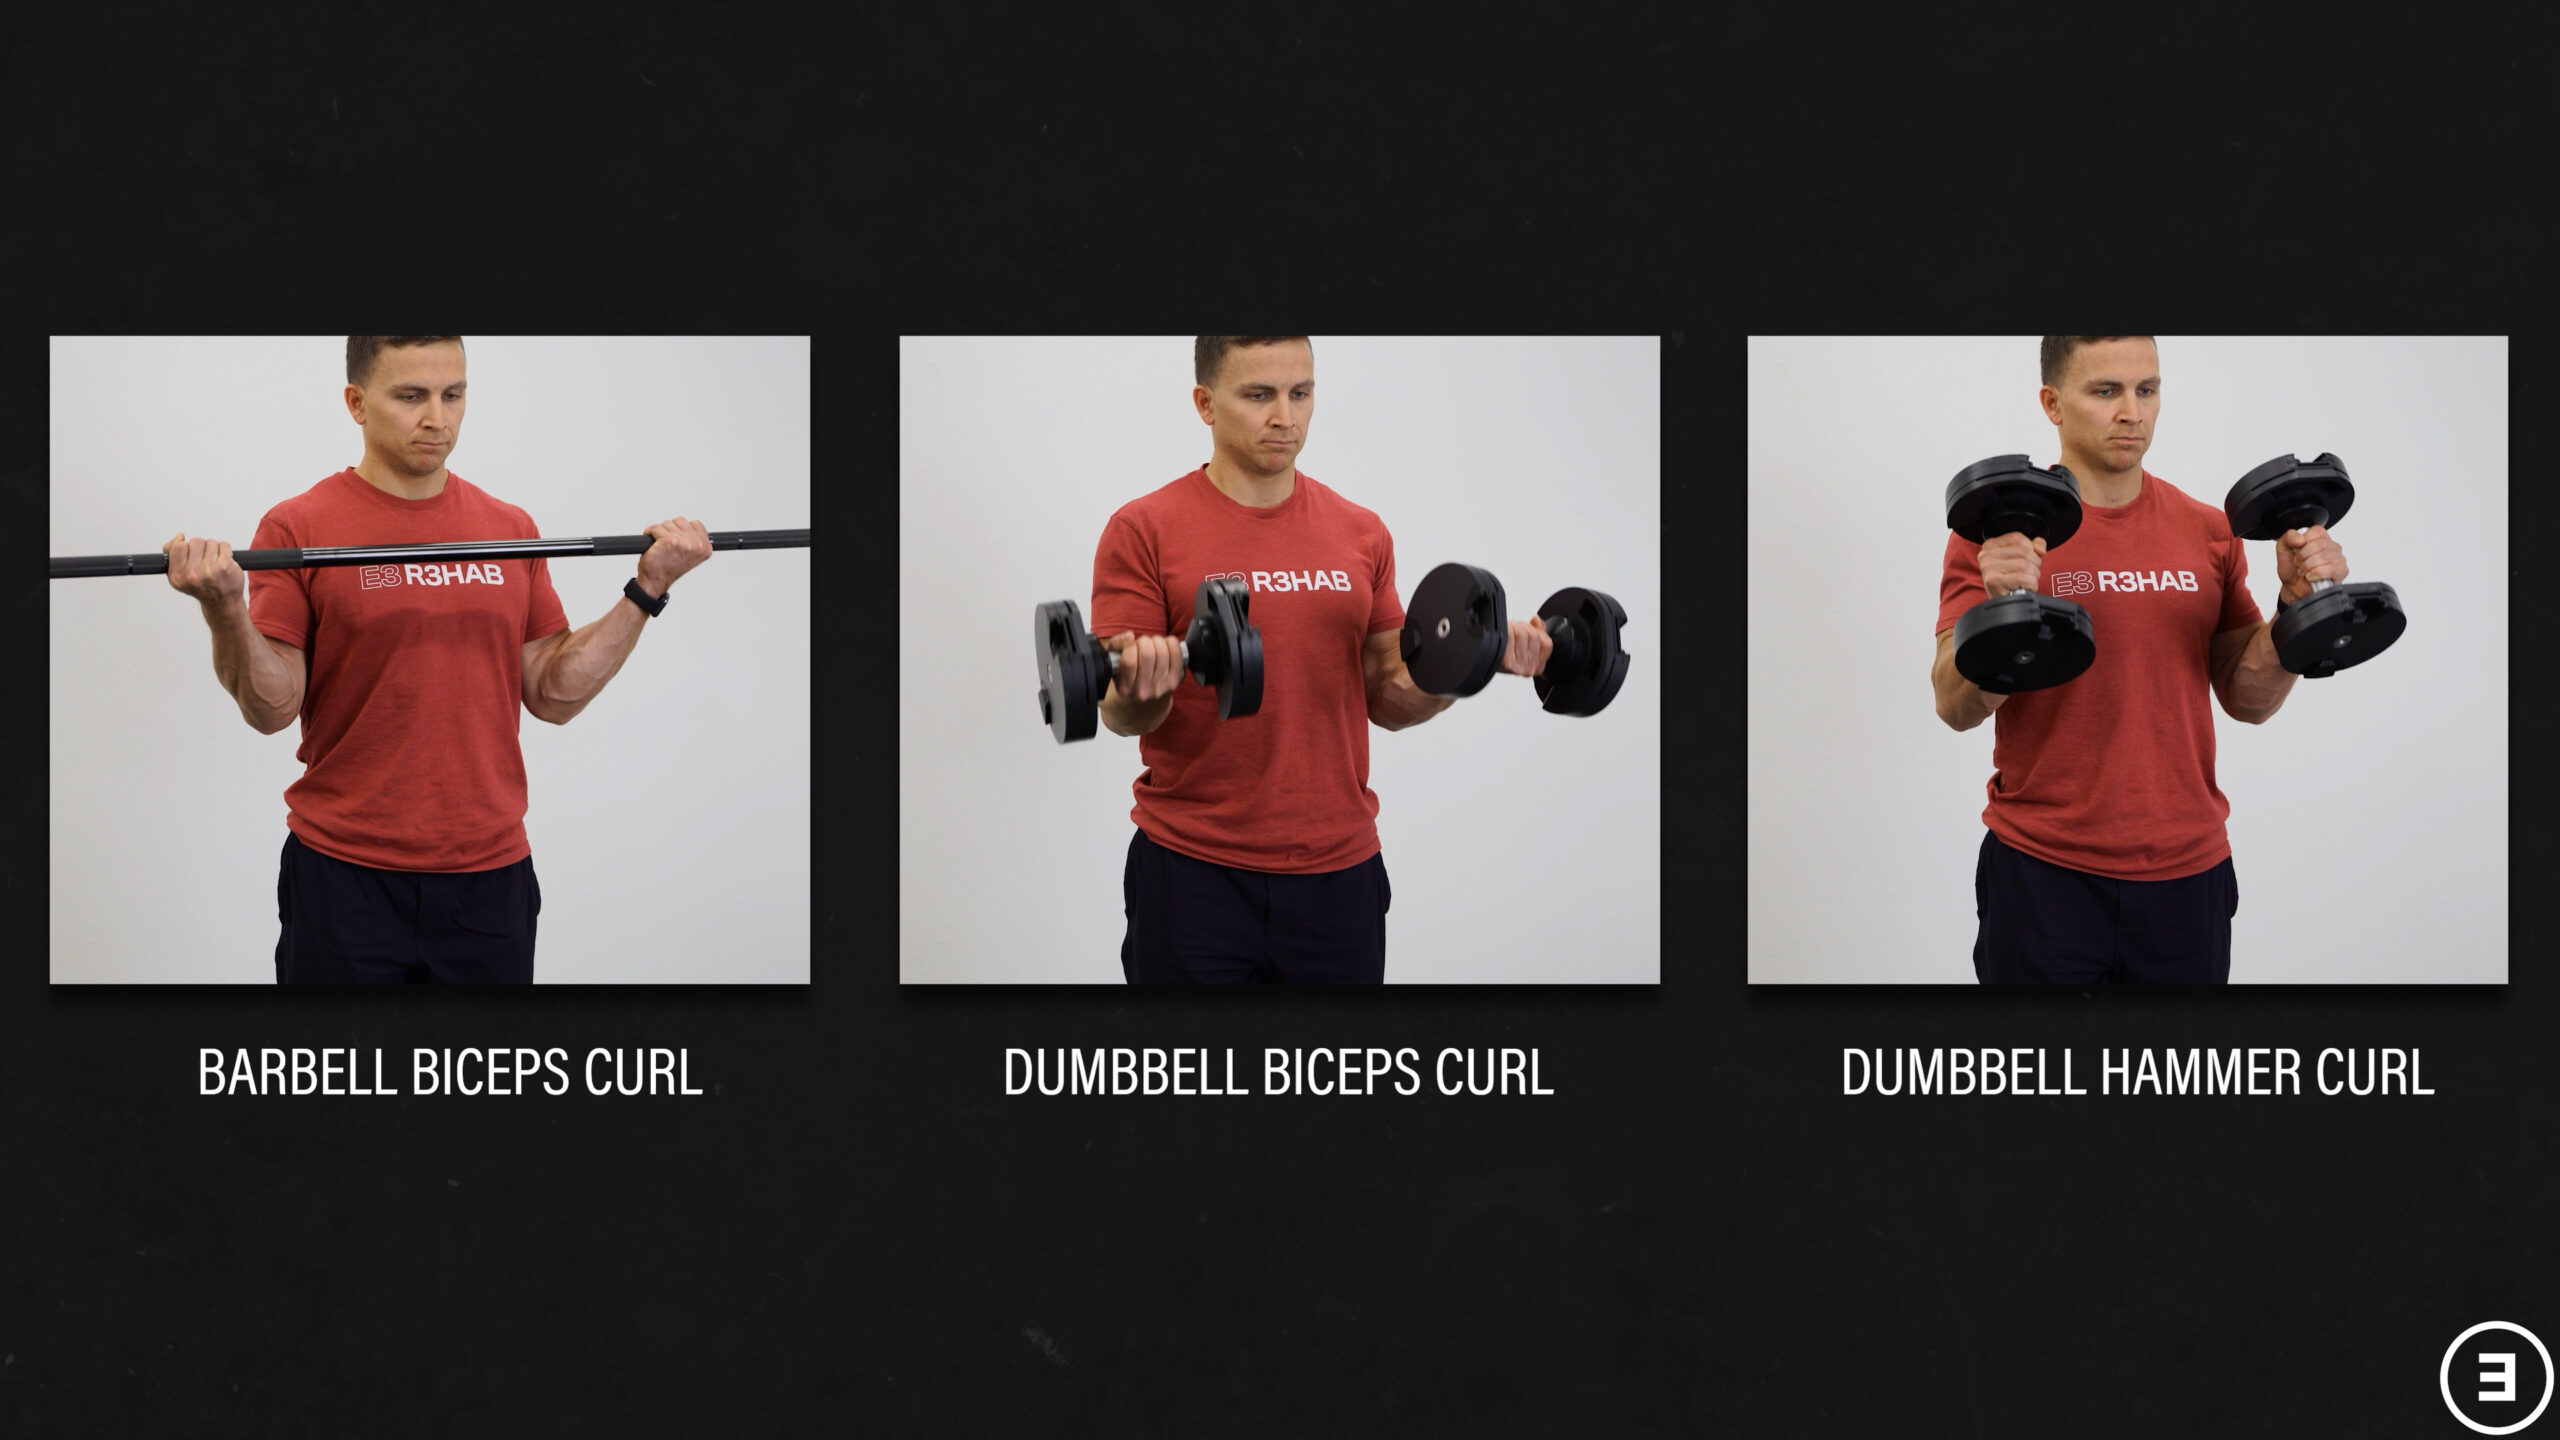
Biceps Curls
Some individuals will experience discomfort during the supinated position of a biceps curl, particularly with a barbell, or when carrying objects with forearms supinated. This is actually similar to a test that physical therapists use to assess ulnar-sided wrist pain.
If you have pain during a barbell biceps curl, try dumbbells, an EZ bar, or a machine. If you try dumbbells and they don’t help, try supinating less.
If you have pain while picking up or carrying objects in this position, you might just have to be mindful of that until your range of motion and strength improve with the exercises shown later in this blog.
Phone/Computer/Mouse Usage
If you notice wrist pain with prolonged phone, computer, or mouse usage, here are 3 easy options:
- Take regular walking breaks. Set a timer, reminder, or write yourself a note if you need to.
- Adjust your workstation if it’s feasible, affordable, and it’s something you’ve been meaning to do anyway.
- Incorporate some of the exercises from this blog into your daily routine every few hours. The warm-up only takes a few minutes, requires no equipment, and can be done anywhere.
Please understand that not all of these modifications are meant to be permanent. For example, I’m not suggesting that everyone has to perform modified push-ups for the rest of their lives. If your strength, range of motion, and symptoms allow, choose what you prefer. However, temporary modifications can help minimize flare-ups and get you on the right track for long-term success.
Step #4: Load Management & Graded Loading
Load management is about discovering, understanding, and respecting your current capabilities and level of tolerable activity.
Graded loading is about slowly building off that baseline and progressively working toward your previous function, or greater depending on your goals.
The idea is that you’re finding a Goldilocks-level of load that is tolerable (not too much, not too little, but “just right”) and gradually progressing it over time.
One of the best ways to accomplish this is by manipulating the volume, frequency, and intensity/effort of any activities that load your wrist.
Think about volume as the total amount of an activity you do broken down by whatever metric of time you want to use. For instance, 1,500 push-ups per month or roughly 375 push-ups per week.
Frequency is how often you do that activity. Maybe you’re doing push-ups every other day.
Intensity and effort can be thought of as how hard, heavy, or fast you do an activity: a tall plank for 10 seconds versus clapping push-ups to absolute failure.
How do these concepts relate to getting back to doing push-ups, yoga, handstands, etc.? Well, in addition to implementing the modifications mentioned earlier, it’s beneficial to adjust the volume, frequency, and intensity of these exercises.
As expected, doing handstands daily is more demanding on your wrists than doing them three times per week. Similarly, practicing them for 3 hours at a time is more taxing than practicing them for an hour at a time.
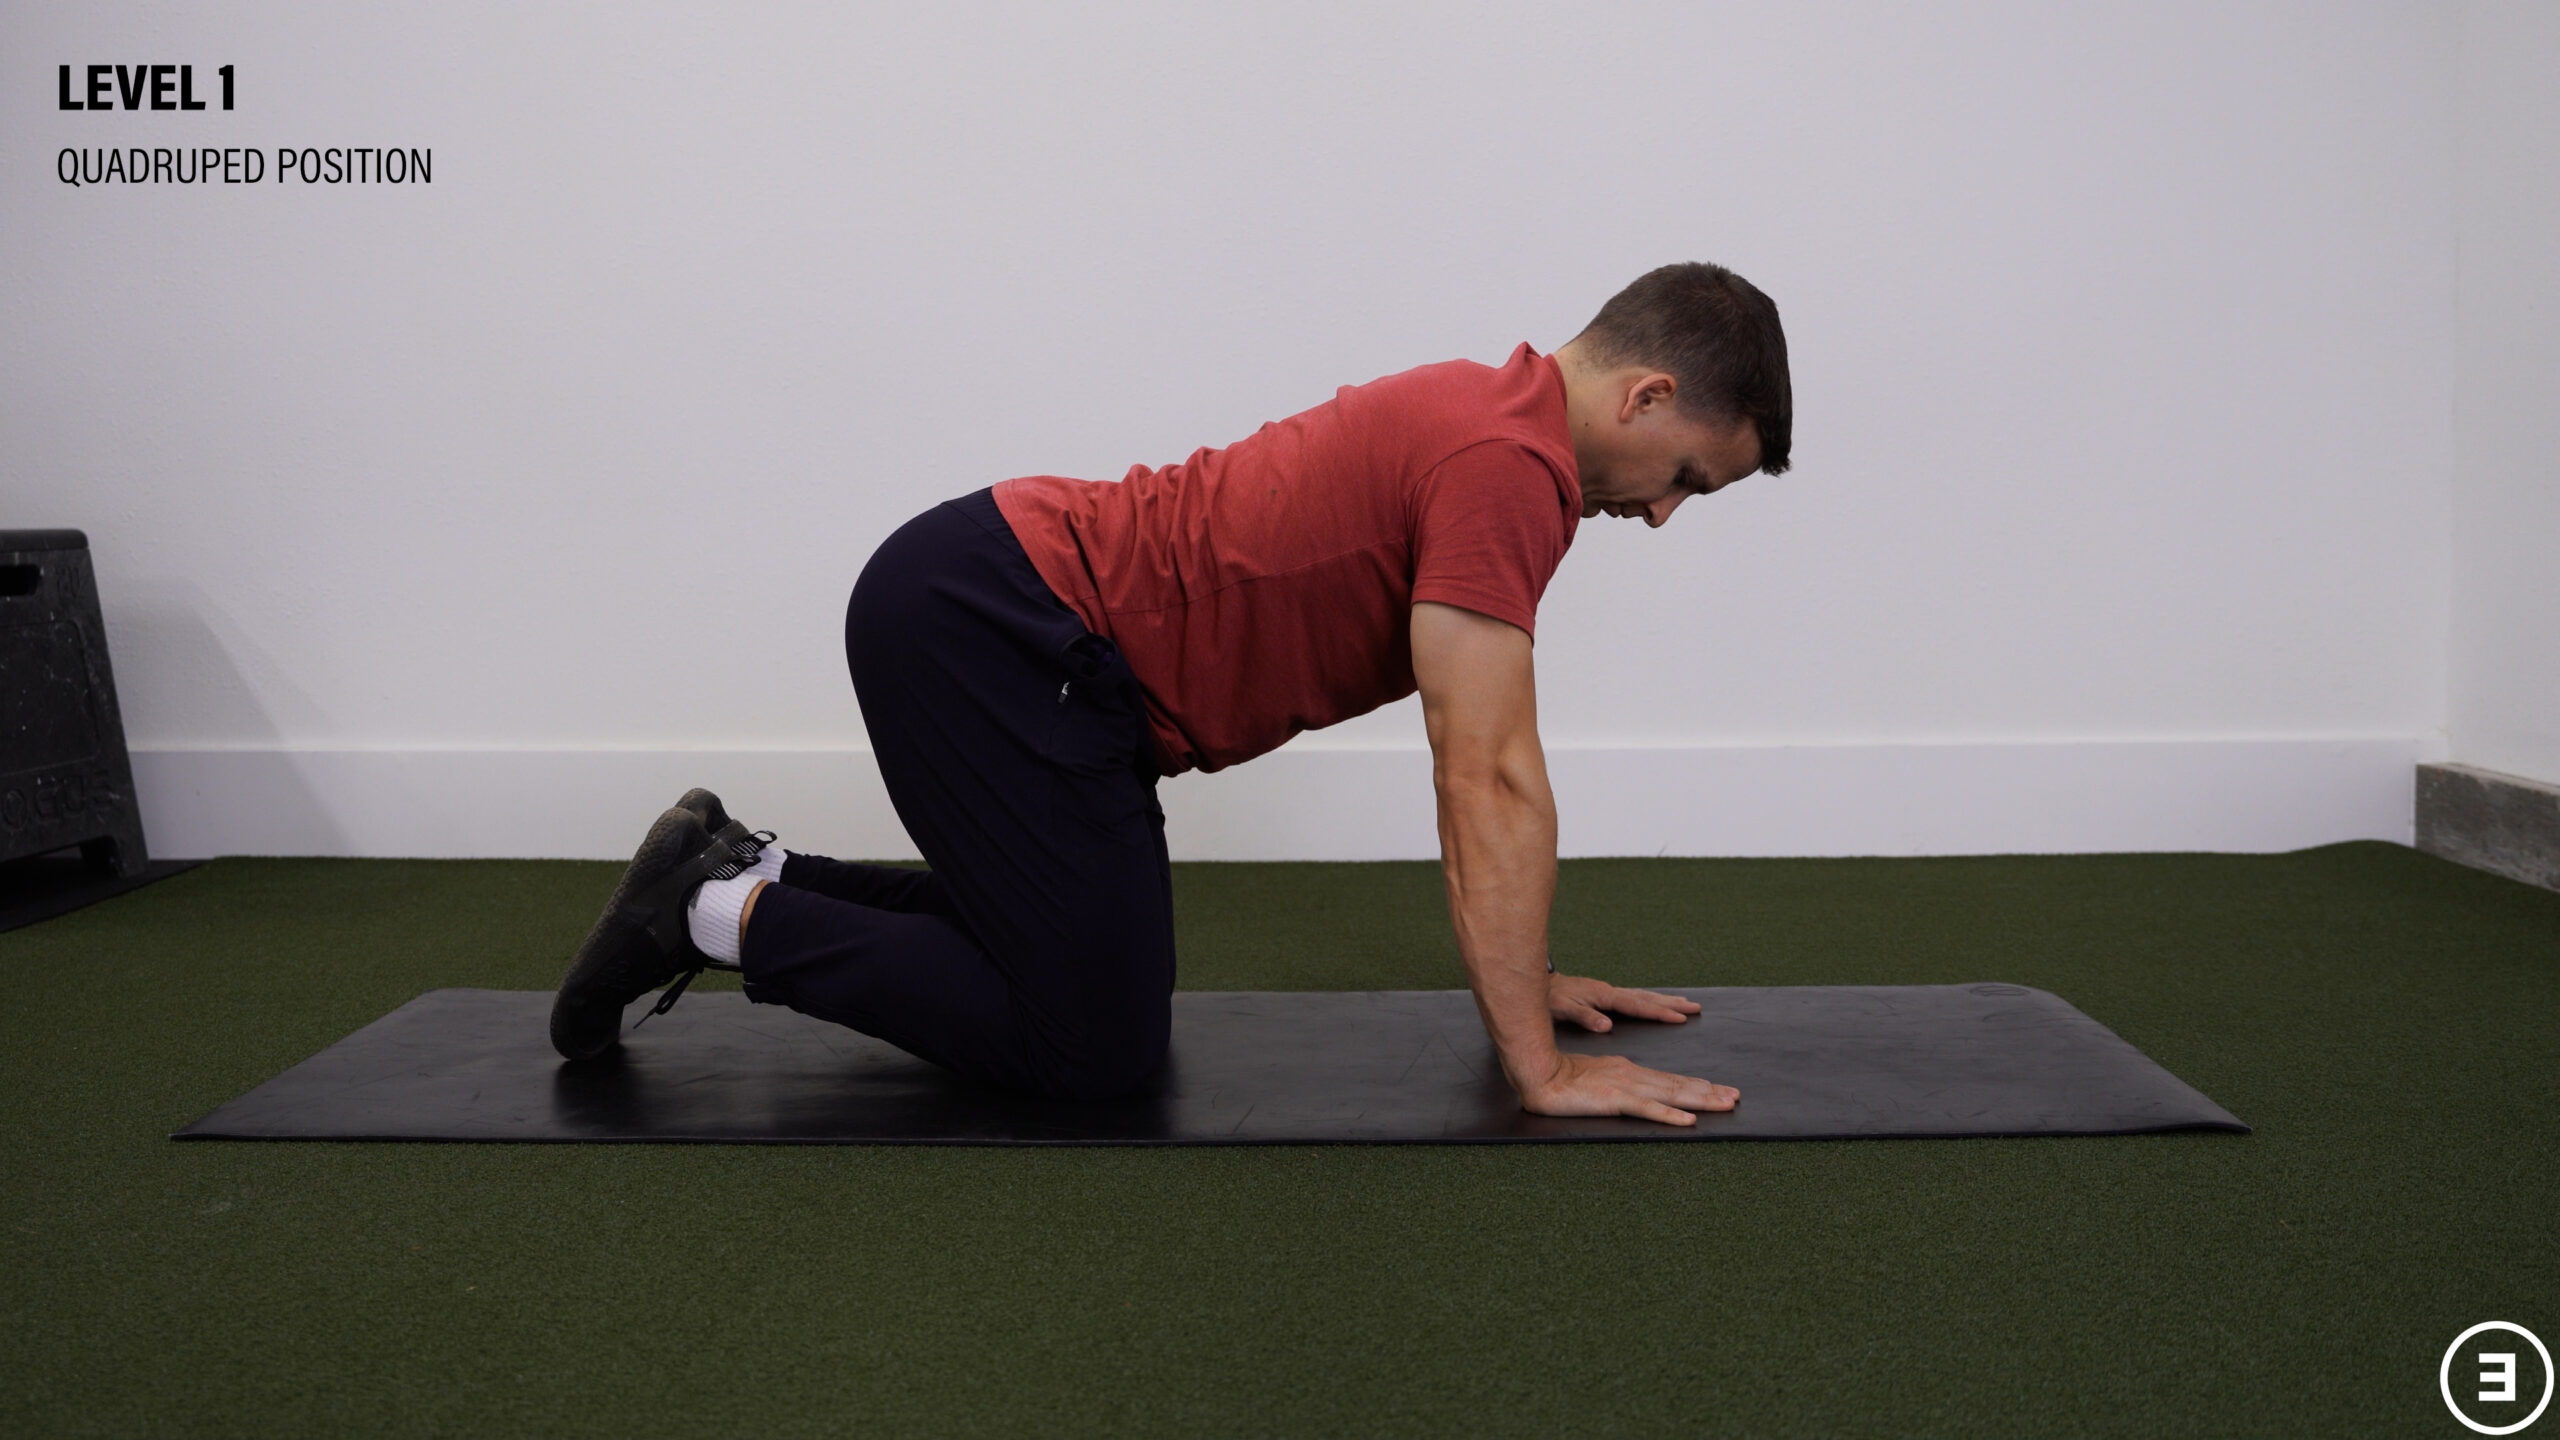
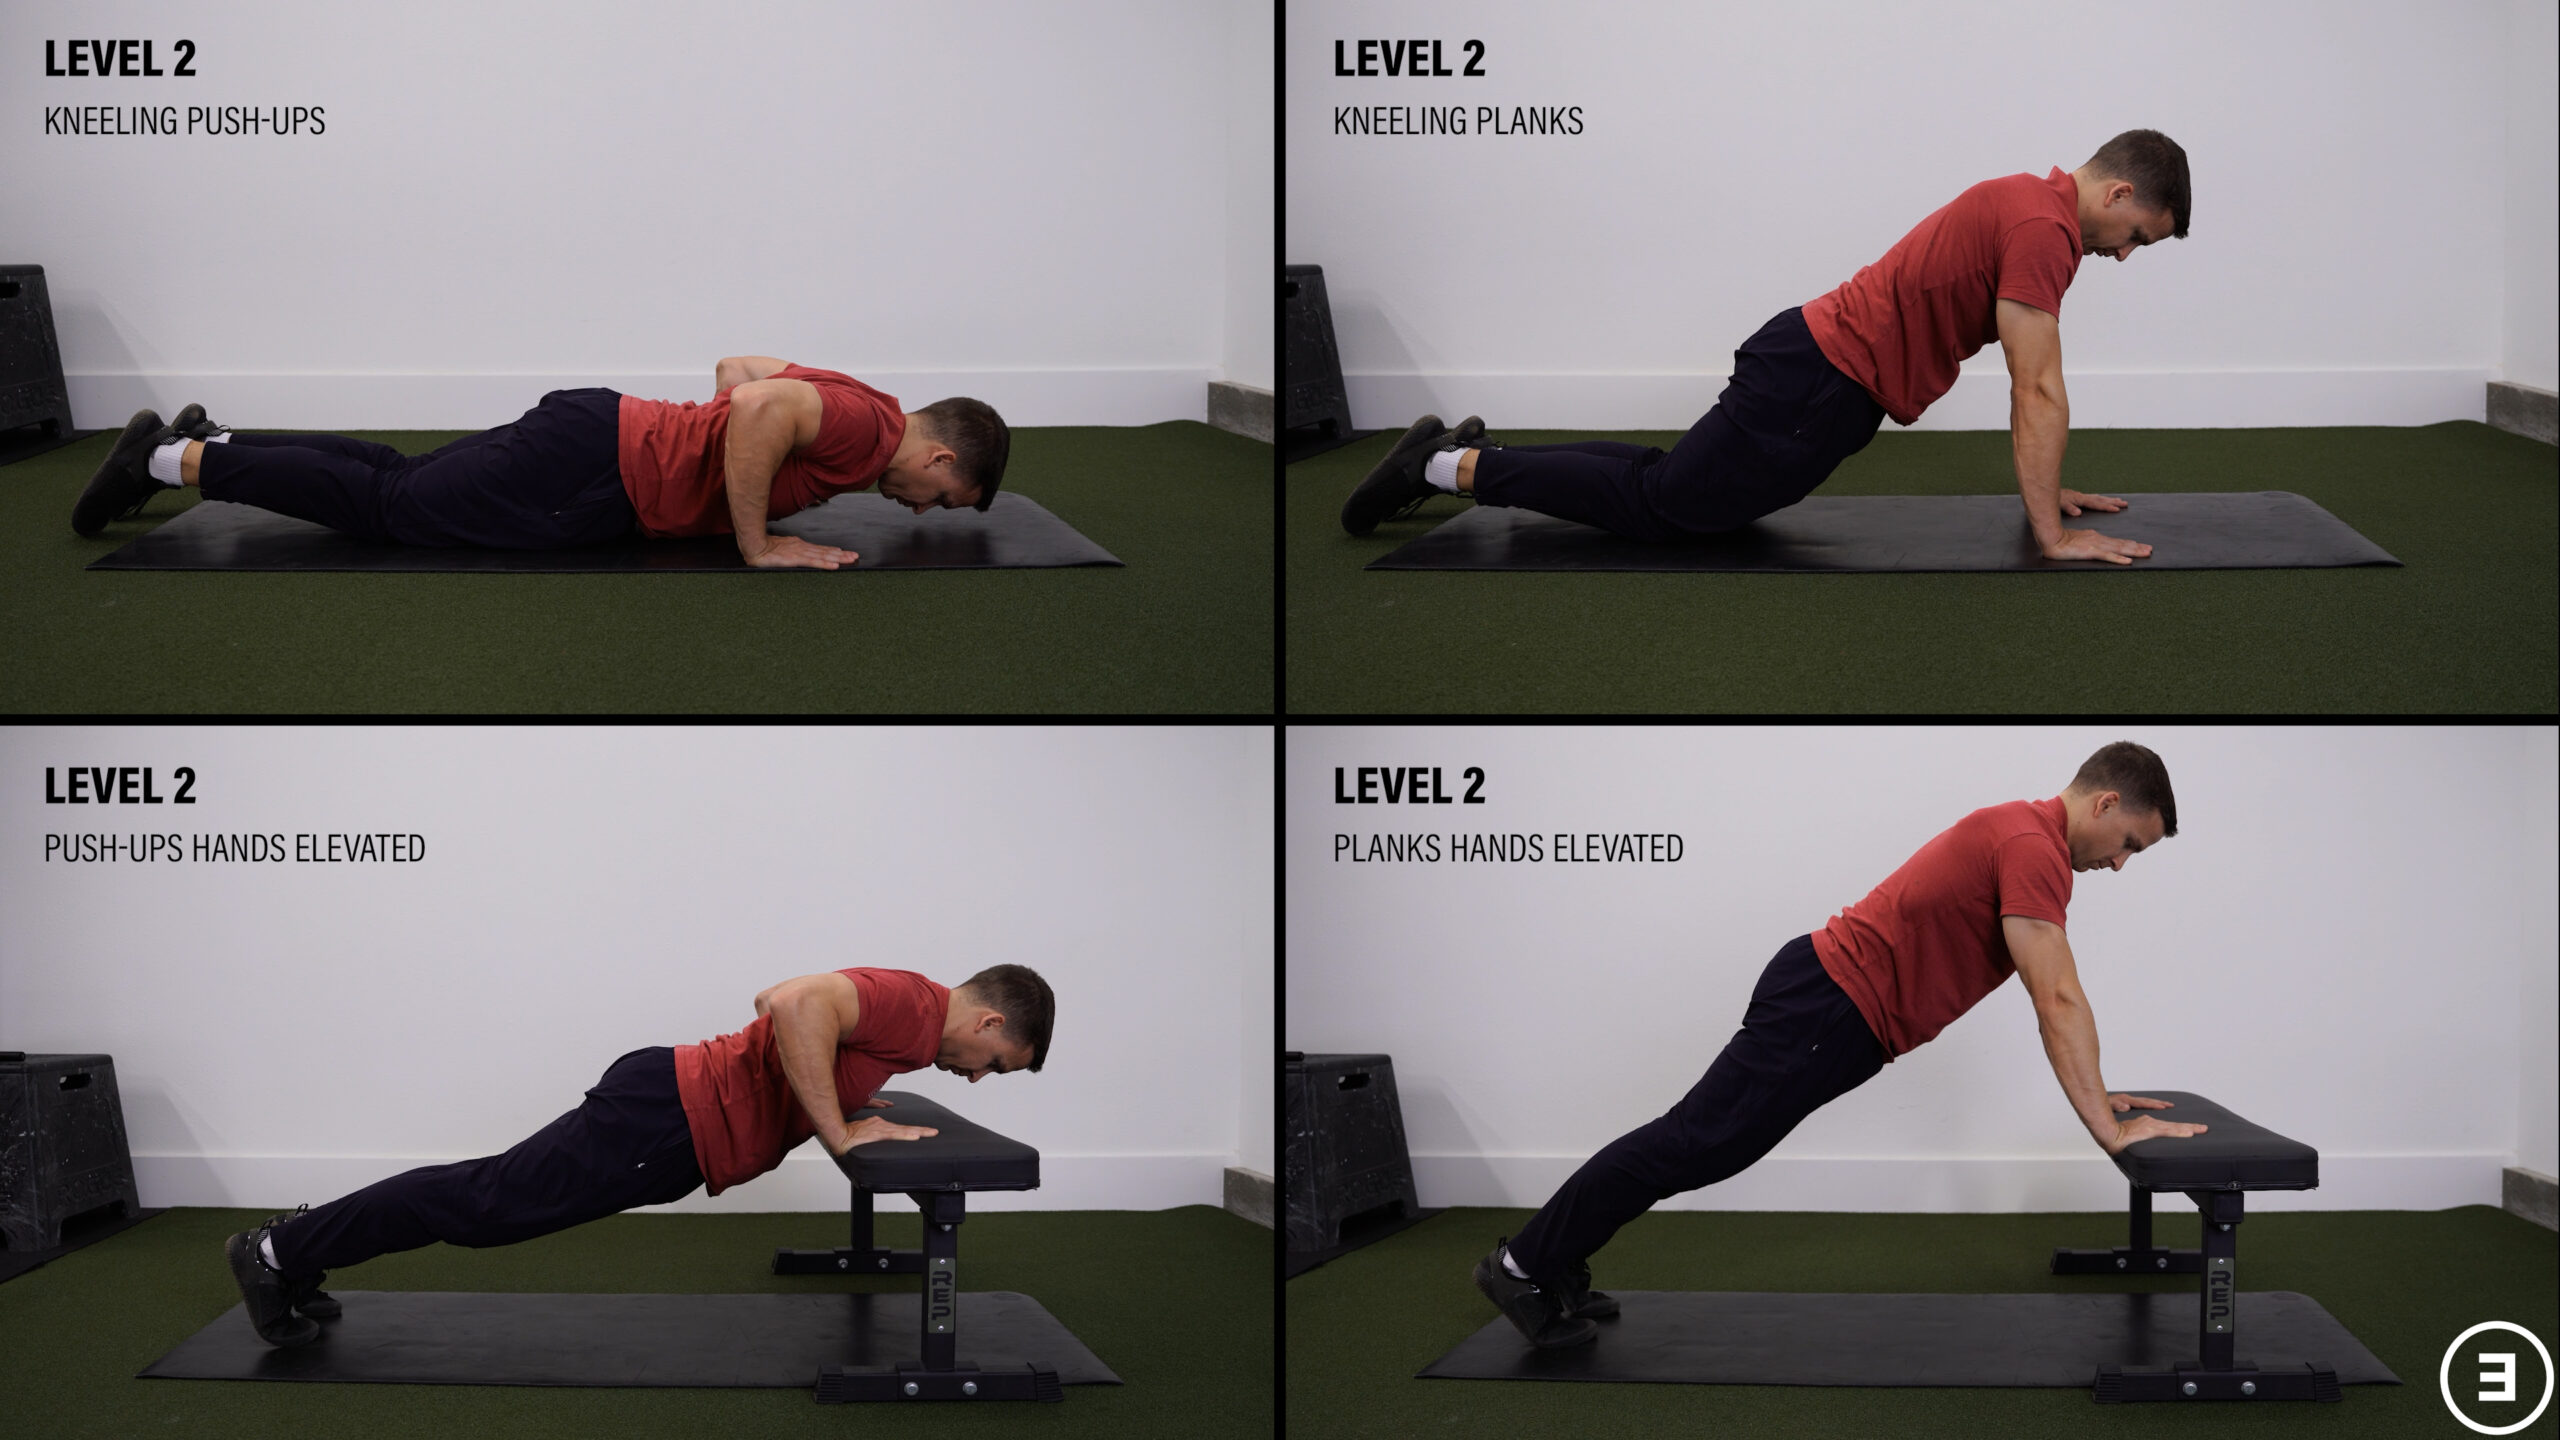
The type of weight bearing exercise you do also changes the demand on your wrists. For example, a handstand loads your wrists much more than a kneeling push-up. Therefore, you could work through weight bearing exercise variations that are progressively more challenging for your wrists.
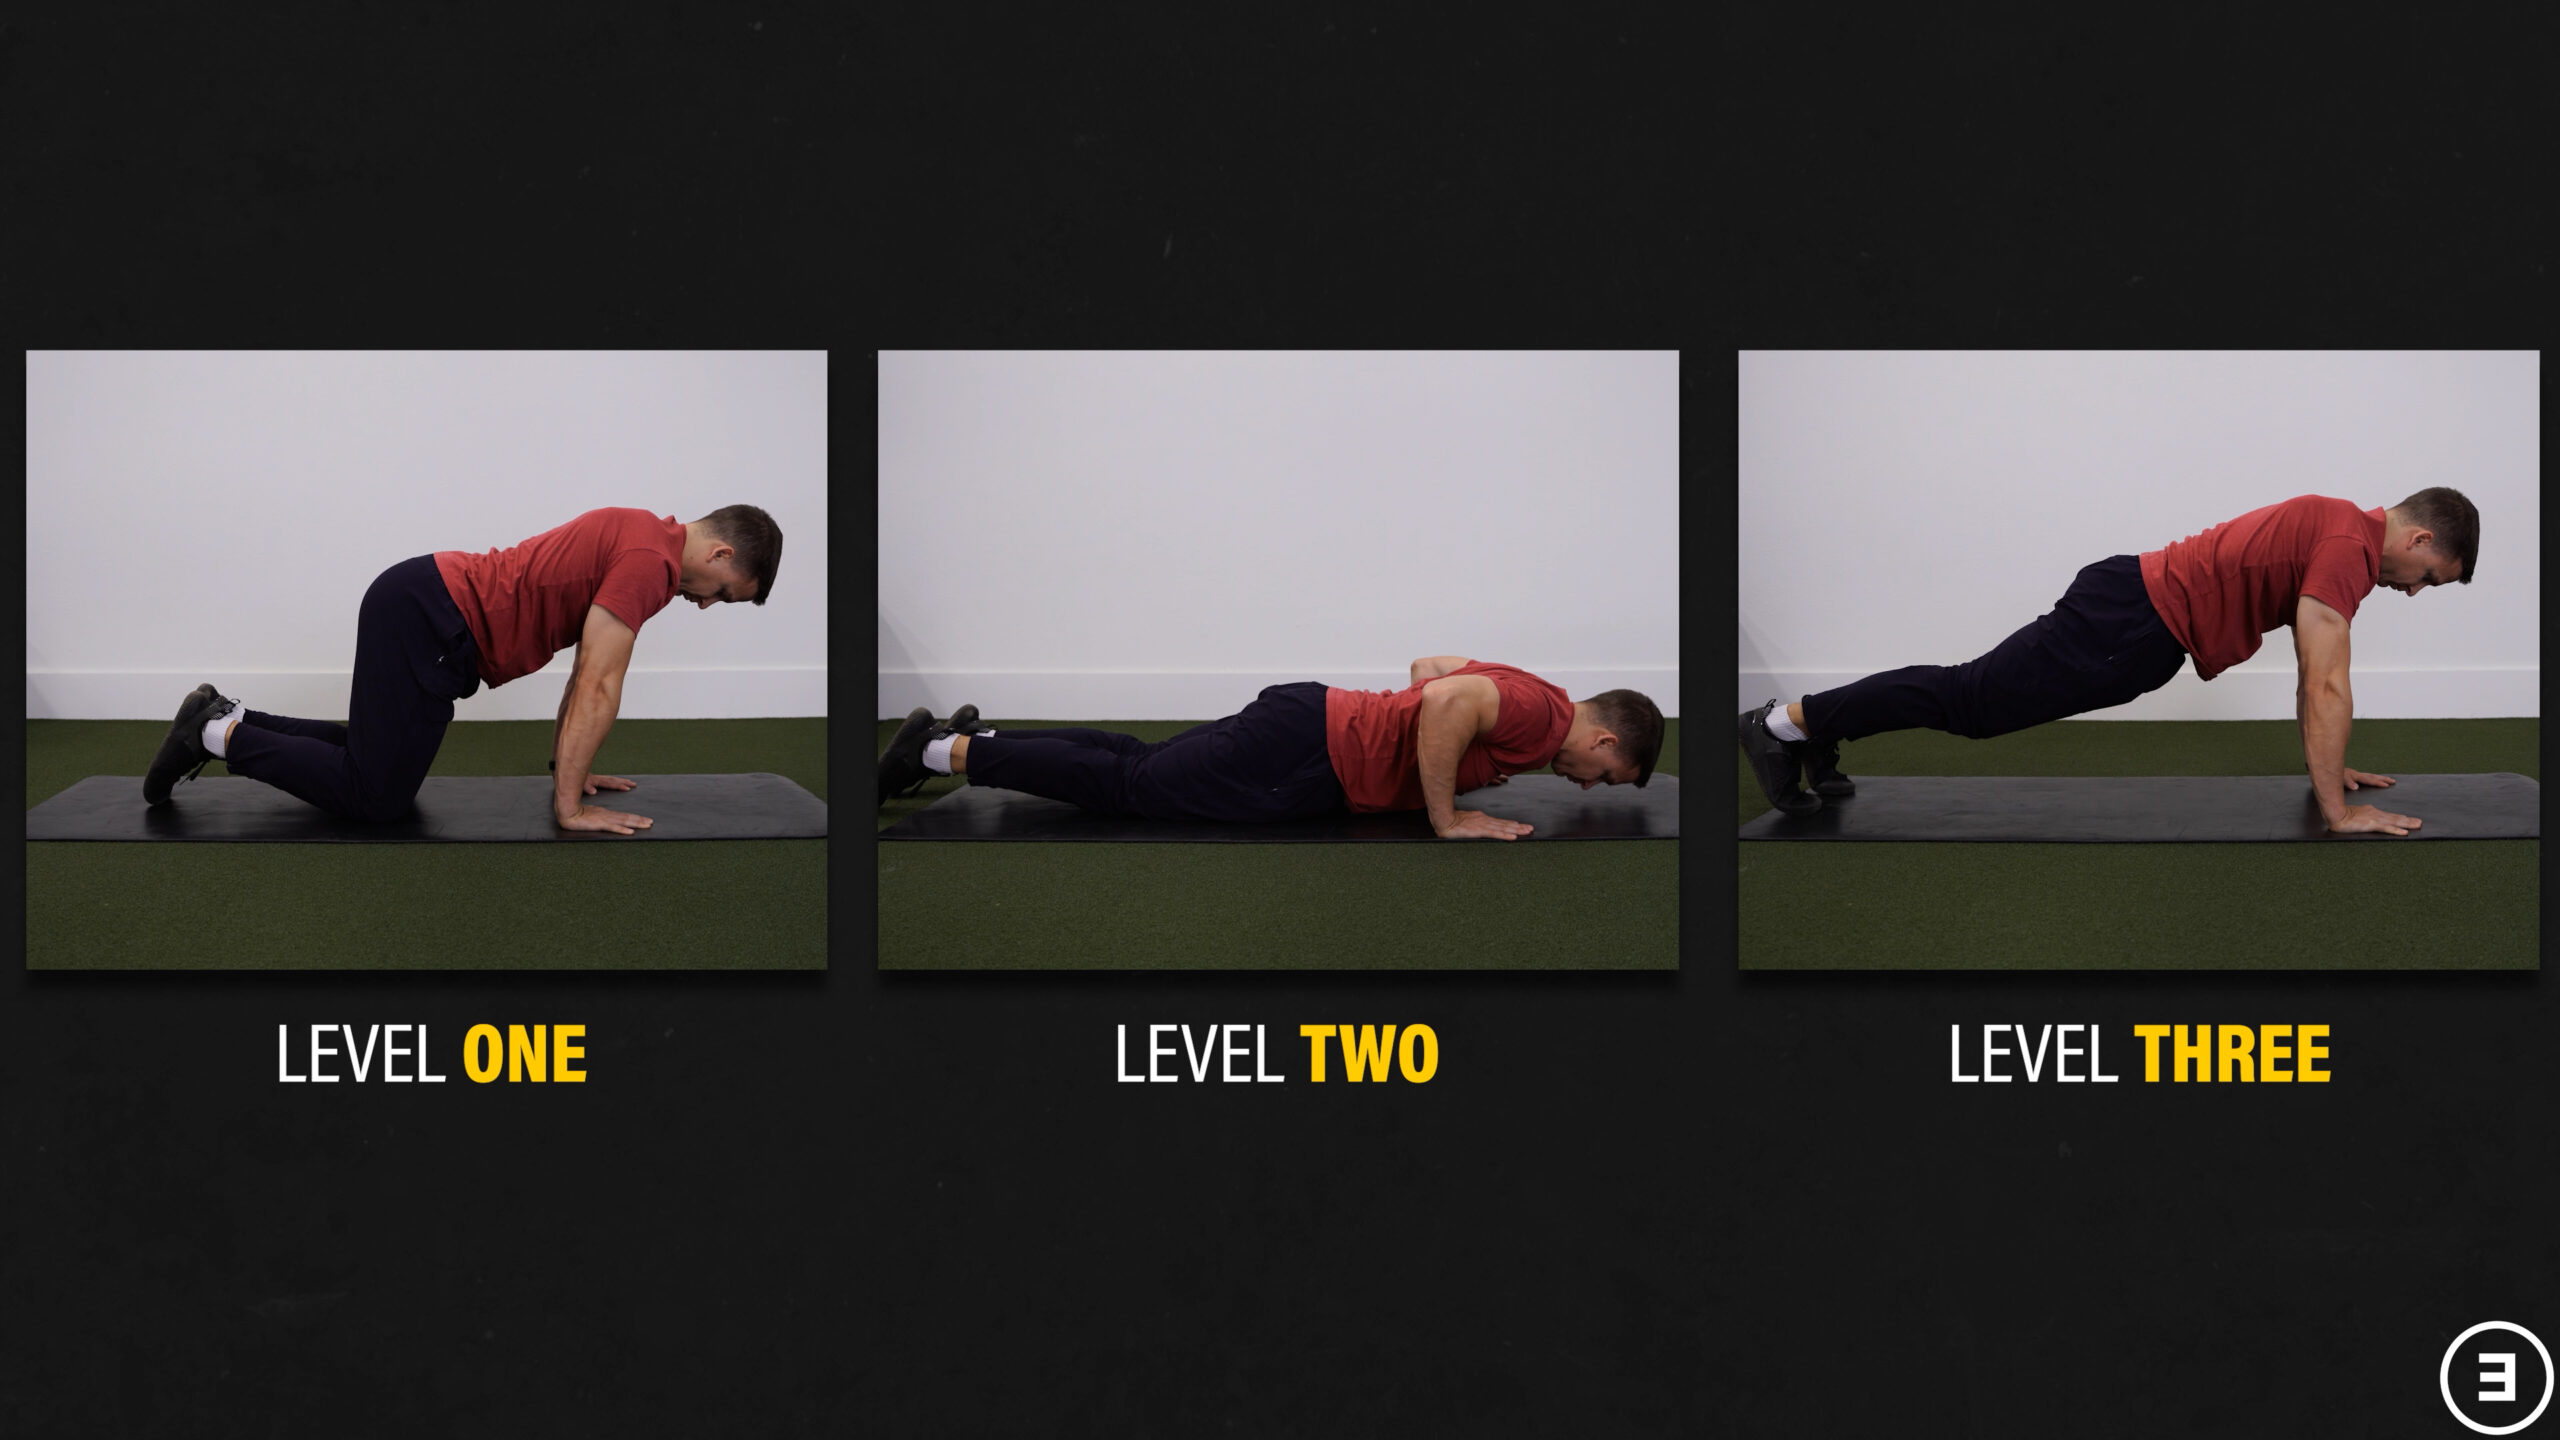
There’s no shortage of possibilities. Think about this three level progression as an example:
Level 1: Quadruped Position
Level 2: Kneeling push-ups and planks, or push-ups and planks with your hands on an elevated surface
Level 3: Regular push-ups and planks

In the quadruped position, you can increase the load on your wrists by shifting your weight forward toward your hands or decrease the load by shifting your weight backward toward your knees. You’re then gradually loading your wrists more with each level. You can even increase the load on your wrists more or less in a full push-up or plank position depending on how you shift your bodyweight again.
So if your goal is to resume push-ups, yoga, handstands, or similar movements, there’s three things you’ll likely want to do:
- Increase your wrist strength and mobility with the exercises in the next section.
- Incorporate activity and technique modifications as needed.
- Adjust the frequency, volume, and intensity of weight bearing exercises, which may involve a gradual progression of increasingly demanding movements.
Step #5: Exercises
It took awhile to get here, but I think the exercises are more useful when paired with the rest of the education in this blog.
The program is structured to take you through a brief warm-up, followed by a series of wrist and forearm exercises that will increase your strength and range of motion in all directions, then exercises to improve grip strength and endurance, and ends with wrist mobility as needed.

Warm-Up
For the warm-up, you can do 1-2 sets of 30-60 seconds of each:
- Wrist Flexion & Extension Range of Motion
- Radial & Ulnar Deviation
- Wrist Circles
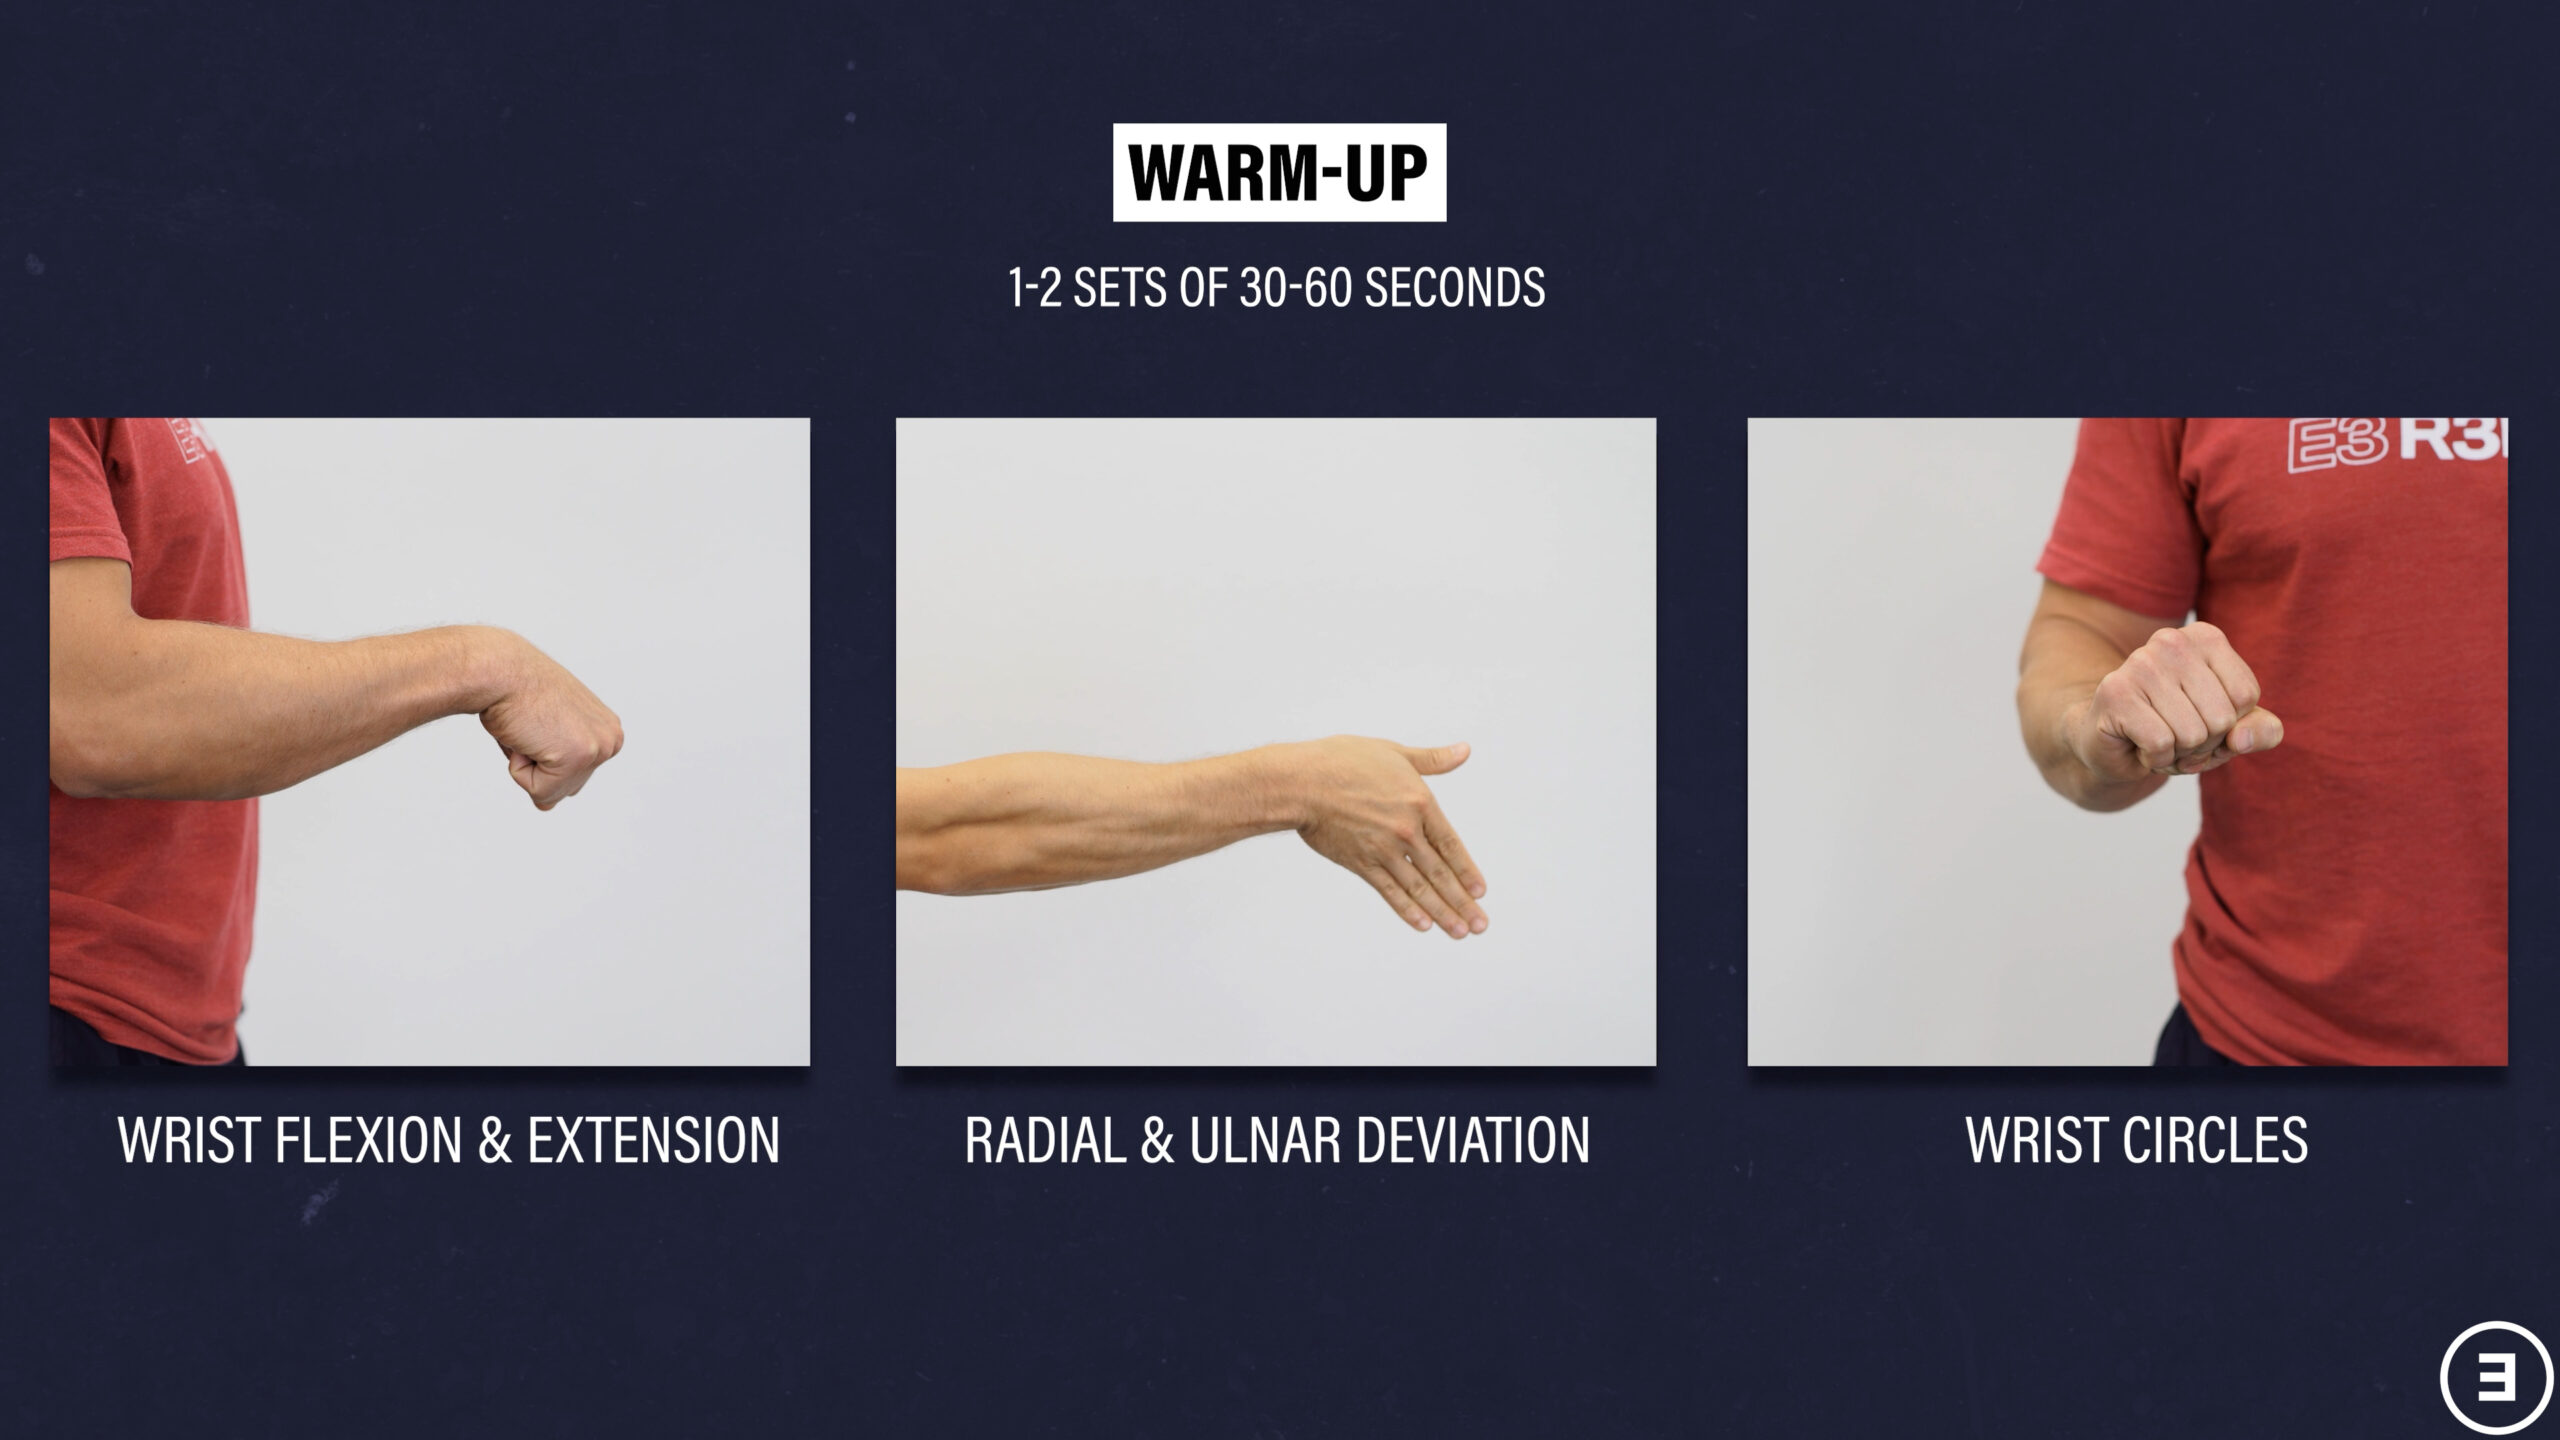
Keep the movements slow and controlled within a tolerable range of motion. You can use an open hand or closed fist, your elbow can be bent or straight, and your forearm can be supported or unsupported.
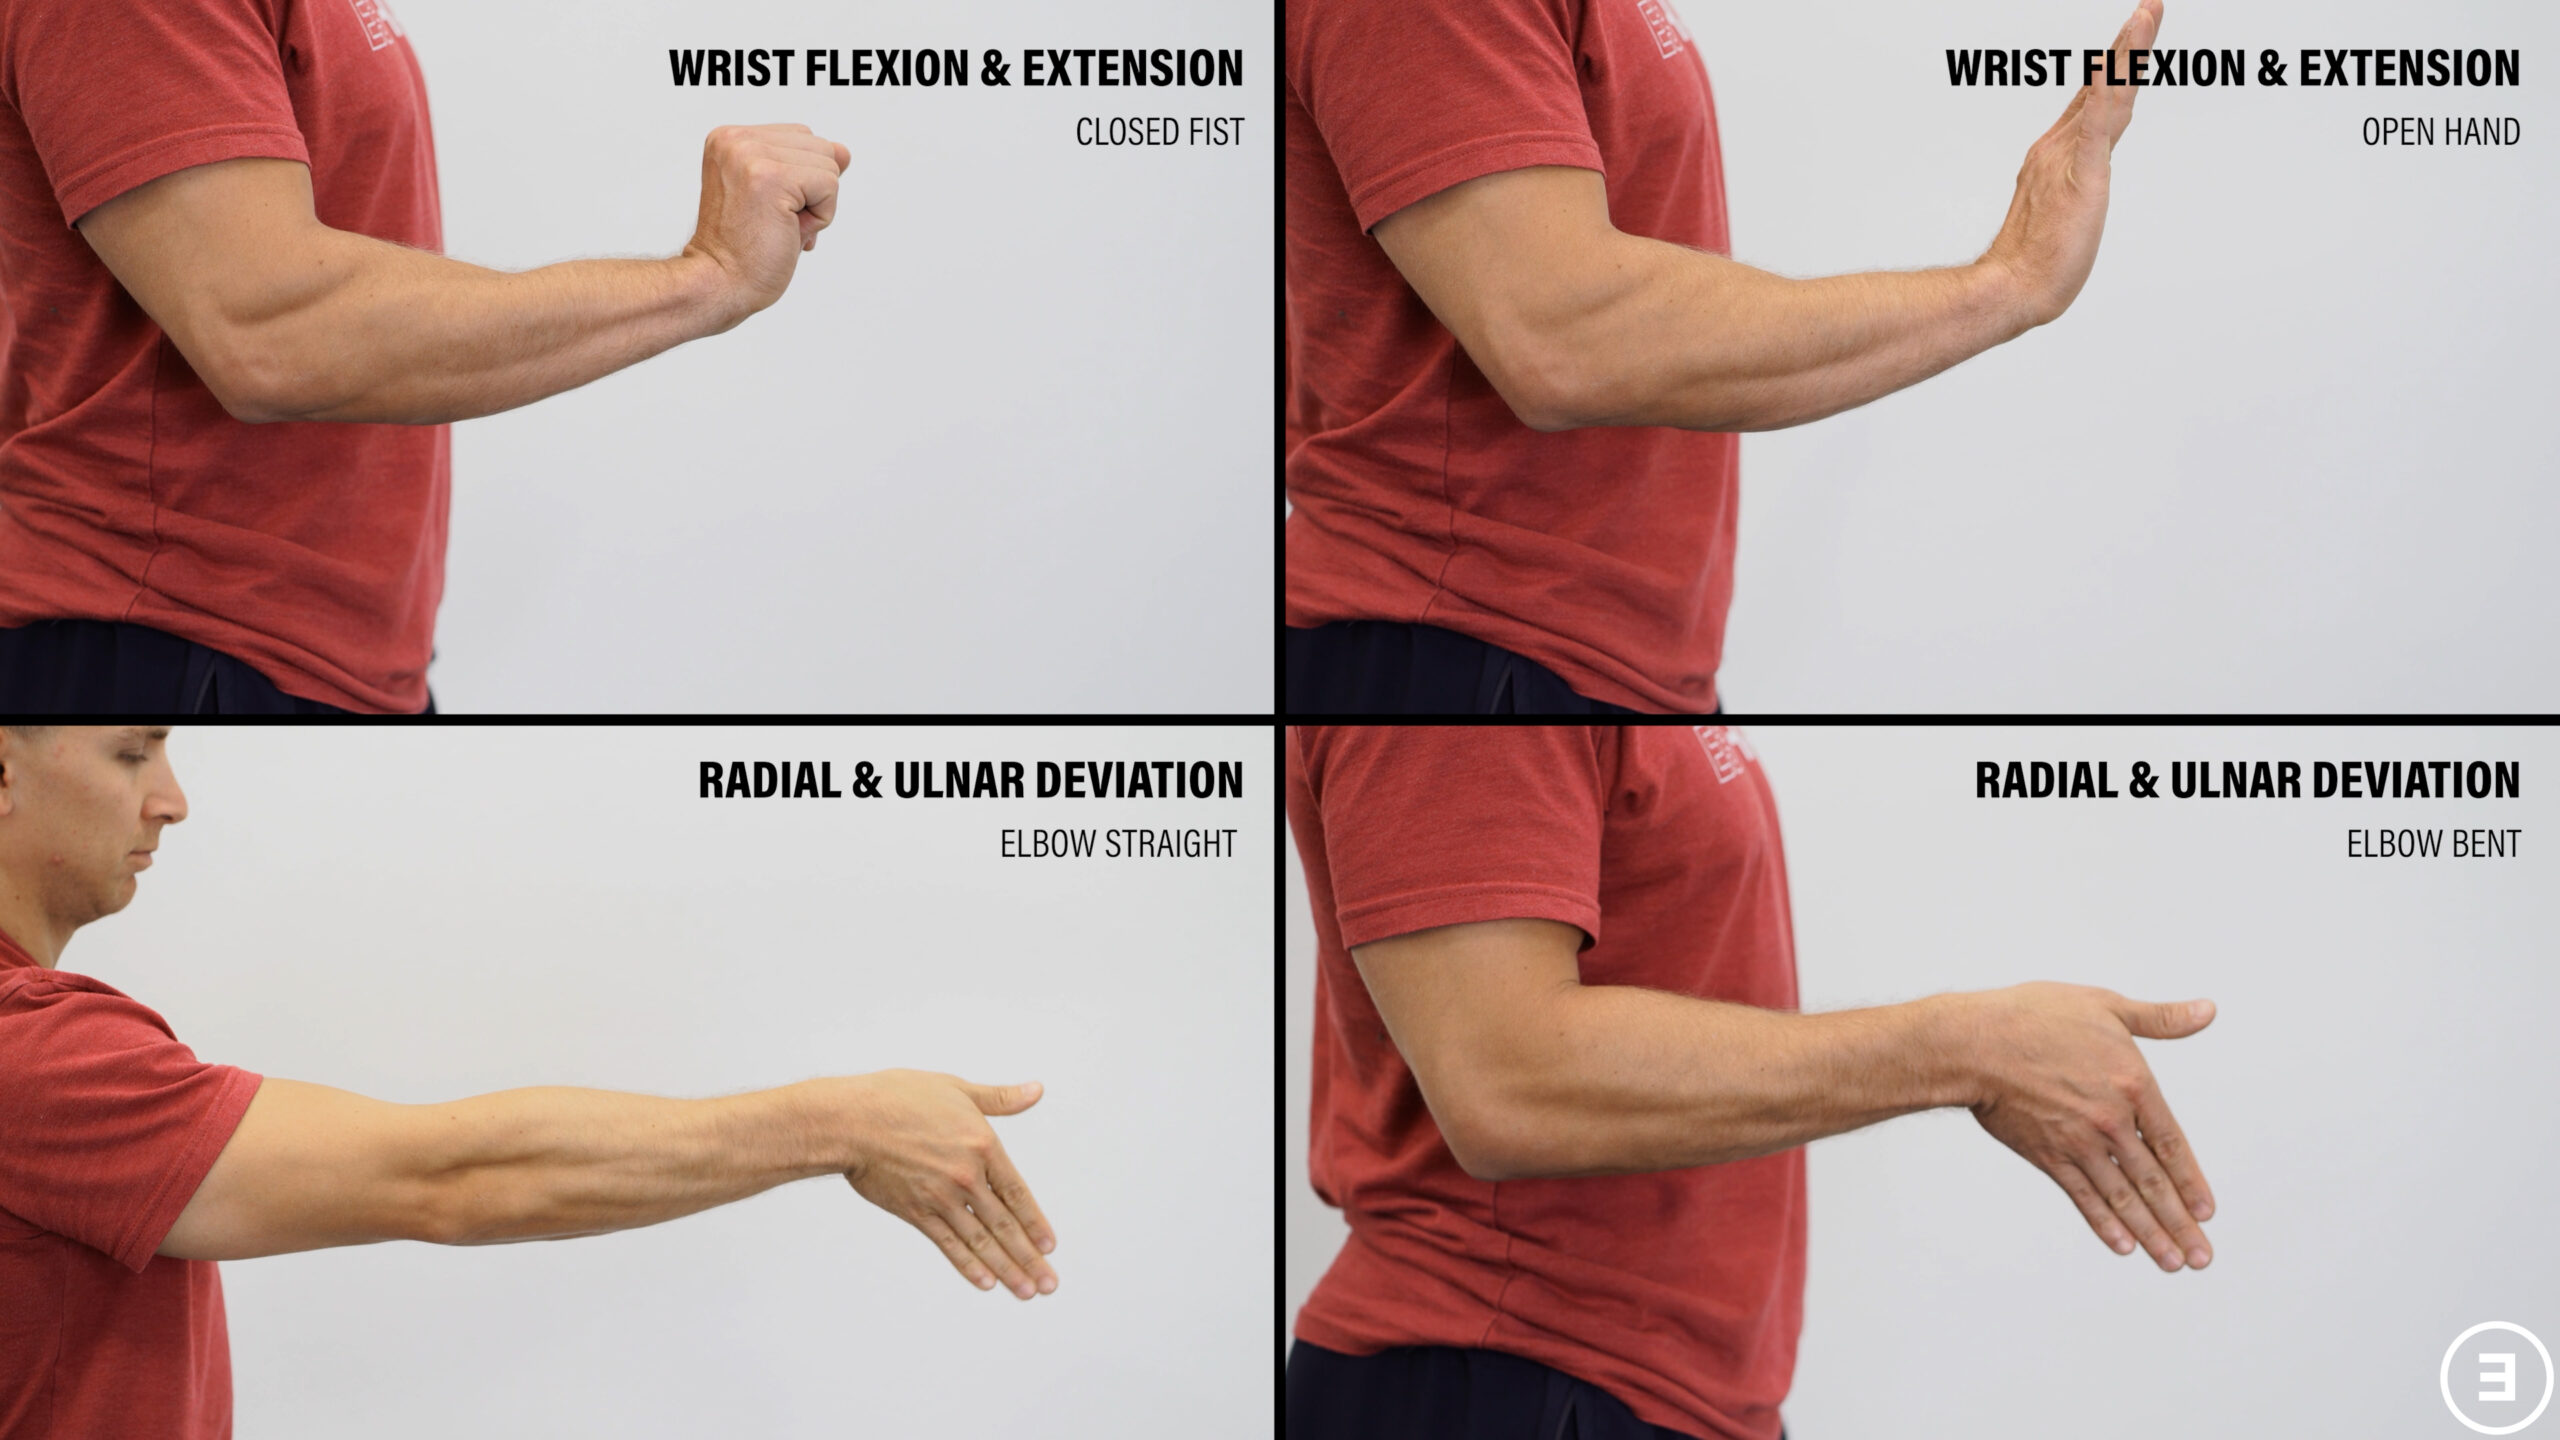
For an increased stretch with ulnar deviation, you can tuck your thumb but be mindful of this if you have De Quervain’s.
Wrist & Forearm Strengthening
For the wrist and forearm strengthening, you can start by supersetting 2-3 sets of 10-20 repetitions of resisted wrist flexion and extension.

This means that you would do 1 set of wrist flexion, 1 set of wrist extension, and then repeat for the desired number of sets. You will likely be stronger with wrist flexion than wrist extension. If you want to uncurl your fingers a bit as you do wrist flexion, you’re welcome to do so.
Ideally, you’ll be seated with your forearm supported on a table, bench, or your thigh. You can use a dumbbell, a band with or without a handle, or whatever household objects you have laying around.
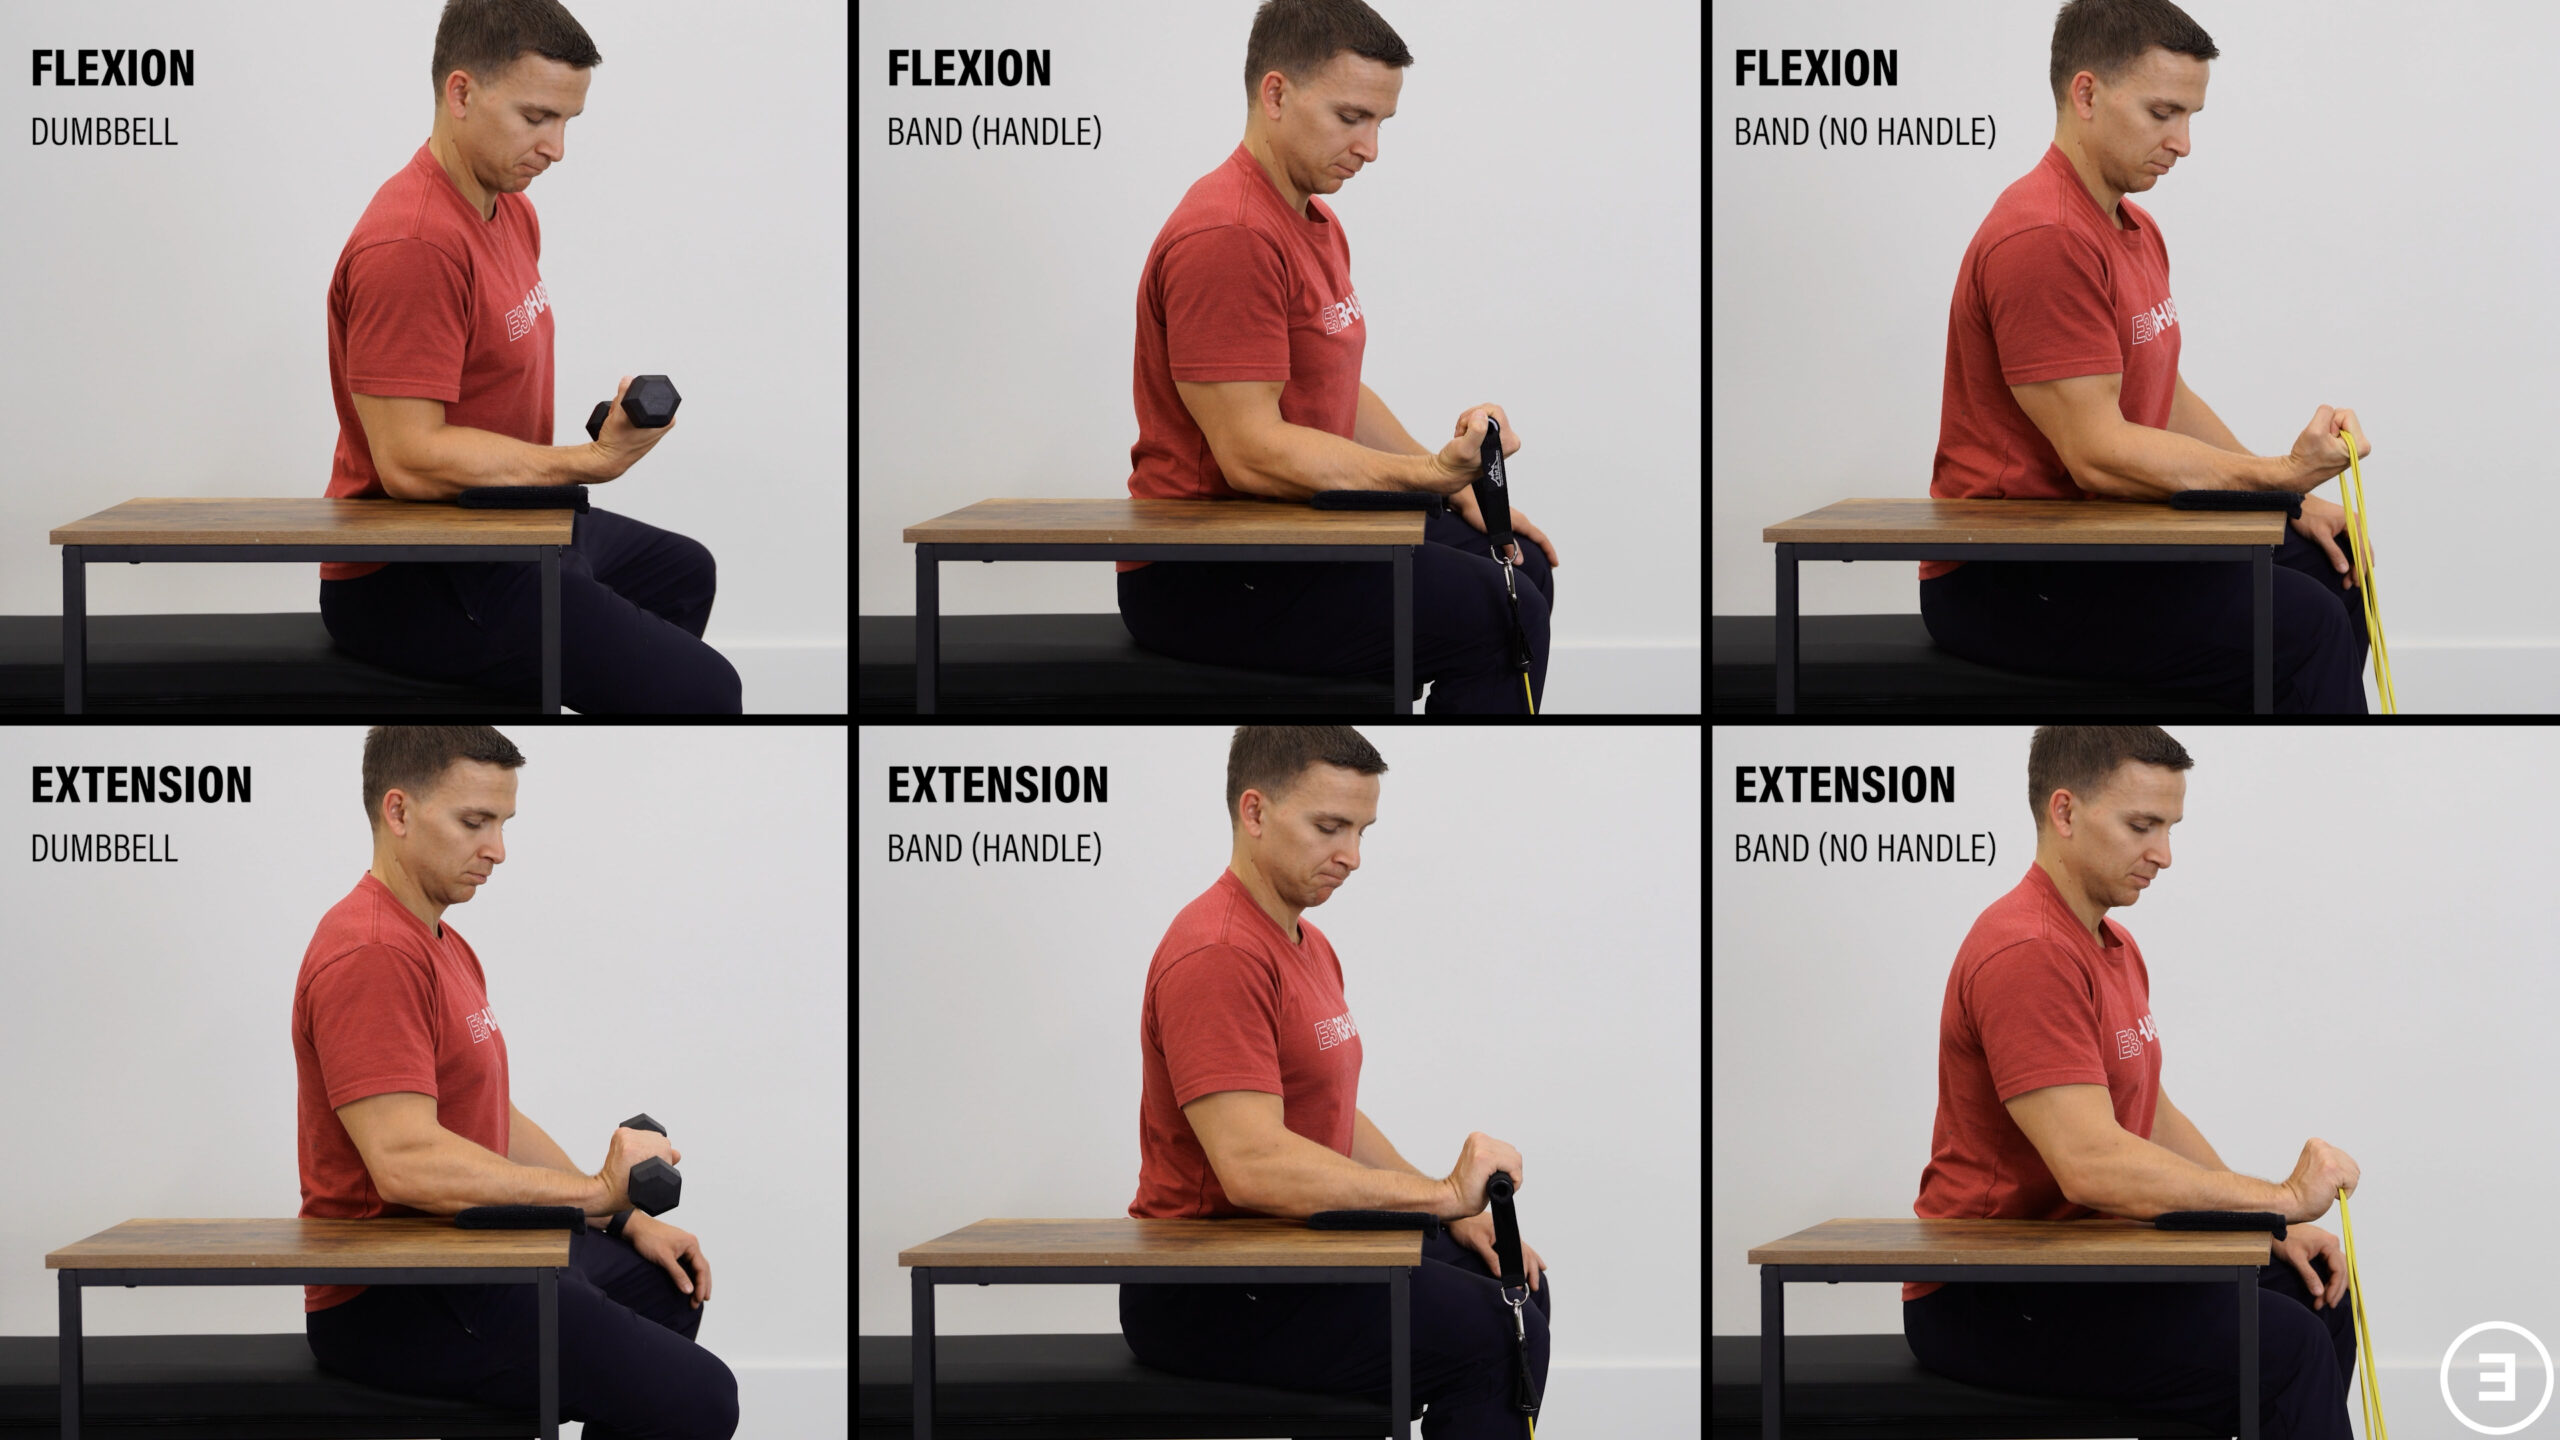
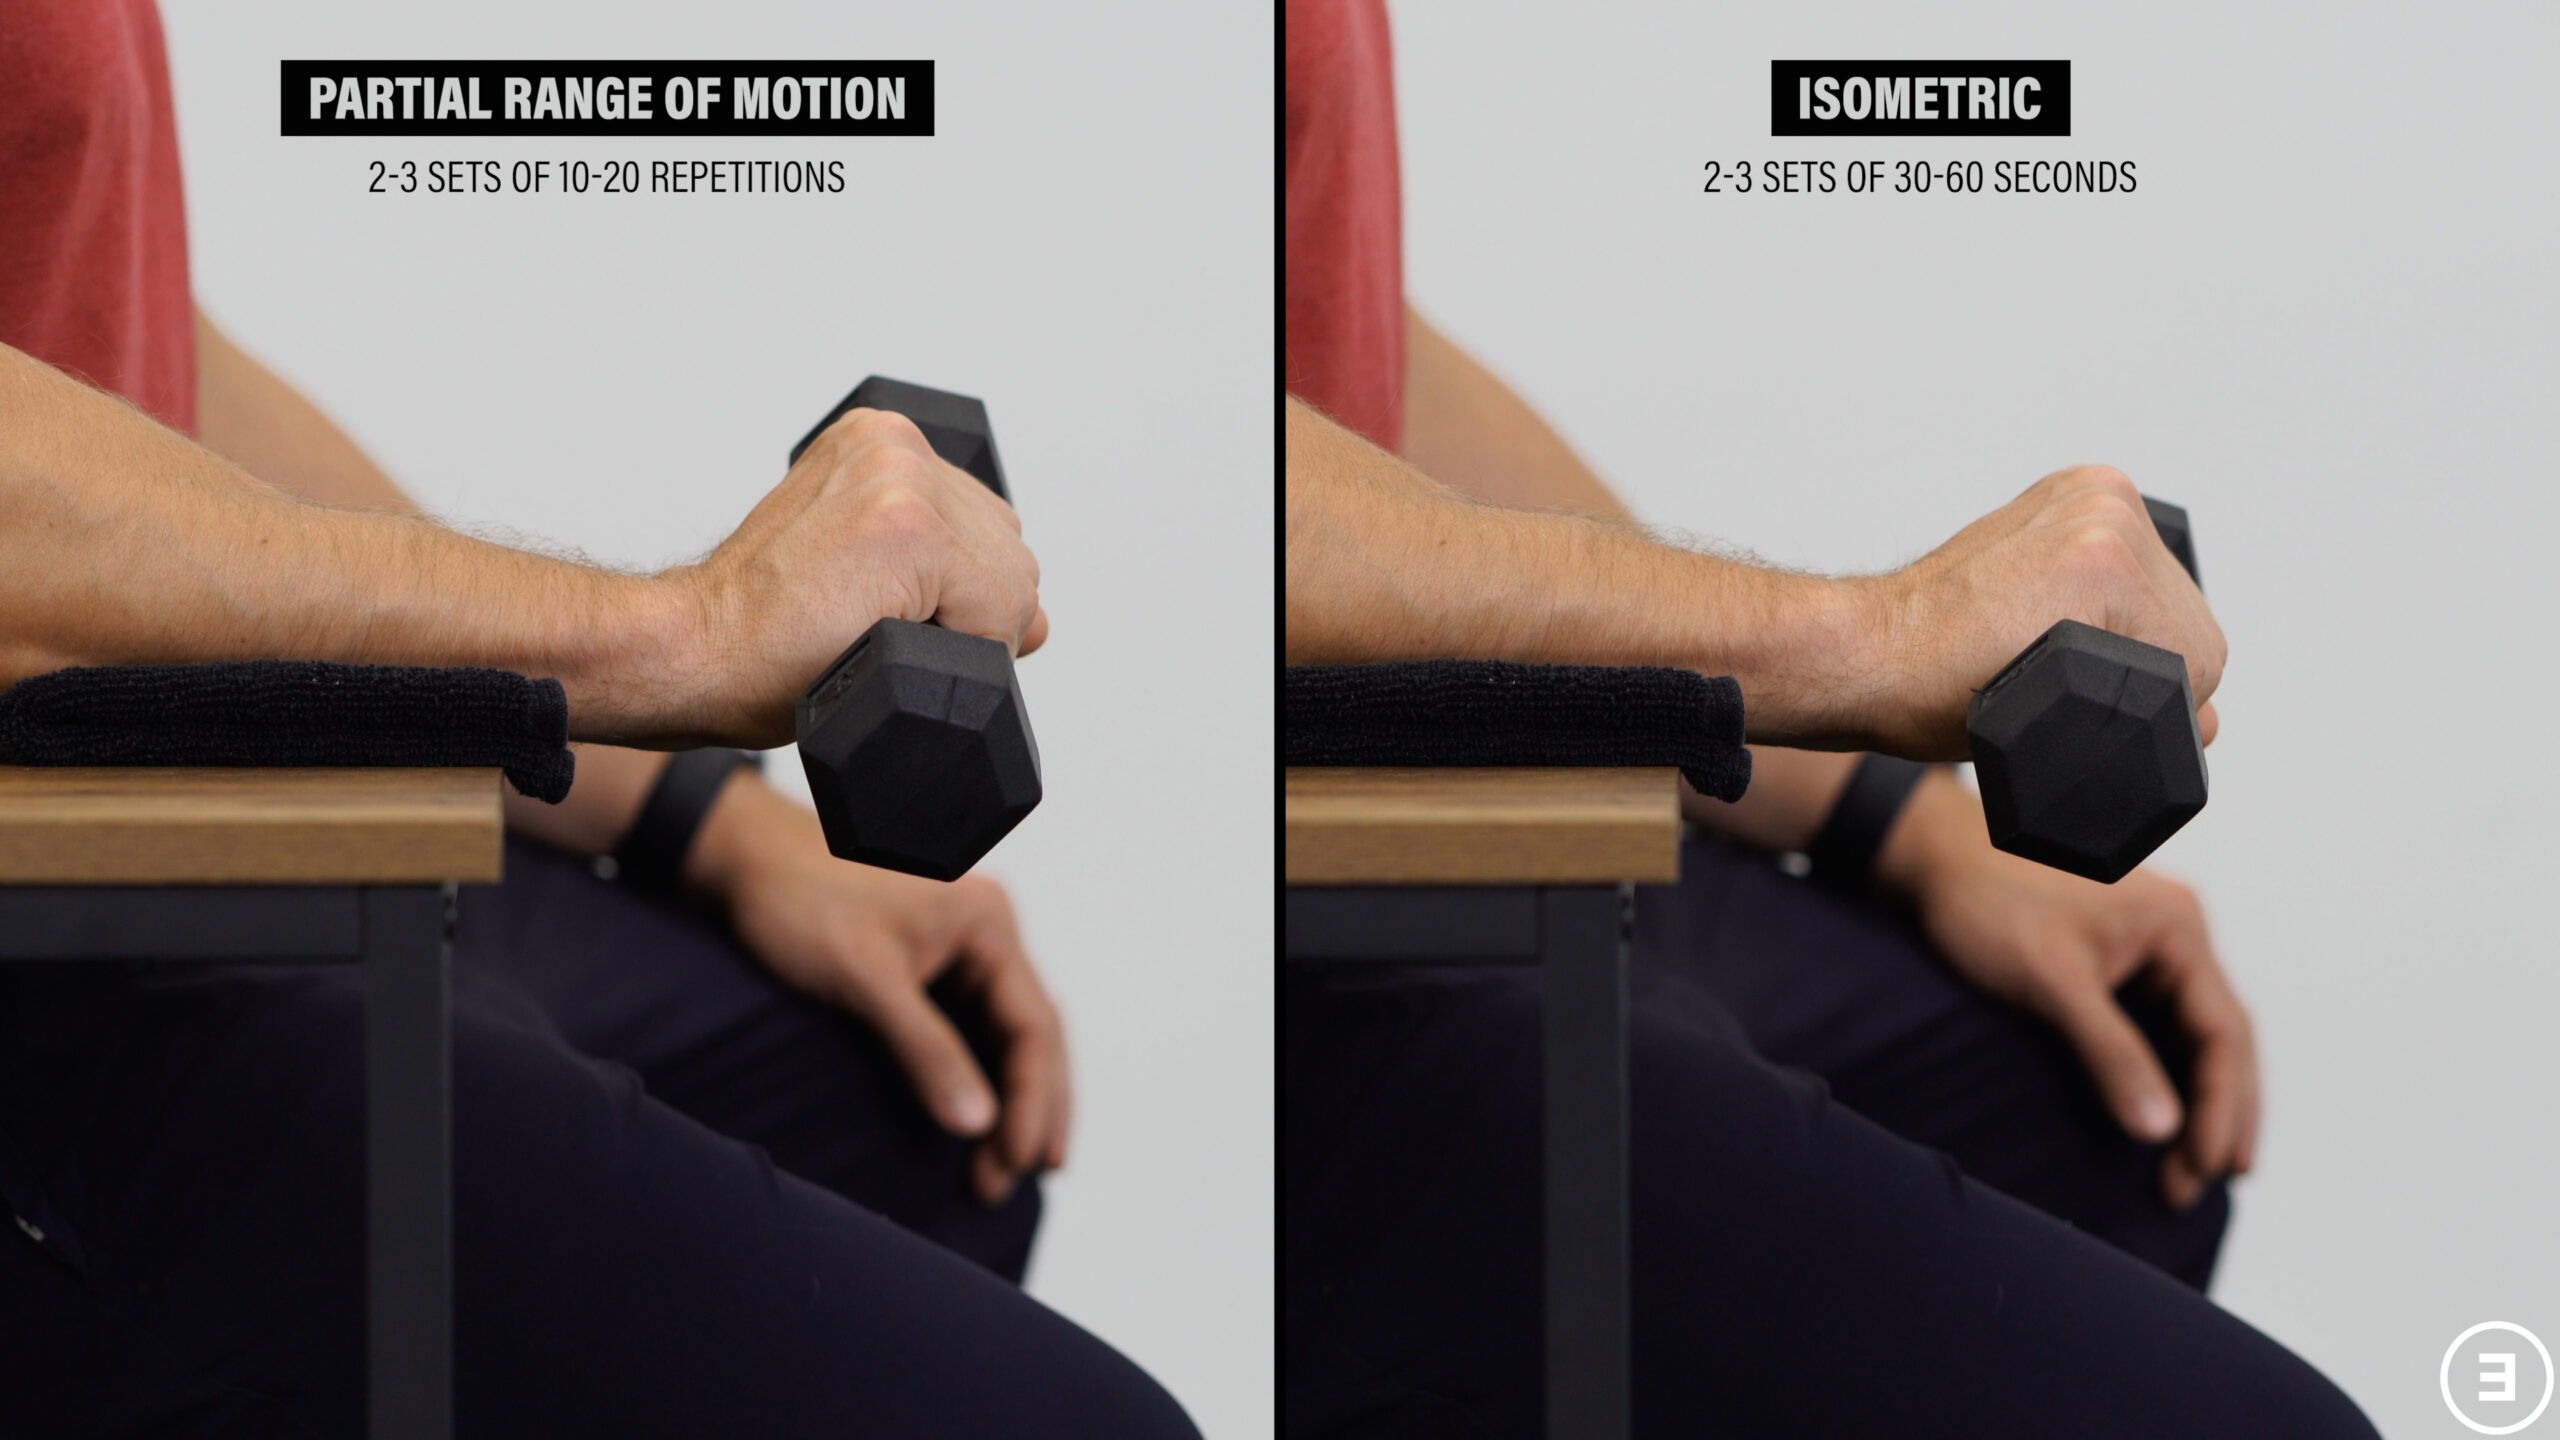
If the full range of motion is uncomfortable, you can shorten the range of motion or just perform an isometric which involves a static hold for 30-60 seconds.
You’ll follow this up with resisted pronation and supination, radial deviation, and ulnar deviation for 2-3 sets of 10-20 repetitions each.
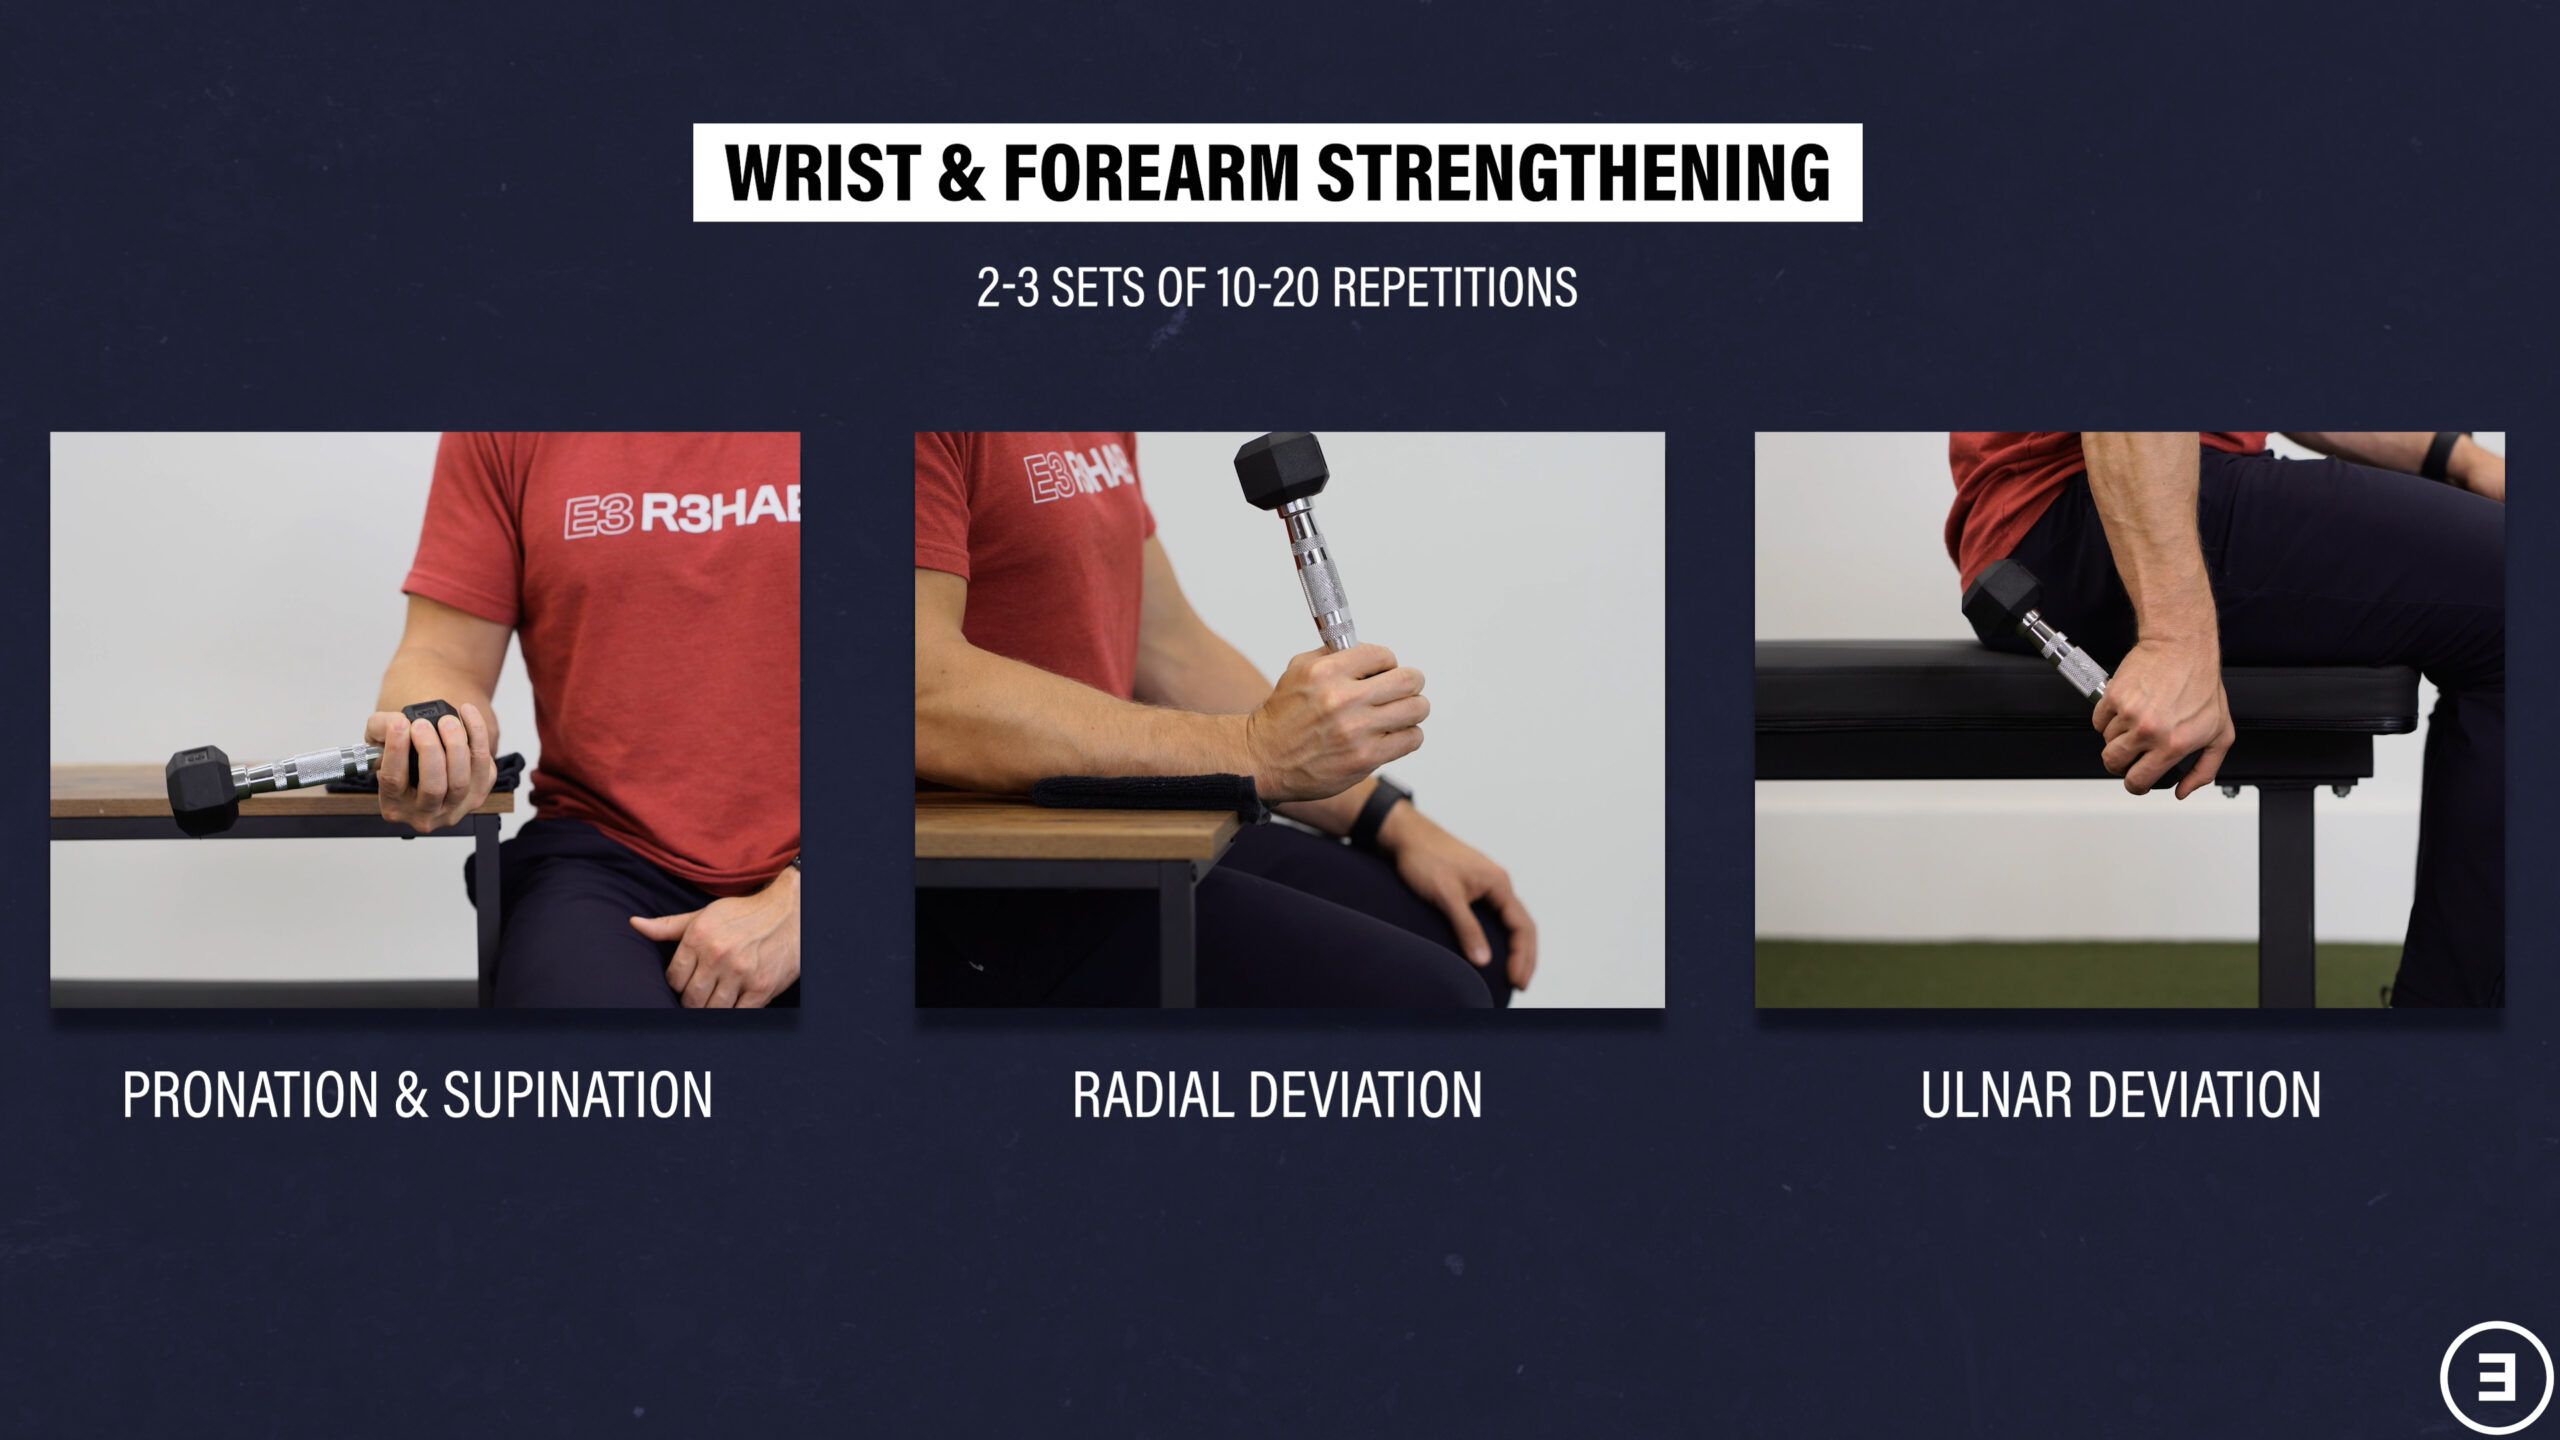
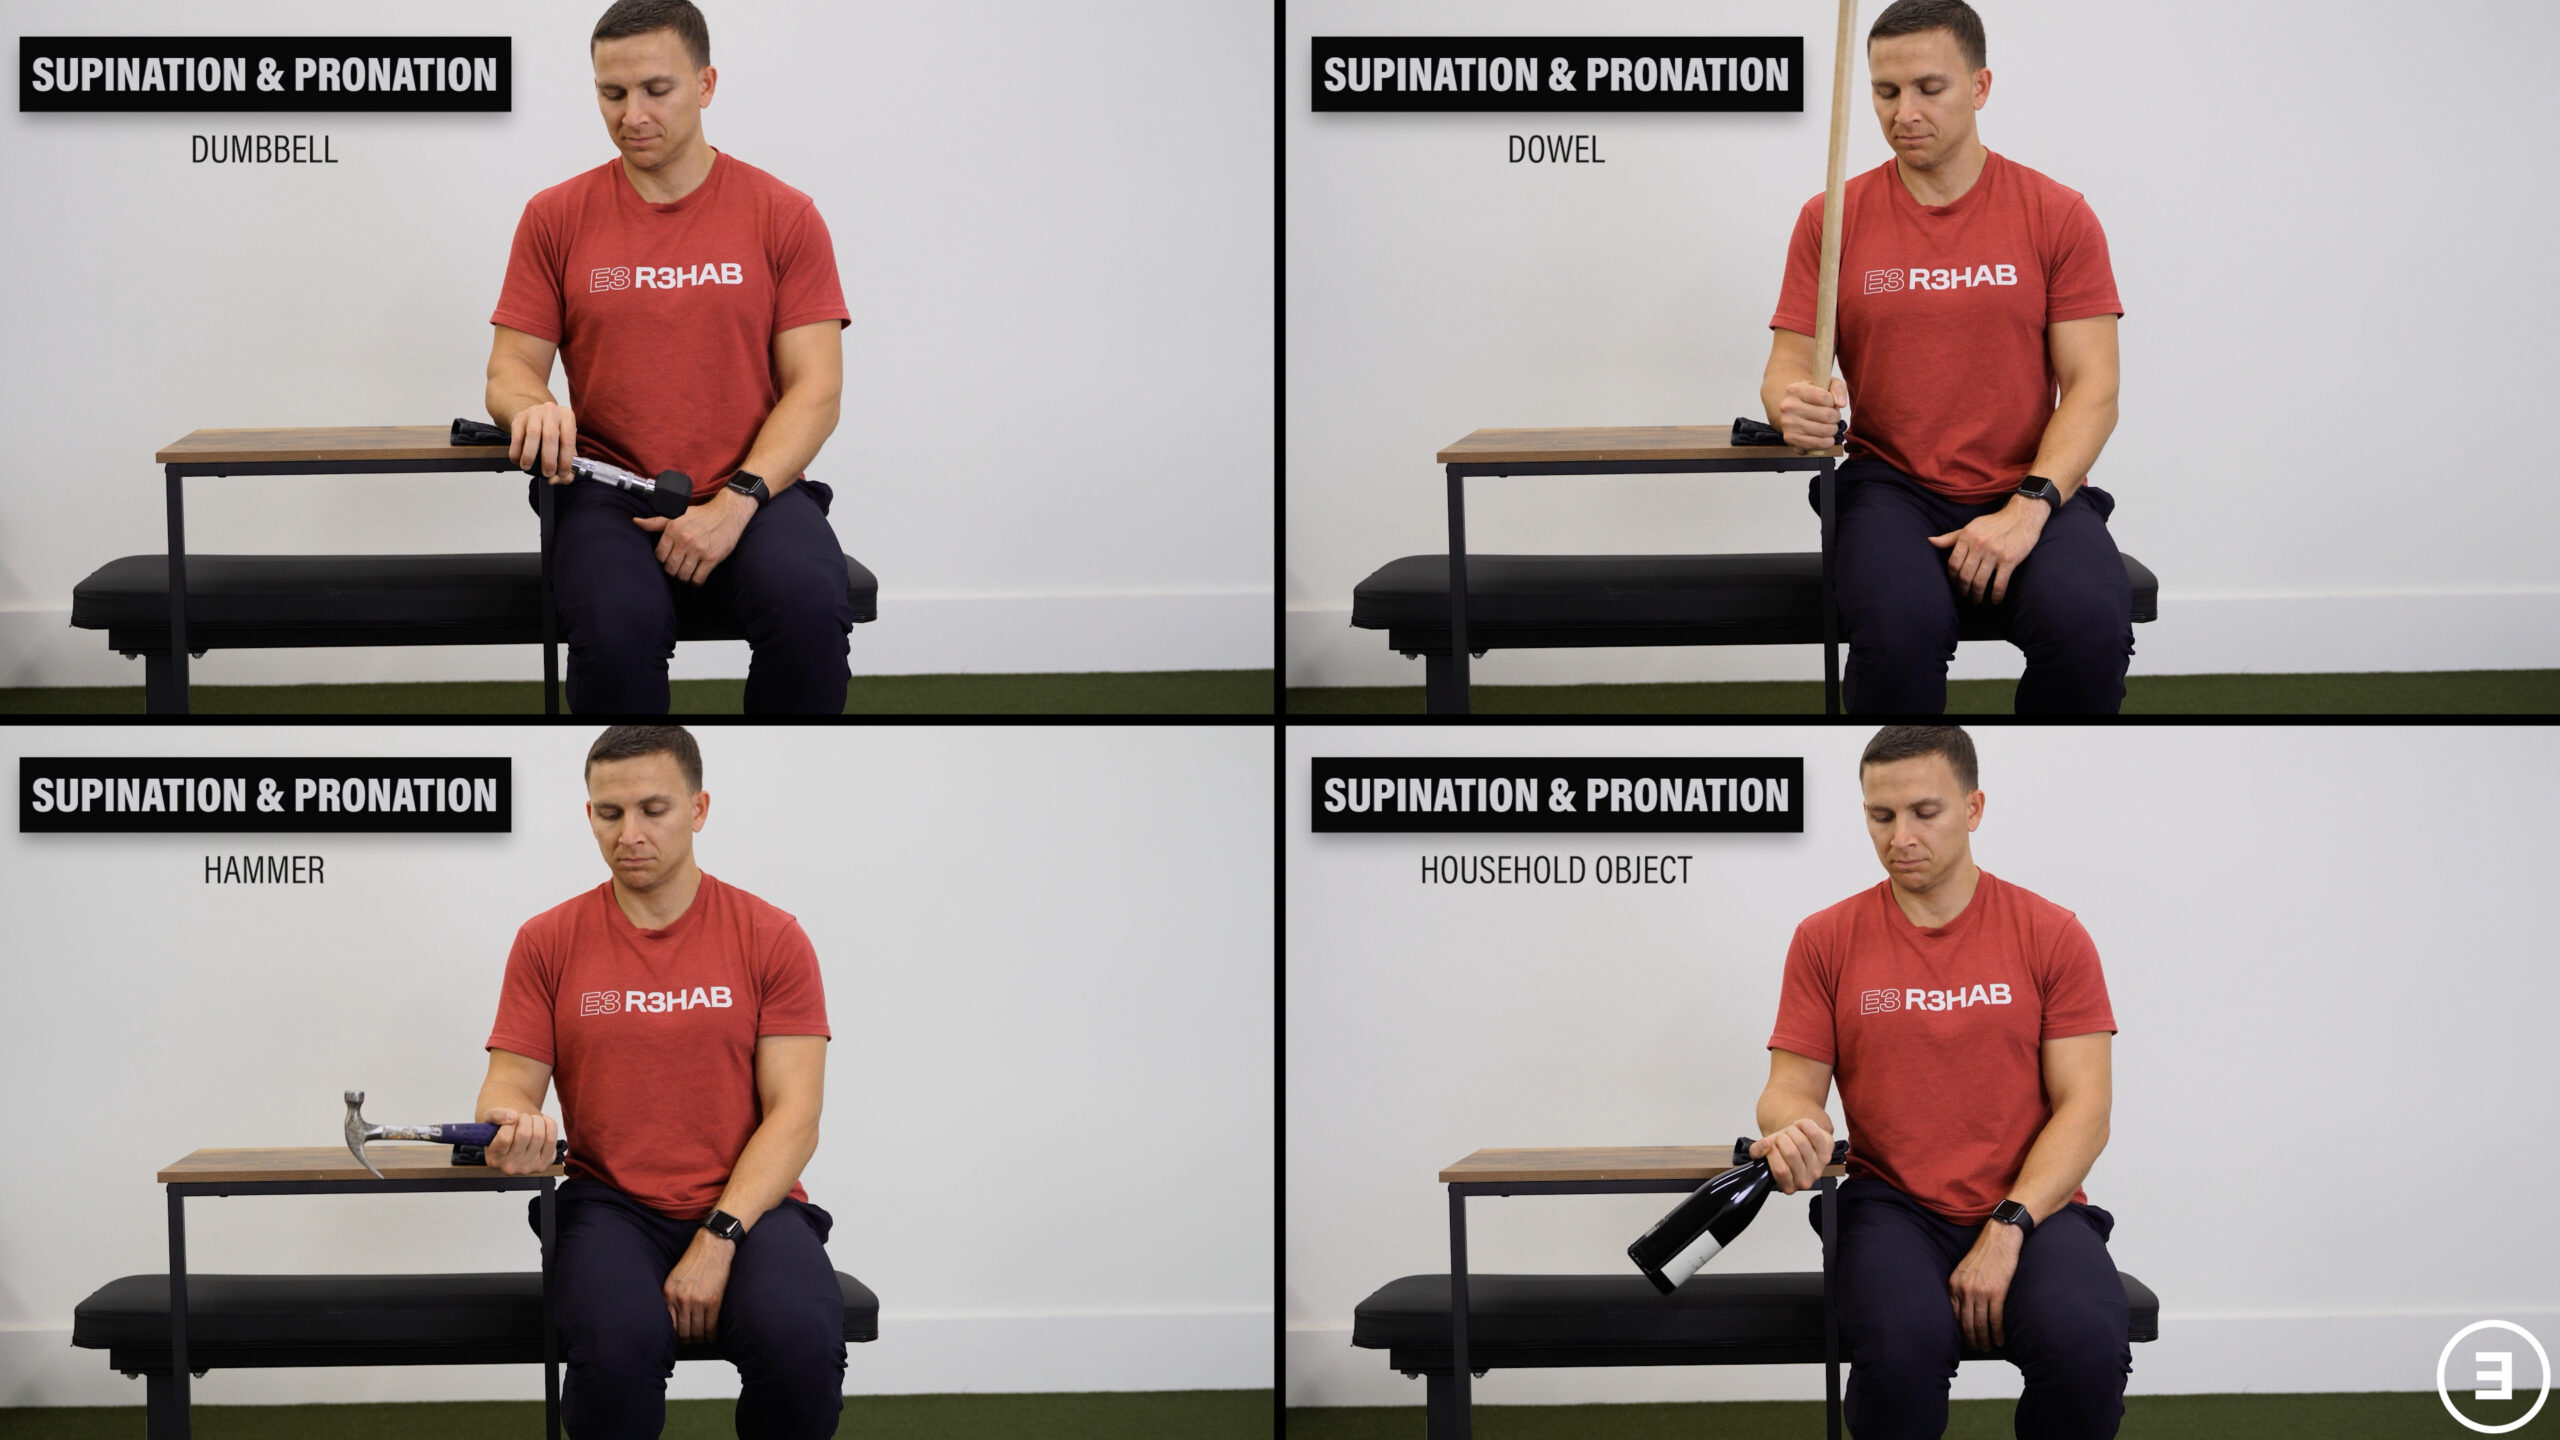
For pronation and supination, your elbow should be bent with your arm tucked by your side, forearm supported or unsupported, and you can be sitting or standing. Hold onto the end of a dumbbell, dowel, hammer, or another household object.
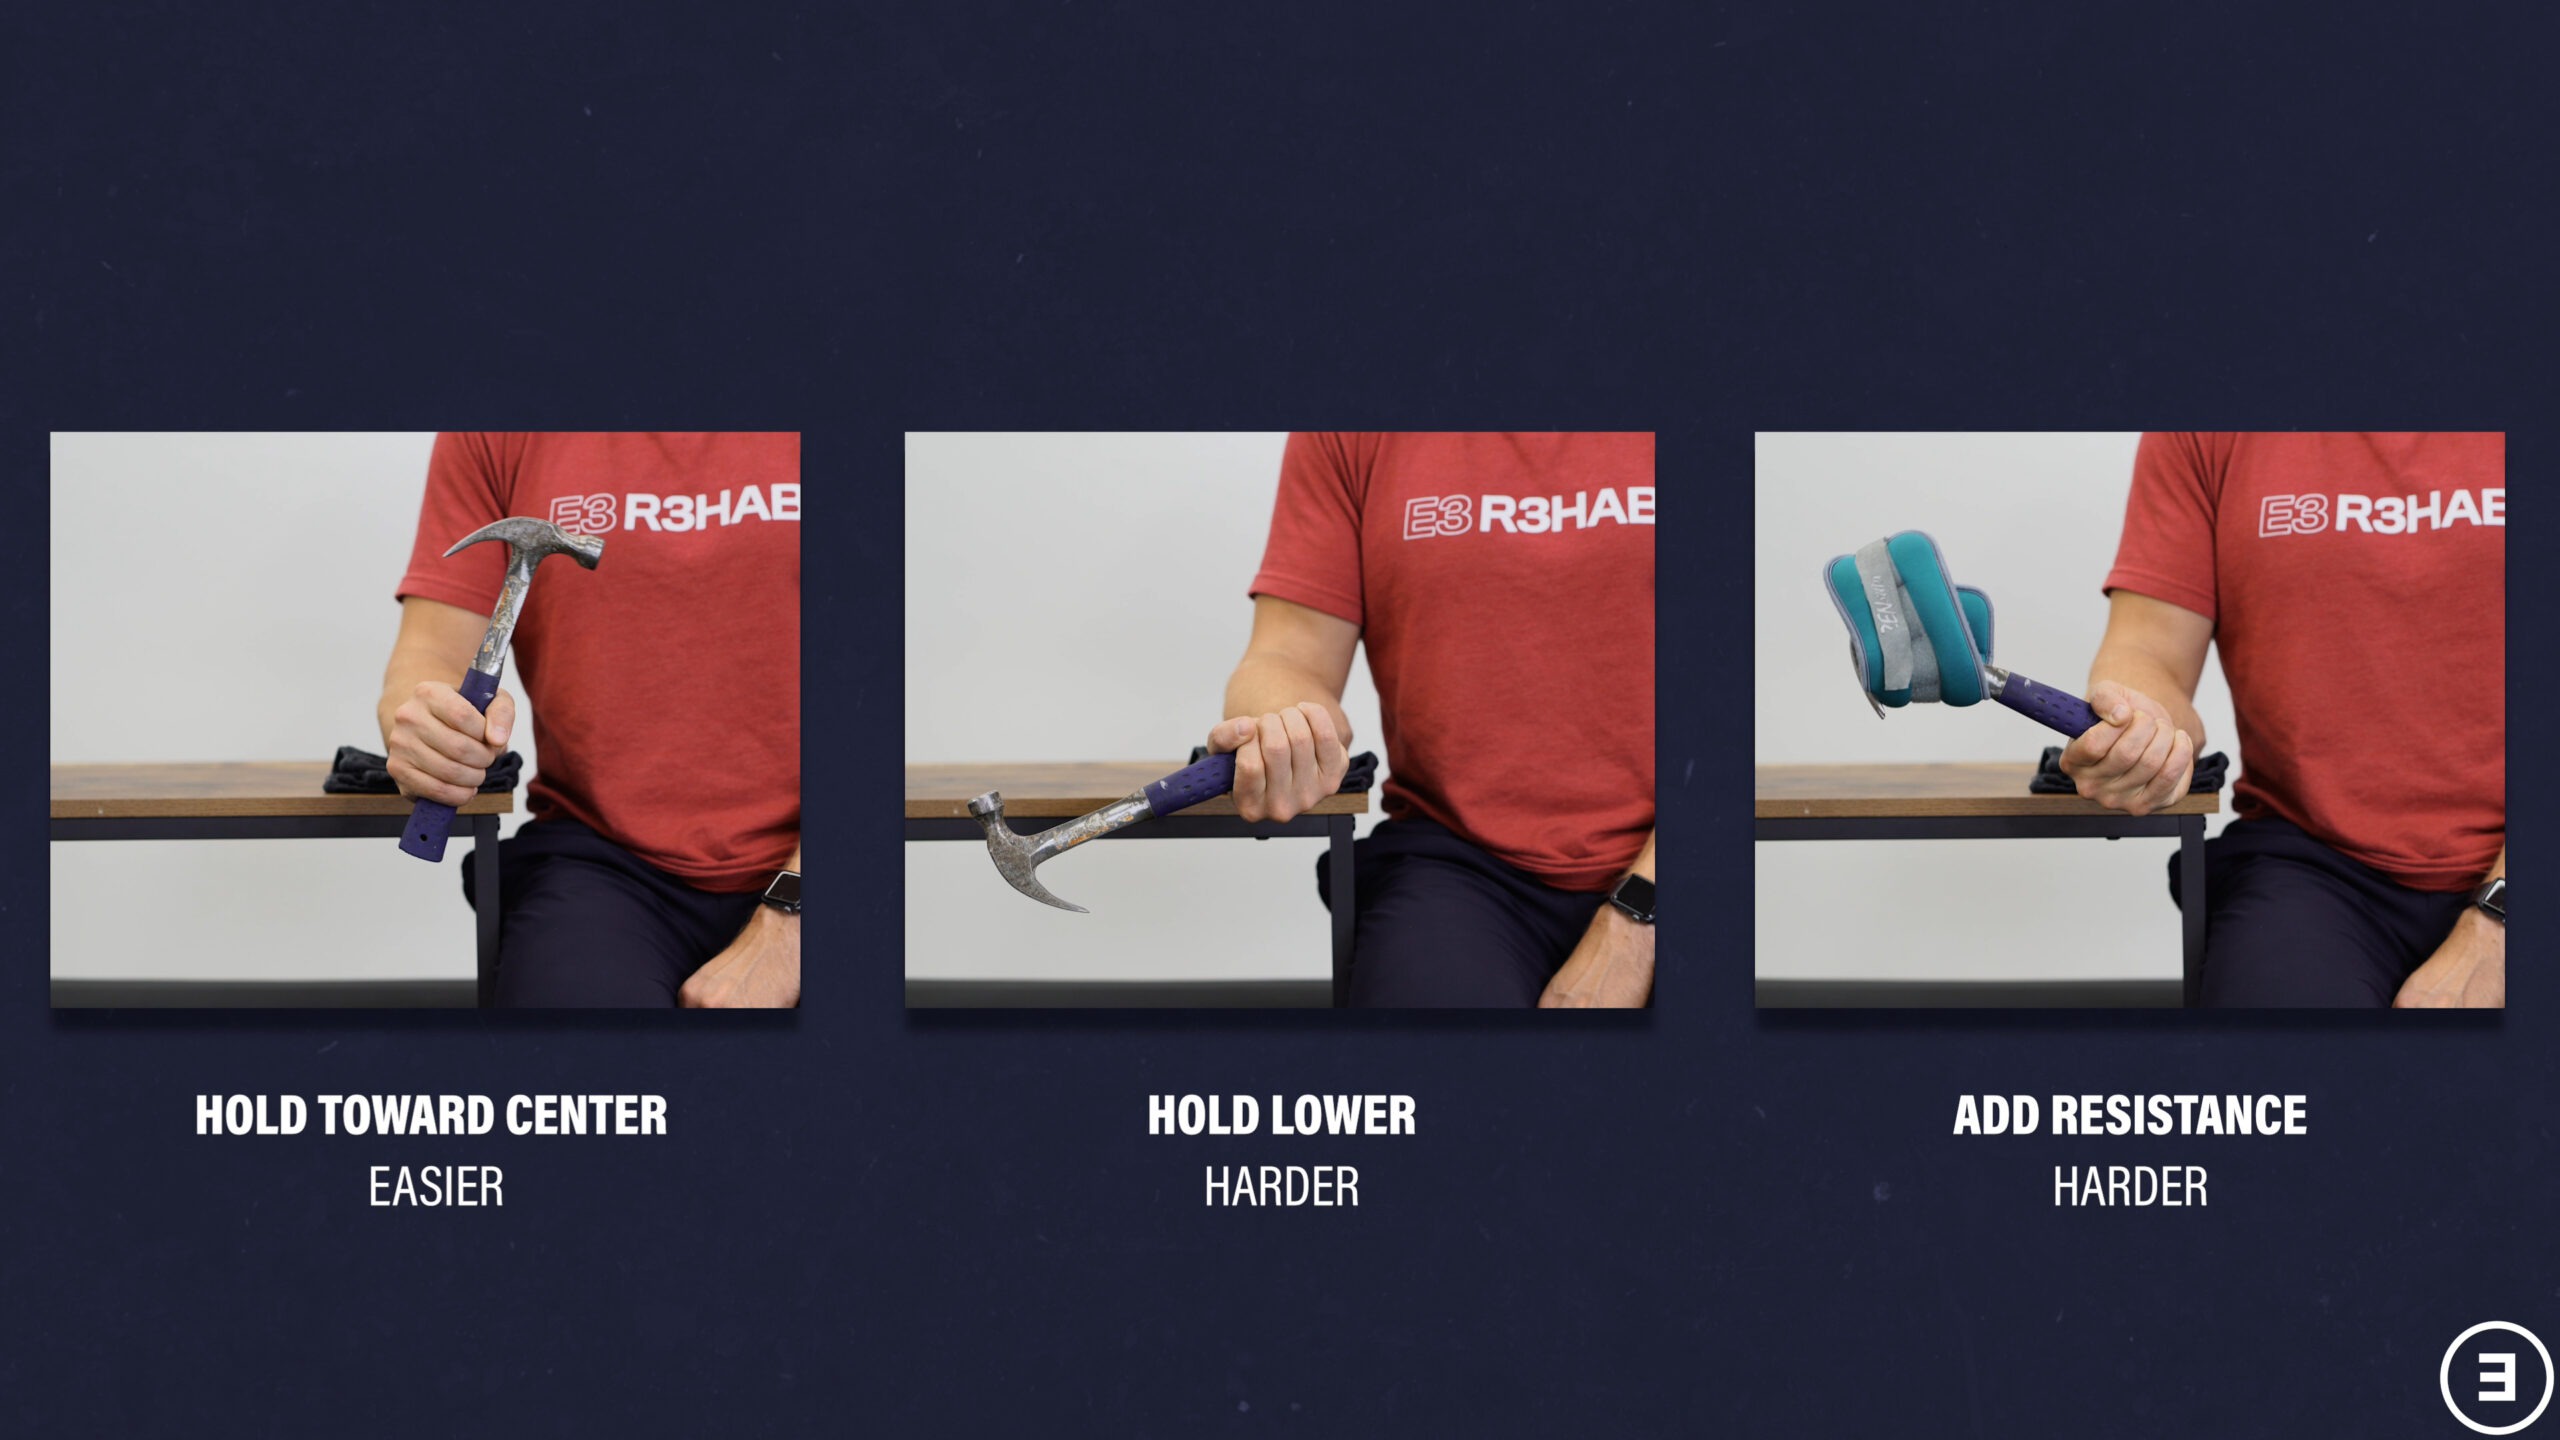
The closer you grab to the center of that object, the easier pronation and supination become. Make the movements harder by grabbing lower, using something that’s heavier, or adding resistance in the form of a cuff weight.
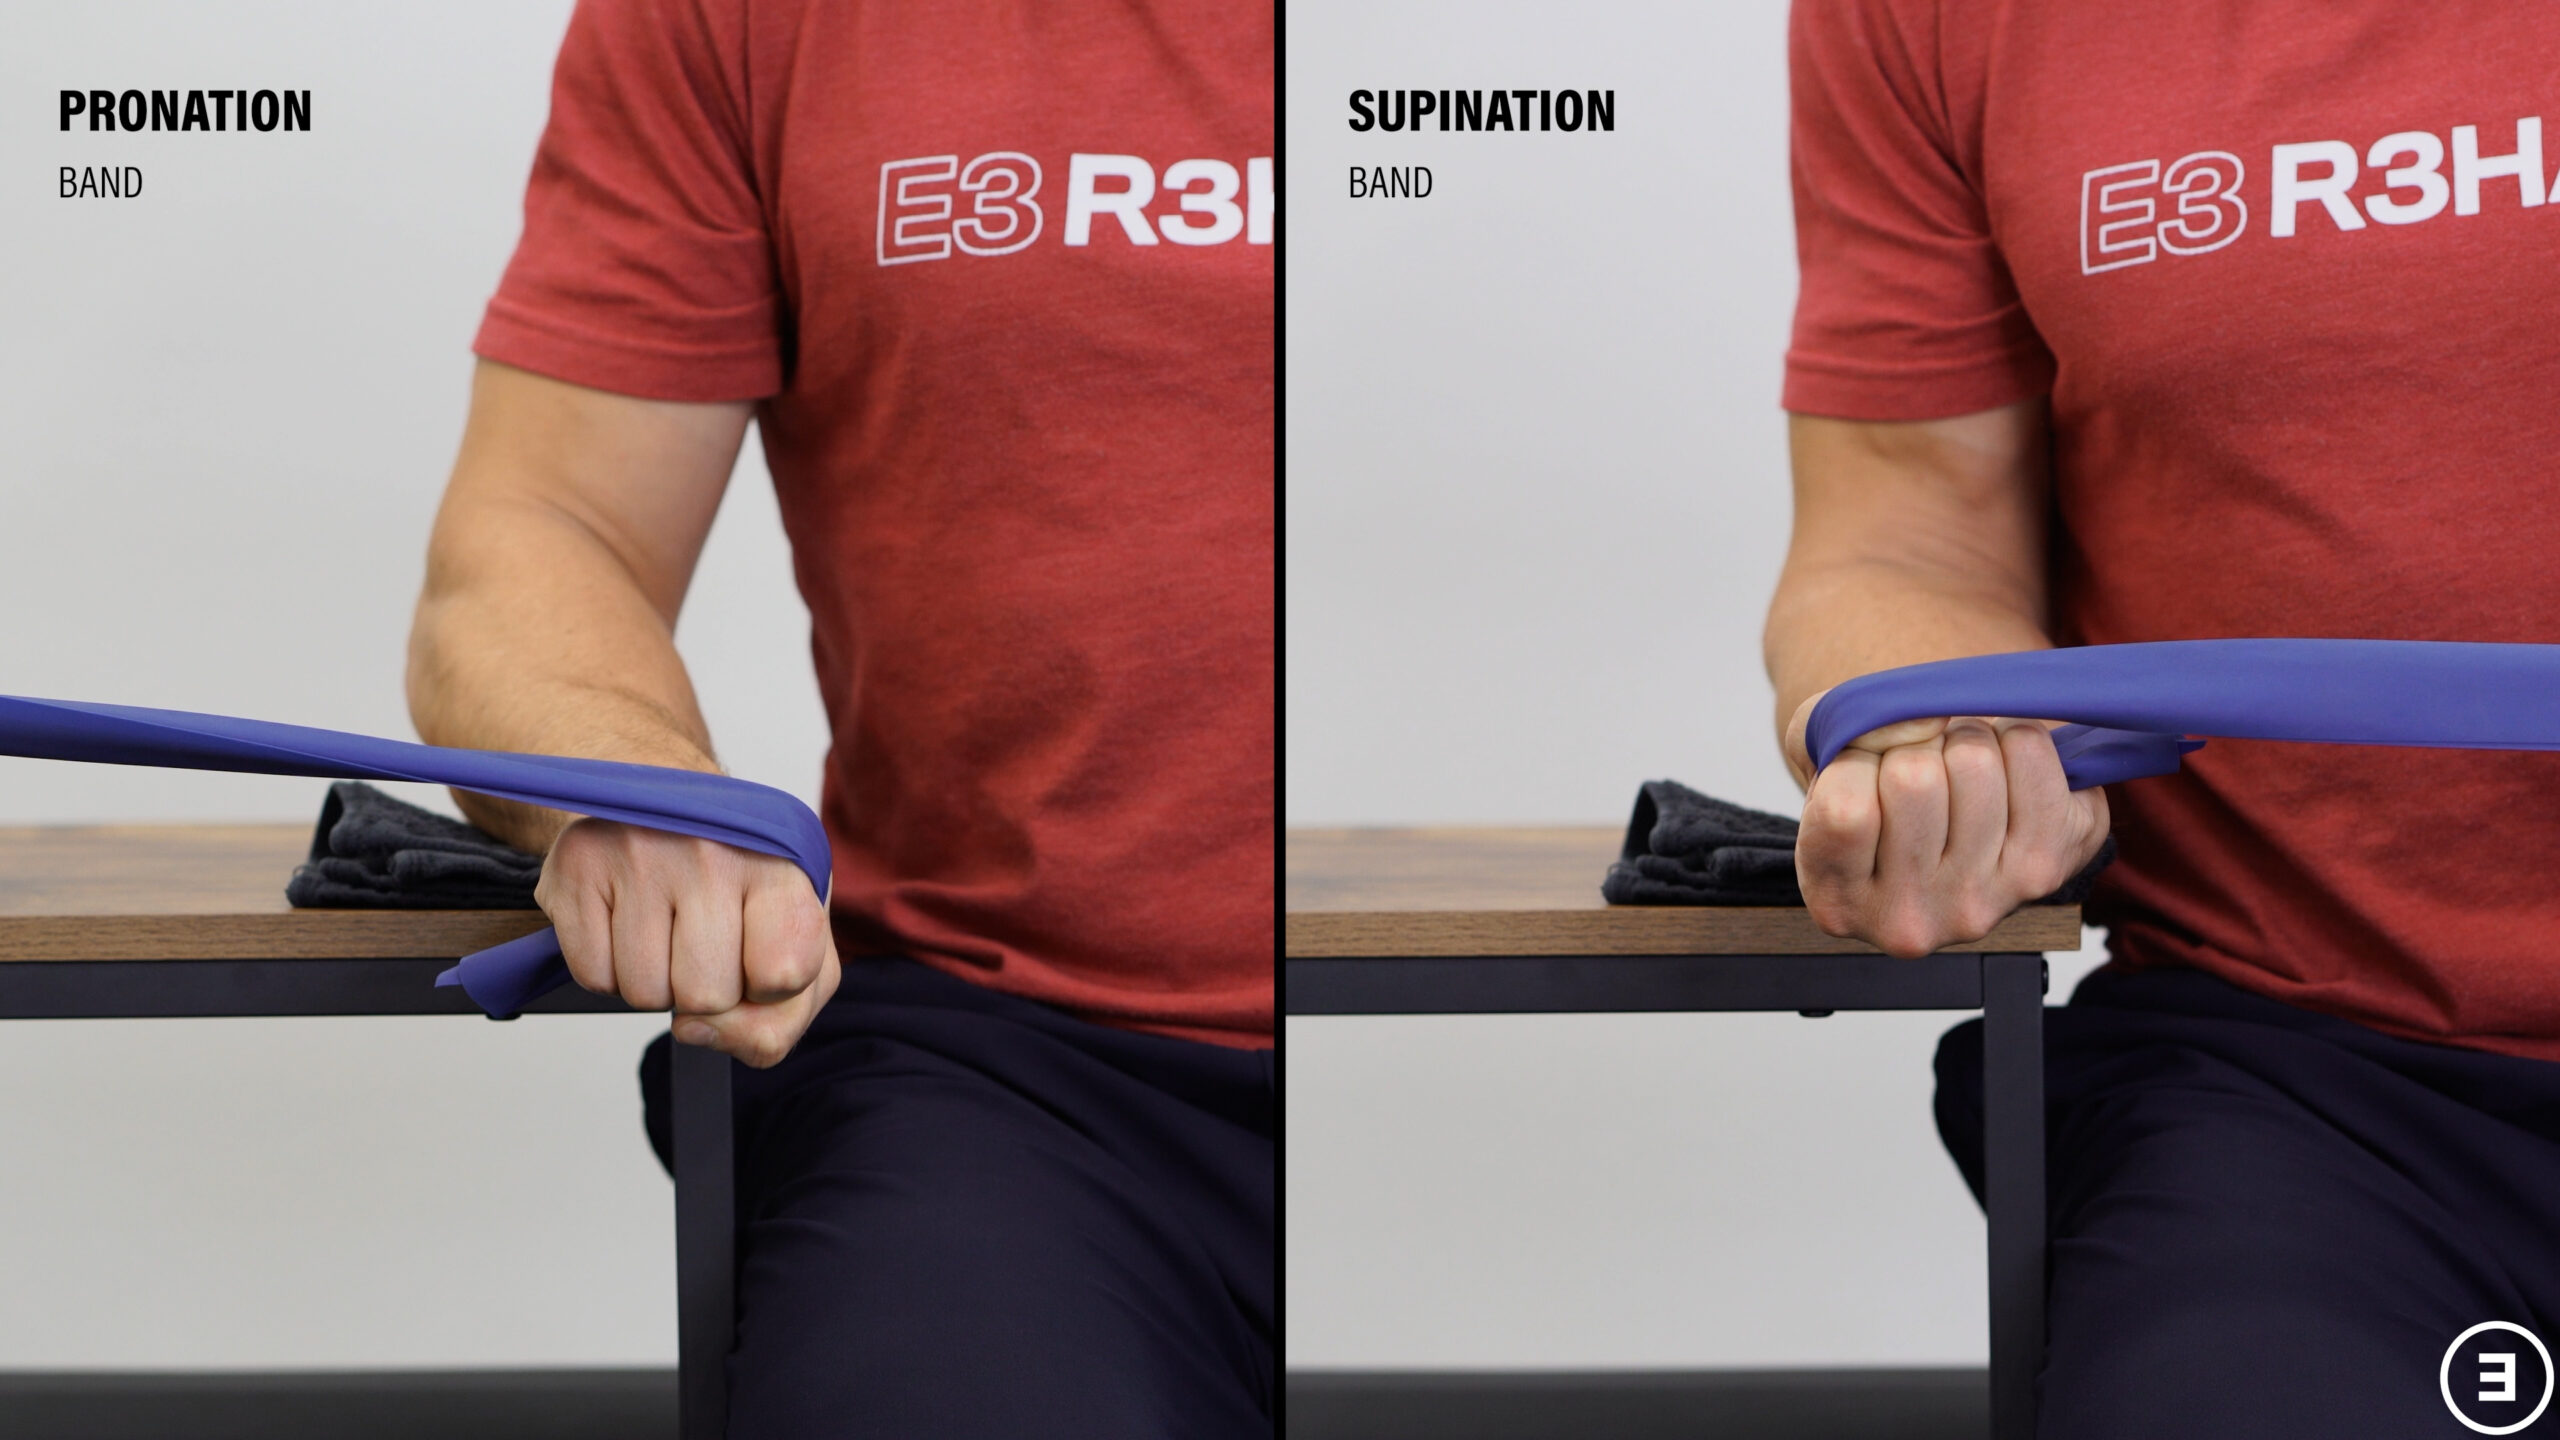
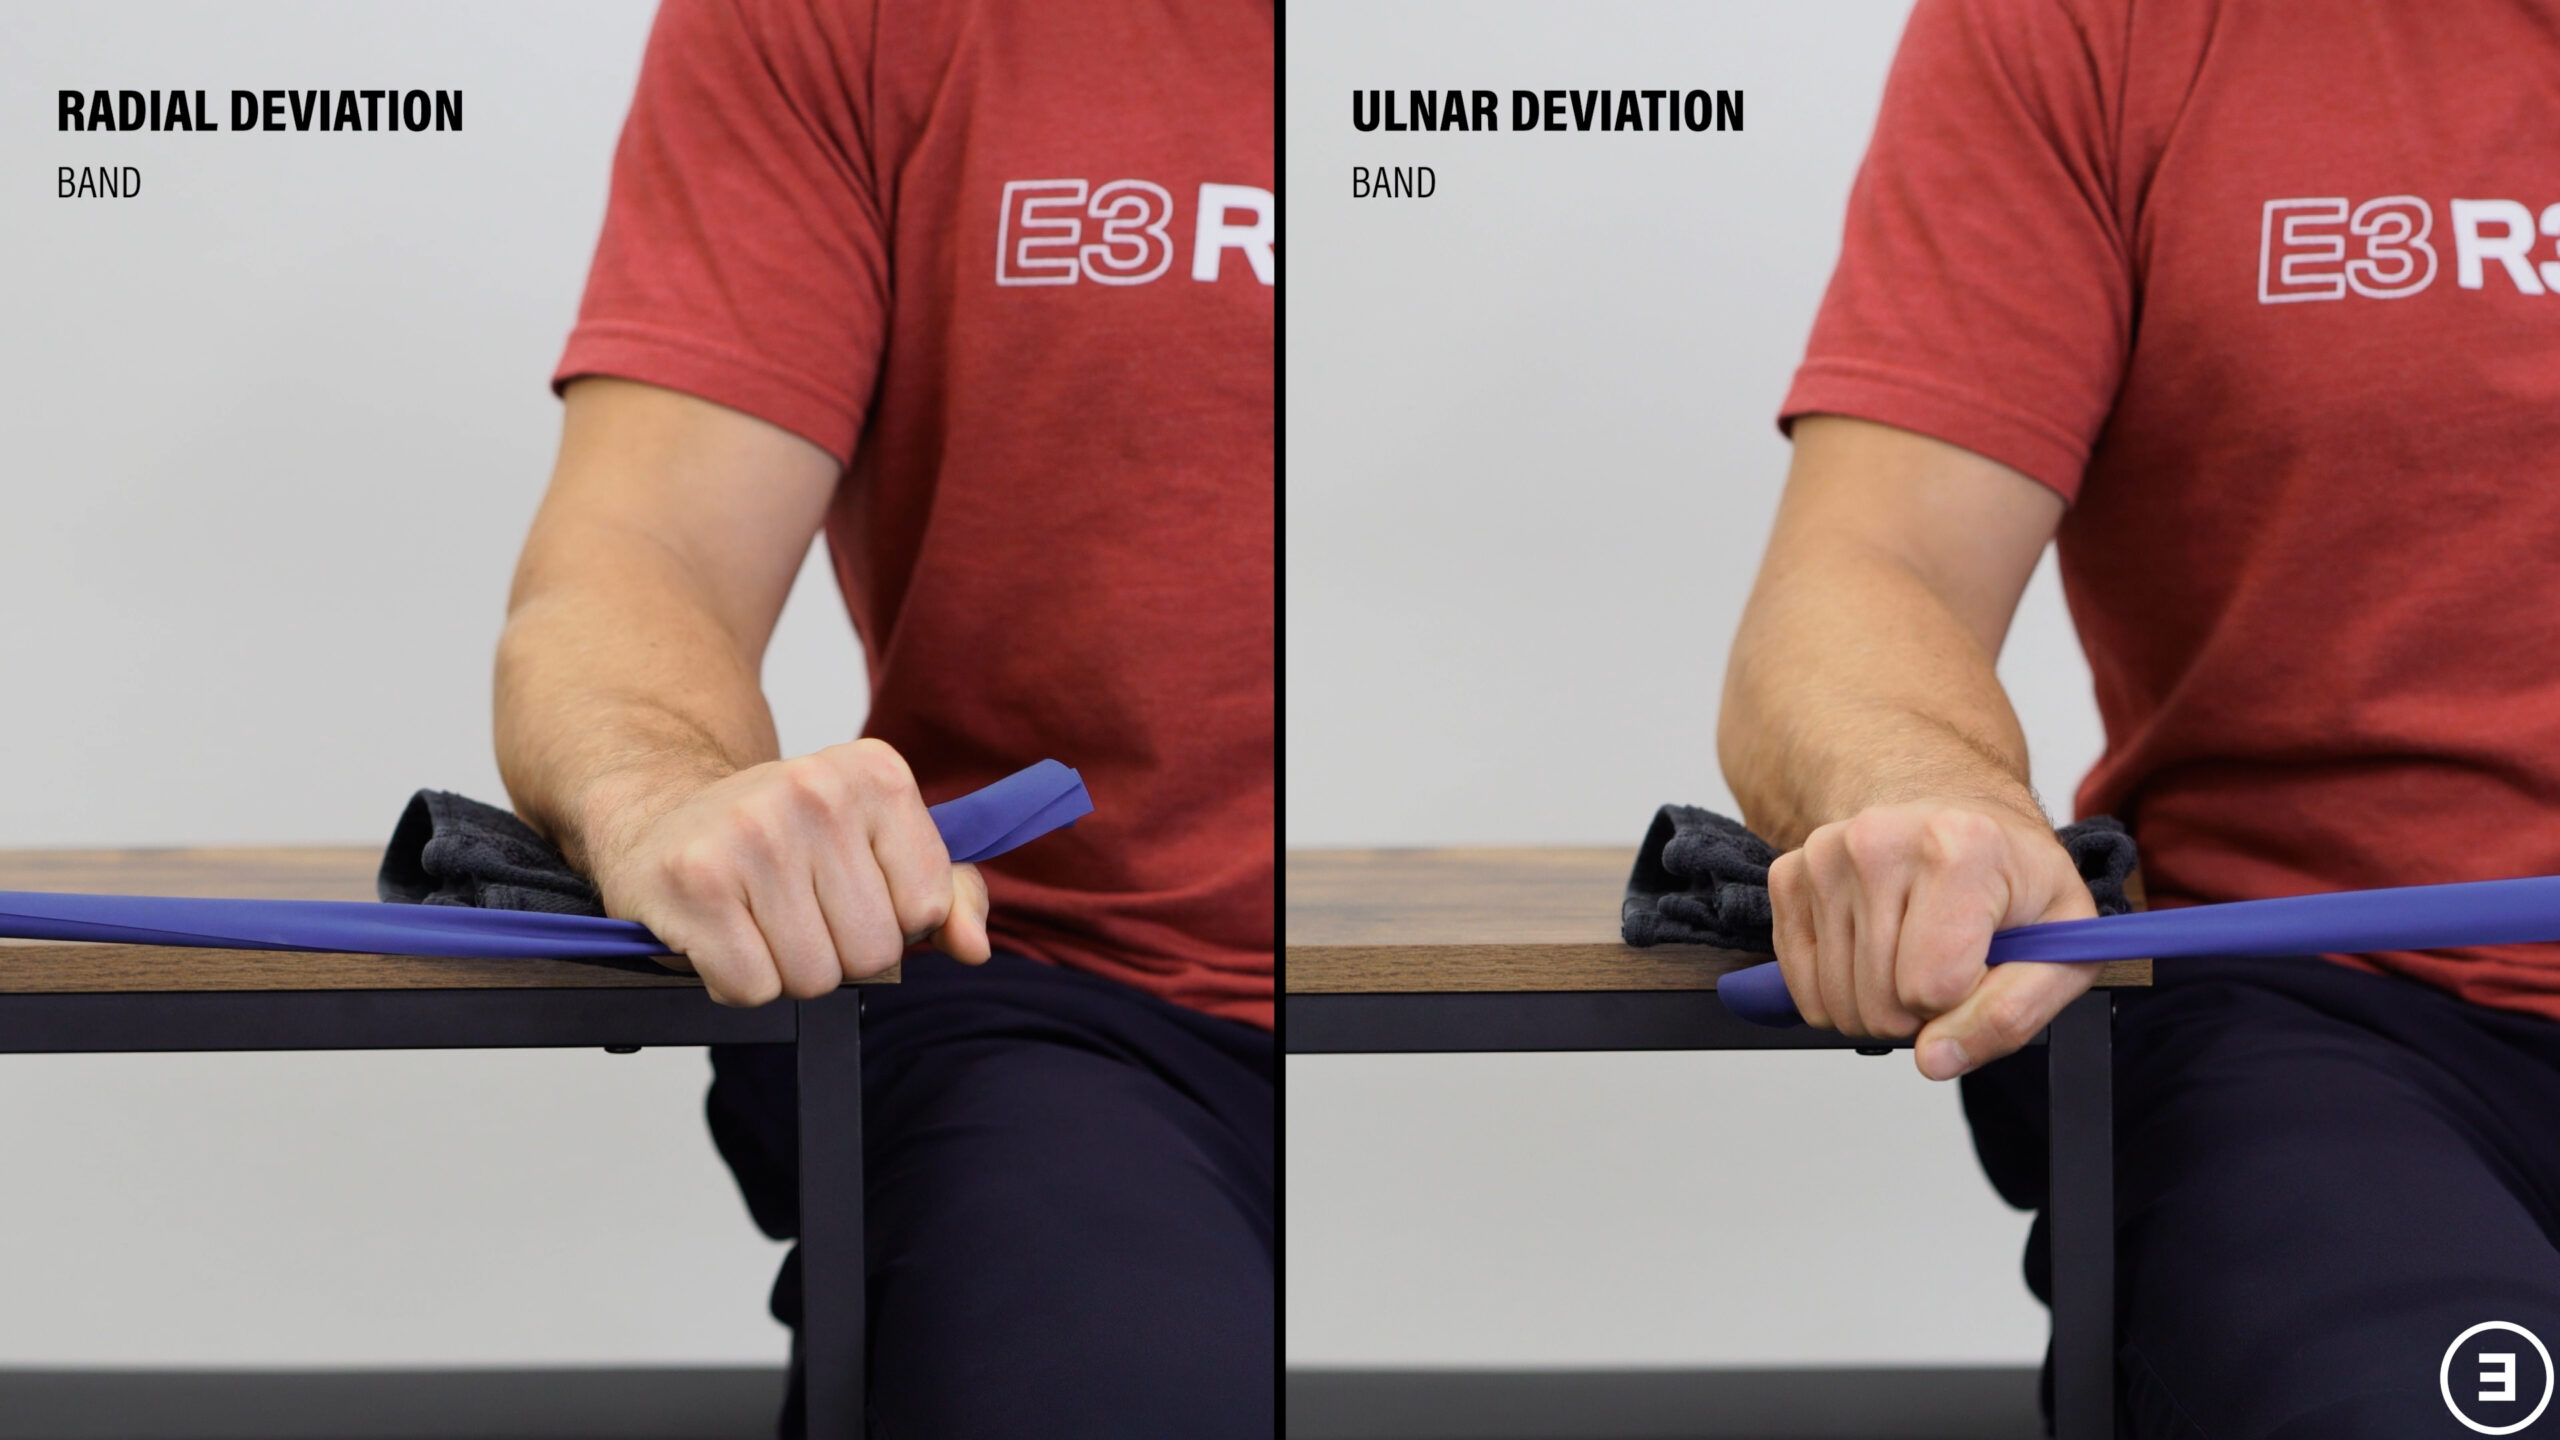
You can also use a band, but you’ll have to train each direction individually.
Radial and ulnar deviation have to be trained separately. If you’re going to use a dumbbell, hammer, or dowel, it’s easiest to do them with your arm by your side while sitting or standing.
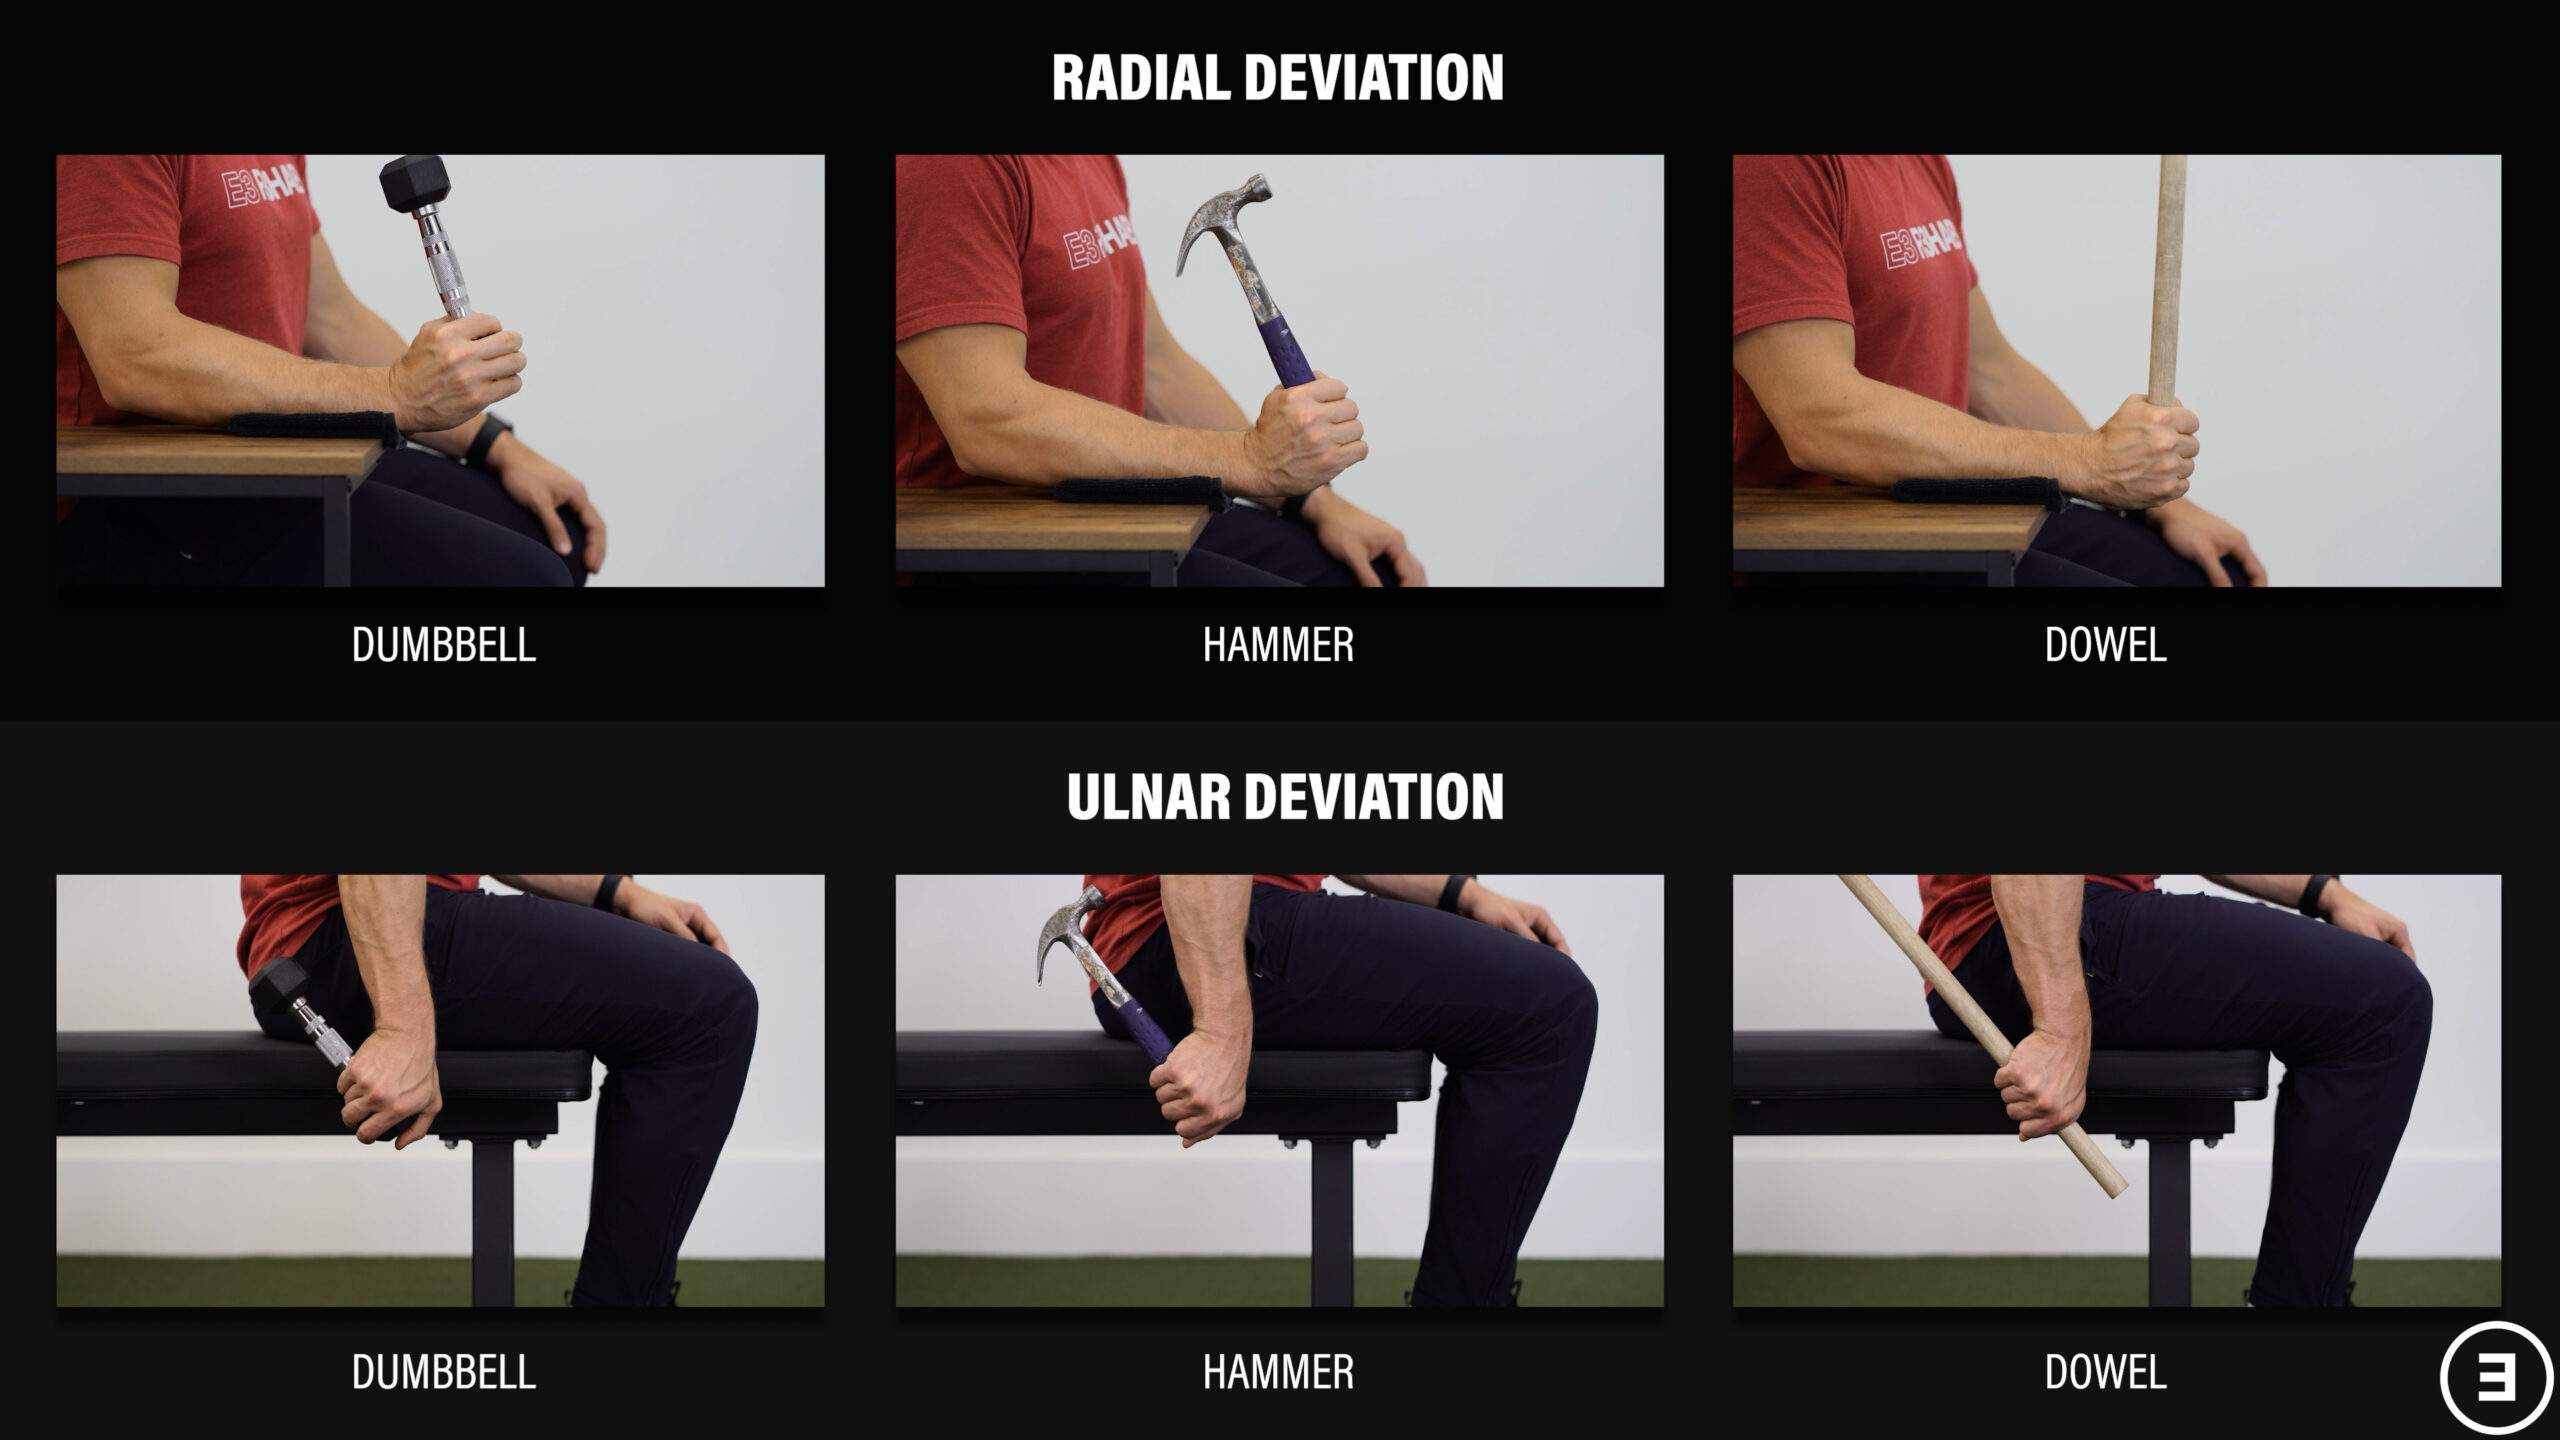
If you’re going to use a band, you can step on it and support your forearm for radial deviation and let your arm hang by your side for ulnar deviation.
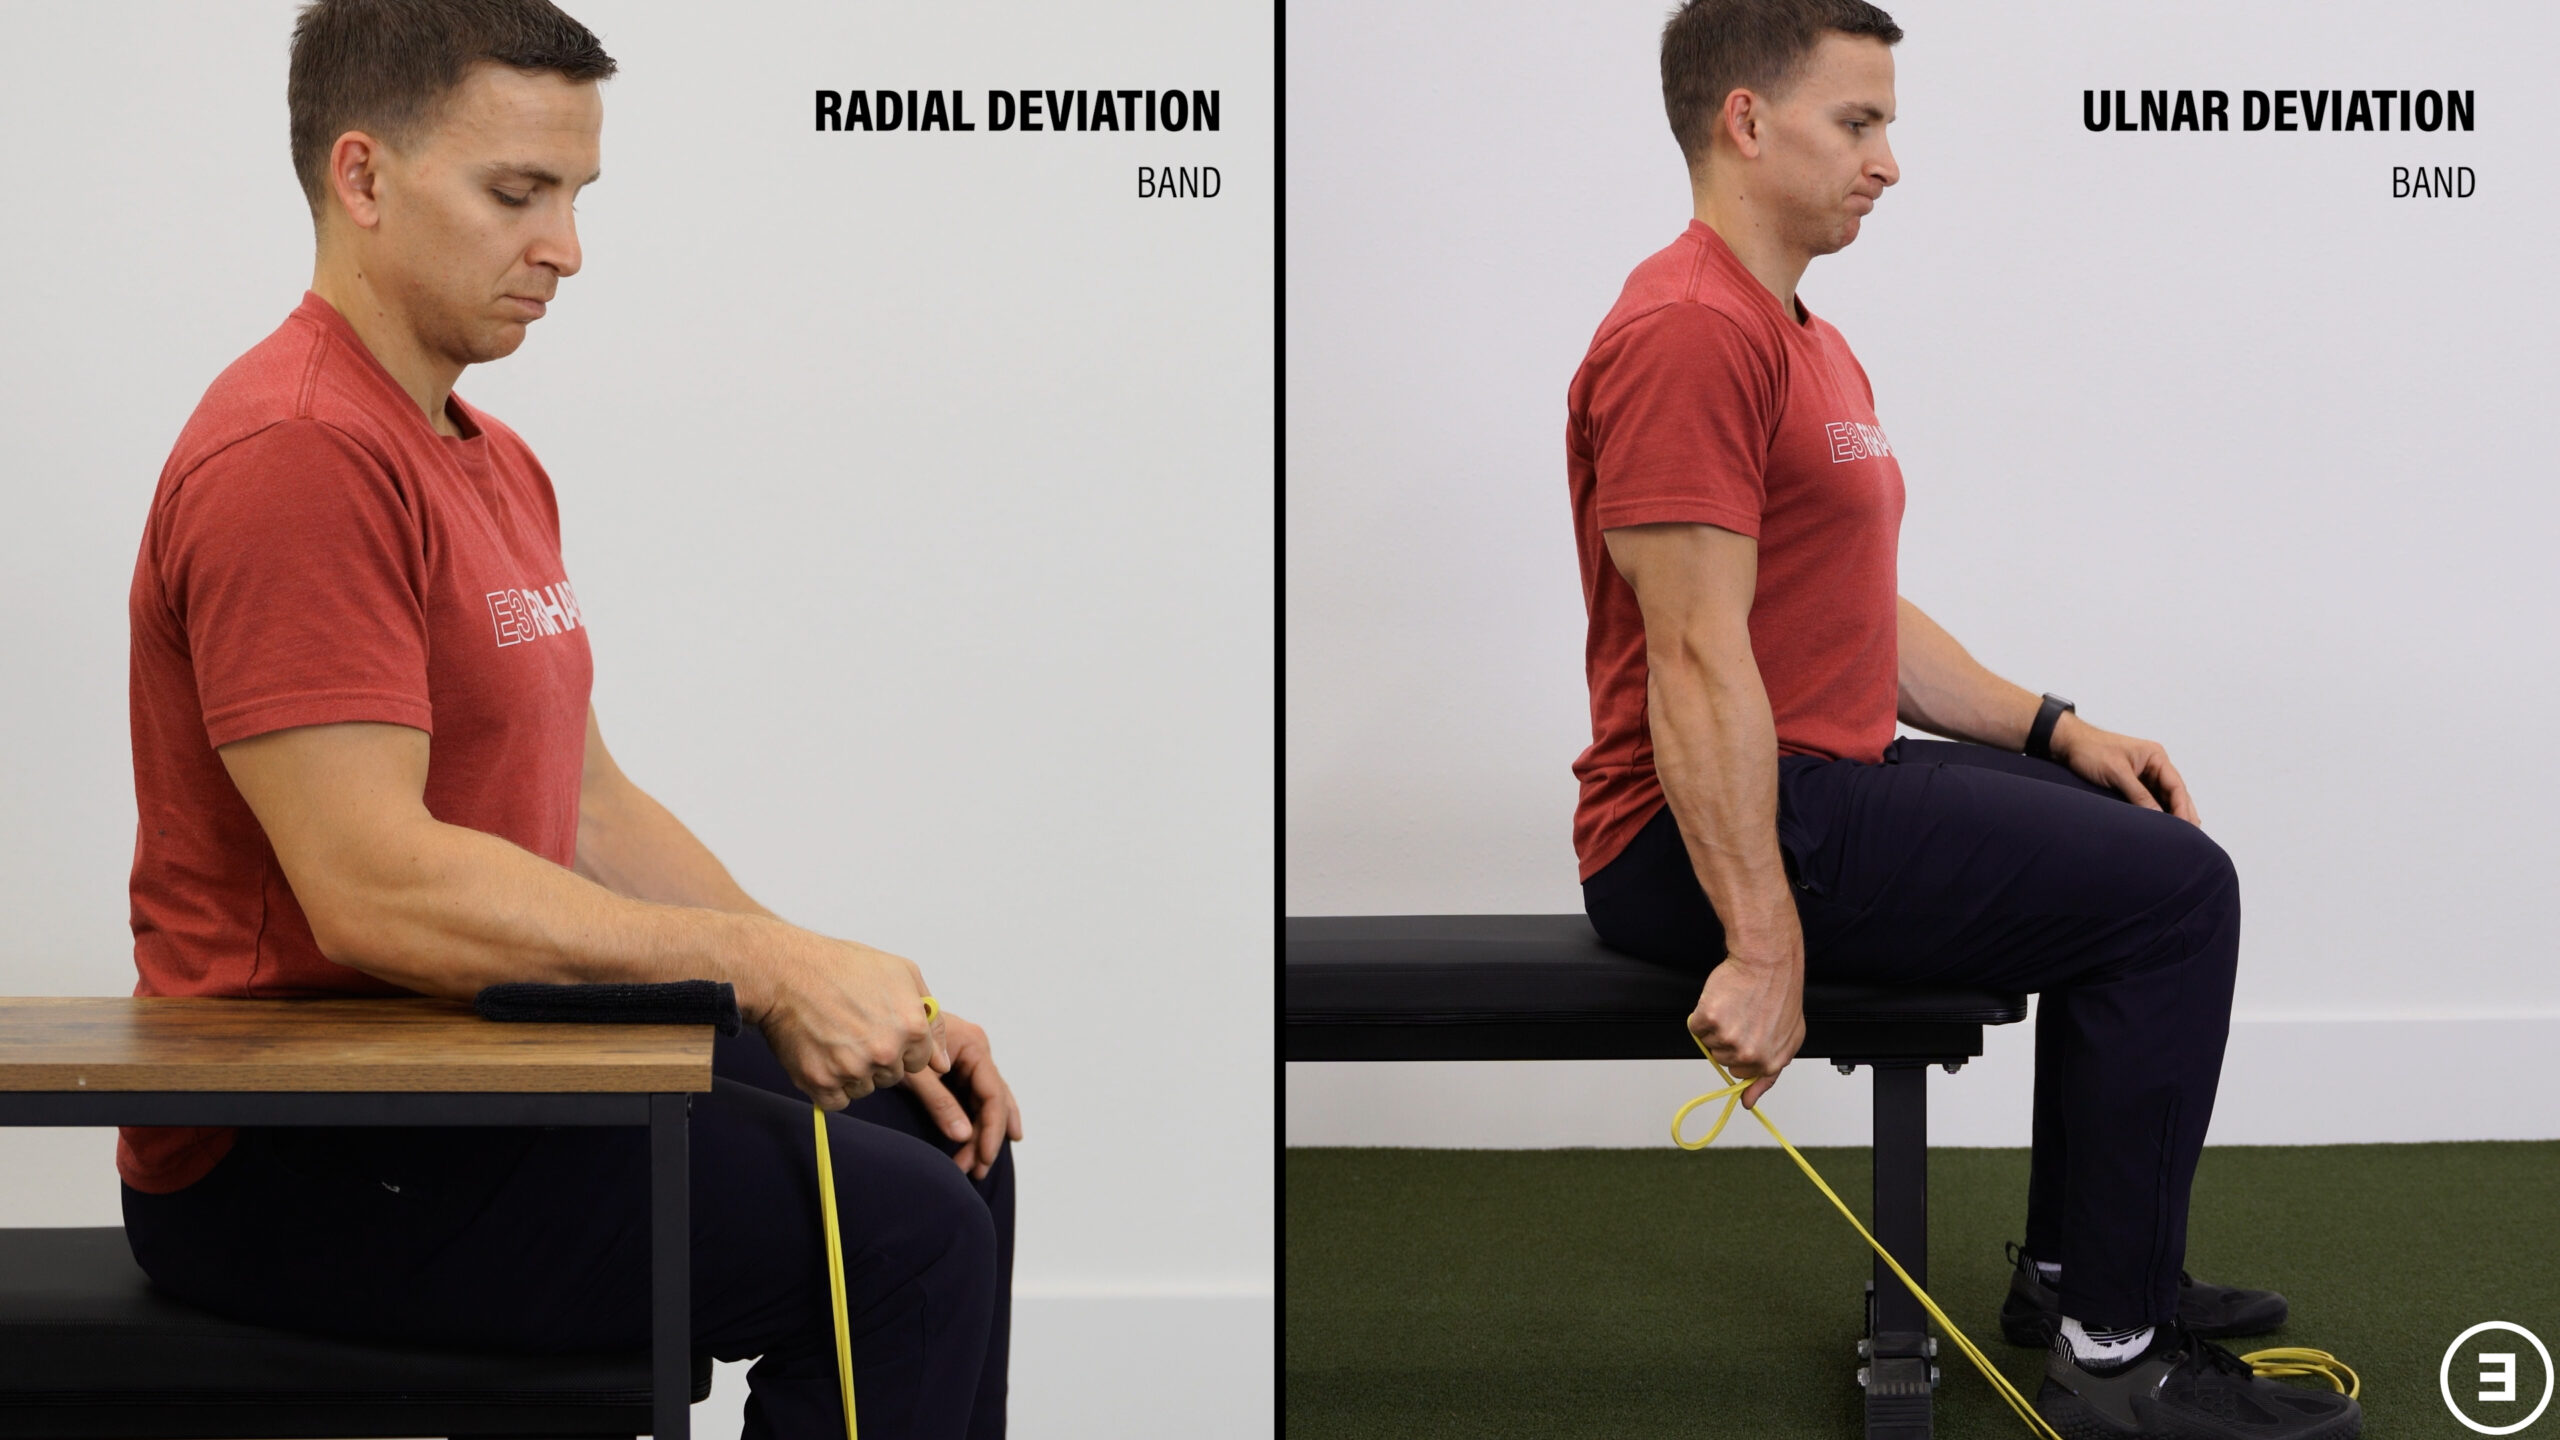
You can also do both with your palm facing down if you anchor the band at a 90 degree angle to your forearm.
Once again, all of these exercises should be performed slowly within a tolerable range of motion.
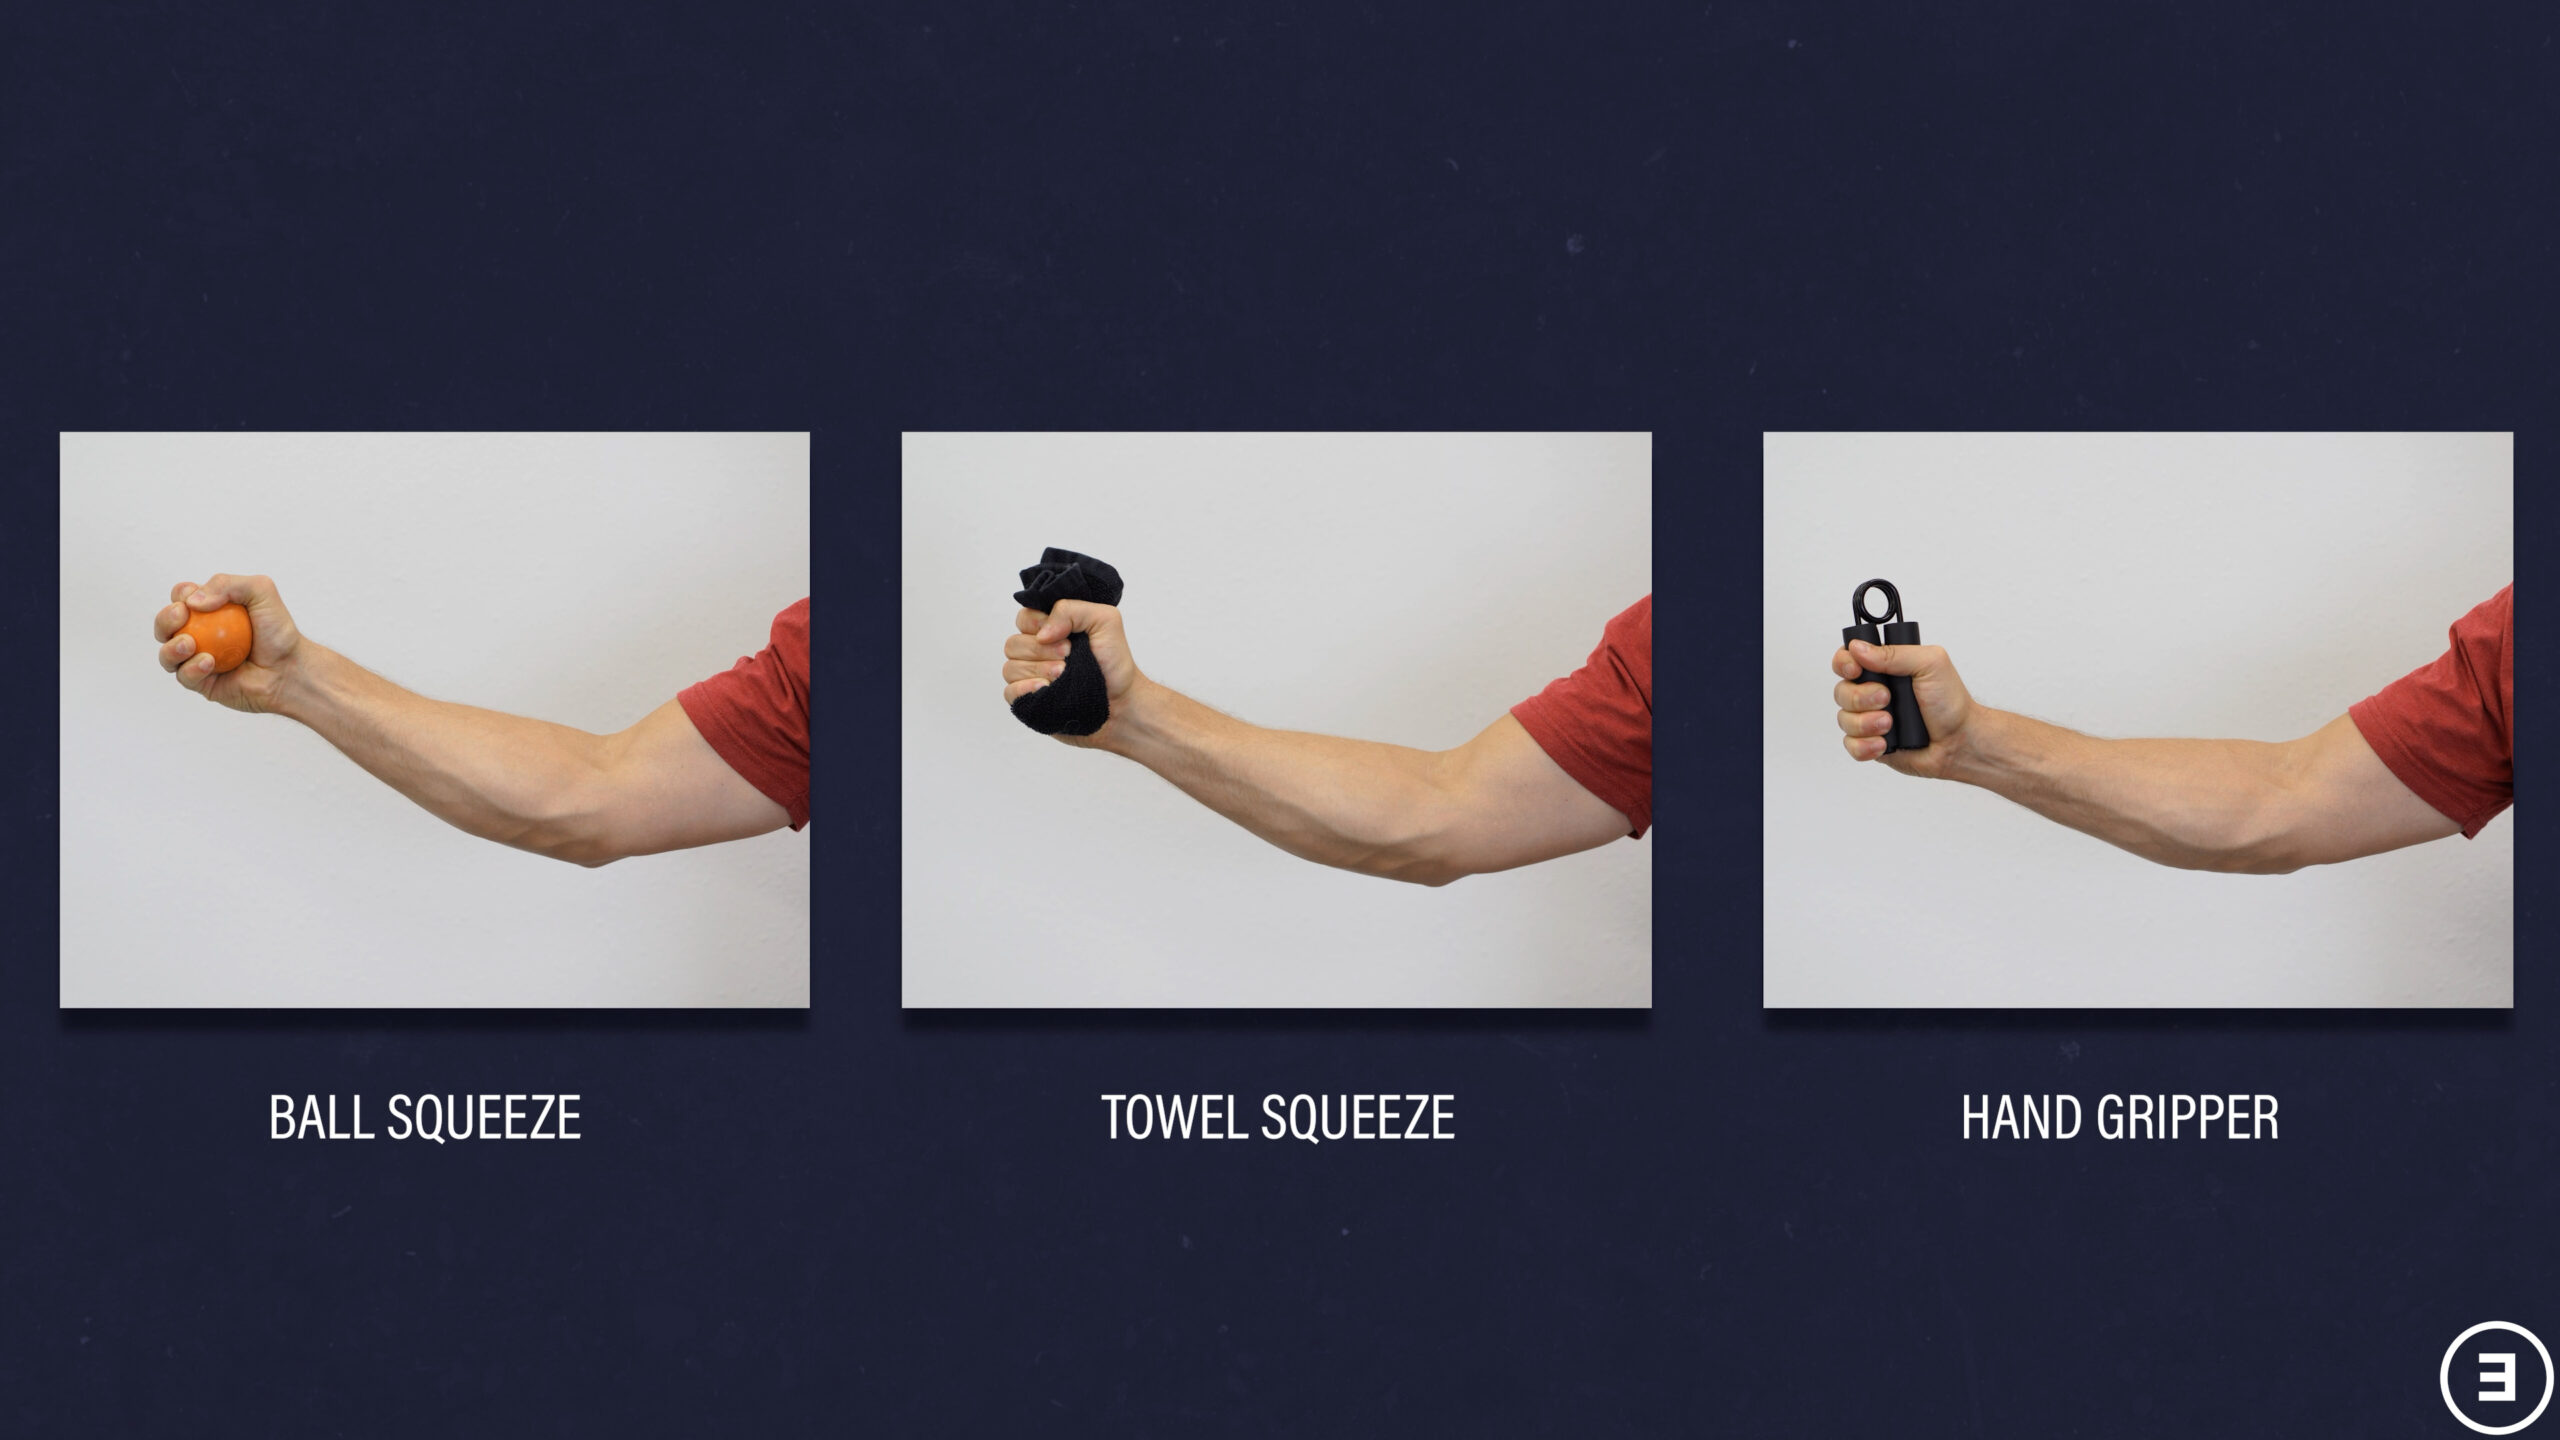
Grip Strength & Endurance
For grip strength and endurance, there’s no shortage of options. If you want to keep it simple, you can periodically squeeze a lacrosse ball, tennis ball, towel, or one of those grippers throughout the day.
If you want to do gym-based movements, aim for 2-3 sets of farmer’s carries or suitcase carries with dumbbells or kettlebells. You can grab the wide portion of either, like the hex part of a dumbbell or the bottom of a small kettlebell, for a different challenge. You can also do plate pinches with a larger bumper plate or with 2 smaller plates held together.
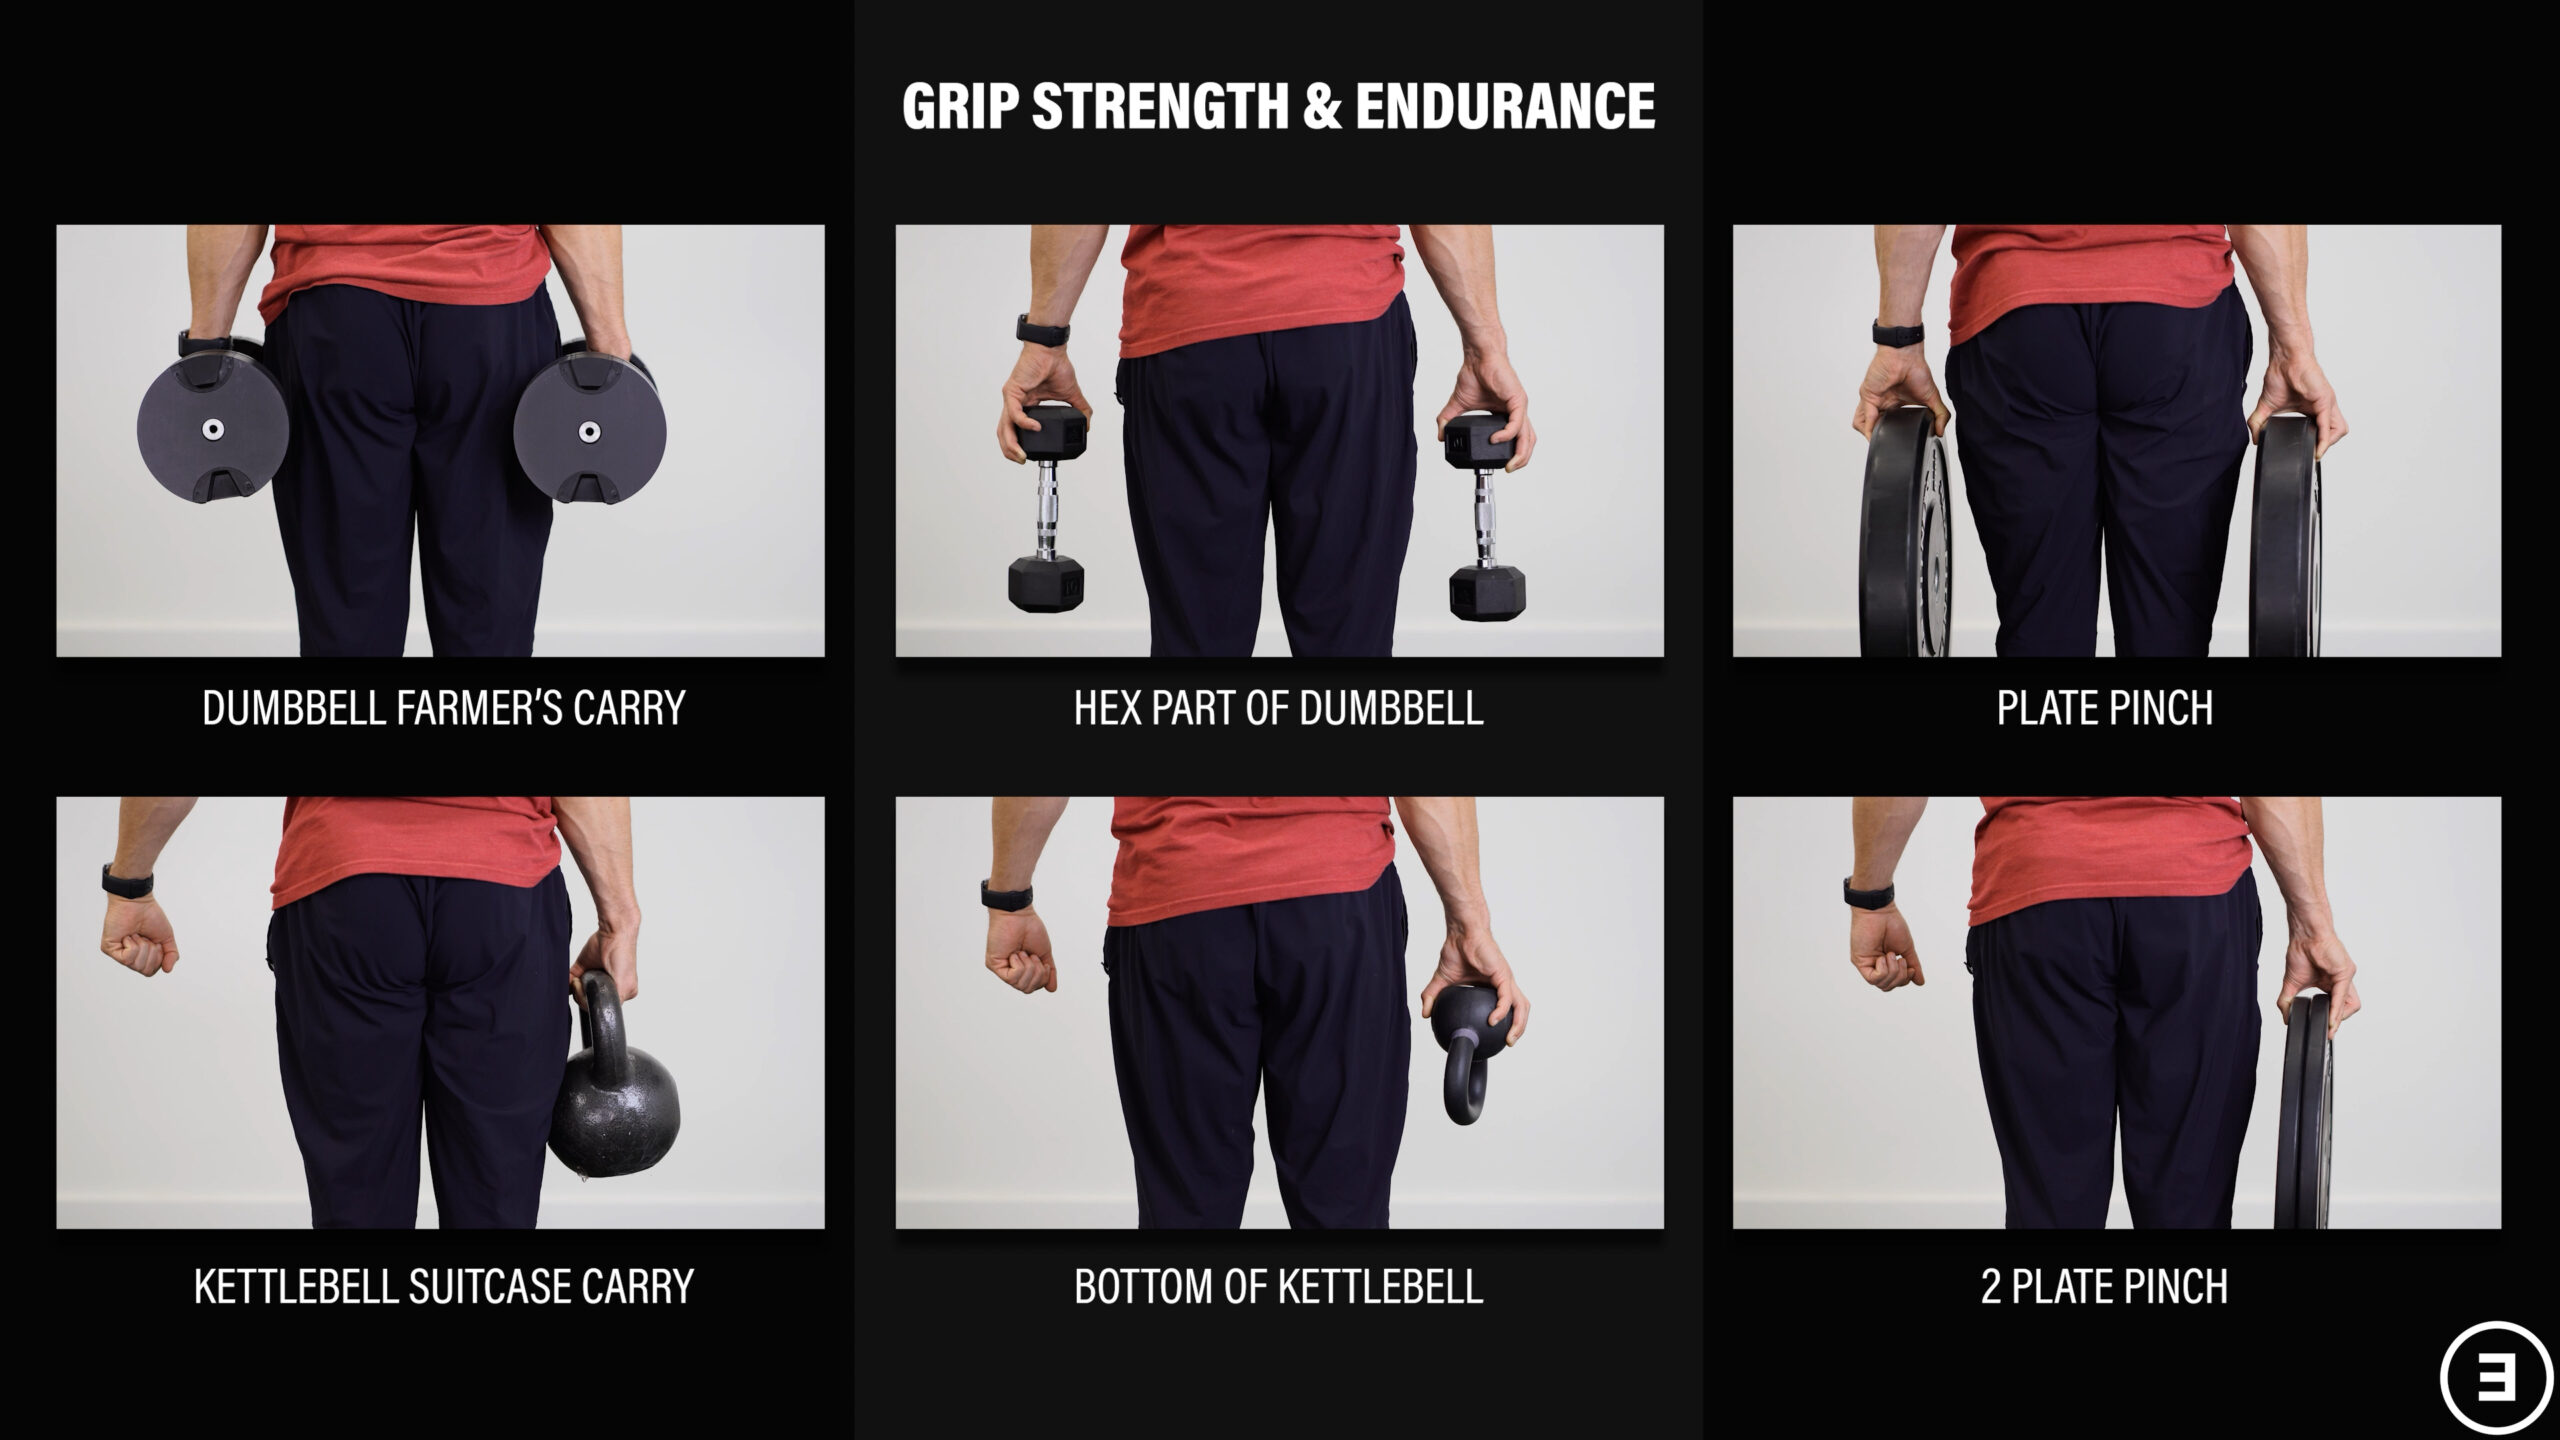
If you’re struggling with grip strength in the gym, try to find a balance between getting stronger and working toward your goals while not overworking yourself. If you think about exercises that require grip strength on a continuum, weighted pull-ups and heavy deadlifts are on the far right side while a standing row with a yellow band will be further toward the left side.
Pick suitable exercise variations, manage your training frequency, intensity, and volume, and use lifting straps as needed while improving your grip strength over time and making progress in the gym.
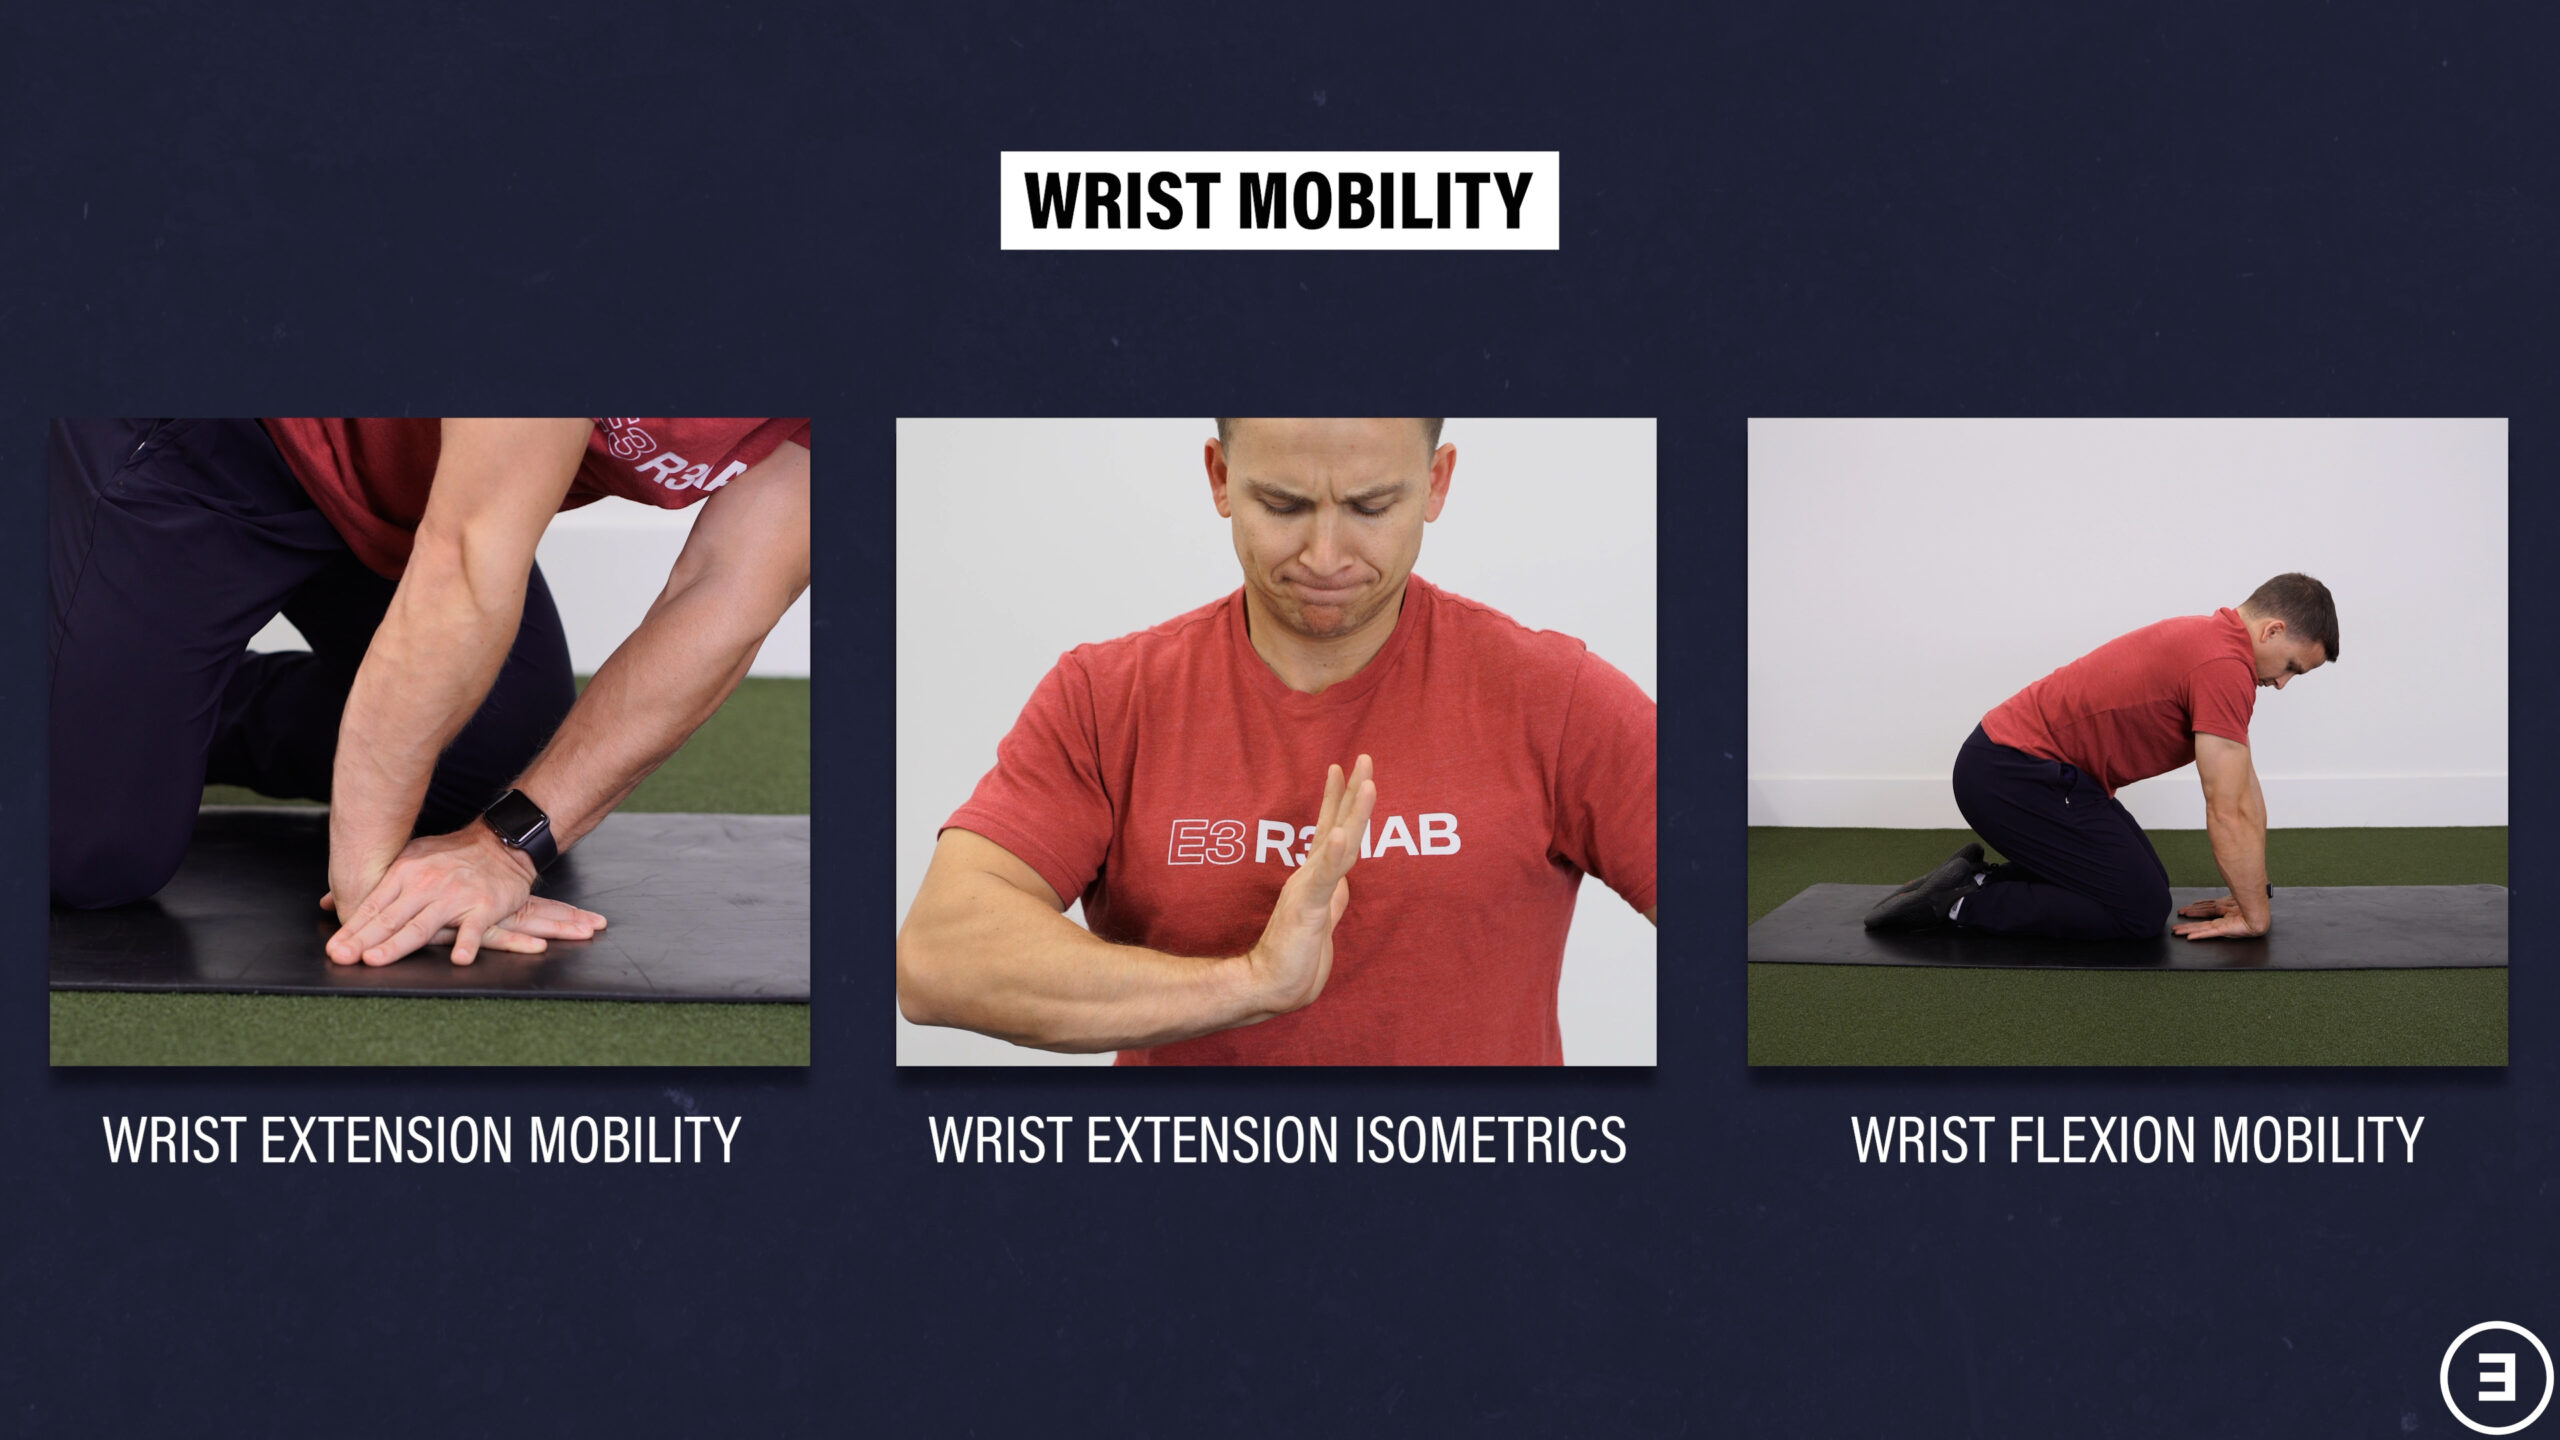
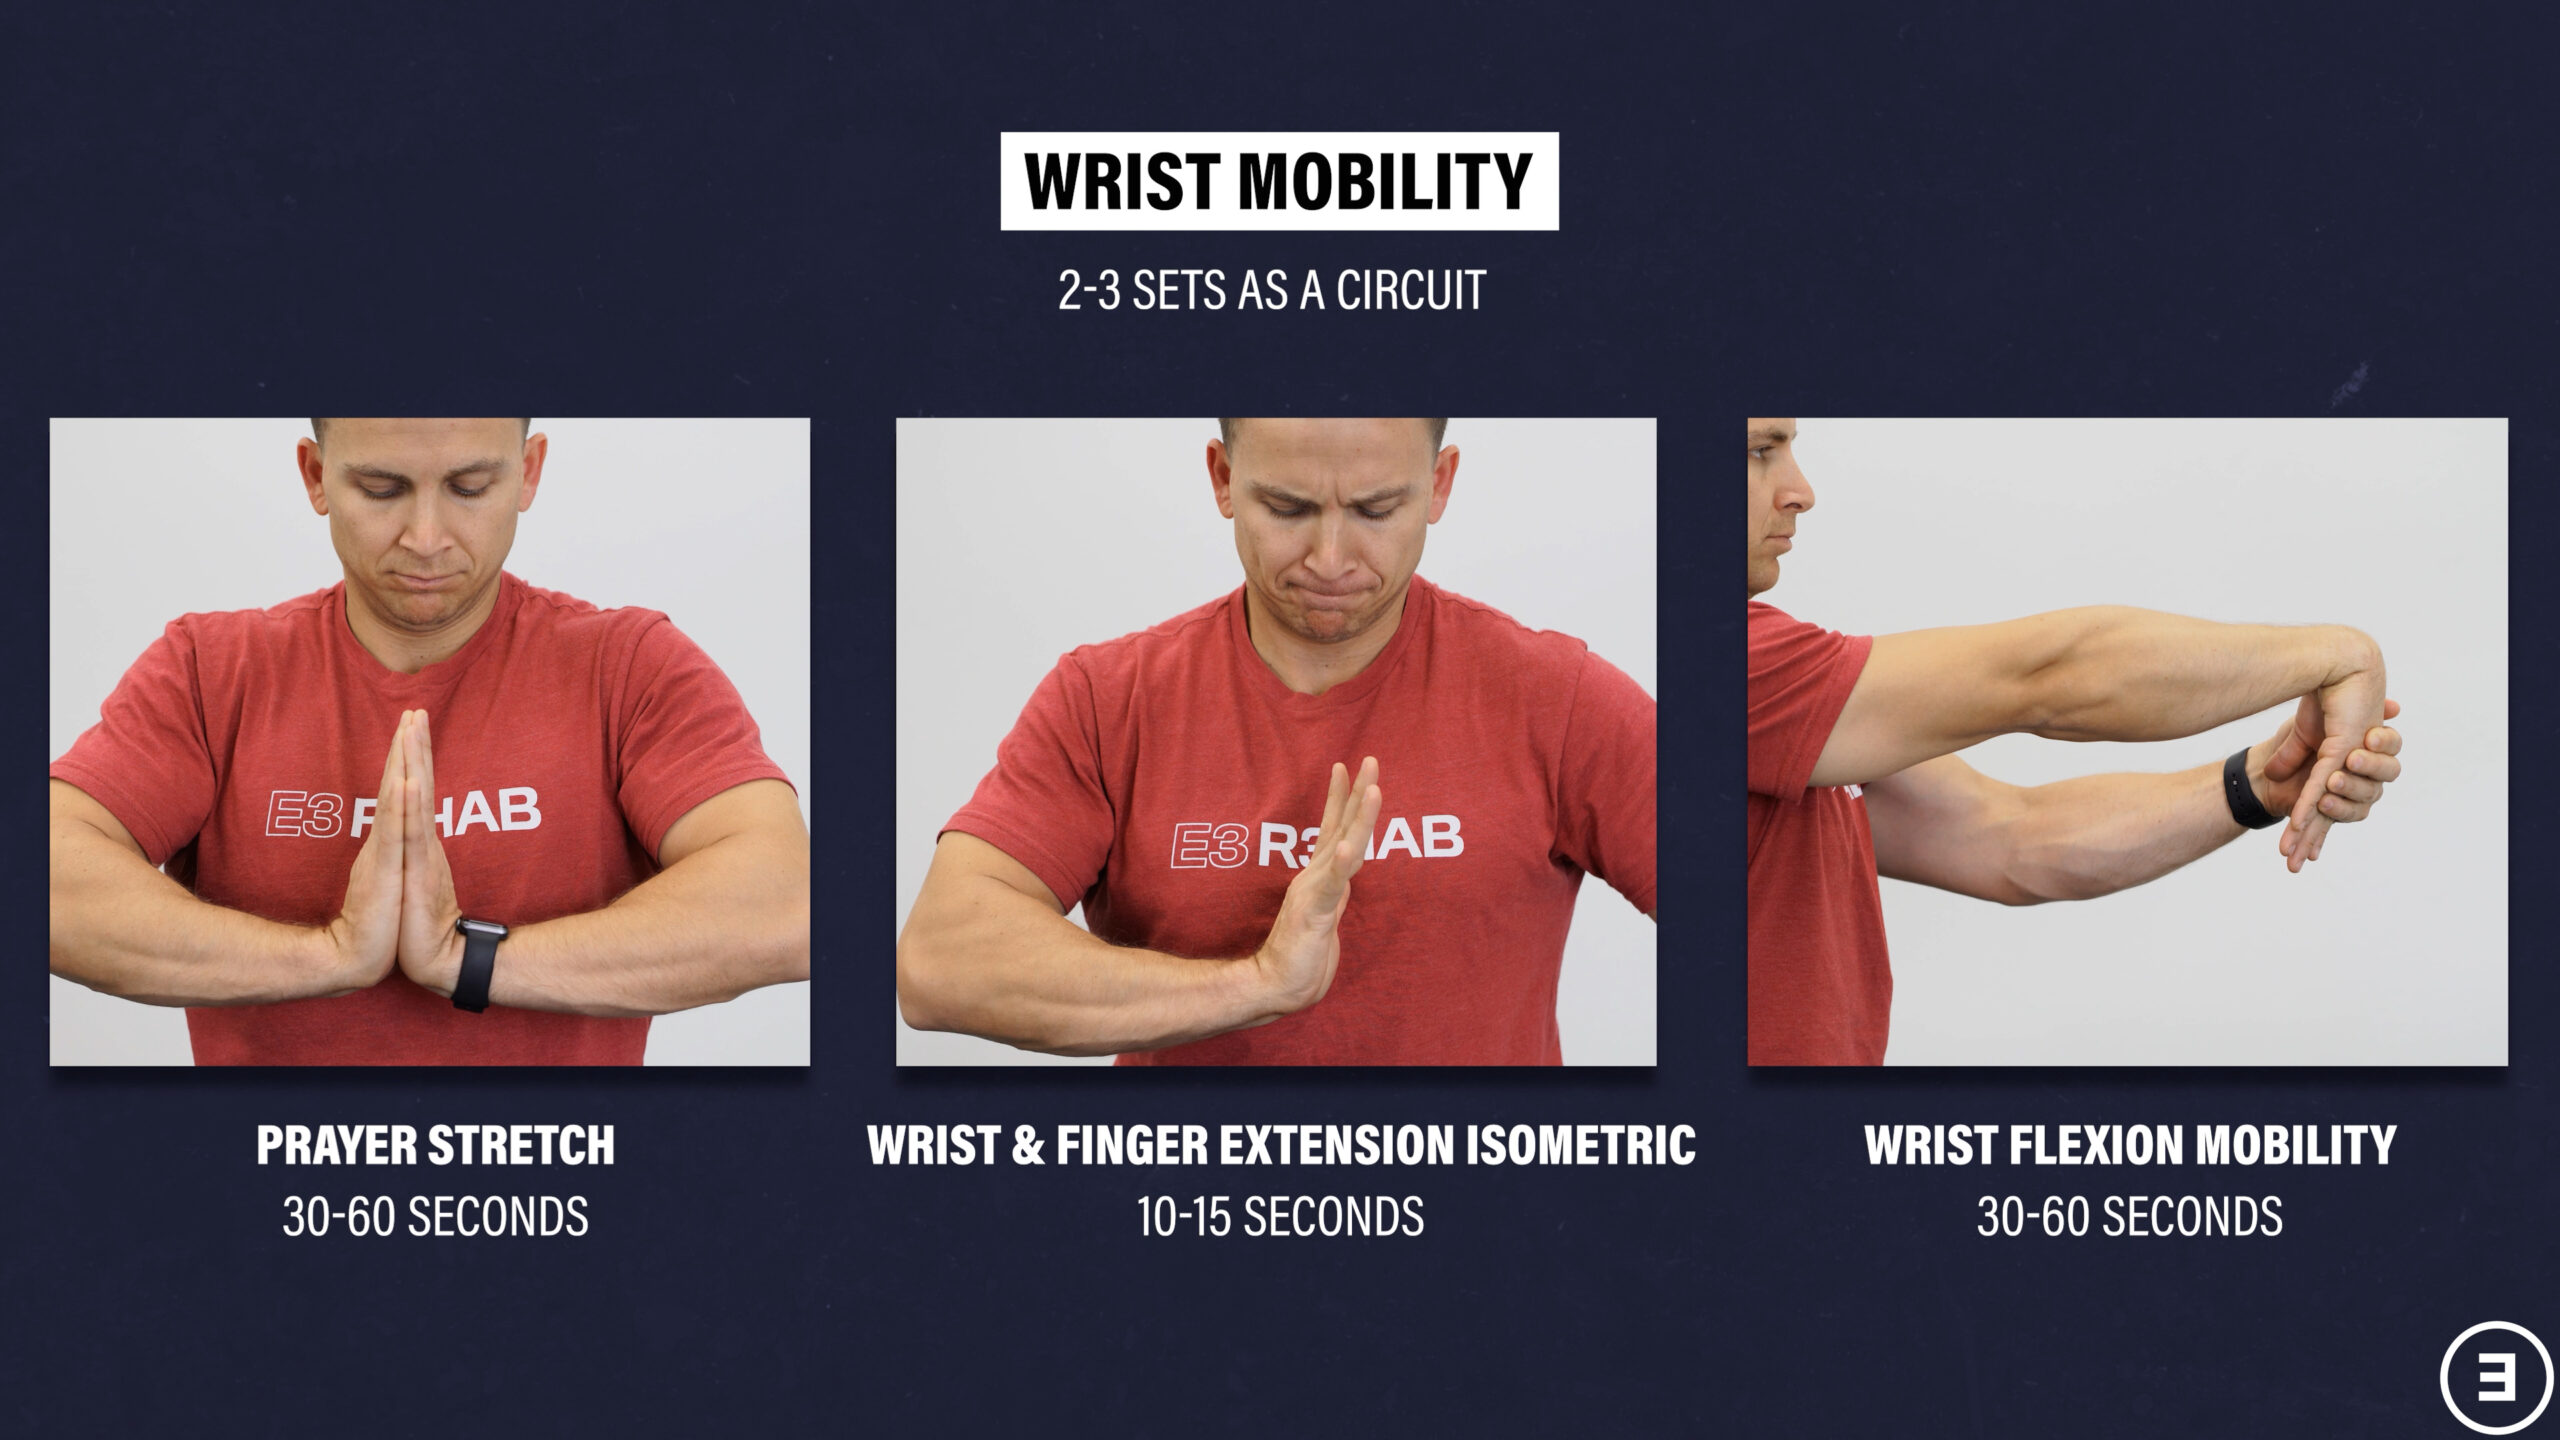
Optional Wrist Mobility
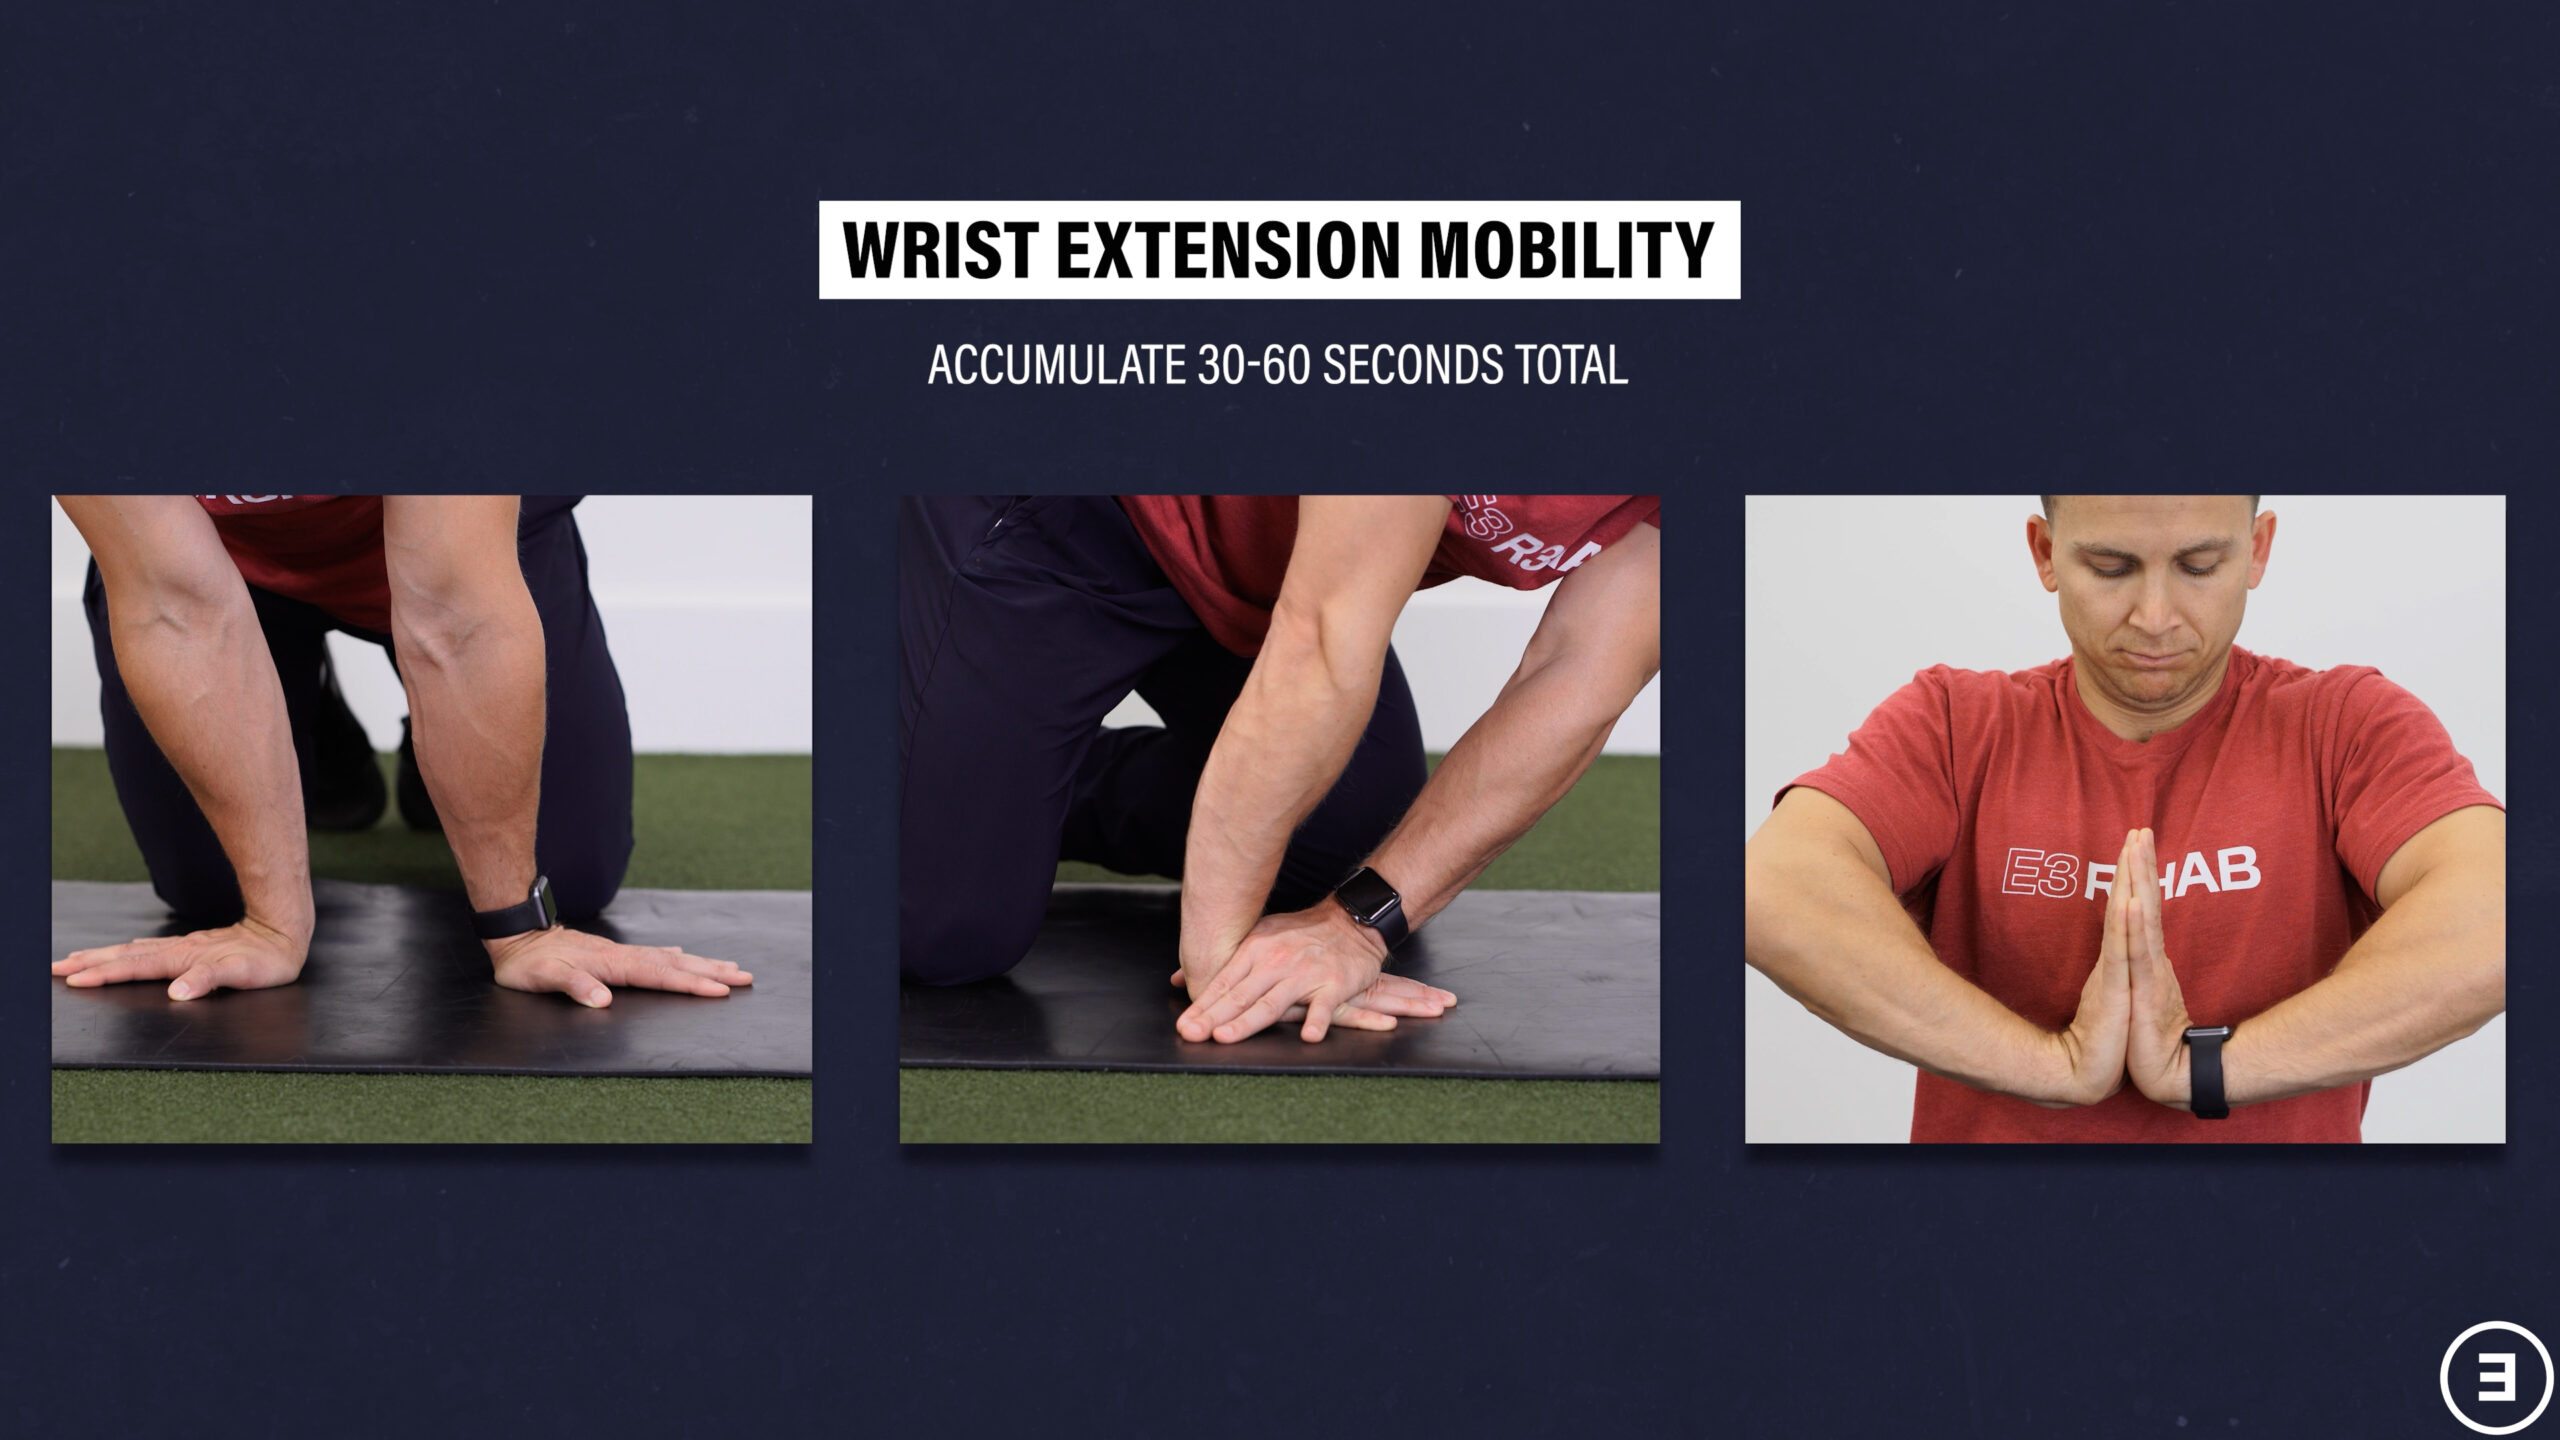
If you need to improve your wrist mobility beyond what’s already been demonstrated, consider grouping these 3 exercise categories: wrist extension mobility, wrist extension isometrics, and wrist flexion mobility.
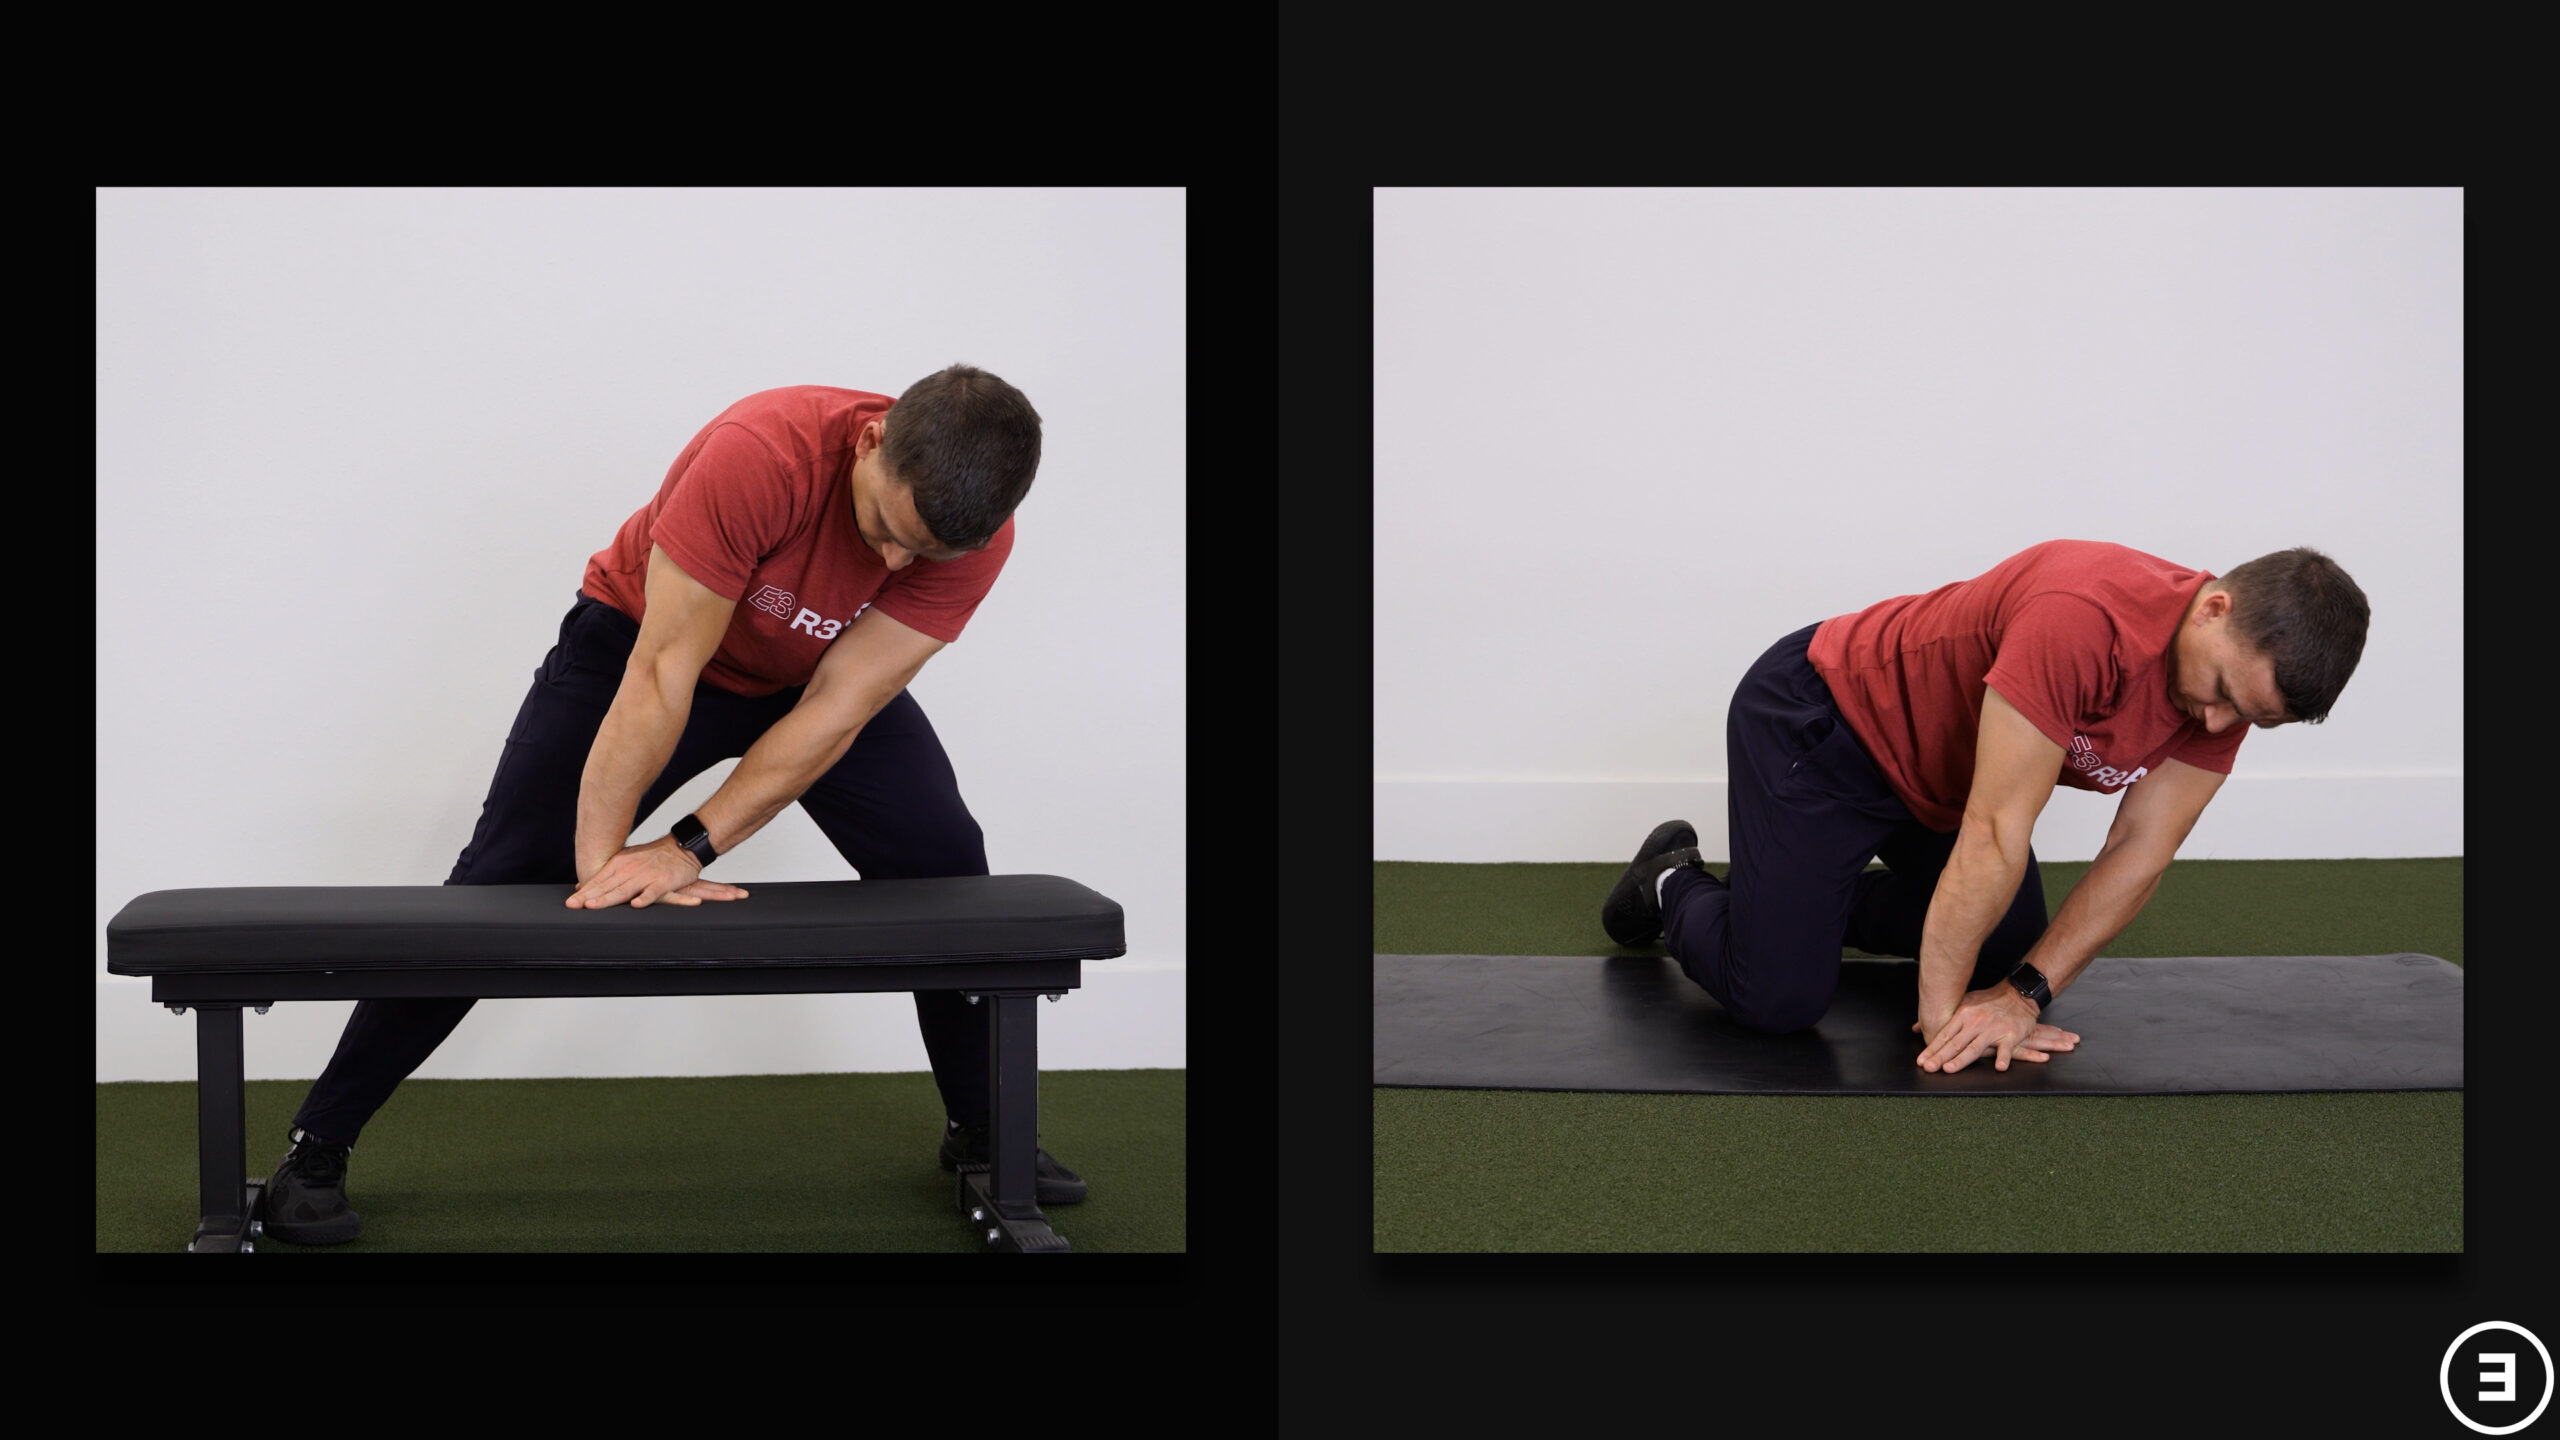
One option for wrist extension mobility is quadruped rocking with your hands facing forward, backward, or away from each other.
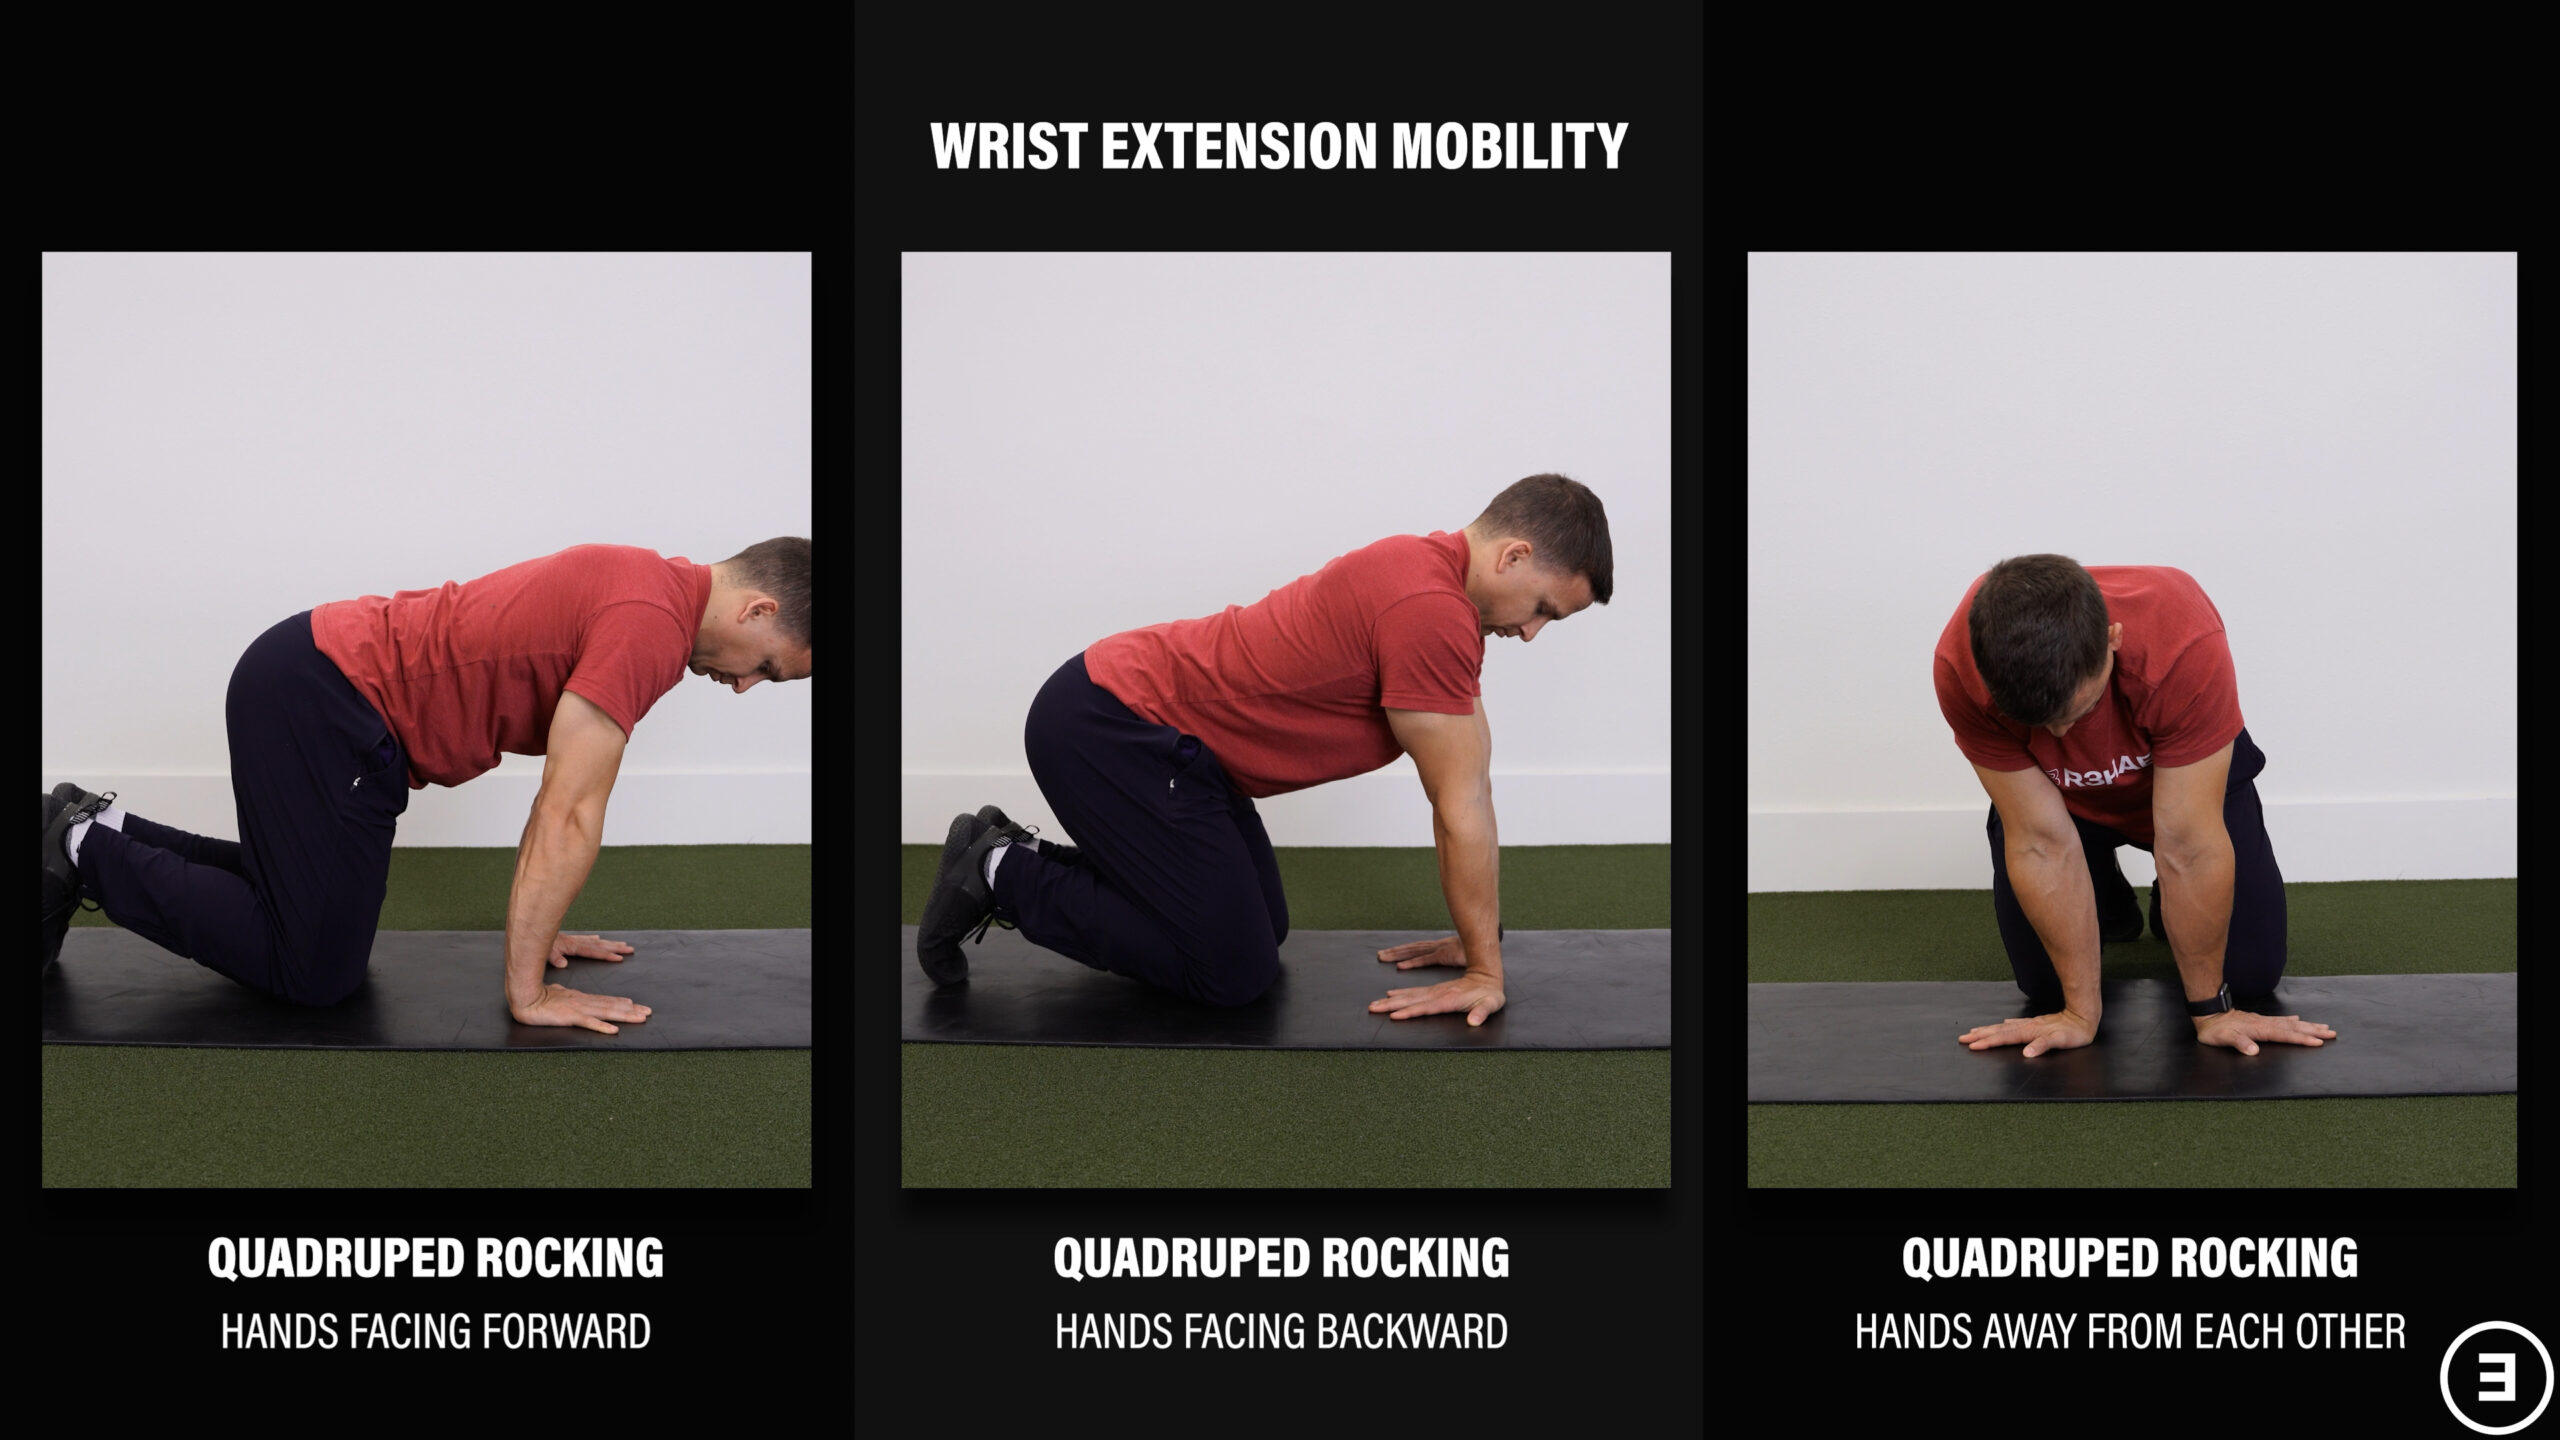
A variation of this involves making a C-shape with your thumb and index finger of your uninjured side, placing that on the lowest portion of your affected wrist, and applying pressure as you do the rocking. This can be done in standing or quadruped, and may make the movement more comfortable.
Two other options include the prayer stretch and using your other hand to pull your wrist and fingers into extension.
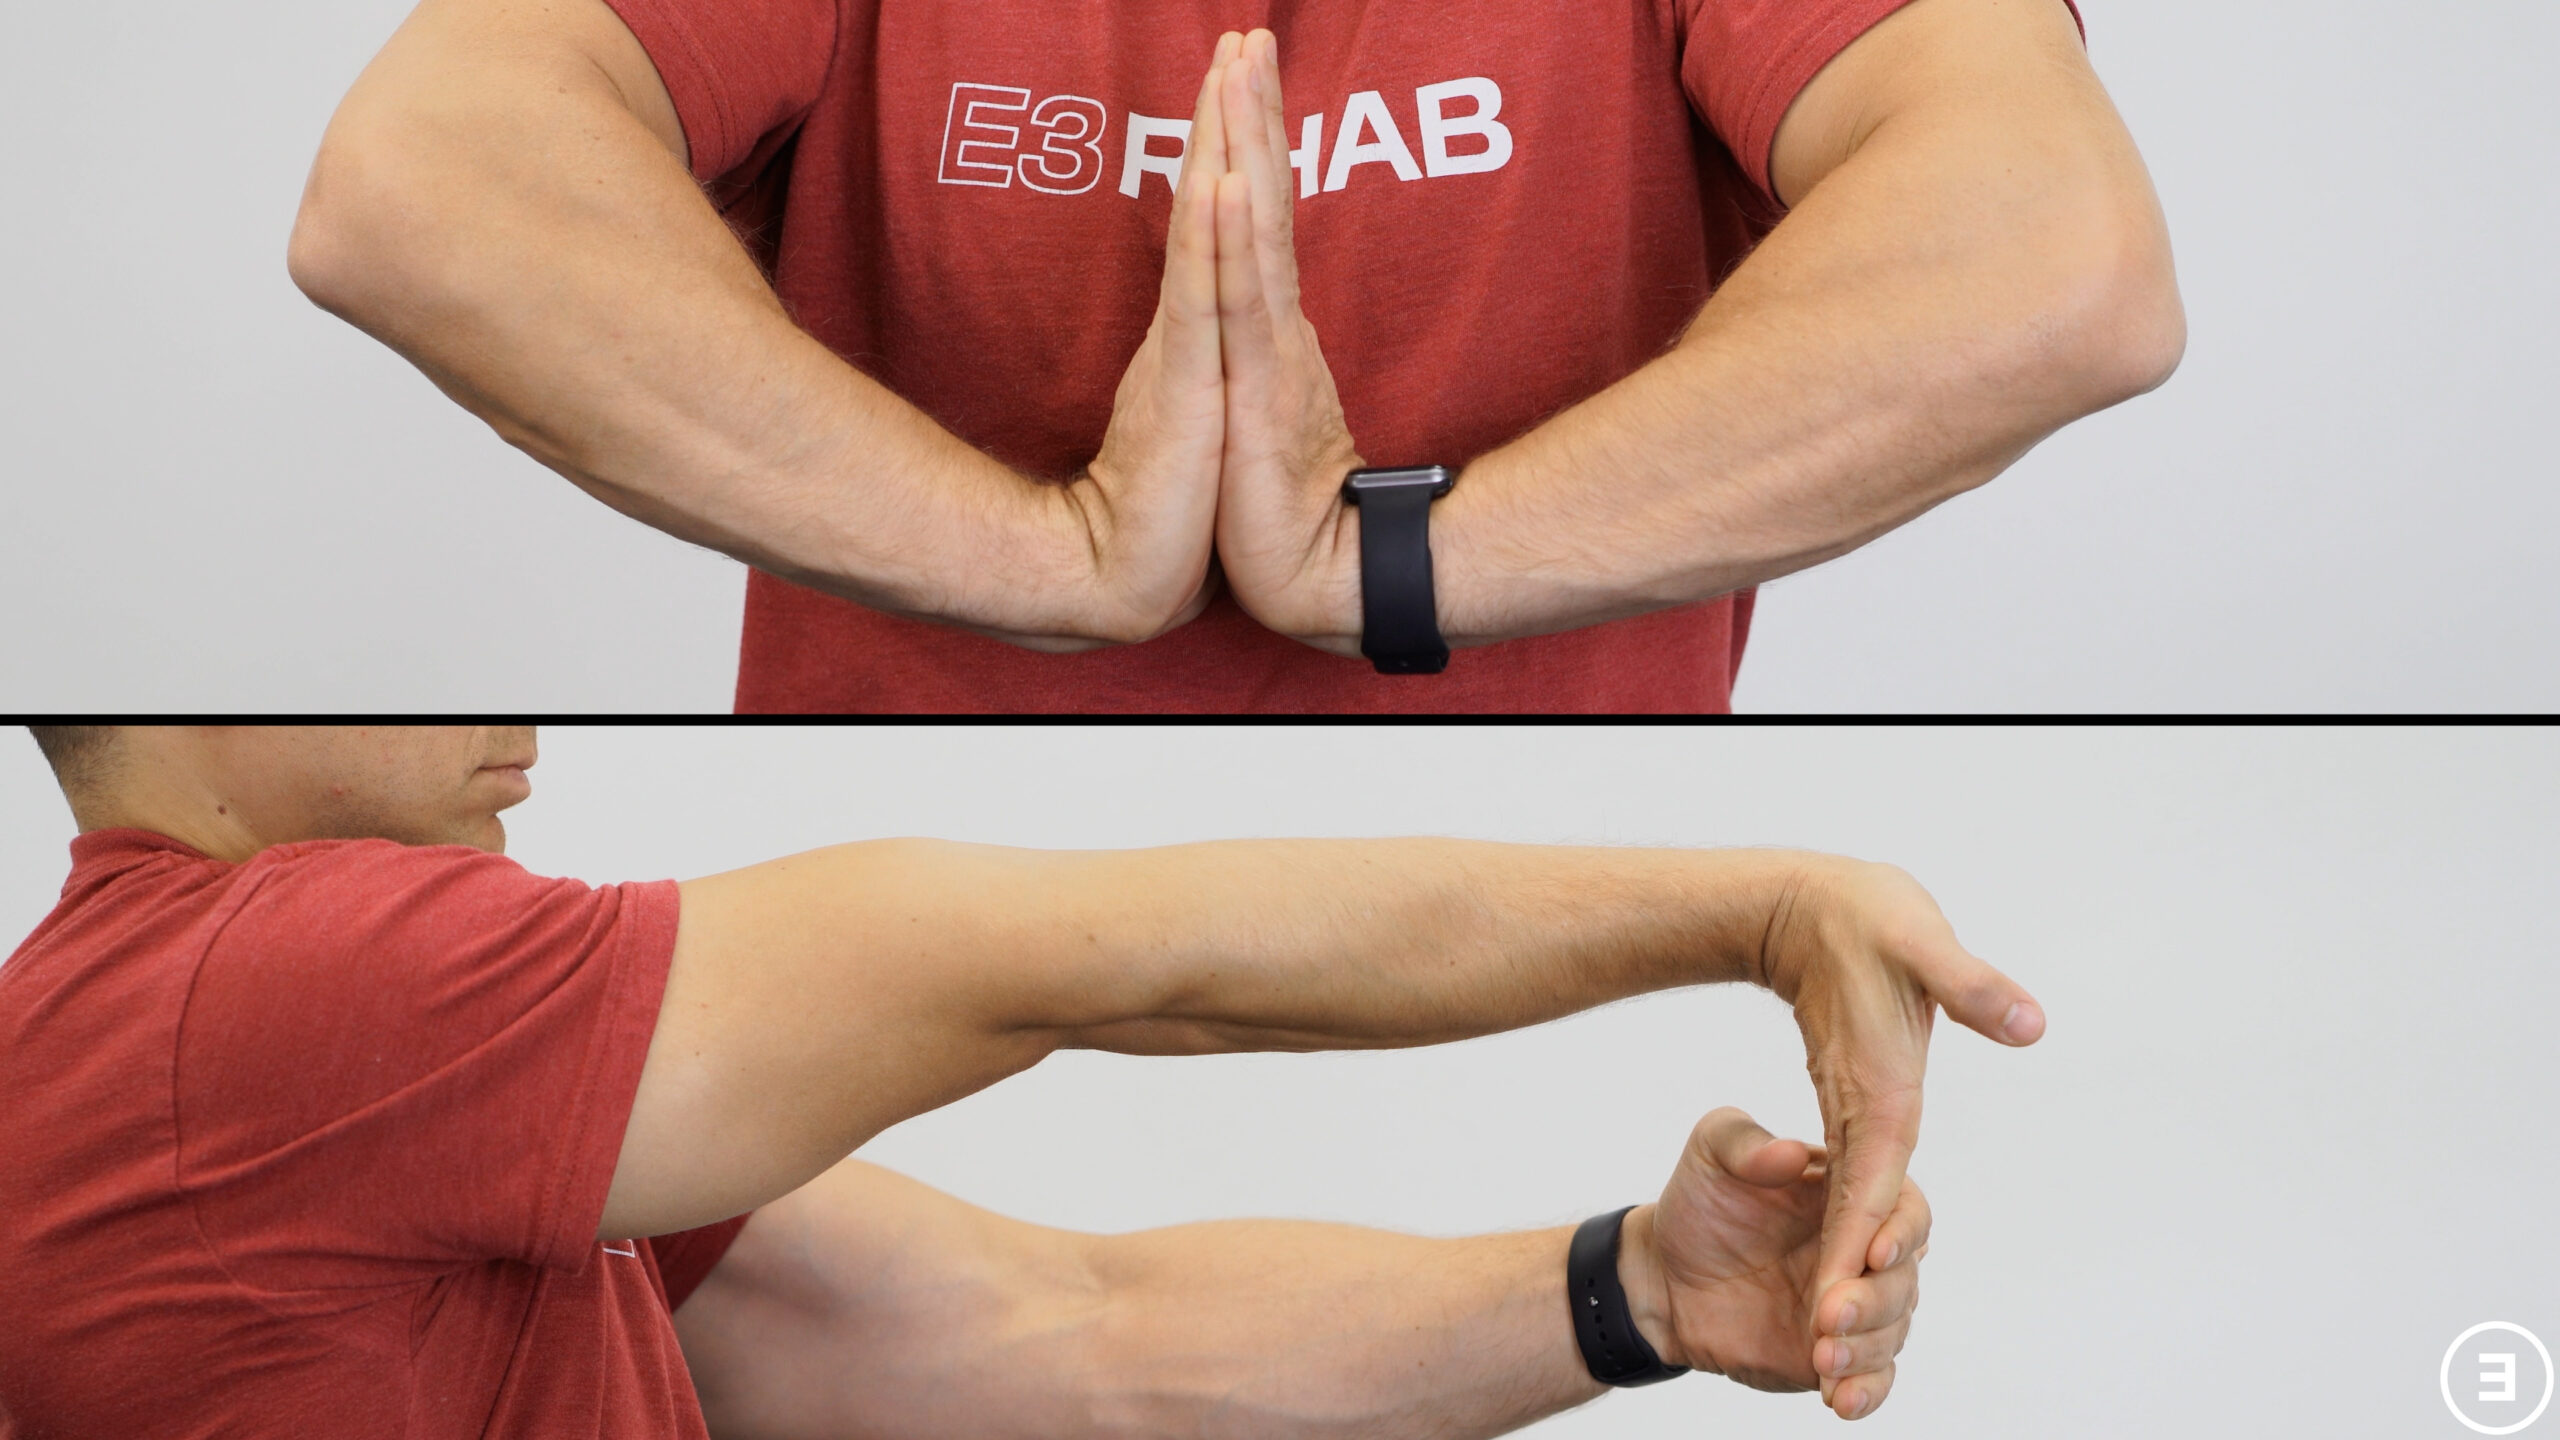
For any of these exercises, you’re trying to accumulate 30-60 seconds total, but you can move in and out of the positions or hold the positions depending on what’s comfortable for you.
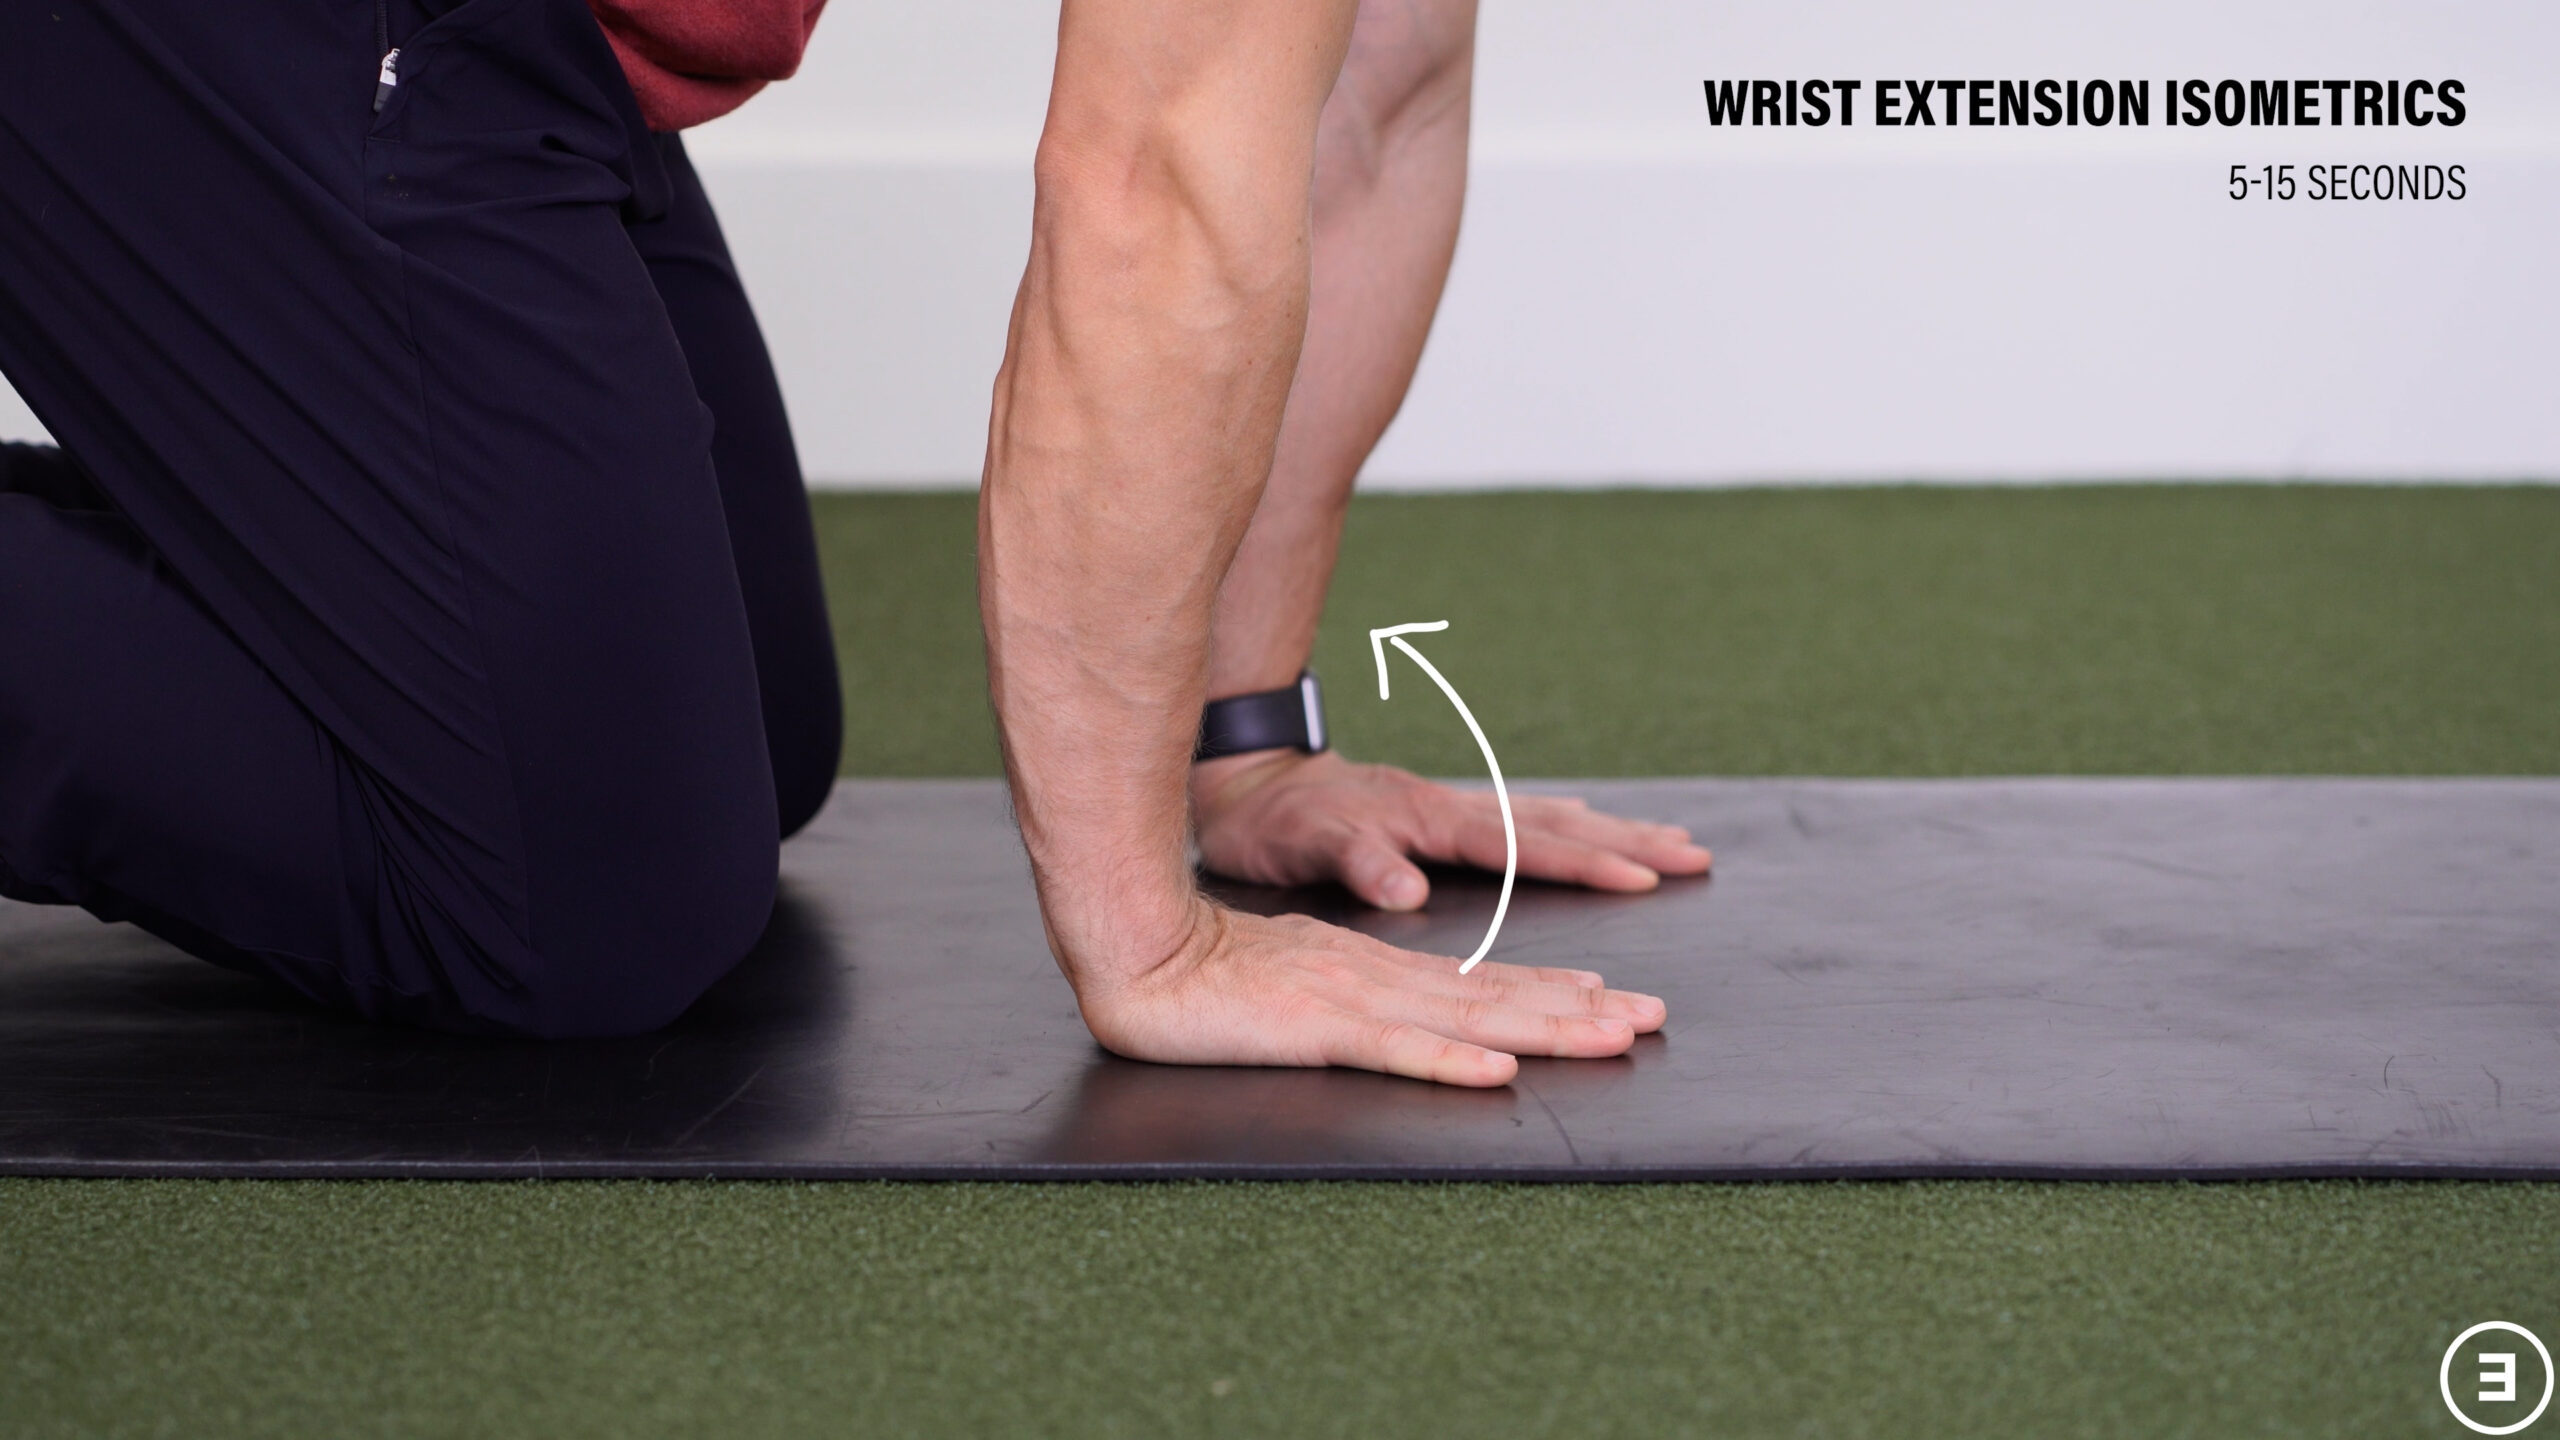
For the wrist extension isometrics, you’re trying to contract all of the muscles on the back of your forearm while your wrist and fingers are extended. For example, let’s say you just did 60 seconds of quadruped rocking. You’d keep your wrist in a similar position, offload some weight as needed, and then imagine lifting your fingers off the ground and moving your wrist into further extension.
Your wrist and fingers probably won’t move. This is very hard and very uncomfortable because of the fatigue and cramping that sets in, which is why you’d probably only do this for 10-15 seconds. Maybe even 5-10 seconds.
Another example would be doing the prayer stretch for 30-60 seconds, letting go, and then trying to contract all of those muscles on the back of your forearm.
I want to reiterate that it doesn’t feel great, so you want to start off with a light contraction. Think of it like stretching your hamstrings and then immediately contracting your hip flexors in their shortened state. They’re going to cramp.
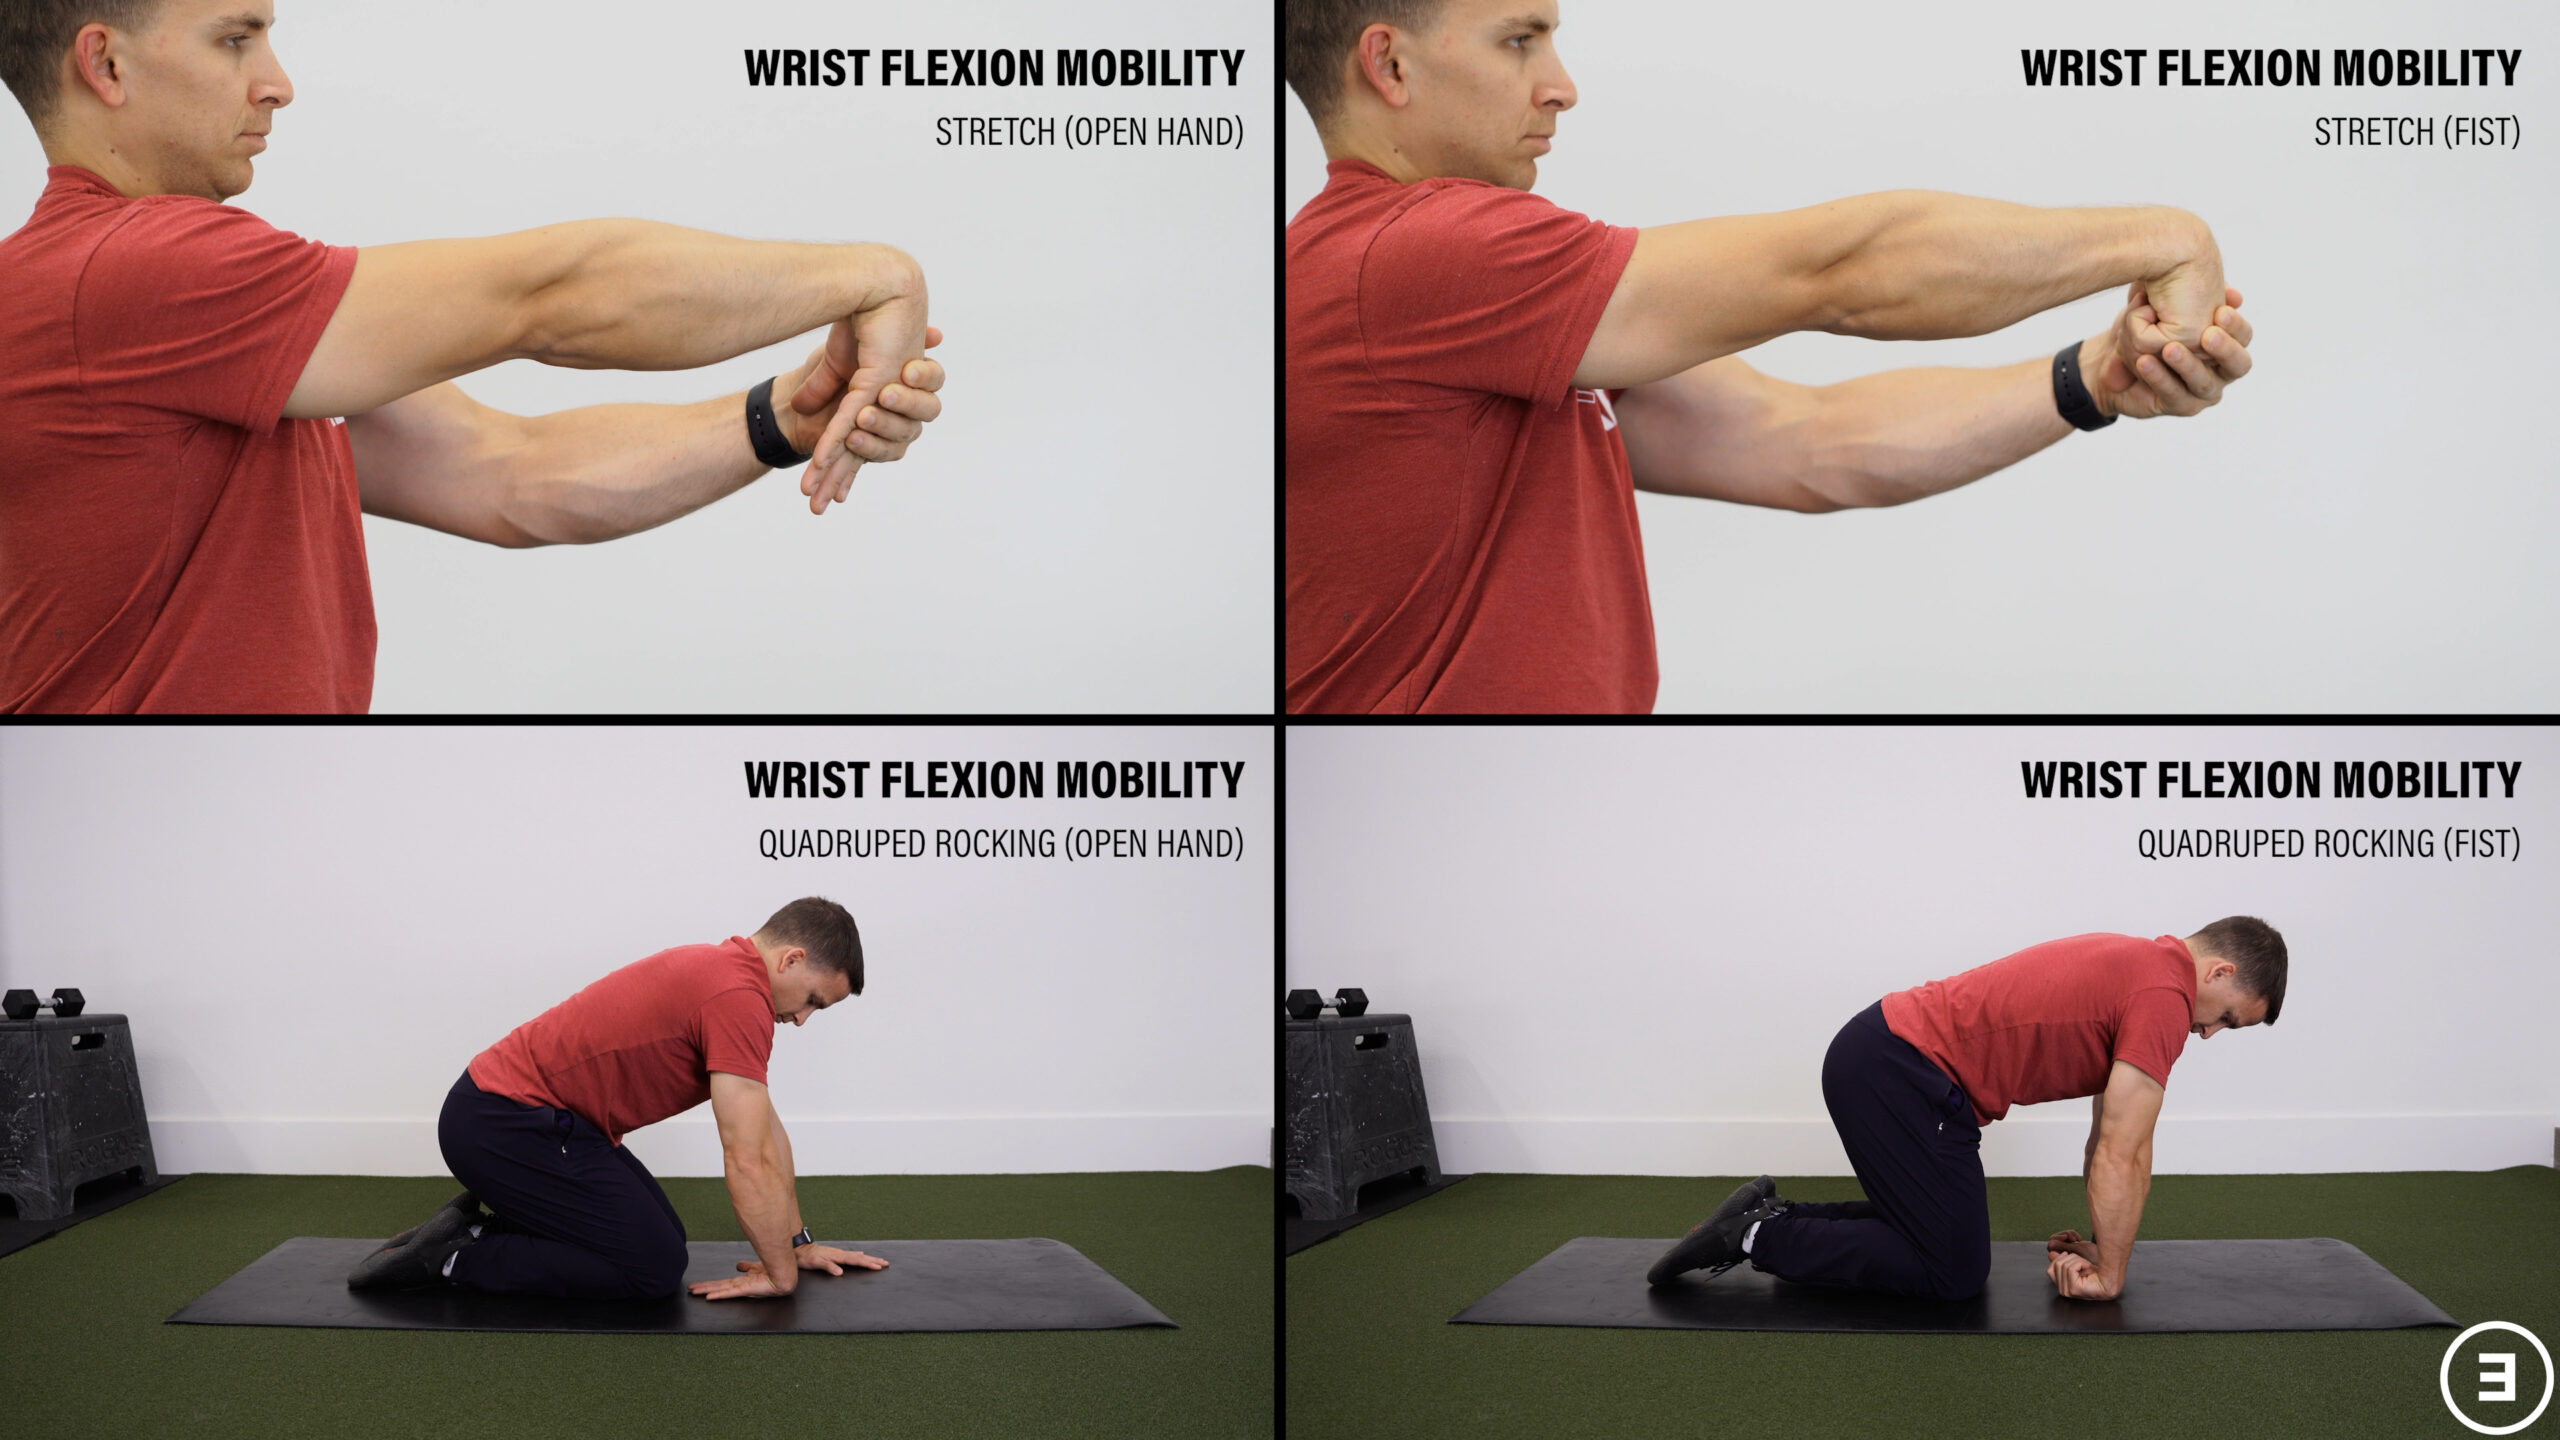
The circuit ends with wrist flexion mobility as a way to stretch those muscles and loosen up the wrist. You can do a gentle stretch with your arm out in front of you or do the quadruped rocking with the wrist in flexion. Making a fist would increase the stretch for both.
So if you did 2-3 sets of this circuit, it might look like this:
- 1 set of the prayer stretch, moving in and out as needed, for 30-60 seconds
- 1 set of a wrist and finger extension isometric hold for 10-15 seconds
- 1 set of wrist flexion mobility, moving in and out as needed, for 30-60 seconds
- Then repeating for 1-2 more sets
Practical Application
I’ve provided a lot of information, so let me try to make it a little more simplified and practical for your particular situation.
First of all, you don’t have to do everything. For example, if you’re not worried about doing handstands or push-ups on a flat surface, you probably don’t need to concern yourself with the wrist mobility exercises I presented at the end. Similarly, if you don’t have any issues with your grip, you might not need to do dedicated exercises for your grip strength and endurance.
If you wanted to perform the program as is, two times per week is a good starting point.
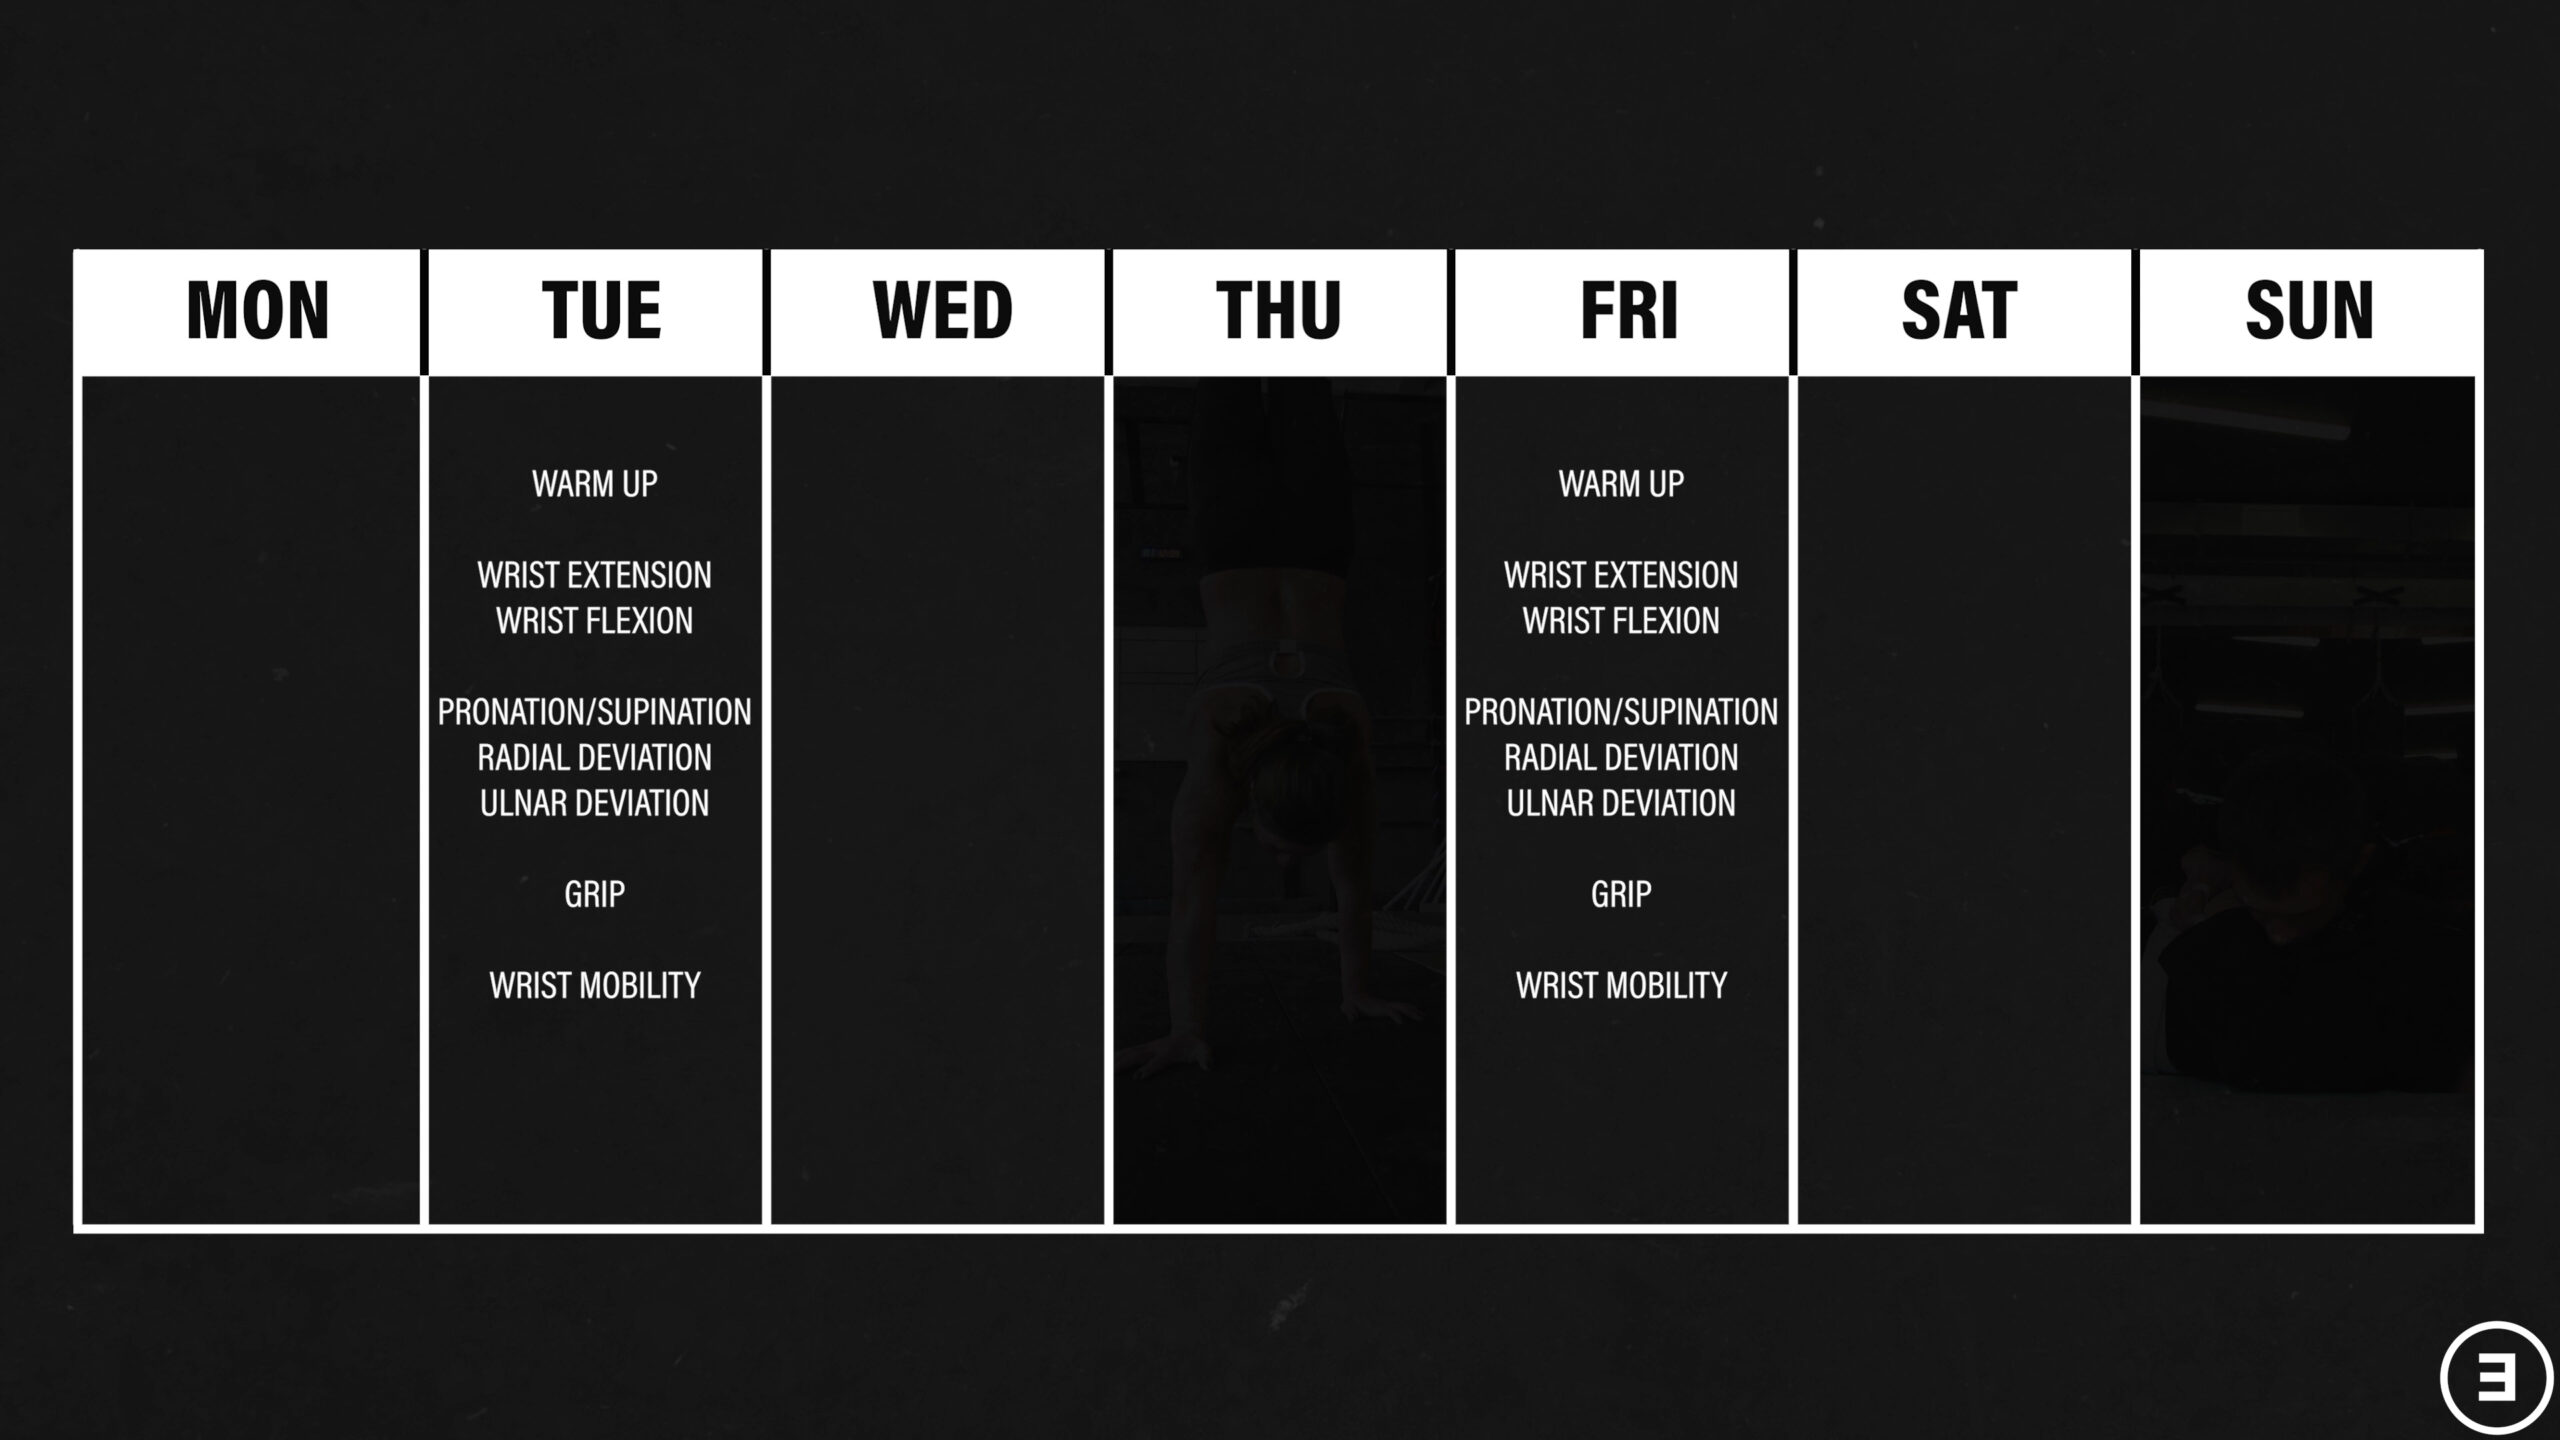
If handstands or jiu-jitsu or a different activity is really important to you and you need more wrist extension and better tolerance to weight bearing wrist extension, you can do the mobility category an extra 1-2 days per week if it’s tolerable. On the other hand, you can do the warm-up every day if you want.
If you’re recovering from an injury, you likely only need to do the exercises on your injured side. However, if you just want to increase the strength, mobility, etc. of your wrists, you can certainly do the exercises on both sides.
The point is for you to take what you need and leave what you don’t.
Let me provide two case examples before I summarize this entire blog.
Case Example #1 – The College Tennis Player
Imagine Emma, a 20-year-old student-athlete who plays Division 1 tennis while maintaining a 4.0 GPA at Stanford University. She is nearing the end of her college career and wants to play professionally, so she decided to add an extra hour of training every morning 4 months ago. Based on her busy schedule, this required sacrificing an extra 90 minutes of sleep each day. She developed pain within 2 weeks of her new routine, but continued on despite a worsening of symptoms.
What advice would I give Emma? I think it’s pretty straightforward:
- Don’t voluntarily sacrifice sleep. She is an extremely busy, high-functioning student-athlete and that extra sleep is vital for her recovery, performance, cognitive function, stress management, and overall health.
- Decrease training volume. This is a load management issue. More isn’t always better, especially when introduced quickly, and it’s clear that the additional hour of training each morning contributed to her development of symptoms.
Those two pieces of advice might be all she needs. If she does perform the exercise program, she likely doesn’t need to incorporate the optional wrist mobility exercises or most of the gym-based progressions and modifications.
Case Example #2 – The CrossFitter
Will is a 37-year-old recreational athlete, full-time banker, and father of two. Despite exercising regularly 2-3 days per week, he recently put on 10 pounds of weight during the holiday season. Considering that a new CrossFit gym opened near his house, he figured he would join for at least a few months to get back in shape. Although training has been going mostly fine, he developed wrist pain about 2 months ago during an intensive week of burpees, push-ups, handstand push-ups, and front squats.
There’s a lot that Will can do here. Here are three possible options, broadly speaking:
- Will joined the CrossFit gym because he wanted to lose weight. He could take a break from CrossFit, or just the movements aggravating his wrist, while continuing to exercise in other ways to still accomplish his goal.
- Will could modify problematic exercises like push-ups and front squats. For example, he could do push-ups on dumbbells and use lifting straps during front squats so he’s not loading his wrist into an extended position.
- Will could adjust the frequency, volume, and/or intensity of his training to a more tolerable amount.
Since he might benefit from more wrist extension, he could eventually do the wrist mobility exercises 3-4 times per week, as well as work through the weight bearing progression mentioned earlier.
Summary
In summary, here are the 5 steps to successful wrist rehab:
- Get Cleared To Exercise – If you’ve had a fracture, surgery, or you’re unsure of your injury, you don’t want to do more harm by pushing yourself too soon before your wrist has had a chance to heal appropriately.
- Relative Rest – You rarely need to completely rest and avoid all symptoms after an injury, but you also shouldn’t approach rehab with a “no pain, no gain” mentality. Relative rest (and the “art” of rehab) is about finding that fine line between doing too much and doing too little.
- Activity & Technique Modifications – Temporary modifications to aggravating exercises and activities can help minimize flare-ups and get you on the right track for long-term success.
- Load Management & Graded Loading – Find a Goldilocks-level of load that is tolerable (not too much, not too little, but “just right”) and gradually progress it over time by manipulating the volume, frequency, and intensity/effort of any activities that load your wrist.
- Exercises – Incorporate exercises as needed to improve the strength, range of motion, and stability of your wrist.
With all of this information at your disposal, take what you need, leave what you don’t, and figure out what works best for you.
Don’t forget to check out our Wrist Resilience Program!

Want to learn more? Check out some of our other similar blogs:
Carpal Tunnel Syndrome, Improving Elbow Range of Motion, Tennis Elbow Rehab
Thanks for reading. Check out the video and please leave any questions or comments below.