In this blog, I’m going to teach you everything you need to know about acromioclavicular joint injuries, sometimes referred to as a separated shoulder, including whether or not surgery is necessary, as well as provide you with a comprehensive rehab program.
As the name implies, the acromioclavicular joint, or AC joint, is the connection between the acromion of the scapula, or shoulder blade, and the distal end of the clavicle, or collarbone.
It is supported by a joint capsule, the acromioclavicular ligament, and the coracoclavicular ligament, which consists of two parts: the trapezoid and conoid ligaments.
Type 1 – involves a mild sprain of only the acromioclavicular ligament.
Type 2 – consists of a ruptured acromioclavicular ligament and joint capsule, and a mild sprain of the coracoclavicular ligament.
Type 3 – both ligaments and joint capsule are ruptured and the distal end of the clavicle is moderately elevated.
This type often presents with a piano key sign, where applying downward pressure on the distal clavicle causes temporary reduction. Upon releasing the pressure, the clavicle returns to an elevated position, similar to pressing a piano key.
Type 4 – presents similarly to type 3 but with a posteriorly displaced distal clavicle, possibly penetrating the trapezius muscle.
Type 5 – the distal clavicle is severely elevated and there is a high probability that both the deltoid and trapezius muscles are detached from the clavicle.
Type 6 – the distal end of the clavicle is inferiorly displaced under the coracoid process of the scapula (behind the coracobrachialis and short head of the biceps tendon).
This injury is usually the result of a direct force to the top part of the acromion, such as a fall on the shoulder with the arm at the side. However, it can also occur from falling on an outstretched hand (FOOSH) or more severe injuries may result from a motor vehicle accident.
It is typically characterized by pain when moving your arm across your body (shoulder horizontal adduction), overhead (shoulder flexion), and behind you (shoulder extension) since these place more stress on the AC joint.
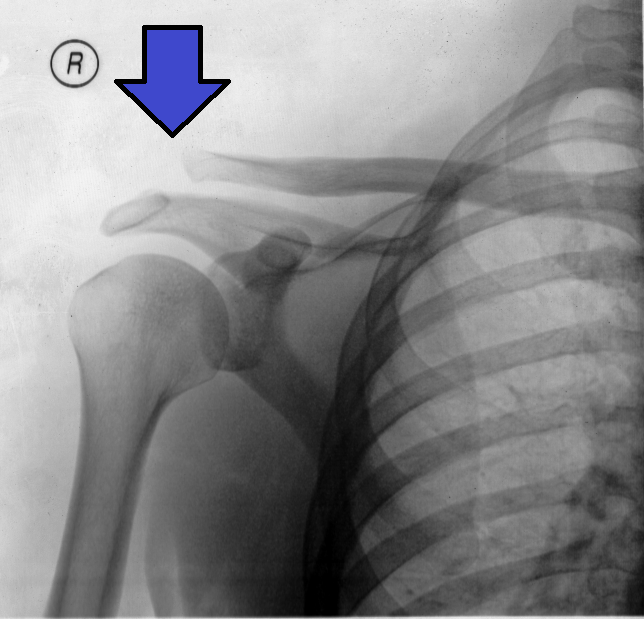
In severe cases (types 3-6), a visible deformity may occur due to the displacement of the distal clavicle.
Since this injury results from trauma, it is important to rule out other diagnoses, such as a clavicle fracture, injury to the sternoclavicular joint, and any possible neurovascular involvement.
Acromioclavicular Joint Injury Management
In the event of an AC joint injury, there are two primary treatment options: nonoperative management and surgery.
The previously mentioned Rockwood classification system is often utilized in an attempt to guide the choice of appropriate care, with most recommendations generally favoring conservative management for types 1 and 2 and surgery for types 4, 5, and 6. There has been a lack of consensus for type 3 injuries.Verstift et al 2021, Phadke et al 2019, Frank et al 2019
However, according to a more recent review by de Groot et al in 2023, the “Rockwood classification cannot differentiate between patients who will benefit from surgery and those who will not.” These authors do agree that “low-grade injuries (should) be treated conservatively” but “there is no consensus that surgical intervention is necessary for acute high-grade lesions.”
This is because there is someresearch showing that severe injuries can have similar outcomes whether they are treated with or without surgery. For example, a 2019 Cochrane review “found that surgery compared with conservative treatment may not improve shoulder function, return to former activities, or quality of life at one year” for types 3 through 6.
So, what does this all mean?
If you have a low-grade type 1 or 2 injury, nonoperative management should be the first line of treatment in most cases.
For more severe injuries (types 3-6), factors such as your symptoms, function, and goals will play a key role in your decision to have surgery or not.
For instance, you may have heard that your favorite football player ended up having surgery for a type 3 AC joint sprain, while your uncle with a similar injury chose nonoperative management because he has minimal pain, doesn’t work or play a sport, and only needs to perform day-to-day tasks.
It is also worth noting that since more severe injuries (types 3-6) have a displaced clavicle, the cosmetic appearance of your shoulder may play a role in your decision to have surgery.
Acromioclavicular Joint Injury Rehab Overview
The rehab program I am going to present will consist of 4 overlapping categories. It starts with a brief period of immobilization, before gradually building back any lost range of motion or strength, and ending with power exercises that will help prepare you for a return to sport or higher-level activities.
Most exercises will have varying levels of difficulty, allowing you to progress at your own pace based on your symptoms, tolerance, function, etc.
Even though not every exercise shown will follow a perfect progression, your goal is to find an appropriate starting option and gradually progress over time.
The information in this blog is geared toward nonoperative management. If you are going to have surgery or had surgery, you will eventually follow a similar rehab plan, but you will have other factors to consider such as healing timelines and post-surgical precautions.
For example, after surgery, there are often range of motion restrictions and limitations against how much you can lift for a set duration of time to protect the surgical repair. As always, you should get clearance from your surgeon and physical therapist before starting any new exercises.
Category #1: Immobilization (Recommended)
Immediately following an AC joint sprain, a brief period of immobilization in a sling is often the first recommendation as this will reduce the load placed on the AC joint and allow symptoms to calm down.
How long you wear a shoulder sling can vary from a couple of days to a few weeks depending on your symptoms, severity of injury, and function.
Research from LeVasseur et al 2021 found that “for the majority of patients, immobilization lasts for approximately 3–10 days and the patient can self-discontinue when they find it appropriate” which “often occurs when patients are free of pain with the arm at the side and during activities of self-care.”
Category #2: Range of Motion Exercises (Recommended)
The second category of rehab consists of range of motion exercises to address any mobility deficits that may result from pain, muscle guarding, and immobilization.
You can start these exercises within about a week after the initial injury, but ultimately, it will depend on your symptoms and tolerance. This means you should be able to perform these exercises with little to no pain during and without experiencing a significant increase in pain afterward or the next day. If you do, scaling back the intensity and volume of exercises would be recommended.
The primary restrictions observed typically involve shoulder flexion, external rotation, and sometimes extension.
For shoulder flexion, start by lying on your back with knees bent, and while holding onto a stick or PVC pipe, slowly move your arms overhead as far as comfortable. Use as much assistance from your uninvolved side as needed.
To decrease the intensity, move through less range of motion. To increase the intensity, add a light weight to the stick to help move the shoulder further overhead.
Other options include supporting your arms against a wall, elevated surface, or the ground in child’s pose, and gently rocking in and out of as much shoulder flexion as tolerated.
Eventually, you can include more advanced variations, like a dumbbell pullover on a bench.
You will perform external rotation either sitting or lying on your back.
Holding a stick or PVC pipe, place your involved shoulder at your side with your elbow bent to 90°. Use your non-involved side to move your shoulder in and out of external rotation. Again, use as much assistance from the uninvolved side as needed.
As your range of motion and tolerance improves, perform this movement without a stick by actively rotating your arm outward, gradually working your way up to shoulder height.
To increase the intensity, you can hold a light weight in your hand. To move through more range of motion, place your arm on a pad or towel.
Finally, for shoulder extension, hold a stick or dowel and use your non-involved side to gently move your arm behind you, using as much assistance from the uninvolved side as needed.
As your tolerance improves, progress by performing lift-offs with a dowel in standing.
Internal rotation isn’t typically a restriction with this injury, but if you want to work on this motion, you can follow a similar active progression as the external rotation option lying on your back.
These range of motion exercises can be performed for 2-3 sets of 30-60 seconds or 10-20 repetitions, moving at a slow and controlled speed. The frequency you perform these exercises will vary. For instance, if you had surgery, you might perform these up to 3 times a day once you have been cleared by your surgeon. In other cases, 2-4 times a week should be sufficient for improving your shoulder range of motion.
Similar to the range of motion exercises, you can begin this category when symptoms allow, which is typically somewhere within the first week after the initial injury. Again, you should have little to no pain during exercises and should not have a significant increase in pain afterward or the next day. If you do, scaling back the intensity and volume would be recommended.
There are a lot of options to consider, so I am going to quickly review 7 groups of exercises.
1. External Rotation Strength
As you are transitioning out of the sling, starting with isometrics is generally well-tolerated because it involves little to no movement.
You can rotate your hand outward into a wall or door frame, use a cable or band, lie on your side holding a light weight, or even use a band while keeping your arms tucked at your side.
As symptoms allow, progress to an exercise that moves your shoulder through a larger range of motion. You can do this standing with a cable or band, lying on your side with a weight, or using a ribbon or loop band.
You can also do a variation with your elbow supported on your knee, which will not only work on your external rotation strength but can also improve your internal rotation range of motion.
If you participate in sports or activities that involve overhead movements or simply want to make the previous options more challenging, you can perform external rotation with your shoulder and elbow at 90° using a band or cable or lying on your stomach with a weight.
External rotation strengthening exercises can be performed for 2-3 sets of 10-15 repetitions or 15-45 seconds for the isometrics, 2-3 times a week. Earlier in the rehab process, you can perform the isometrics daily if symptoms allow.
2. Internal Rotation Strength
Start with an isometric variation by rotating your hand inward into a wall or door frame or holding a cable or band.
Then, perform internal rotation with a cable or band moving through as much range of motion as you can tolerate.
Finally, you can make the movement more challenging by performing in a 90/90 position.
Aim for 2-3 sets of 10-15 repetitions, 2-3 times a week. If performing an isometric, you can do these daily for 2-3 sets of 15-45 second holds.
3. Shoulder Elevation Strength
These will follow a similar progression, starting with isometrics into an immovable object or using a loop band, then eventually moving through larger ranges of motion using dumbbells or bands.
For these lateral raise variations, start by lifting to shoulder height. To make them more challenging, you can gradually increase the range of motion, eventually building up a butterfly lateral raise which involves moving your shoulders fully overhead.
If lifting the arms at your side is uncomfortable, you can perform these in what’s called the scapular plane, which is about a 30-45° angle in front of you.
You can also experiment with palms facing down or turning your thumbs up toward the ceiling.
Once again, aim for 2-3 sets of 10-15 repetitions, 2-3 times a week, or 15-45 second holds for the isometric options.
4. Posterior Shoulder Strength
For this group of exercises, you can follow a progression performing what is called As, Ts, and Ys.
You can do repetitions using a cable or band or while lying on an inclined surface either with or without weights. If you have minimal equipment, you can perform isometrics while lying on your stomach on the ground.
These variations can be programmed for 2-3 sets of 10-15 repetitions or 30-45 second holds, 2-3 times per week.
If you want a more challenging option after mastering the Y variations, try standing angels with a band or prone swimmers. If moving your shoulders into extension is uncomfortable, you can hold your arms slightly in front of you when using a band or lie on an elevated surface for the prone variation. Perform these slow and controlled for 2-3 sets of 30-60 seconds.
5. Weight Bearing Strength
There are endless exercise options but here is a simple tall plank progression. Start with your hands on a wall or elevated surface, progress to the floor, and finally to shoulder taps where you tap your opposite shoulder in an alternating fashion while minimizing trunk movement. For each level, think about pushing the floor away from you.
If you want to incorporate shoulder blade movement you can perform a push-up plus. Press the ground away from you, separating your shoulder blades, and then slowly lower your chest to the ground, bringing your shoulder blades together. Repeat this movement while keeping your elbows straight.
If you need to make this easier, perform with your hands on a wall or place your hands on a bench or elevated surface.
If you want to incorporate an overhead component, press the ground away from you and transition into a downward dog, moving your shoulder into as much flexion as comfortable.
Either option can be performed for 2-3 sets of 30-60 seconds, 2-3 times per week.
6. Compound Pushing Exercises
Building off the weight-bearing movements, push-ups might be a good starting option since they are easily modifiable. For example, you can start by reducing the range of motion, elevating your hands, or using a more narrow hand position since these load the AC joint less.
If you are performing a bench press, using dumbbells will allow for more variability in your shoulder position. You can also modify the range of motion by performing a floor press, or try slowing down the movement by incorporating a tempo.
Adjusting variables like your range of motion, intensity, and speed would apply to other gym exercises as well.
Lastly, if you want to return to overhead pressing, you can use angled variations, like a landmine press, to gradually expose yourself to increasing amounts of arm elevation.
7. Compound Pulling Exercises
Similar to push-ups, inverted or TRX rows are a good starting point since you can easily manipulate the effort level by adjusting your body position. The more upright you are, the easier it becomes, while the more horizontal you are, the more difficult it becomes.
For horizontal pulling exercises, you might need to minimize the amount of shoulder extension by stopping the movement when the upper arm is in line with the trunk. You should also focus on using your back muscles and squeezing your shoulder blades to avoid dumping your shoulder forward.
Similar to vertical pressing, you can use angled variations to help progress back to vertical pulling movements.
Exercises requiring a hanging component are generally more demanding on the shoulder. For example, if you were doing weighted pull-ups previously, you might start with an assisted variation, progress to body weight, and then gradually add weight over time.
You can also experiment with different grips to determine which one feels most comfortable for your shoulder.
For both the compound pushing and pulling movements, it is recommended that you build back your range of motion first, and then gradually increase the volume, intensity, and speed needed for your desired goals.
There is a wide range of parameters you can implement, but to keep it simple, aim for 2-3 sets of 5-20 repetitions, 2-3 times a week.
Category #4: Reactive and Power Exercises (Optional)
The last category of exercises will enhance your shoulder strength, coordination, and power, as well as improve your ability to absorb and generate forces. These are some key attributes required for sports and activities involving throwing, catching, swinging, etc.
There are countless options, but here are a few examples.
Using a small weighted ball, you can start with ball drops while lying on your side.
Other variations include ball drops while lying on your stomach with your arm in a T, Y, or 90/90 position.
You can also perform ball dribbles against a wall with your arm overhead or at different angles.
If you have a partner, you can try more coordinated throws such as this half-kneeling ball toss.
Finally, there are medicine ball variations, like a chest pass, shot put throw, rotational throw, and overhead slams.
For the variations using a small ball, perform for 2-3 sets of 30-60 seconds of total work. For the medicine ball options, aim for 2-3 sets of 4-8 reps. Your goal is maximal power and effort for each repetition so use an appropriate weight that allows you to move fast. A heavier ball is not necessarily better.
Individualizing Your Program
Before telling you how to put all this information together, there are 2 things I want to mention about the exercises I just presented.
First, as I said earlier, these categories have overlap. As an example, you might start the range of motion and shoulder isometric exercises while still choosing to wear the sling throughout the day.
Second, you don’t have to do every exercise or exercise category. For instance, if you don’t have limitations in your shoulder extension range of motion, you don’t need to do those specific exercises. Or if you do not plan on returning to a sport or activity that places higher demands on your shoulder, you don’t have to perform the reactive and power exercise category.
Here are 2 case examples to help illustrate how all of this information can be put into practice.
Case Example #1
For the first example, let’s say you slipped and fell on ice resulting in a type 1 AC joint sprain. Your job primarily involves working at a desk, you don’t play sports, and you enjoy playing video games in your free time.
During the first week, you wear a sling and opt to rest and ice for the first few days. On day 5, since your pain has decreased significantly, you begin performing shoulder flexion and external rotation with a dowel to help restore your range of motion, as well as incorporate the shoulder isometrics, daily.
You stop wearing the sling on day 8 but continue progressing with the range of motion and a few shoulder strength exercises, 3 times a week.
You follow this program for a few weeks to a couple of months or until your range of motion, strength, and function during work and day-to-day activities have returned to a desirable level.
Case Example #2
In the second example, let’s say you are a high school football quarterback who recently suffered a type 2 AC joint sprain after getting sacked in a game.
Your first week may look very similar to the previous example. However, once symptoms allow, you decide to incorporate a more comprehensive program, 2 days a week.
Over the next few months, you perform all the shoulder strength exercises, progress toward the compound pushing and pulling movements, and eventually the reactive and power exercises (shown in the picture below is what a sample program might look like).
As a general framework, you need to determine your current level of function, establish your end goal(s), and then design a plan for gradually returning to this level of function.
As an example, the high school quarterback I just mentioned would eventually need to implement a return to throwing program in addition to his rehab and training exercises. This would involve gradually increasing the distance, effort, and complexity of throws in practices, before progressing back to games.
If you participate in other “shoulder-intensive” activities like CrossFit, you would have to slowly ramp up your tolerance to movements like burpees, Olympic lifts, handstands, kipping pull-ups, etc. Remember, build back your range of motion first, and then add volume, intensity, and speed as symptoms allow.
This holds true for any other sport, activity, or work-related goal you might have.
If you had surgery, a similar framework can be applied but this process will need to be a collaborative conversation with your surgeon, physical therapist, and coach.
The good news is that whether you had surgery or not, return to sport rates have been shown to be fairly high following an AC joint sprain.
Verstift et al in 2021 examined outcomes for the nonoperative treatment of types 1 and 2 and found that 50 out of 65 patients returned to sports after injury.
In a different study by Verstift and colleagues, authors found that for types 3 through 6, “the rate of return to sport following surgery is high and most patients can expect to return to their pre-injury level of sport.”
The timeframe from surgery to return to play varies widely, but a 2022 systematic review did find that between 3 and 6 months was the most common.
Want to learn more? Check out some of our other similar blogs:
Thanks for reading. Check out the video and please leave any questions or comments below.
Do you want a structured plan that’s going to provide you with the knowledge and tools to feel more confident, capable, and resilient than ever before? Check out our Shoulder Resilience Program!