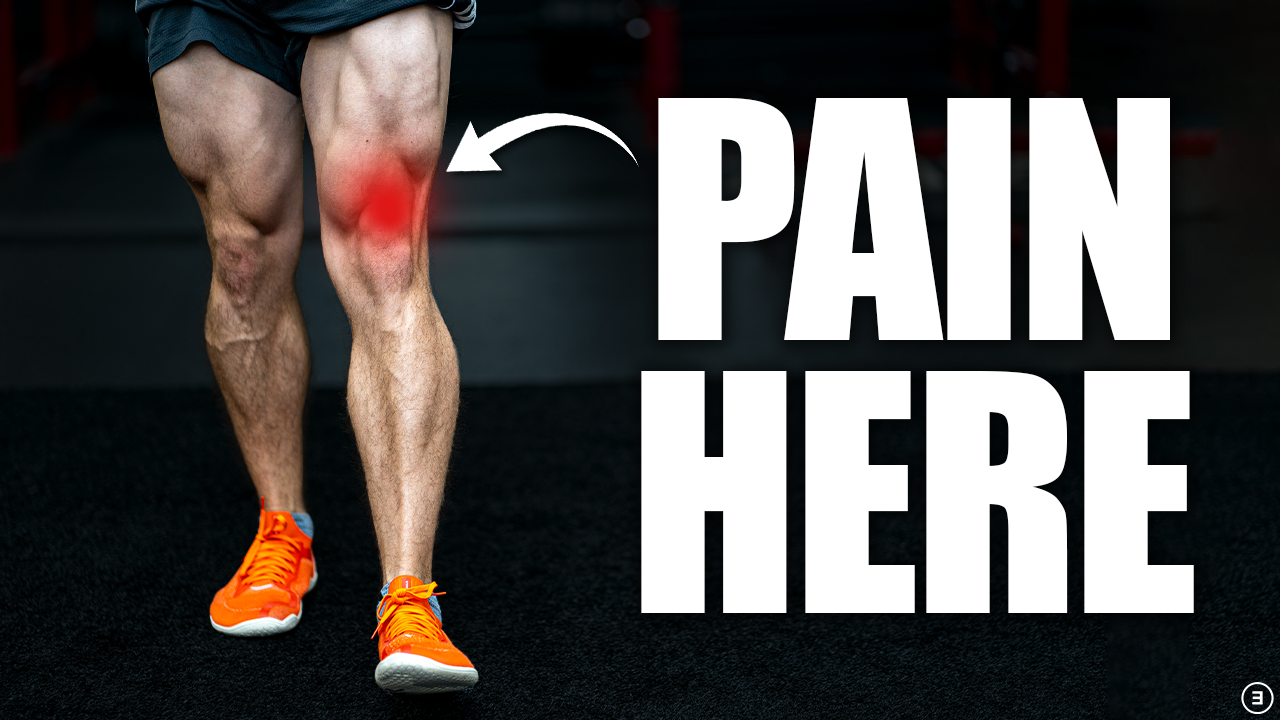
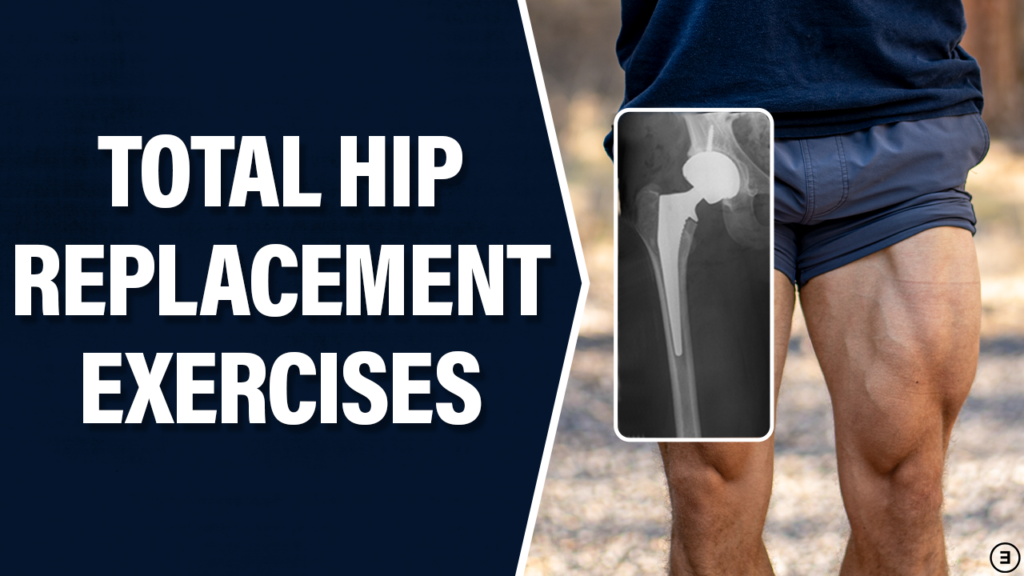
I’m going to show you the BEST exercises to improve your long-term strength, mobility, and health after total hip replacement surgery, regardless of your age or current function.
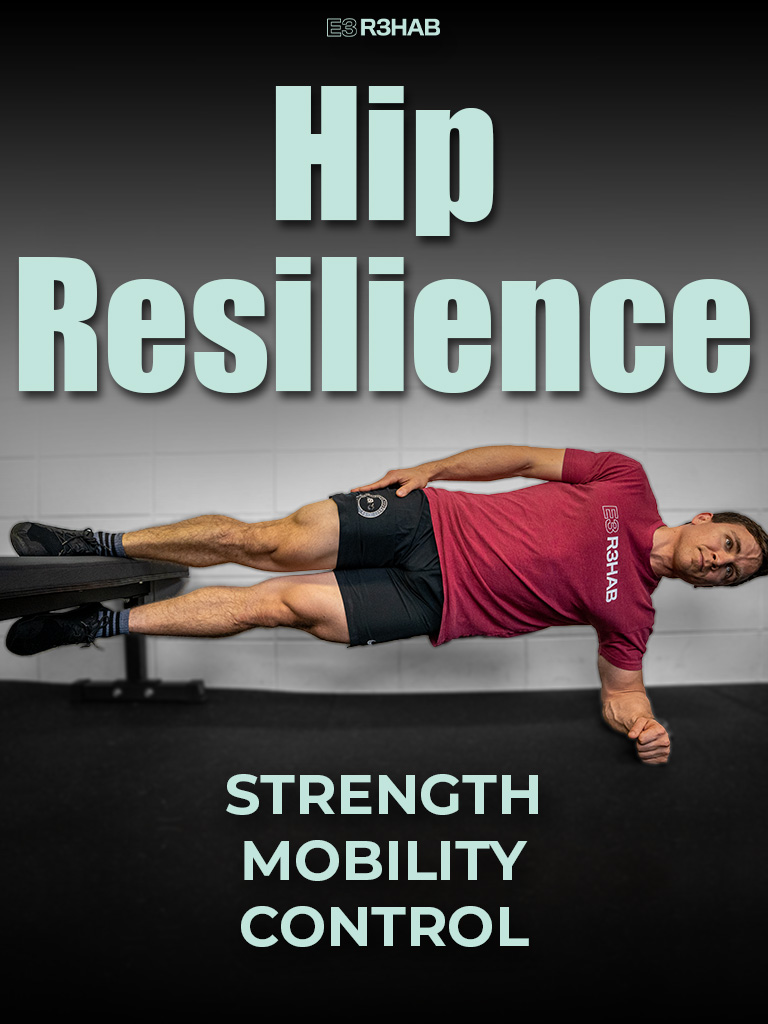
Looking to improve the strength, range of motion, and control of your hips to enhance your function and performance? Check out our Hip Resilience program!
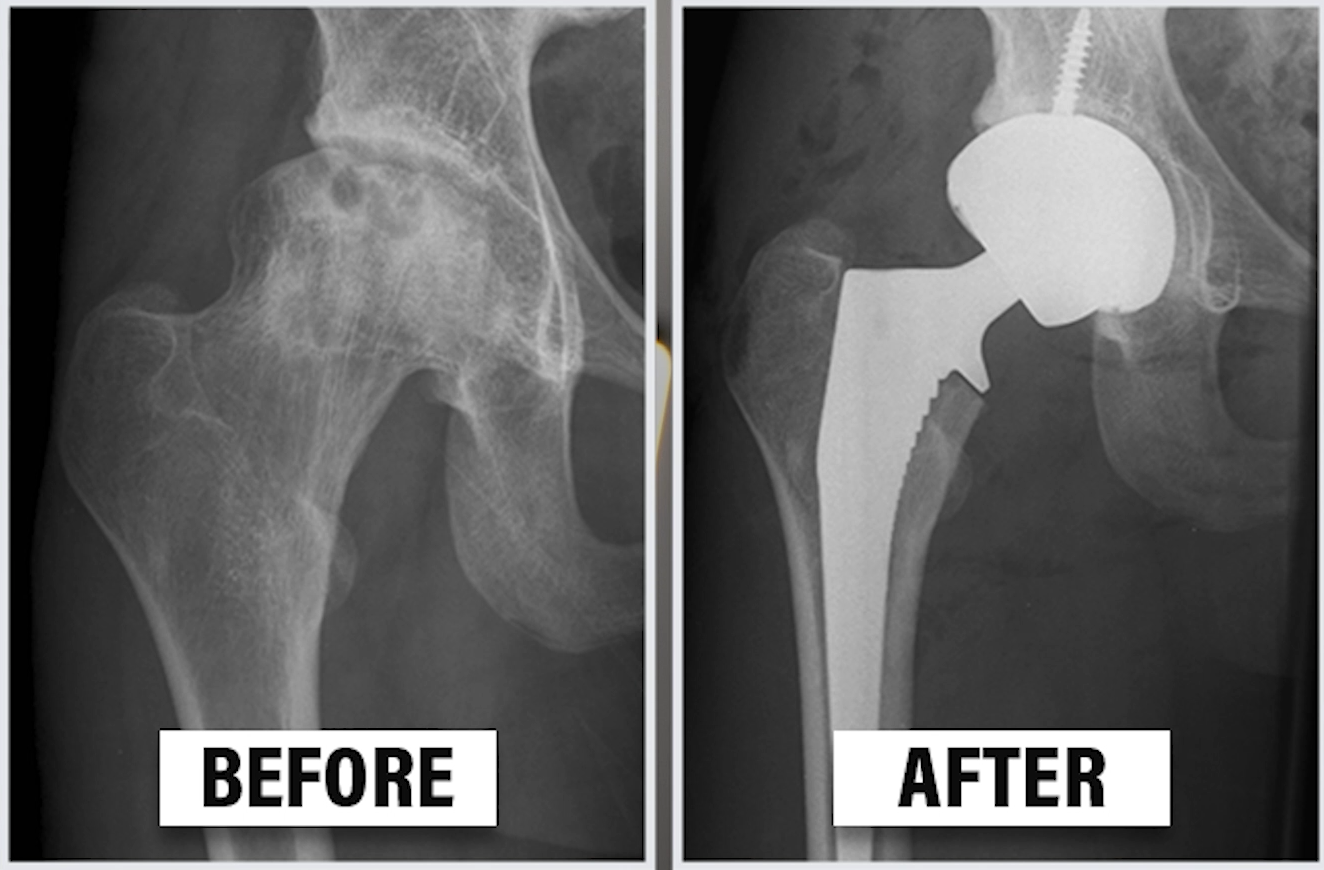
Total Hip Replacement At 19 Years Old
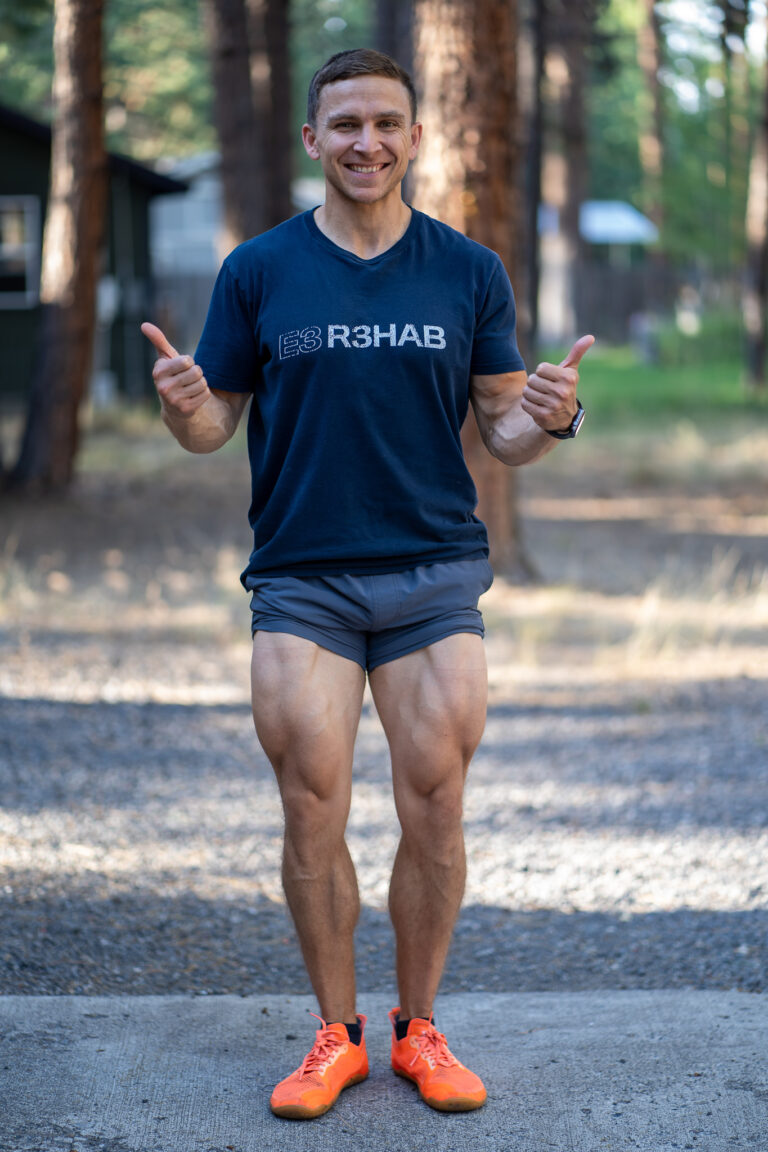
My name is Marc Surdyka and I am a 33-year old physical therapist who has had a right total hip replacement for over 14 years.
I want to start by providing some quick background information about me that answers the most common questions that I get when making this type of content.
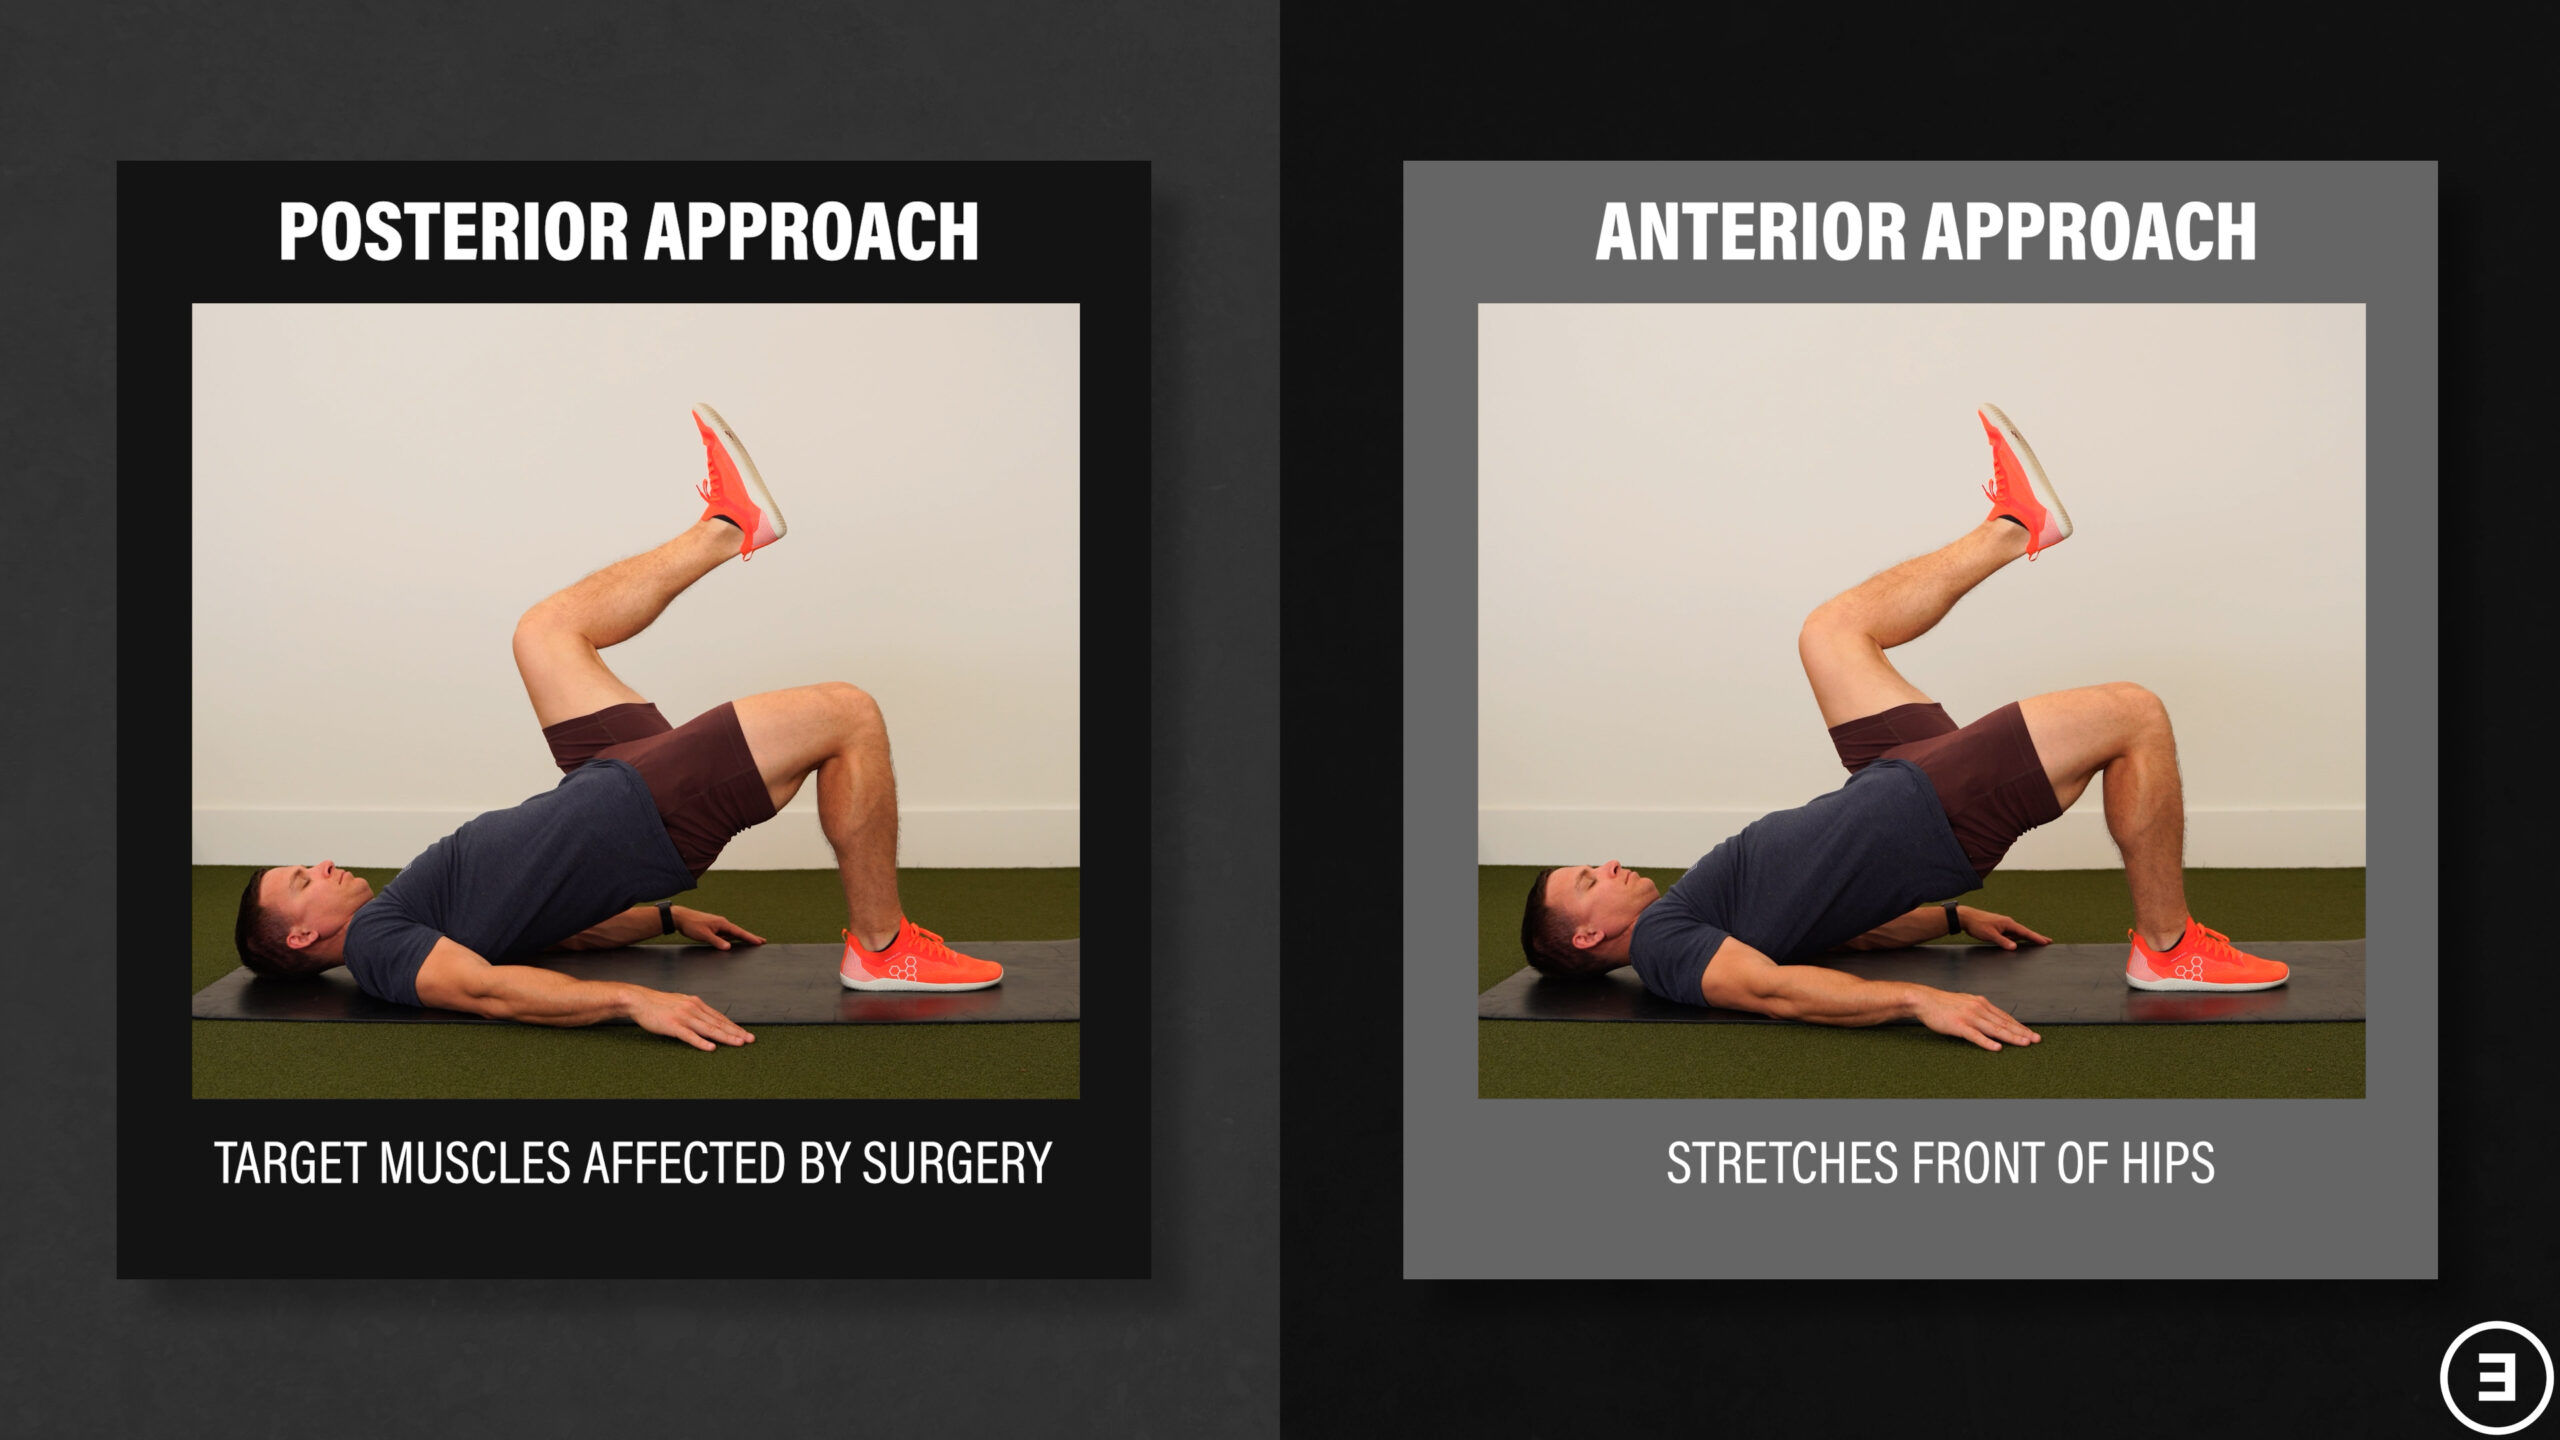
I had cancer as a teenager, developed a condition known as avascular necrosis (AVN) likely due to high doses of oral corticosteroids, and eventually had to have my right hip replaced when I was 19 years old. My surgeon used a posterior approach and I have an uncemented, metal-on-metal implant.
I am not recommending a particular approach or implant, and the advice in this blog applies to all surgical approaches and types of materials used. If you have specific questions about either topic, be sure to have a discussion with your medical doctor.
Despite having the surgery over 14 years ago, I have no pain at rest or with day-to-day activities. Surprisingly to many, I’m able to get down into a deep squat, sit in a 90/90 position, lift relatively heavy weight, jump and land, and perform some challenging feats of strength.
I don’t claim to be the strongest, most flexible, or most athletic person with a total hip replacement, but I like to think that I continue to function at a fairly high level 14 years later.
You’re More Capable Than You Think
I’m not sharing this information to necessarily encourage you to do the same, to promise you’ll be able to do those things after reading this blog, or for you to compare yourself to me. I’m actually not a fan of comparisons because, as the saying goes, “Comparison is the thief of joy.” Everyone’s on their own journey and timeline, and that’s going to be important to consider when implementing the exercises from this blog.
My intention is to emphasize that even with a total hip replacement, you’re likely far more capable than you think. Too many younger people expect the quality of their lives to be significantly diminished after a total hip replacement, but in reality the surgery should hopefully give you a new lease on life.
Is This Blog Only For Young People?
With that being said, this blog is for all ages and fitness levels. As a physical therapist, I’ve worked with individuals in their 20s, all the way up to people in their 90s with total hip replacements. Regardless of your goals, these exercises and recommendations are beneficial for improving your function and quality of life, increasing strength and muscle mass, and reducing fall risk, all of which are even more important as we get older.
Precautions, Pain, and Assistive Devices
Prior to discussing the exercise rationale, I want to bring up two points:
1. I am not suggesting that you disregard any precautions or recommendations provided to you by your surgeon. However, it is important to understand that precautions are meant to have an end date.
As someone who had a posterior surgical approach, I had the usual precautions of avoiding certain hip movements early on, such as not bending past 90 degrees and avoiding crossing my legs. But they were temporary. Nowadays, I’m not purposely pushing into discomfort or trying to turn myself into a pretzel, but I’m also not worried about dislocating my hip.
If you have any concerns about what you can or cannot do, get clarification from your surgeon or physical therapist.
2. The second point relates to monitoring and managing pain. You wanted to get back to feeling normal… yesterday. I get it. But healing takes time. Unfortunately, there’s no way to speed up the recovery process, but you can delay it if you push too hard or too fast, too soon.
The biggest example of this is people wanting to rush off their assistive devices, such as crutches and walkers. Since I was 19 when I had my hip replaced, I promise you I didn’t enjoy explaining to people why I was on crutches. And I definitely wanted to get off of them as quickly as possible. But I used them as long as I needed. Not only are assistive devices there to reduce your pain and improve your mobility, they help normalize your walking so you are at less of a risk of developing a limp.
You’ll get back to doing the things that you want. Just take your time.
Total Hip Replacement Exercise Rationale (~3 Months After Surgery)
The main reason I thought this blog was necessary to make is that there are not many resources available for more advanced, progressive exercises for individuals who want to return to a higher level of function.
I am not dismissing the lower level exercises recommended immediately after a total hip replacement – ankle pumps, quad sets, glute squeezes, short arc quads, etc. These exercises are great, but there should be a next step and this is it.
Although the title of this section mentions “~3 months after total hip replacement surgery,” the timeline is honestly a bit arbitrary. There might be some people who begin doing many of these exercises shortly after surgery, while others need more time.
As I said earlier, embrace your own timeline and journey while monitoring and managing any symptoms along the way.
I will offer as many exercises as I can that require little to no equipment, so there’s a low barrier to entry. I will also provide options of varying difficulty, so the exercises are suitable for any fitness level.
You don’t have to do any exercises you aren’t comfortable with or don’t fit your goals. My intention is to provide you with a flexible routine that you can individualize to your needs. The way that I’m going to present the exercises means that you can perform and progress them for years to come.
If any of the exercises seem unrealistic for you, please just wait until the end of the blog where I provide examples of how you can implement this information into your weekly routine depending on your symptoms, function, and goals.
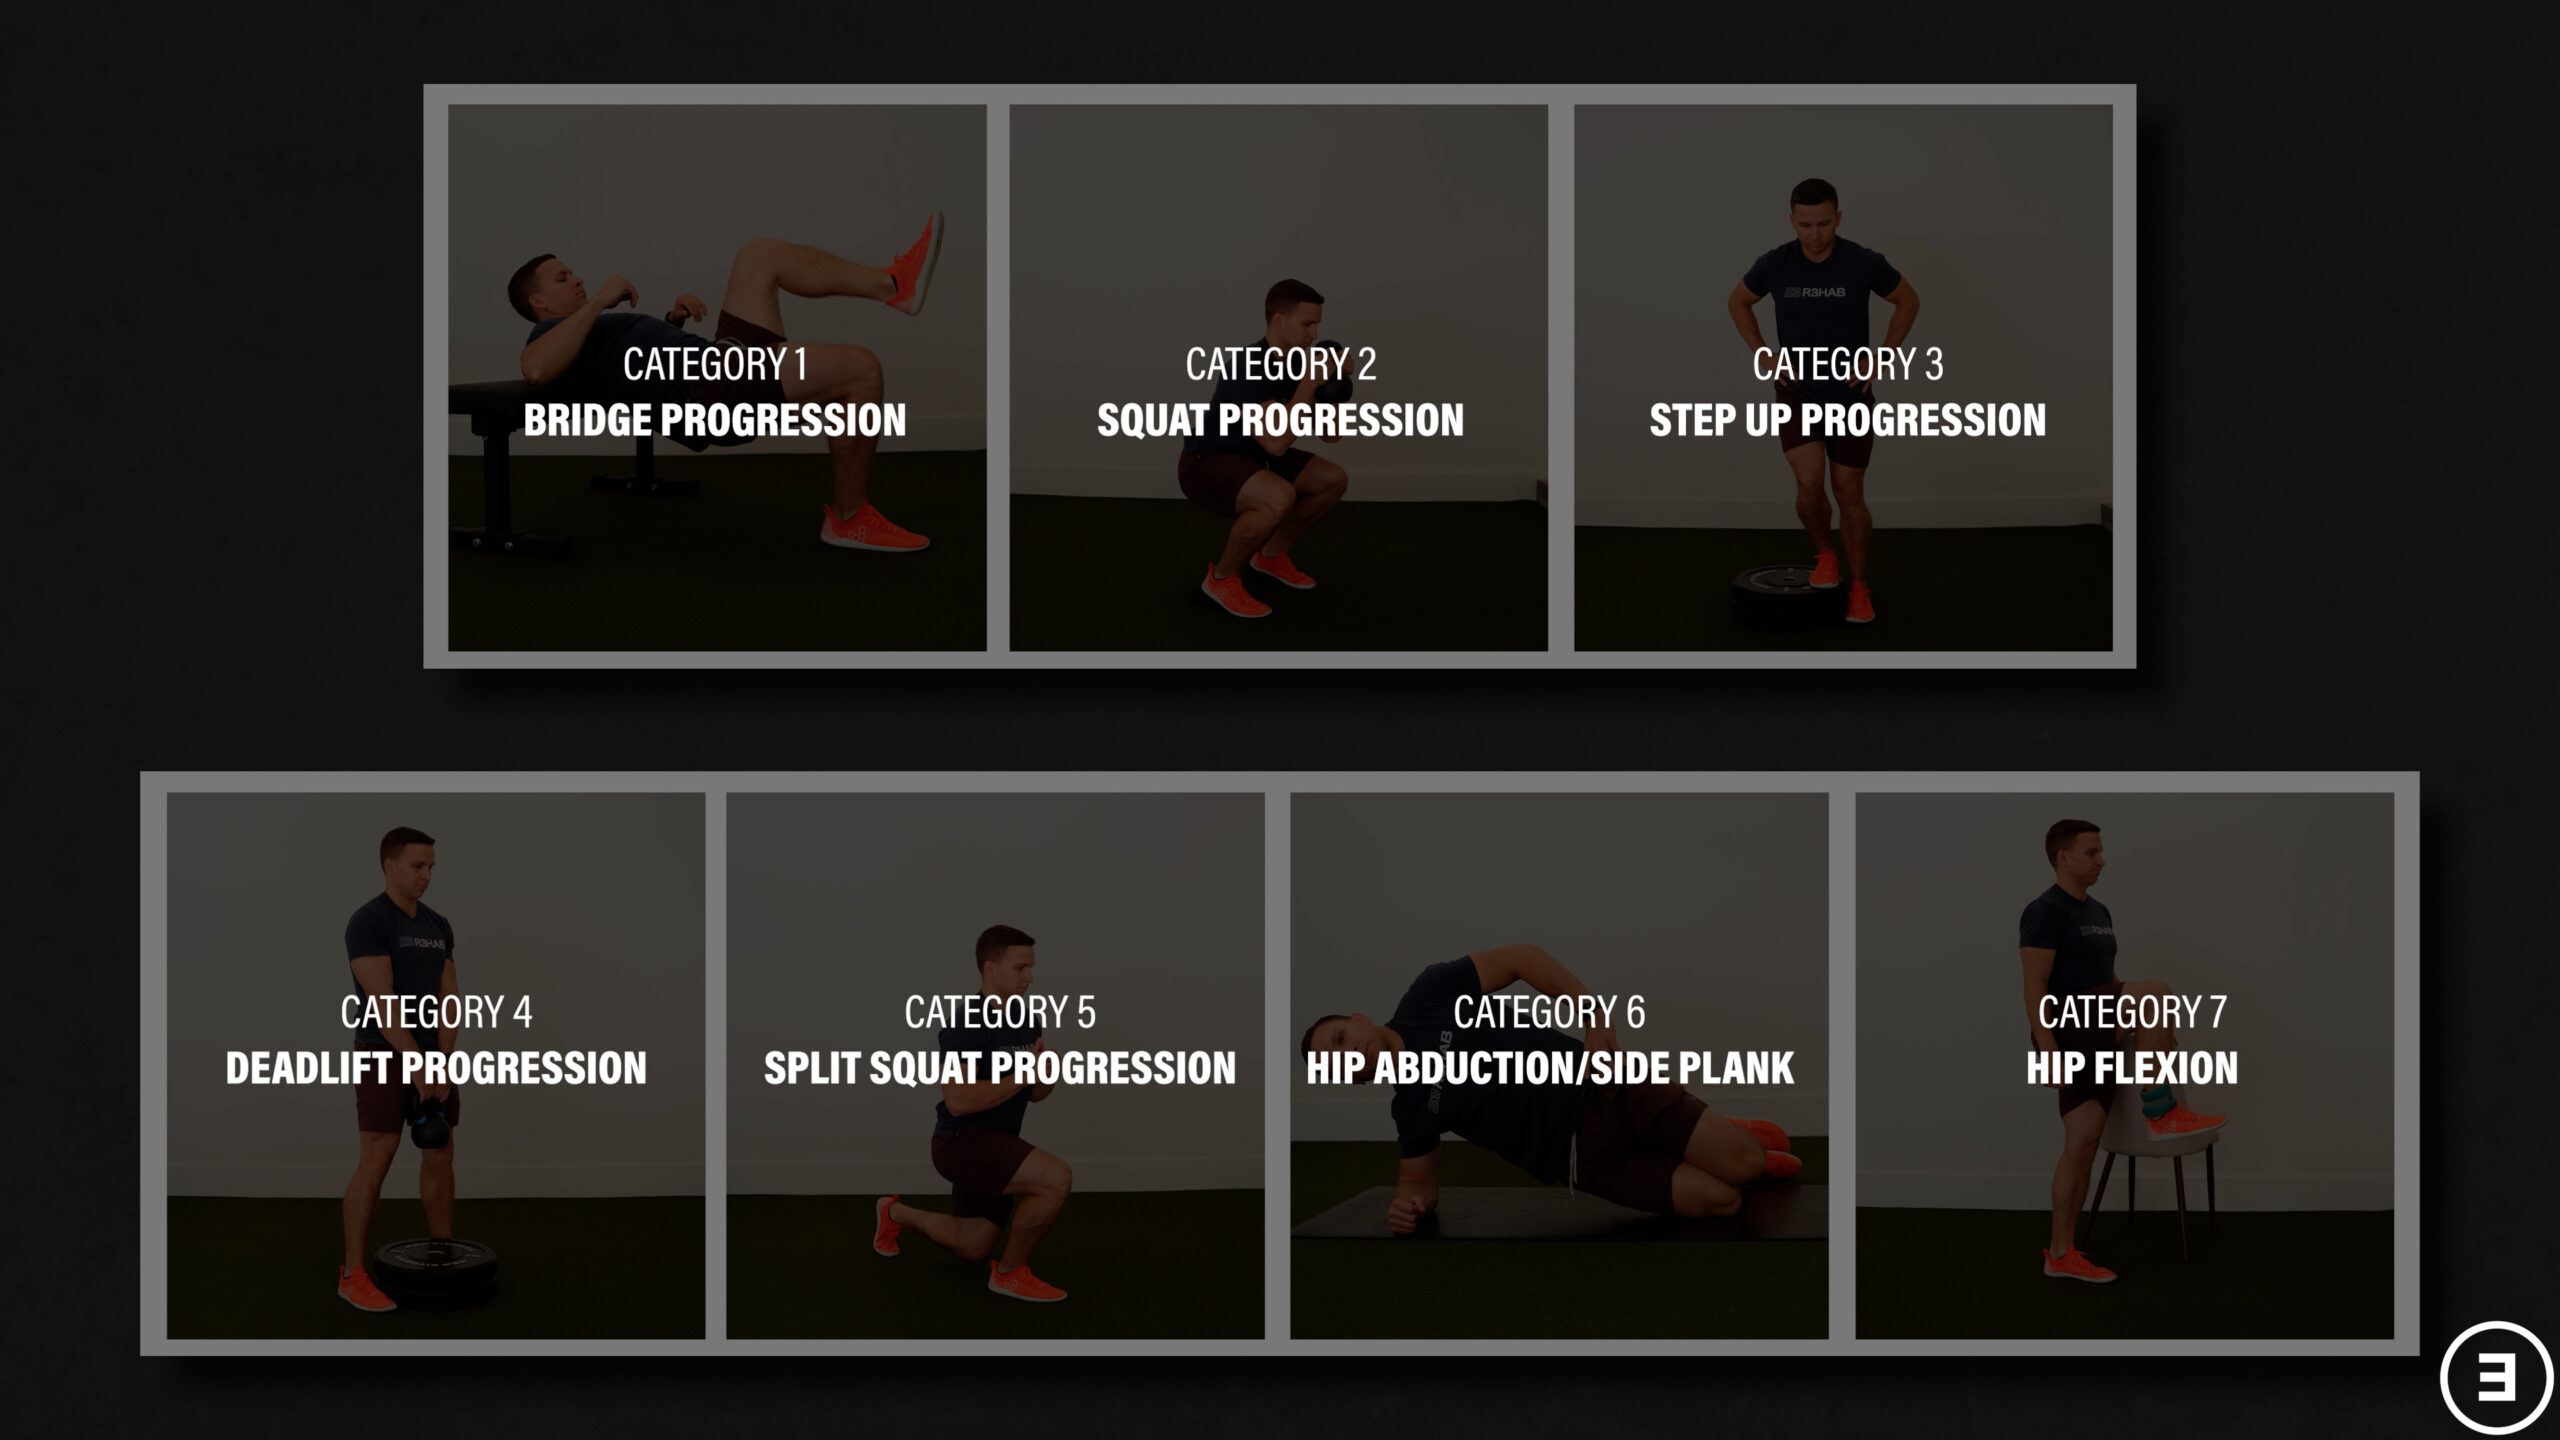
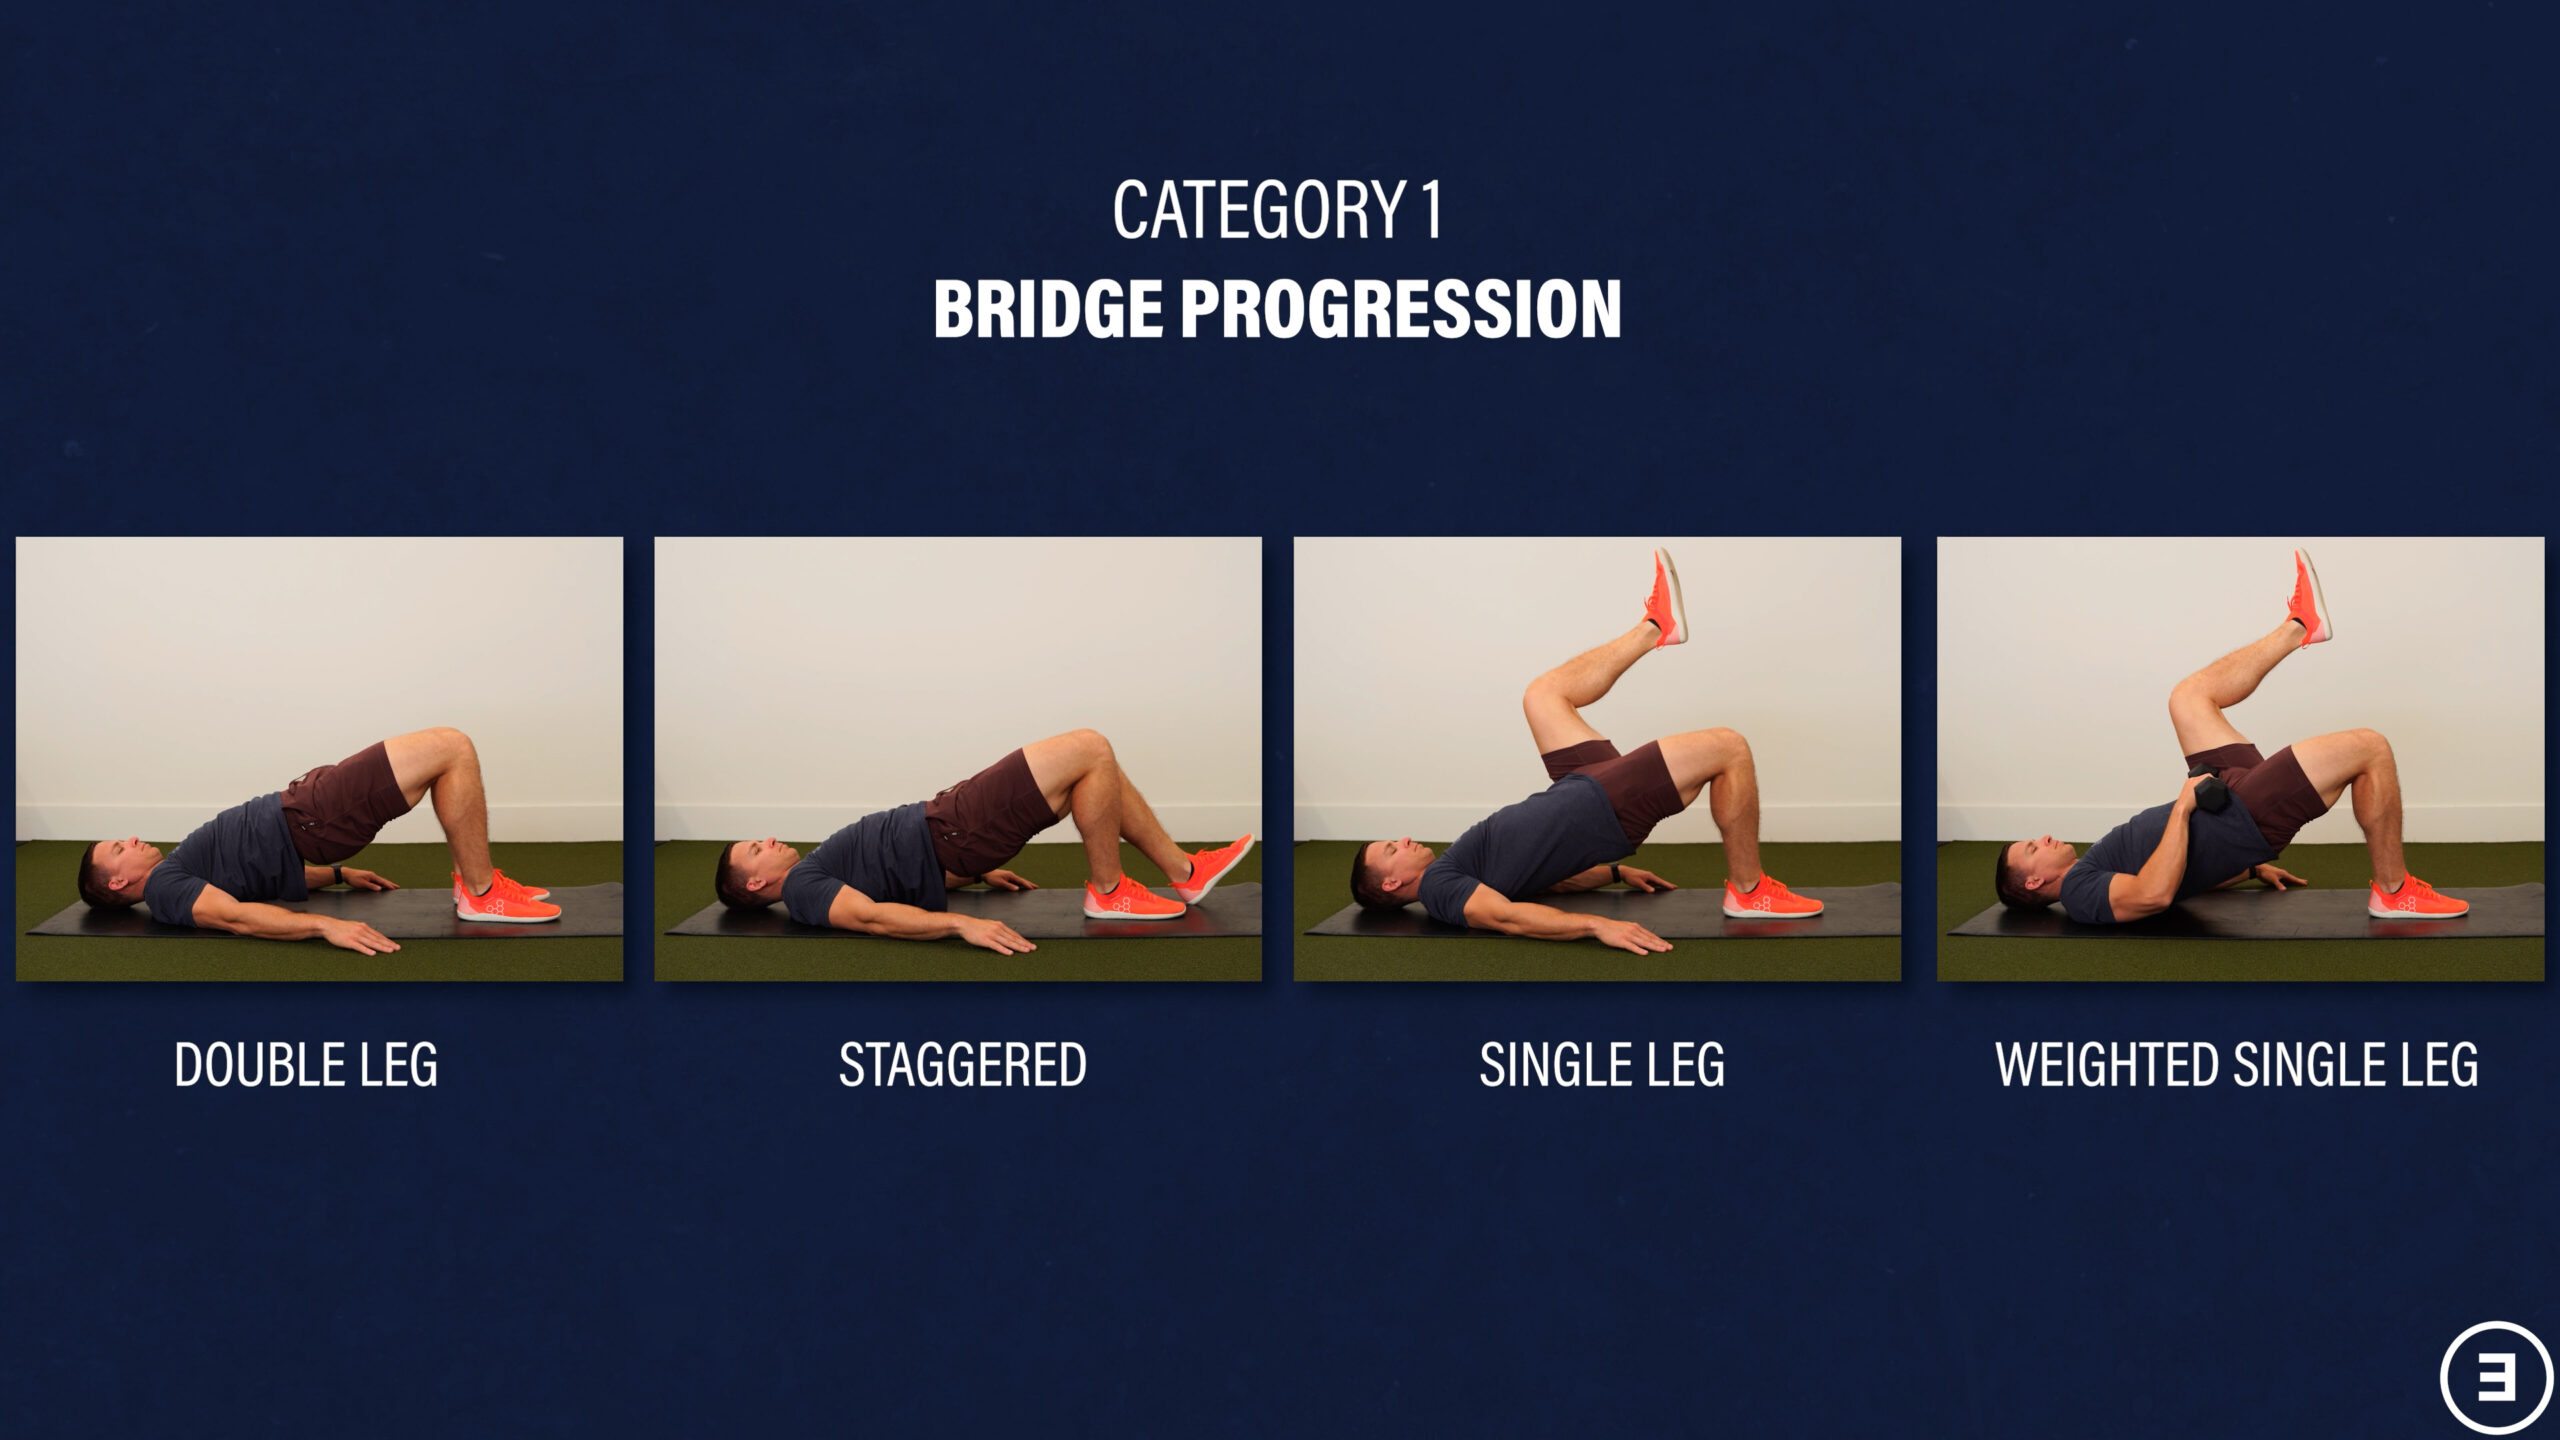
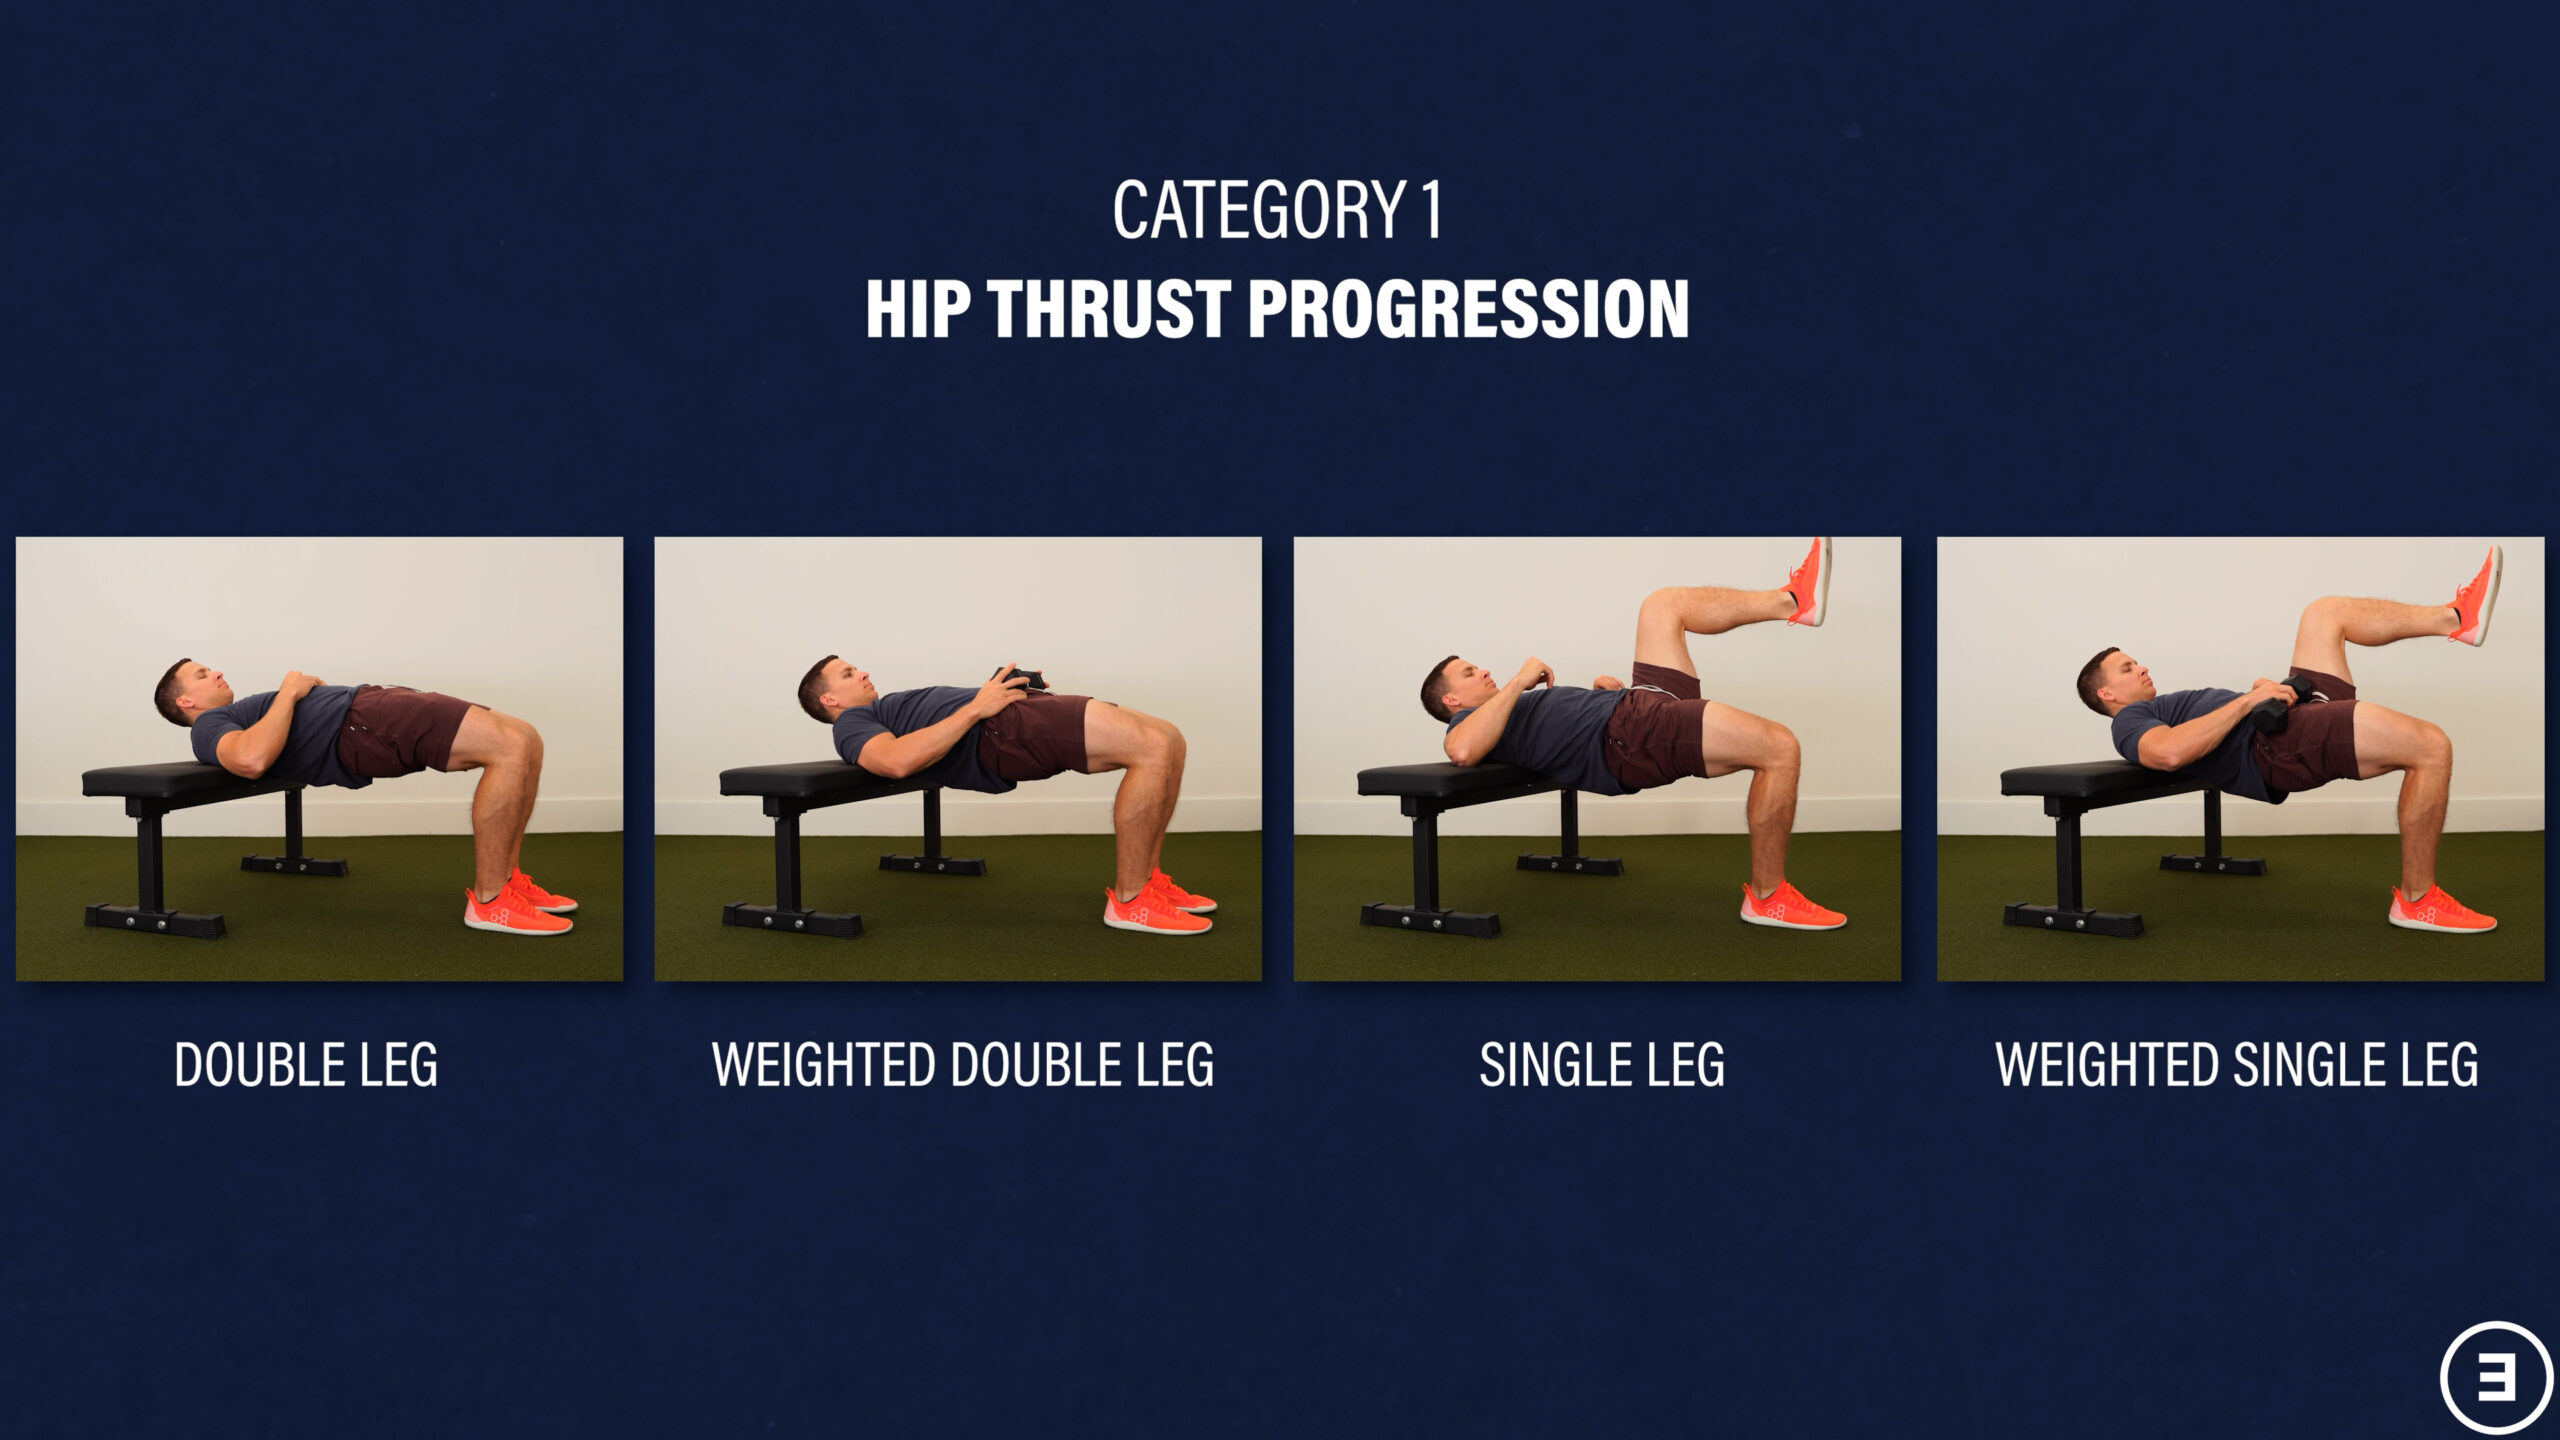
Bridge Progression (Category #1)
The first exercise is a bridge progression, which primarily trains the glute muscles. Although everyone should likely do some variation, bridges are especially beneficial for individuals who had a posterior approach because these muscles are usually affected by the surgery. Bridges also provide a nice stretch to the front of the hip in those who had an anterior approach.
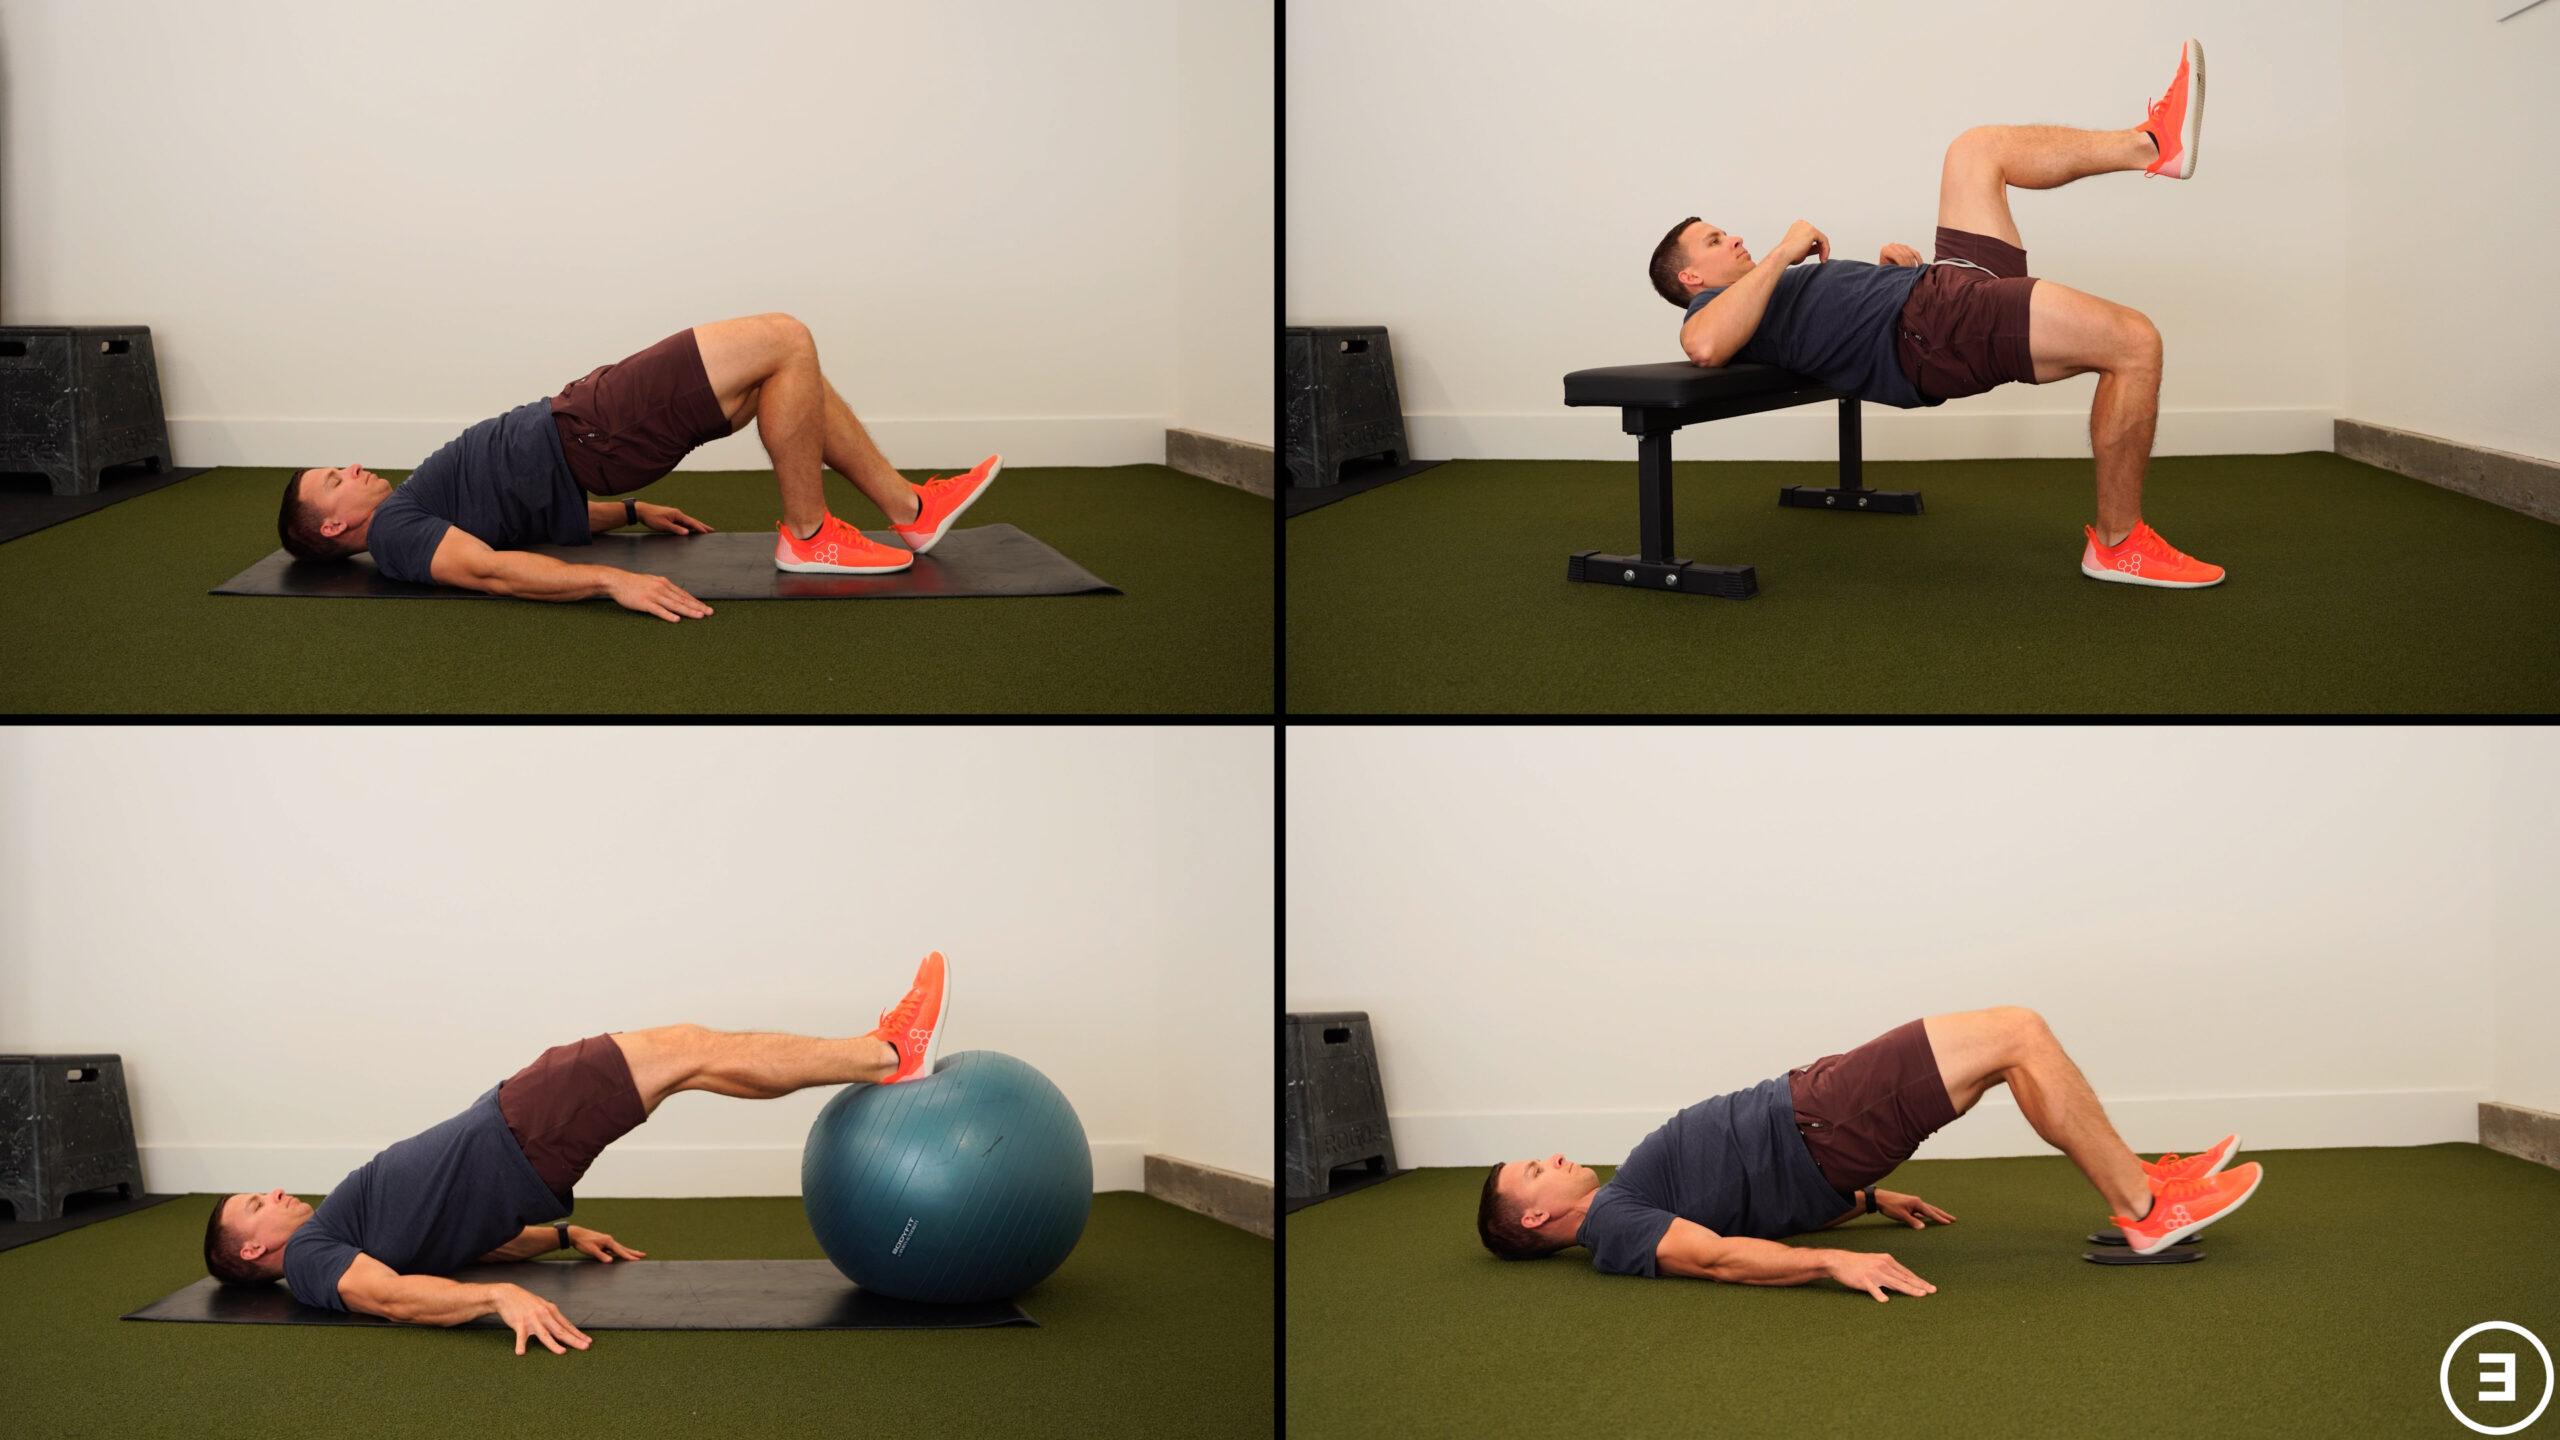
To perform a bridge, lie on your back, squeeze your butt muscles, lift your hips up toward the ceiling, and lower back down. If you want to progress, you can stagger your legs so that one side is working harder than the other. You would do that on both sides. If you want to progress even more, you can perform single leg bridges on each leg. The last option would be to add weight.
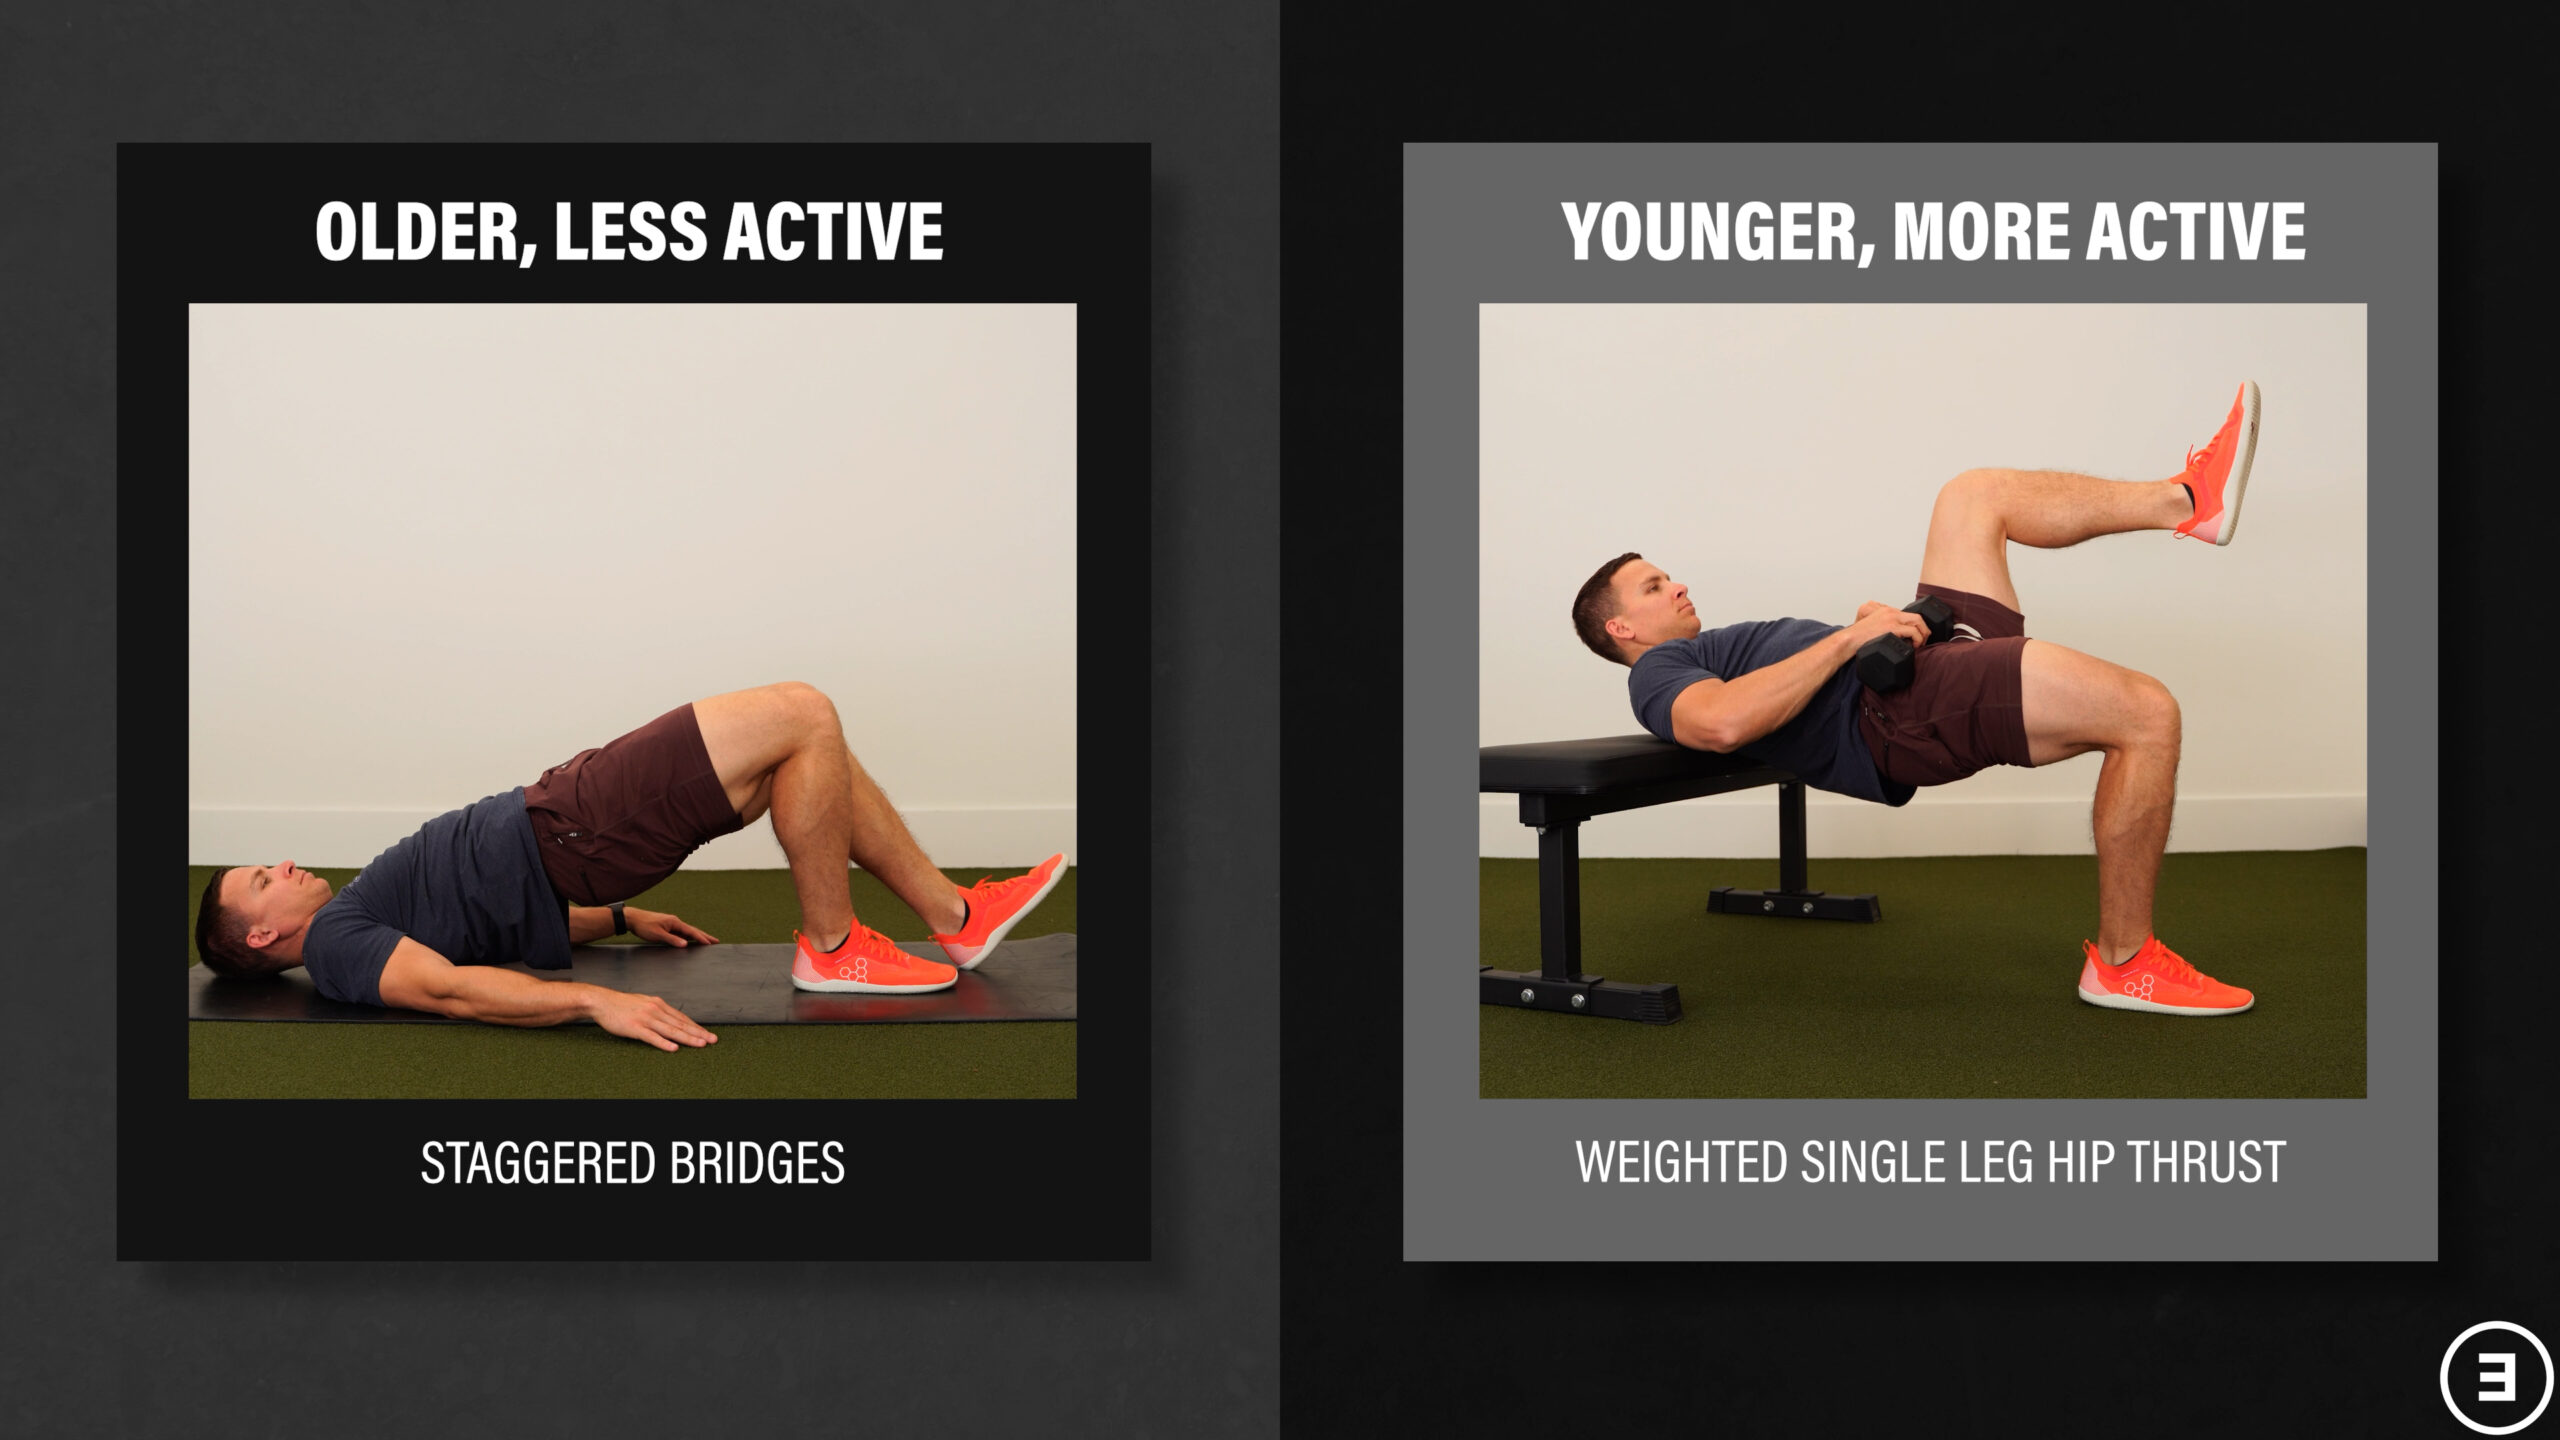
Depending on your goals, symptoms, and function, you could also perform hip thrusts in which your upper body is supported on a bench or couch. Progressions include performing them on a single leg and/or adding weight.
If you wanted to get your hamstrings more involved (the muscles on the back of your thigh), you could support your legs on an exercise ball, keep your knees relatively straight, lift your hips up toward the ceiling, and then lower back down. Progressions include performing them on a single leg or curling the ball toward you while keeping your hips lifted. This can also be done on the floor with sliders.
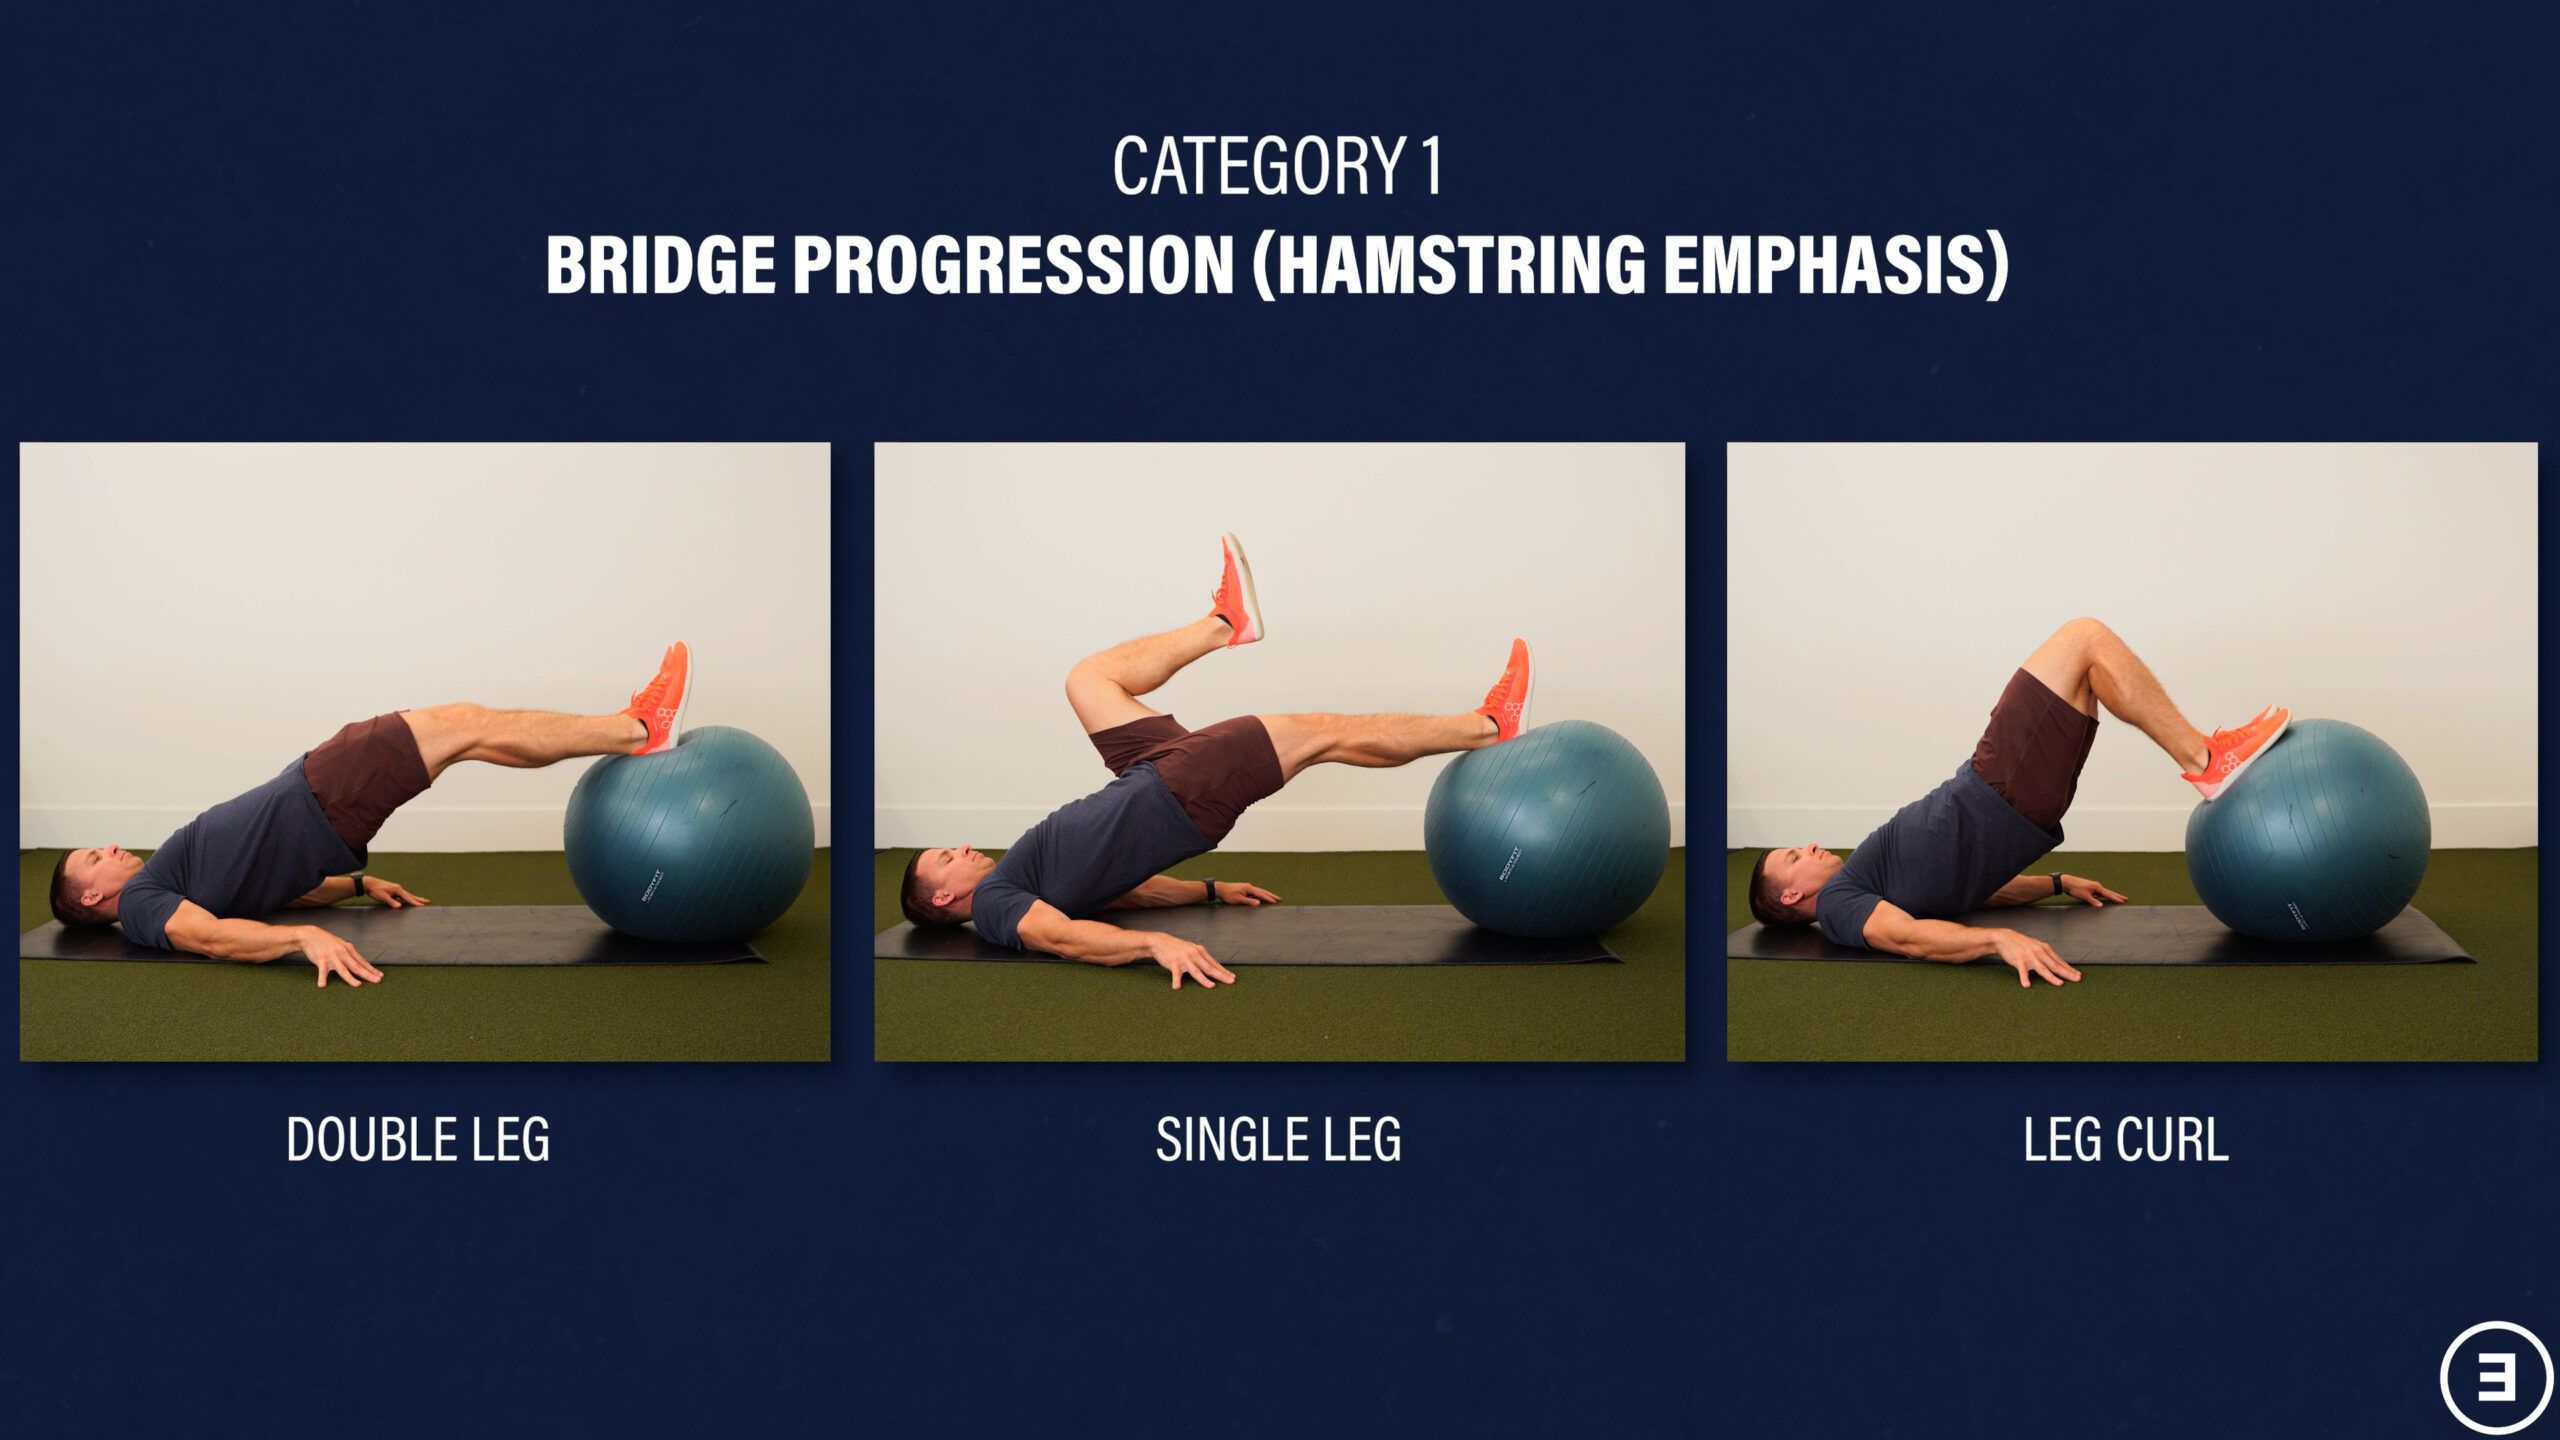
As you can see, there is an option suitable for any fitness level.
For example, if you’re an older, less active individual, your goal might be to work up to the staggered bridges. On the other hand, a younger, more active person might progress toward the single leg hip thrusts with weight.
Squat Progression (Category #2)
The second exercise is a squat progression, which is helpful for everyday life at any age.
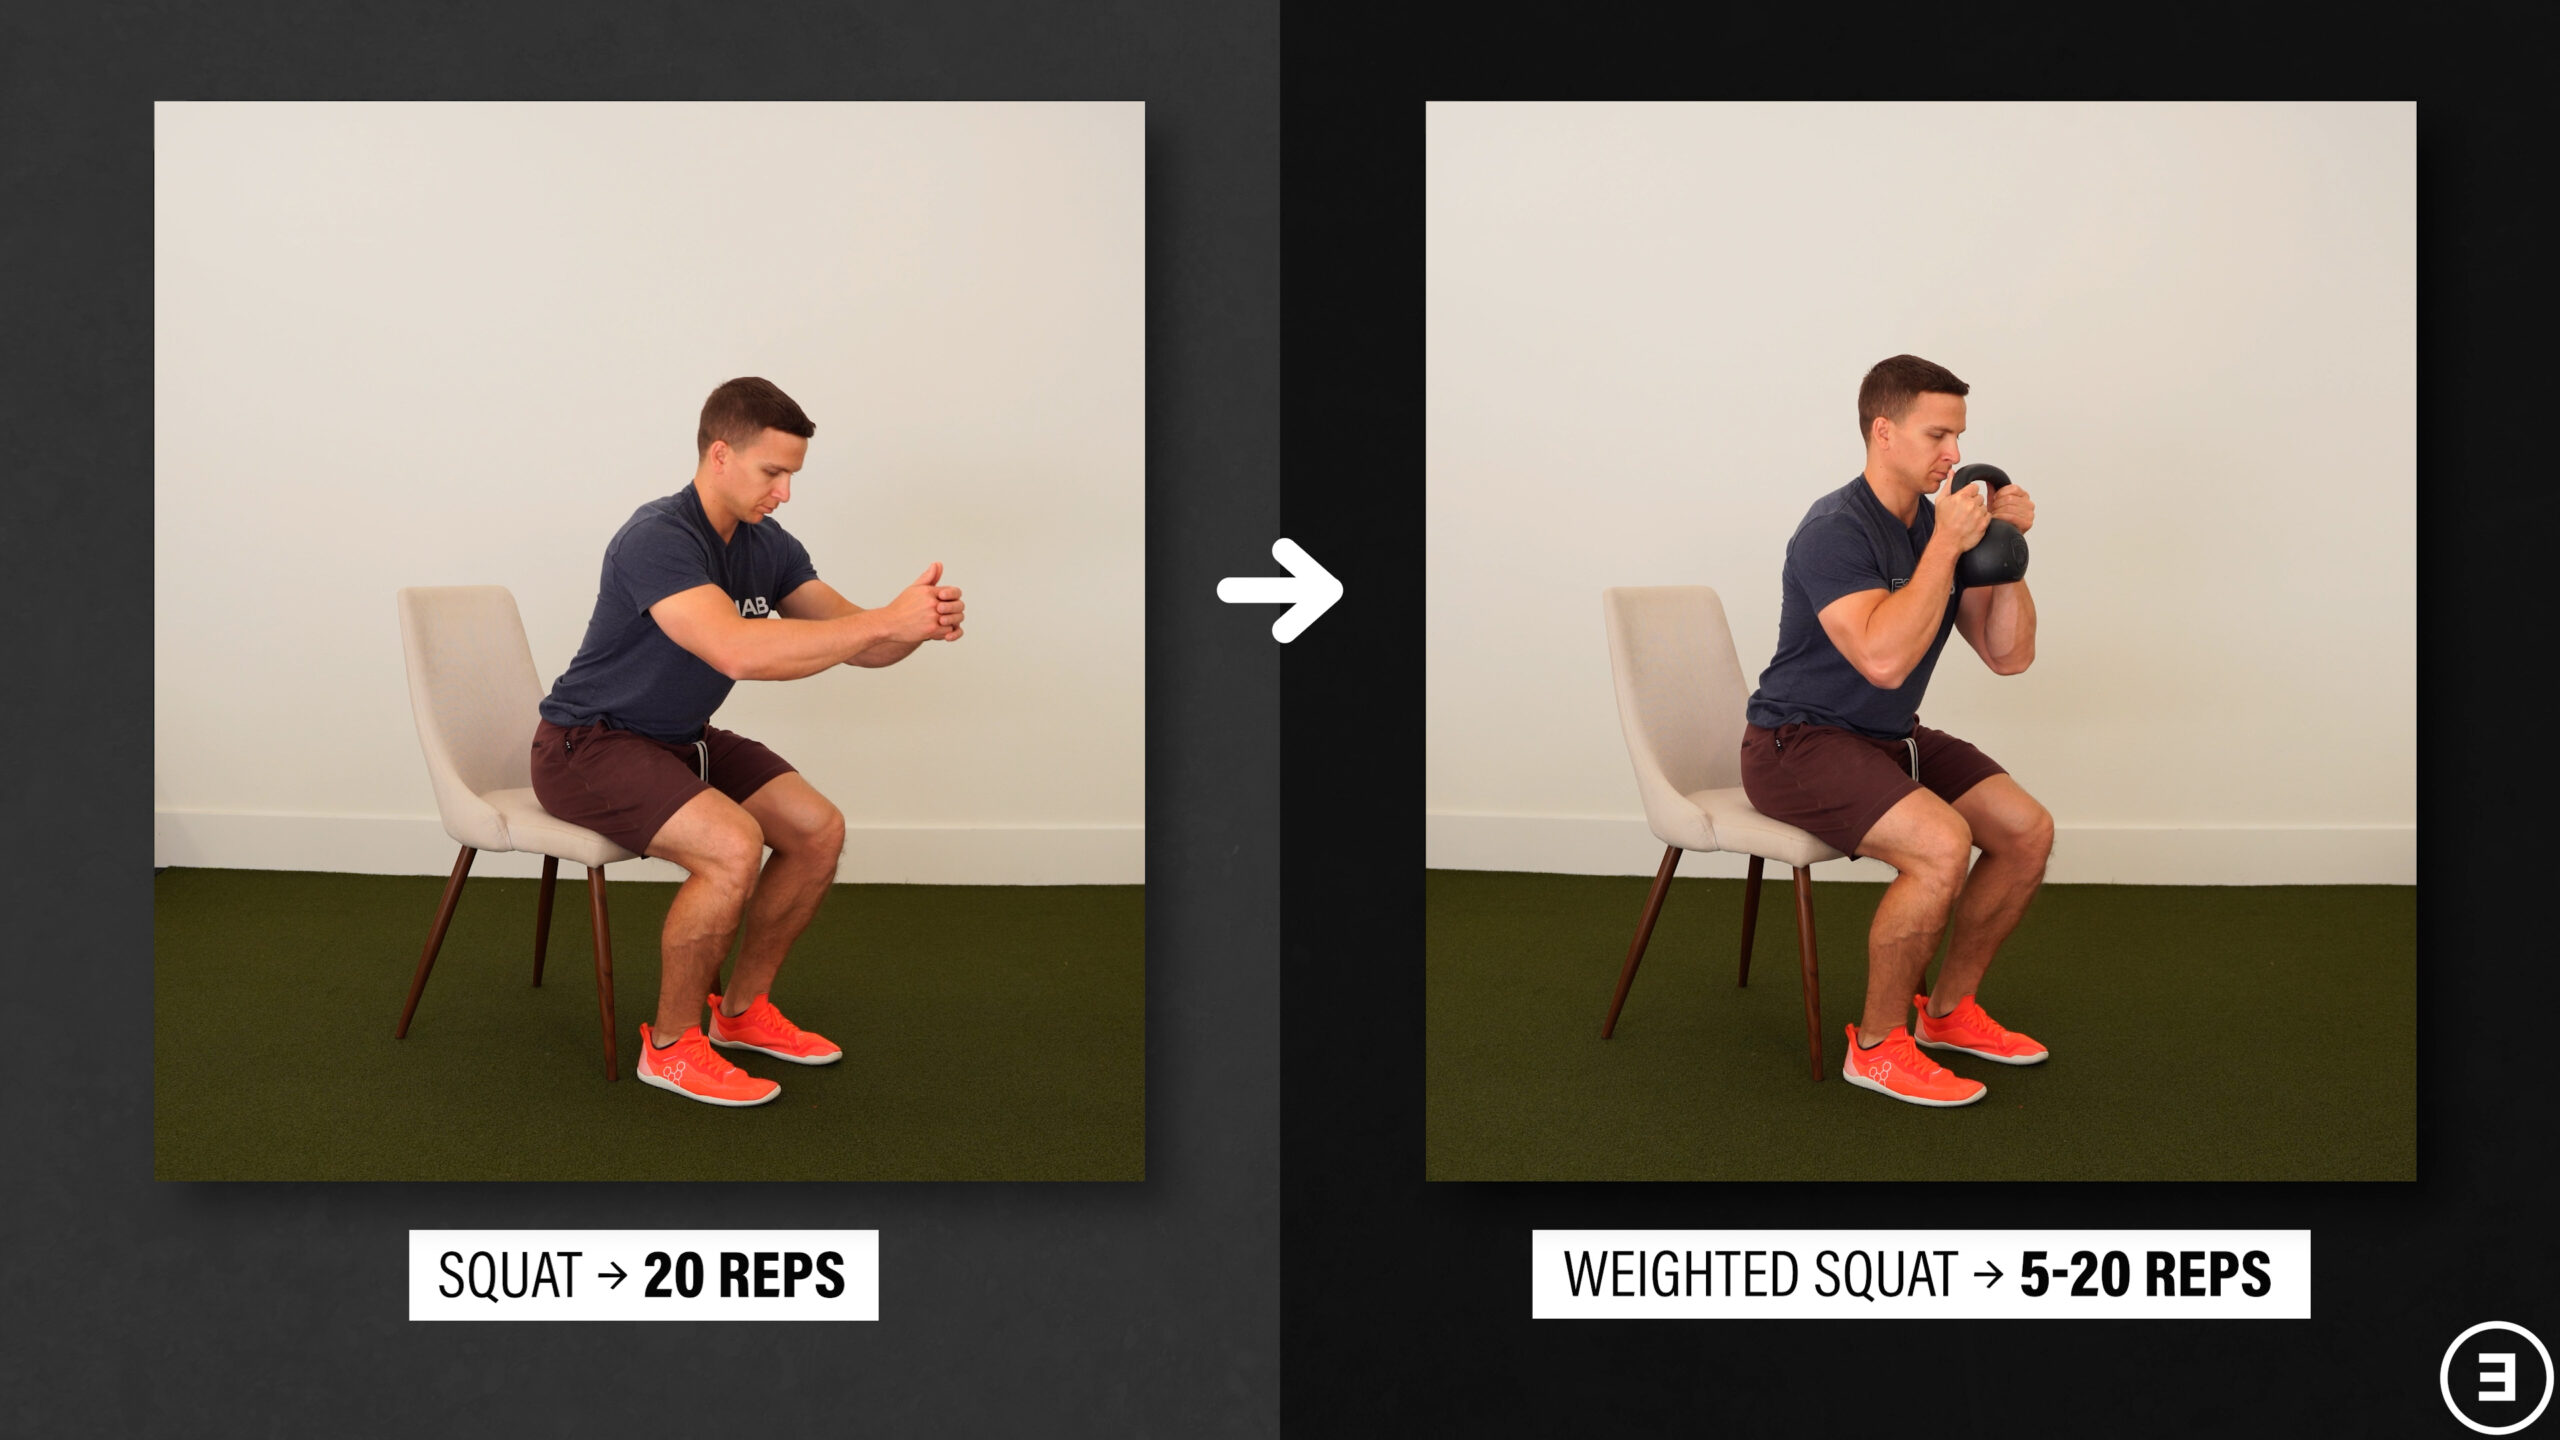
Scoot to the front of a stable chair, lean forward, stand up, slowly sit back down, and repeat. If you need to make it easier, you can use your hands for assistance and/or raise the height of the seat. I’m using a TRX suspension trainer to hold on to and a foam pad to increase the height of what I’m sitting on because we filmed this in a gym setting, but use whatever you have available to you.
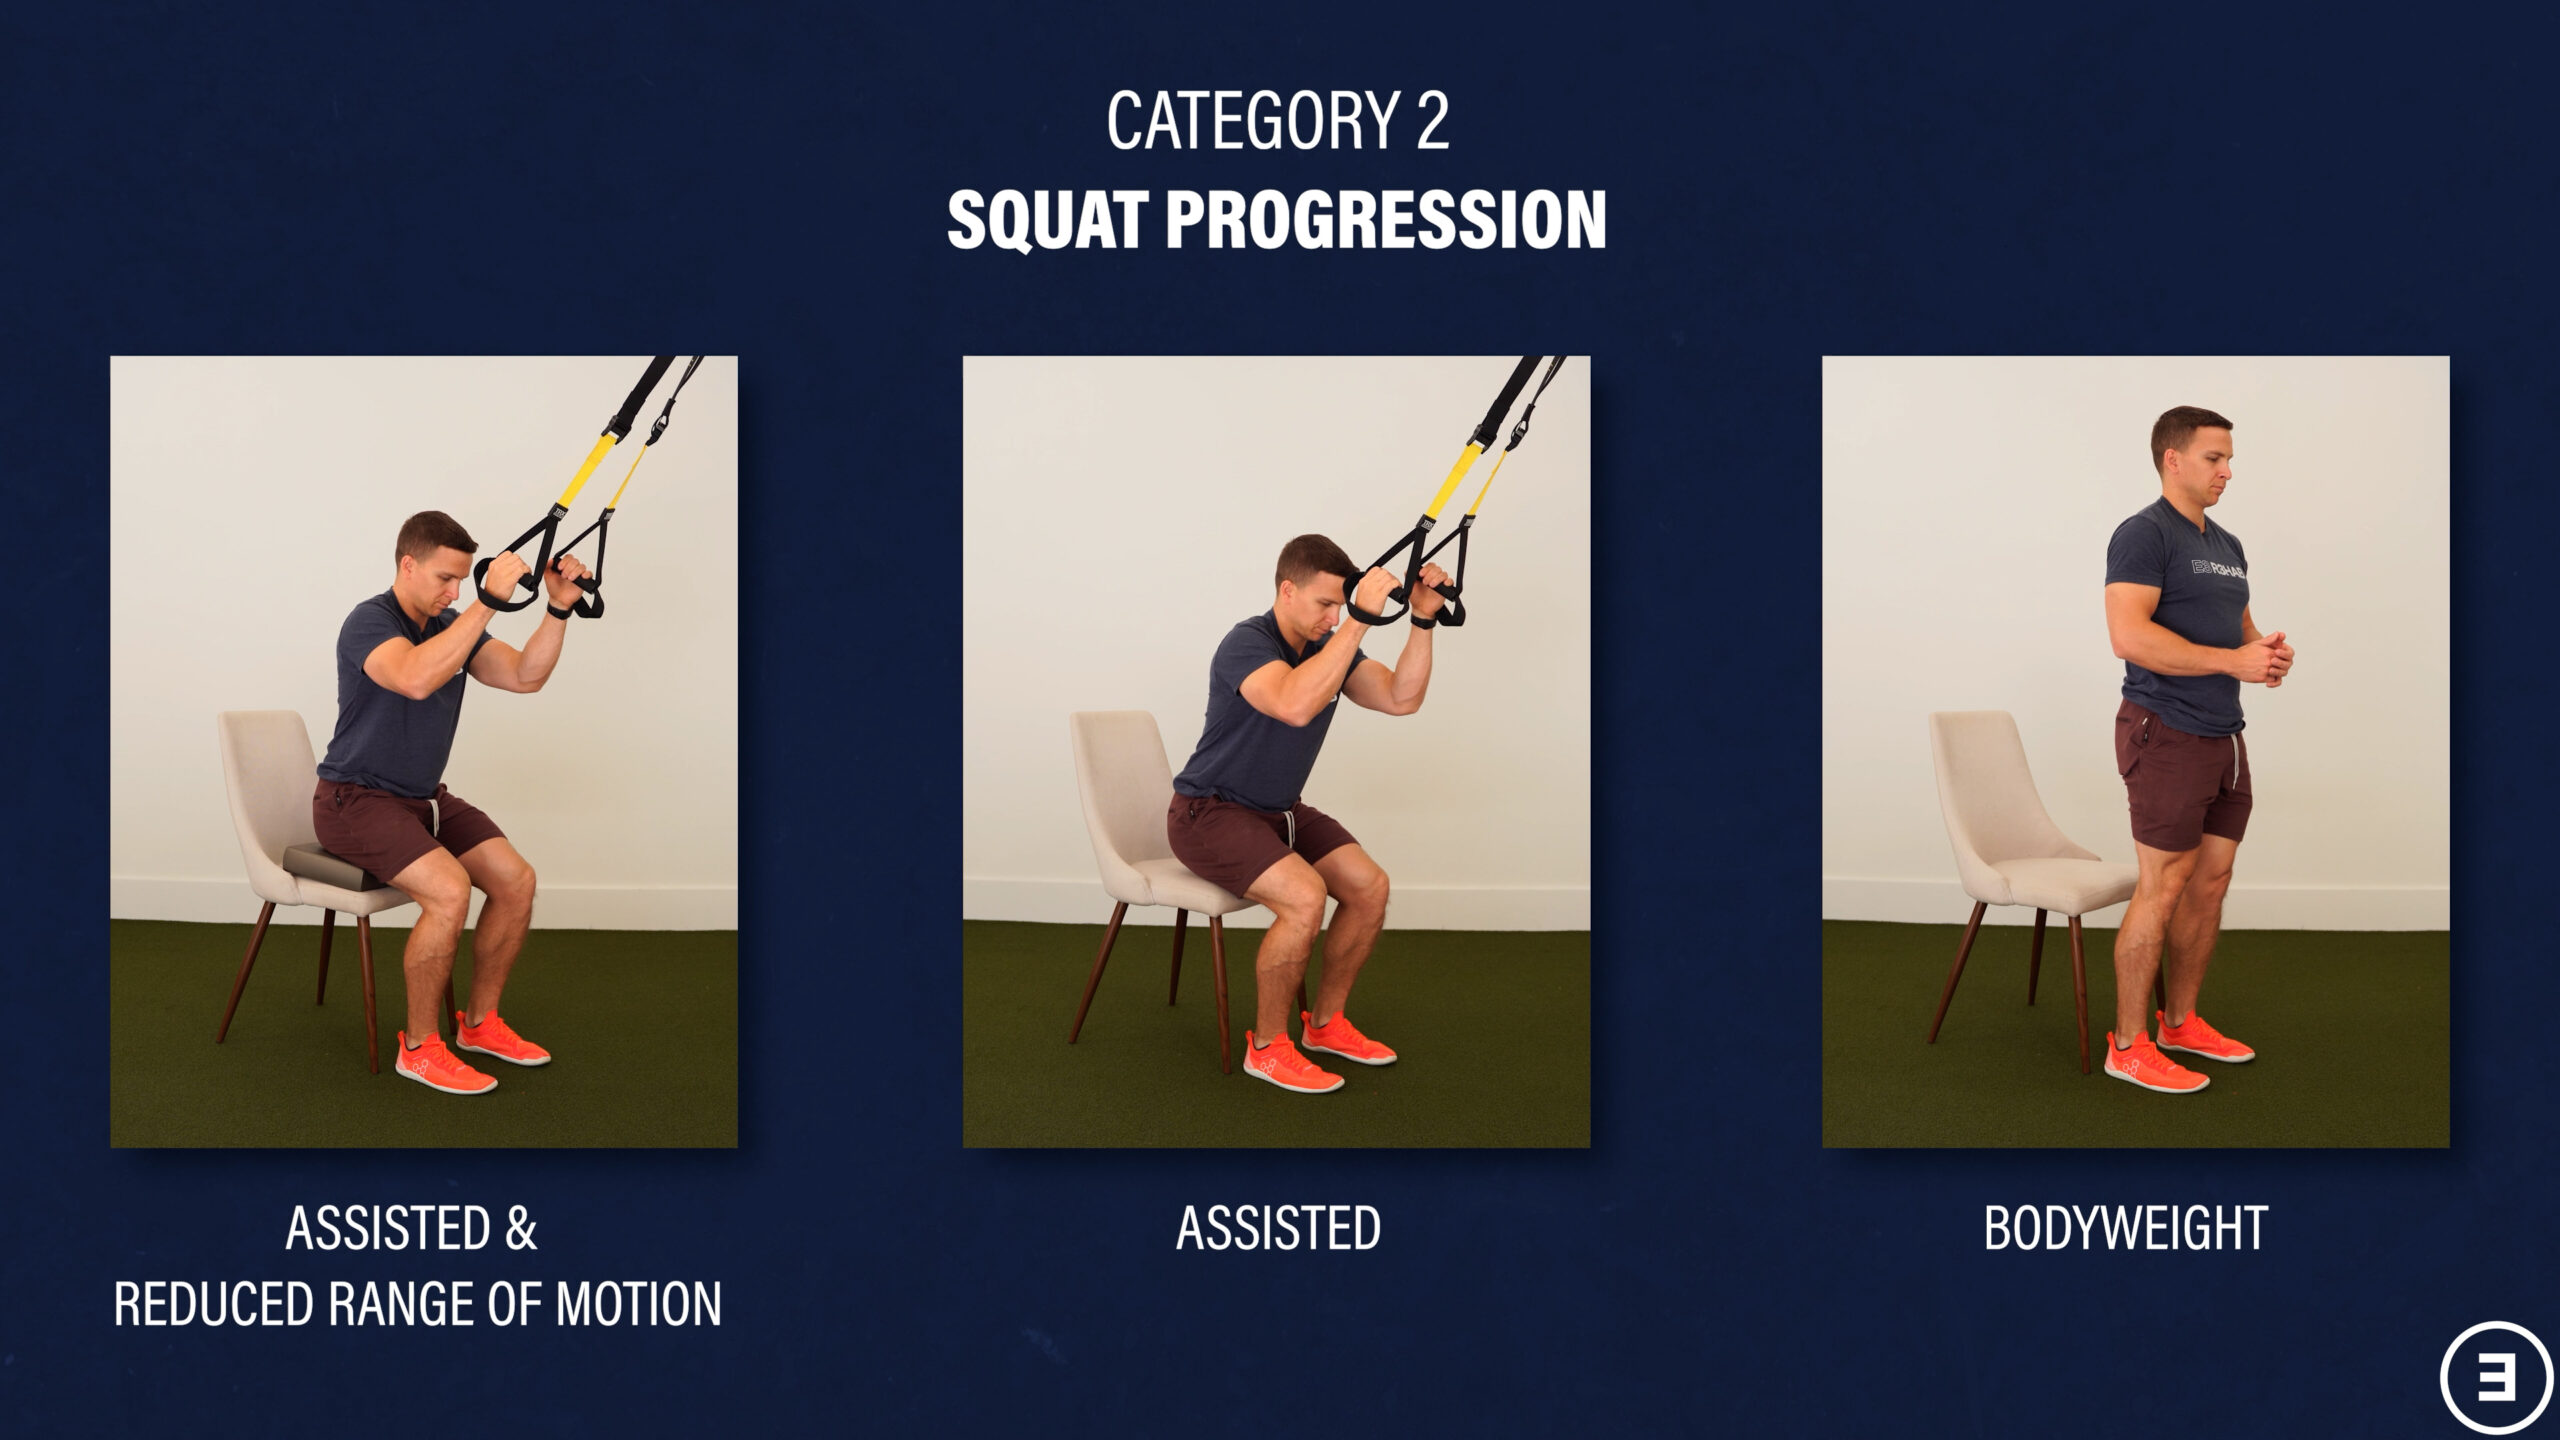
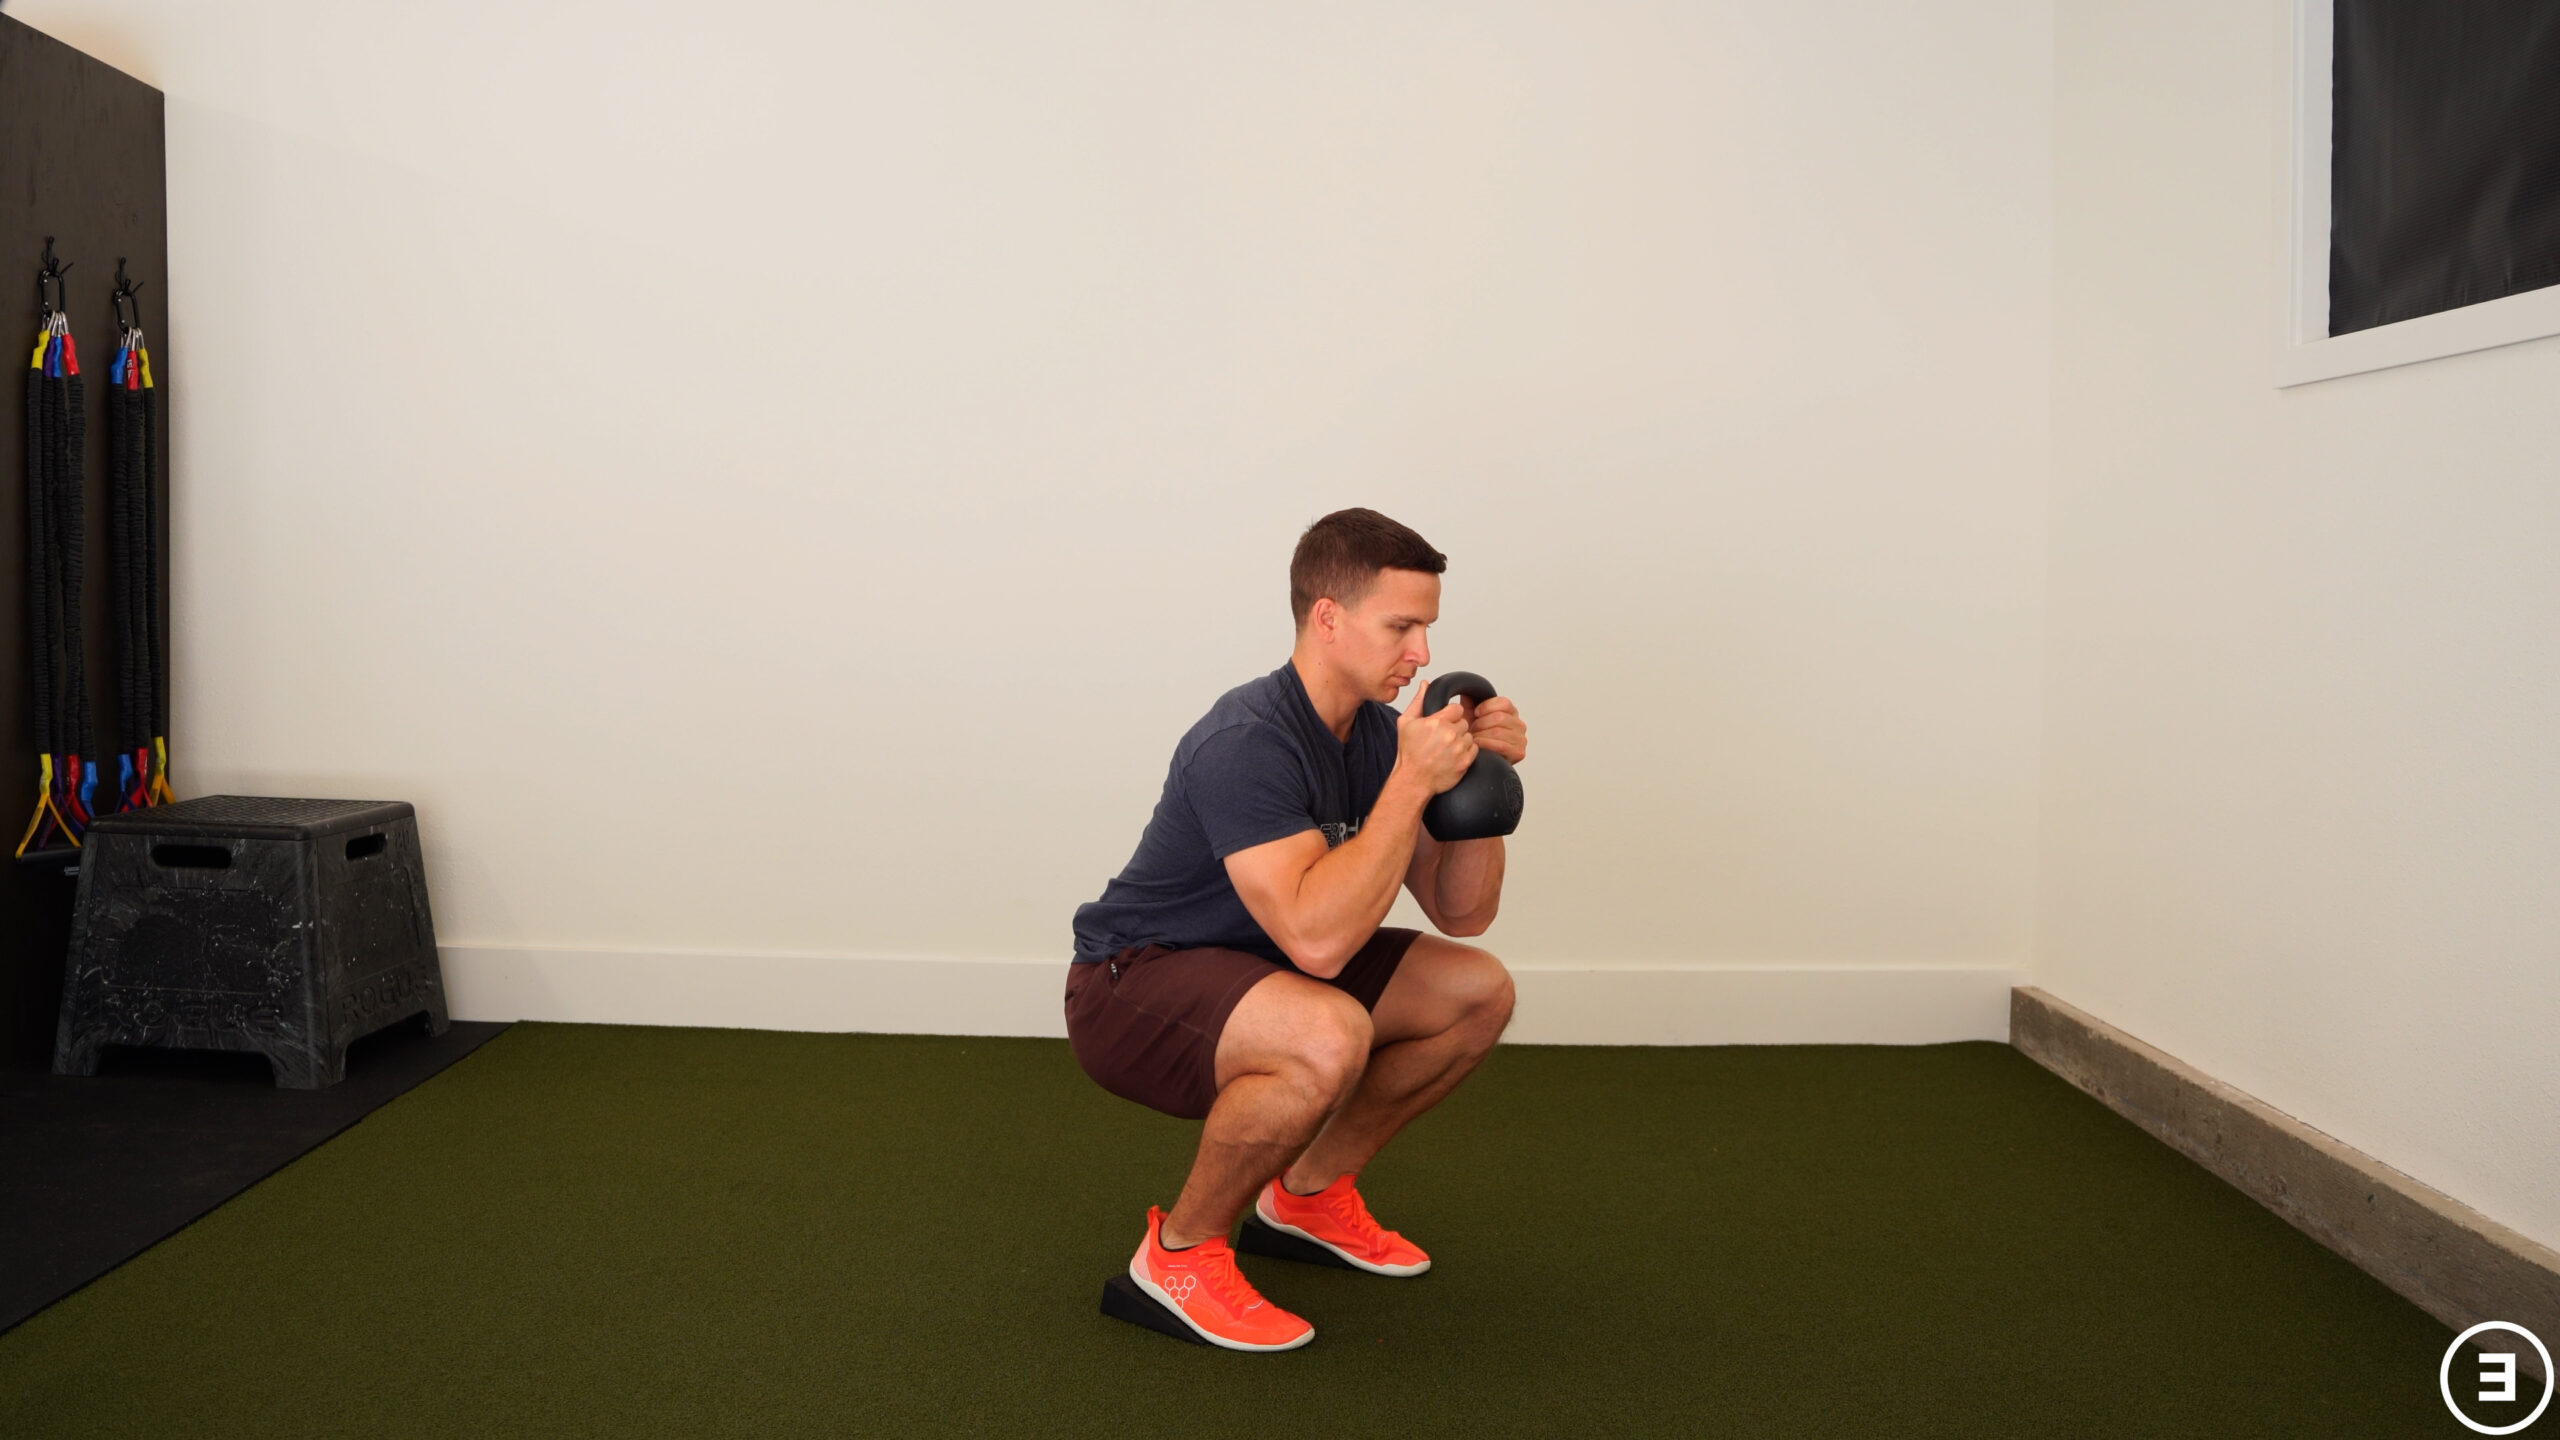
If you want to make the exercise harder, hold a weight in your hands. As long as it’s safe to do so, you can also remove the chair so you’re able to sit into a deeper squat.
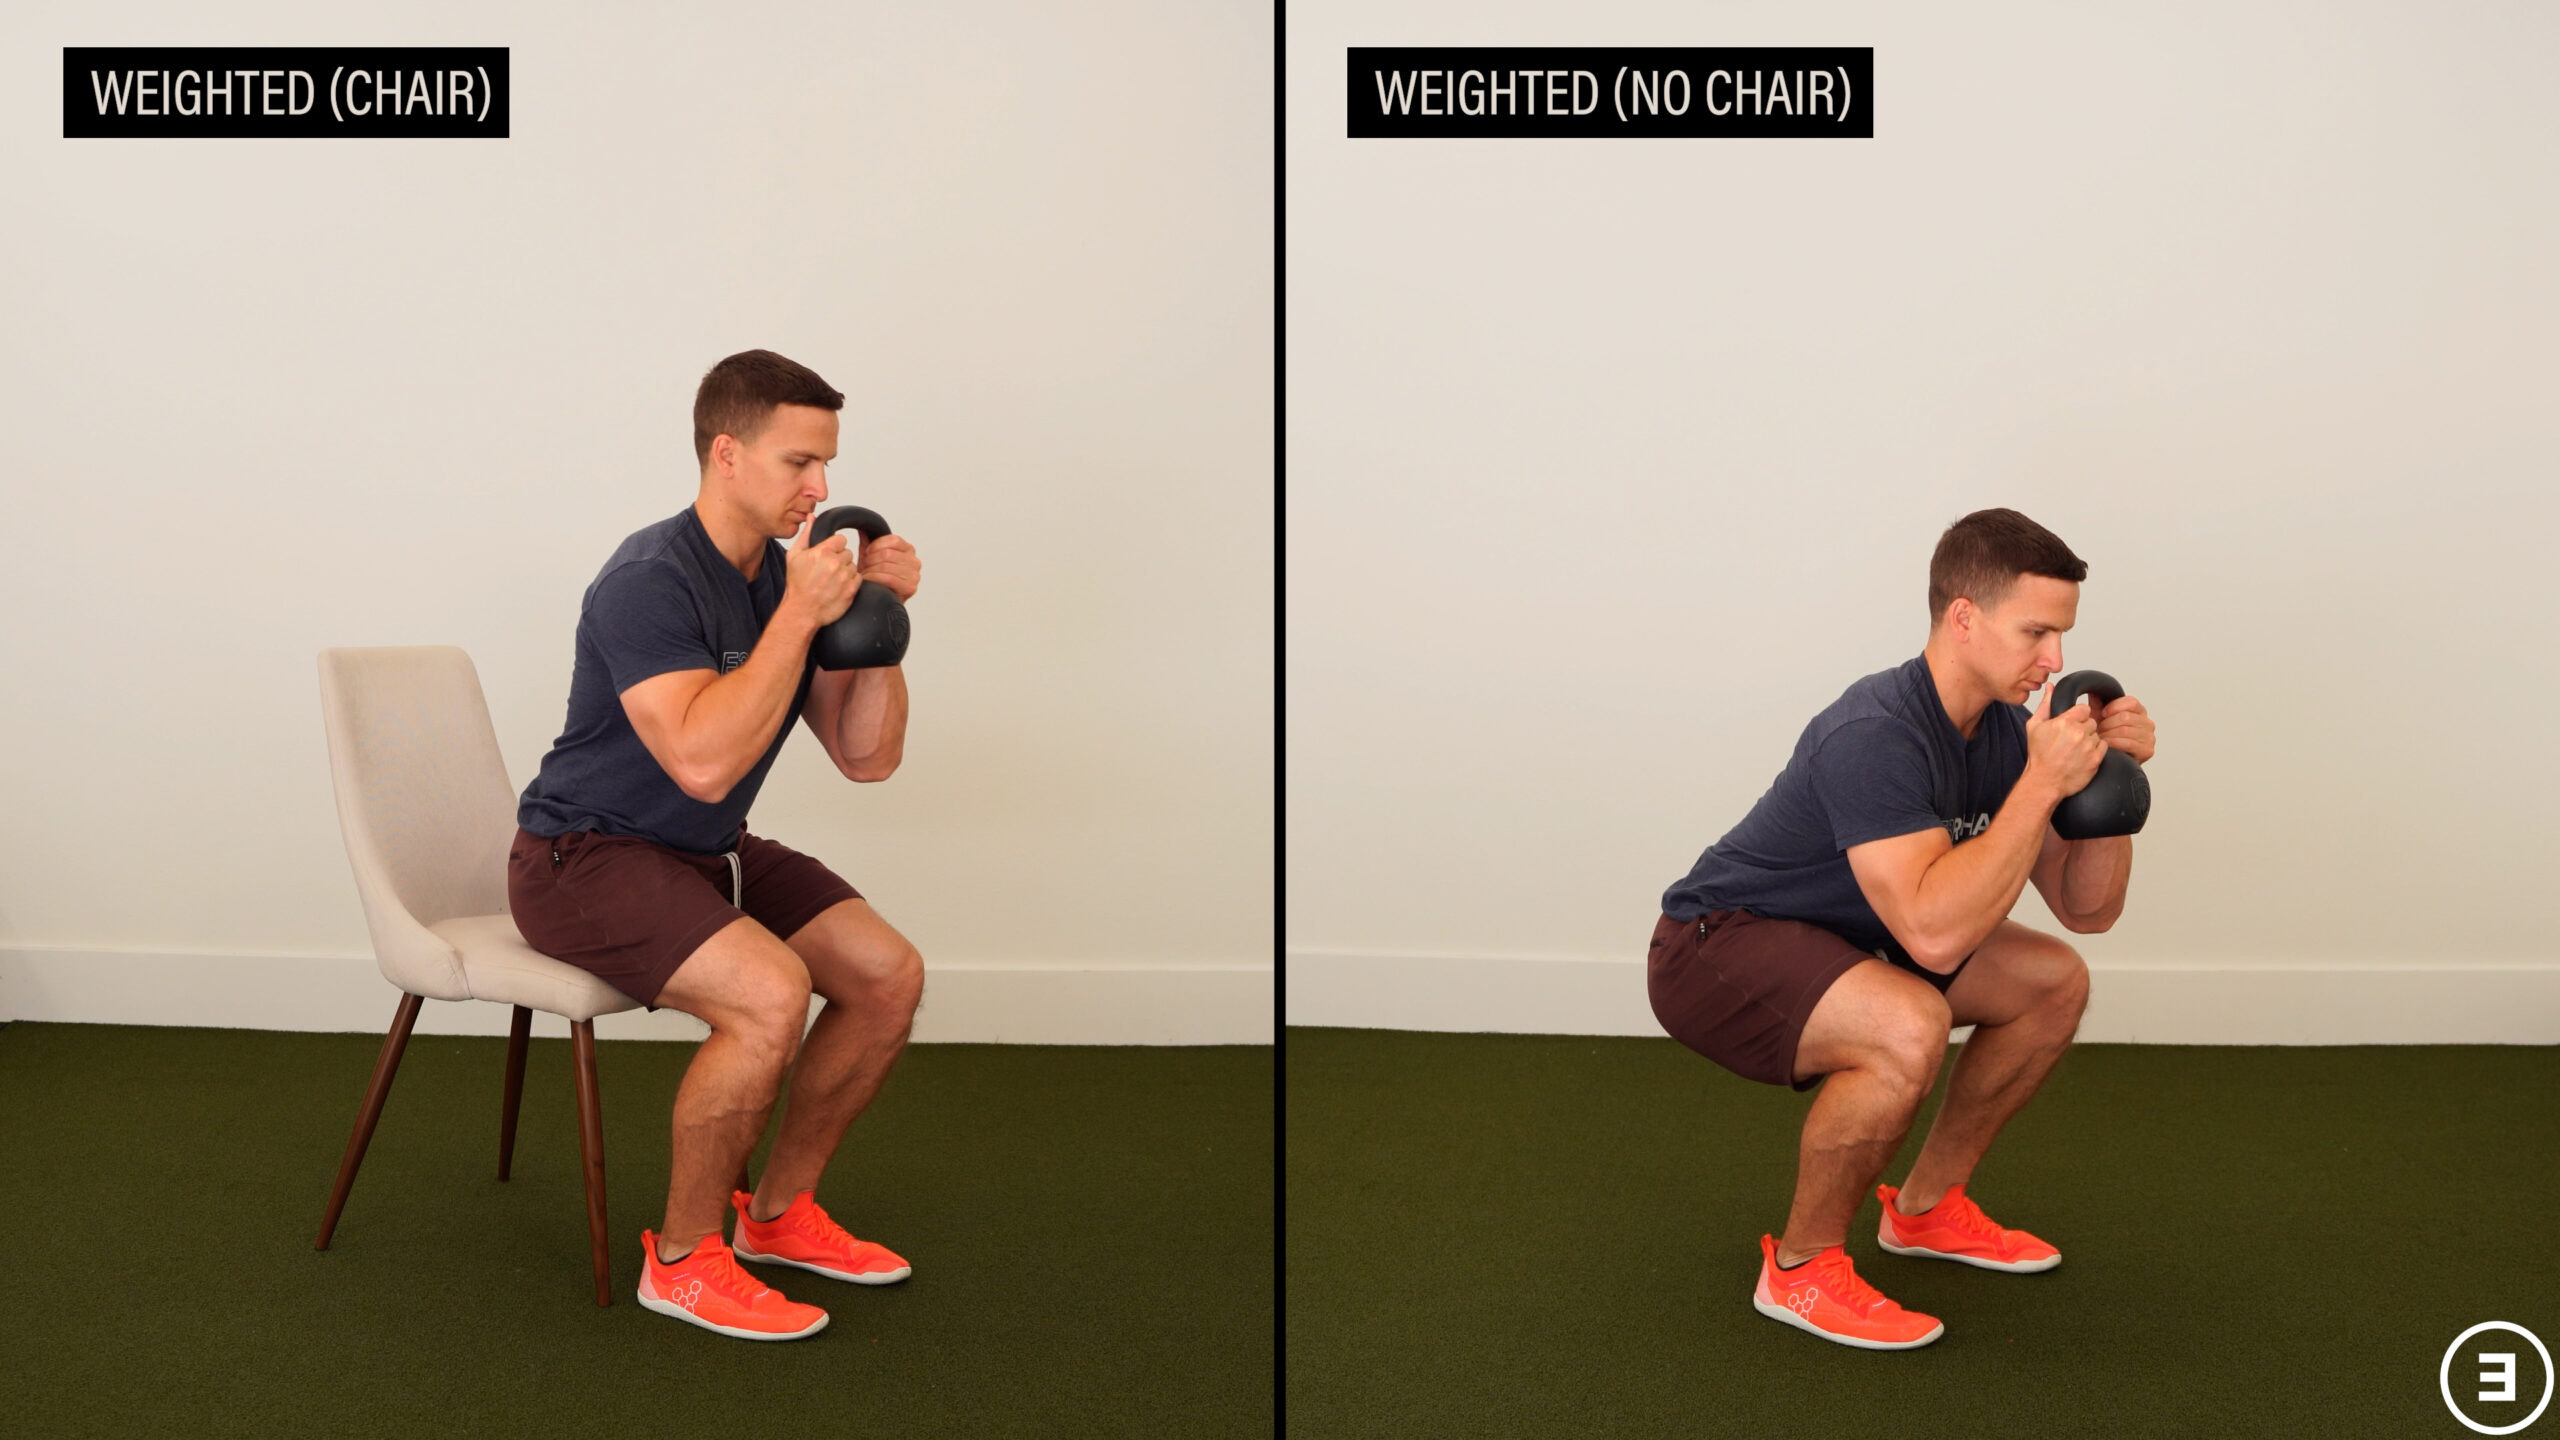
From here, you can slowly add more weight or move to gym-based exercises like barbell squats or smith machine squats.

You can add a heel elevation at any point, which should allow you to remain more upright during squatting. I experience discomfort if my hip is too flexed at the bottom of a weighted squat, so trying to remain more upright is one way of eliminating that discomfort.
Step Up Progression (Category #3)
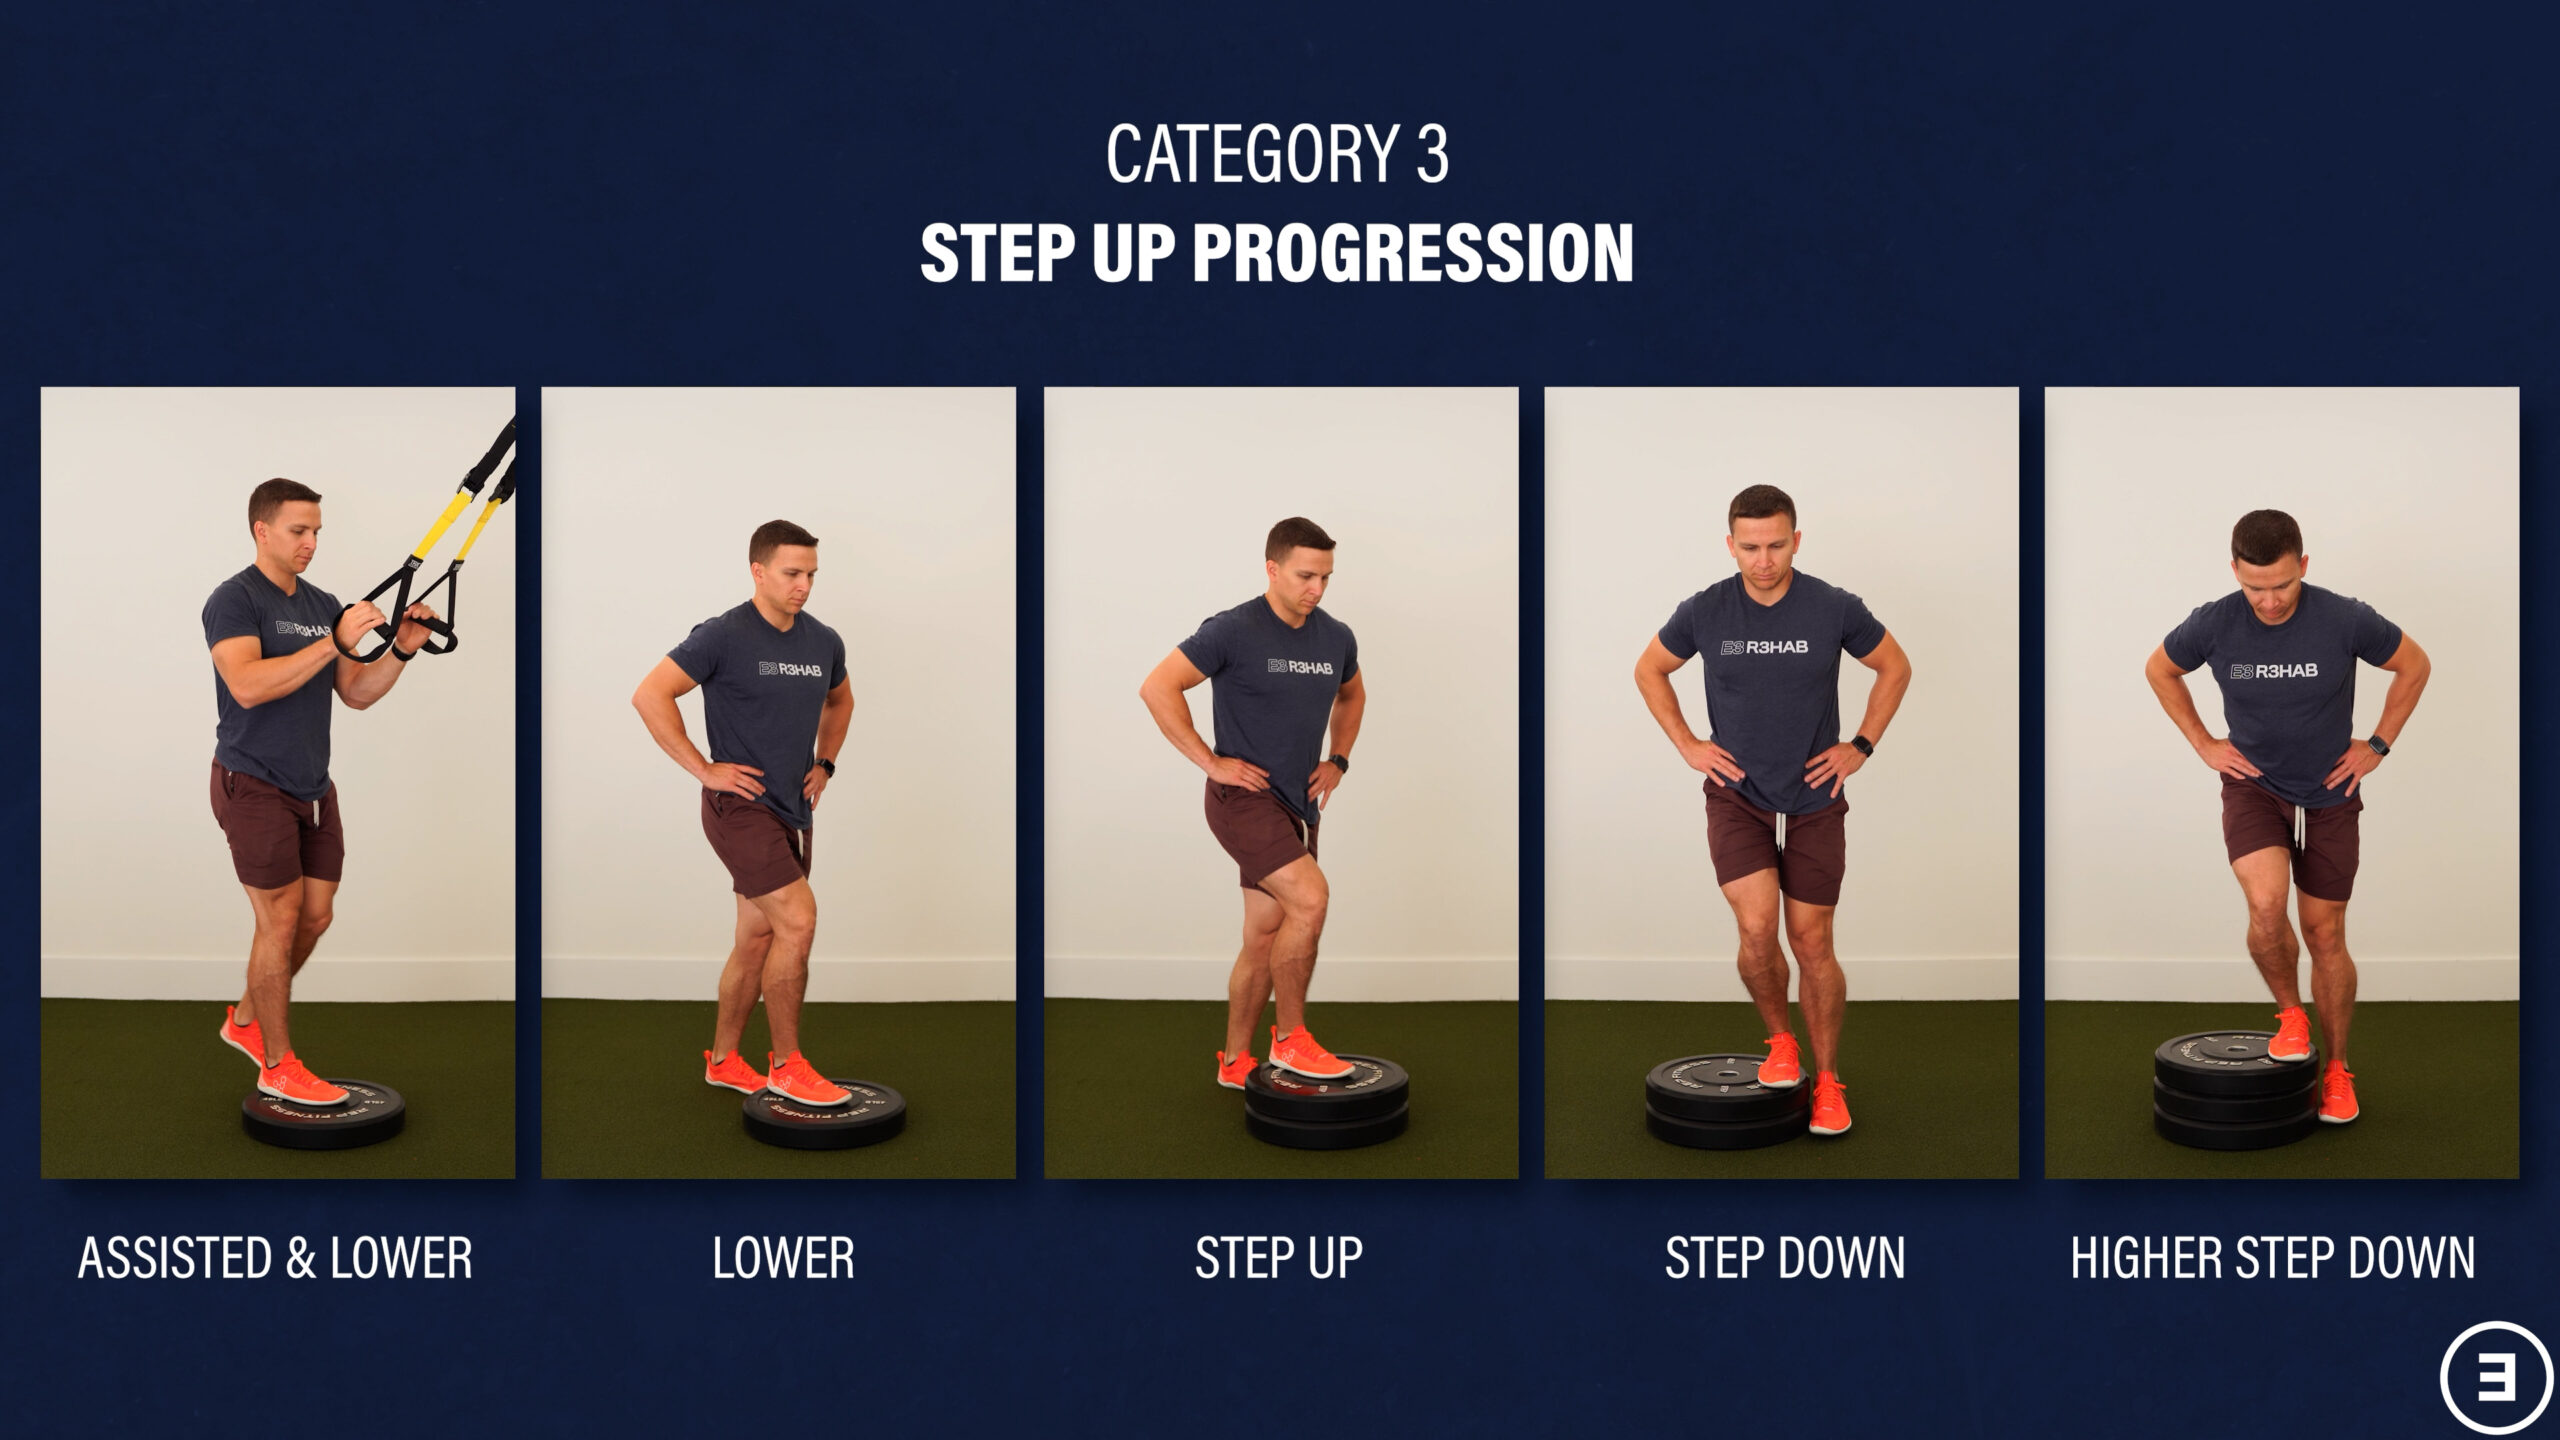
The third exercise is a step up progression, which is needed for going up and down stairs and navigating curbs.
You can use stairs or stack up sturdy objects available to you. If you need to make it easier, use your hands for assistance, decrease the height of the step, or do both. Once again, I’m using gym equipment for assistance, but you can use an actual handrail or whatever is available to you.
From here, you can stand sideways and practice lateral step downs while trying to keep your pelvis level.
To make step ups or lateral step downs harder, increase the height of the step.
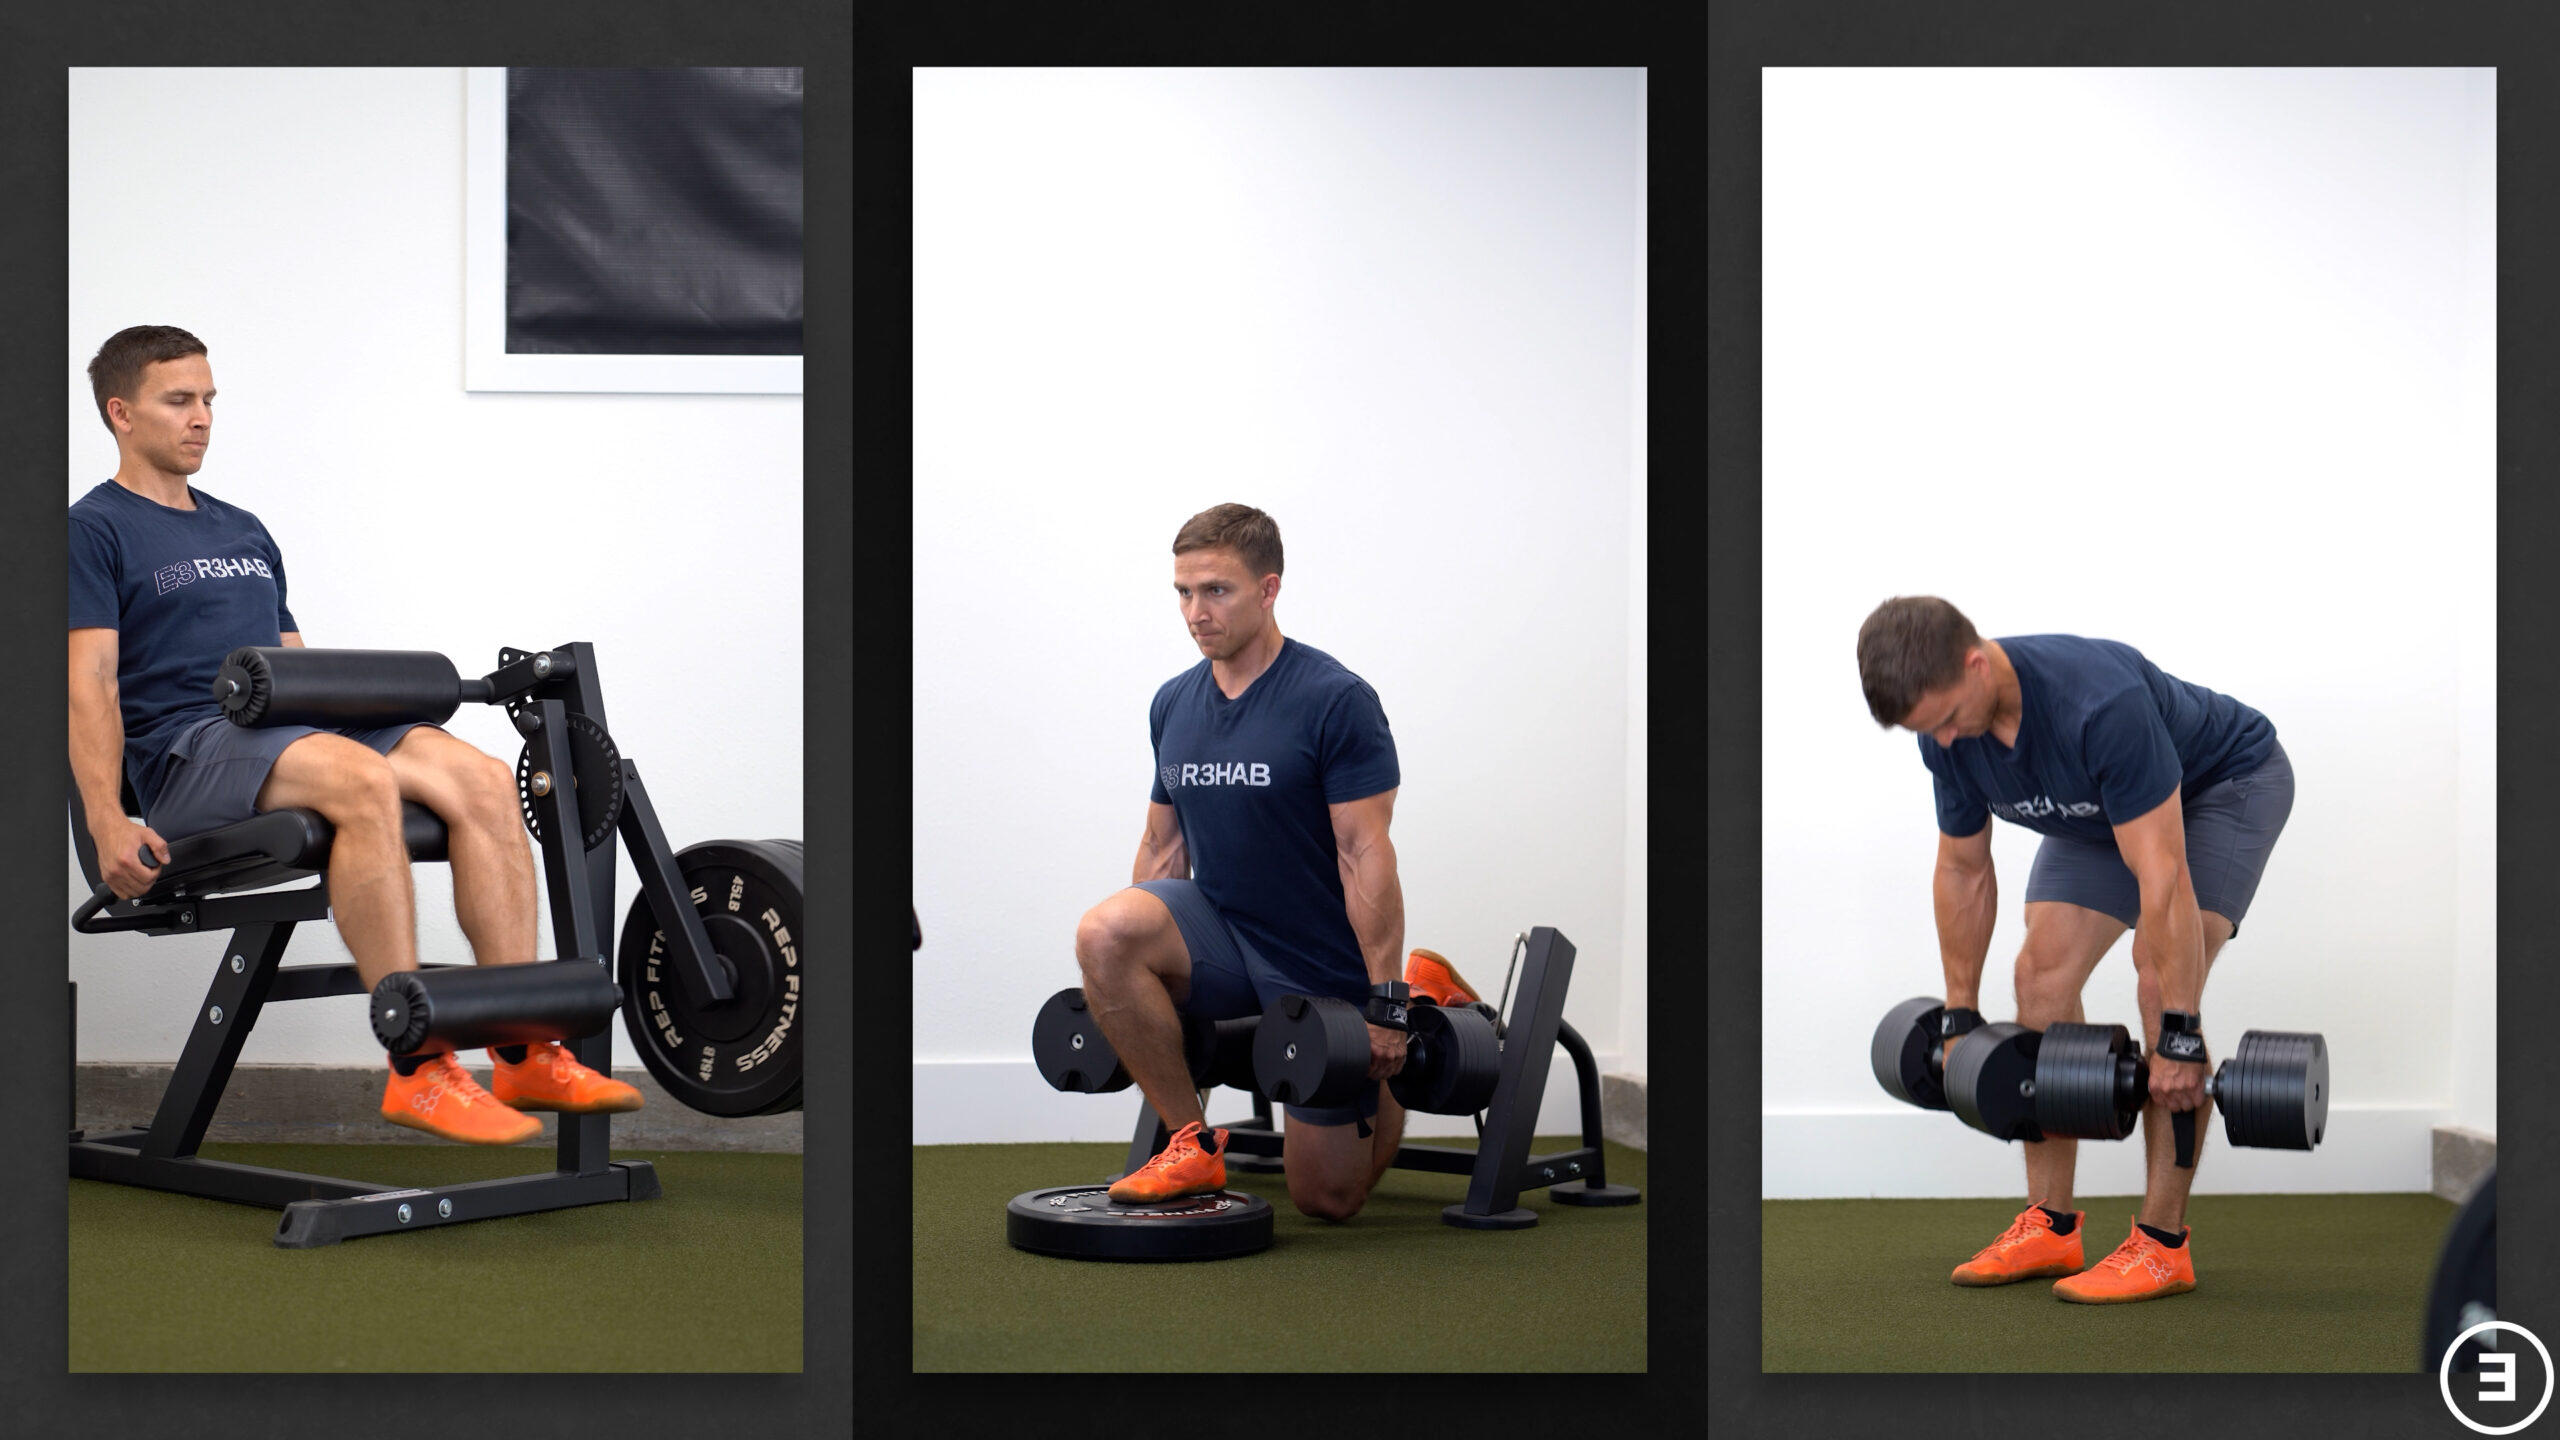
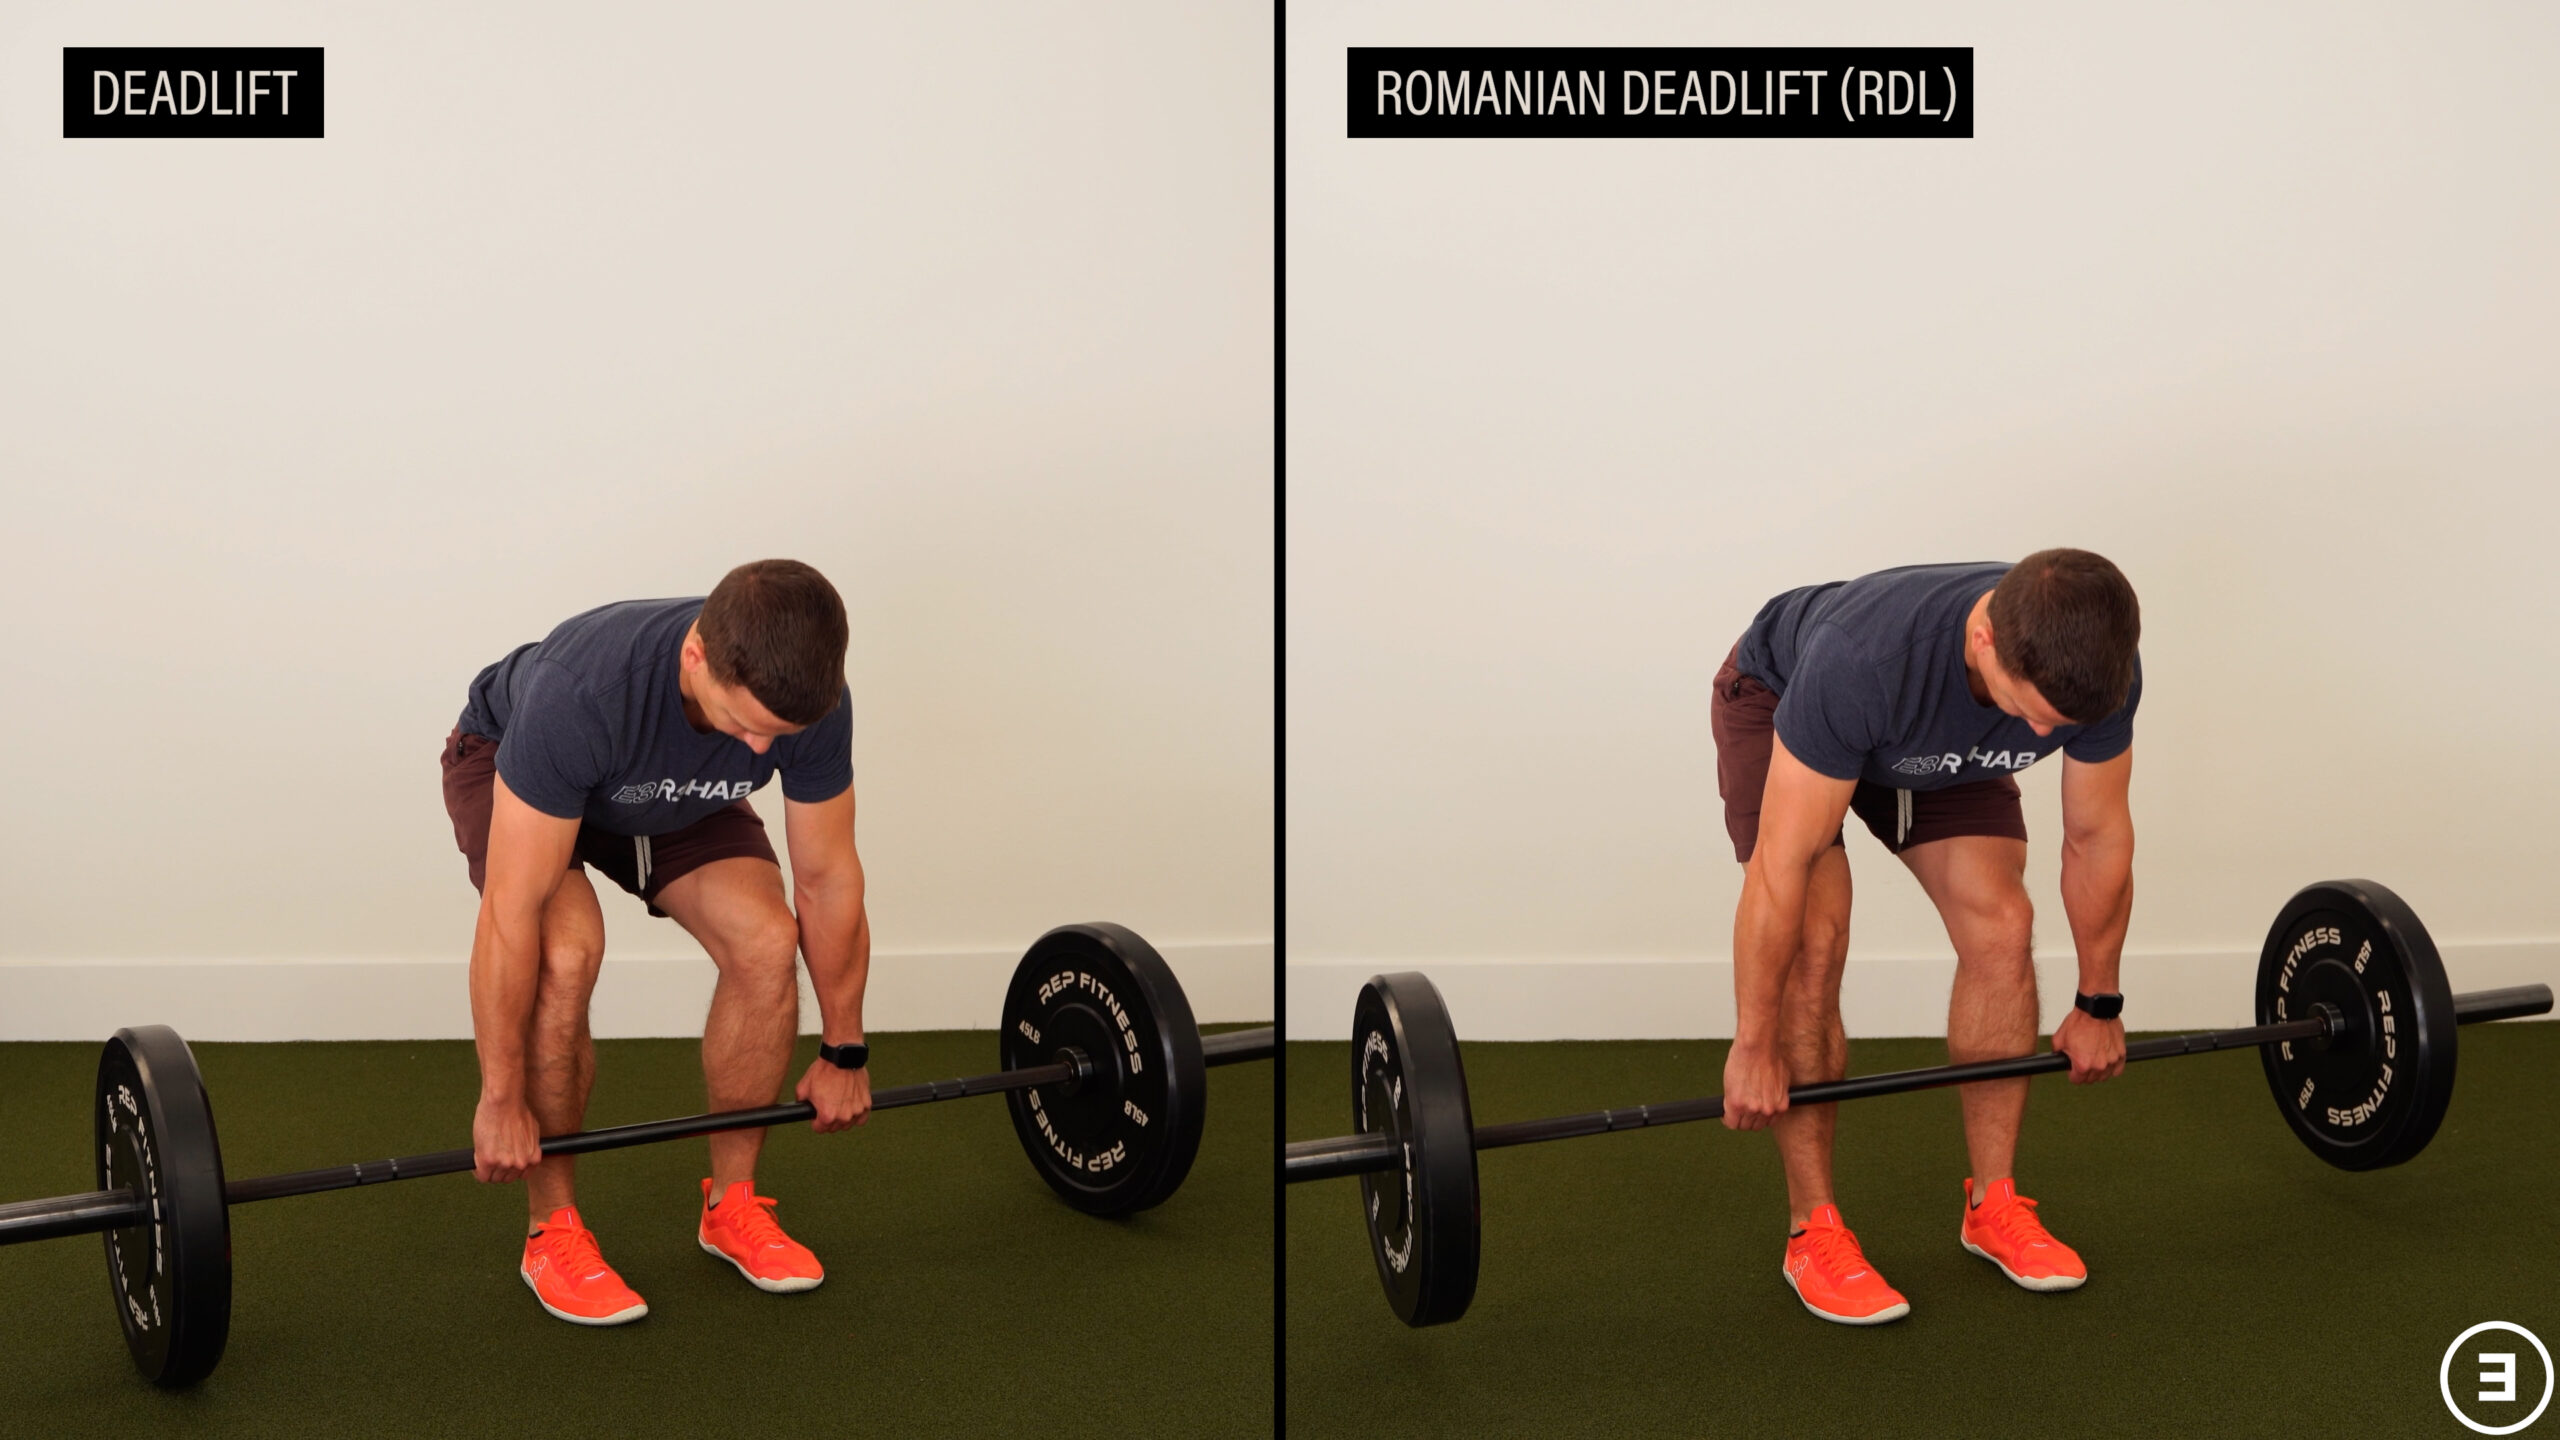
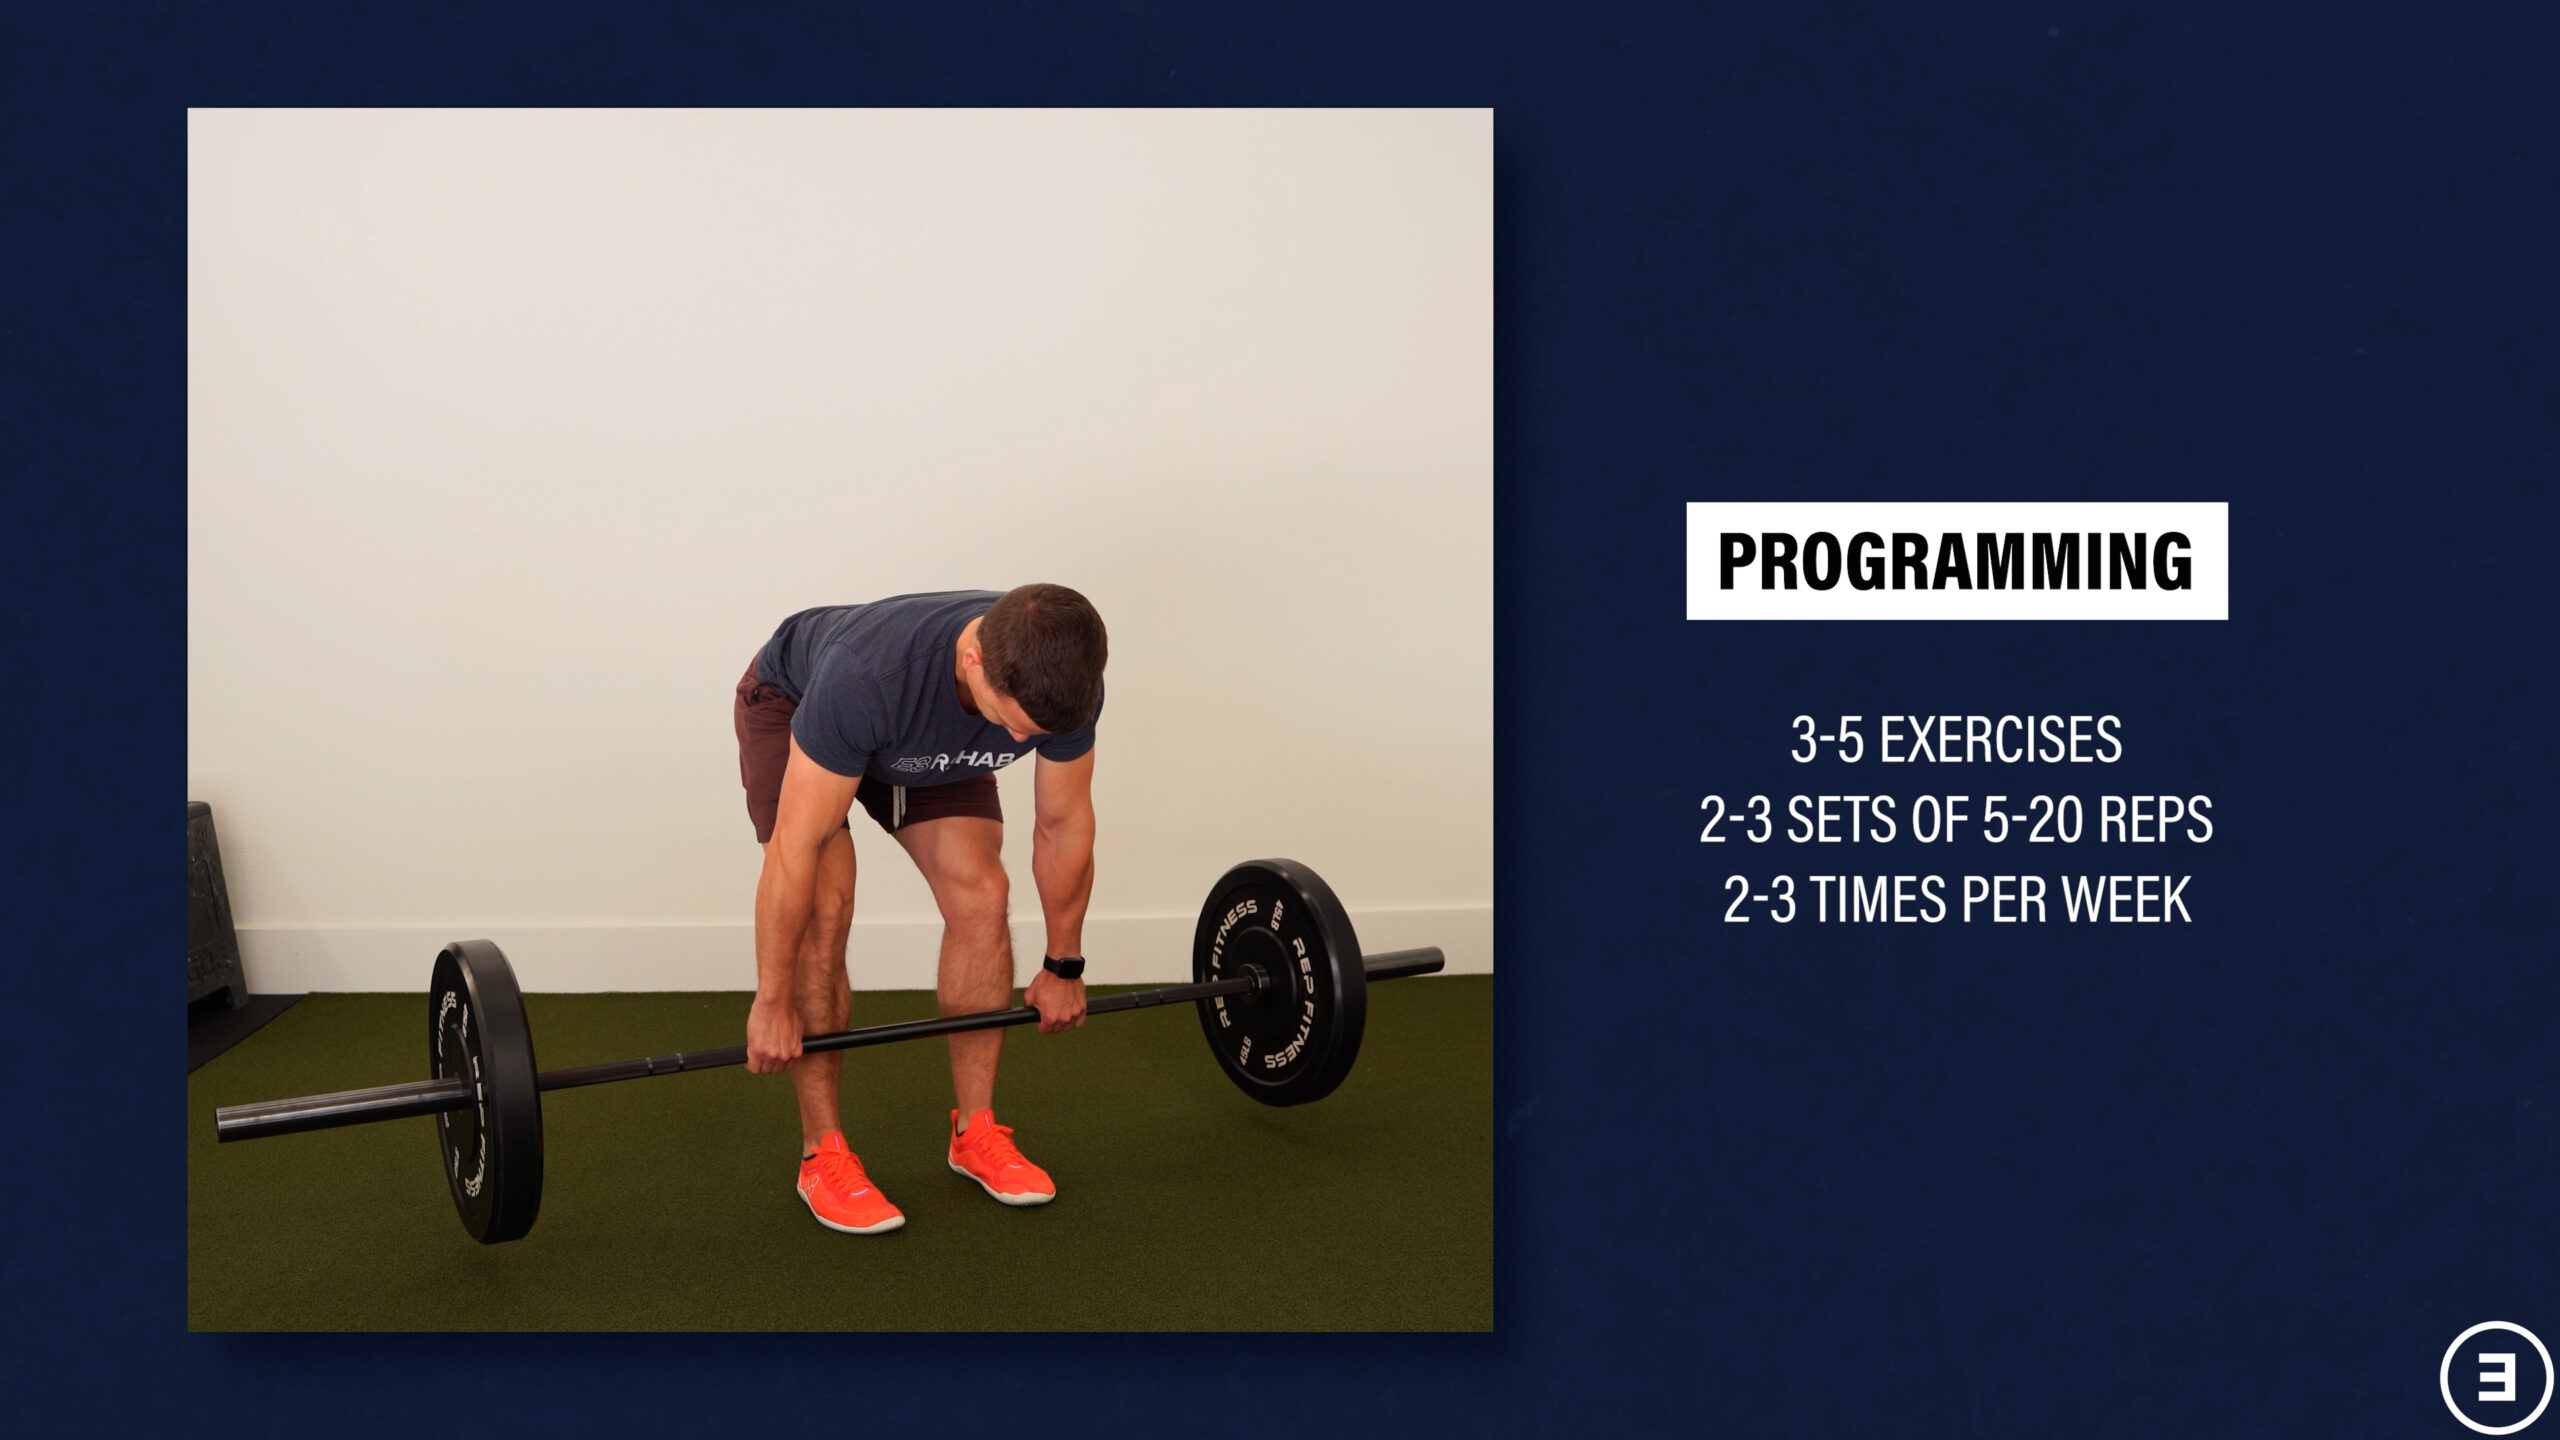
Deadlift Progression (Category #4)
The fourth exercise is a deadlift, which is useful for picking up and moving things around the house.
Whether it’s a dumbbell, kettlebell, or backpack filled with objects, the easiest thing to do is start with a weight from an elevated position. With a slight bend in your knees, bend down while attempting to keep your low back relatively flat, grab the weight with two hands, stand up, and repeat. Over time, add more weight or lower the height.

If desired, you can eventually perform gym-based variations such as barbell deadlifts, Romanian deadlifts, etc.
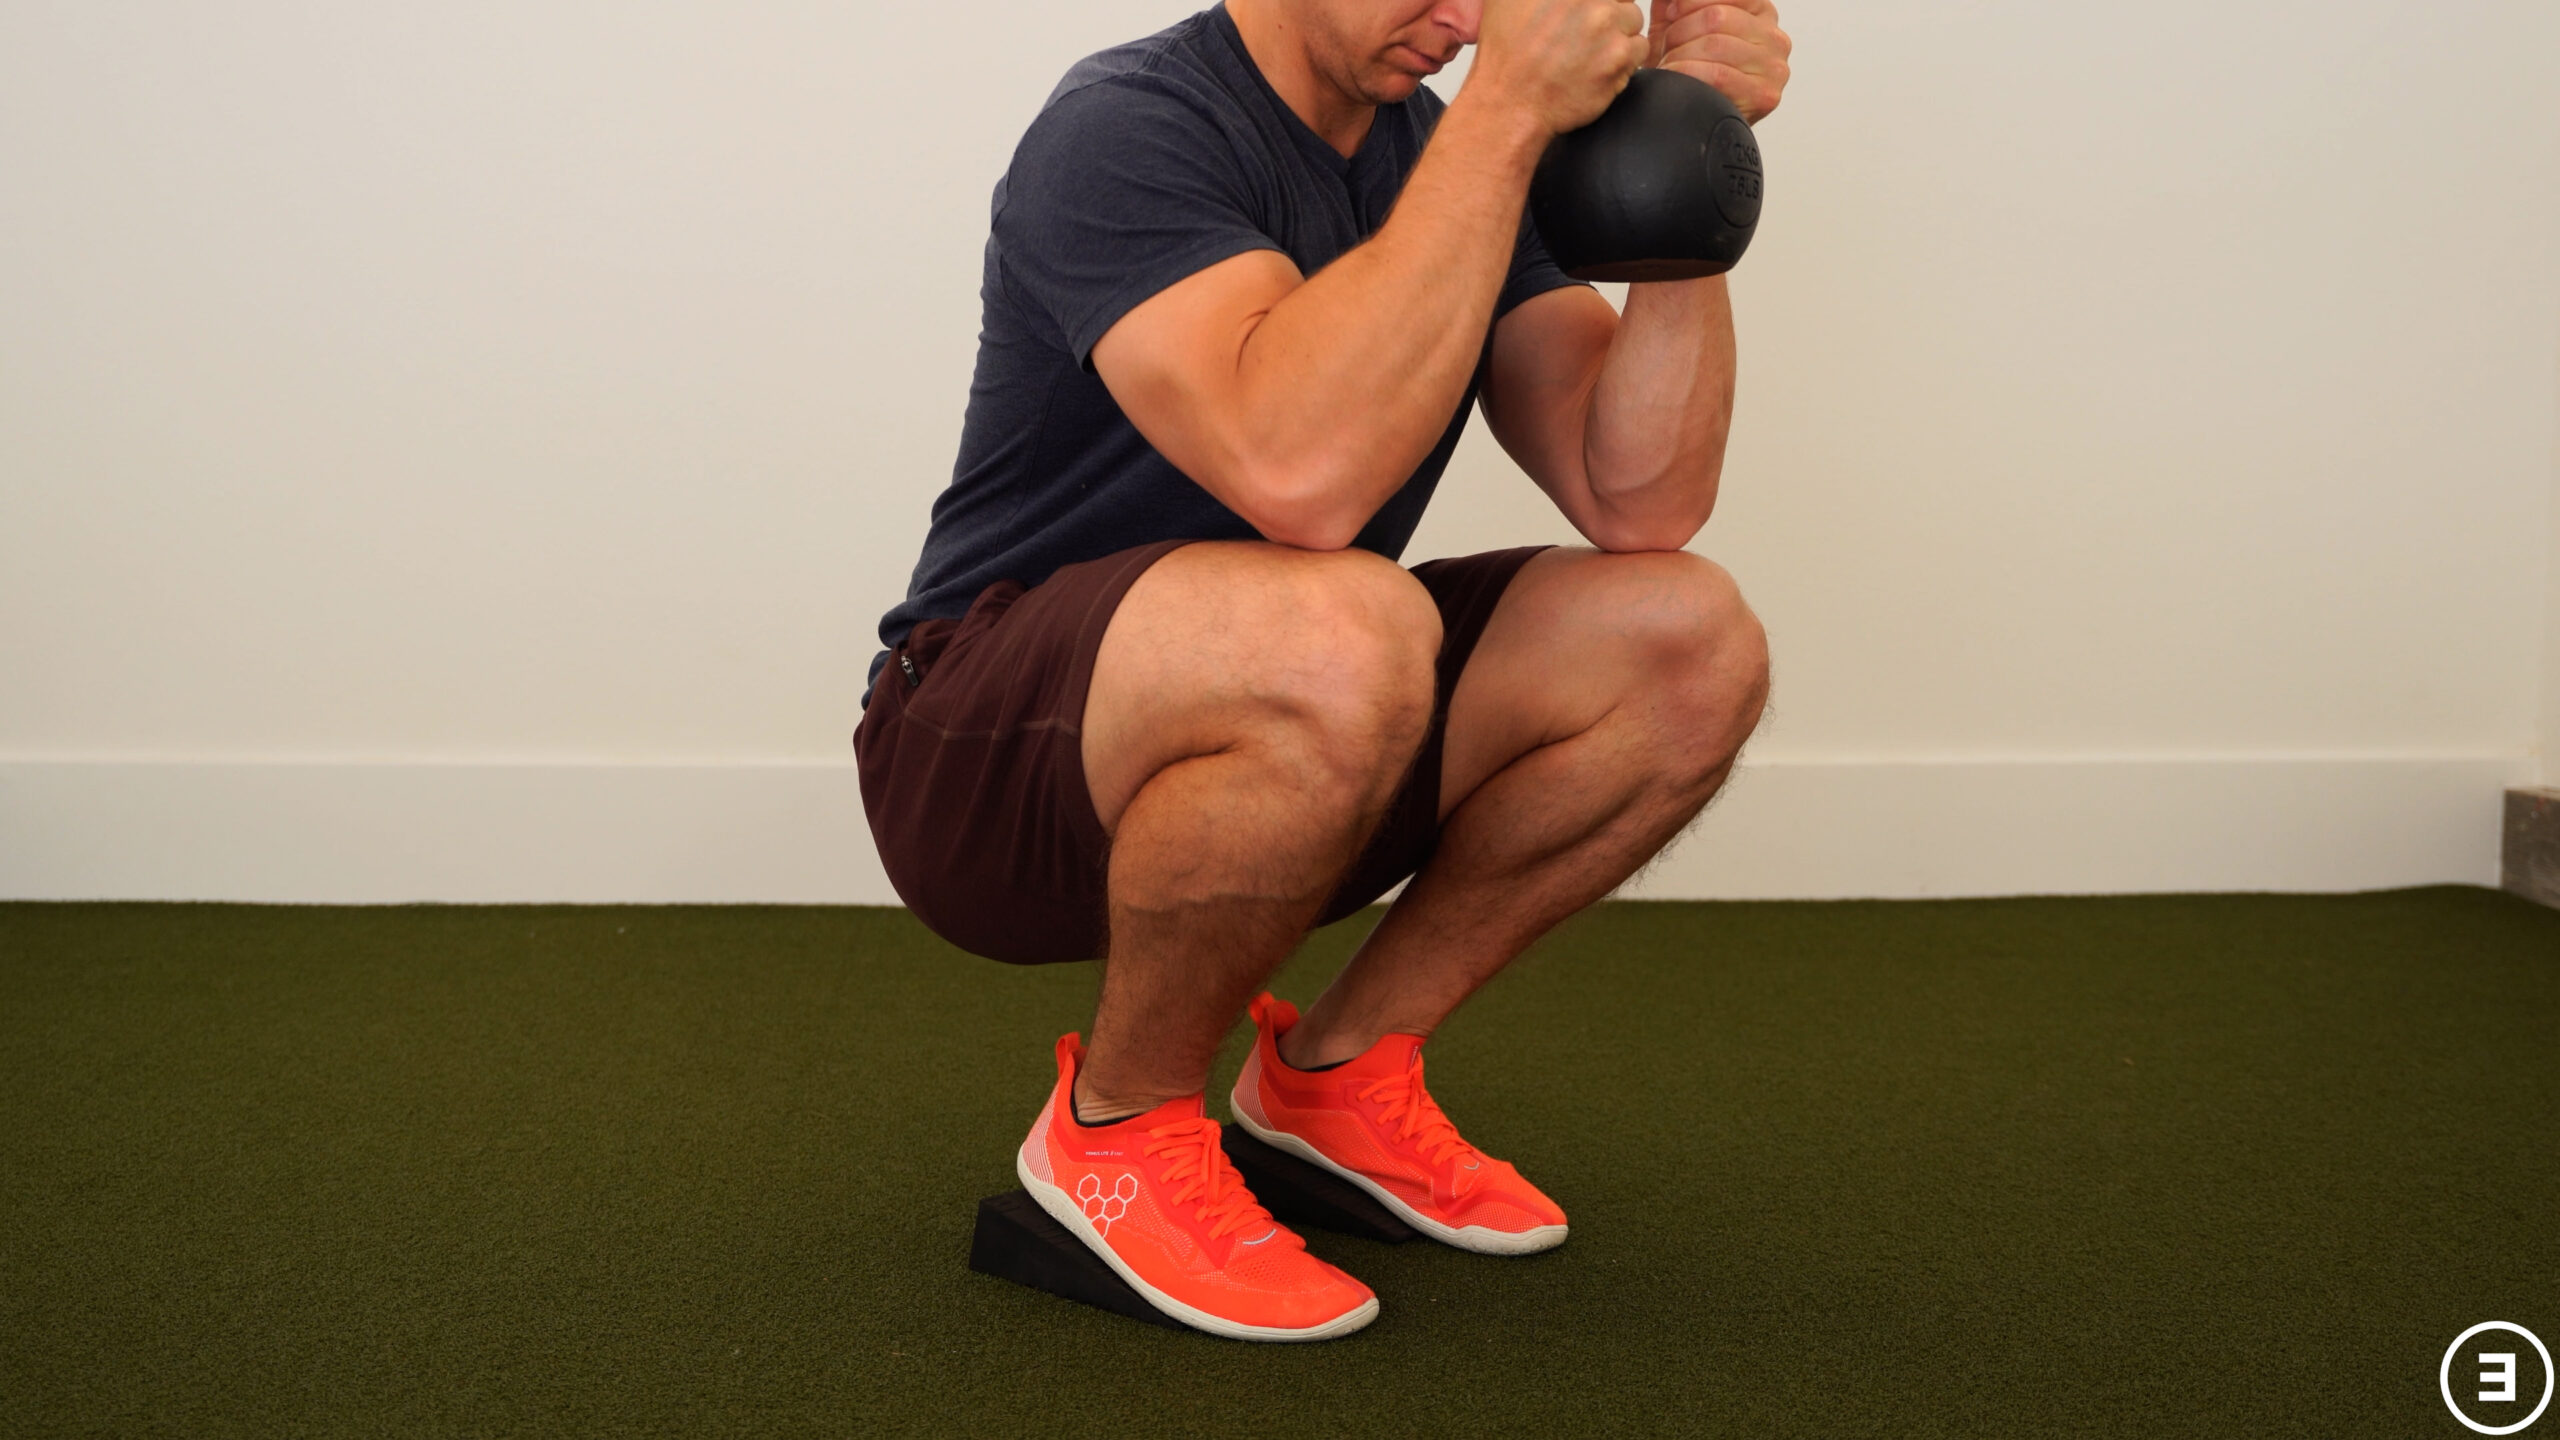
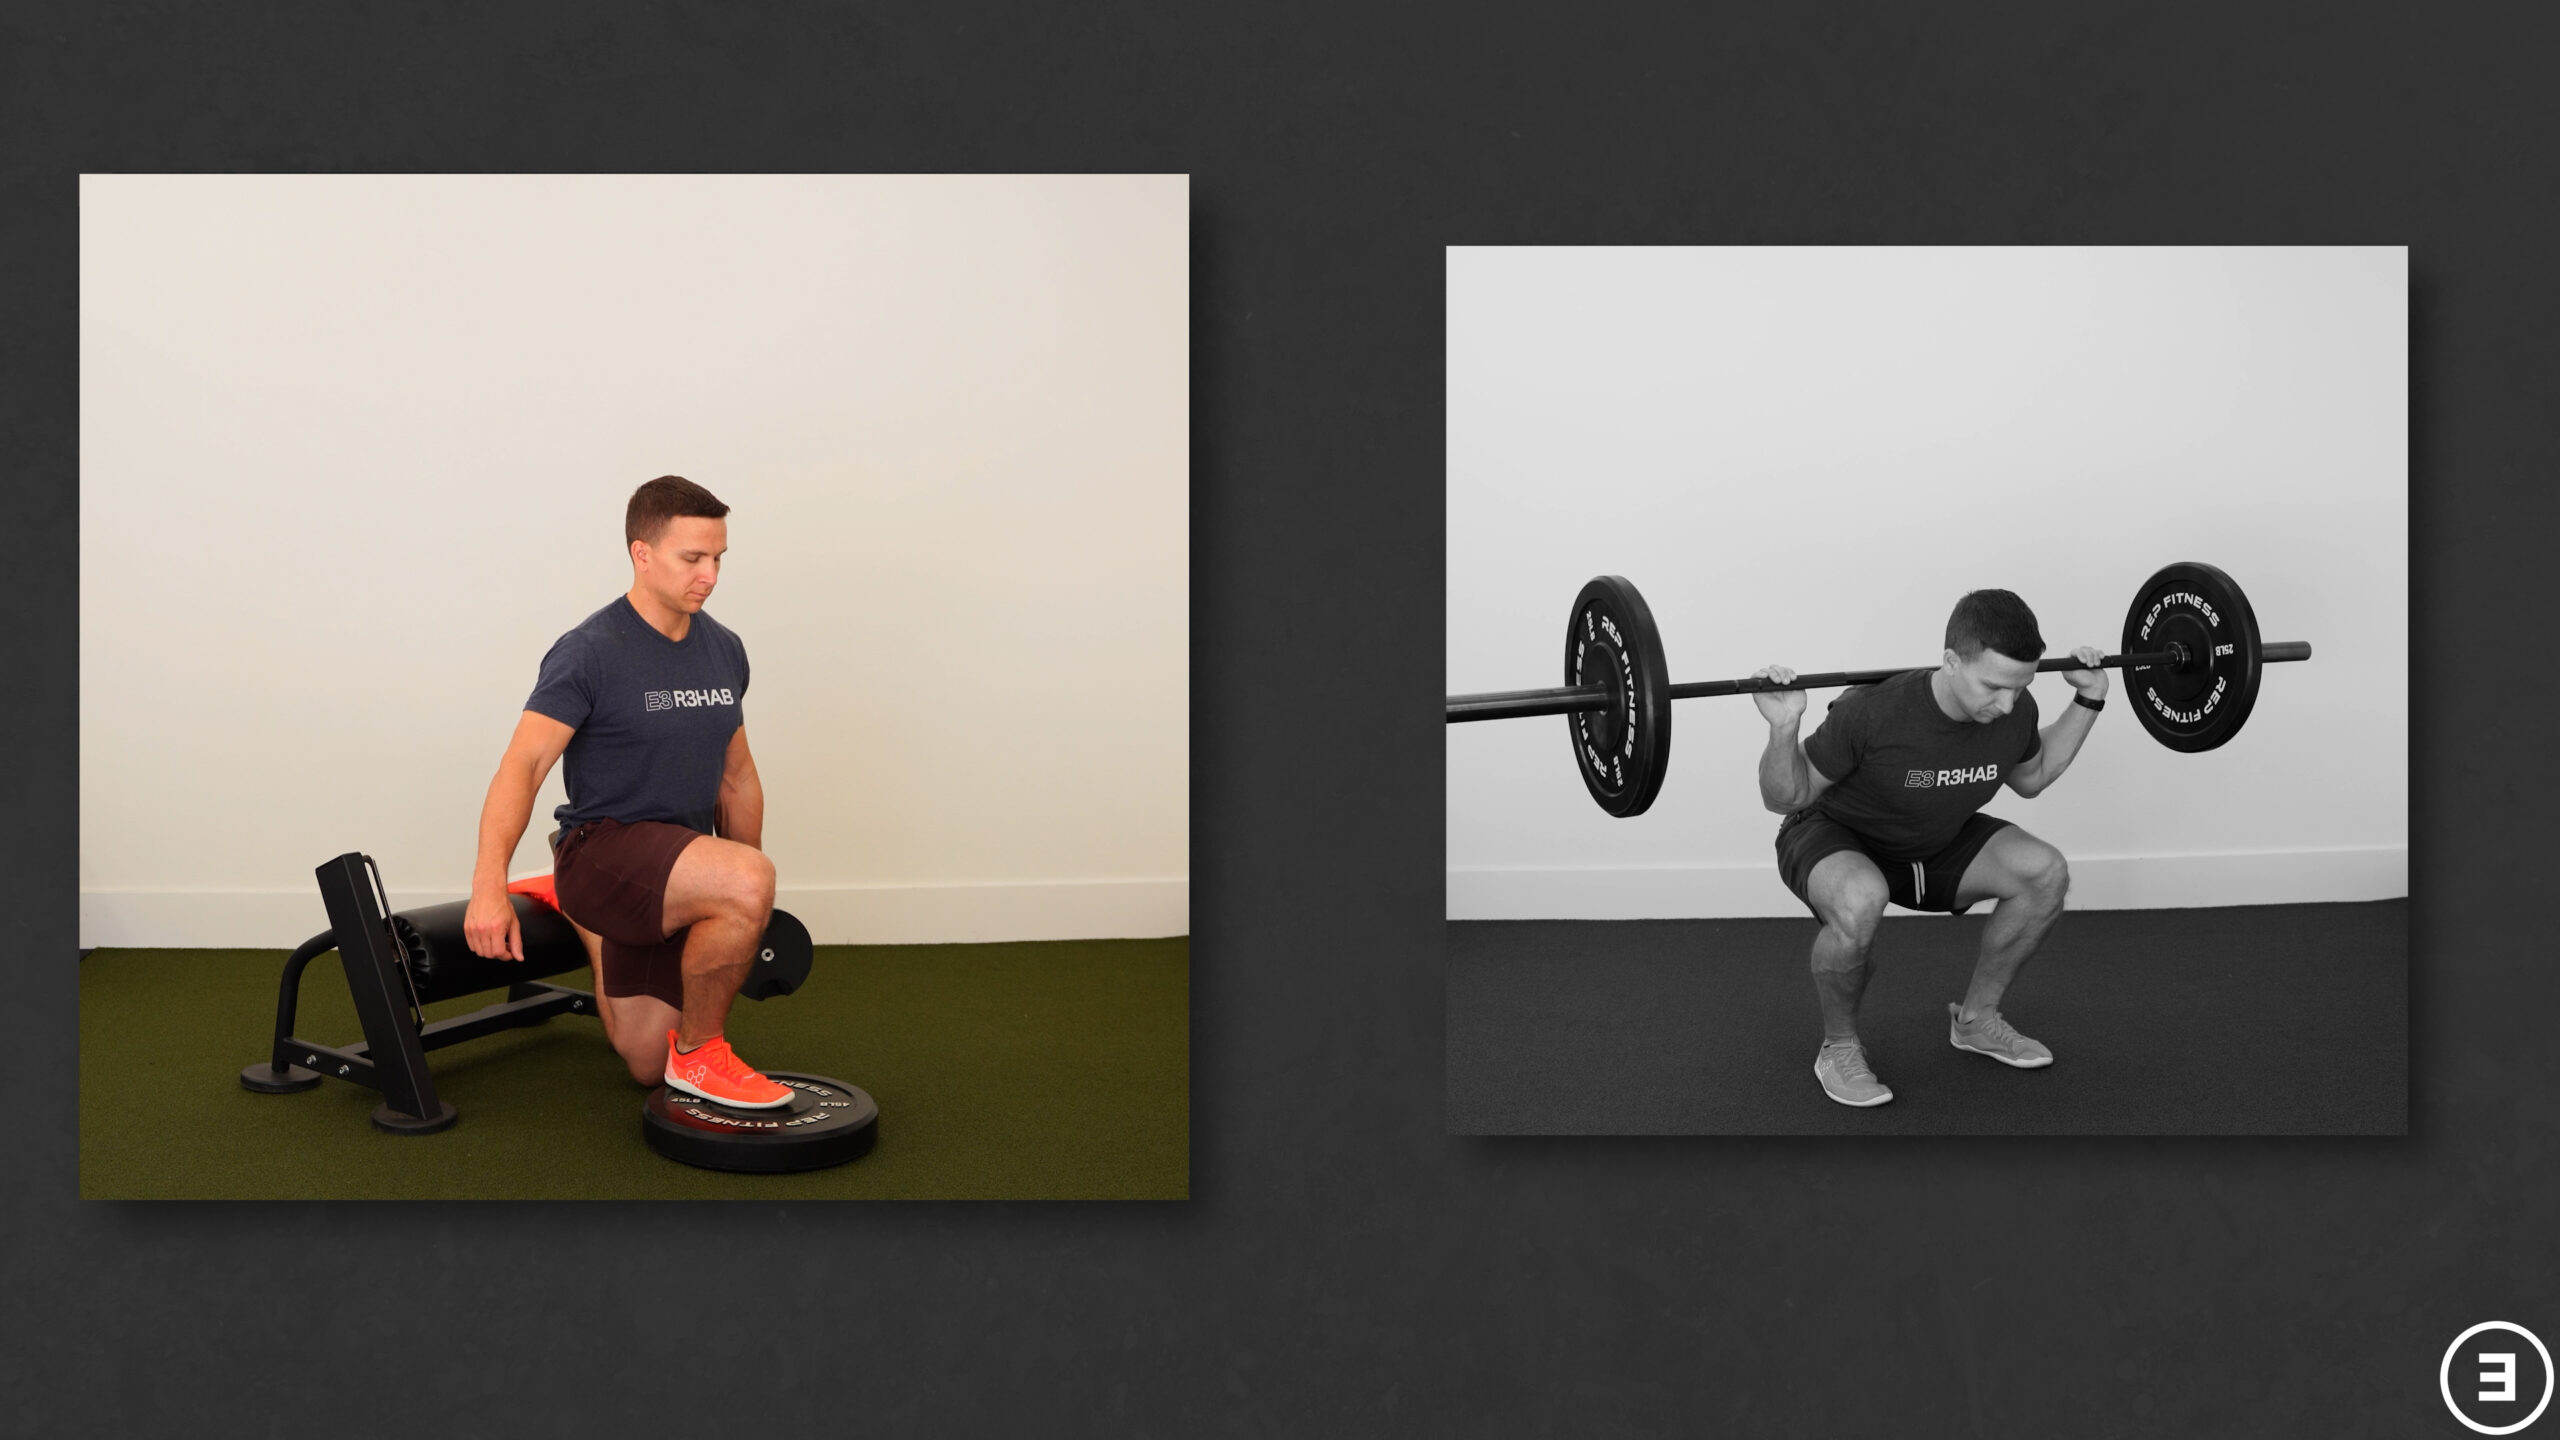
Split Squat Progression (Category #5)
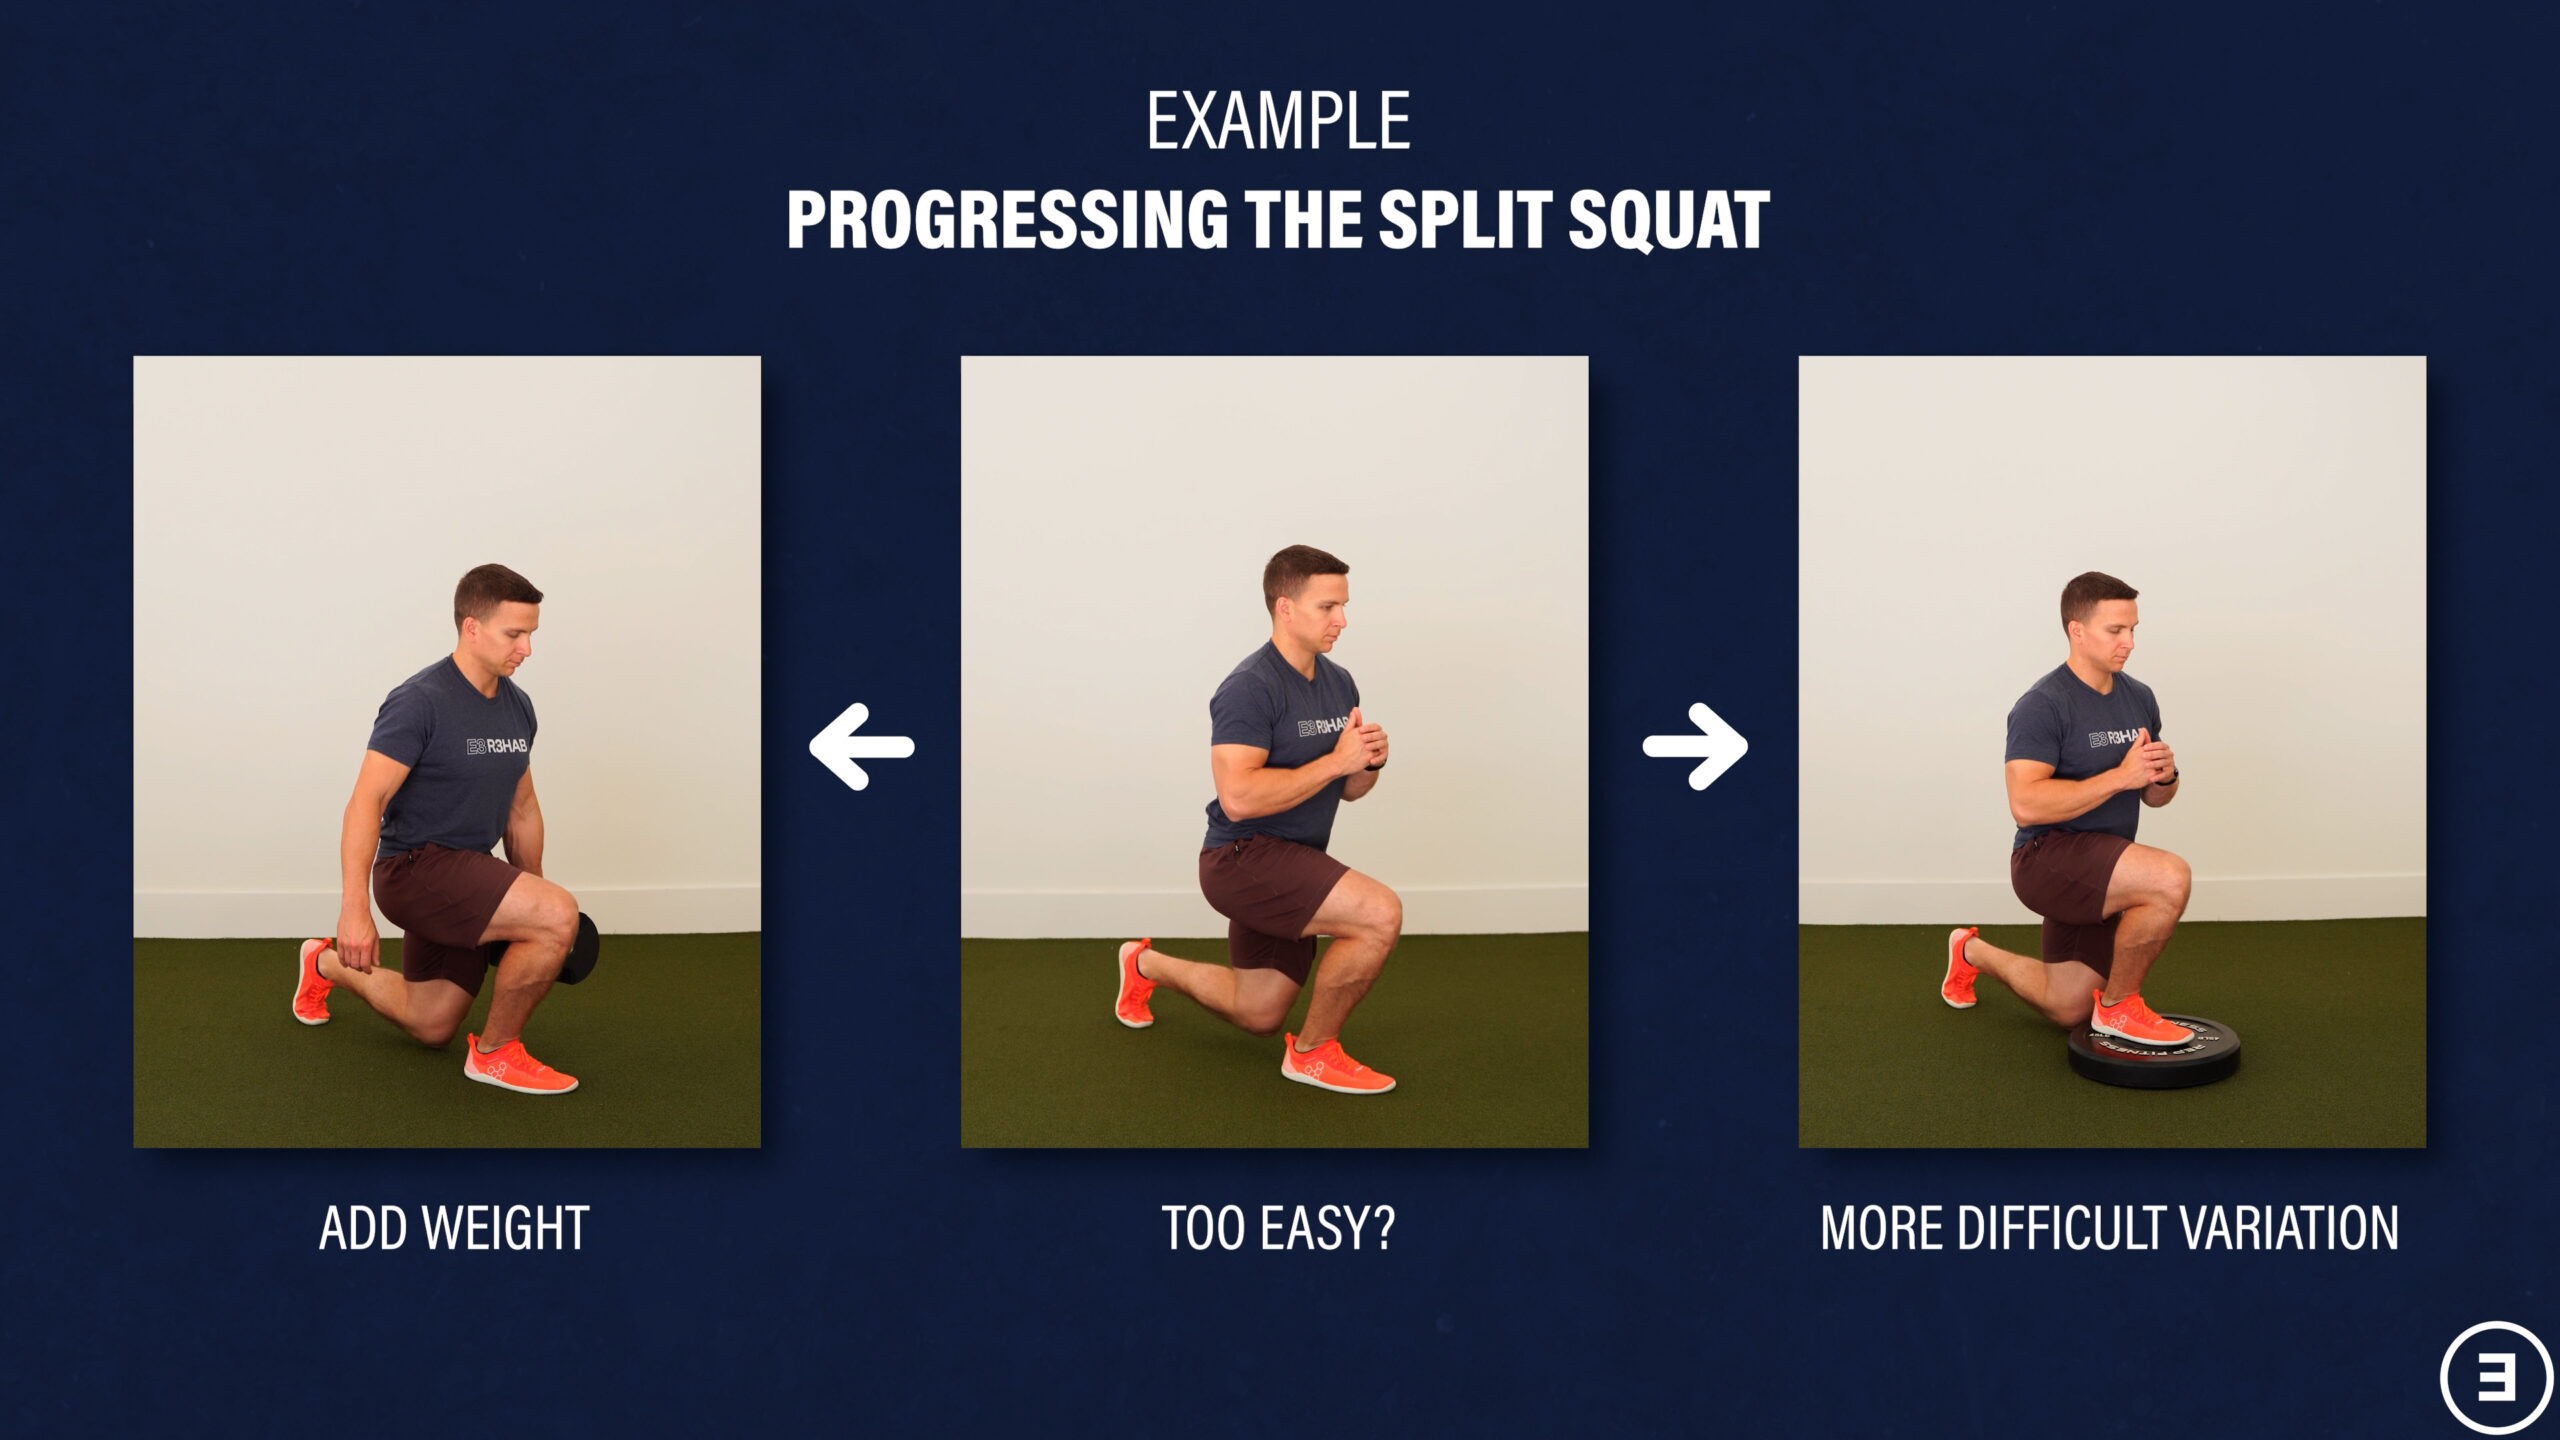
The next exercise option is a split squat progression.
Start in a stride stance and lower yourself down while pretending that your back knee is tapping an egg that you don’t want to crack. If it’s too difficult, shorten the range of motion and/or use your hands for assistance.
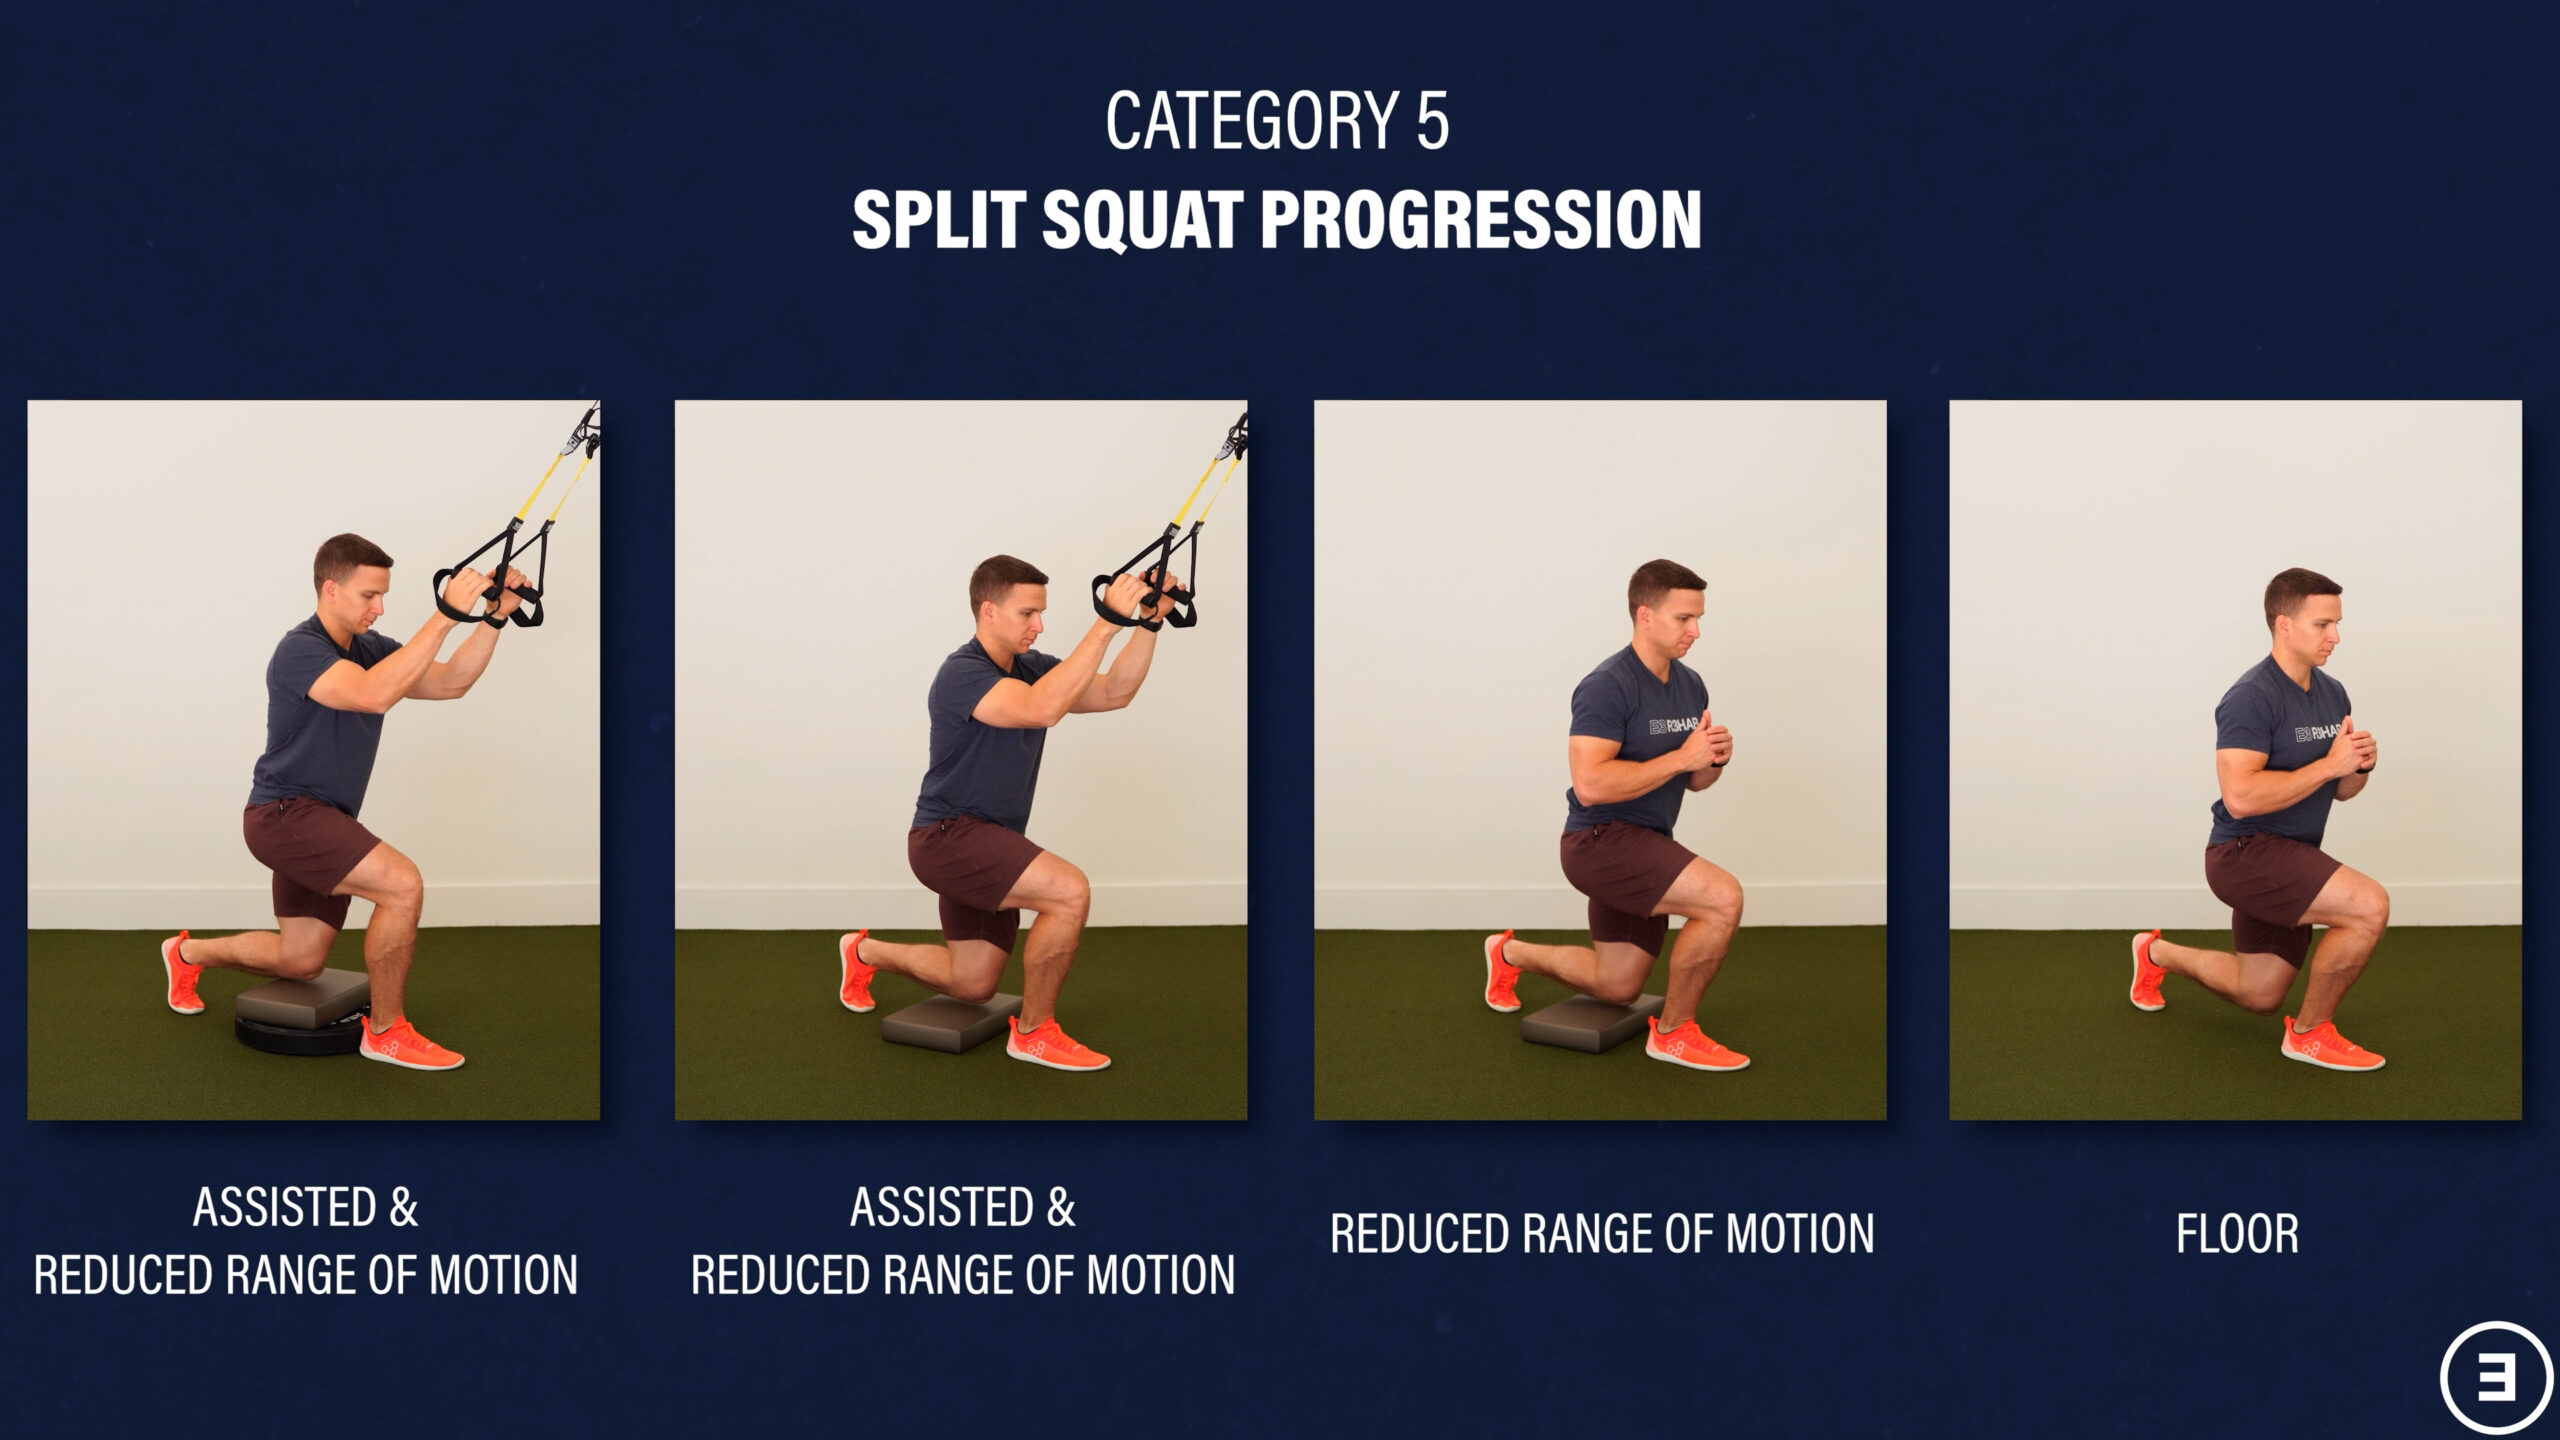
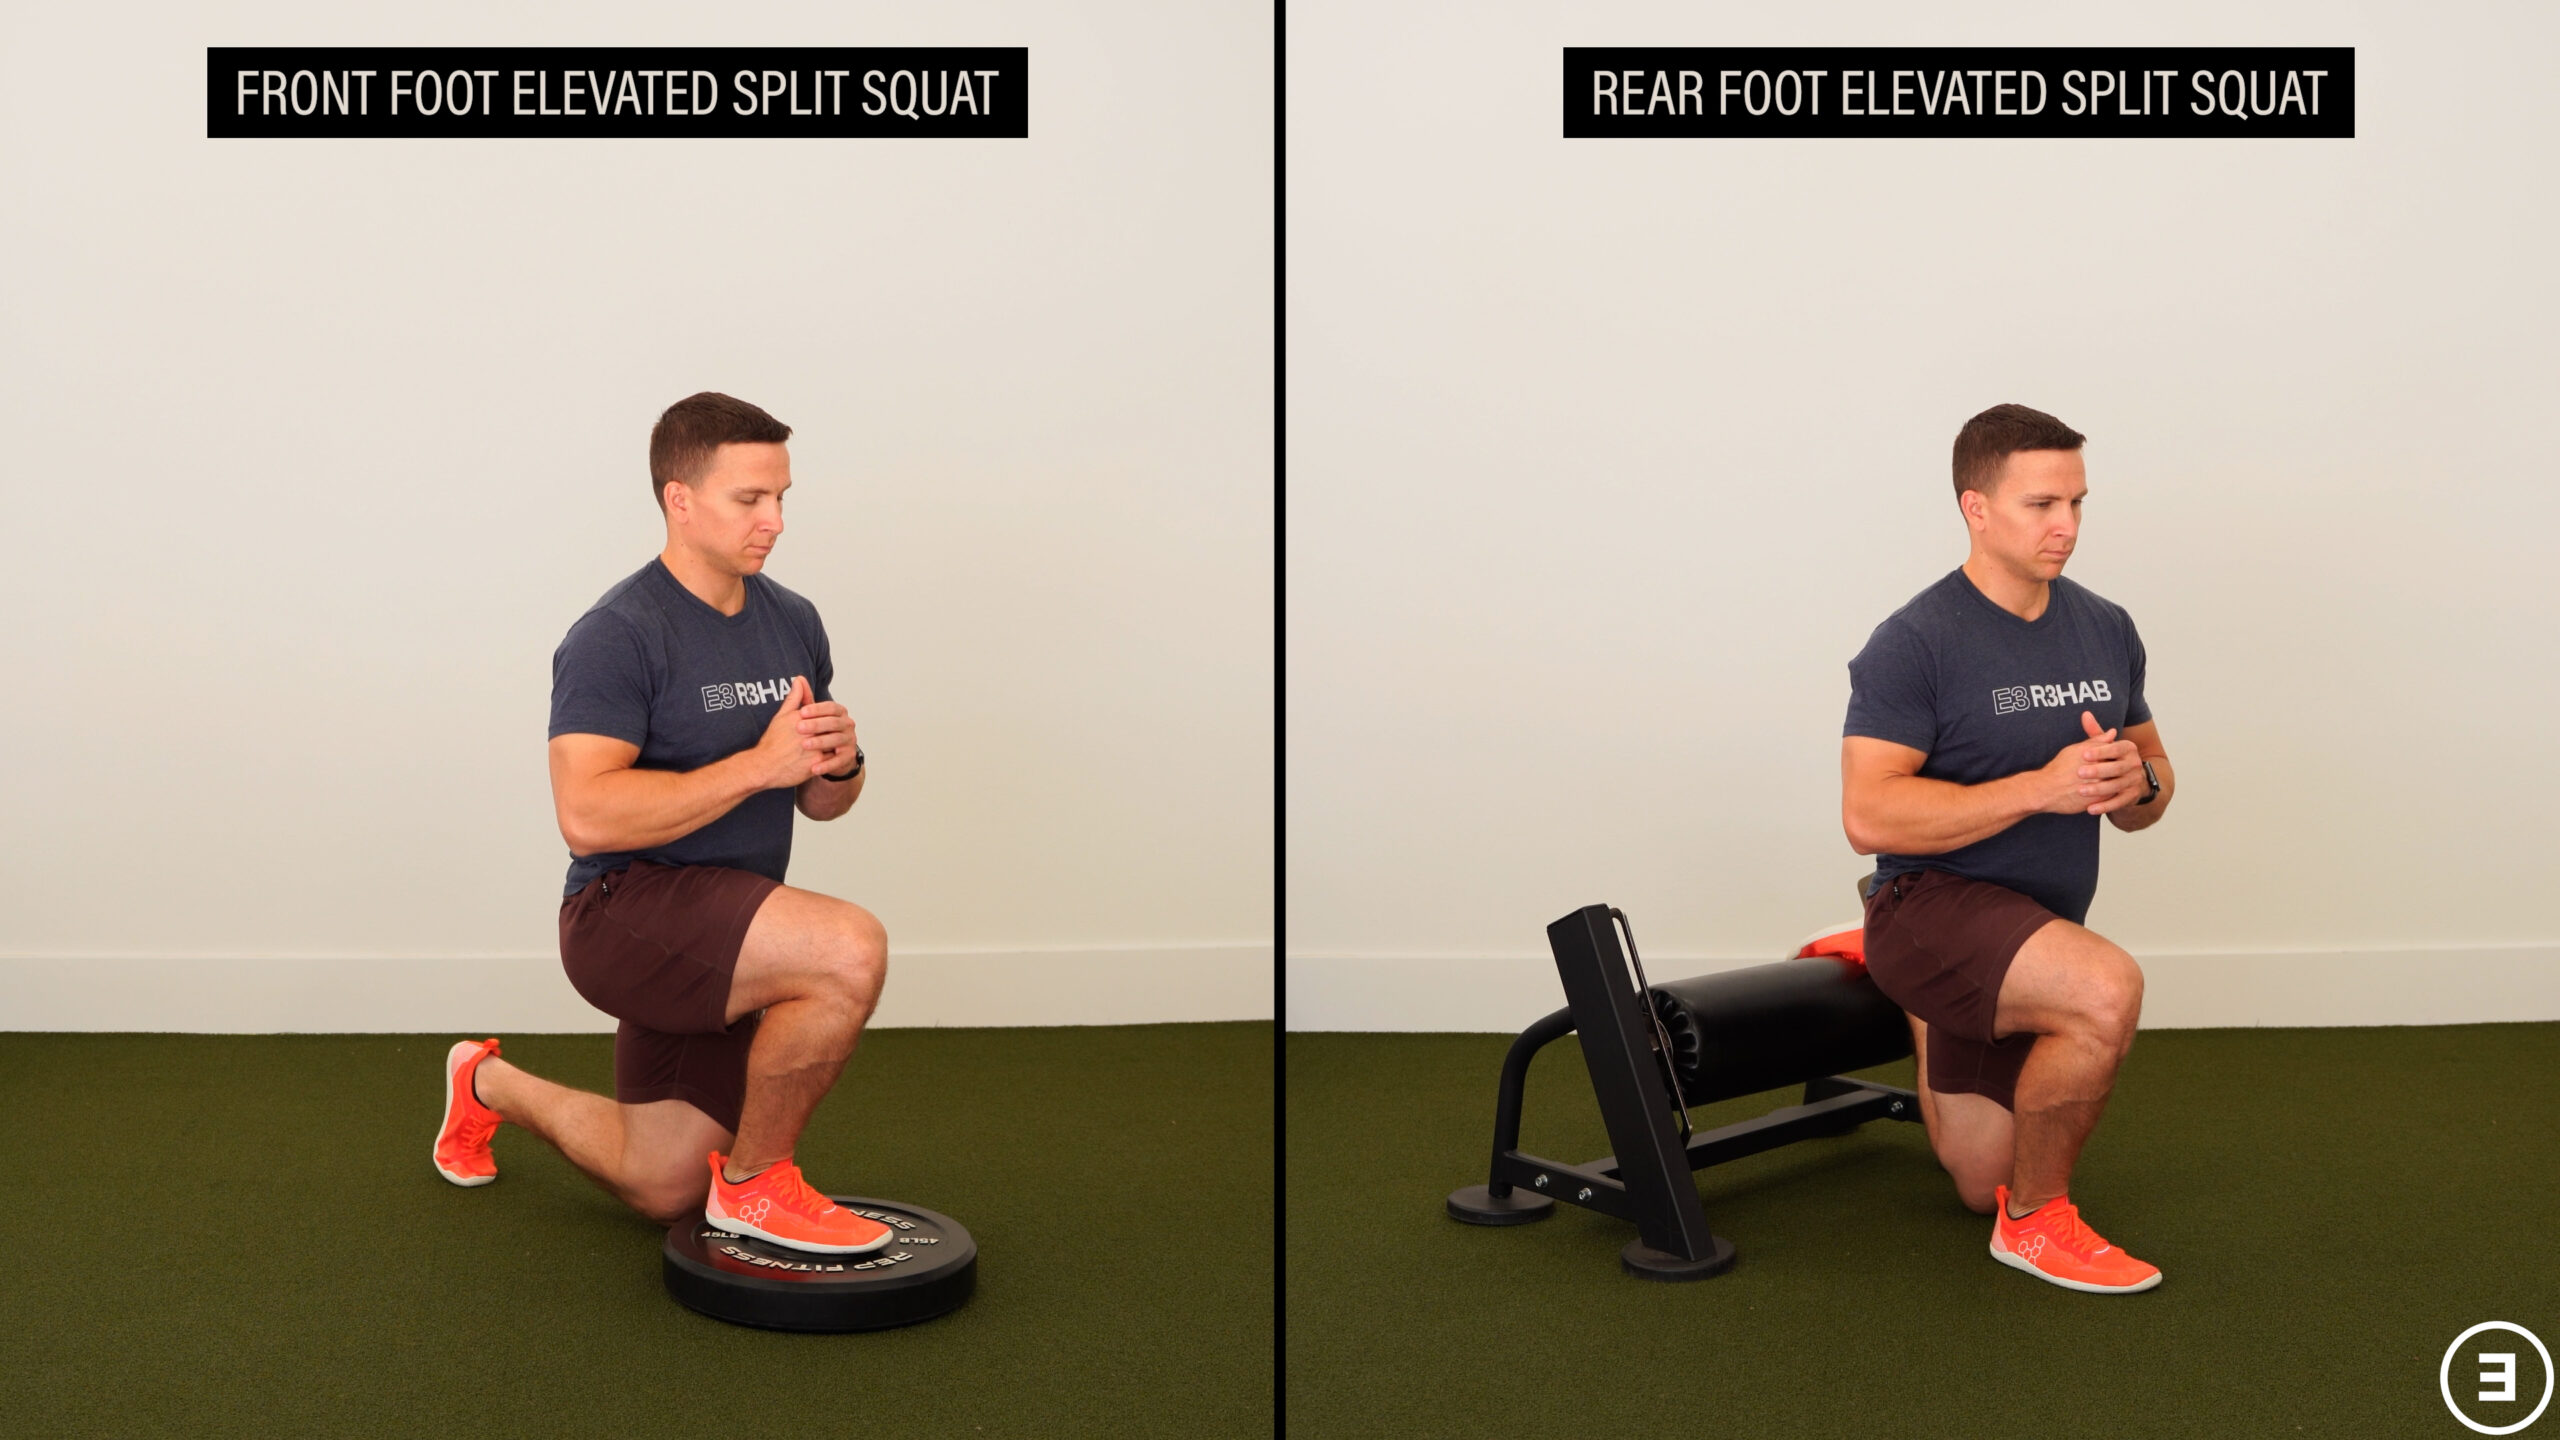
Two other variations include a front foot elevated split squat and rear foot elevated split squat. For the front foot elevated split squat, you can elevate the front leg using a 2-4” object to start. For the rear foot elevated split squat, the overall technique of the movement and position of your torso should be similar, so use an object to elevate your back foot that isn’t too high. Also, the majority of your weight should be through the lead leg.
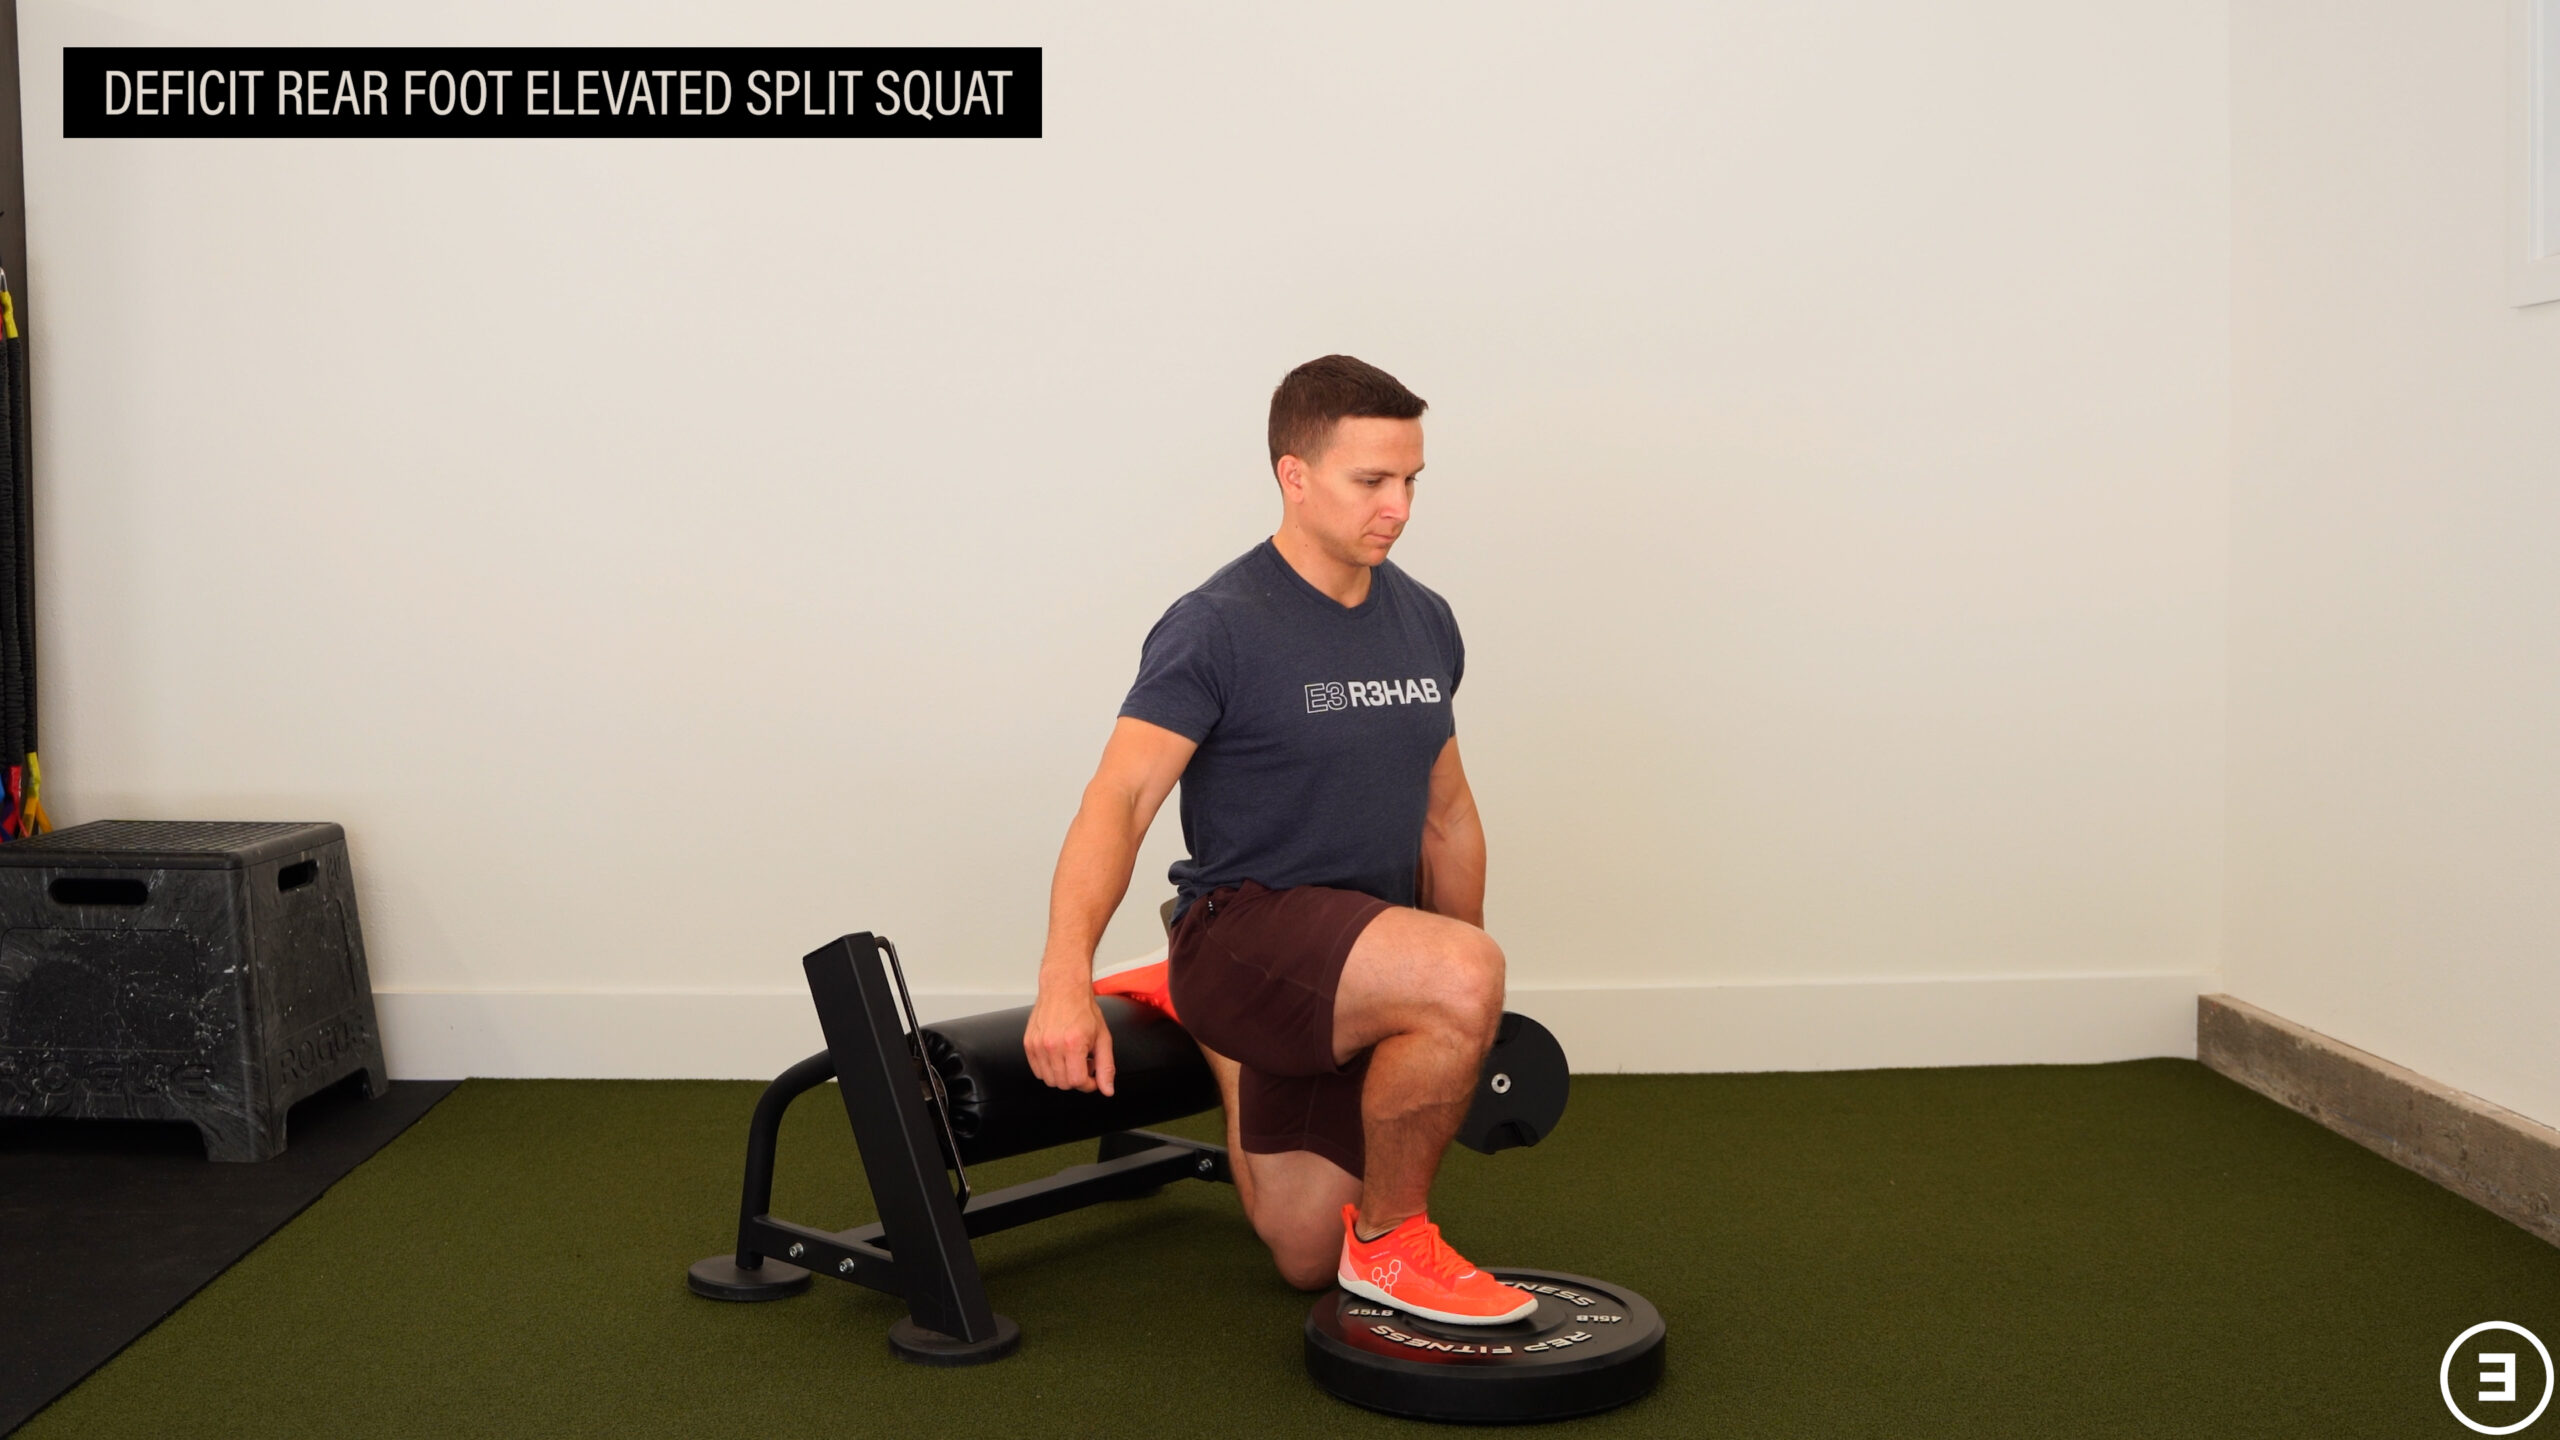
I currently do a variation that is a combination of the two known as a deficit rear foot elevated split squat.
For any of the variations, you can hold a weight in one hand and use the other hand for balance as needed.
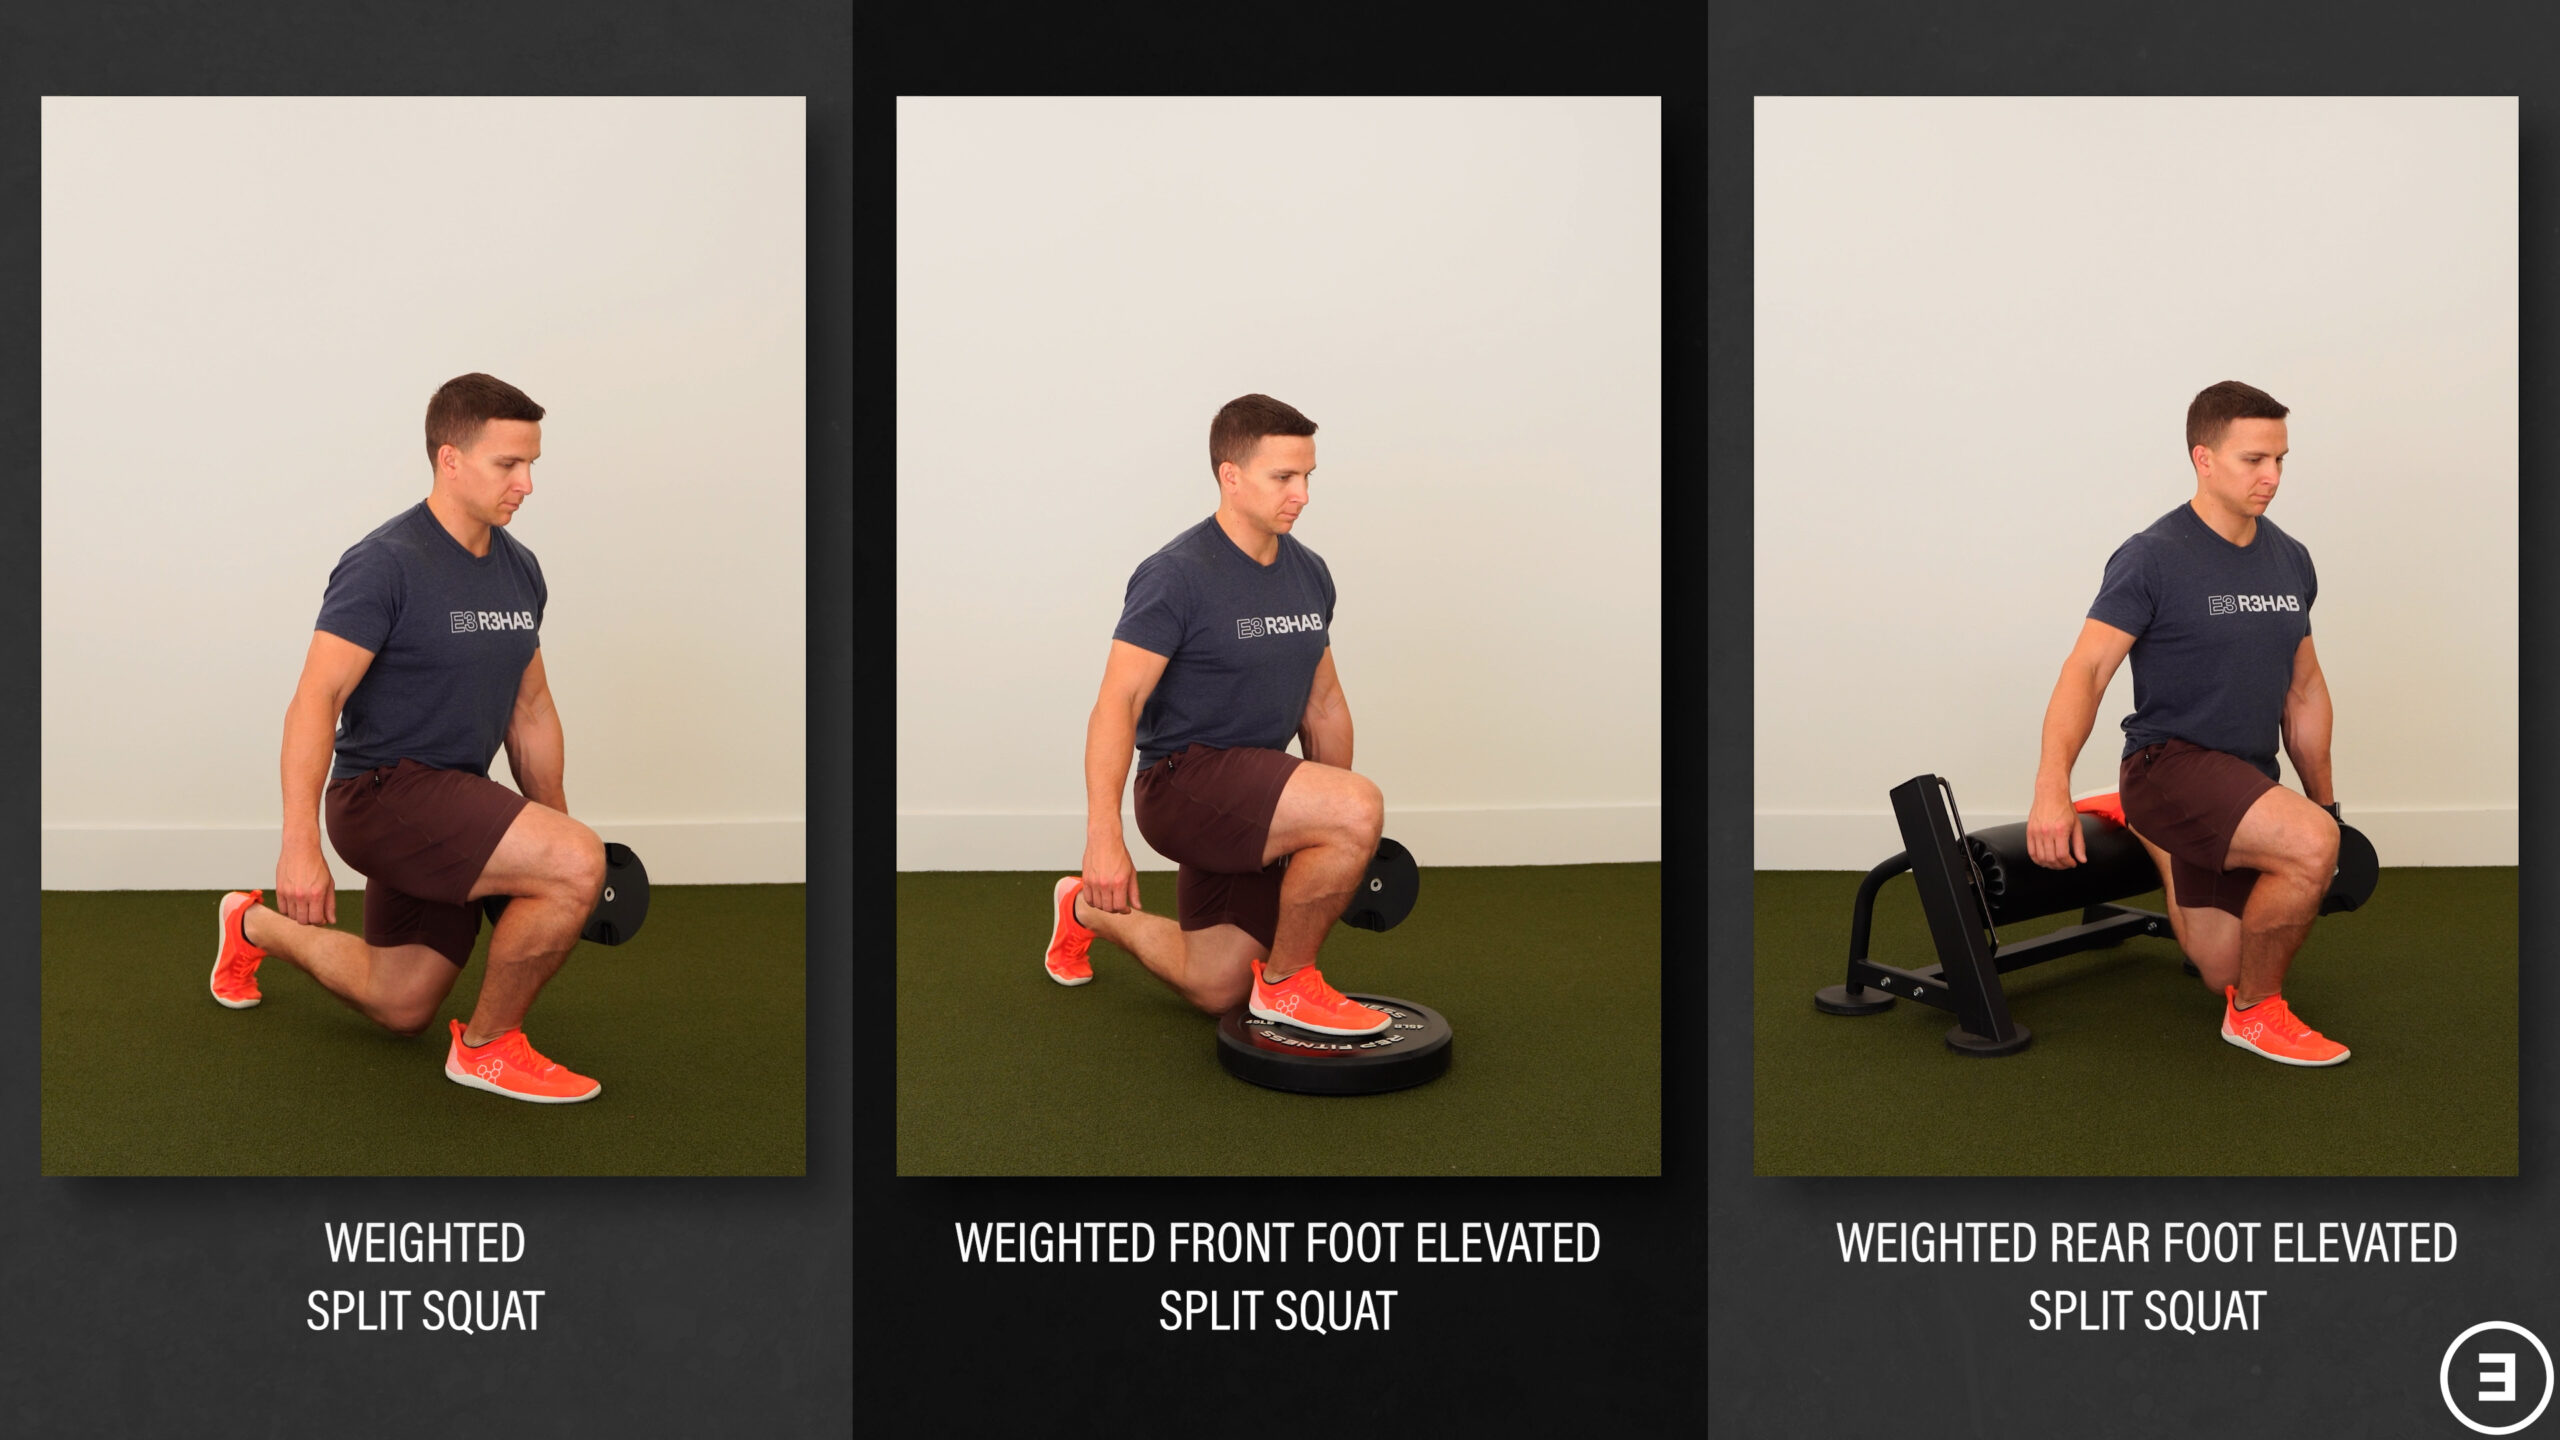
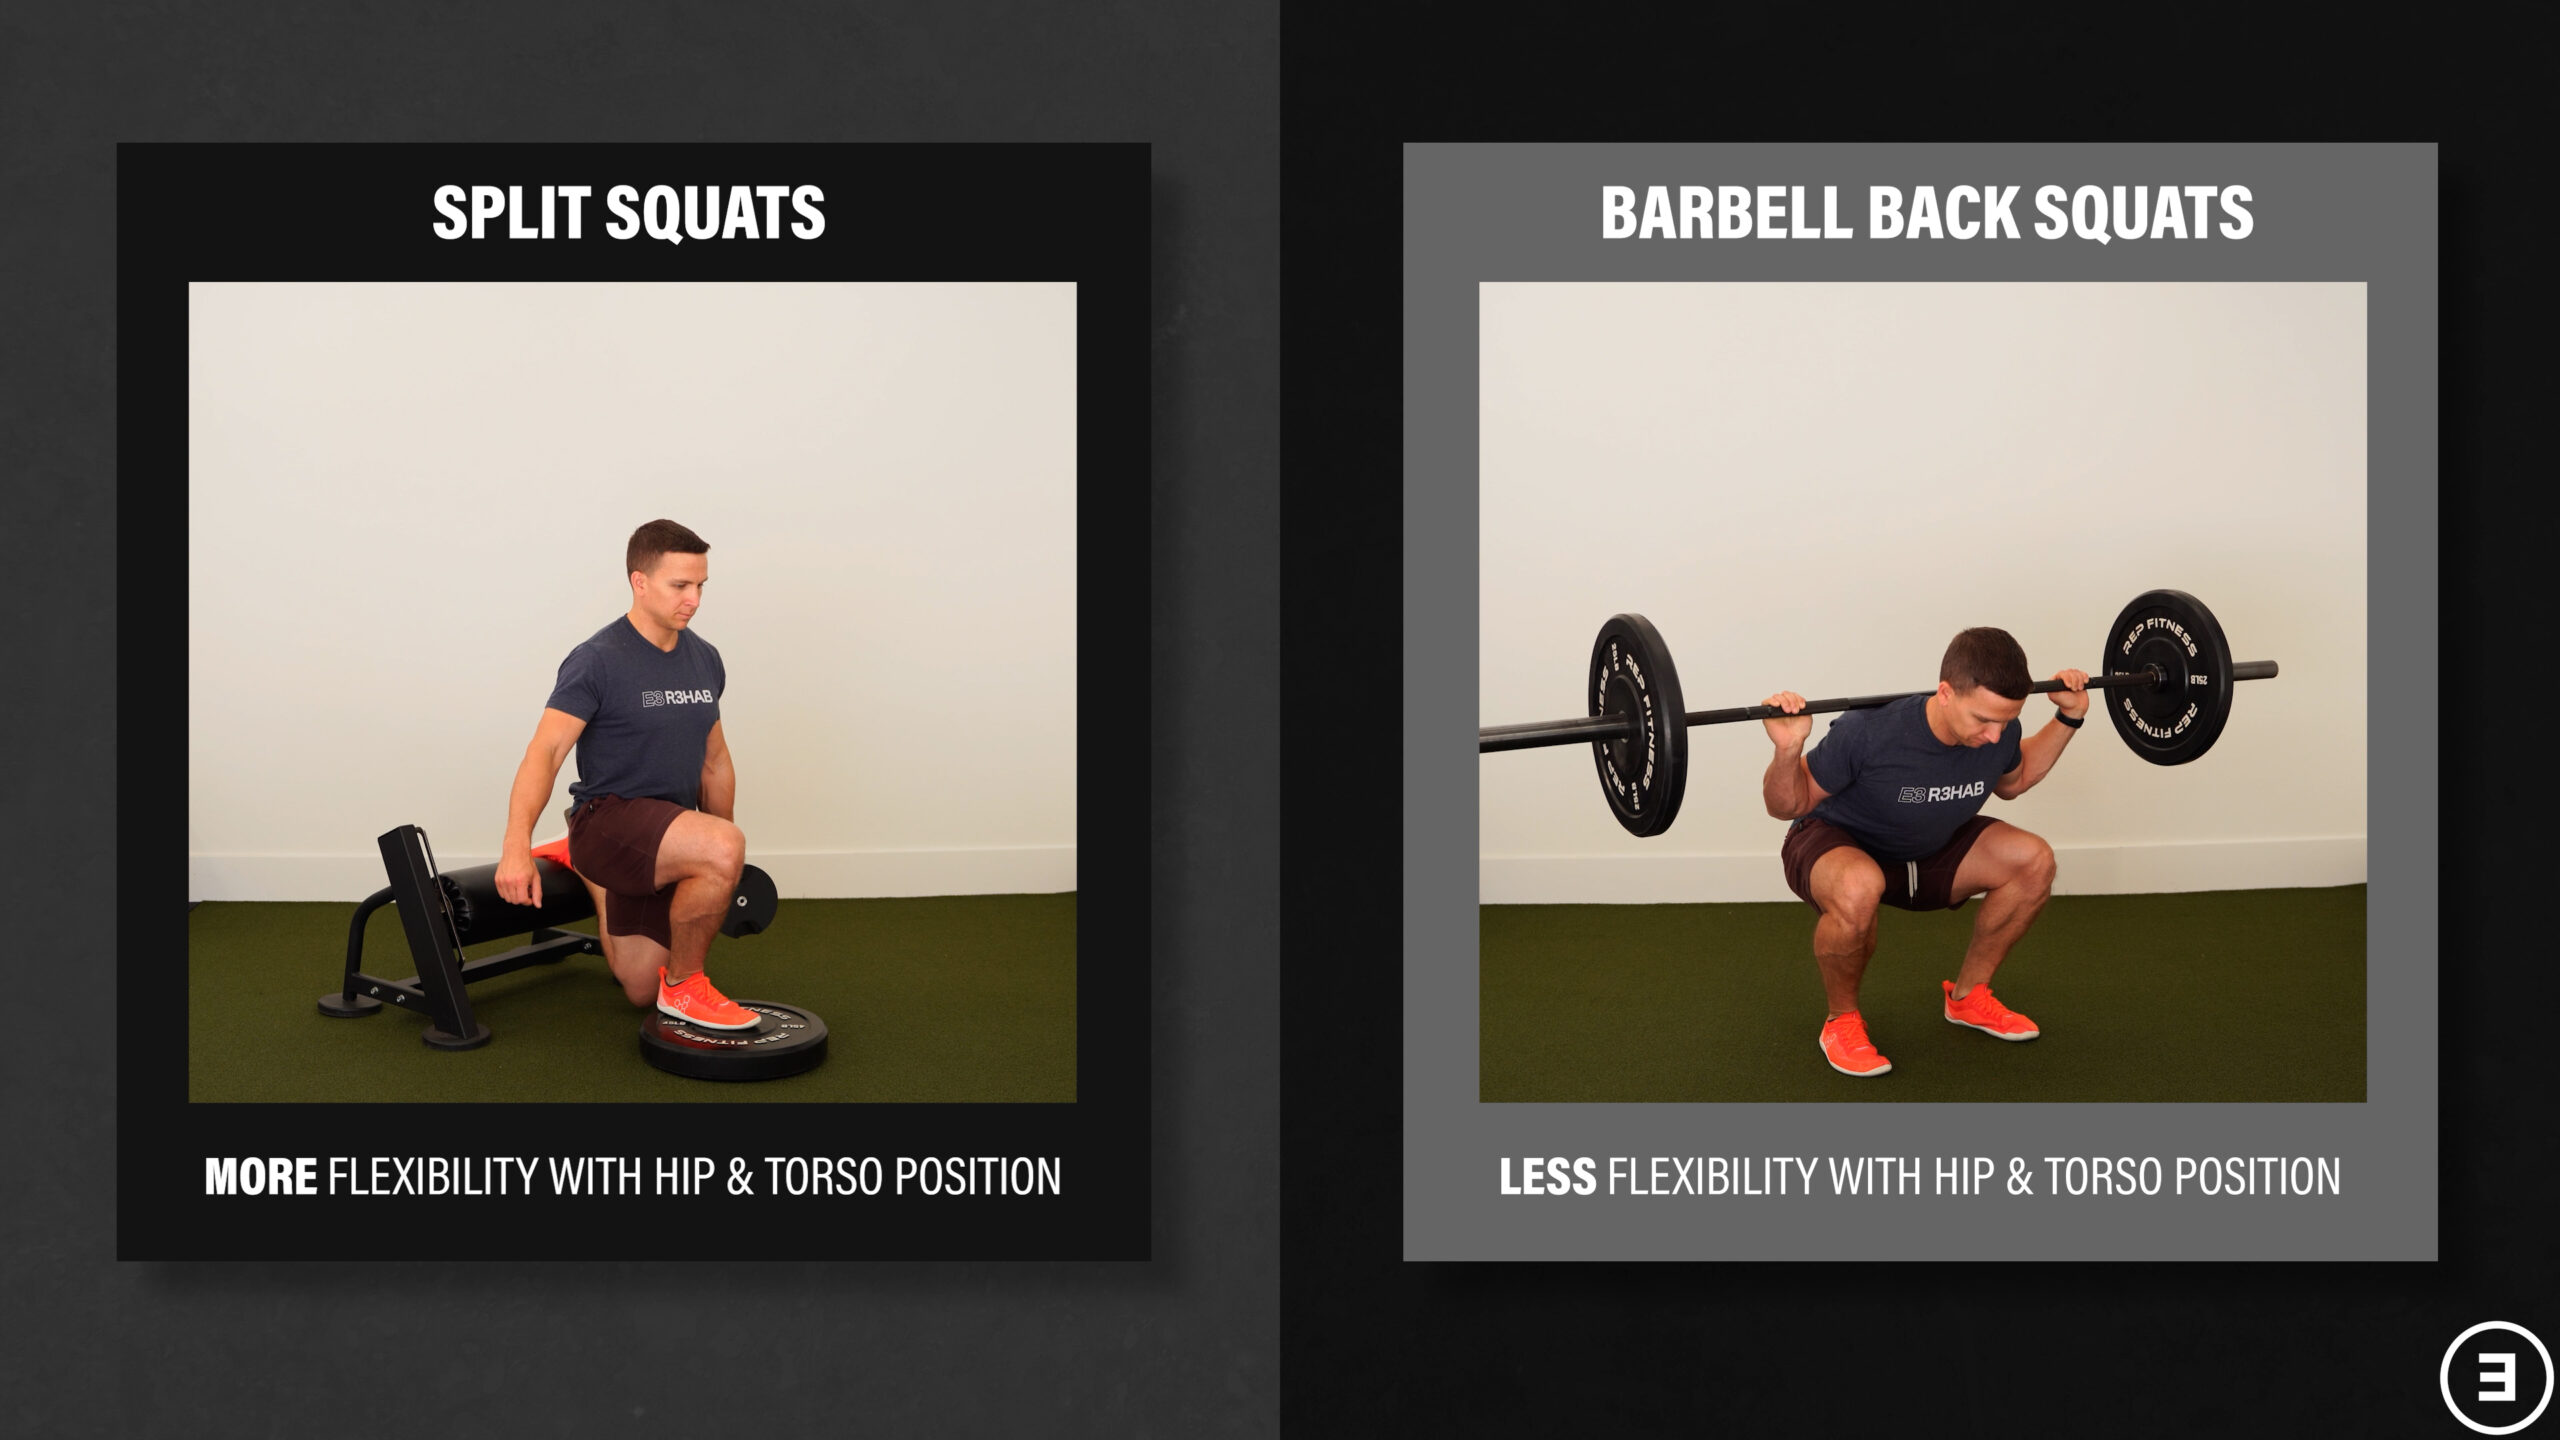
Aside from the many benefits of the exercise on its own, I’m a big fan of the split squat because it helps ensure that you can get up from the floor safely. It’s also much more comfortable on my hip than a traditional barbell back squat because I have more flexibility with my hip and torso position.
Hip Abduction/Side Plank (Category #6)
The next exercise category focuses on the glute muscles on the side of the hip, which are important for walking, stairs, and general hip stability, especially after a posterior or lateral surgical approach. I’m going to provide a lot of options of varying difficulty, so you can choose what’s best for you.
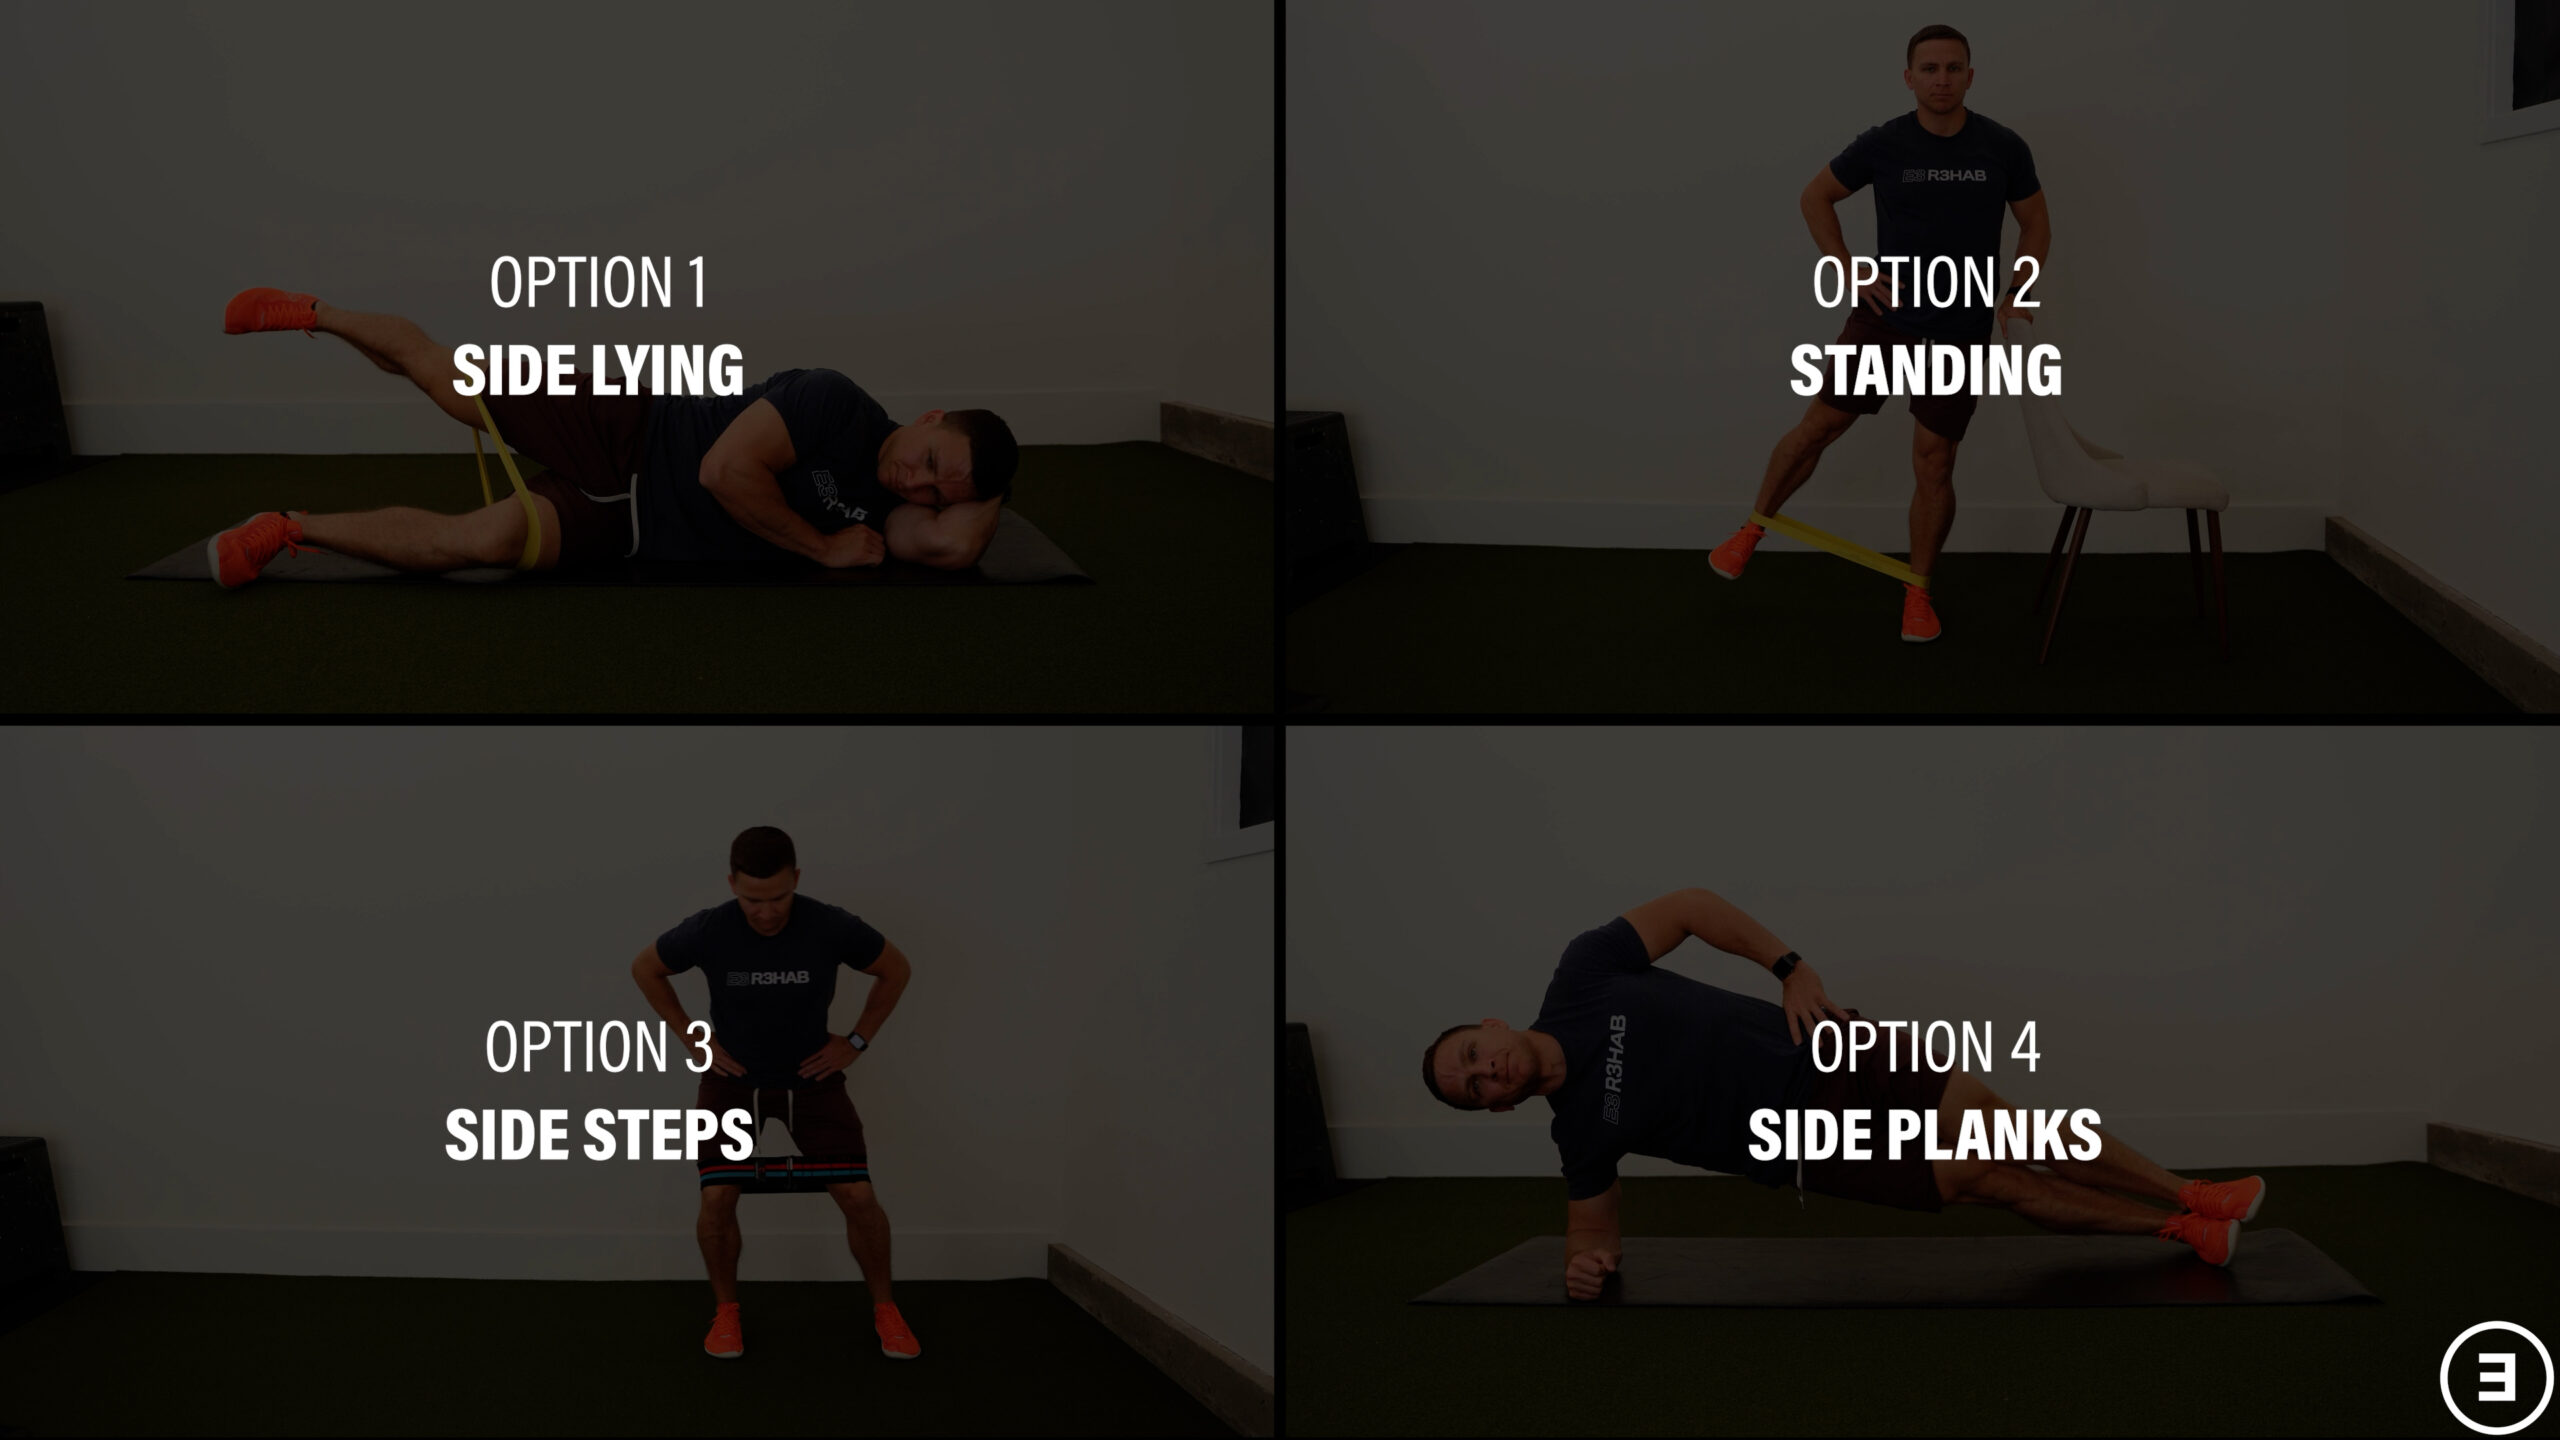
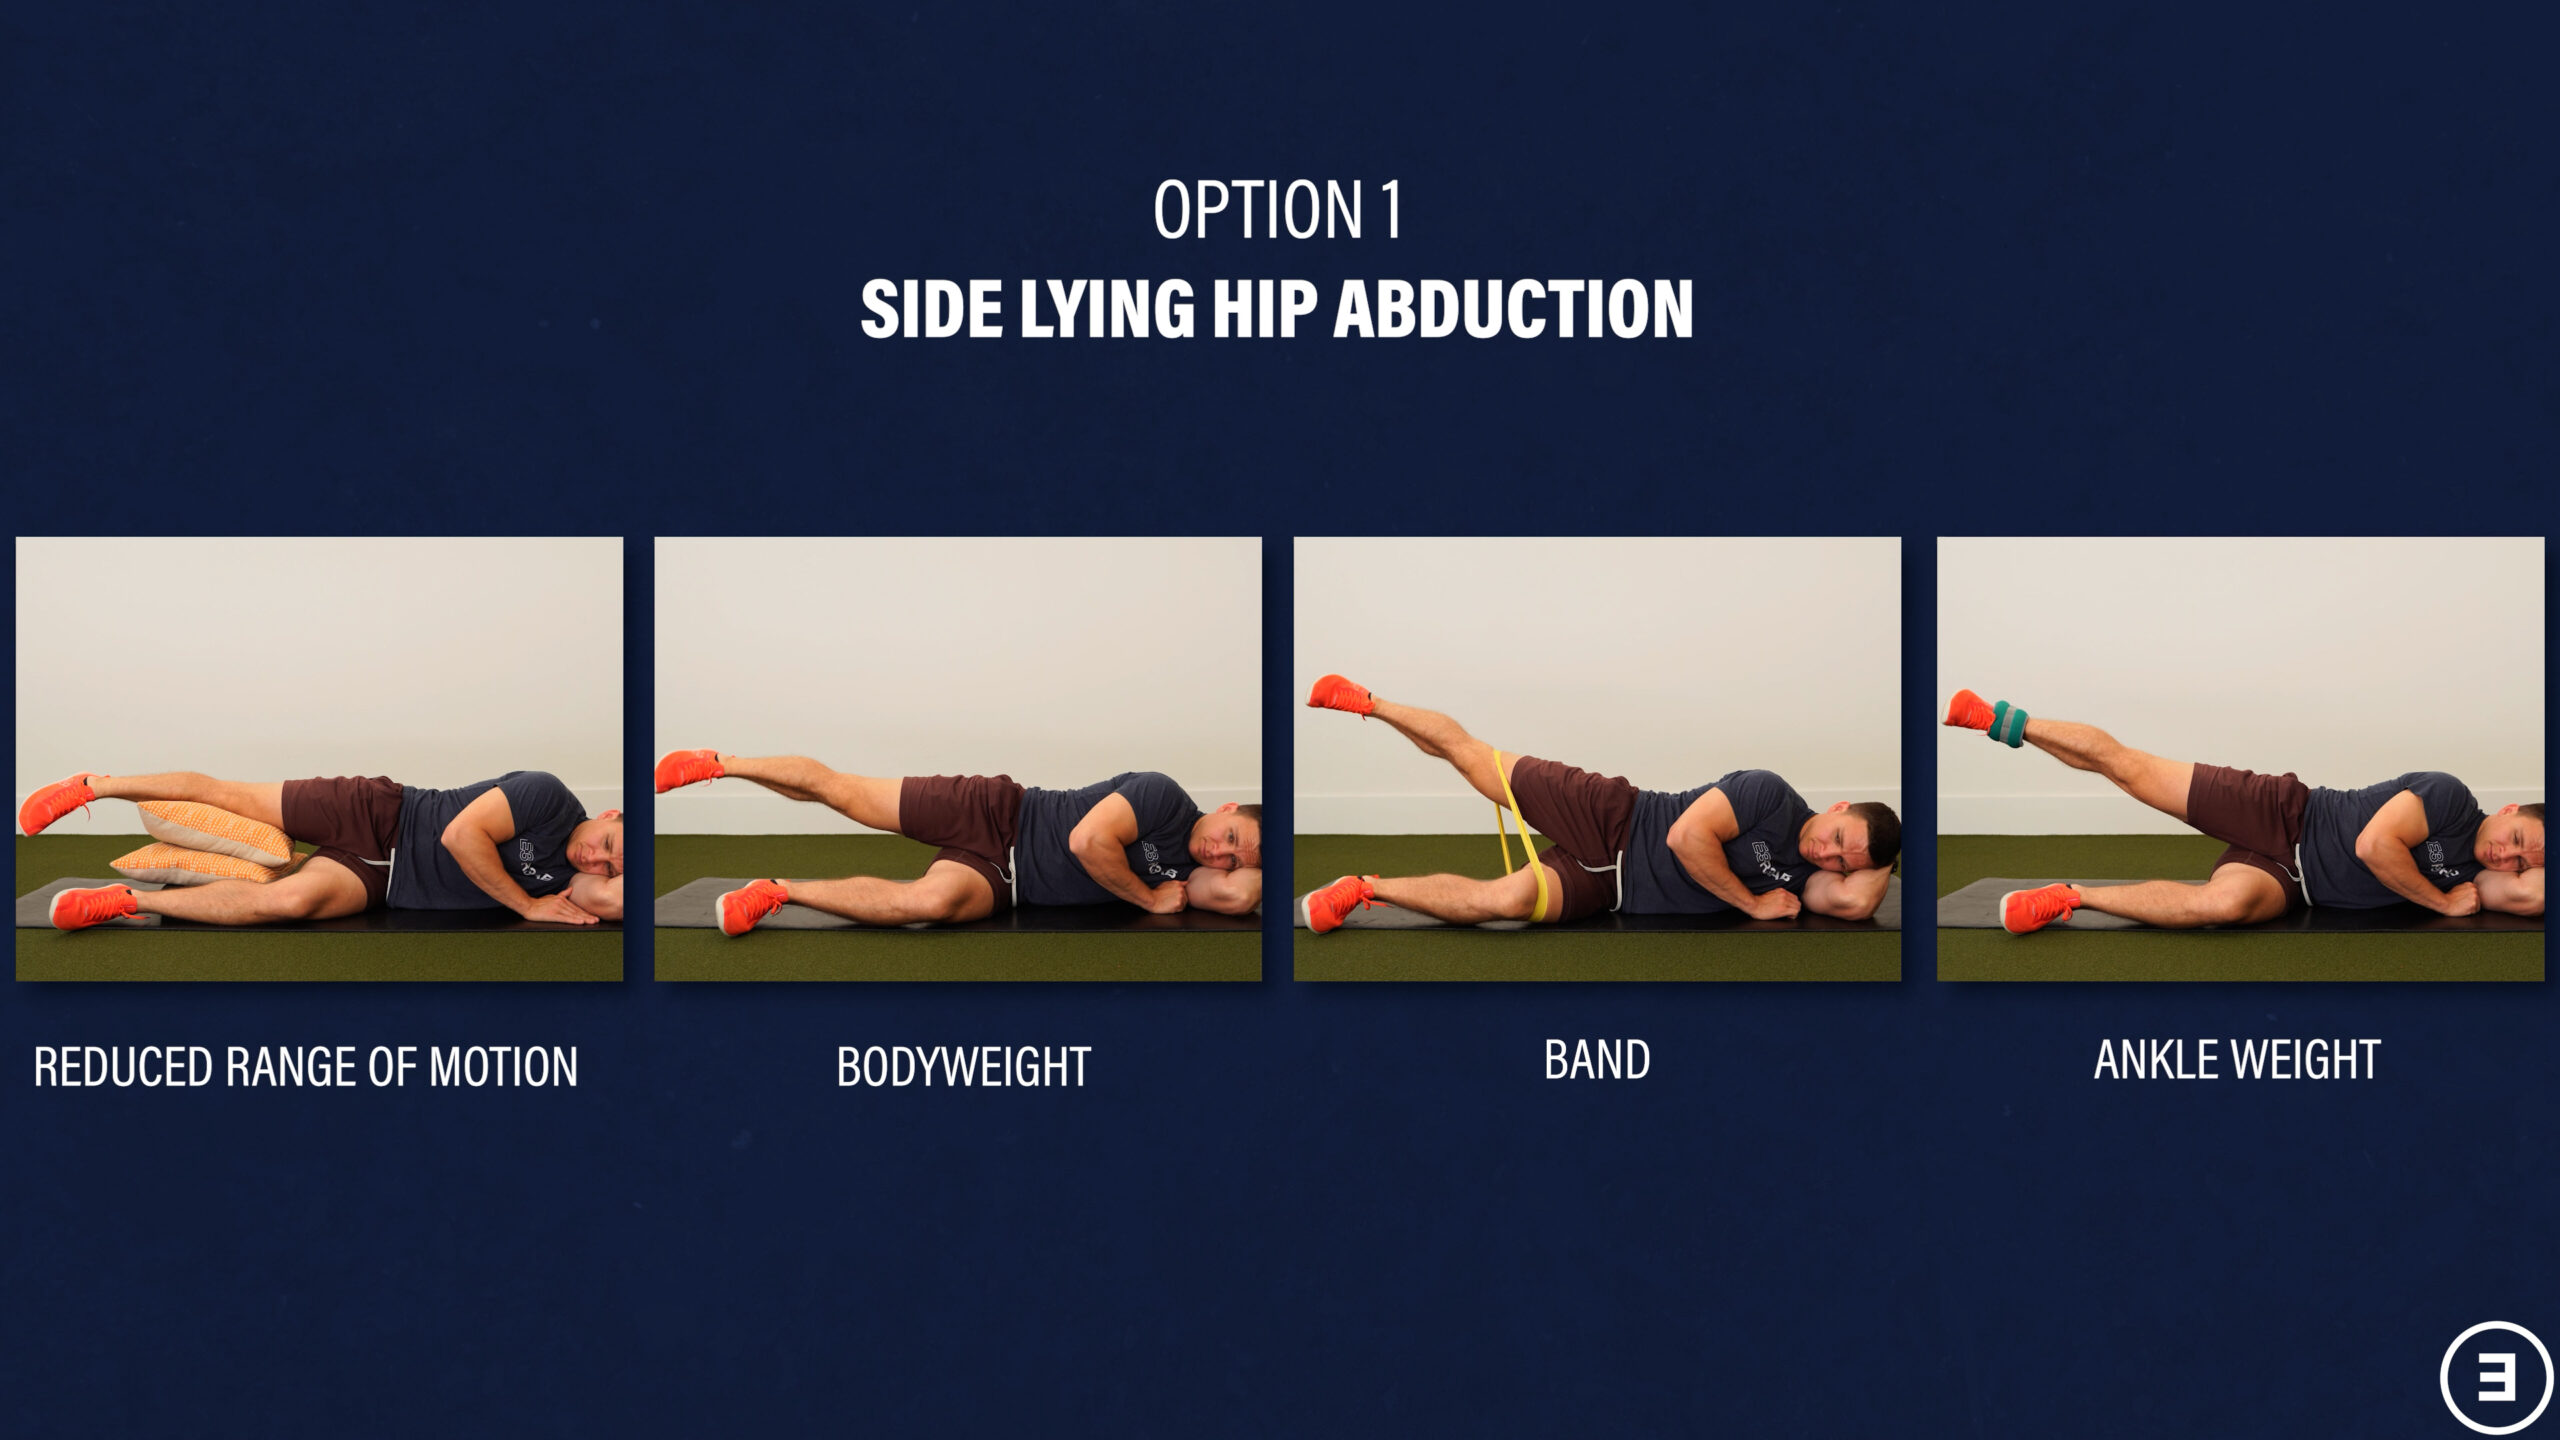
For side lying hip abduction, lie on your unaffected side with your bottom hip and knee bent. While keeping your top knee straight, lift the top leg up toward the ceiling and lower back down. If you need to make it easier or more comfortable, you can start with your top leg resting on 1-2 pillows and only lift a small amount. To make the exercise harder, add a band around your thighs or weight to your ankle.
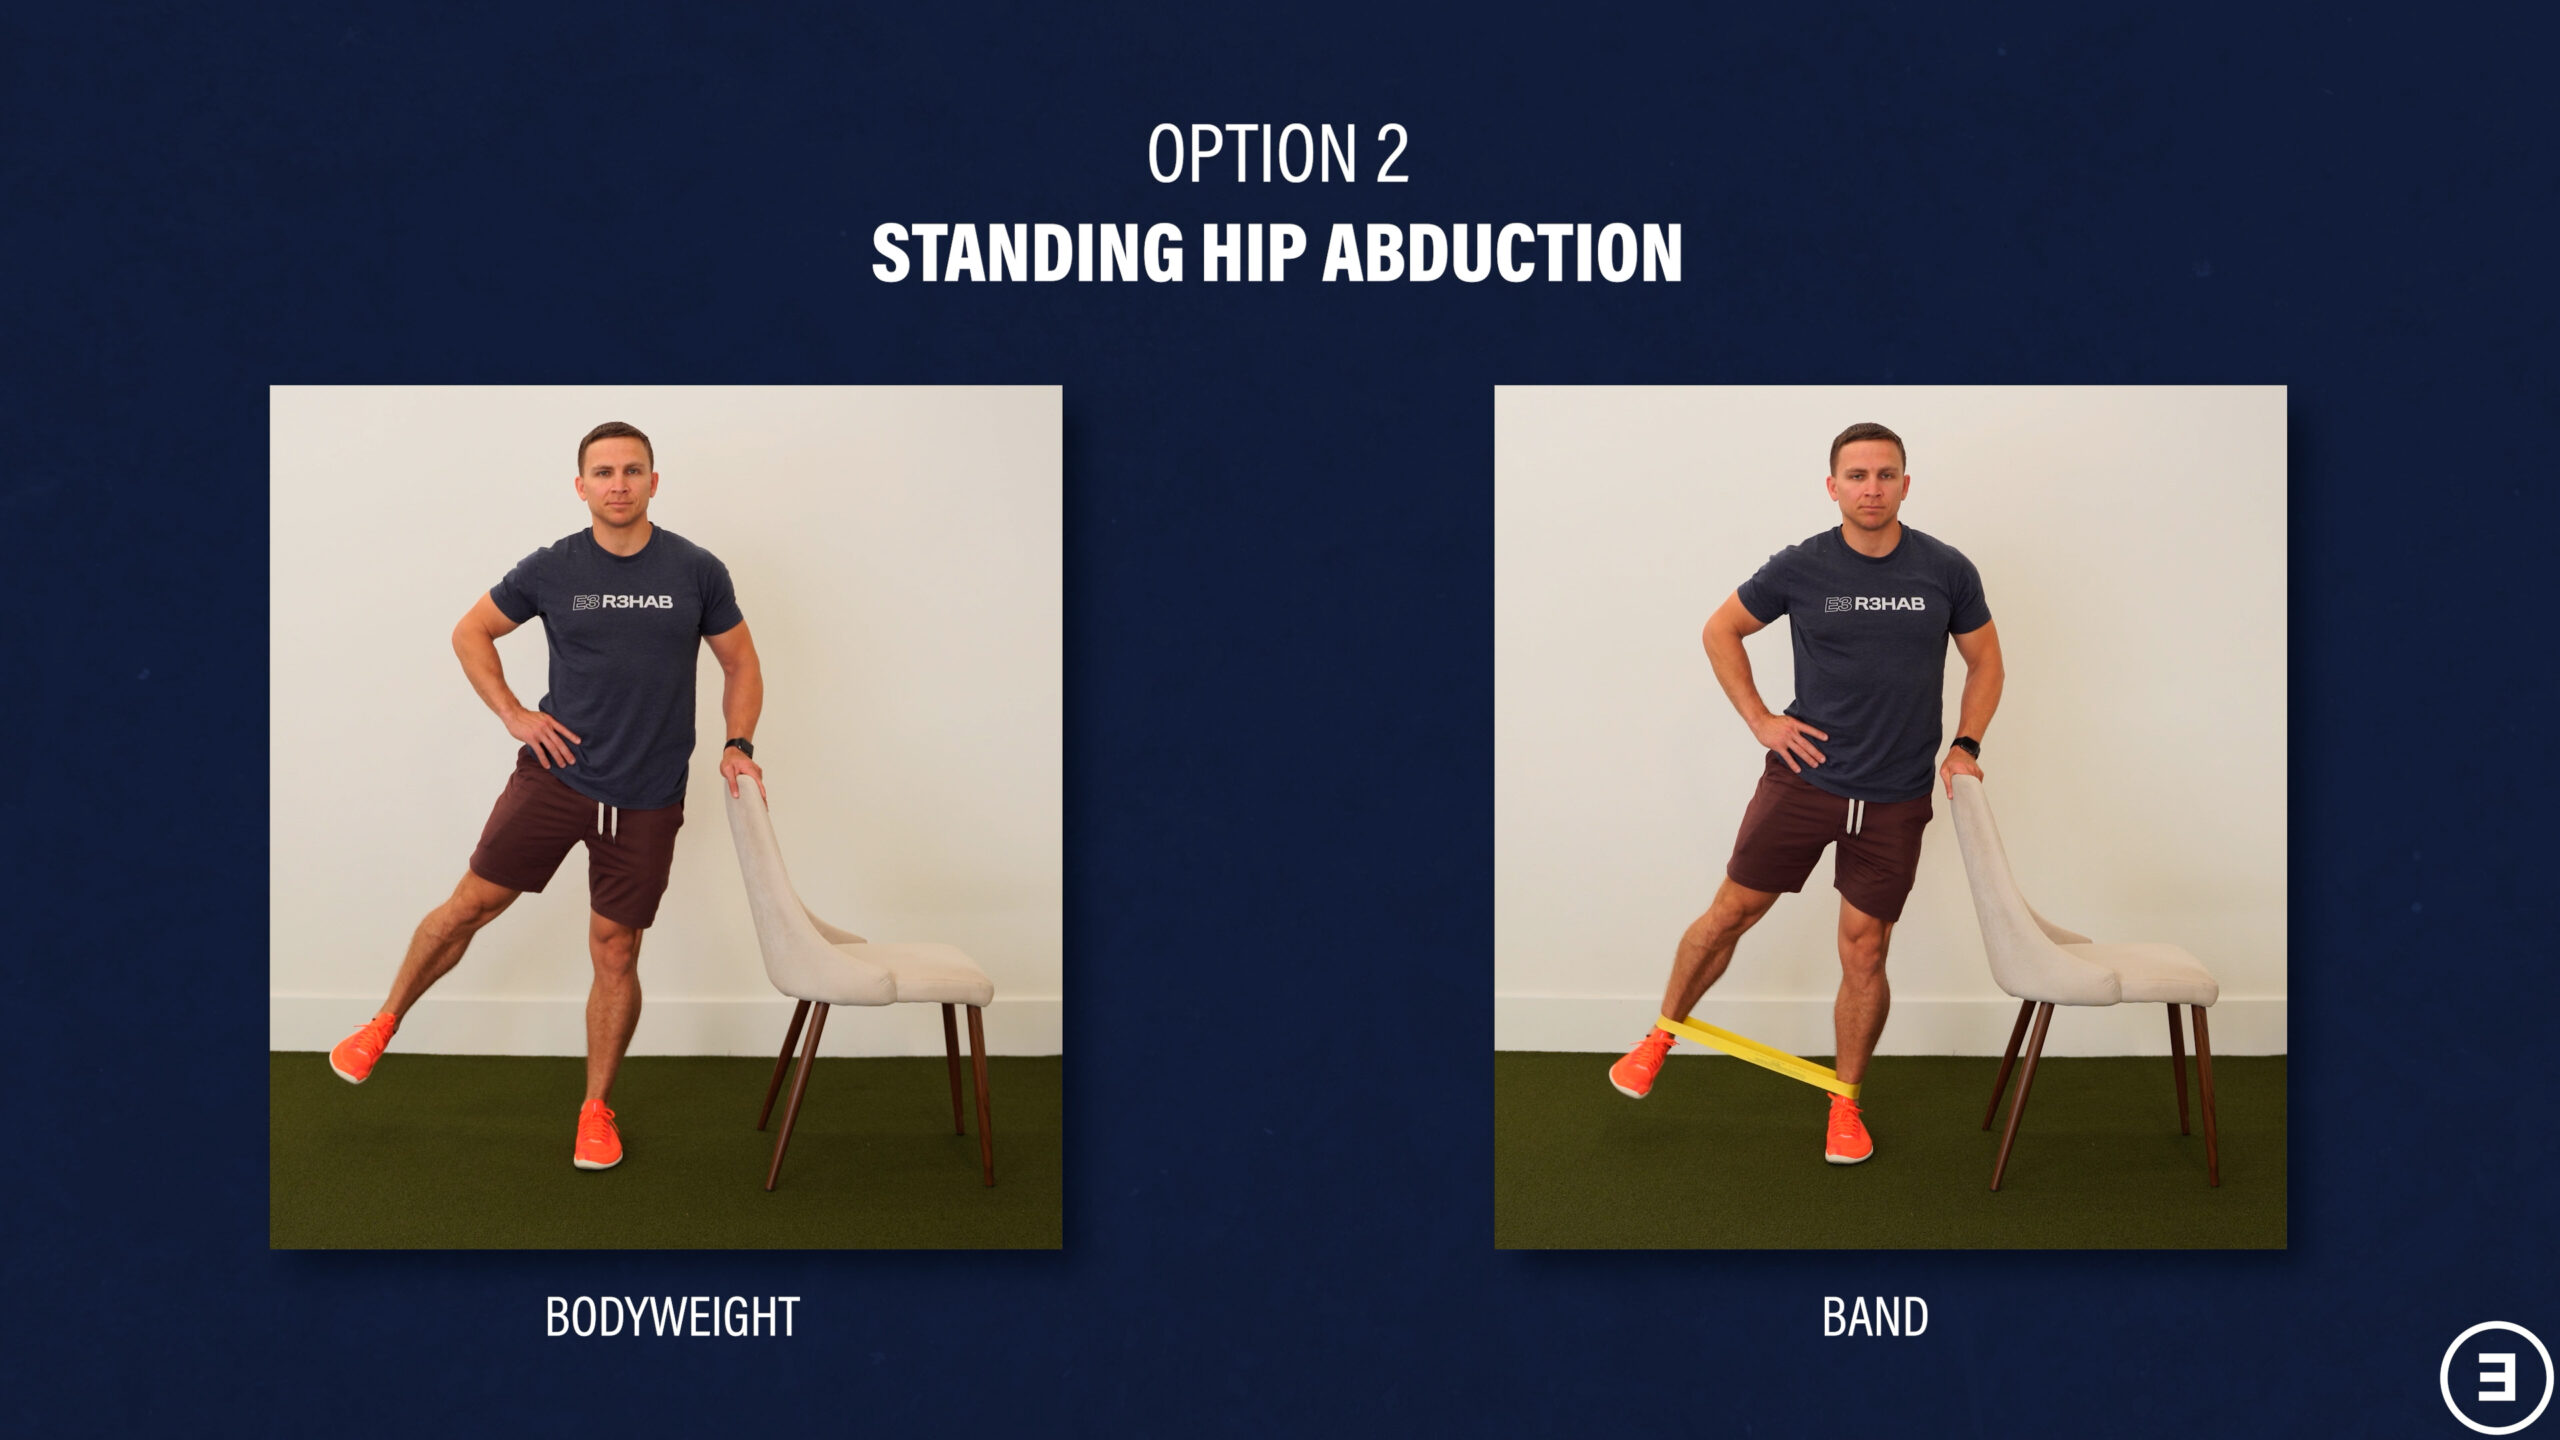
For standing hip abduction, hold on to a chair, table, or countertop and kick your leg straight out to the side. To make it more challenging, add resistance using a band at home or the cable column at the gym. Both hips will be working during this exercise.
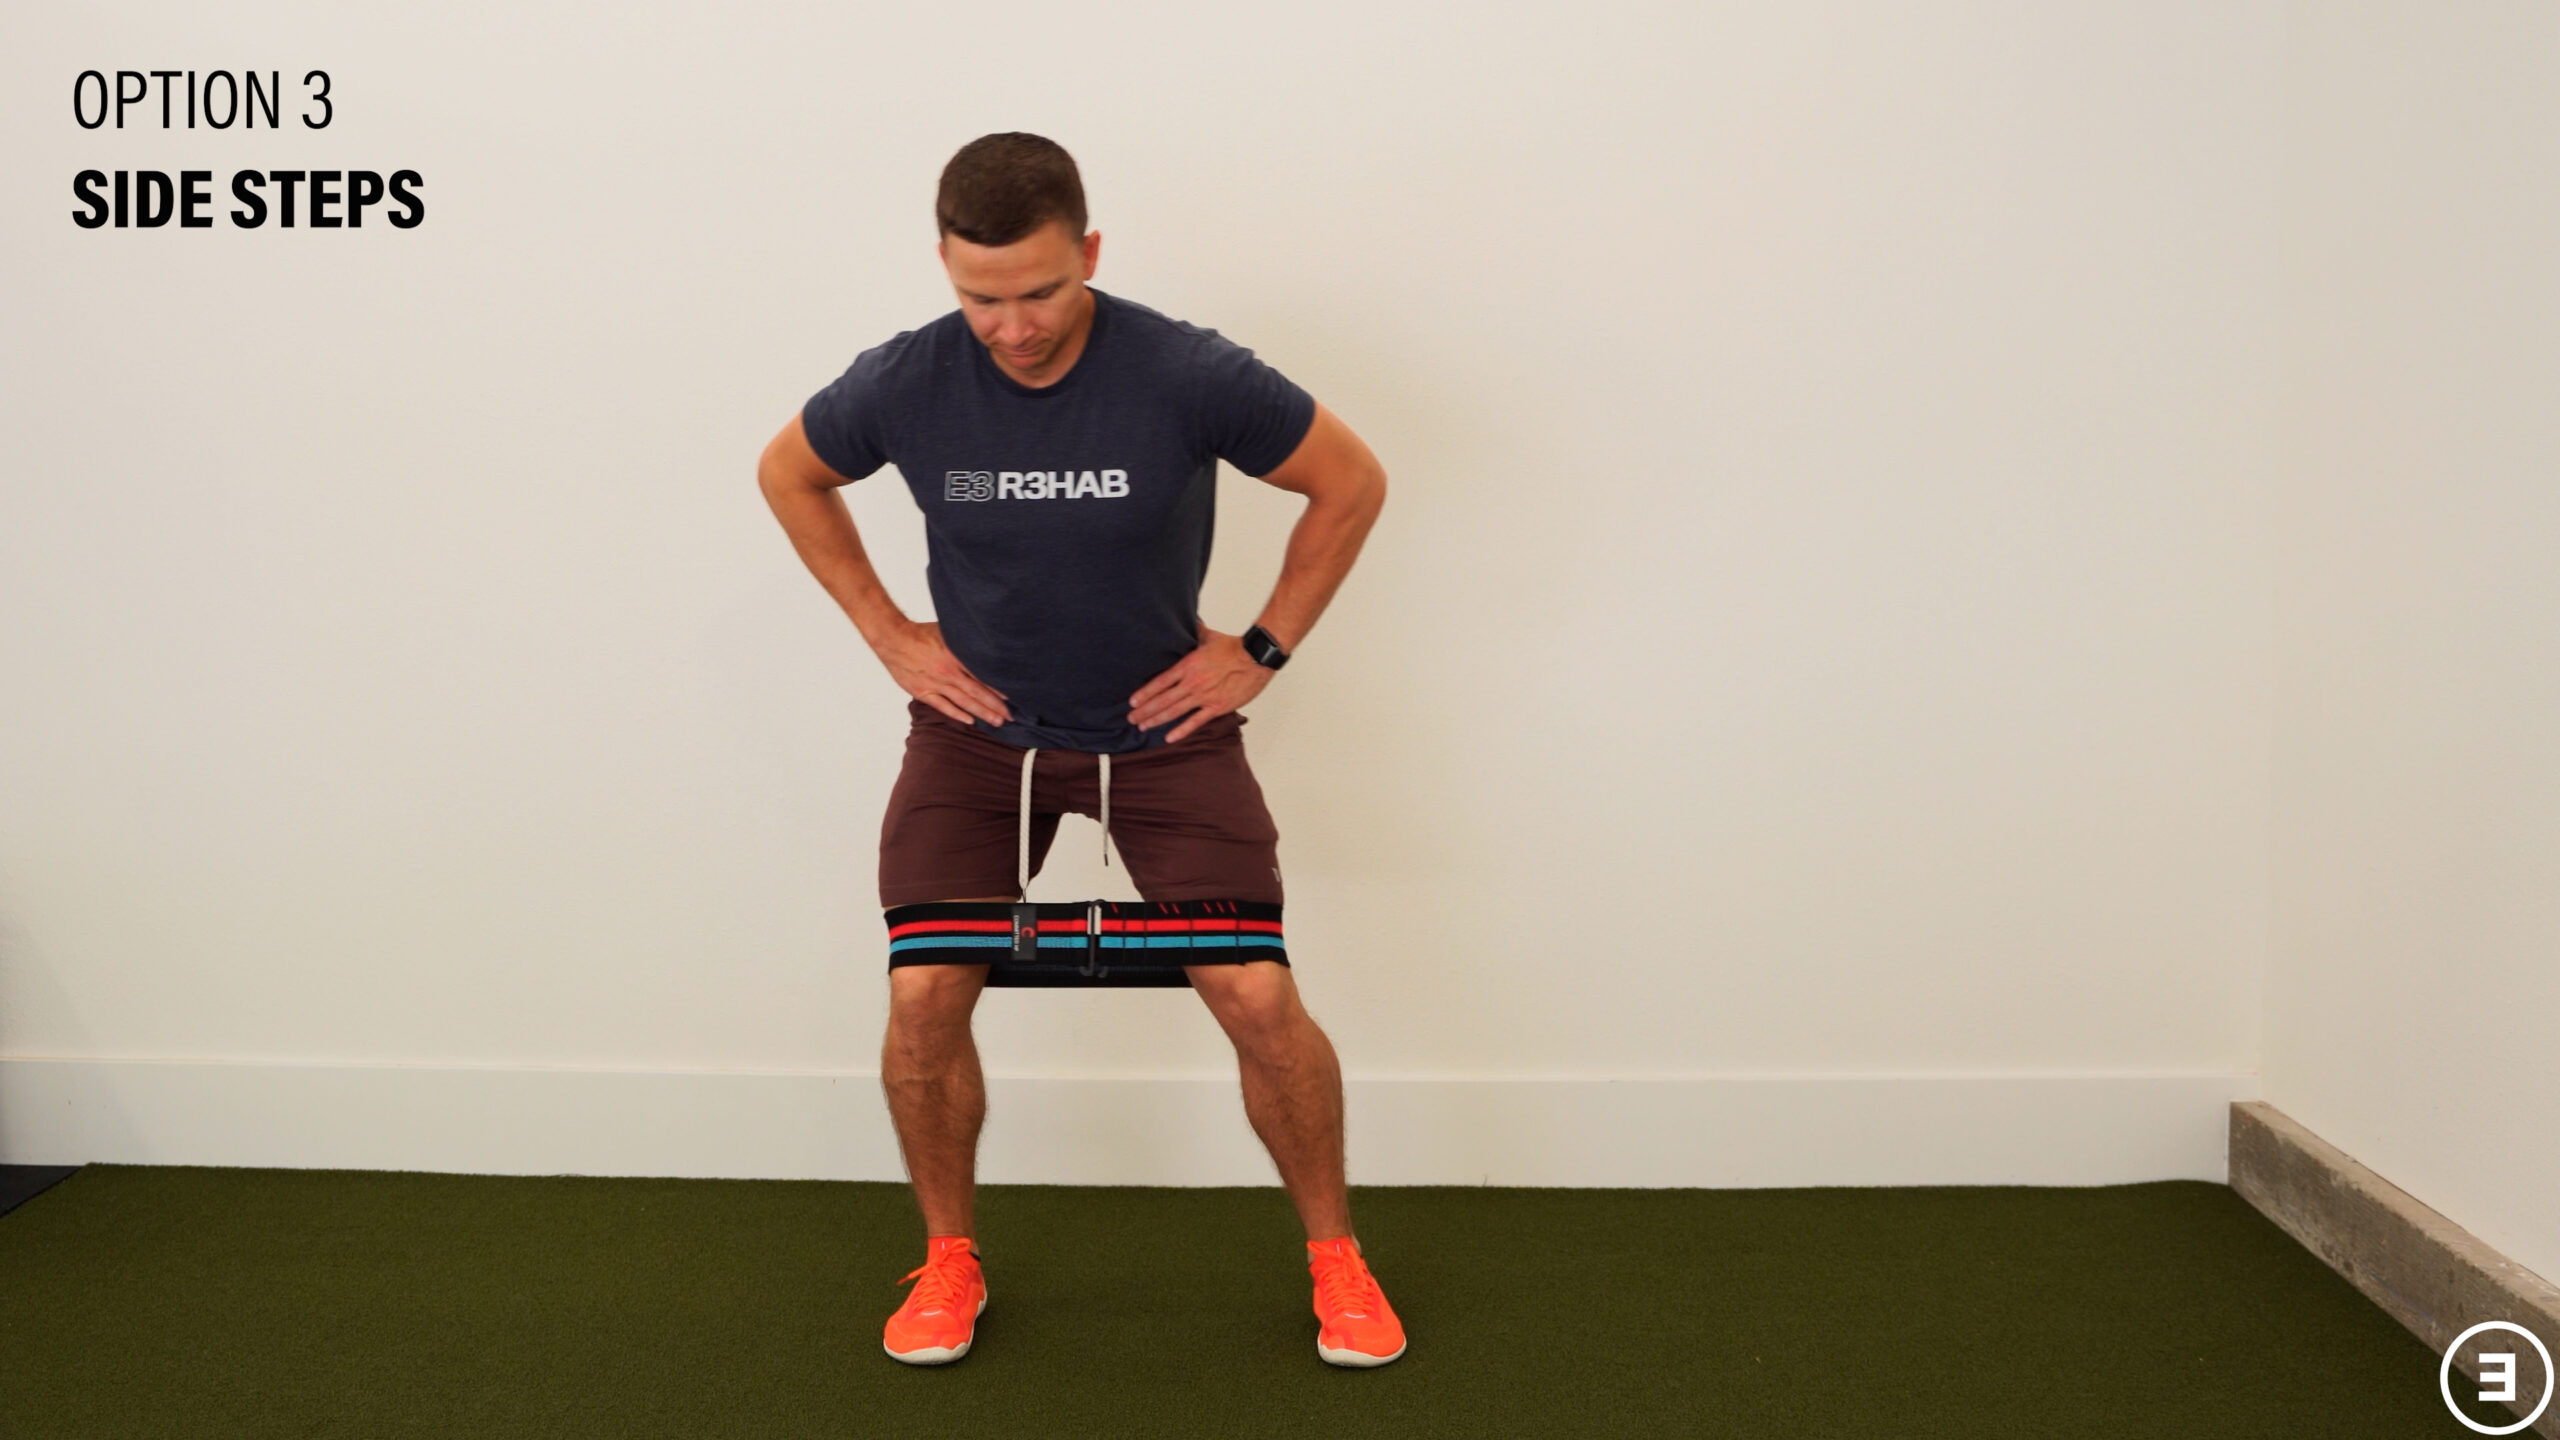
You can also do side steps in standing with a band around your knees. To make it harder, increase the resistance of the band. You can practice side stepping without a band if needed.
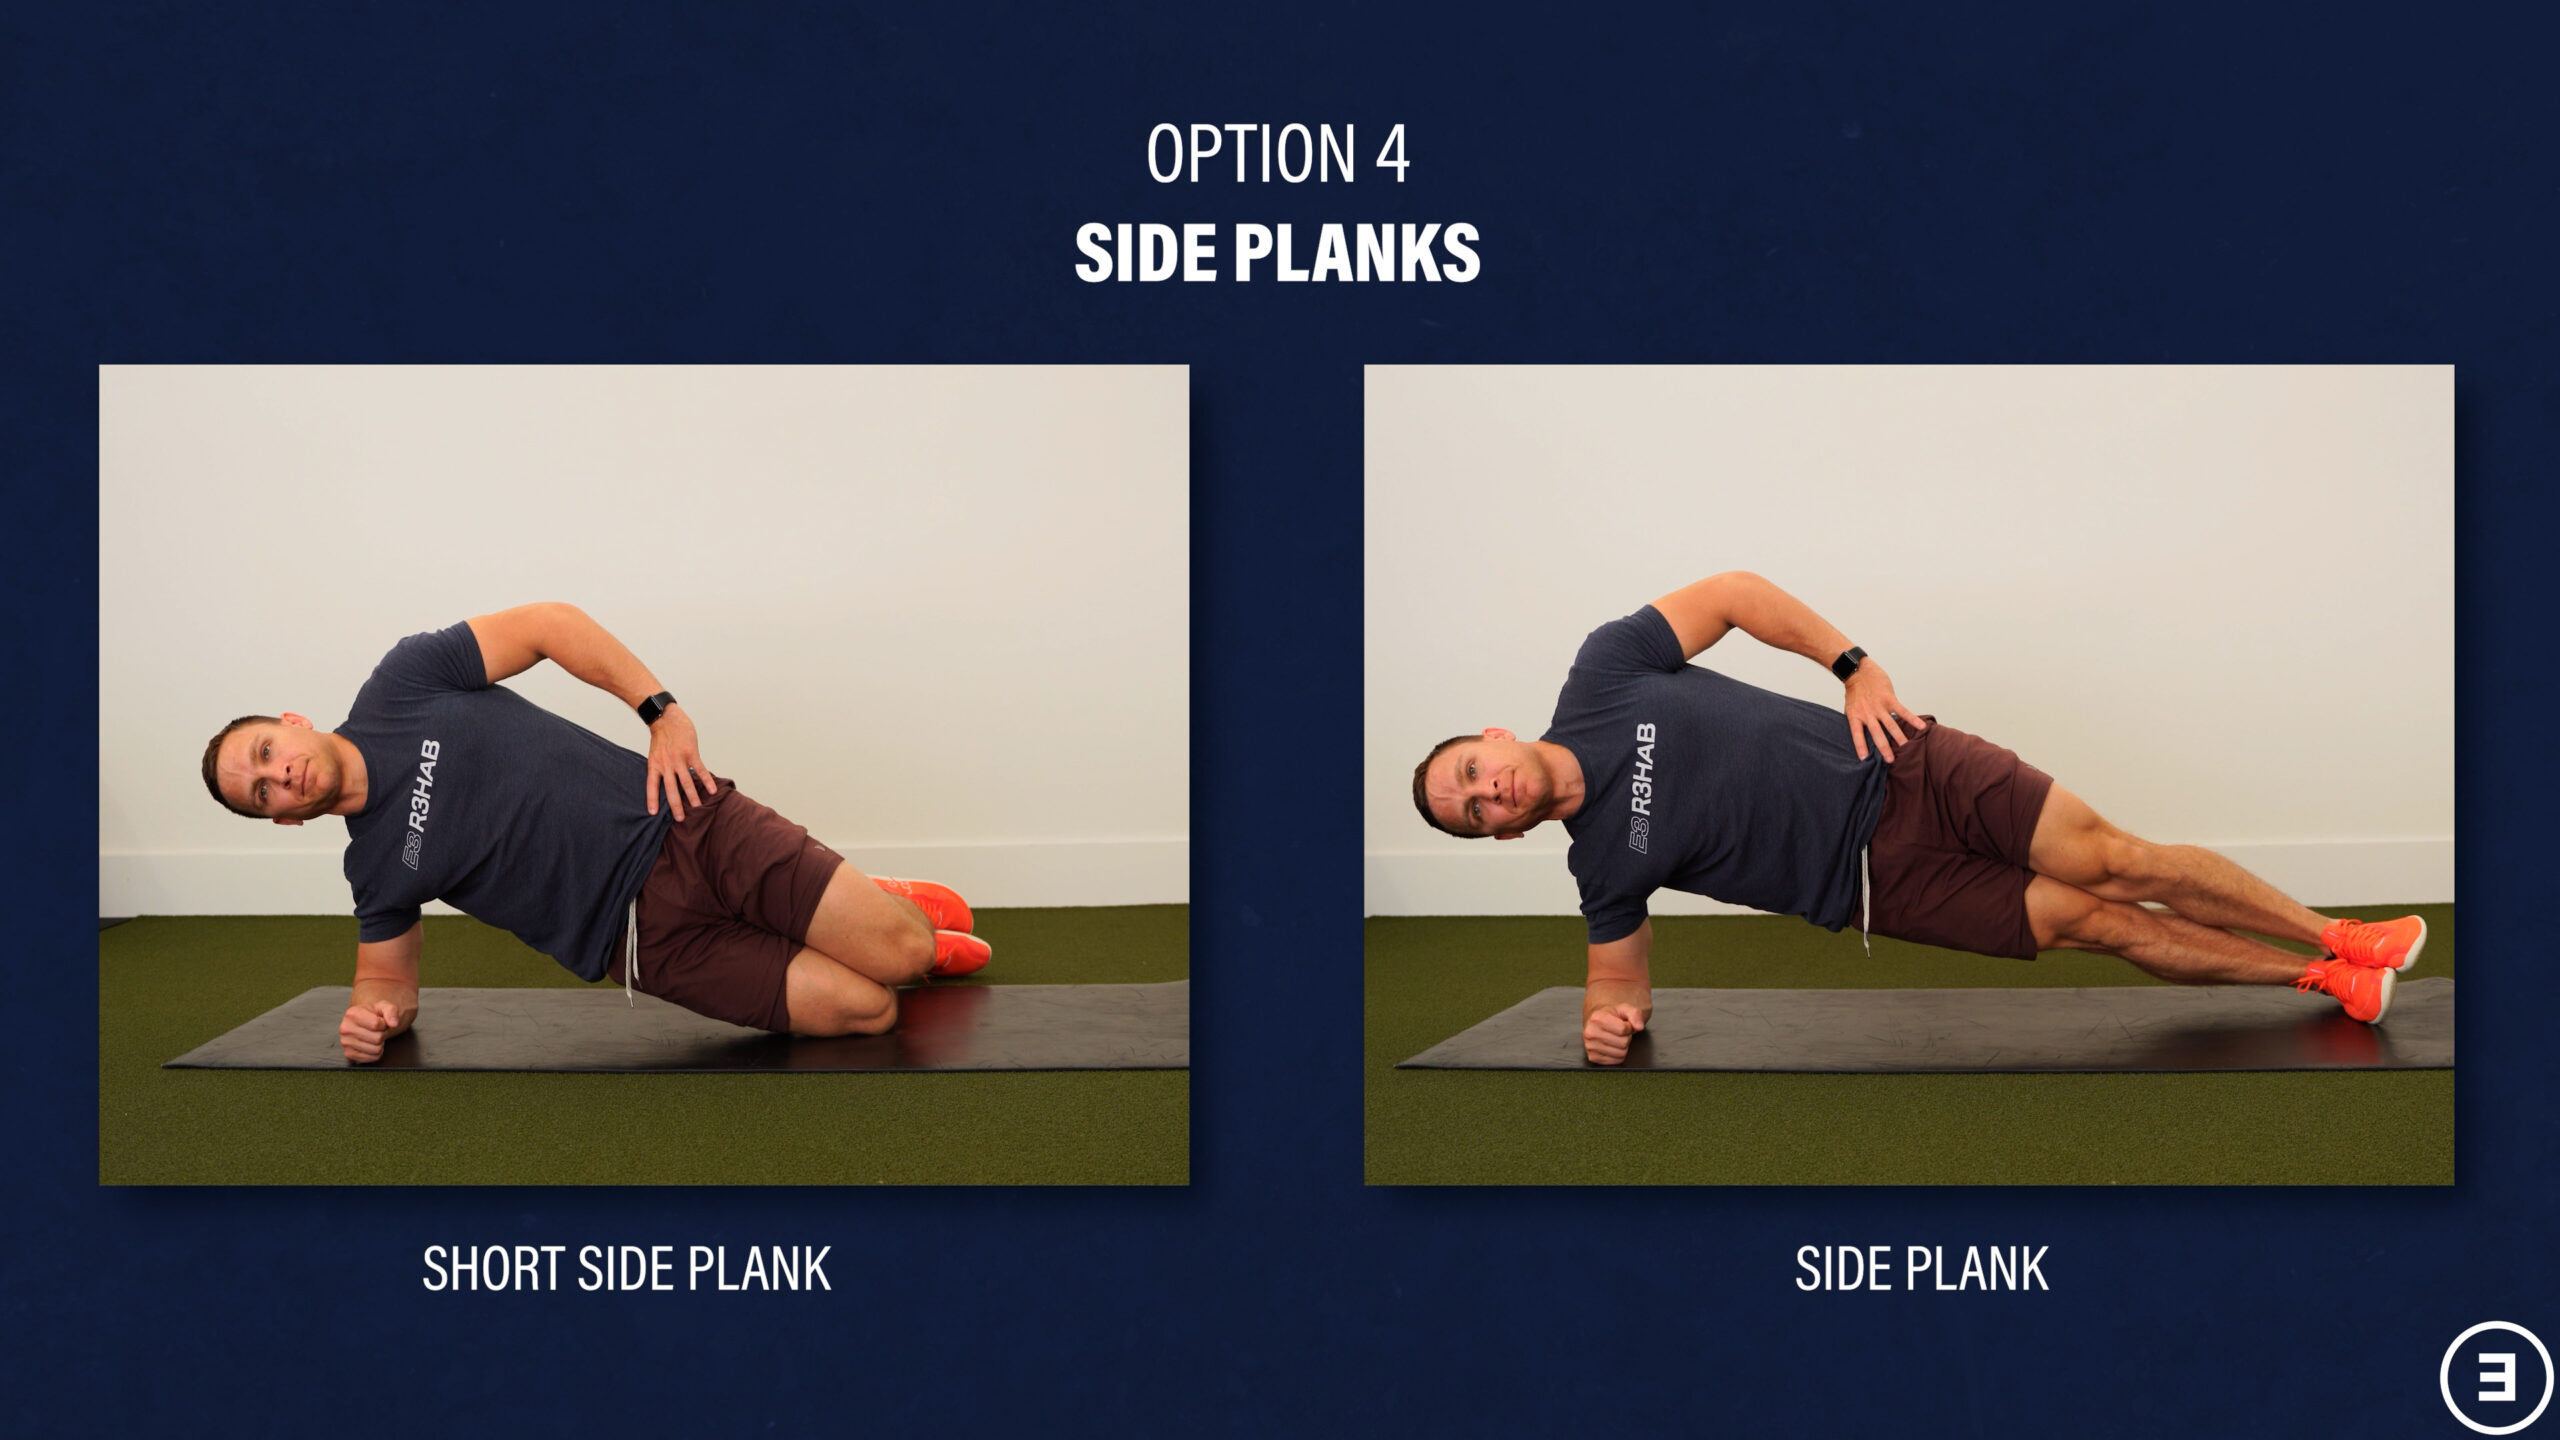
Lastly, you can perform side planks, or short side planks, which are easier.
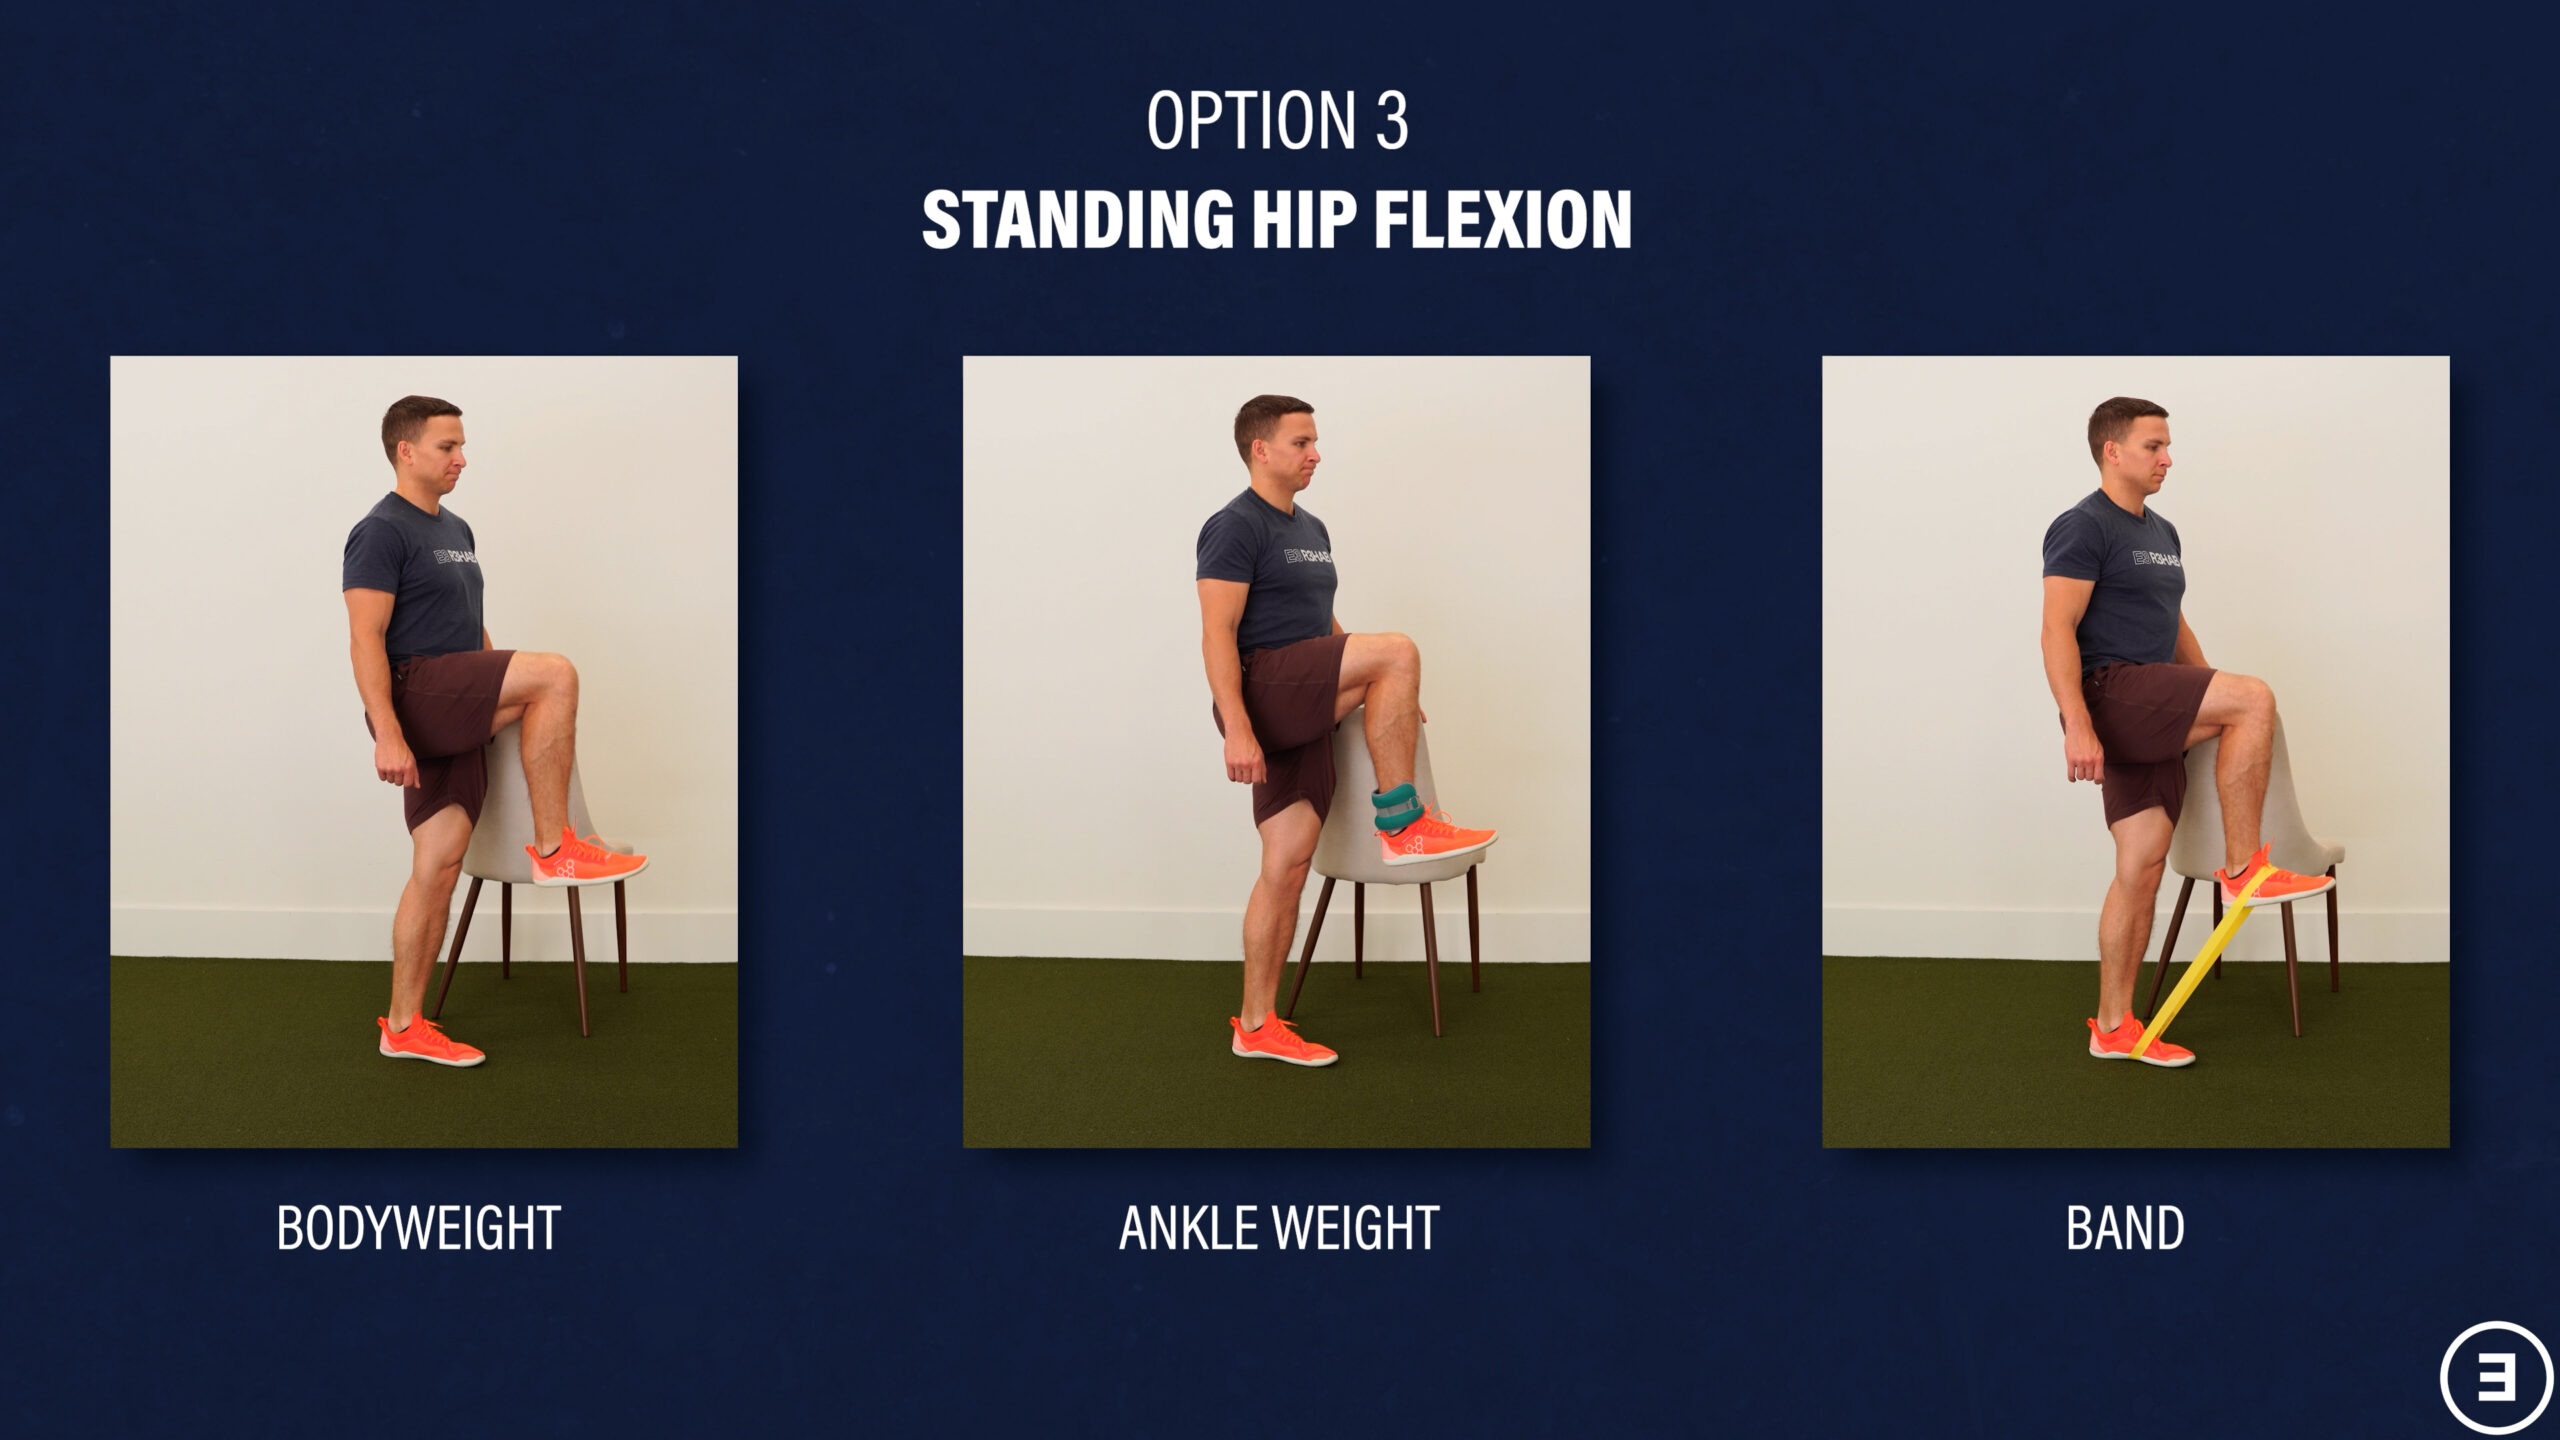
Hip Flexion (Category #7)
The final exercise category relates to hip flexion, which is important for walking, stairs, curbs, lifting your leg in and out of a car, etc.
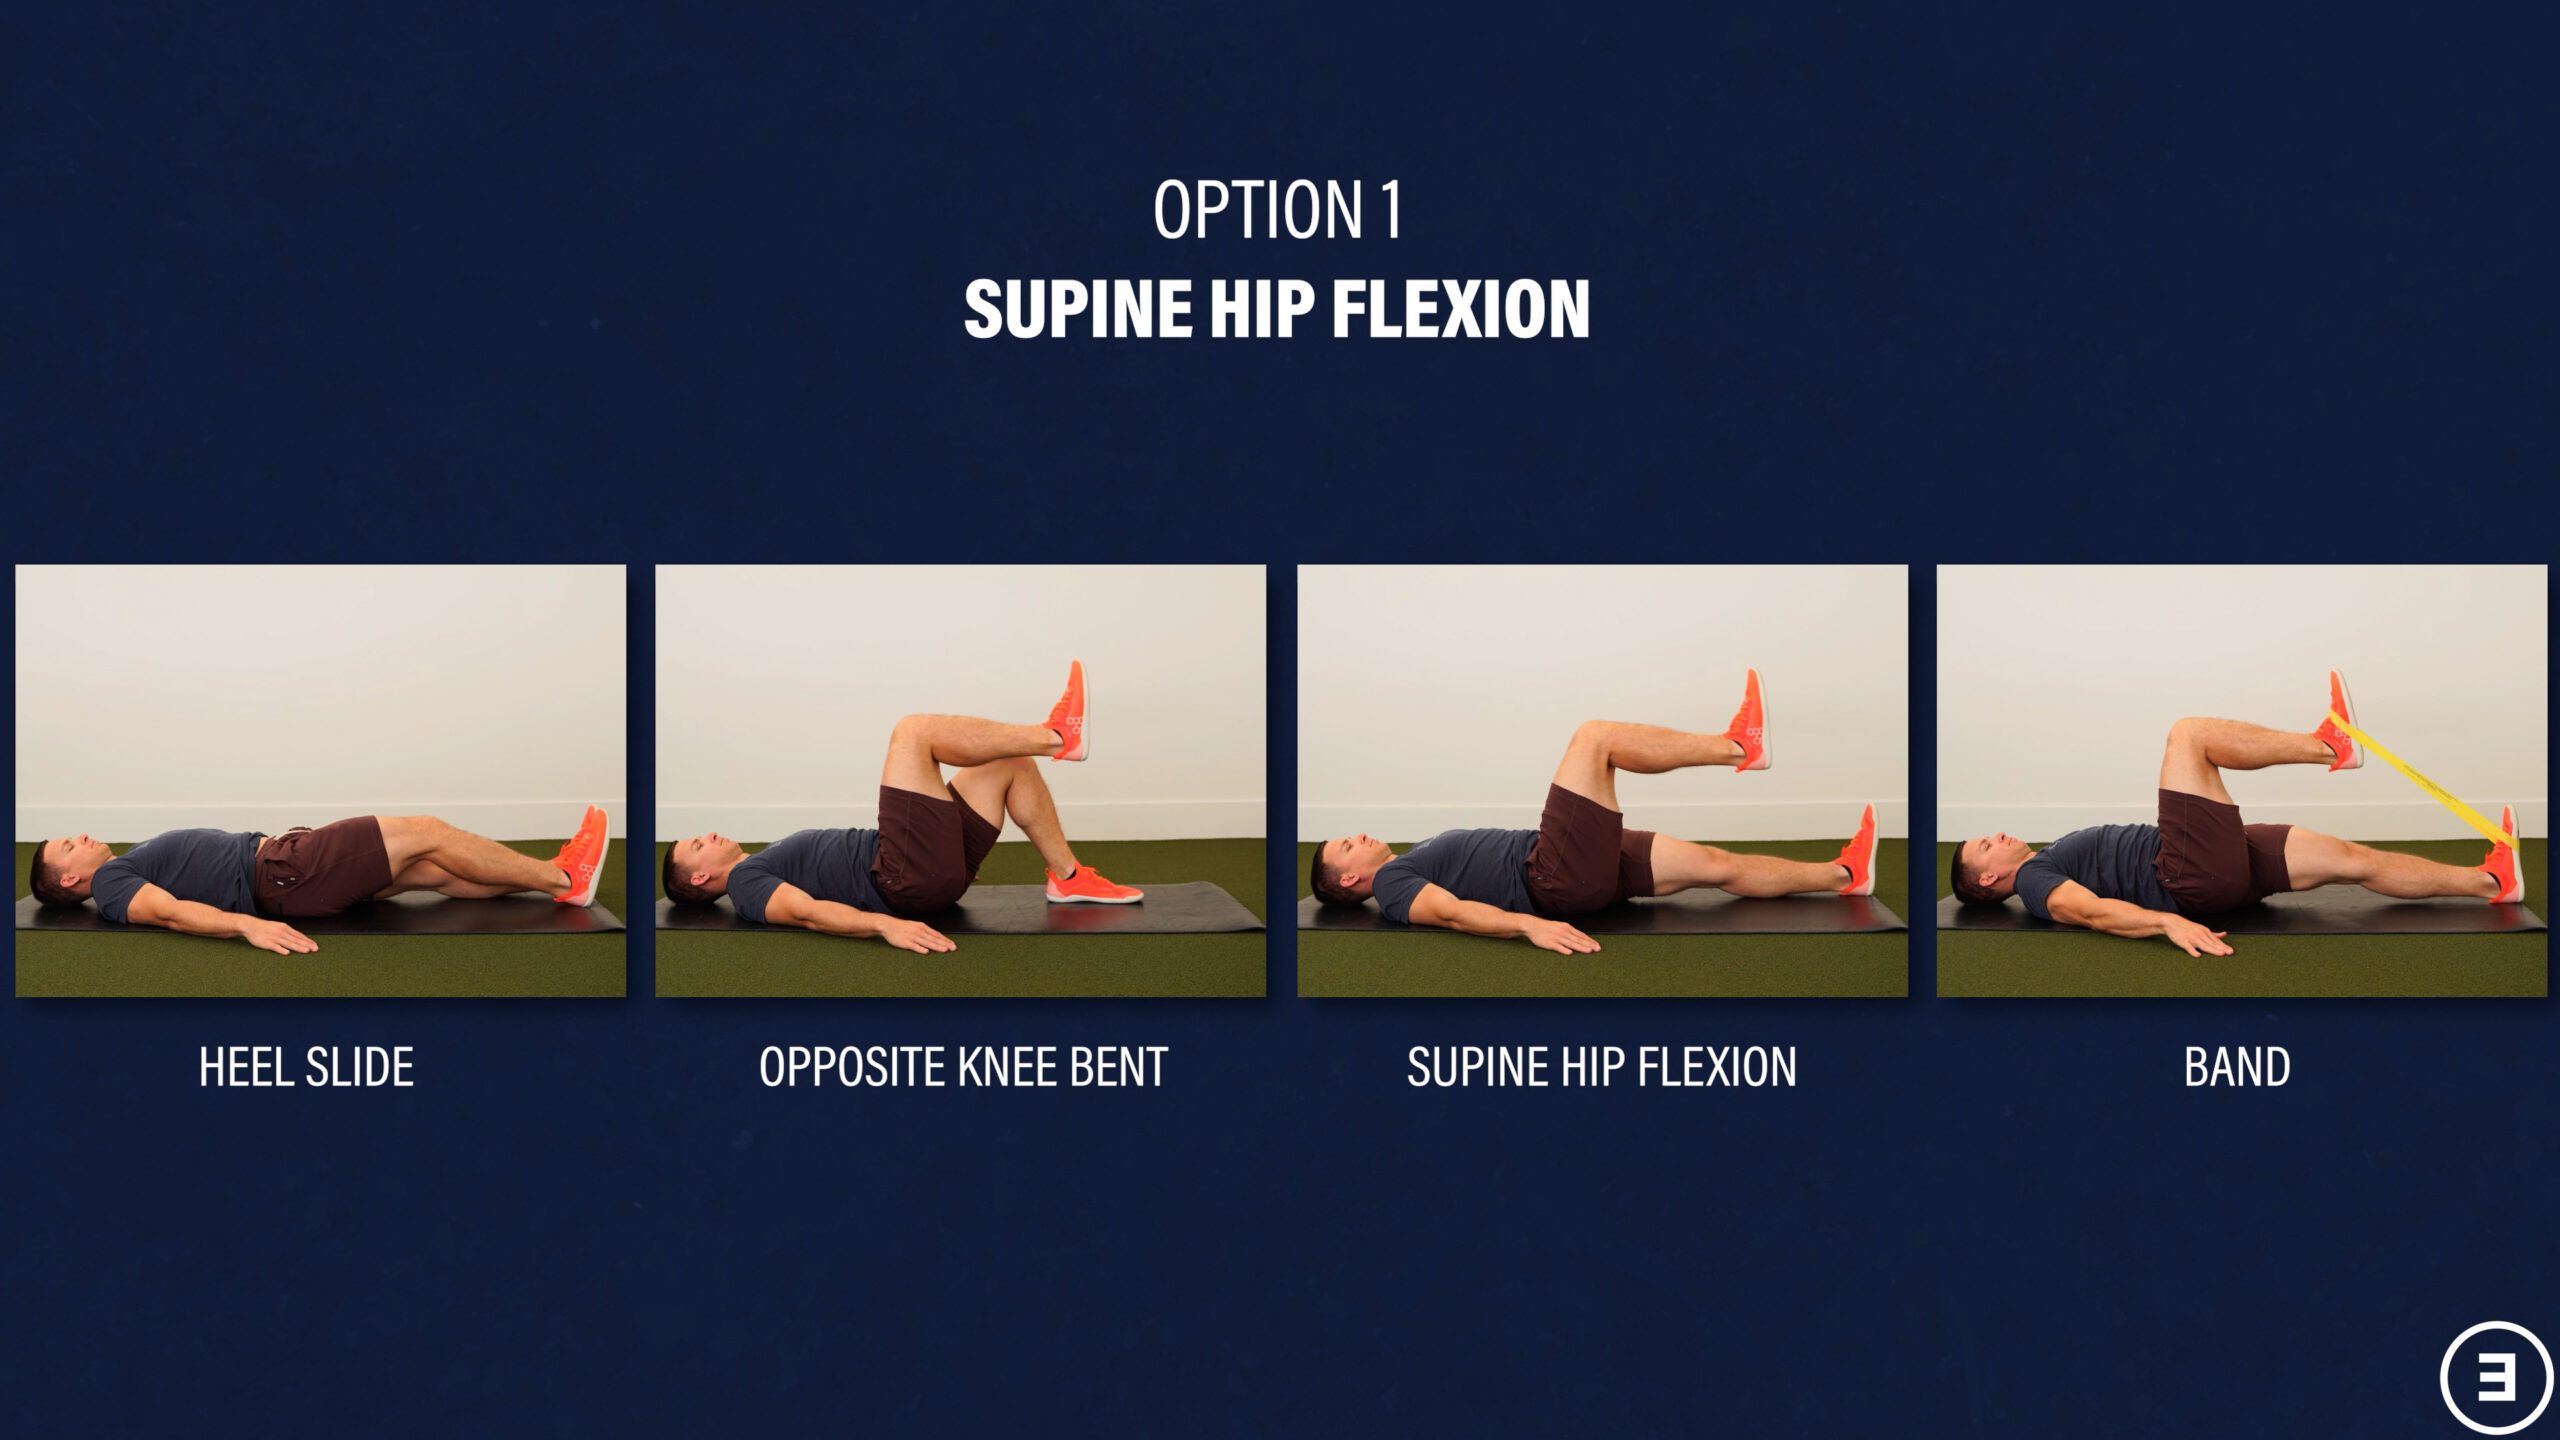
Starting on your back with both legs straight, lift one thigh toward your chest, lower back down, and repeat. If that’s too difficult, try bending the opposite knee or just starting with a heel slide. Add a band around your feet to make the movement significantly harder.
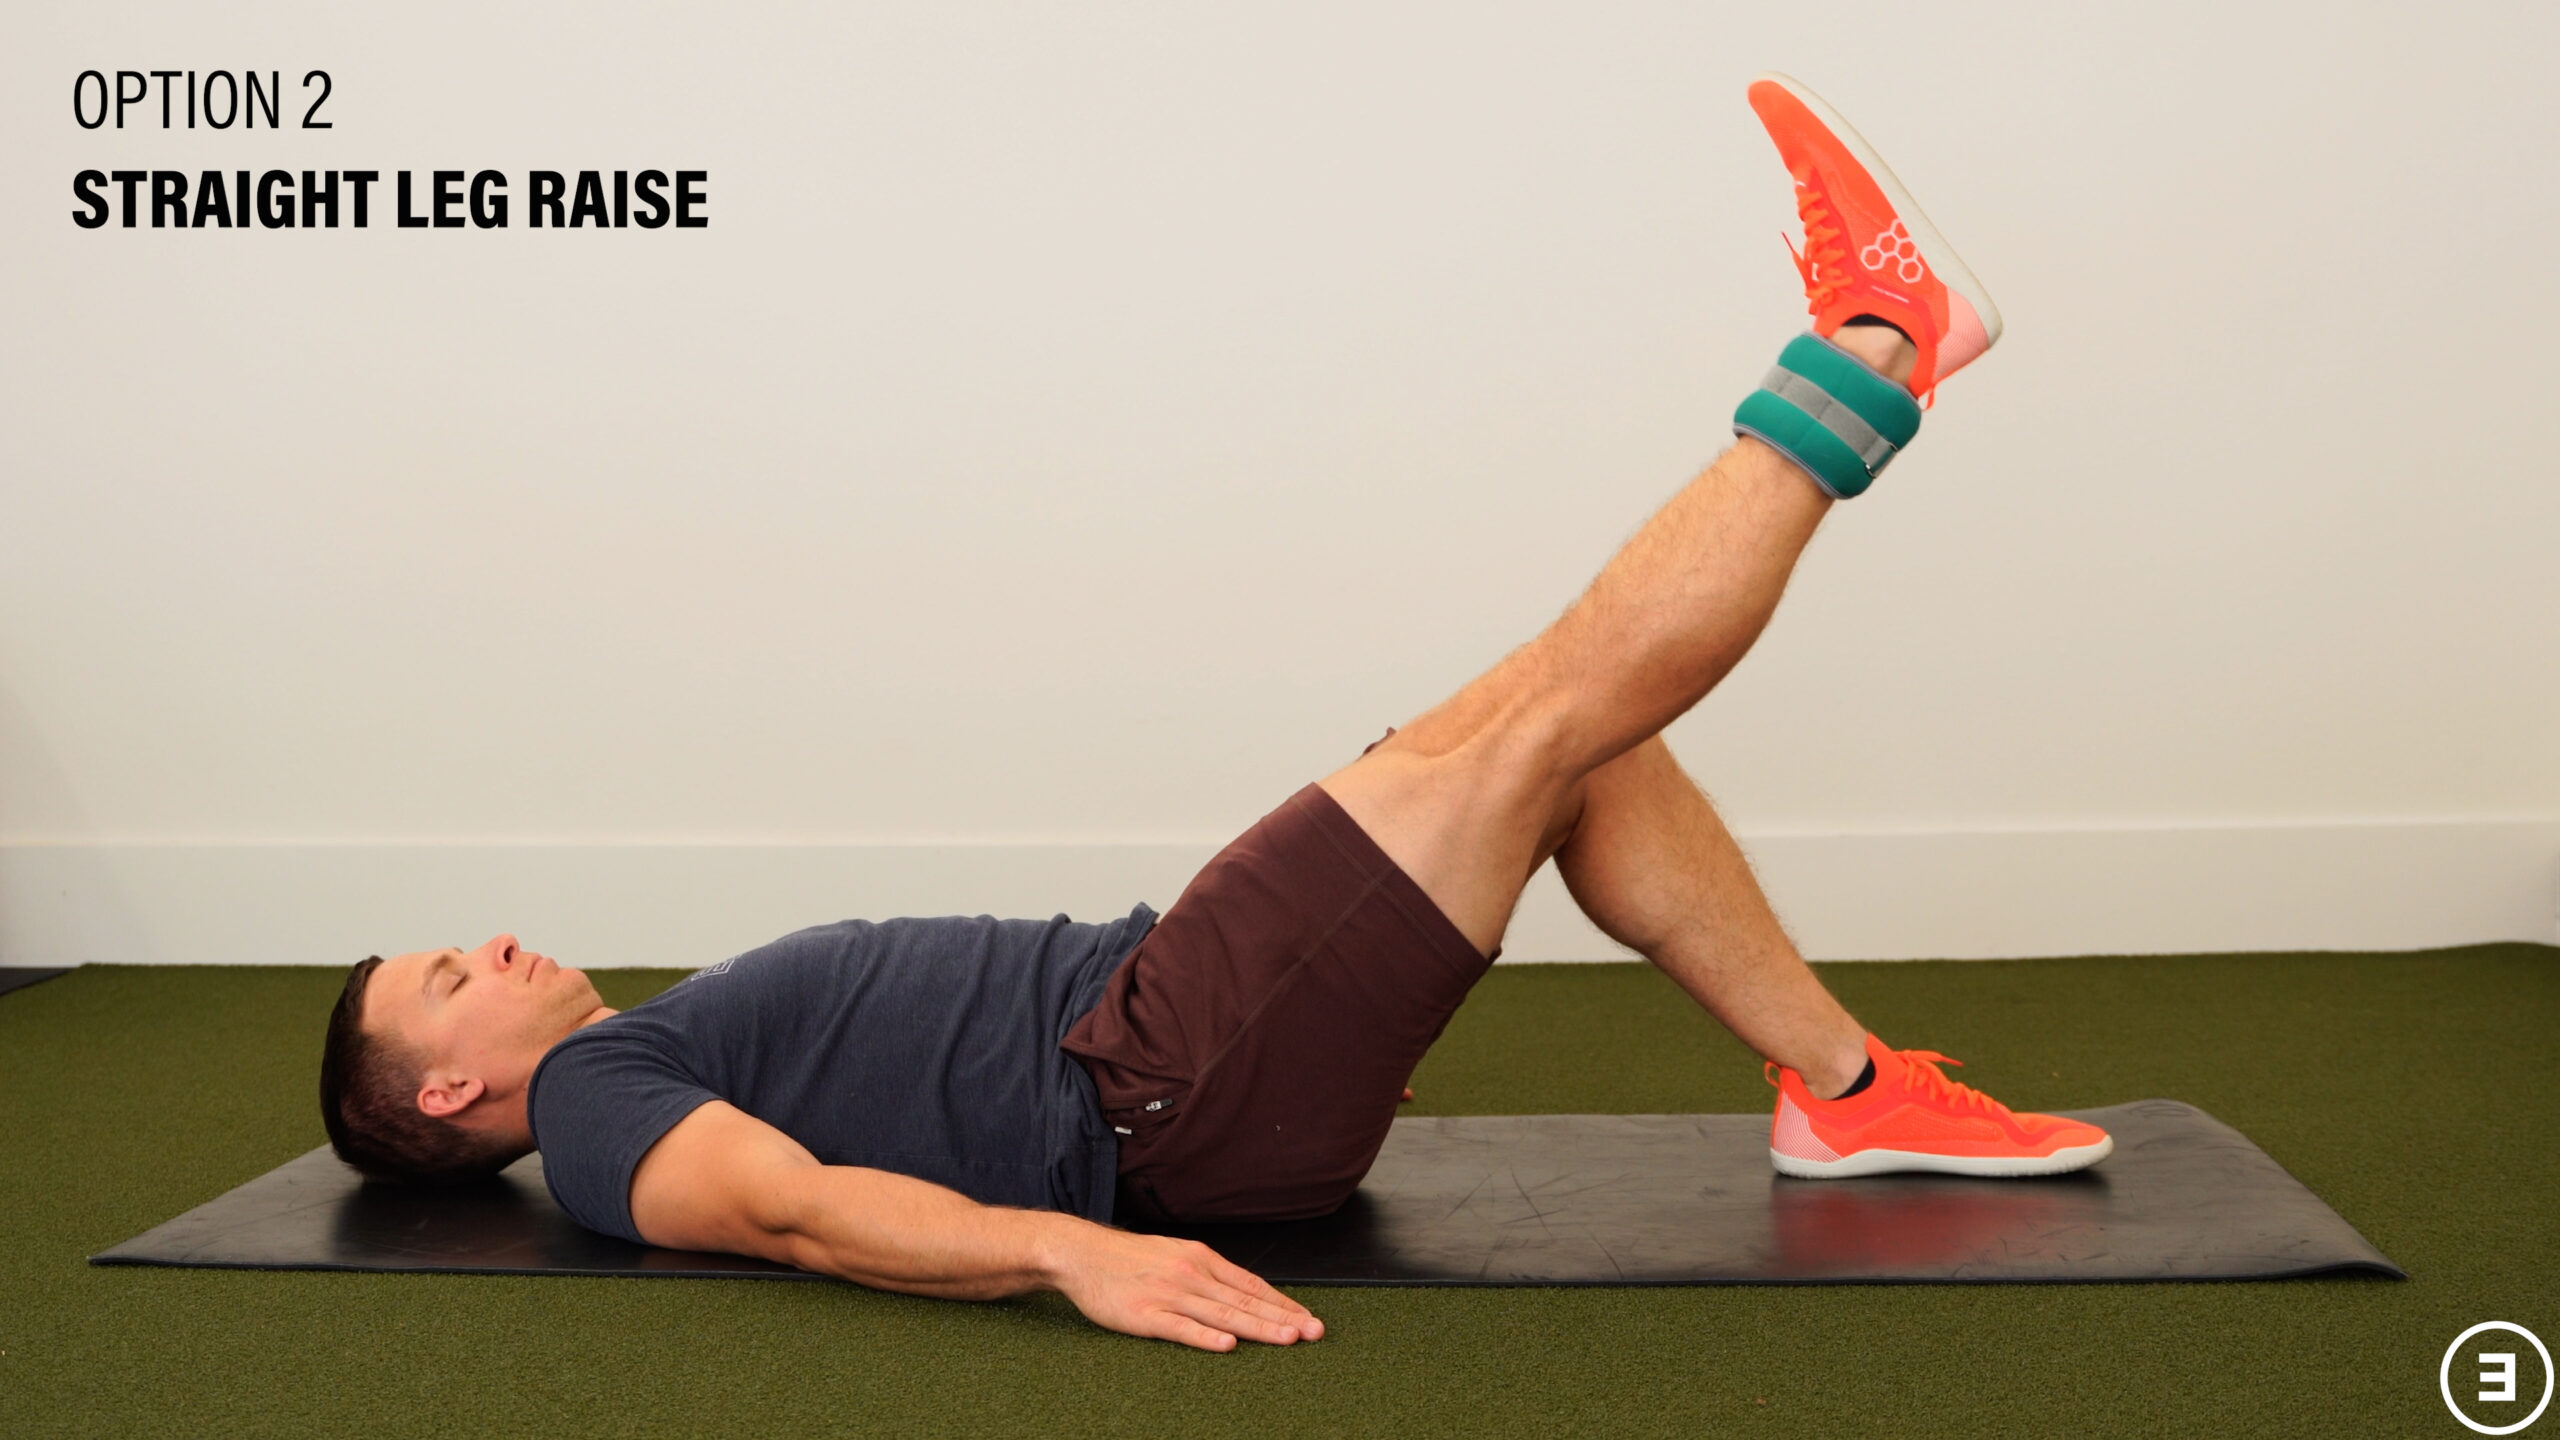
Another option is a straight leg raise. While keeping one knee bent, squeeze the thigh muscles of the working leg, and lift it up until it’s roughly parallel to your opposite thigh. Increase the difficulty by adding a weight to your ankle.
Hip flexion can also be done in standing while holding on to a sturdy object. Resistance can be added in the form of an ankle weight, band, cable column, or whatever else you have available to you.
Additional Exercises
If you want to expand your exercise selection beyond movements that focus on the hip, you should consider training your calves, upper body, and trunk musculature.
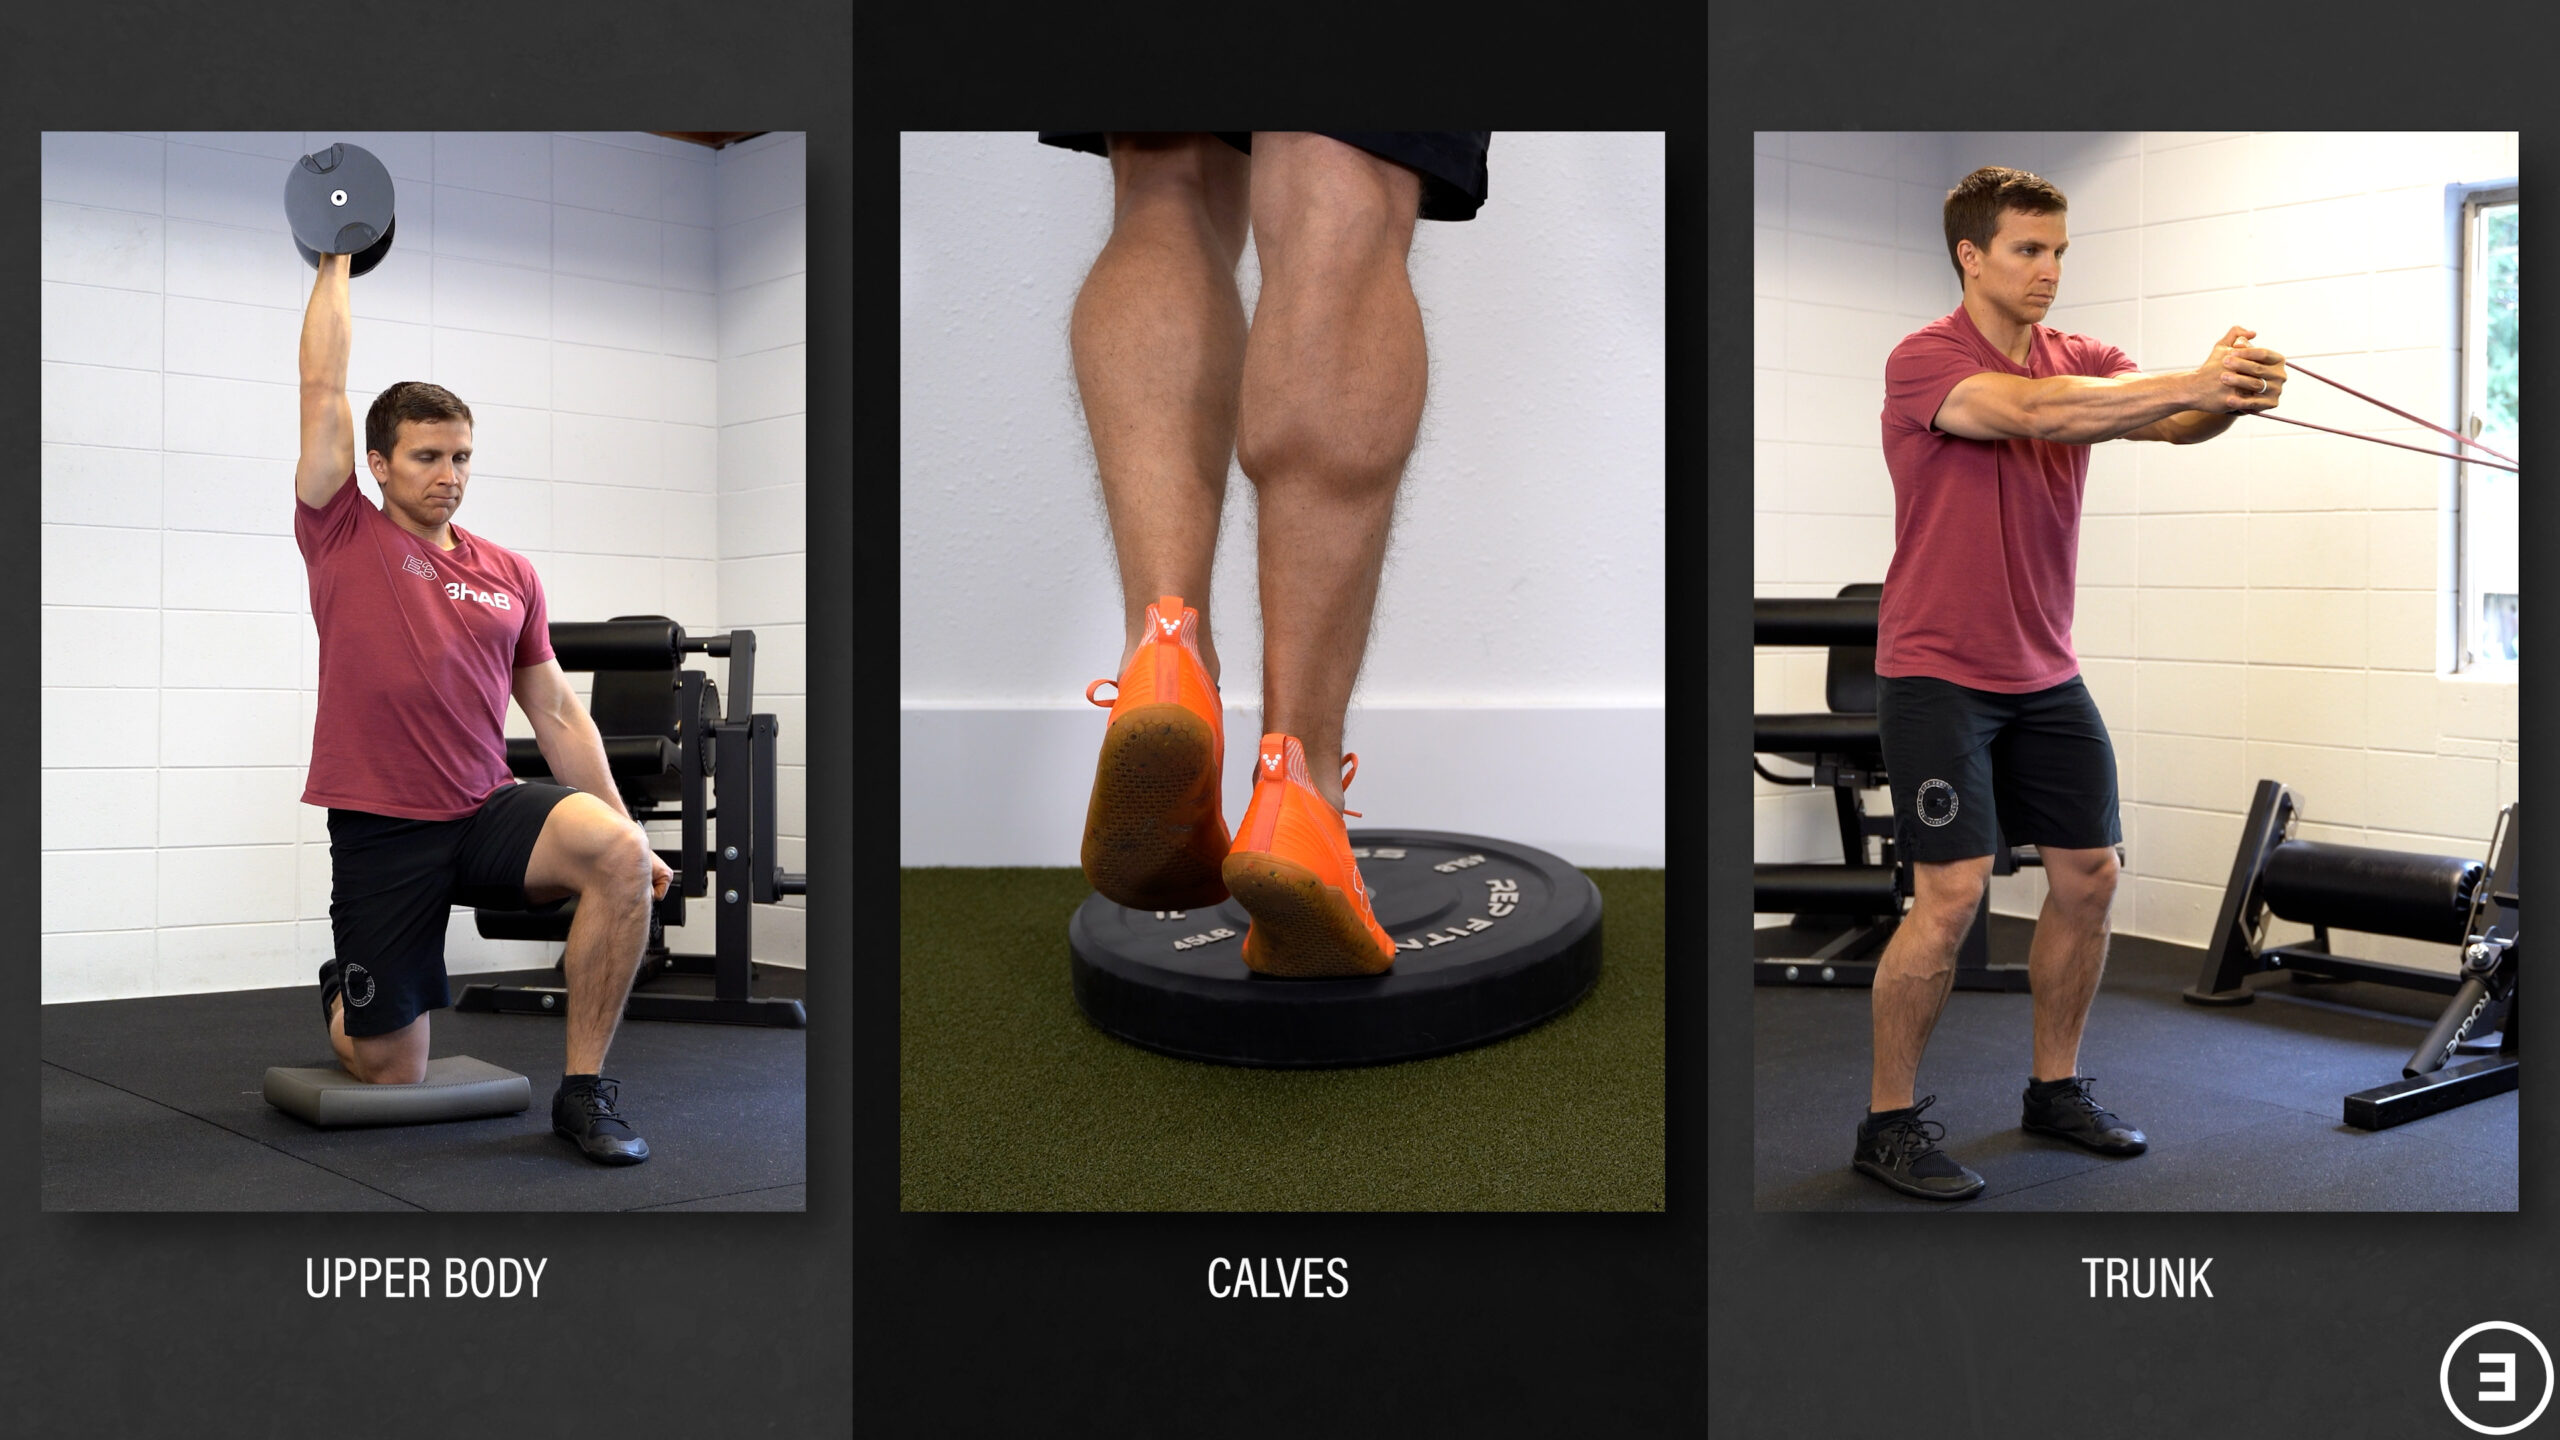
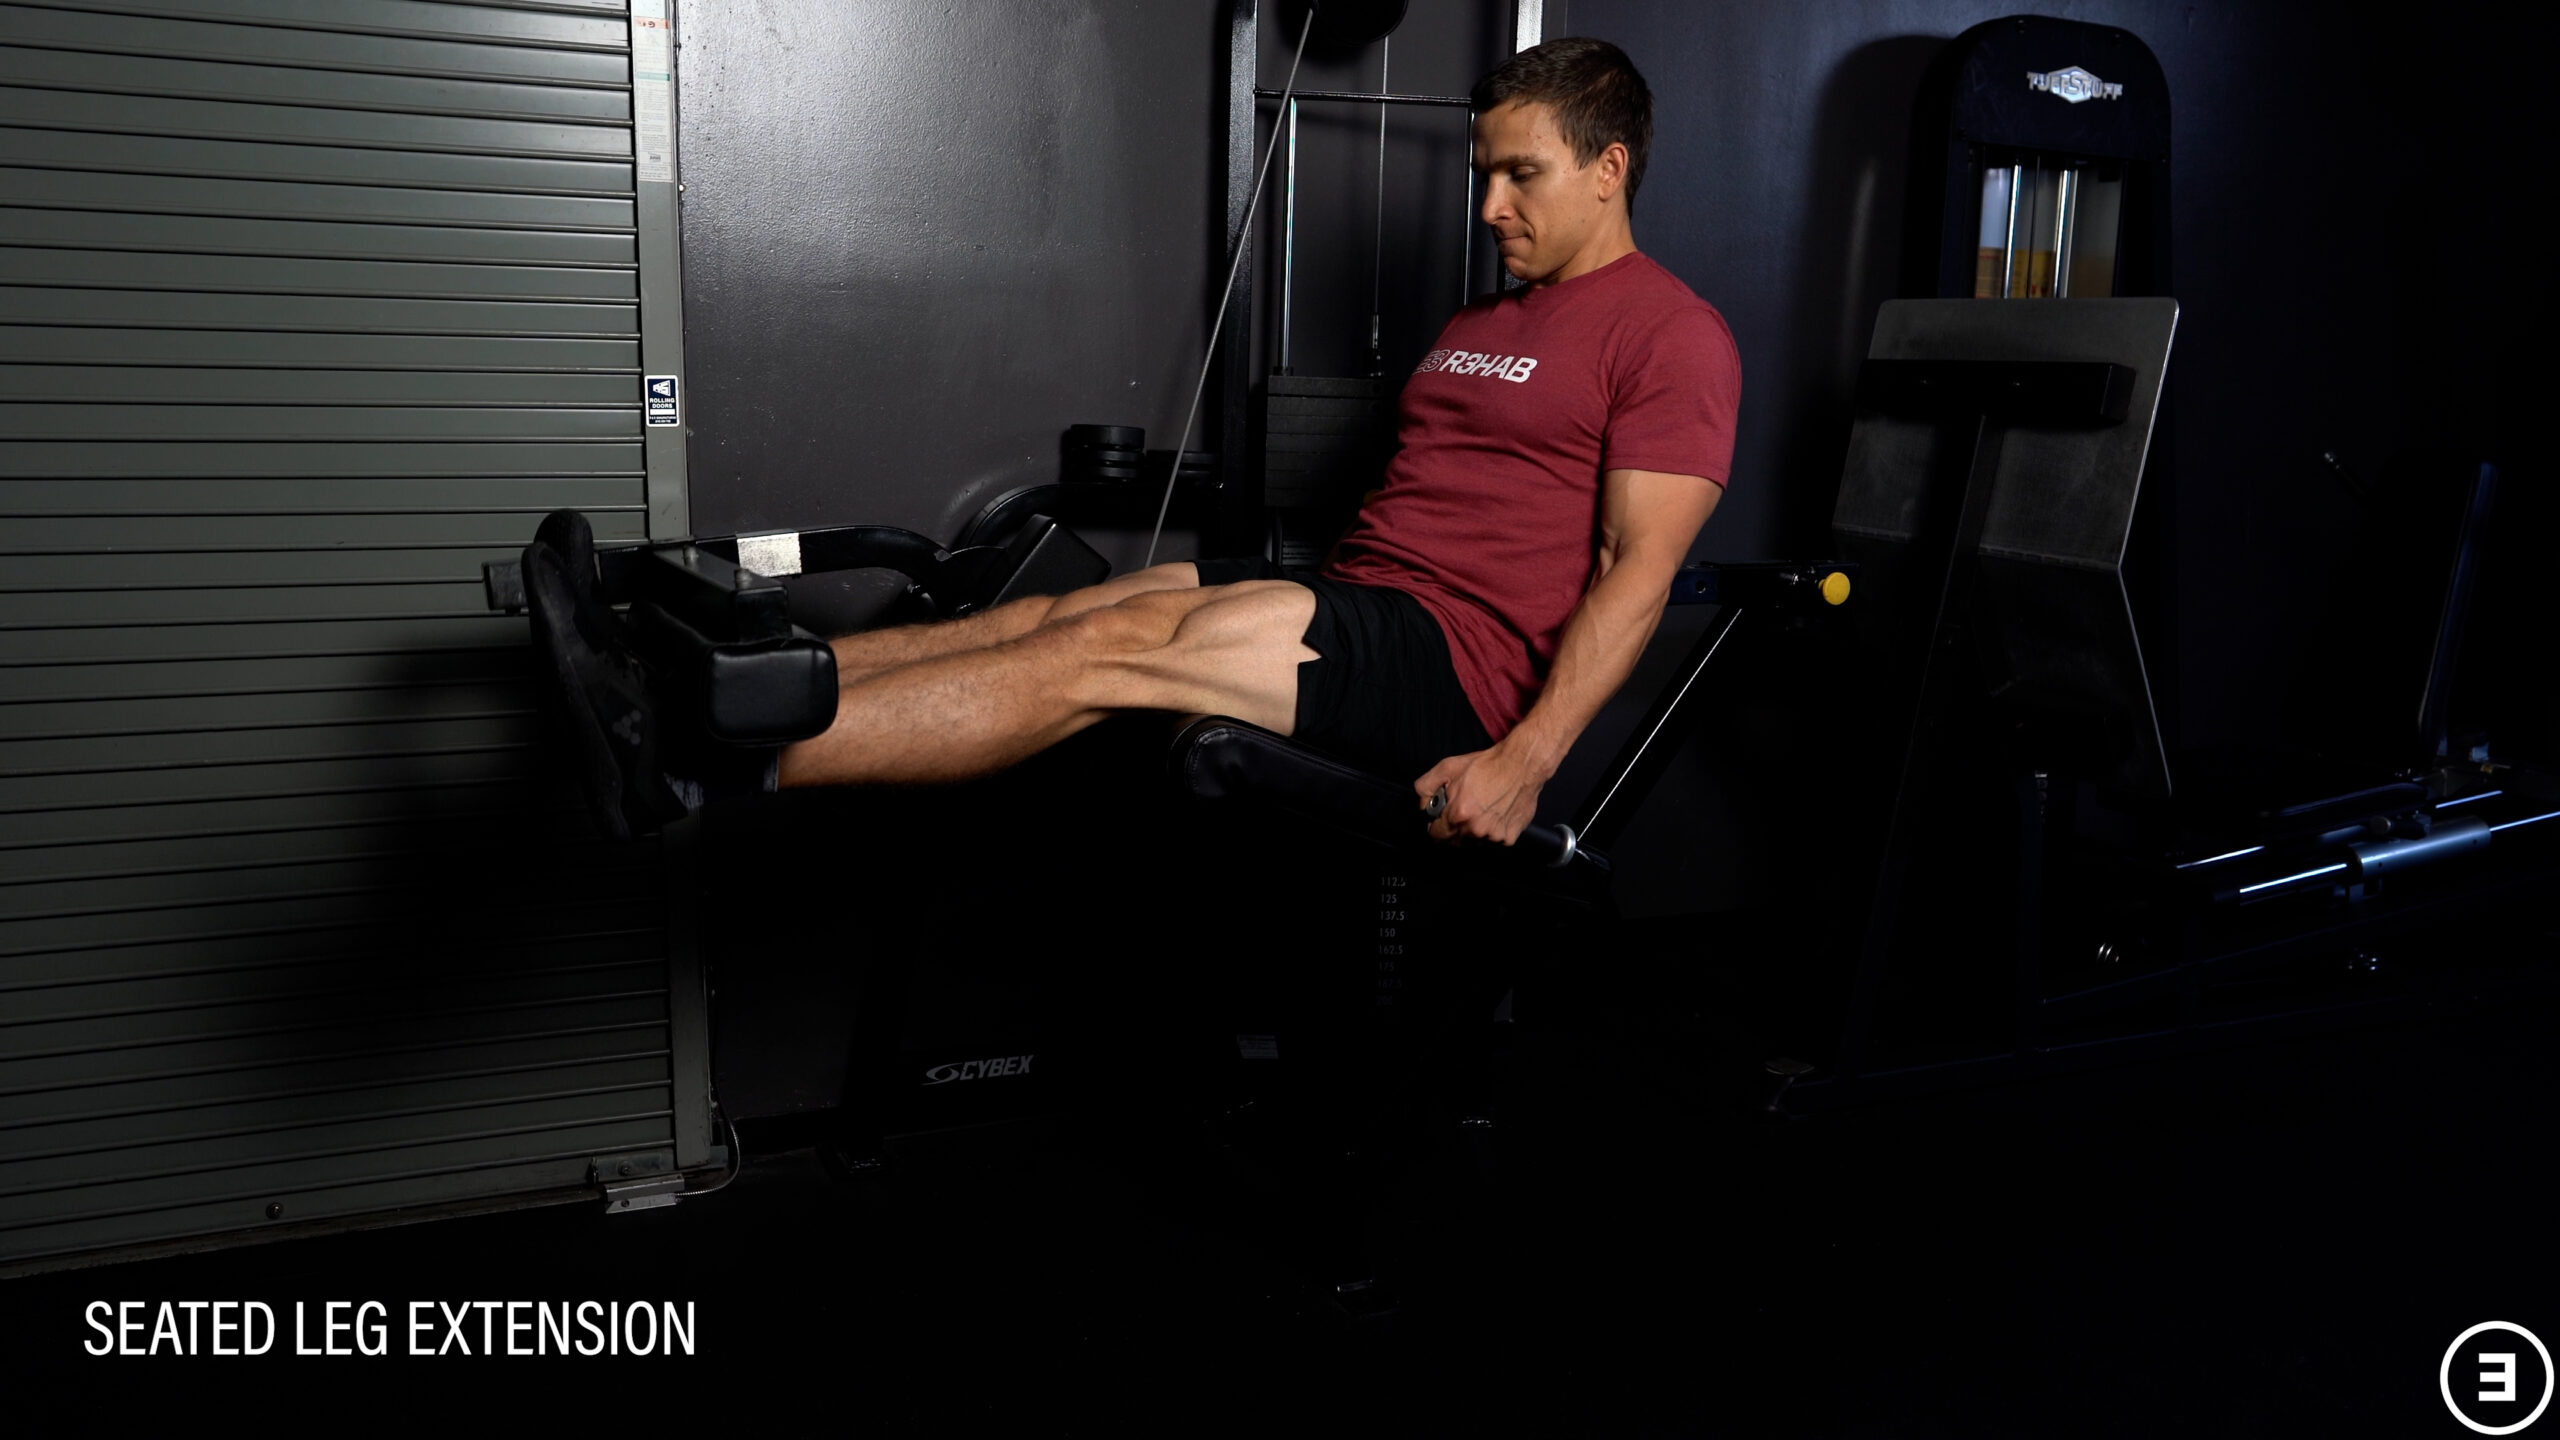
And although I mentioned trying to offer as many exercise options as possible that require little to no equipment, there are a lot of benefits to eventually getting a gym membership, such as access to different machines. For example, seated leg extensions can be a great option after a total hip replacement because they are tolerable for most people and getting the thigh muscles stronger helps make going up and down stairs, squatting, and similar activities easier.
How To Program and Progress Exercises
Now I want to answer two questions you might be wondering:
- How do you program these exercises into your weekly routine?
- How do you know when to progress an exercise?
A simple rule of thumb would be to perform 3-5 exercises, 2-3 times per week. For each exercise, complete 2-3 sets of 5-20 repetitions.
I am suggesting that you should be capable of doing at least 5 repetitions of an exercise because if, for example, you can only complete 1 repetition of a regular split squat, you’re probably better off making it easier or choosing a different exercise altogether until you’re a bit stronger.

Similarly, if you can perform 20 repetitions of an exercise, you should likely find a way to make it more challenging.
Therefore, if an exercise becomes too easy, you can add weight or progress to a more difficult variation. As long an exercise is tolerable and you can maintain good, controlled technique, consider challenging yourself.
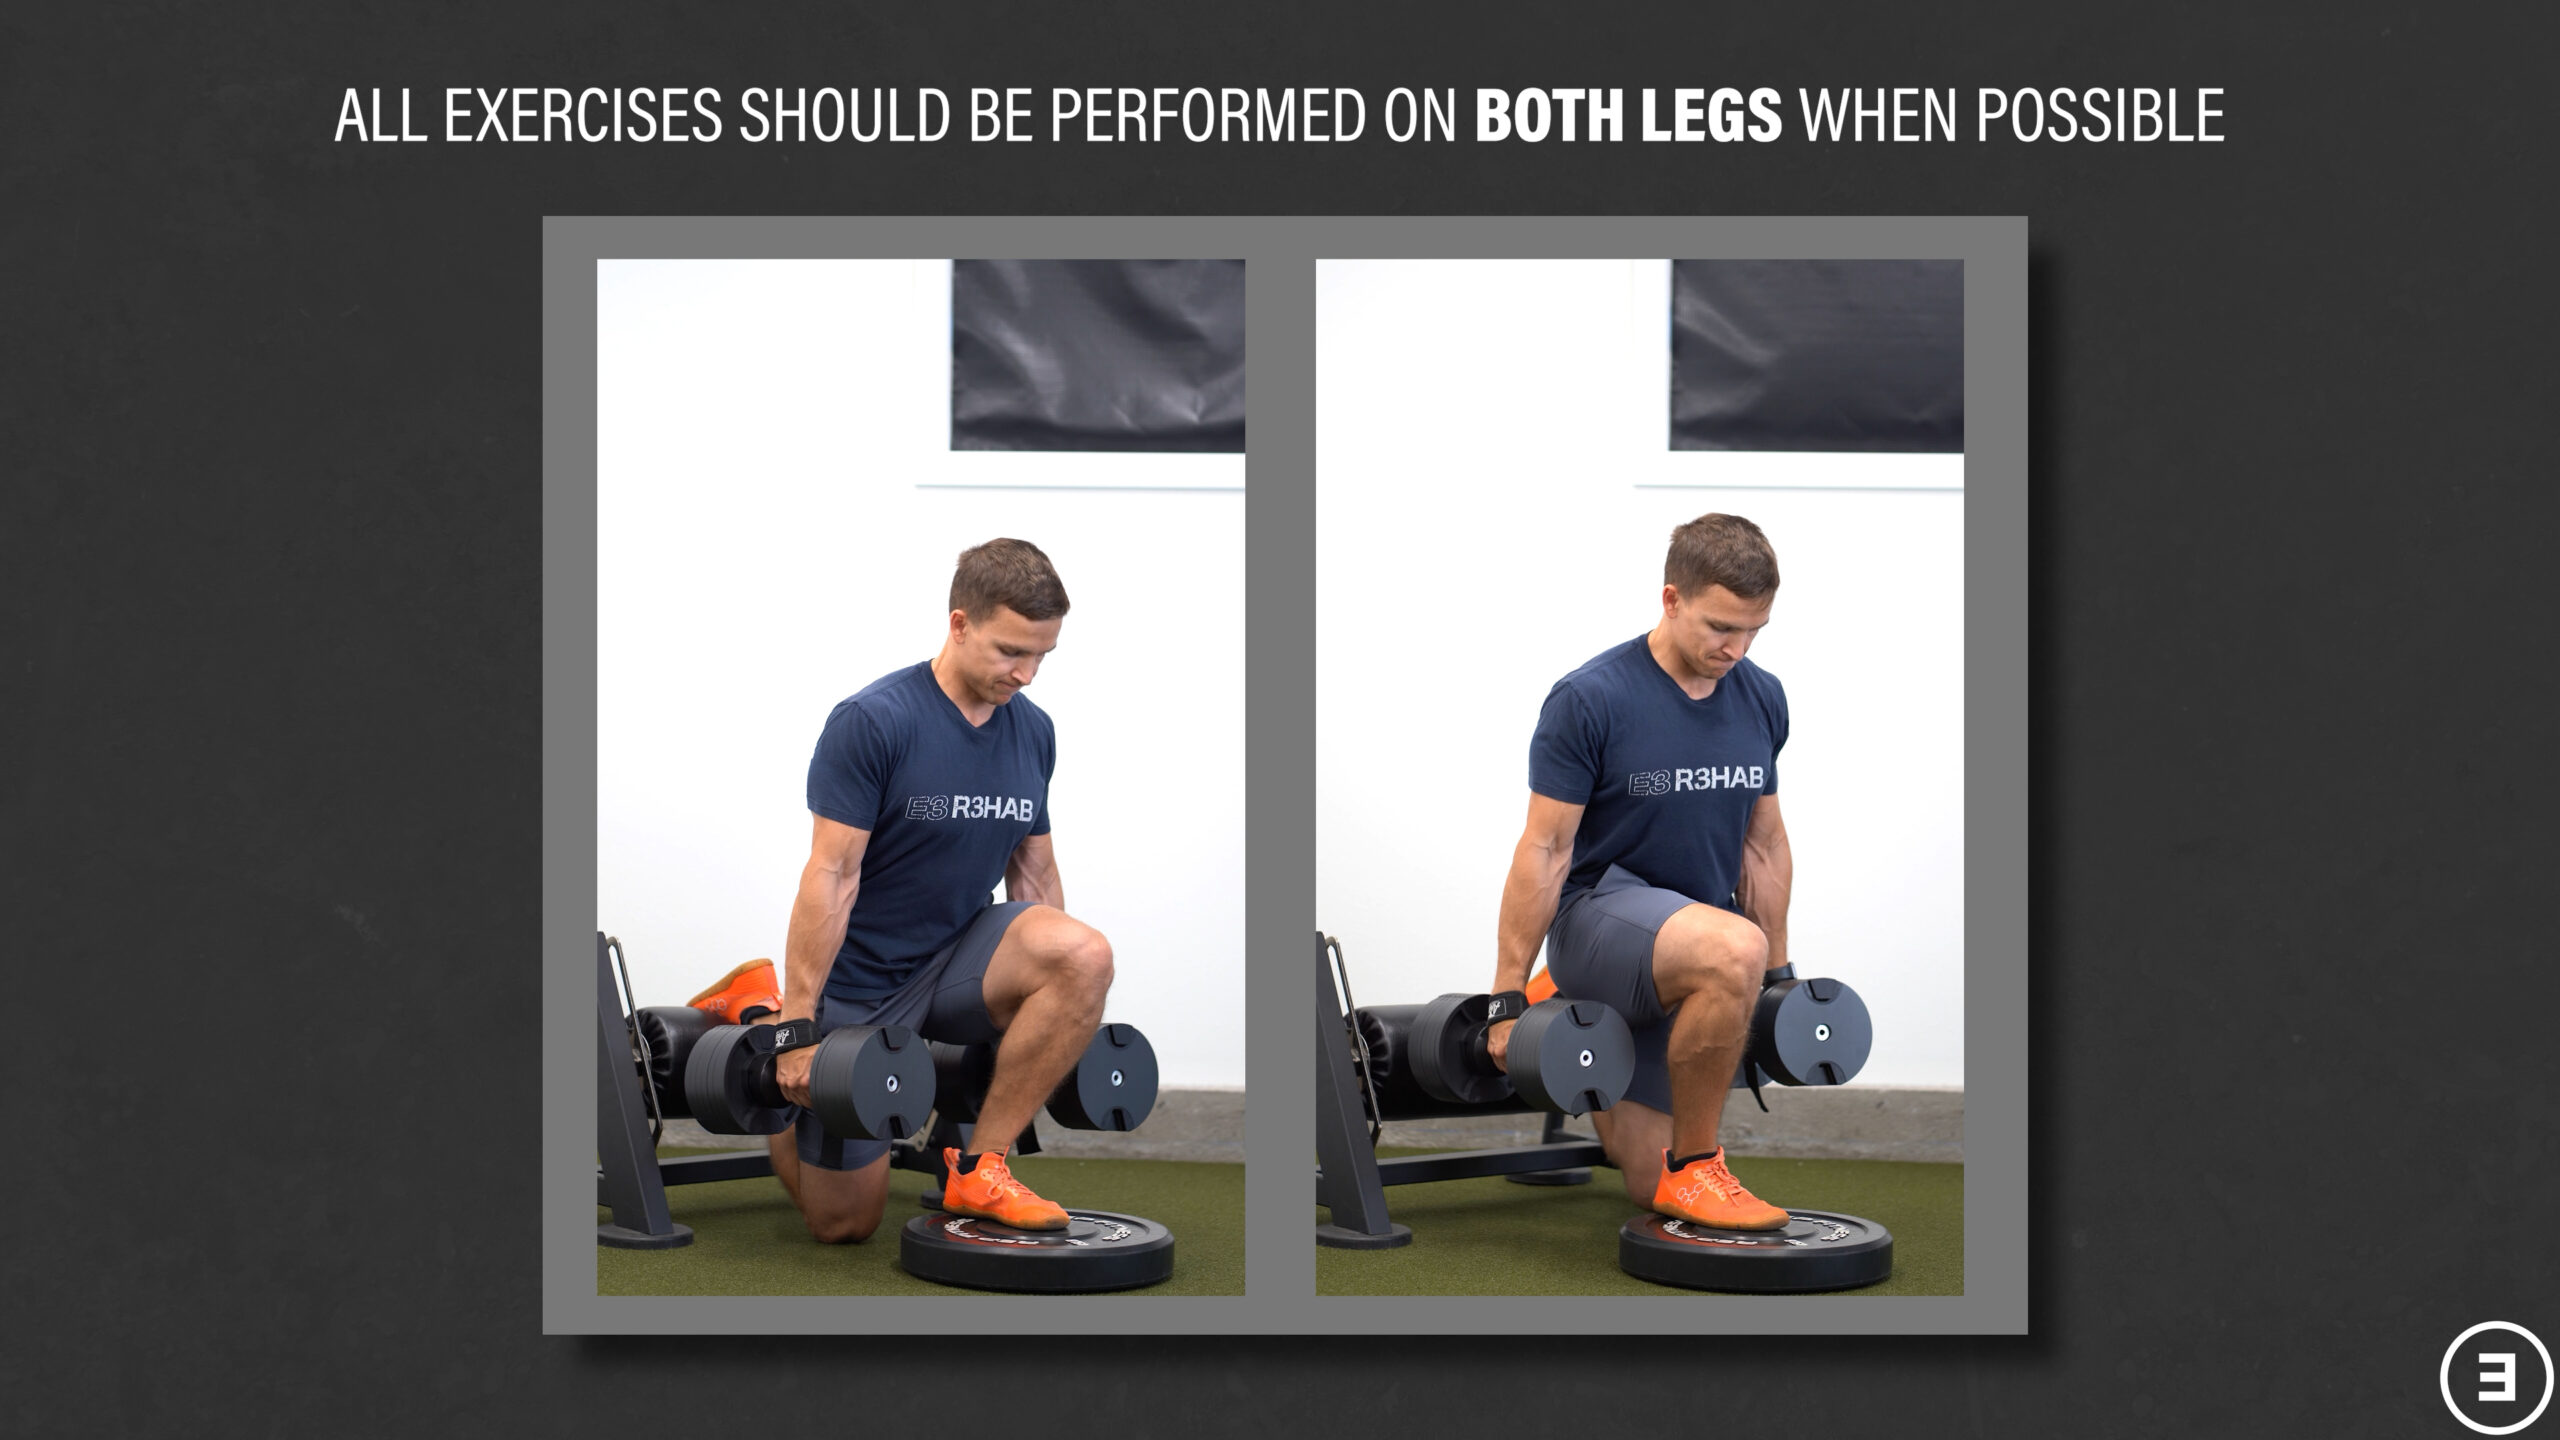
I also want to mention that all exercises should be performed on both legs when possible. My left, non-replaced side, is still stronger than my right side for many exercises and that’s completely okay. You’re just aiming for small, gradual progressions on both legs over time.
Walking, Cycling, and Other Forms of Cardio
One form of exercise I haven’t discussed yet is cardio, or endurance-based activities.
Believe it or not, the options are limitless: swimming, rowing, elliptical, stair climber, sled pushing and pulling, jump roping, ski erg, boxing, etc. You can even do high intensity interval training, also known as HIIT training, with battle ropes, kettlebells, medicine balls, or any equipment you enjoy using.
Most importantly though, I think everyone would benefit from regular walking and/or cycling. Cycling is comfortable for most people and can be done stationary on a recumbent or upright bike, or outdoors. I wouldn’t be surprised if I’ve ridden at least 10,000 miles since my hip replacement 14 years ago. It’s one of the activities that has kept me in good shape.
Walking shouldn’t be overlooked either. I personally aim for 3 outdoor walks with my dogs each day and track my steps so I can set physical activity goals for myself.
It might be nice to set an eventual goal of 30 minutes of intentional movement daily, but it’s fine to start wherever you need. For example, you might start with 5 minutes of walking or riding a stationary bike, every other day, and build up to 30 minutes daily over the course of 1-2 years.
Once again, there’s no specific timeline that you need to follow and it’s not always helpful to compare yourself to others or even your past self. Just do what you can.
What About Range of Motion or Mobility Exercises?
I actually think there is too much of an emphasis placed on range of motion and mobility exercises, especially early on.
Your range of motion after surgery is largely limited by pain and the healing process that’s taking place. If you just give yourself enough time and avoid forcing yourself into painful movements or positions, your range of motion should naturally improve.
Plus, performing the strengthening exercises in this blog through a large range of motion in a slow, controlled manner will help increase your mobility over time.
Just like you don’t need to discontinue the use of assistive devices as quickly as possible, you don’t need to rush into stretching a total hip replacement that’s going to have limitations anyway.
What About Pain With Exercise?
As you would expect based on what I’ve already talked about, there’s no reason to try to push through significant pain shortly after the surgery. Although the purpose of a hip replacement is to have a total net positive on your life, it’s still a traumatic procedure that requires time to recover and heal appropriately.
Otherwise, I’ll describe the guidelines I use for myself these days.
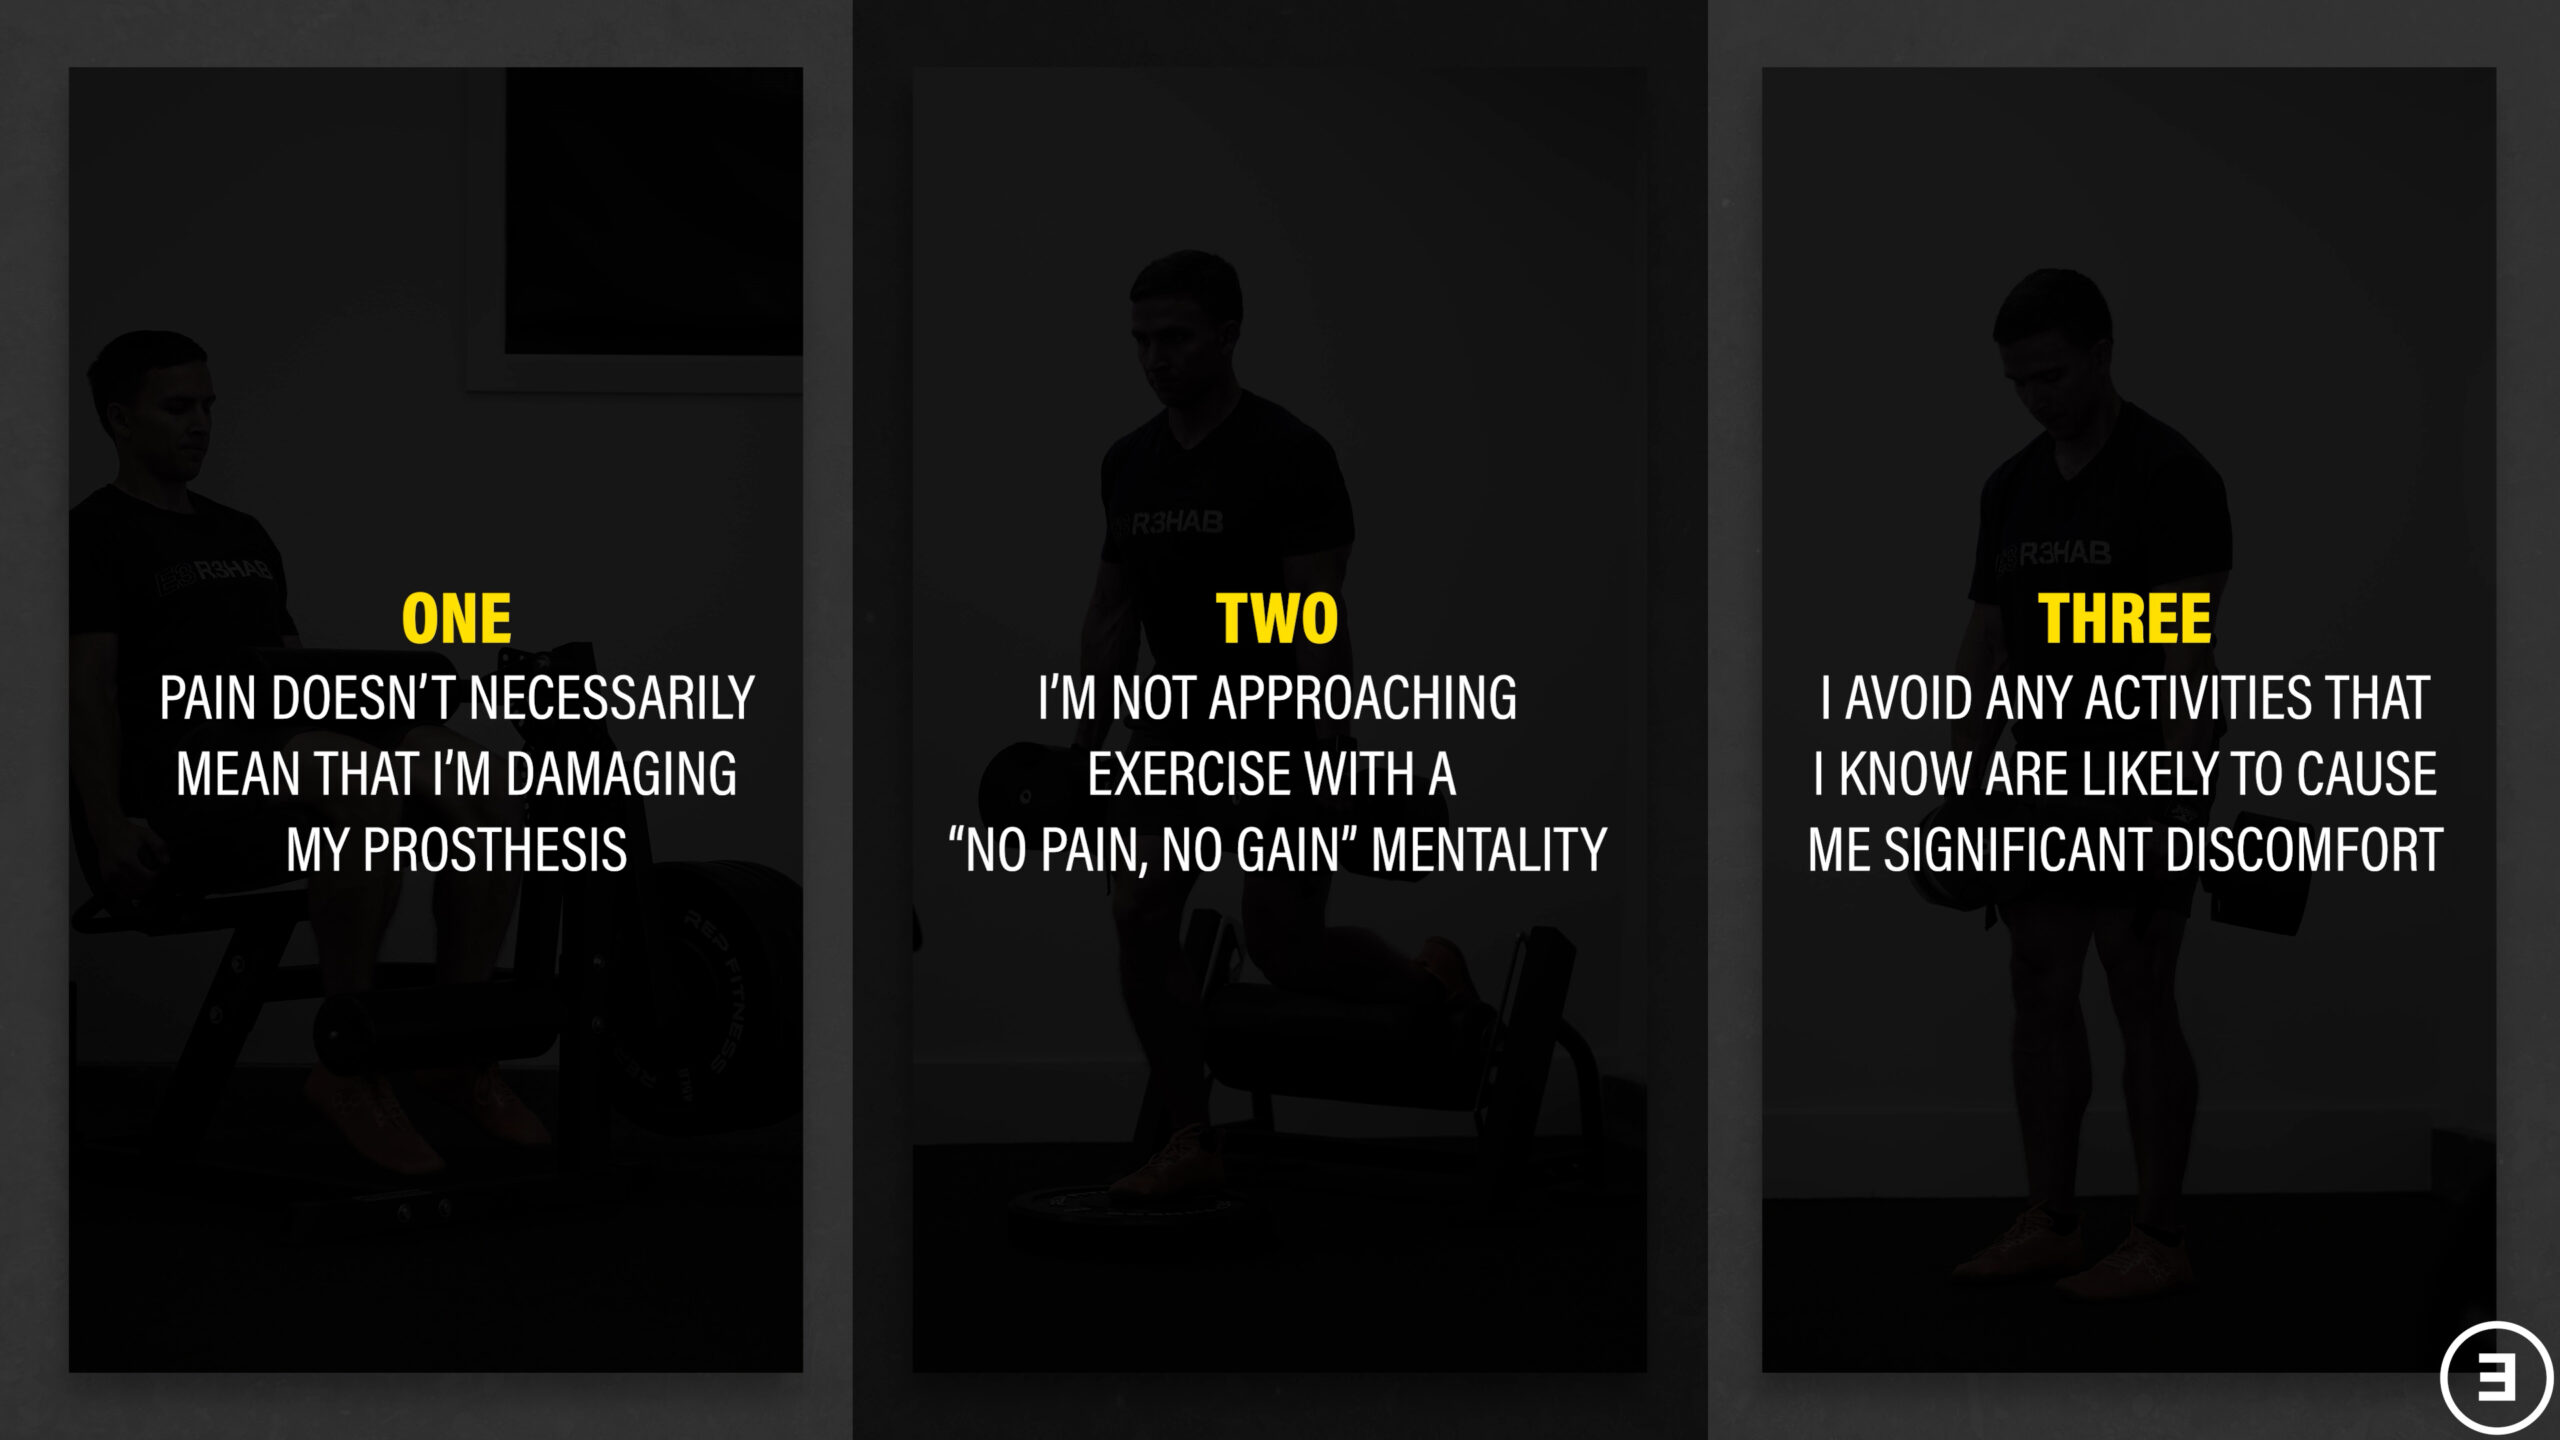
I understand that pain doesn’t necessarily mean that I’m damaging my prosthesis, but I’m not approaching exercise with a “no pain, no gain” mentality either.
For the most part, I avoid any activities that I know are likely to cause me significant discomfort. As an example, I’d rather do bike sprints than actual sprints because bike sprints are pain-free whereas regular sprints are not.
I’ve also modified my training routine to include exercises that accomplish similar goals while causing me less symptoms. For instance, I prefer dumbbell split squats to barbell back squats because dumbbell split squats are much more comfortable for me while providing the same overall results I would get from barbell back squats.
This is not to say that I never have discomfort with exercise. I do. If I completely avoided everything that irritated me even just a little bit, I’d be much more restricted with my exercise and activity selection. I just try to make sure things are tolerable and I minimize any flare-ups.
Have I ever regretted pushing myself too hard before? Of course. It happens. I’ve used those moments as learning experiences.
So, do I allow myself to have discomfort with training? Sometimes. For me, the benefits of regular exercise and resistance training outweigh the potential negatives of slight discomfort from time-to-time, especially as a cancer survivor who is at a higher risk of other health issues.
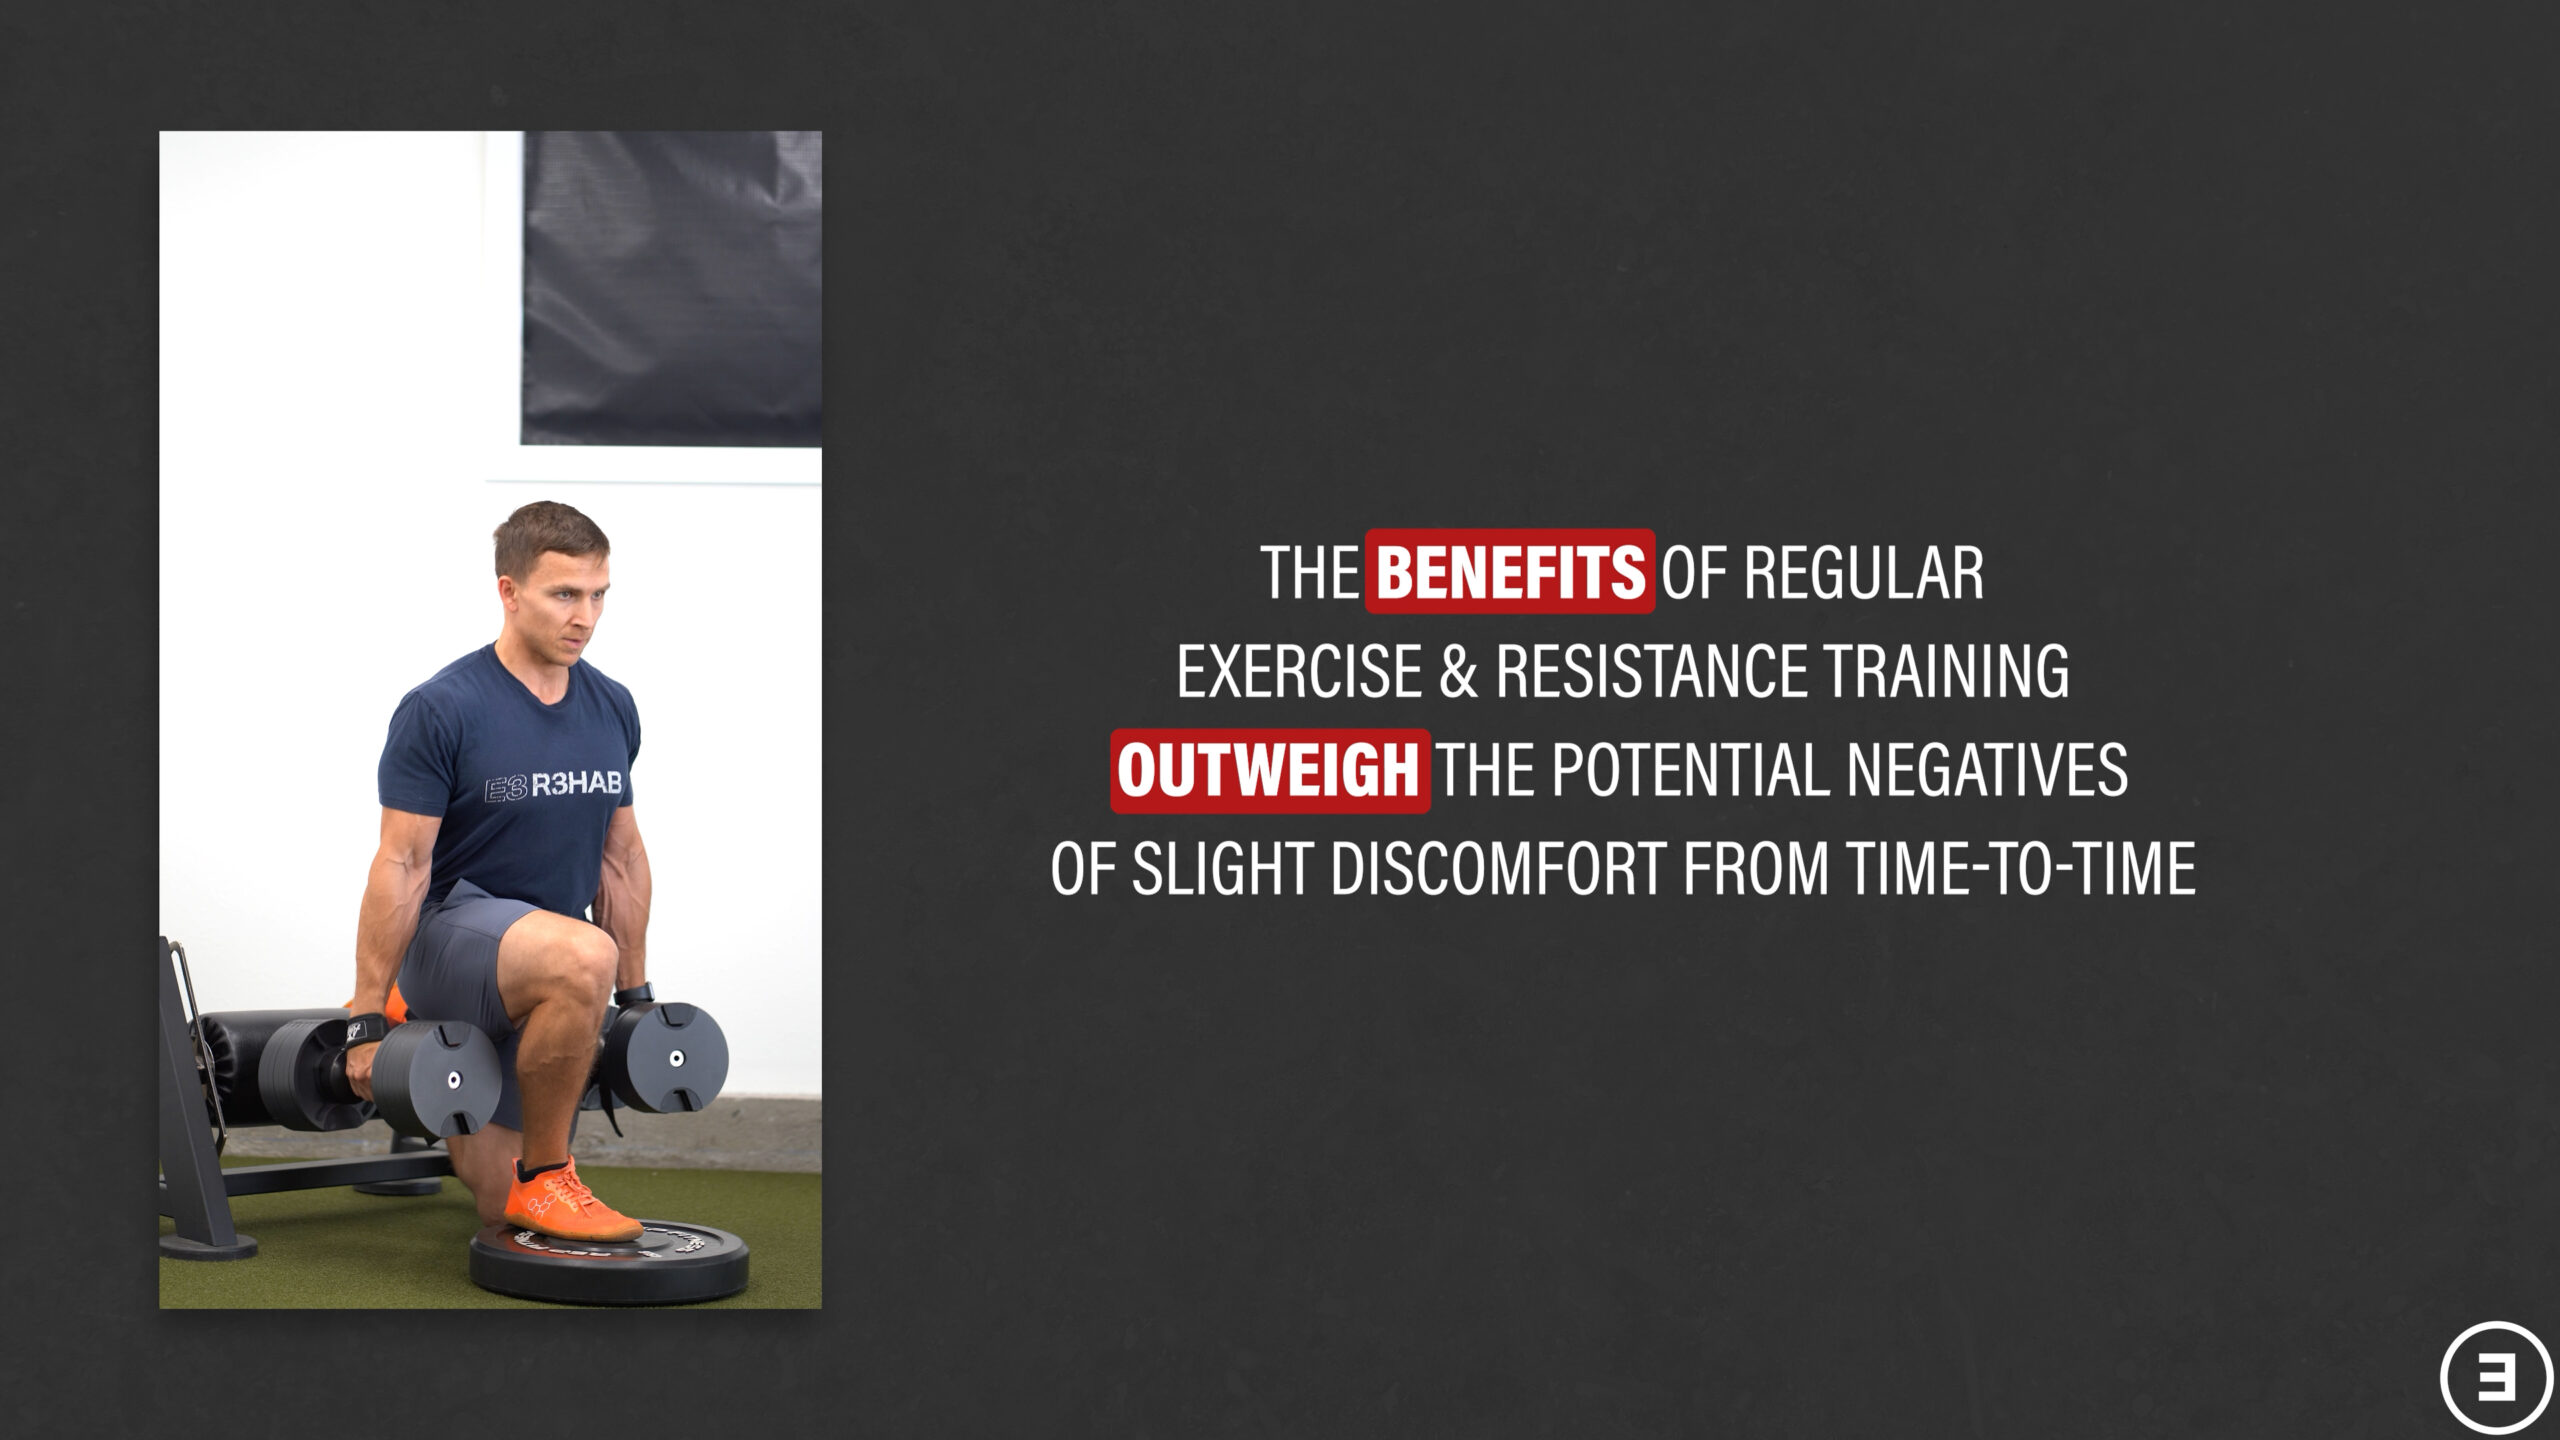
But like I said, I’m not purposely pushing into pain, I always make sure any discomfort is tolerable during exercise, and I do my best to avoid pain that lingers beyond the actual exercise. I don’t want pain impacting my sleep or day-to-day life.
Does that mean you should follow the same principles? Not necessarily. Speak to your surgeon and physical therapist to determine what is best for you. However, understand that being 100% pain-free is not always a realistic expectation after a total hip replacement.
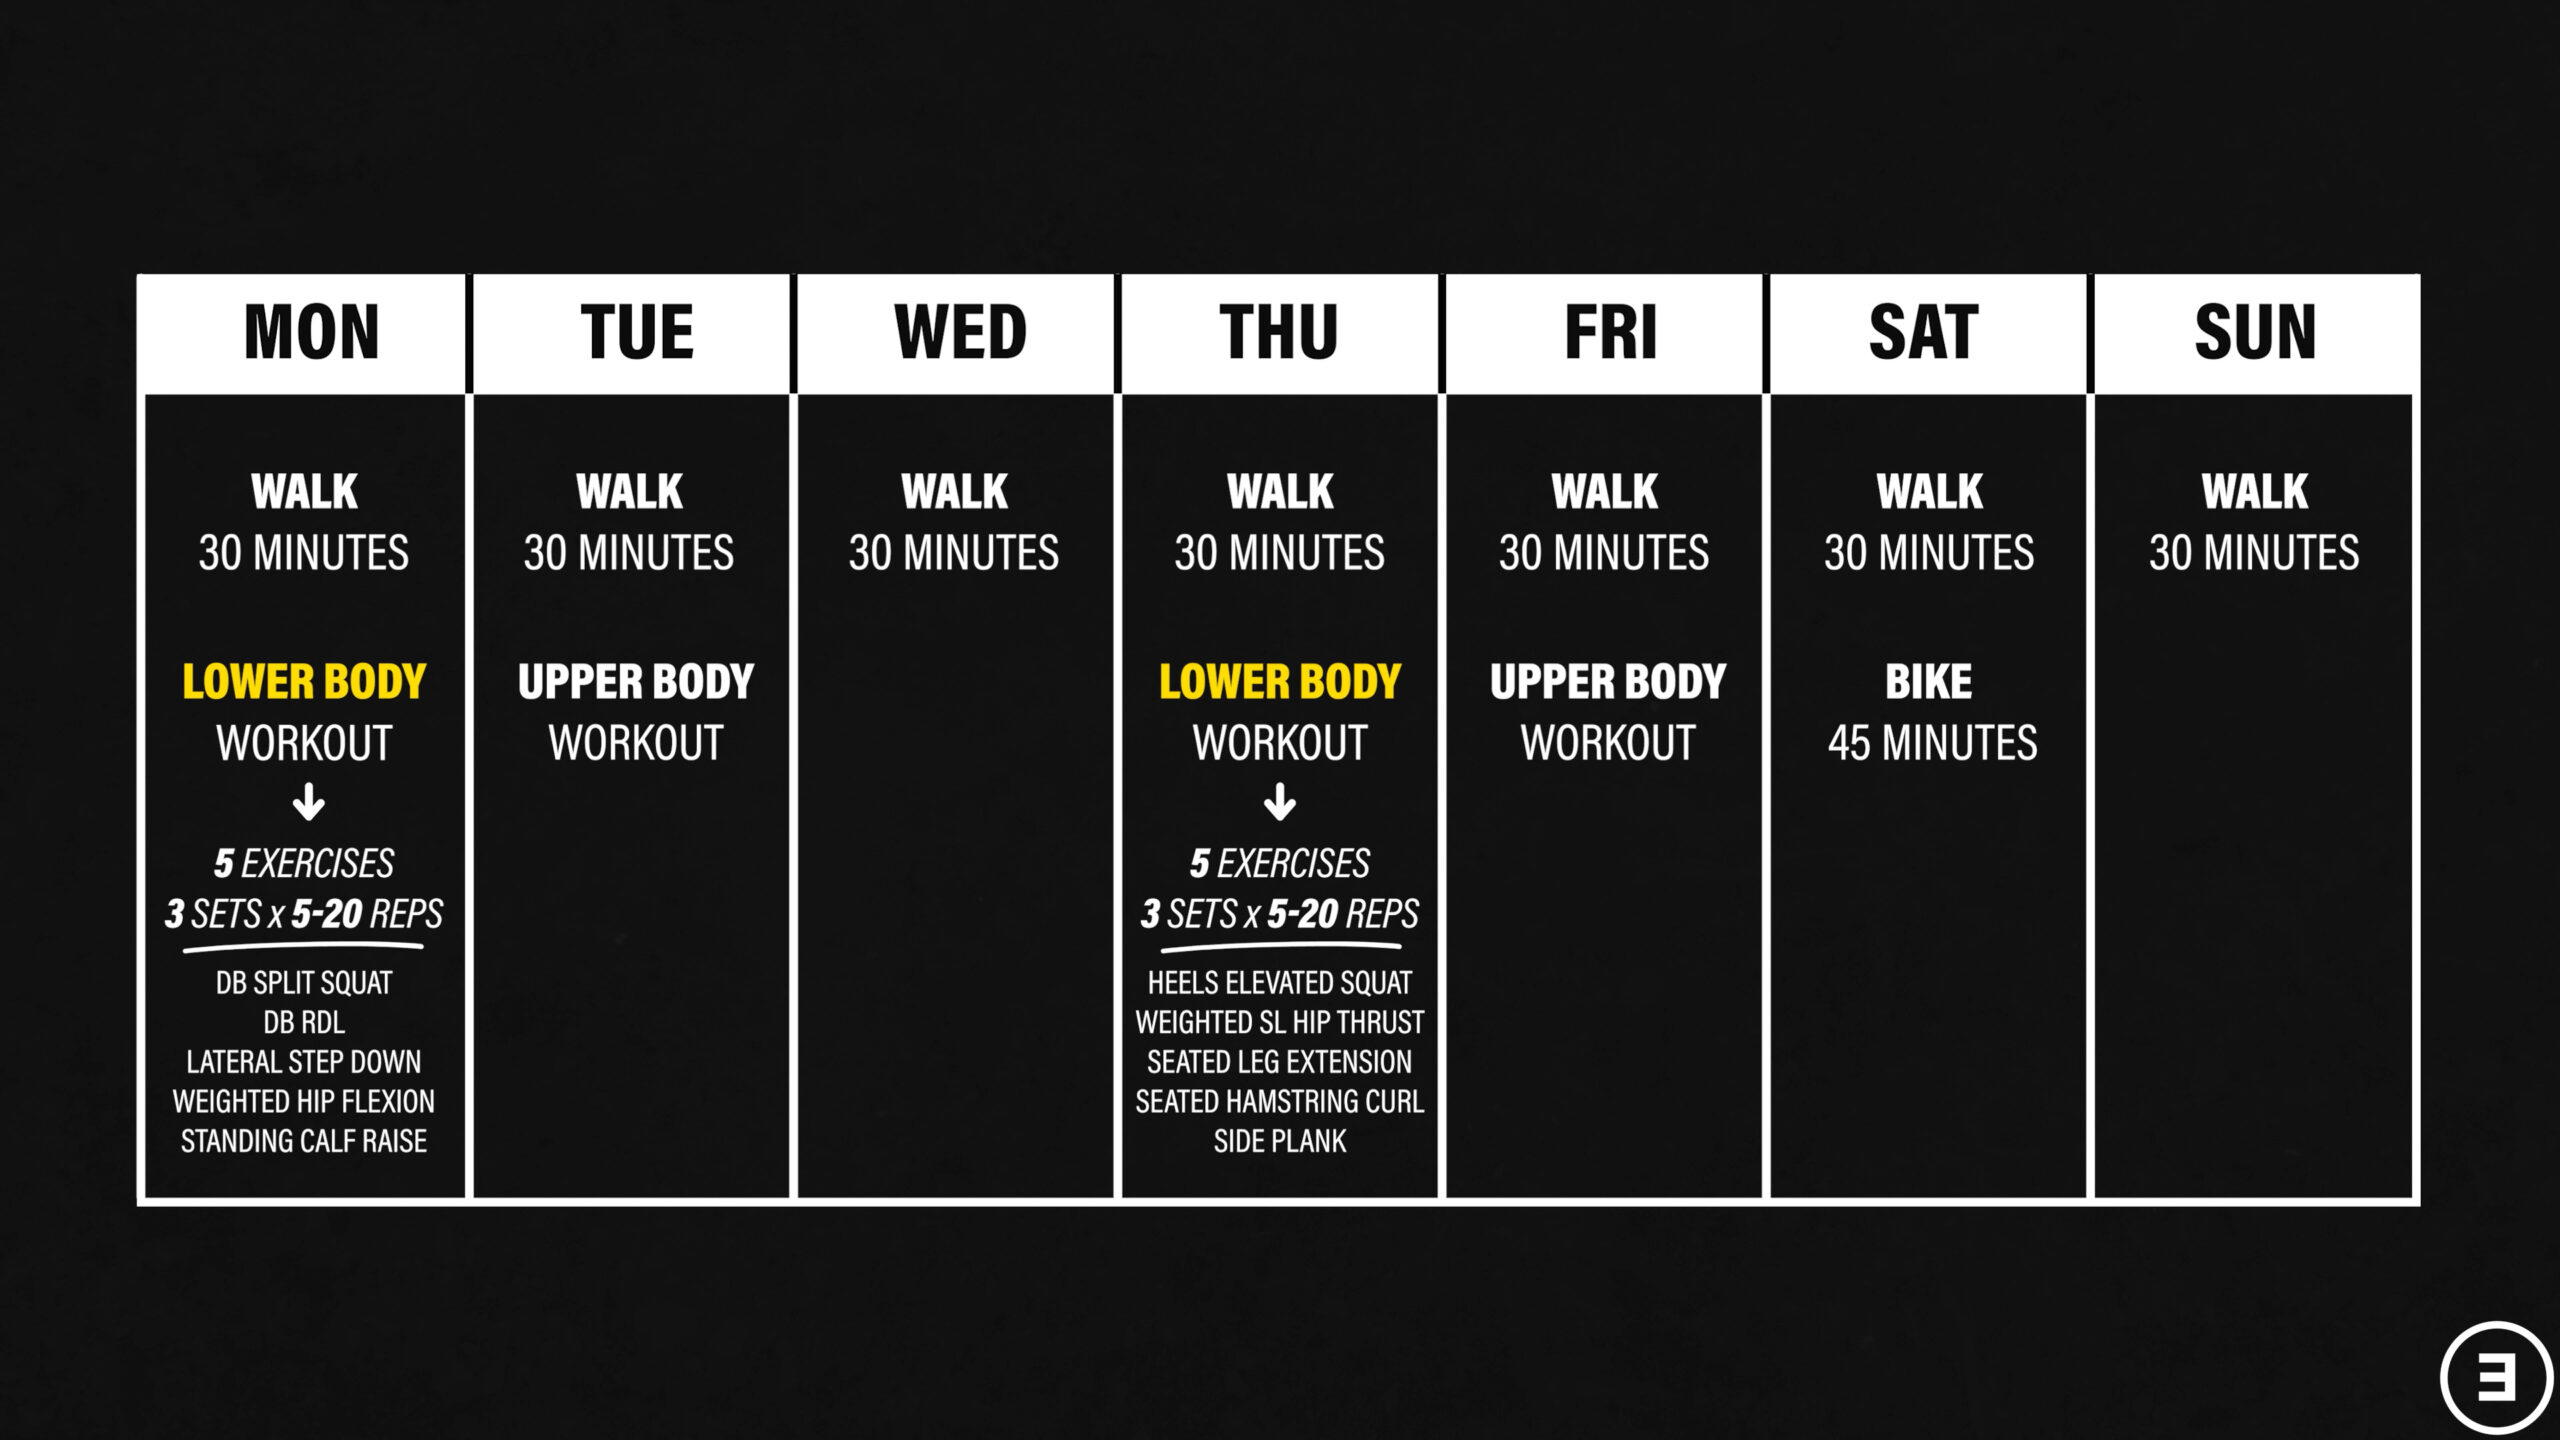
Case Example #1 – Younger, More Active Individual
Let’s say you’re an active 31-year-old who has had a total hip replacement for 2 years.
You might structure your weekly routine in such a way that you walk at least 30 minutes per day, ride your bike outside for 45 minutes one day, train your upper body 1-2 days per week, and perform 5 lower body exercises for 3 sets of 5-20 reps 2 days per week.
For example, you might perform dumbbell split squats, dumbbell Romanian deadlifts, body weight lateral step downs, weighted standing hip flexion, and standing calf raises on Monday.
On Thursday, you might do heel elevated goblet squats, weighted single leg hip thrusts, seated leg extensions, seated hamstring curls, and side planks.
This is a reasonable routine that you could do for months while slowly trying to progress by adding weight or reps. If an exercise became too easy, uncomfortable, or boring, you could swap it out for something else. There’s an infinite number of possibilities.
Case Example #2 – Older, Less Active Individual
Now let’s say you’re a less active 68-year-old who had a total hip replacement 3 months ago.
You might focus on the same 3 exercises, 3 days per week. For example, you could do bodyweight squats, bridges, and step ups on Mondays, Wednesdays, and Fridays. If you were feeling up to it, you could add in hip flexion and hip abduction exercises on the floor.
If you had access to a recumbent bike or safe neighborhood for walking, you might aim for 10 minutes, 3-4 days per week initially.
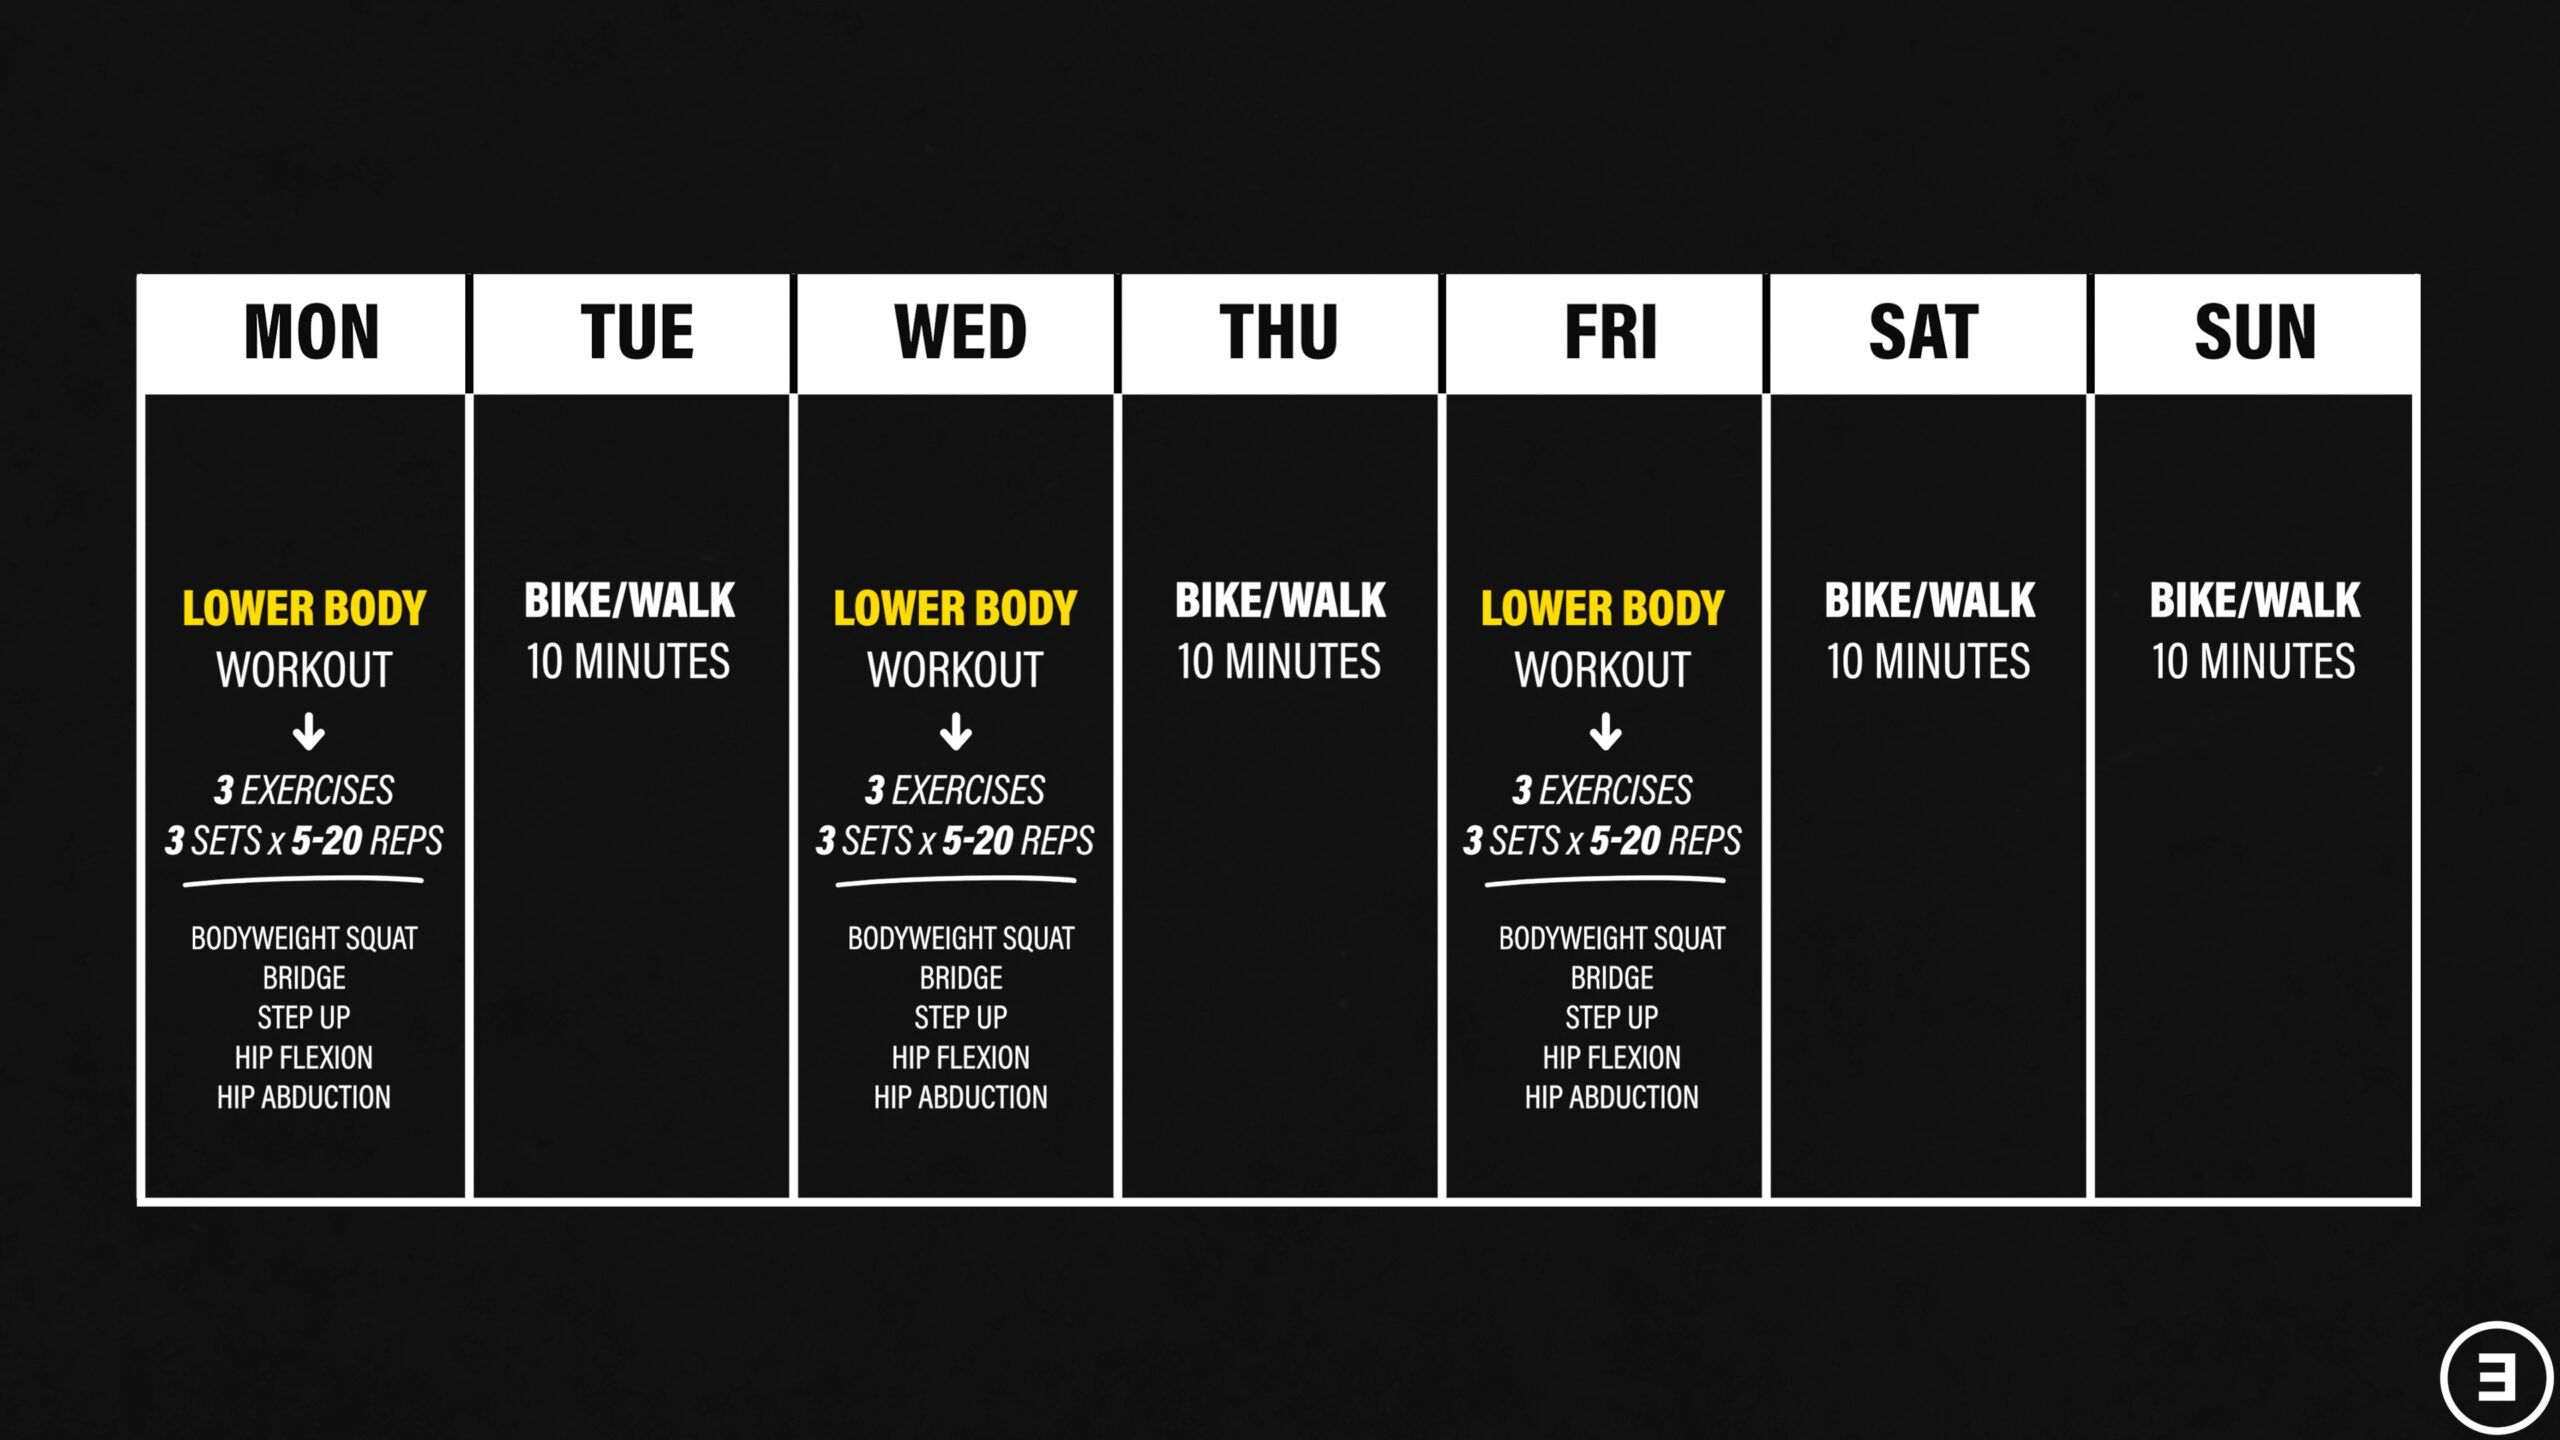
Regardless of your age or fitness levels, it’s important to create a routine that fits your goals and needs. Unfortunately, I can’t give examples for every possible scenario or circumstance.
Don’t forget to check out our Hip Resilience Program!
Want to learn more? Check out some of our other similar blogs:
Hip Osteoarthritis, Total Hip Replacement Q&A, Total Hip Replacement
Thanks for reading. Check out the video and please leave any questions or comments below.