Whether you’ve had an Anterior Cruciate Ligament (ACL) reconstruction, you’re waiting for the operation, or you’re managing your injury without surgery, this blog will tell you everything you need to know about the ACL rehab process.
Looking to improve your strength, range of motion, and power to enhance your function and performance? Check out our Knee Resilience program!
Important To Know
Before diving into the information, there’s two things I want to mention:
- The timeline of your recovery may vary based on your injury or surgery. For example, if you had an ACL reconstruction AND repair of your medial meniscus, the early stage of ACL rehab will last longer.
- Precautions for when to initiate certain exercises will vary based on your surgery or surgeon. For example, hamstring strengthening may be delayed if you had a hamstring tendon autograft.
Therefore, everything in this blog needs to be individualized, and this information is not medical advice or a substitution for consultations with an orthopedic surgeon and physical therapist.
Common Mistakes
Research by Ardern et al in 2014, Wiggins et al in 2016, and Webster & Feller in 2019 informs us of three significant issues:
- Only 55% of individuals return to competitive sport following surgery.
- 1 in 4 athletes who are younger than 25 and return to high-risk sport will go on to have a second ACL injury.
- Expectations for returning to preinjury sport are often not met.
For those reasons, I can’t emphasize enough the importance of avoiding these seven mistakes:
- Not following fundamental strength and conditioning principles. If your ACL rehab never includes a squat or split squat with relatively heavy weight that makes you want to quit because it’s so challenging, you’re probably not sufficiently trained.
- Not incorporating exercises to improve your cardiorespiratory fitness. Aerobic exercise can be started fairly early, and it should be continued and progressed throughout the process.
- Not using the appropriate objective criteria to assess your function. Your physical therapist cannot measure the strength of your quads with their hands.
- Only using time to make decisions. Your surgeon cannot determine that you’re ready to begin running because 3 months have passed since your surgery. The most important aspect about time, which the majority of people get wrong, is that you need to wait a minimum of 9-12 months before returning to sport if you want to significantly reduce your risk of reinjury. You are not your favorite professional athlete, so don’t make that comparison.
- Ignoring the neurocognitive aspects of rehab. An ACL injury is not just about your knee, but you as a person.
- Not training the uninjured leg because it’s common for its function to decrease over time secondary to disuse.
- Rushing and overcomplicating rehab instead of sticking to the basics.
Early Stage
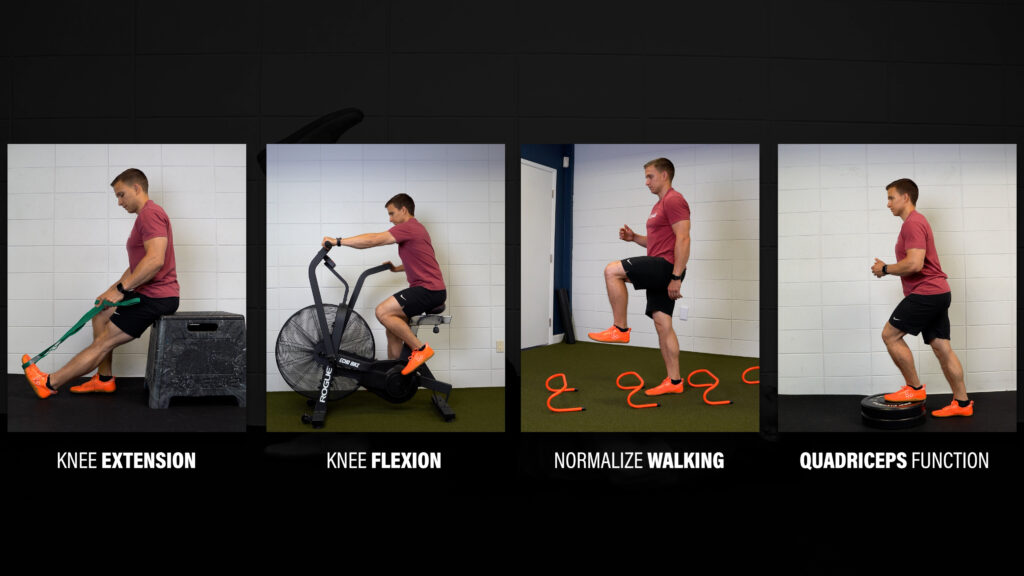
The basics start with the early stage of ACL rehab where the primary goal is restoring your knee extension range of motion. Other goals include restoring knee flexion range of motion, normalizing walking, and improving the function of your quads.
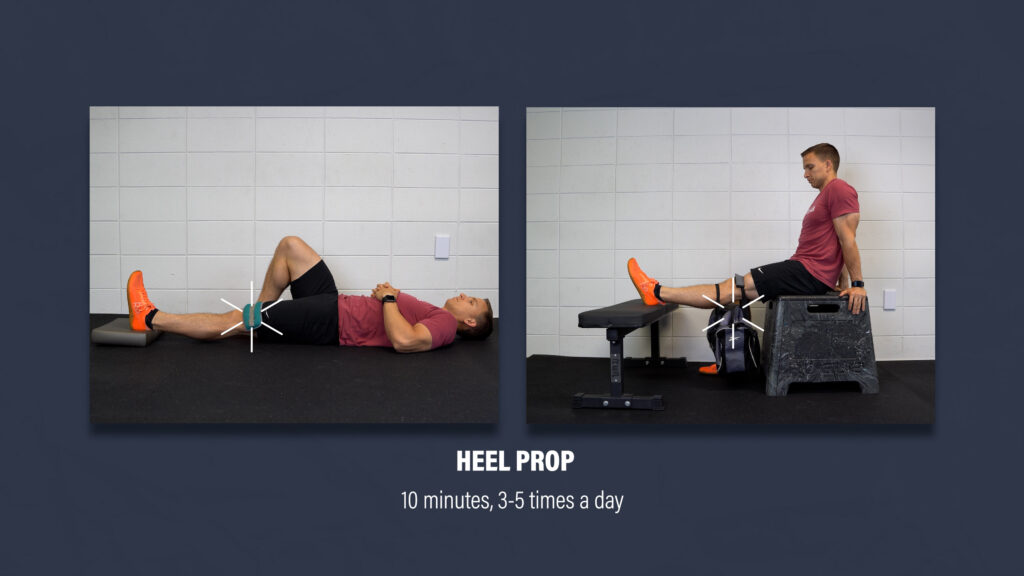
Here are two ways to improve knee extension:
- Prop your heel for 10 minutes, 3-5 times per day. The position might be slightly uncomfortable, but it should not be unbearable. Over time, you can add a light weight to increase the stretch if needed.
- Quad sets all day, every day. Squeeze your quads for 10 seconds, relax, and repeat any chance you get.
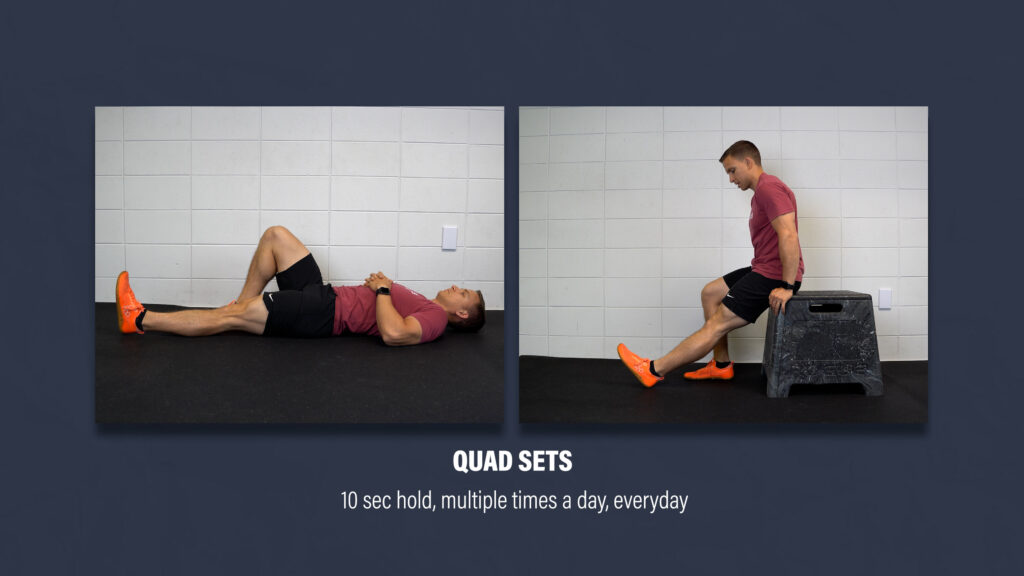
Over time, you can intensify the quad contractions by propping your heel or using a strap to pull on your foot to add a calf and hamstring stretch.
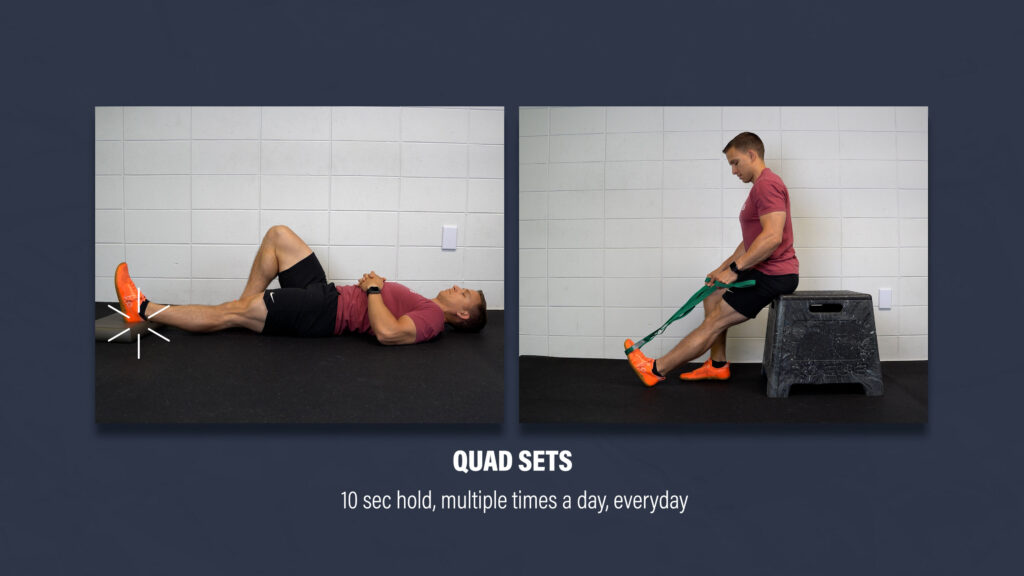
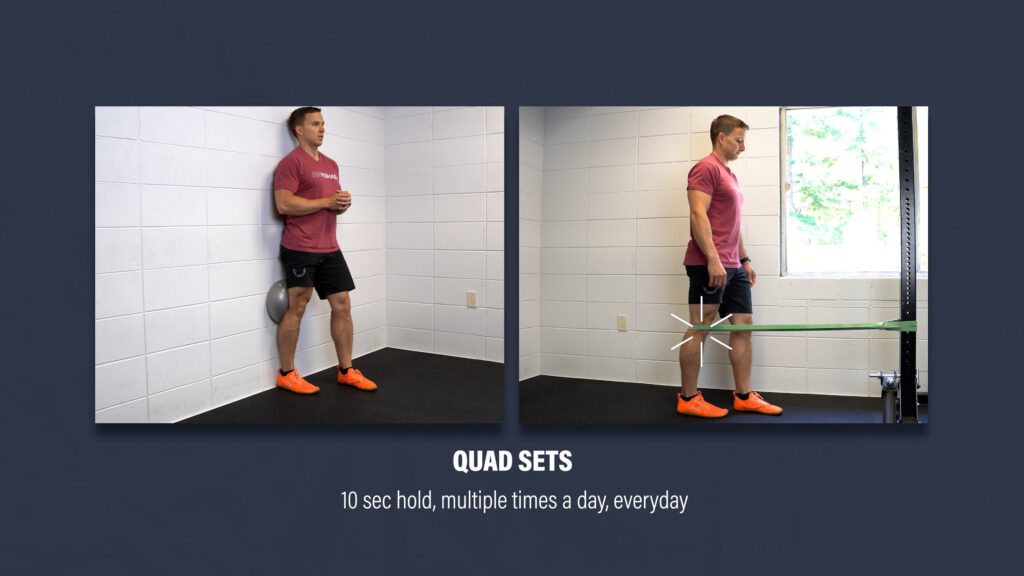
Other quad set options will include external resistance, such as a ball against a wall or a band anchored to an object.
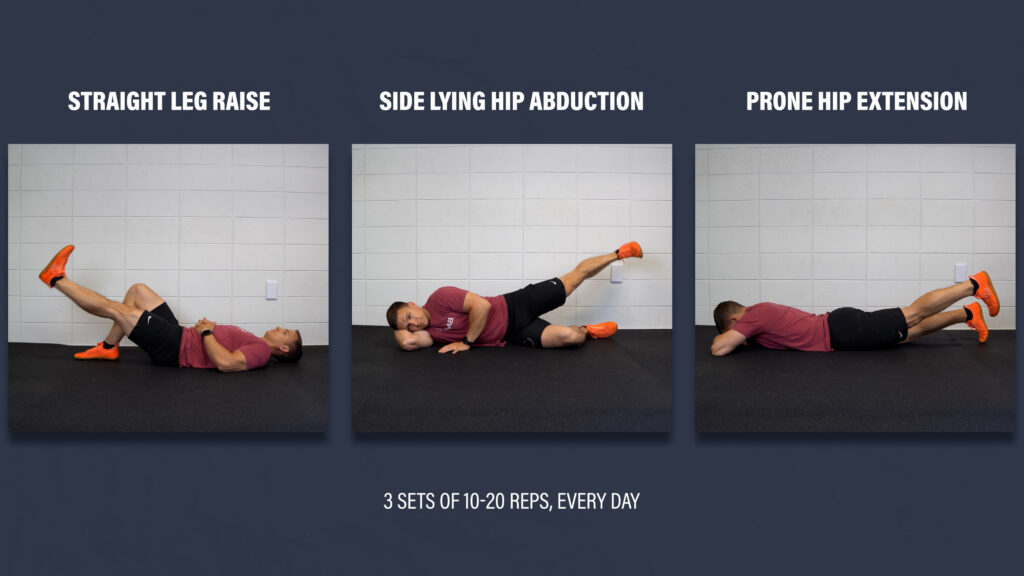
The first major milestone related to quad function is being able to perform a straight leg raise with your knee completely straight.
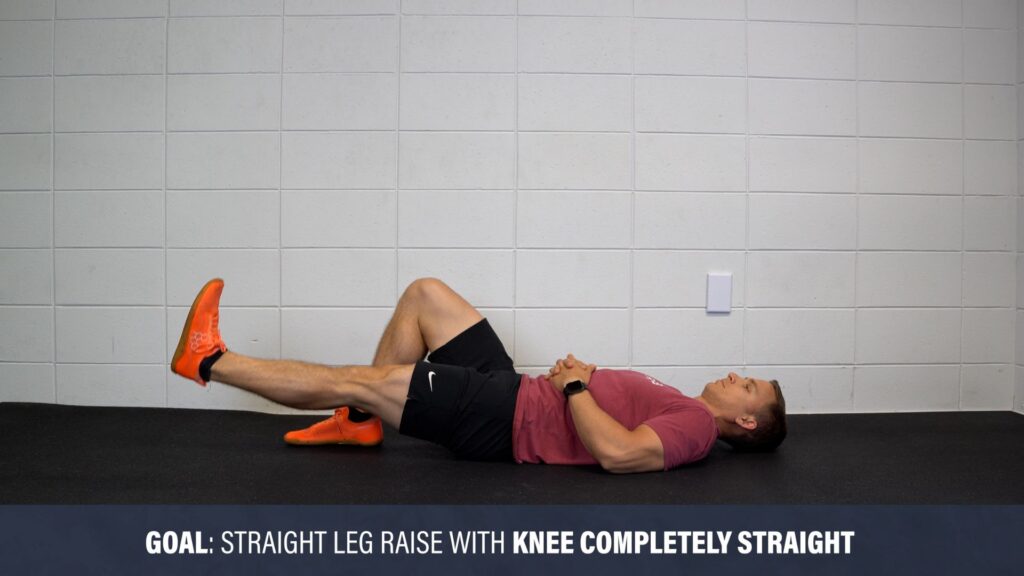
When you can achieve that, start performing 3 sets of 10-20 reps every day on your back (straight leg raise), side (side lying hip abduction), and stomach (prone hip extension).
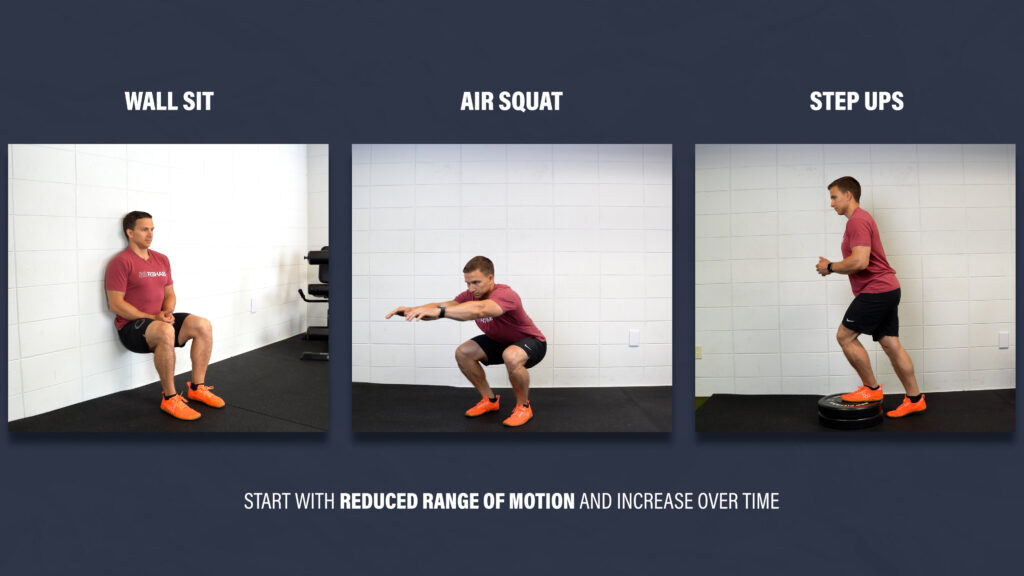
At some point, you’ll also perform and progress wall sits, air squats, step-ups, and similar exercises, likely starting with a shortened range of motion.
Part of normalizing walking is simply restoring your knee extension range of motion and quad function. However, you can also practice standing on one leg for up to 60 seconds. Additionally, you can balance with your eyes closed, step over cones, and walk backwards.
Similar to knee extension, here are two ways to improve knee flexion range of motion:
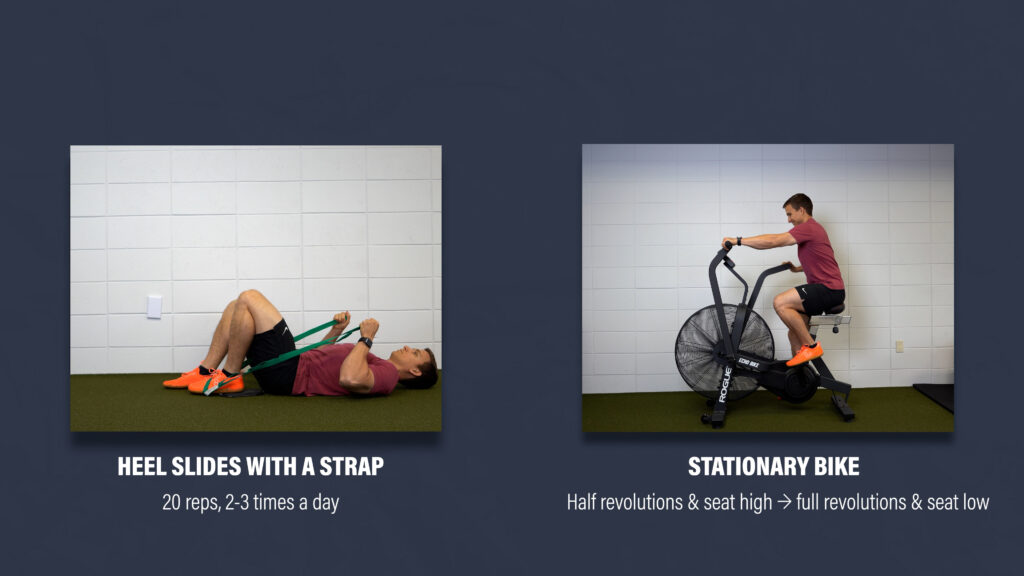
- Heel slides with a strap. You can do sets of 20 reps at least 2-3 times per day.
- Ride a stationary bike. Start by performing half revolutions with the seat high. Progress by lowering the seat and completing full revolutions.
Monitoring Pain, Swelling, & Joint Soreness
You will have moments when your knee is sore or swollen from pushing yourself too hard, but one of your primary roles is to minimize the frequency and severity of those occurrences by monitoring your response to exercise and adapting appropriately. If you have a flare up, you need to back off a bit. If your knee is feeling great, continue with your small progressions. Don’t rush the basics!
Also, muscle soreness, which is different from soreness of the knee joint, is normal and encouraged as long as it’s not debilitating.
Mid Stage
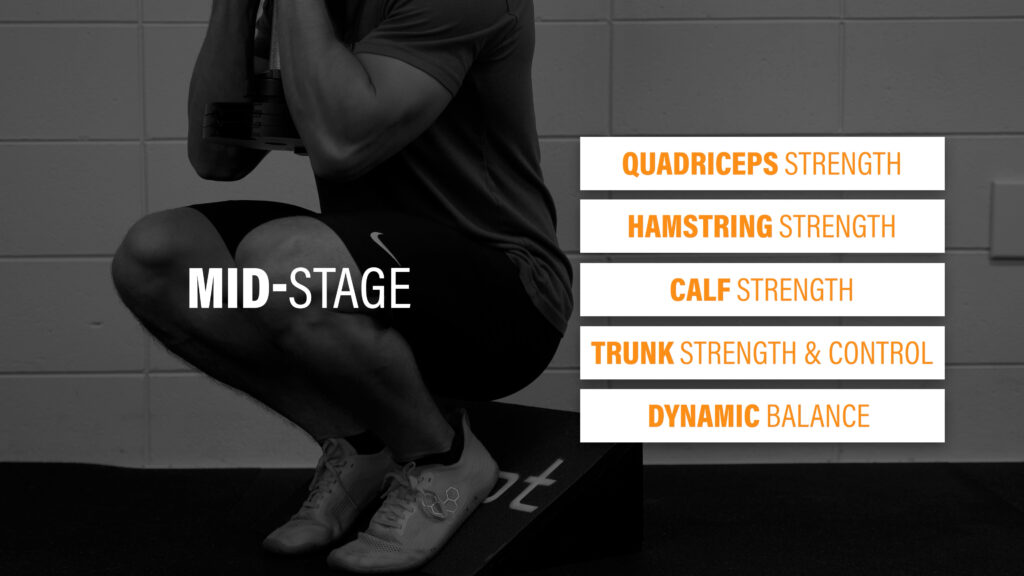
The mid-stage of ACL rehab, as defined by Buckthorpe and Della Villa in 2019, is characterized by muscle strengthening, movement training, and fitness reconditioning. I’m going to demonstrate exercise options for each body region, explain the rationale for their selection, and provide a sample program.
Quadriceps
If you want to improve your function and reduce your risk of reinjury, strengthening your quads needs to be your top priority. Here are 3 progressions that I like:
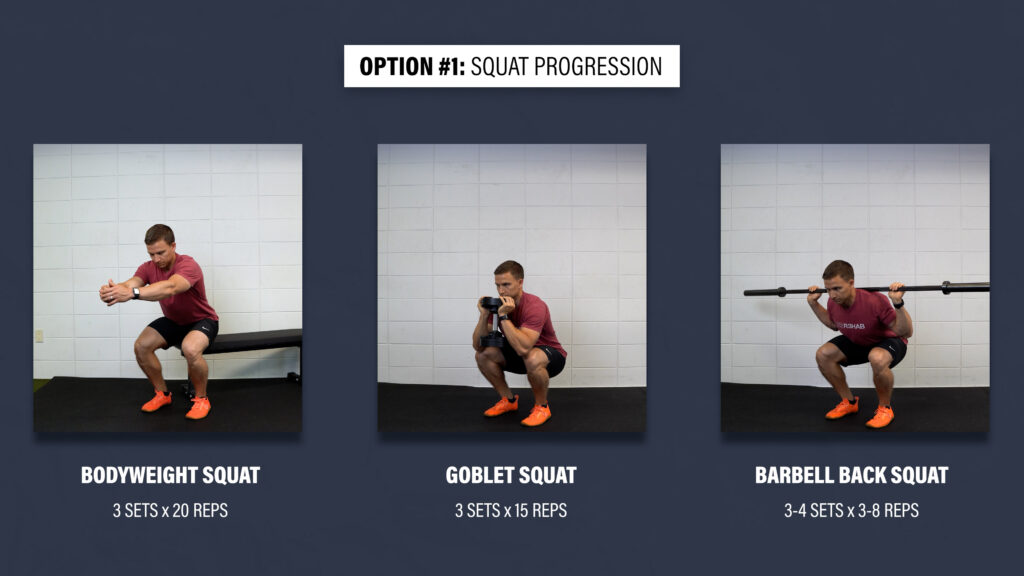
Option #1: Squat Progression
Level 1 – Bodyweight Squat. Gently tap your butt to a chair and stand back up. If it’s too challenging or painful, shorten the range of motion or use your hands for assistance. Aim for 3 sets of 20 repetitions.
Level 2 – Goblet Squat. Aim for 3 sets of 15 reps using a kettlebell or dumbbell.
Level 3 – Barbell Back Squat. Aim for 3-4 sets of 3-8 reps.
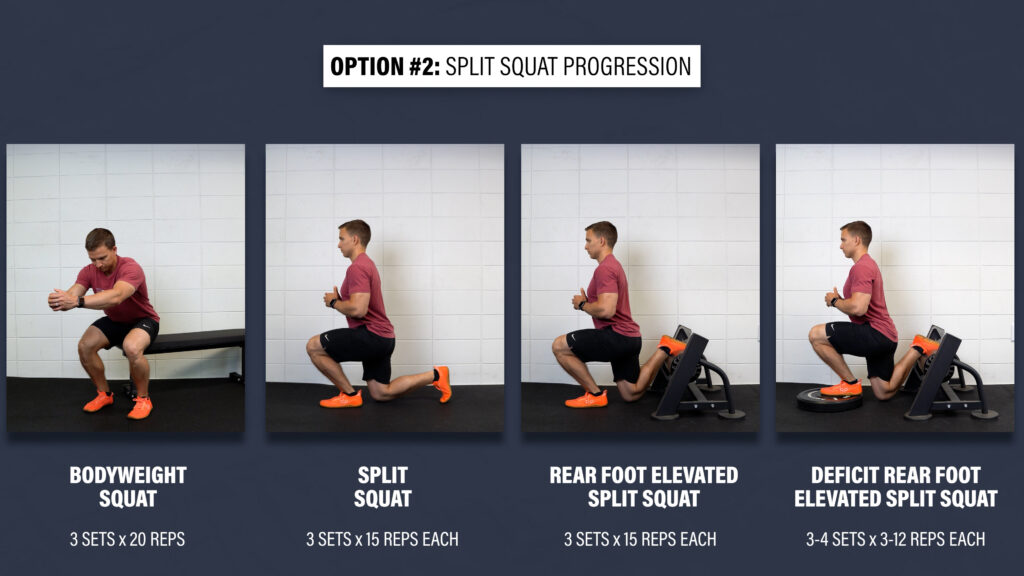
Option #2: Split Squat Progression
Level 1 – Bodyweight Squat.
Level 2 – Split Squat. Start in a stride stance and lower yourself down so that your back knee taps an egg that you don’t want to crack. If it’s too difficult for your front or back leg, shorten the range of motion or use your hands for assistance. Aim for 3 sets of 15 reps.
Level 3 – Rear Foot Elevated Split Squat. The overall technique of the movement and position of your torso should be similar, so use an object to elevate your back foot that isn’t too high. The majority of your weight should be through the lead leg.
Level 4 – Deficit Rear Foot Elevated Split Squat. You’re going to elevate the front leg using a 2-4” object to start. Over time, you can progress the height. Aim for 3 sets of 3-12 slow and controlled repetitions.
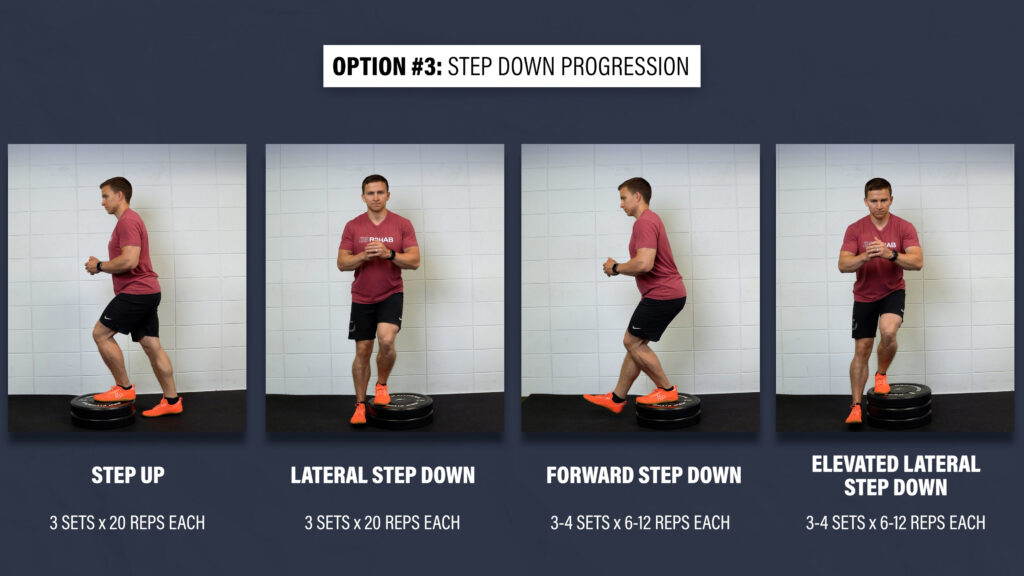
Option #3: Step Down Progression
Level 1 – Step Up. Use a stair or objects stacked 6-7 inches high. Don’t push off with the back leg. Focus on putting all of your weight through the working leg and just gently tap up and down with your other heel. If it’s too difficult, decrease the height or use your hands for assistance. Aim for 3 sets of 20 reps per leg.
Level 2 – Lateral Step Down. Same exact cues except this movement will allow for a little more knee travel. Aim for 3 sets of 20 reps per leg.
Level 3 – Forward Step Down or Elevated Lateral Step Down. You can either step forward off the step or continue to perform the lateral step down while gradually increasing the height of the step. Aim for 3-4 sets of 6-12 slow and controlled reps per leg.
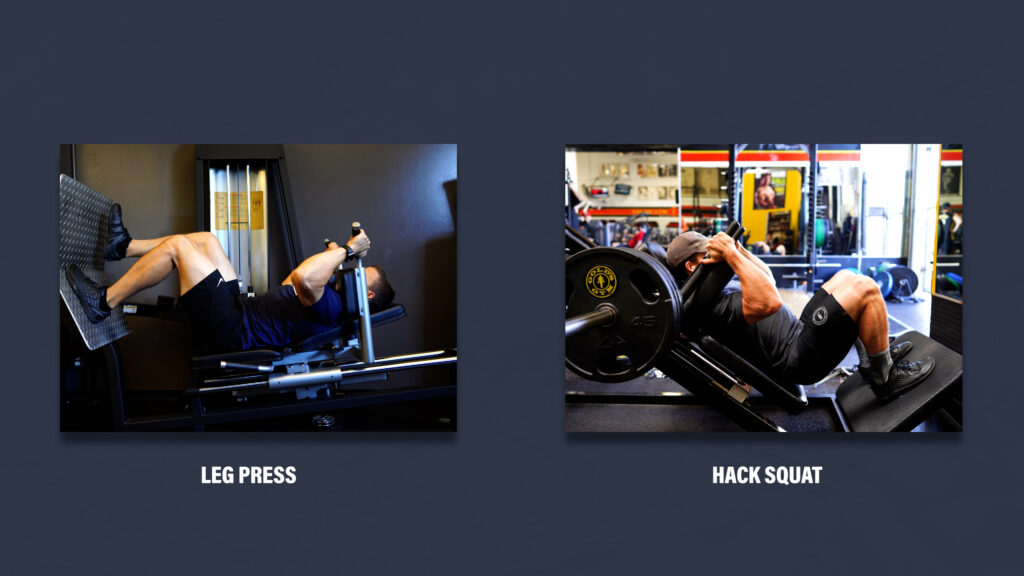
Other options include leg presses, hack squats, single leg squats, and anything else that involves knee extension.
Elevating the heels and driving the knees forward can be strategies used to emphasize the work done by the quads.
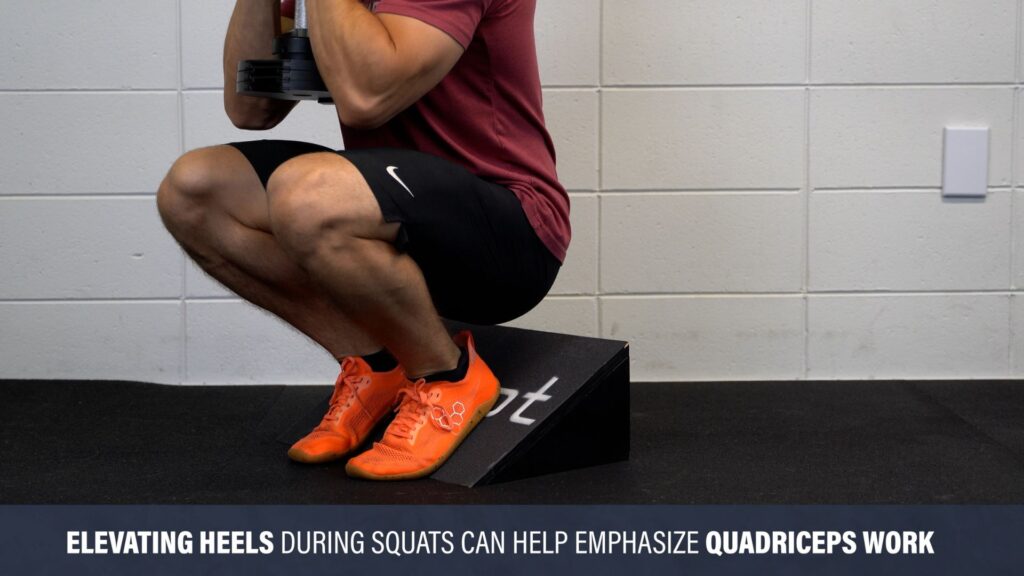
I also highly recommend leg extensions. Research by Sigward et al in 2018 found that people unknowingly perform compensations to offload their quads during squats. Since no other muscles extend the knee, leg extensions ensure that the quads are being trained adequately.
It’s not about what looks “functional.” It’s about doing what’s necessary to restore quad function.
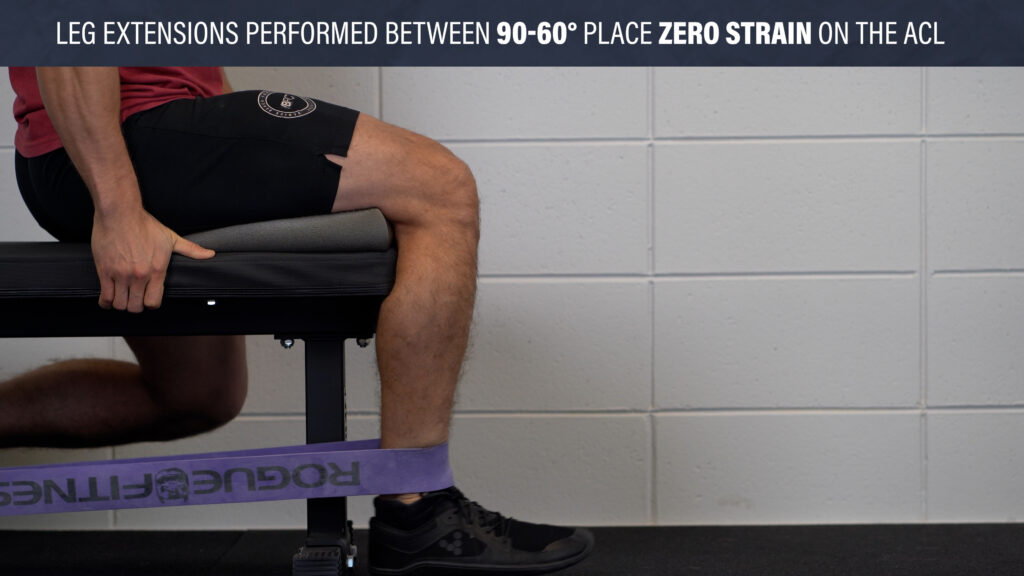
And no, leg extensions are not dangerous to the ACL. Any contemporary clinician or researcher who has followed the science for the past 30 years understands this, but the purpose of this blog isn’t to convince you of that or defy any precautions you might have. If you’re really concerned, leg extensions between 90 and 60 degrees of knee flexion put 0 strain on the ACL, and still provide the majority of the benefits.
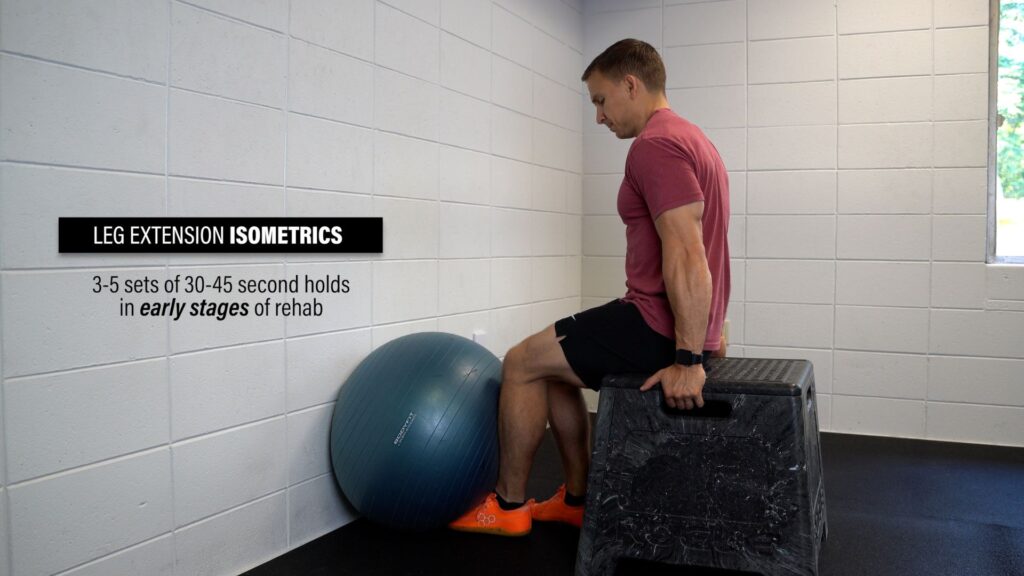
Although I didn’t mention it earlier, isometrics for 3-5 sets of 30-45 second holds can be useful in the early stages of ACL rehab for improving knee extension tolerance and function.
Hamstrings
Another critical component of mid-stage ACL rehab is improving the function of the hamstrings as they help to decrease the strain on the ACL and reduce the risk of re-injury. Here are 2 progressions that I like:
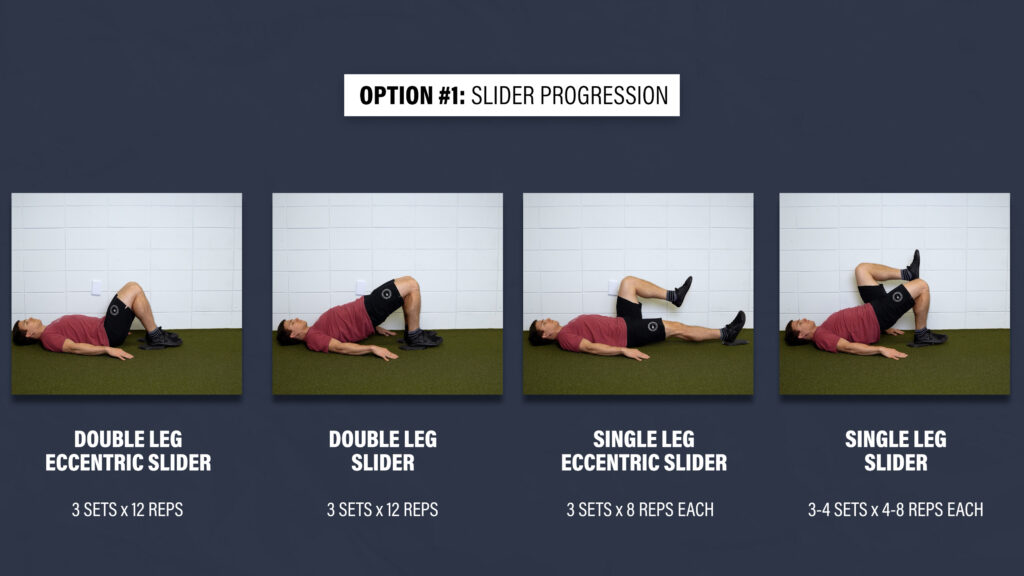
Option #1: Slider Progression
Level 1 – Double Leg Eccentric Slider. Bridge up, keep your glutes squeezed, slowly slide your legs out, drop down, bring your feet back to the starting position, and repeat. If it’s too difficult, just shorten the range of motion. If you can work up to 3 sets of 12 reps, progress to the next level.
Level 2 – Double Leg Slider. Aim for 3 sets of 12 reps.
Level 3 – Single Leg Eccentric Slider. Aim for 3 sets of 8 reps.
Level 4 – Single Leg Slider. Aim for 3-4 sets of 4-8 reps.
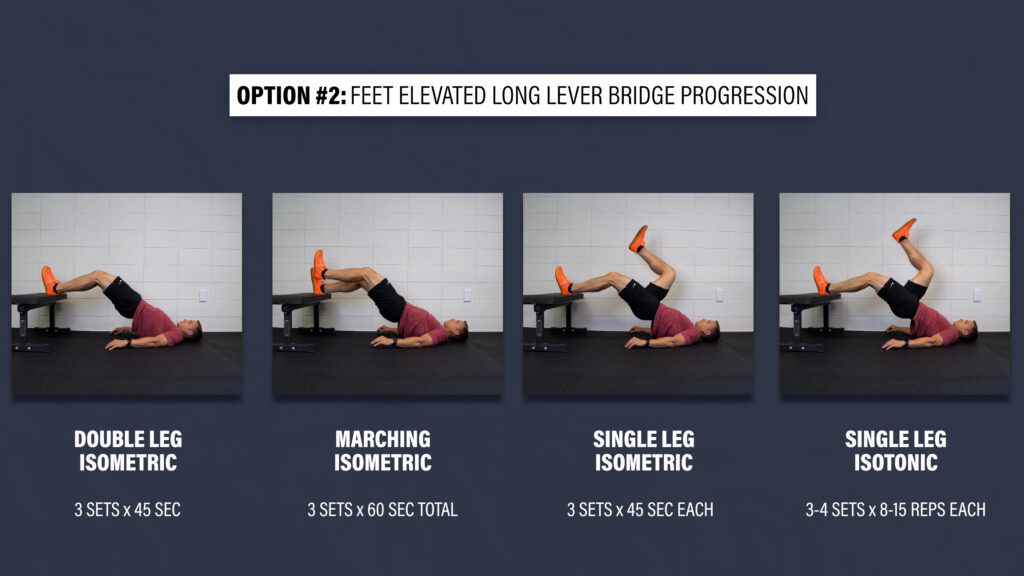
Option #2: Feet Elevated Long Lever Bridge Progression
Level 1 – Double Leg Feet Elevated Long Lever Bridge Isometric. Place both heels on a bench with a slight bend in your knees, bridge up until your hips are straight, and hold this position. Aim for 3 sets of 45 seconds.
Level 2 – Marching Feet Elevated Long Lever Bridge Isometric. Slowly alternate lifting and lowering each leg. Aim for 3 sets of 60 seconds total.
Level 3 – Single Leg Foot Elevated Long Lever Bridge Isometric. Aim for 3 sets of 45 seconds per leg.
Level 4 – Single Leg Foot Elevated Long Lever Bridge. Aim for 3-4 sets of 8-15 repetitions per leg.
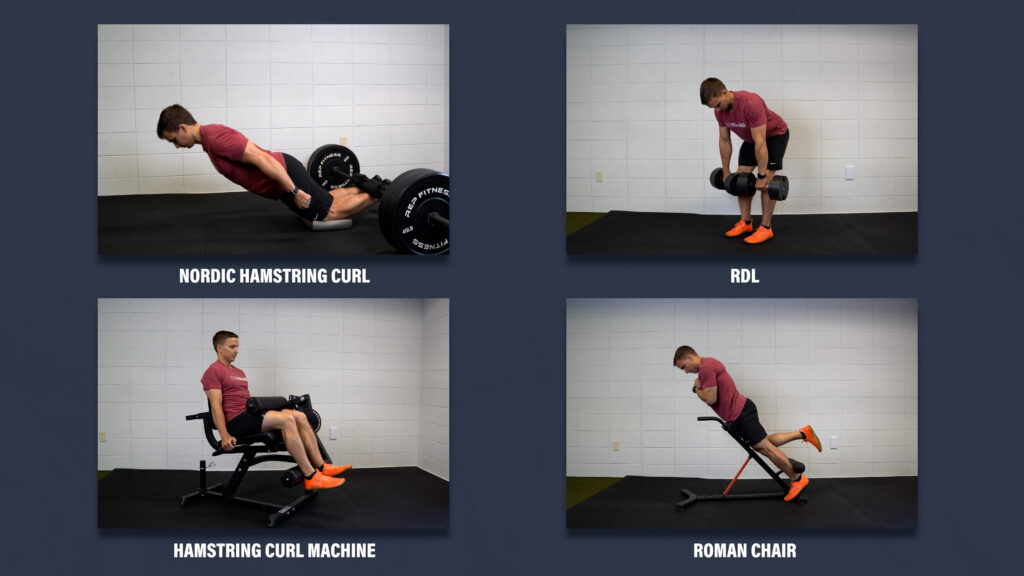
Other options that you should include, to address the hip extension and knee flexion actions of the hamstrings, are nordic hamstring curls, RDLs, seated or prone hamstring curls, and roman chair variations.
Calves
Your calves are important for running, jumping, landing, etc., and similar to your hamstrings, your soleus, one of your primary calf muscles, also helps to unload the ACL. Here are 2 heel raise progressions:
Option #1: Straight Knee Heel Raise Progression
Level 1 – Double Leg Heel Raises on Flat Ground. Aim for 3 sets of 25 slow and controlled reps. Use your hands for balance as needed.
Level 2 – Single Leg Heel Raises on Flat Ground. Aim for 3 sets of 15 reps.
Level 3 – Single Leg Heel Raises on a Step. Aim for 3-4 sets of 8-15 reps. Over time, you can add weight as needed.

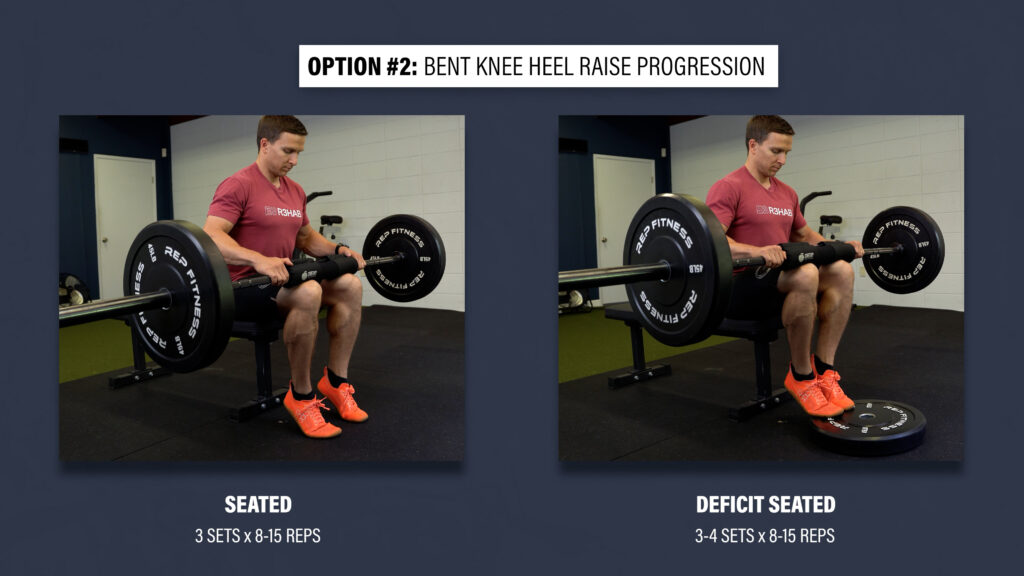
Option #2: Bent Knee Heel Raise Progression
Level 1 – Seated Heel Raises on Flat Ground. Aim for 3 sets of 8-15 slow and controlled reps.
Level 2 – Deficit Seated Heel Raises. Aim for 3-4 sets of 8-15 reps.
You can use a barbell, smith machine, dumbbells, or seated heel raise machine.
Trunk / Hips
The strength and control of your trunk and hips can affect what happens at your knee, so here are 3 exercise progressions that train the hip abductors, extensors, and adductors, as well as the associated trunk muscles:
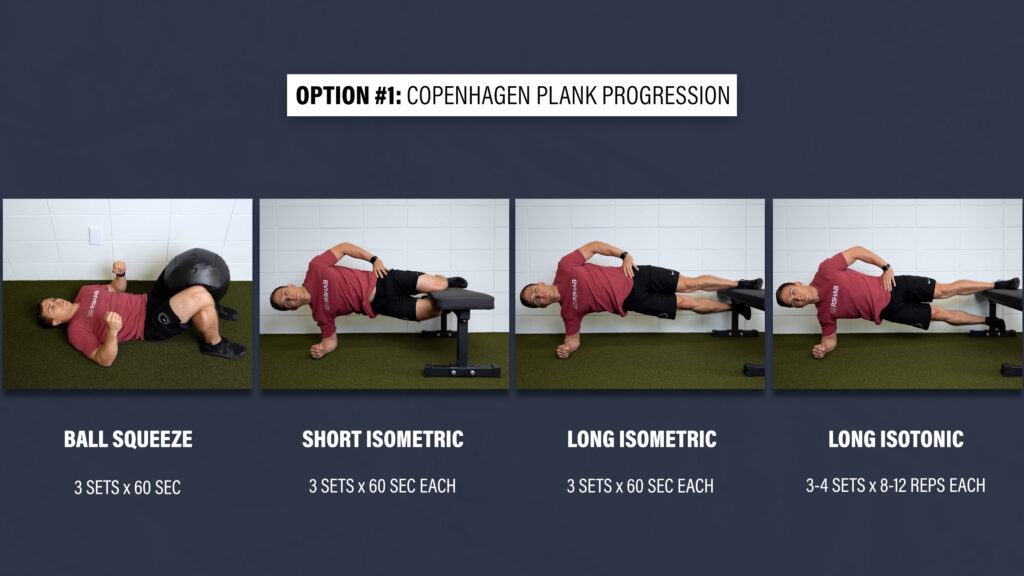
Option #1: Copenhagen Plank Progression
Level 1 – Lie on your back and squeeze a ball between your knees or ankles as hard as you comfortably can.
Level 2 – Short Copenhagen Plank Isometric. Keep your trunk in a straight line and thighs together.
Level 3 – Long Copenhagen Plank Isometric. Same as the previous exercise, but you’re going to keep the knee straight.
Level 4 – Long Copenhagen Plank. Aim for 3-4 sets of 8-12 slow and controlled repetitions.
To progress to level 4, aim for 3 sets of 60 seconds on levels 1-3.
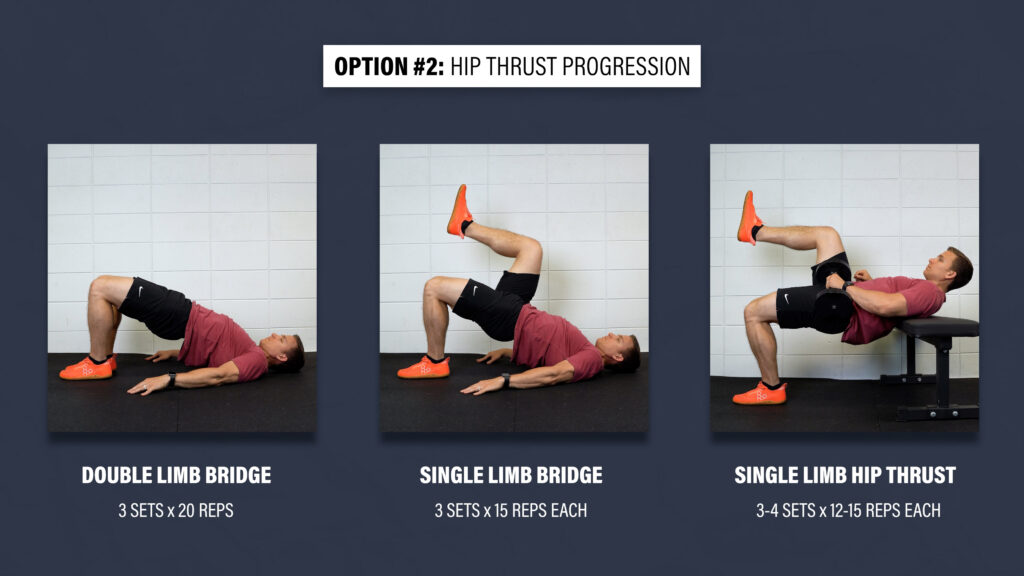
Option #2: Hip Thrust Progression
Level 1 – Double Limb Bridge. Lie on your back, bridge up, squeeze your glutes, lower yourself down, and repeat. Aim for 3 sets of 20 reps.
Level 2 – Single Limb Bridge. Aim for 3 sets of 15 reps.
Level 3 – Single Limb Hip Thrust. Aim for 3-4 sets of 12-15 slow and controlled reps. Add weight as needed.
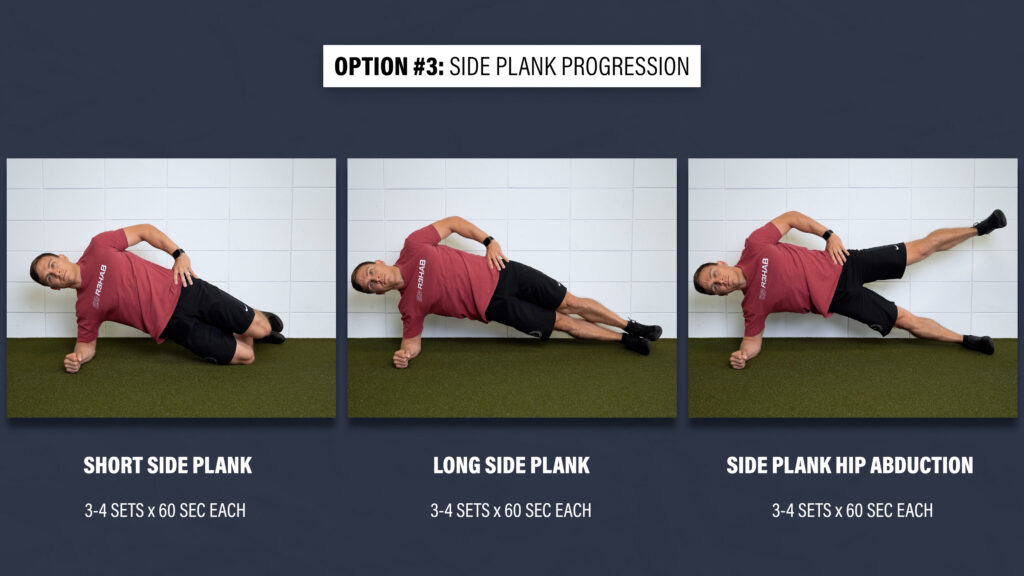
Option #3: Side Plank Progression
Level 1 – Short Side Plank. Start on your forearm and knees while keeping your trunk in a straight line. Hold this position.
Level 2 – Side Plank. Straighten your legs, stack your feet, and keep yourself in a straight line, both from a front view and top view.
Level 3 – Side Plank Hip Abduction. Position yourself in the same way as the previous exercise, but slowly move that top leg up and down with good control.
Aim for 3-4 sets of 60 seconds as you work through each exercise.
Dynamic Balance
The last category here is dynamic balance to help address some of the proprioceptive deficits associated with ACL injuries. Here are 2 options:
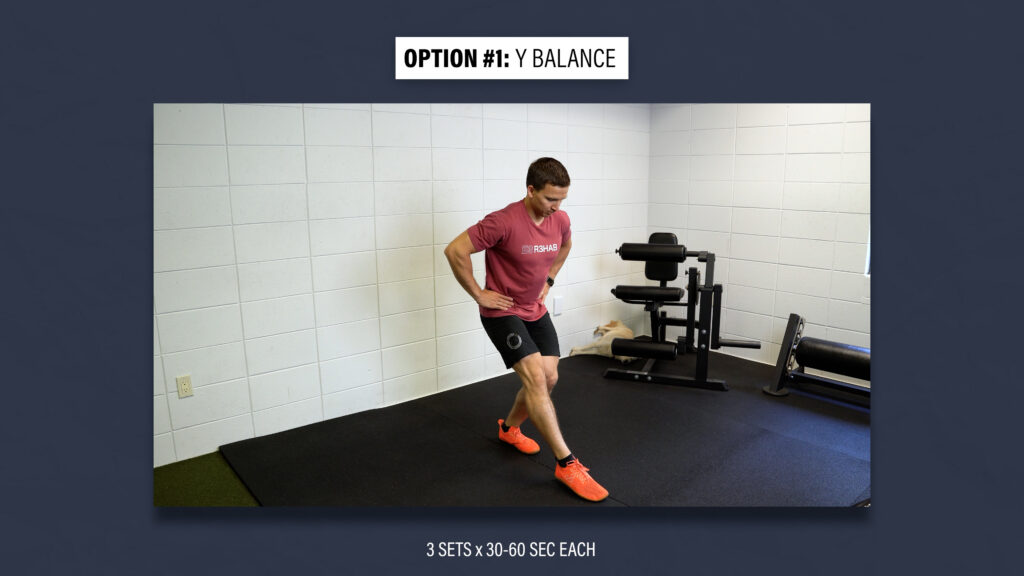
Option #1: Y Balance
Set up tape, cones, or imagine standing on an upside down Y. Stand on one leg and reach in each direction of the Y. Try not to put any weight through the foot that is tapping the ground. Start with small reaches and gradually increase the distance as your balance improves. Begin with 3 sets of 30 seconds each and work up to 60 seconds.
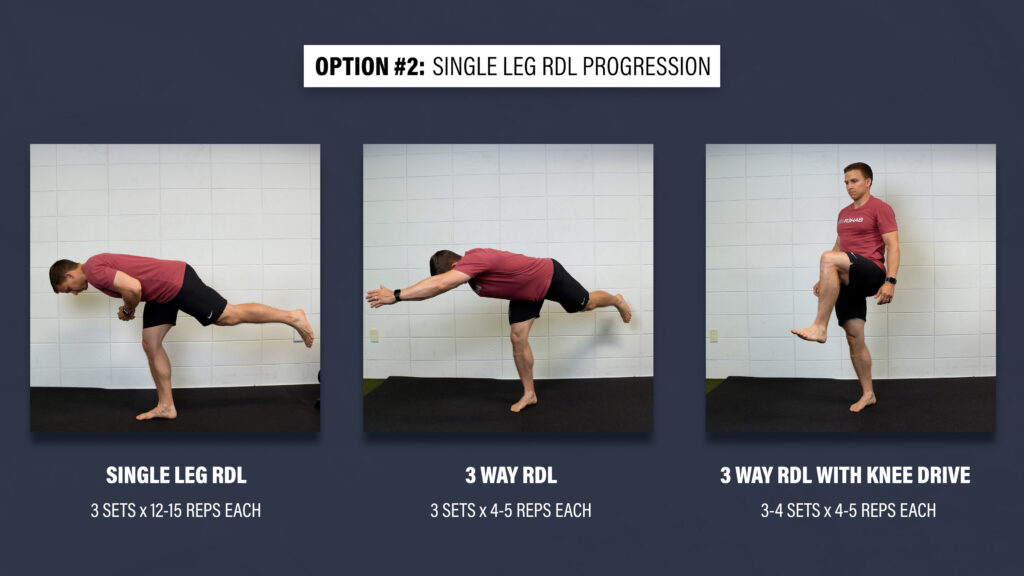
Option #2: Single Leg RDL Progression
Level 1 – Single Leg RDL. Stand on one leg while keeping a slight bend in both knees, hinge at your hips until your trunk is almost parallel with the ground, and then return to the starting position. Repeat this movement without touching your foot to the ground. If this is too challenging, use your hands to help with balance, shorten the range of motion, or tap your foot to the ground. Aim for 3 sets of 12-15 reps.
Level 2 – 3 Way RDL. Reach your arms in 3 directions – to the left, middle, and then to the right. That counts as 1 rep. Aim for 4-5 reps total.
Level 3 – 3 Way RDL w/ Knee Drive. You can progress the previous movement by adding a knee drive.
ACL Rehab Programming
How do you put all of this information together to create a structured program? Let’s start with the early stage of ACL rehab.
Every day, multiple times per day, you’ll be working on your knee extension and flexion range of motion by incorporating quad sets, heel props, heel slides, and cycling on a stationary bike. You’ll also be performing isometric leg extensions at least one time per day. You’ll eventually start performing straight leg raises, which is an important milestone, side lying hip abductions, prone hip extensions, single leg balance, air squats, step ups, etc.
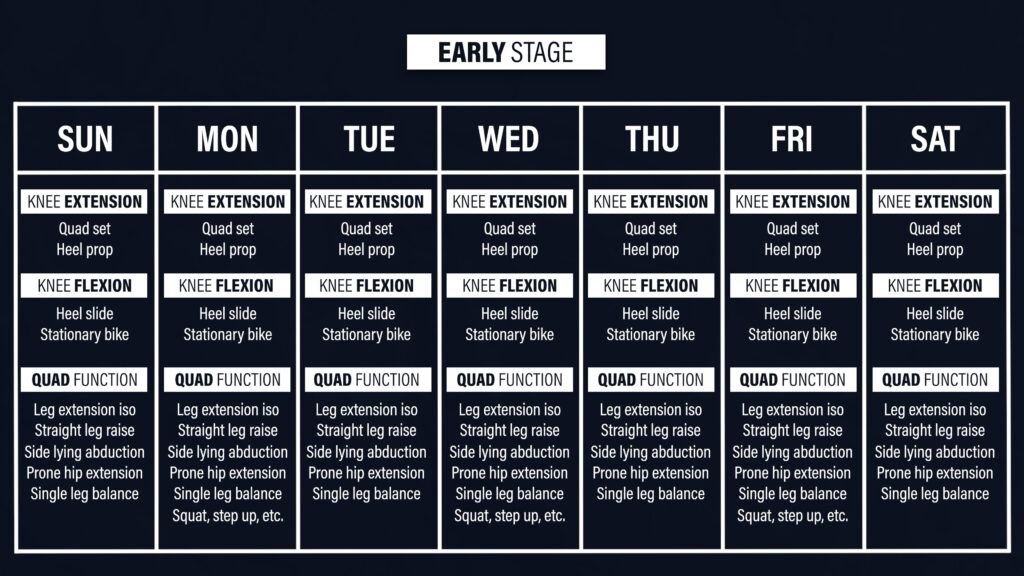
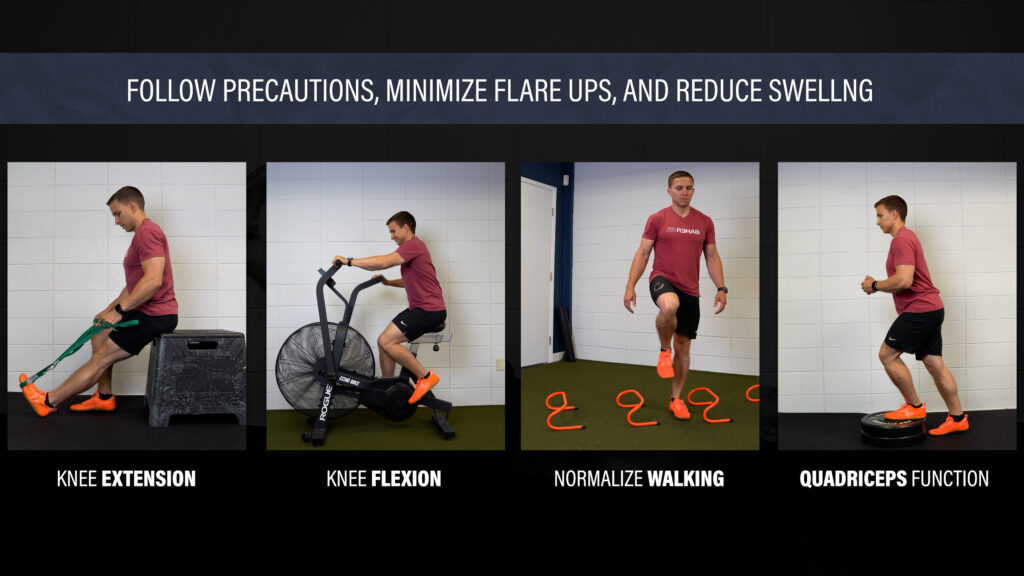
Remember, the primary goals here are to restore range of motion, normalize walking, and improve the function of your quads, while sticking to your precautions, minimizing flare ups, and reducing swelling.
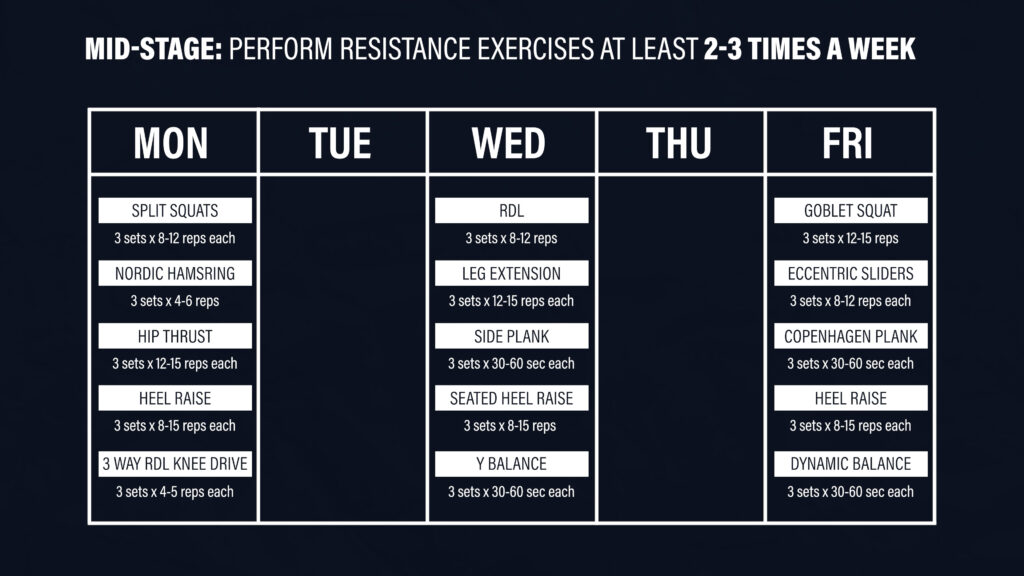
For the mid-stage of ACL rehab, resistance exercises should be performed at least 2-3 times per week. Here is an example of a 3-day program:
On Monday, you can perform split squats, nordic hamstring curls, hip thrusts, standing heel raises, and the 3 way RDLs with a knee drive. On Wednesday, you can do RDLs, leg extensions, side planks, seated heel raises, and the Y balance. On Friday, you can perform squats, sliders, Copenhagen planks, and heel raise and dynamic balance options.
I’m trying to make this information simple and straightforward, but in reality, it’s pretty complex and context-dependent, so here are 6 other key things to consider:
- The stages of ACL rehab aren’t distinct, meaning that you’re not in the early stage of rehab one day and suddenly in the mid-stage of rehab the next day. There’s going to be some overlap because it’s more of a continuum.
- You should be including upper body exercises as well, not just for the physical benefit, but also the mental aspect of feeling like an athlete.
- As I mentioned earlier, don’t forget to train the uninjured leg hard, early, and often, so it doesn’t become deconditioned.
- Incorporate aerobic conditioning as soon as it’s appropriate. For example, you might ride a stationary bike for 45-60 minutes, 2-4 times per week.
- The mid-stage of rehab is an ideal time to build your work capacity. You want to be able to handle more volume over time. For instance, you might start with lower body resistance training 2 times per week and build up to the 3 day-program I provided. You might also begin with 3 sets per exercise and progress to 4-5 sets on certain exercises.
- Lastly, the intention of the exercises may fluctuate over time. Early on, you’re probably going to stick to higher repetition ranges to improve work capacity and endurance. Over time, you’ll likely transition to increasing hypertrophy, strength, and power by manipulating the repetition ranges, rest times, effort or intensity, and speed of the movements. Once again, you can have overlap here, but you can’t expect to return to sport if you’re only accustomed to performing 20 repetitions of every exercise at a low effort. Your parameters should range from 3 to 20 repetitions with minimal rest between sets or exercises, up to 5 minutes of rest between sets or exercises depending on the goal.
Return to Running Criteria
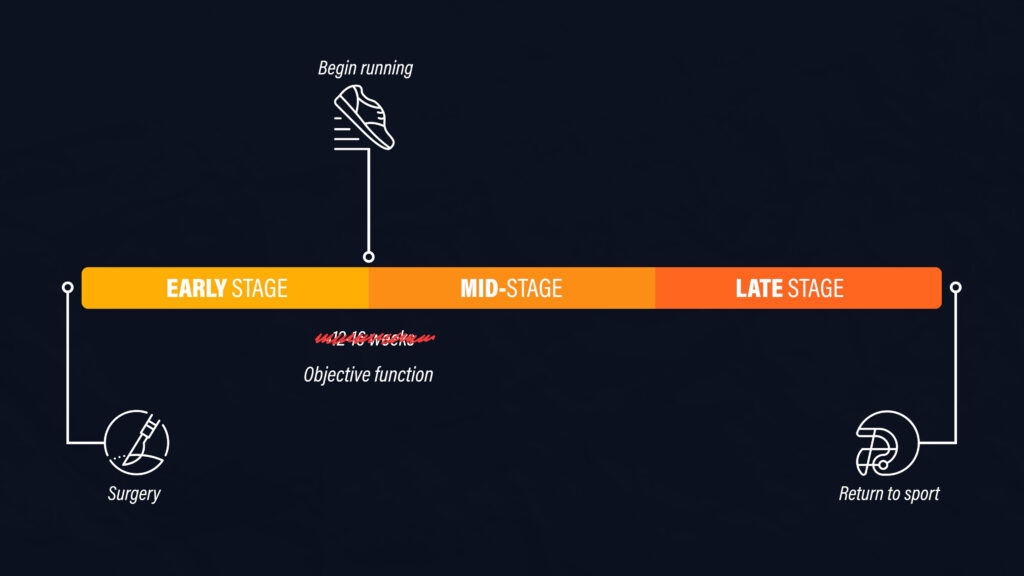
One aspect of the mid-stage of ACL rehab that I haven’t discussed yet is running. Returning to straight-line running is an important landmark and something that most people look forward to.
Historically, people were given permission to run after 12-16 weeks based on the healing of the graft after surgery. However, it is now highly recommended that the initiation of running is based on your objective function.
In addition to having minimal pain, near or full knee range of motion, and minimal to no swelling, here’s the objective criteria that you should meet prior to returning to running recommended by Buckthorpe and Della Villa:
- Display good quality single leg squats and bilateral landings
- Demonstrate isometric knee extensor strength >70% of the uninjured side
- Be able to perform a single leg exercise, such as a leg press, of at least 1.25 times your body weight
Other criteria discussed by Amy Arundale on our podcast include being able to perform a single leg landing from a 30cm box and at least 22 single leg sit-to-stands in one minute.
For the physical therapists reading who are using a dynamometer, Erik Meira suggests 2 Nm/kg of quadriceps torque to bodyweight as a reasonable “bare minimum.”
You can’t just go back to running because the timing feels right – you have to earn it!
Plyometrics Criteria
With regards to returning to plyometrics, Buckthorpe et al recommend progressing from bilateral landings to bilateral plyometrics to unilateral jumping and landing to unilateral plyometrics.
To initiate bilateral landings, you should be able to perform a single limb leg press of at least 100% of your bodyweight. To initiate the single leg plyometrics, you should be able to do at least 150% of your bodyweight.
We made a video about this topic and people were quite surprised by these numbers, but the purpose of this blog and our content is to make sure that you return to sport safely. These might be difficult goals to achieve, but adequate preparation is going to enhance your performance and reduce your risk of reinjury. Don’t take shortcuts!
Plyometric & Deceleration Progressions
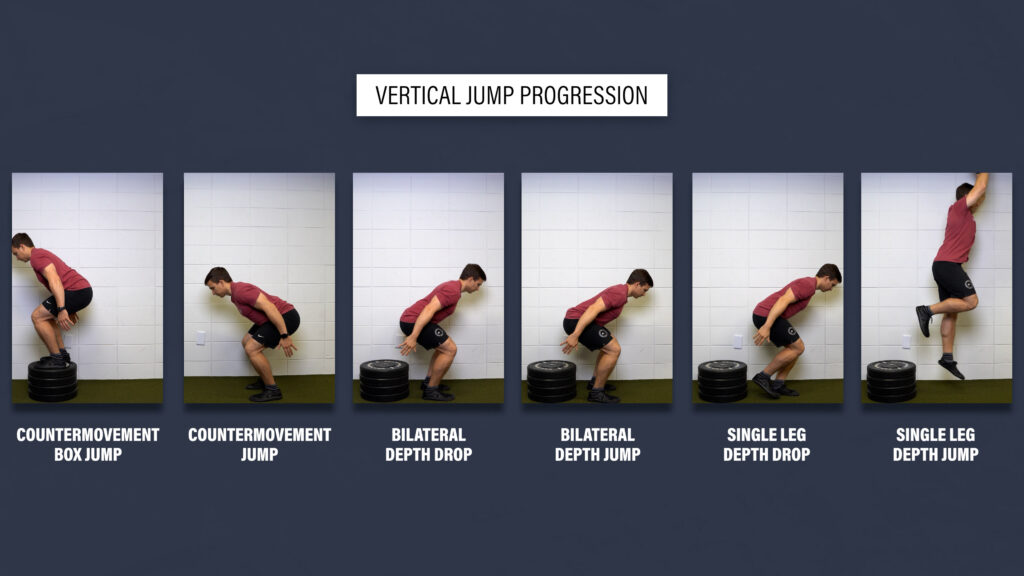
Since there’s an infinite number of plyometric options and progressions to choose from, I want to emphasize the importance of at least including a vertical jump as it’s more indicative of knee function than the traditional horizontal hop tests. An example progression would be:
- Countermovement jump to a box, countermovement jump, bilateral depth drop, bilateral depth jump, single leg depth drop, and single leg depth jump.
It’s also important to focus on deceleration since it’s highly dependent on the capacity of the quads. An example progression would be:
- Forward lunge, forward lunge with step back, step and land, step and land with a step back, and running with a step back.
You definitely should still incorporate other hopping and jumping exercises, especially side-to-side and rotational movements, but vertical jumps and deceleration cannot be overlooked.
With regards to programming, you can practice these movements on your sport-specific training days, which I’ll talk about shortly, or put them on the front end of your gym sessions when you’re the most fresh. At the very least, aim to do 3-4 sets of 4-8 reps, 2-3 times per week. Focus on the quality and execution as opposed to trying to turn them into cardio.
Late Stage, Return to Sport, & Return to Competition
The late stage of ACL rehab is dependent on developing and continuing to develop the solid foundation that I’ve been discussing.
- Do you have full range of motion, no swelling, and minimal to no pain?
- How’s your strength, muscle mass, and power?
- Have you been working through plyometric progressions?
- How’s your conditioning?
This is when you’ll be performing more sport-specific movements, and increasing the intensity and complexity of training. The straight-line running on a treadmill will eventually turn into full sprints and cutting maneuvers. Pre-planned movements should progress to reactive movements. You’re going to slowly try to simulate your sporting environment and demands.
Return to sport criteria from the University of Delaware include being at least 9-12 months out from surgery and possessing quad strength that’s 90-100% of the uninvolved side, but you should be getting tested by a physical therapist with access to a dynamometer. Once again, for the physical therapists reading, Erik Meira suggests a minimum of 3 Nm/kg of quadriceps torque to body weight.
An important caveat here though is that returning to sport doesn’t necessarily mean returning to full competition. In order to return to full competition, Brinlee and colleagues suggest working through this progression without apprehension, pain, instability, swelling, or compensations:
- Non-contact practice
- Small-sided contact practices
- Full practice
- Return to competition with restricted workload
- Return to competition unrestricted
Returning to sport and competition require you to gradually increase your training loads and exposures. Just like everything else, it’s a continuum. It’s a process. If you haven’t played your sport in a year, that’s a lot of work that you need to make up.
Also, the psychological aspect of ACL rehab is extremely important. You need to be confident in your ability to return to sport and competition.
Motor Learning Principles
Since there are many neurophysiologic adaptations that occur after an ACL injury and reconstruction, motor learning strategies should be applied throughout rehabilitation. You want to drive implicit learning.
Implicit learning is when you are able to complete a task without necessarily having direct knowledge of how you are performing it. You don’t think about how each joint is moving while you walk or ride a bike. You perform those movements without much thought required. This is also known as automaticity. Simply put, when you go back to your sporting activities, you shouldn’t have to think about how to perform those tasks or how your knee should be positioned – you should just be able to do them.
There are a few ways that you can help encourage implicit learning:
- Shift your focus externally. While performing exercises and movements, you should aim to have an external focus of attention. Initially, it might be helpful to watch yourself in a mirror, but eventually you need to take that mirror away. You should also try to focus on something outside of your body. For example, during a split squat, instead of telling yourself to drive your knee forward over your toes, place a foam roller or another object in front of you and tap your knee to it.
- Train dual tasking. Dual tasking is when you must complete some task while also performing a motor task. For example, a soccer player has to scan the field to locate opponents and teammates while also dribbling a soccer ball. There are many ways to train dual tasking. Try catching a ball while performing single leg balance, or solving math problems while doing vertical jumps.
- Add reactive training. Most sports require you to engage with and react to the environment. Try performing movements and exercises in response to a stimulus. This can start early in the rehabilitation process by performing straight leg raises to the beat of a metronome or in response to a flashing light. In the mid-stage of rehab, you can do a lunge when someone yells “go” or perform a drop landing when someone throws a ball for you to catch.
Driving motor learning shouldn’t be seen as an isolated exercise or session. Instead, you should approach all exercises and movements with the goal of improving implicit learning, or automaticity. This is your chance to have fun and get creative!
ACL Rehab Final Points
Just so I don’t make this blog any longer than it already is, I want to leave you with 5 brief, final points:
- As I mentioned at the beginning, this information needs to be individualized based on your surgery, prior level of function, goals, etc.
- This blog is not all-inclusive. I unfortunately can’t pack 12 months of ACL rehab into one blog.
- Other than the timelines (because you should return to sport and competition much sooner), most of this information applies to non-surgical management as well.
- We have other blogs (linked below) and videos relevant to ACL rehab, including a dynamic warmup that everyone should be performing to help reduce the risk of reinjury.
- Lastly, my advice doesn’t supersede that of your surgeon or physical therapist, but it may be helpful to discuss certain aspects of this blog with them if you have questions or concerns.