Following a lower-body injury or surgery, it is crucial you are performing these 3 categories of exercises before returning to sport:
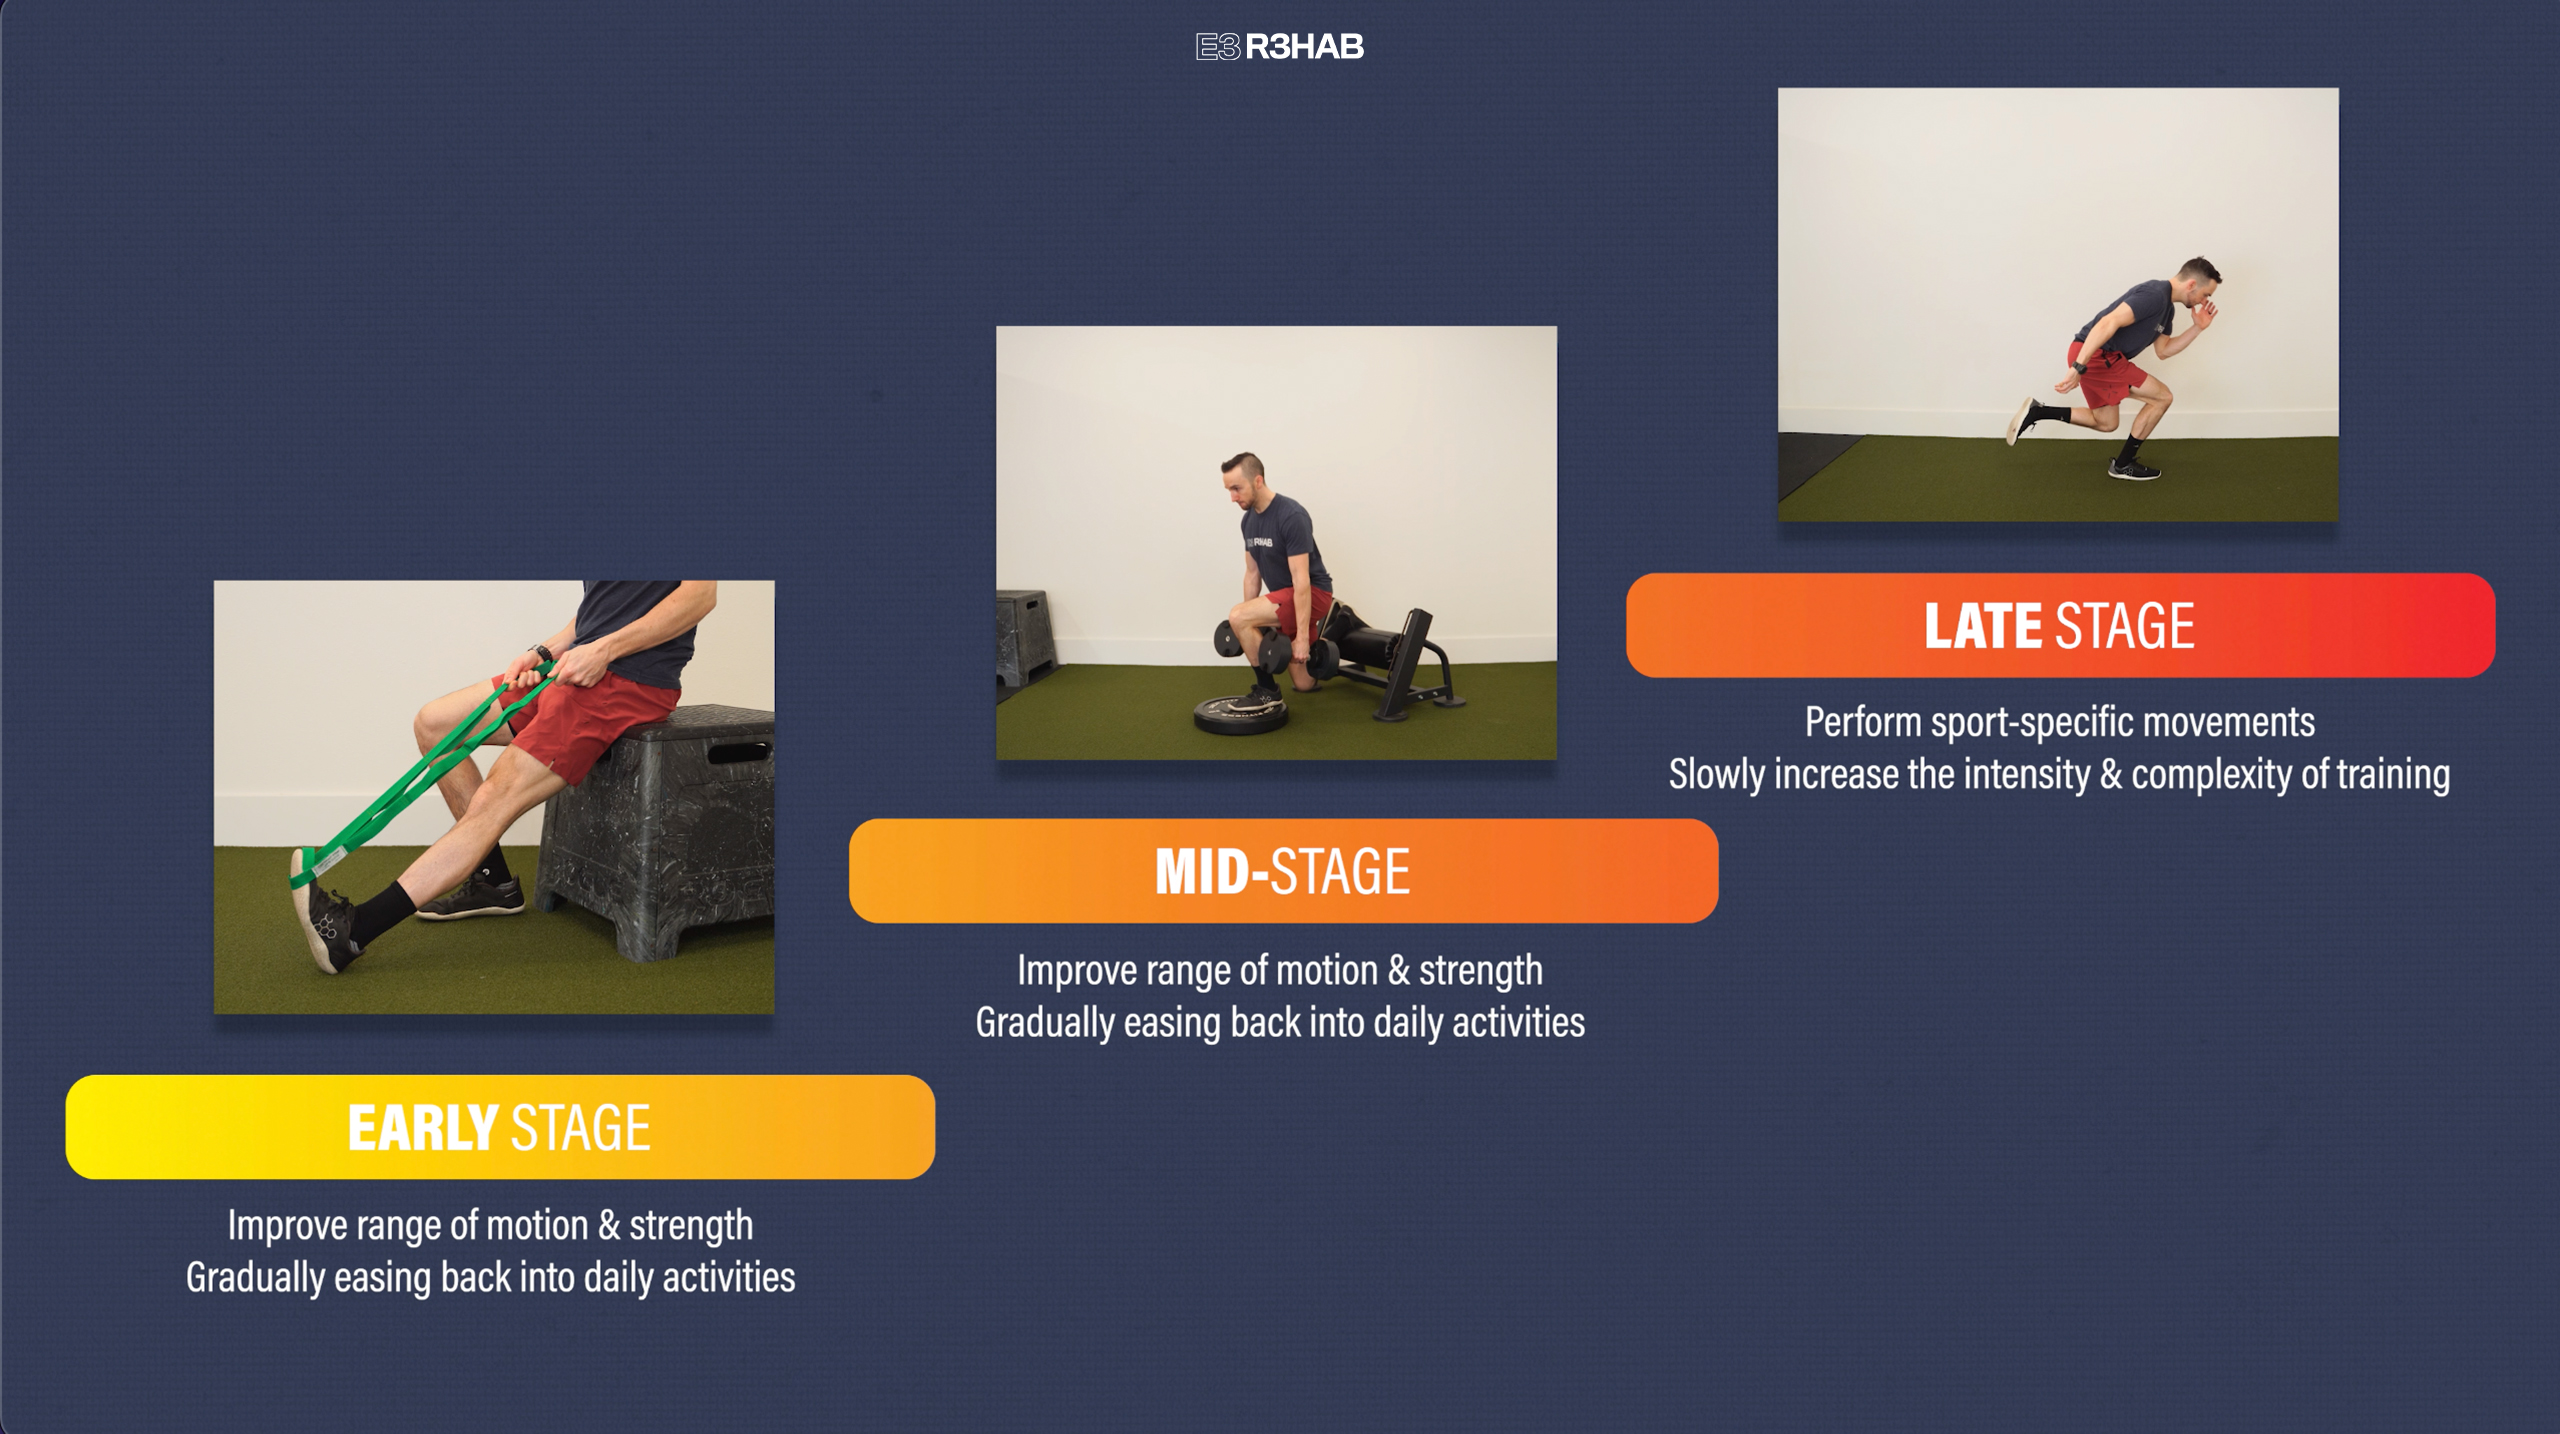
What Is The Late Stage?
If you don’t already know, the late stage is the last of three overlapping stages in rehab. During the first 2 stages, the focus is on improving your range of motion and strength, while gradually easing back into your daily activities. In the late stage, you perform more sport-specific movements and slowly increase the intensity and complexity of your training in preparation for returning to sport.
Ultimately, your exercise selection and timeline will be determined by factors such as your injury or surgery, symptoms, function, and desired sport. Since every case is unique, the information presented in this article is intended to be used as a framework for progressing exercises in this stage.
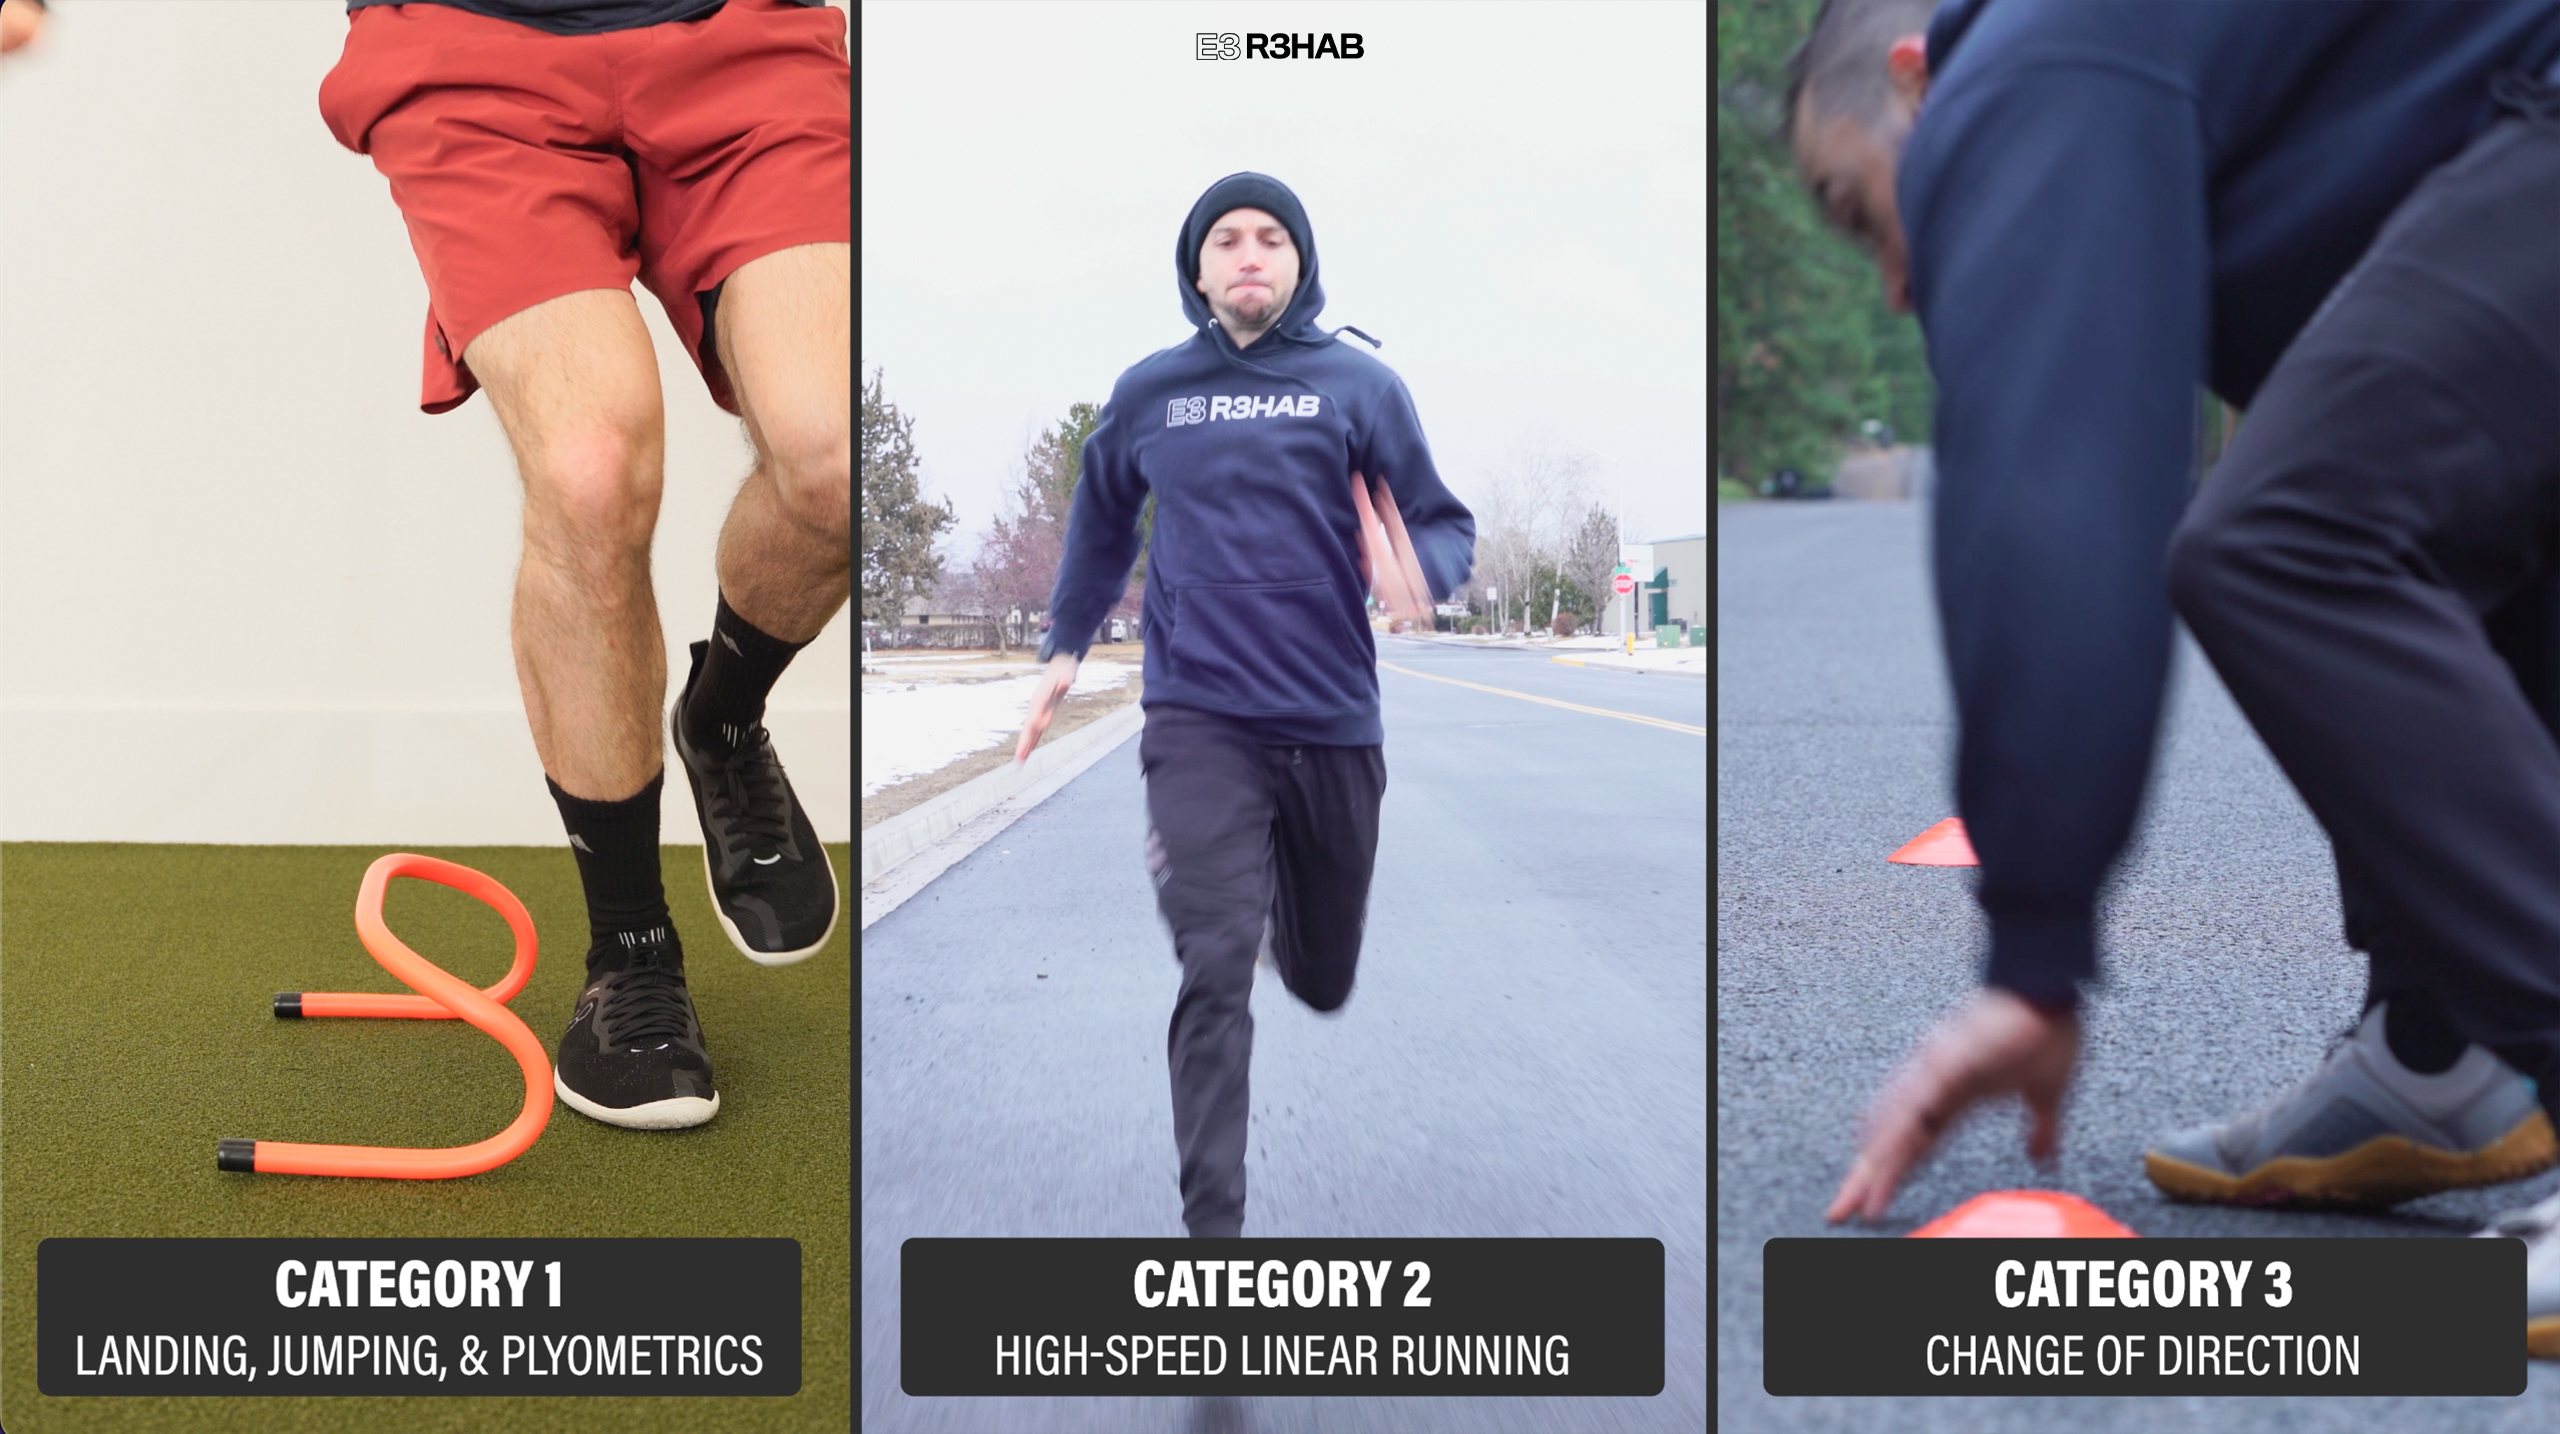
Category 1: Landing, Jumping, and Plyometrics
There are endless options to choose from, but there are usually 3 things to consider:
- Progress from double-leg to single-leg.
- Increase the speed and/or intensity of the exercise as tolerated.
- Incorporate various directions, such as vertical, horizontal, lateral, and multiplanar.
Here are 2 plyometric progressions.
Option 1 is a Vertical Jump Progression:
- Level 1 – Start with a box jump since this will reduce landing impact forces.
- Level 2 – Perform a vertical jump, building up to a maximal effort.
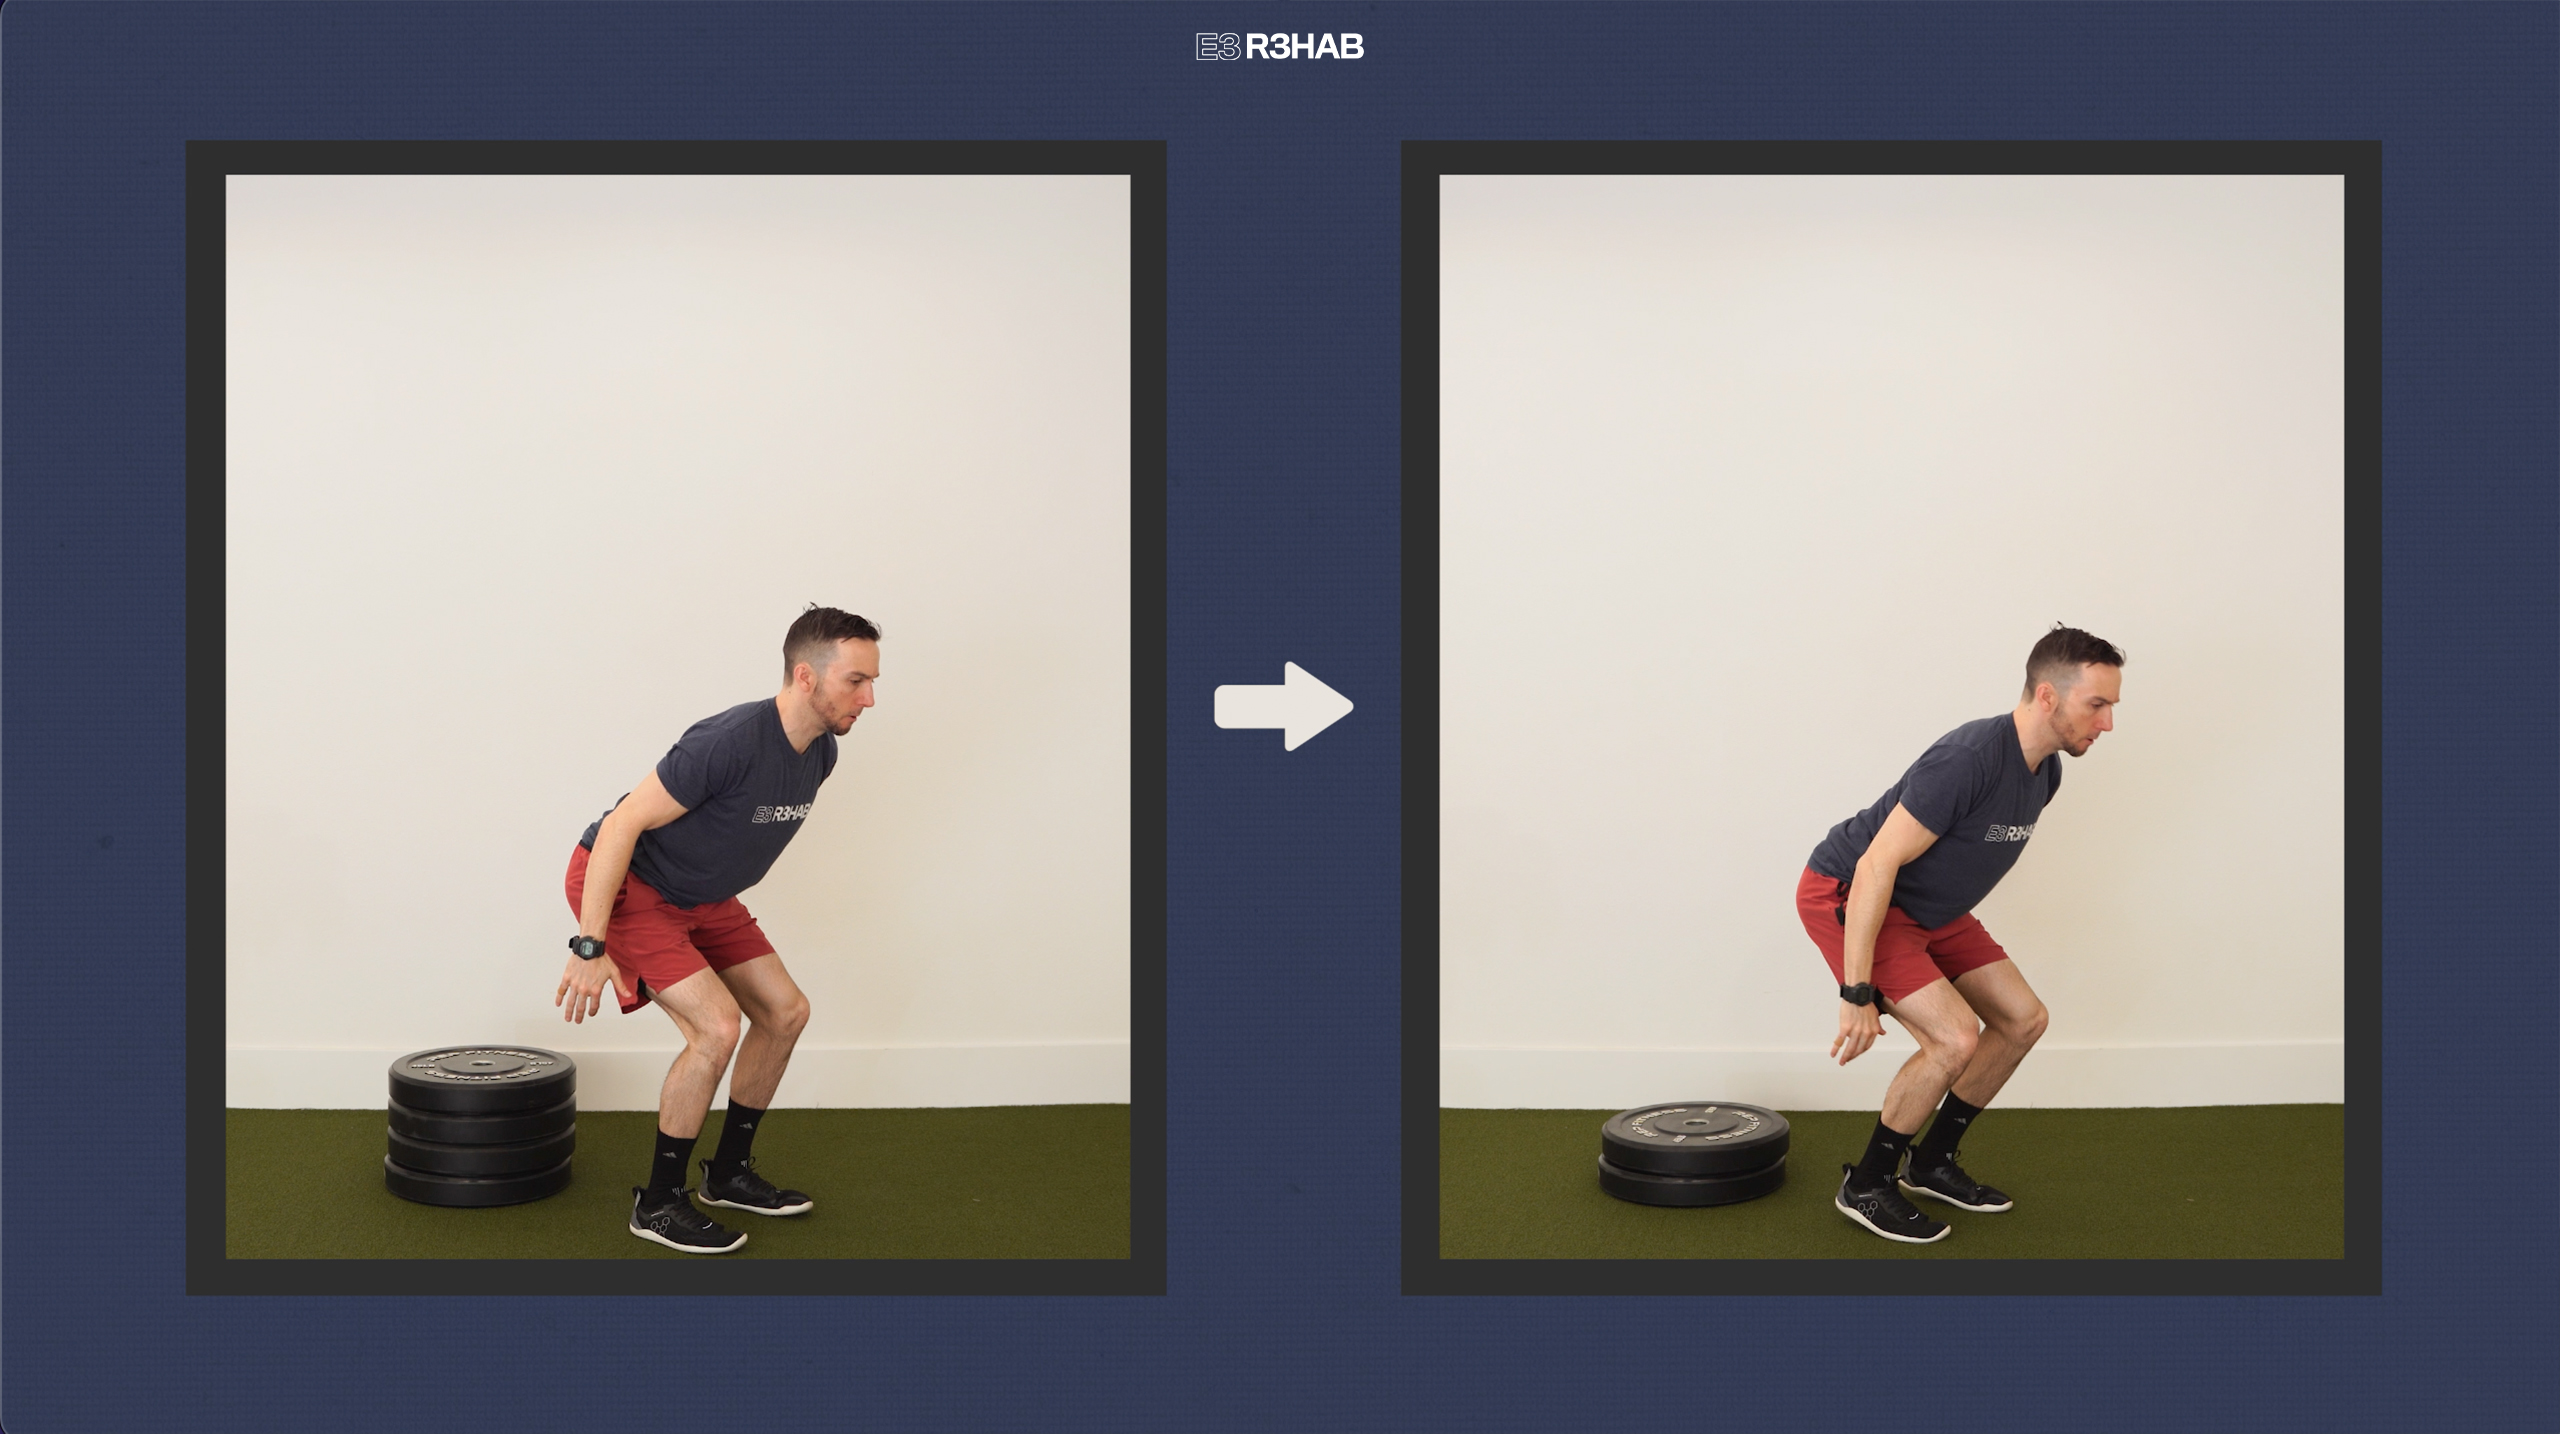
- Level 3 – Depth Drop. Step off an elevated surface and land on two legs.
- Level 4 – Depth Jump. Step off, land on two legs, and then quickly jump up as high as possible.
- Level 5 – Single Leg Depth Drop. Step off an elevated surface and land on one leg.
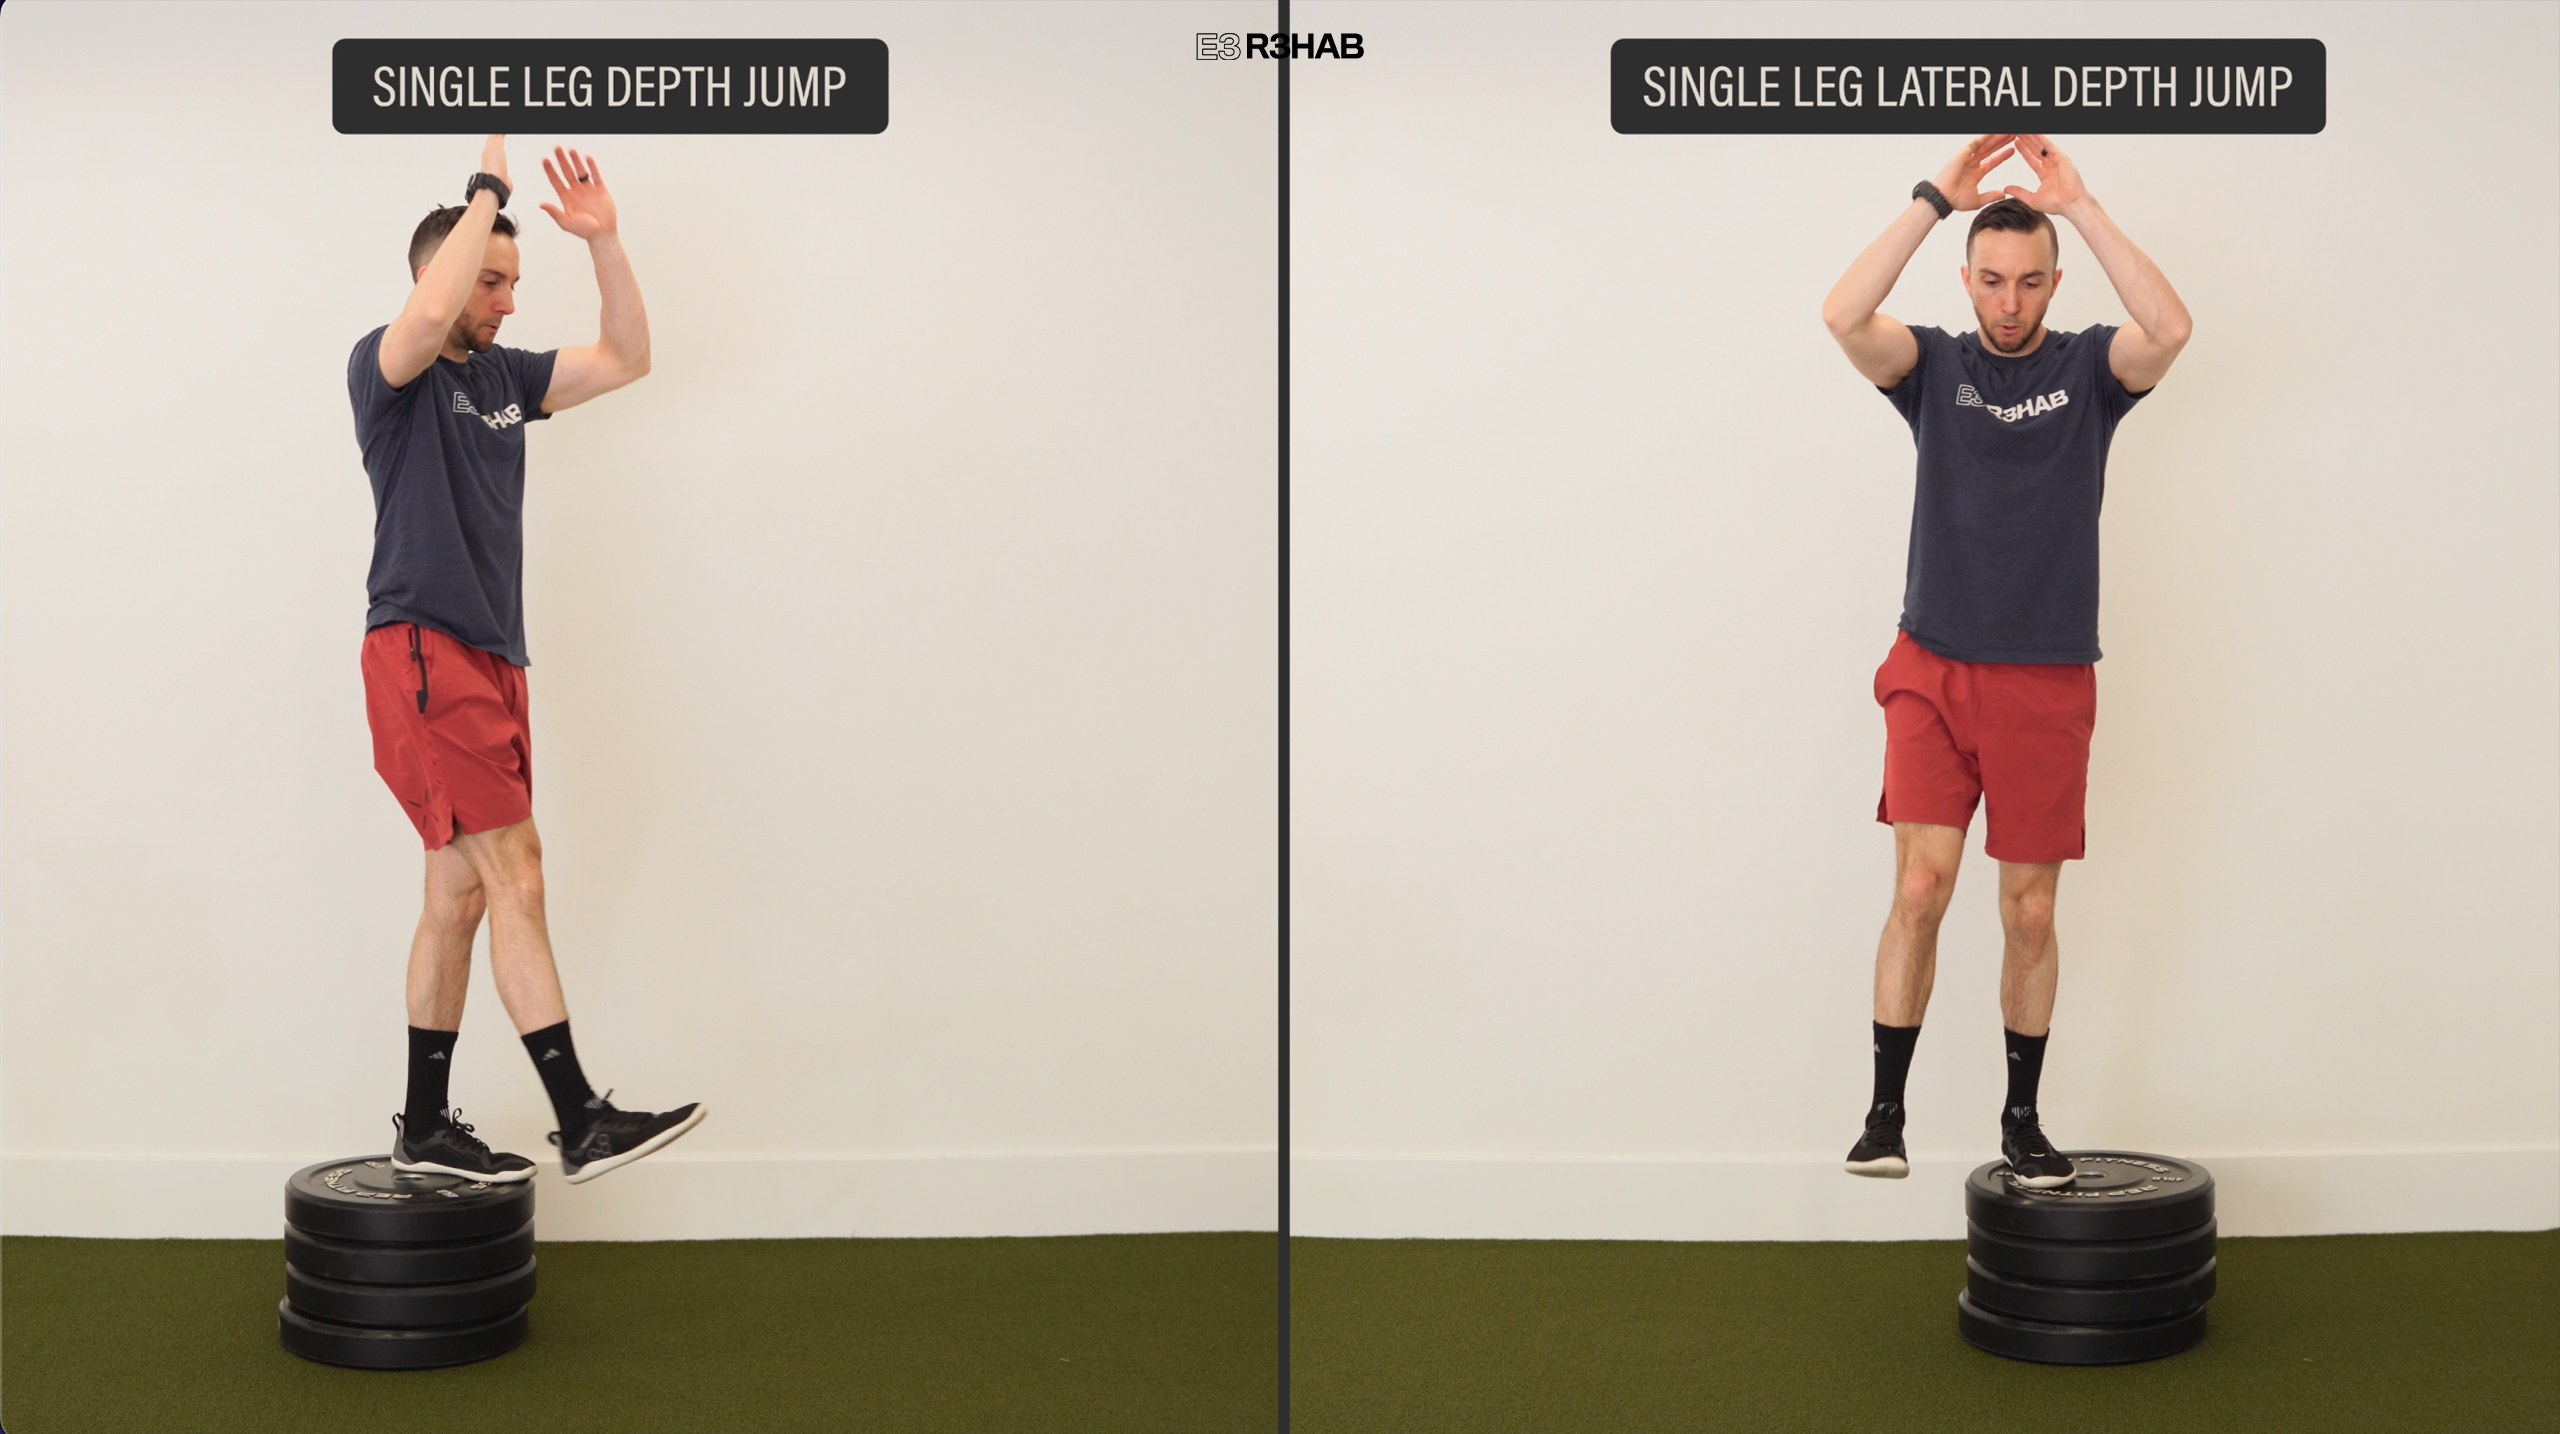
- Level 6 – Single Leg Depth Jump. Land on one leg, then immediately jump up as high as you can.

Once you reach the highest level, you can also perform a single-leg lateral depth jump, where you step off to the side, land, and then quickly jump upward with maximal effort.
In this progression, you can make any level easier by reducing the height of the box and/or reducing the effort of each jump. Similarly, you can make these harder, by increasing the height and/or increasing the effort of each jump.
However, your goal is to use an elevated surface about 12 inches high and/or jump at maximum effort before progressing to the next level.
Option 2 is a Horizontal Jump Progression:
Start with a sub-maximal horizontal jump on two legs, where you build up to about 80% effort, before progressing to a maximal horizontal jump on two legs. Then, you will perform a single-leg sub-maximal jump, followed by a single-leg maximal jump. Try and stick your landing during each repetition.

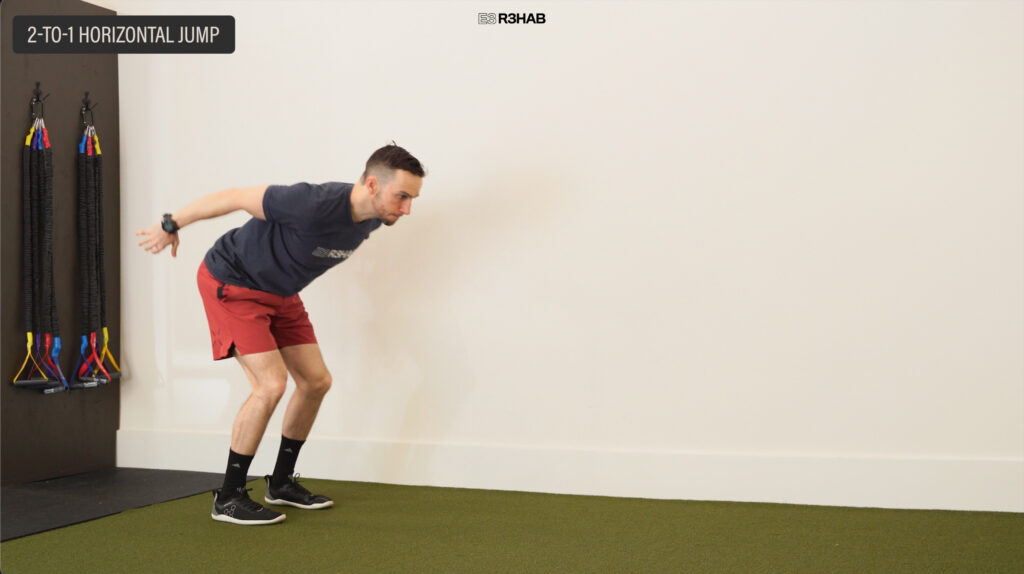
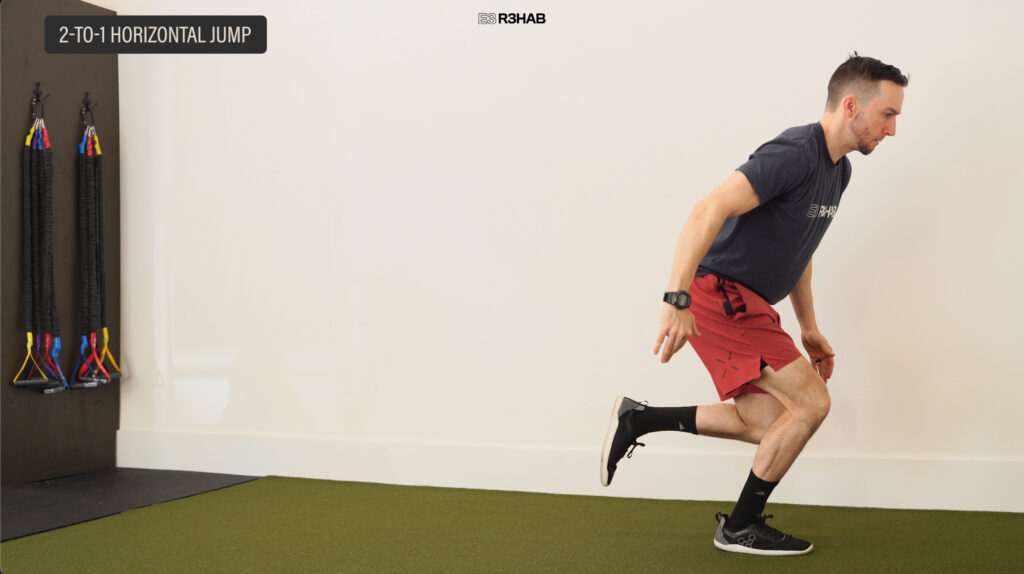
If you want to further challenge your landing on a single leg, you can eventually add a 2-to-1 horizontal jump. Since you will be able to propel yourself further, your ‘landing’ leg will be challenged by having to control higher landing forces.
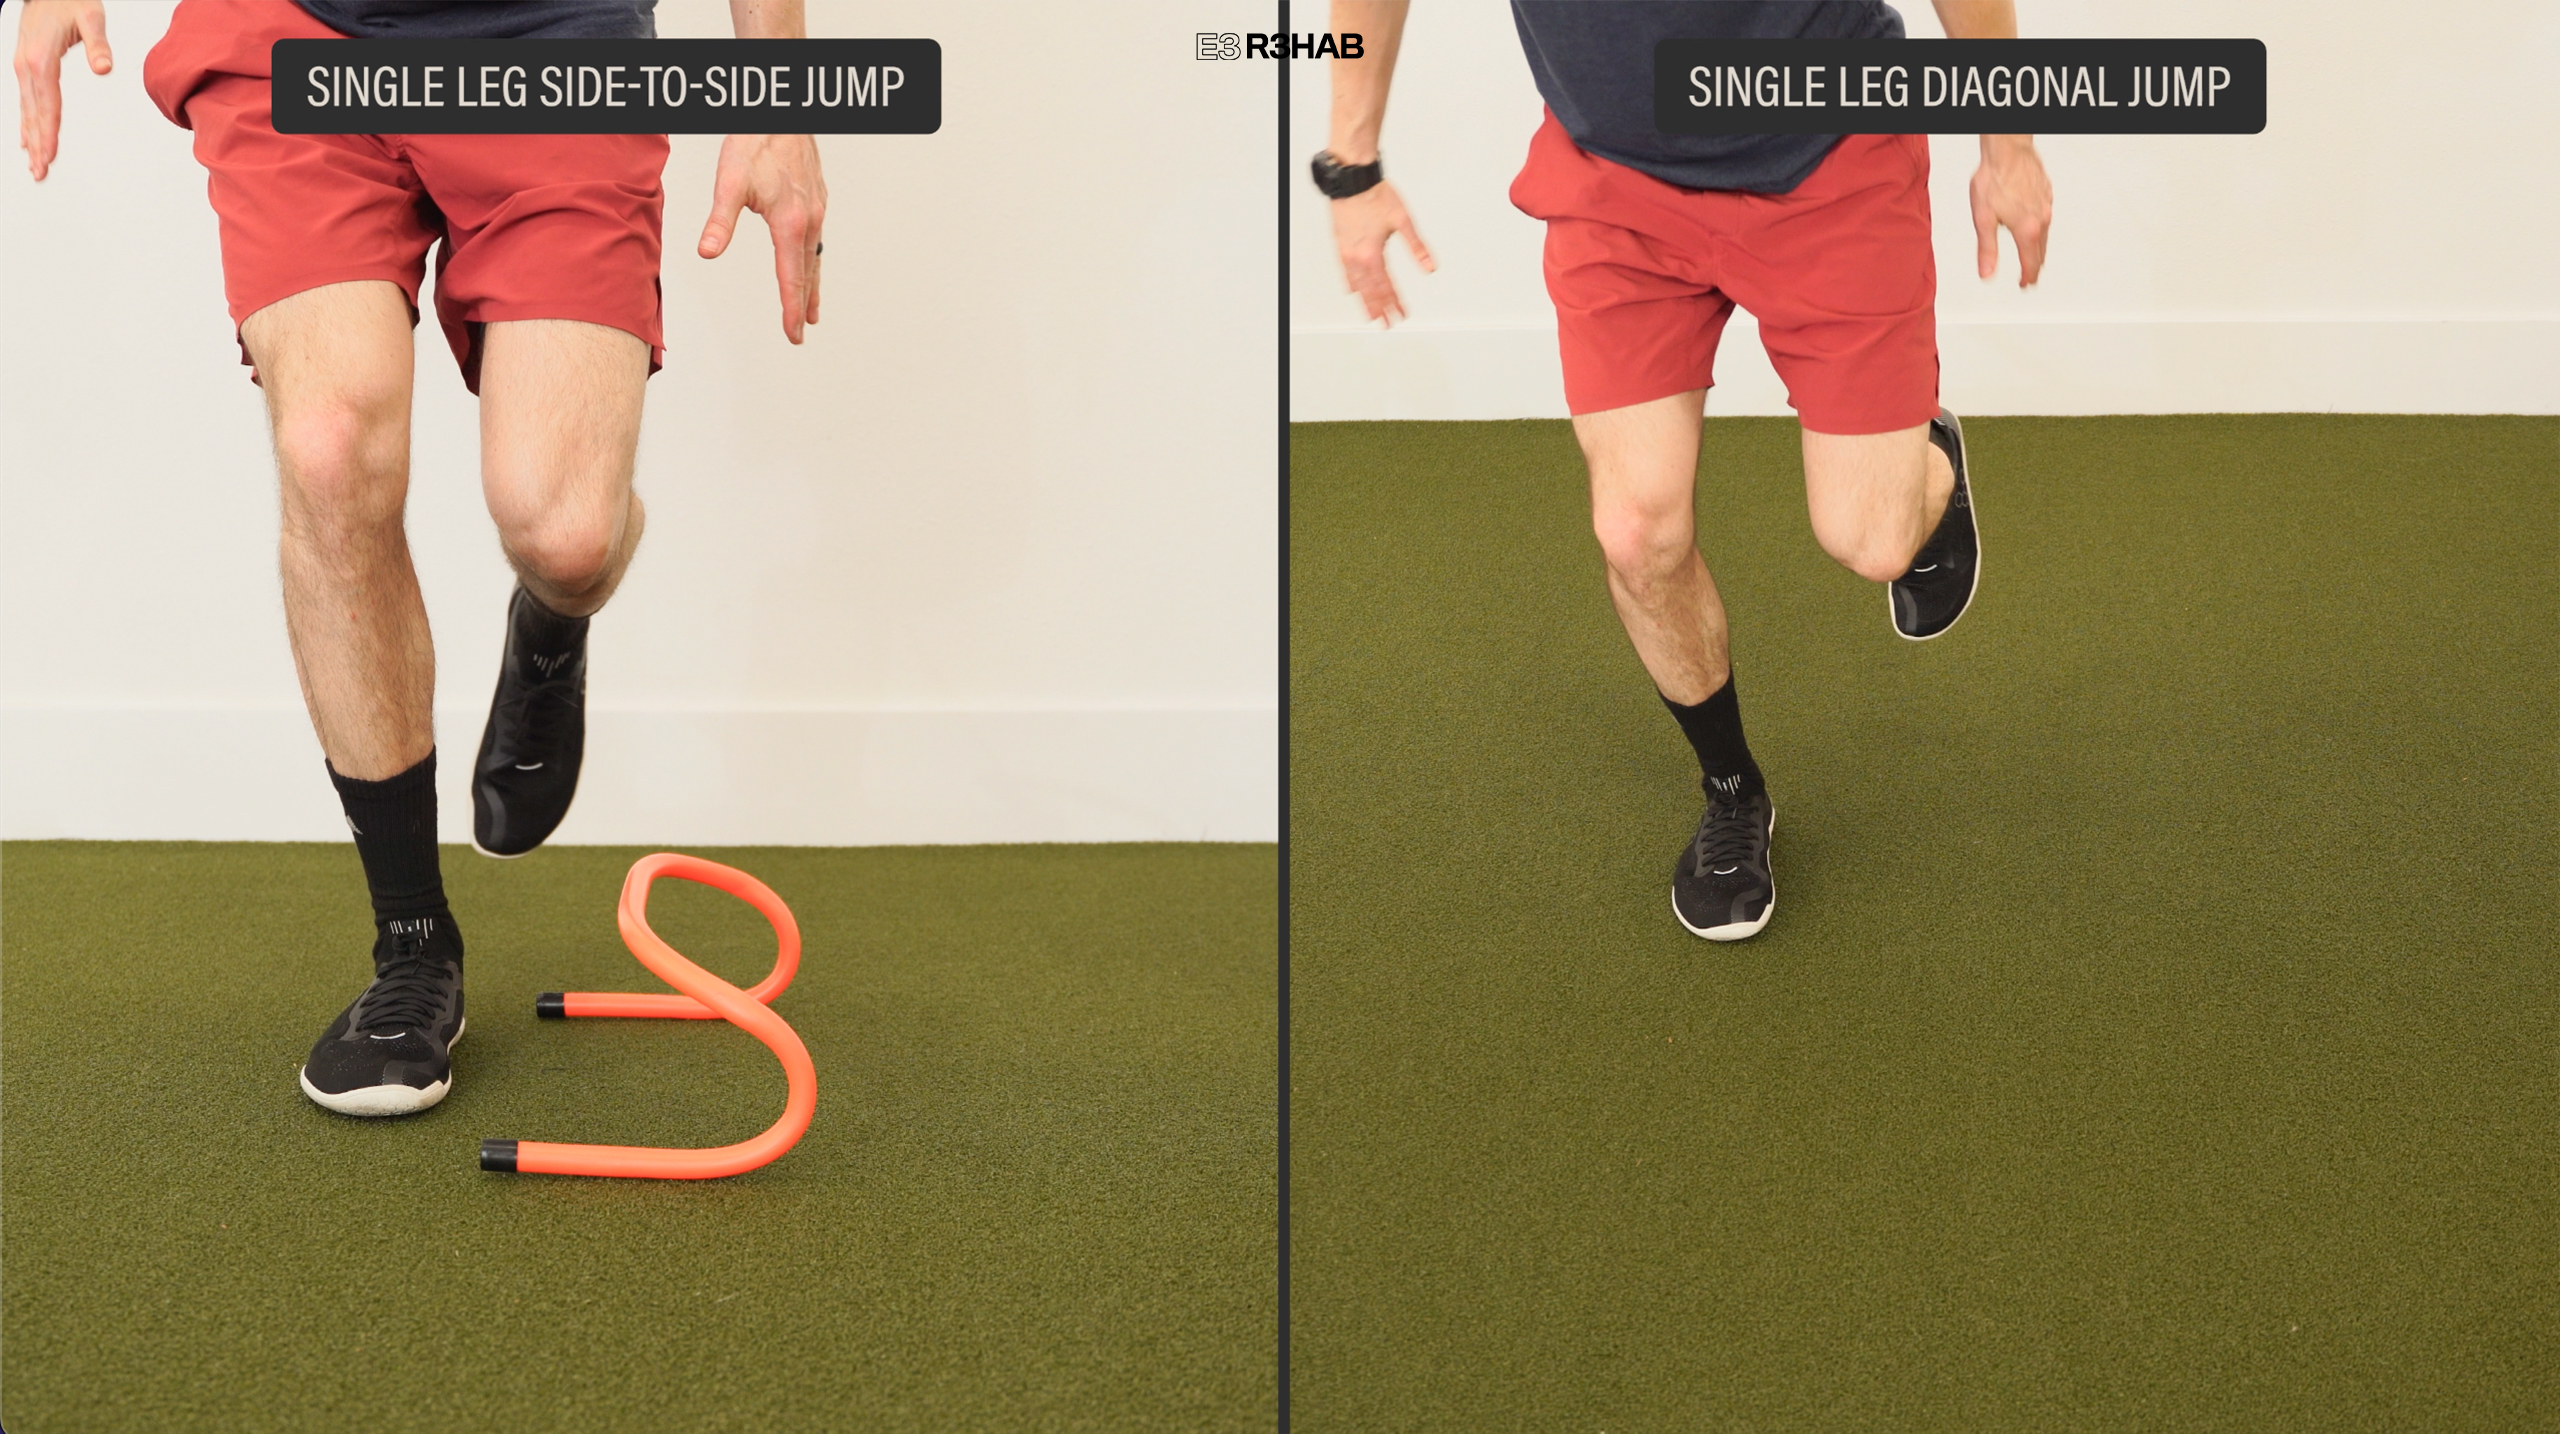
Once tolerated, other single-leg, multi-planar jumping options include side-to-side and diagonal jumps with or without a hurdle.
The reason why you might choose one progression over the other will likely depend on your injury or surgery. A study by Kotsifaki et al in 2021 found that both a vertical and horizontal jump will load the hip, knee, and ankle, but the relative contributions from each joint will be slightly different. For example, during a vertical jump, “each joint contributes approximately ⅓ of the total work, both in (takeoff) and landing.” In contrast, for a horizontal jump, “the hip and ankle predominantly drive the movement” while the knee joint is primarily responsible for absorbing the landing.

Applying this information for rehab suggests that if you’re recovering from a knee injury, it would be essential to include vertical jumps as they are better suited for improving overall knee function. On the other hand, if you are rehabbing a calf strain or foot injury, including horizontal jumps will be crucial for building power and function around the ankle joint.
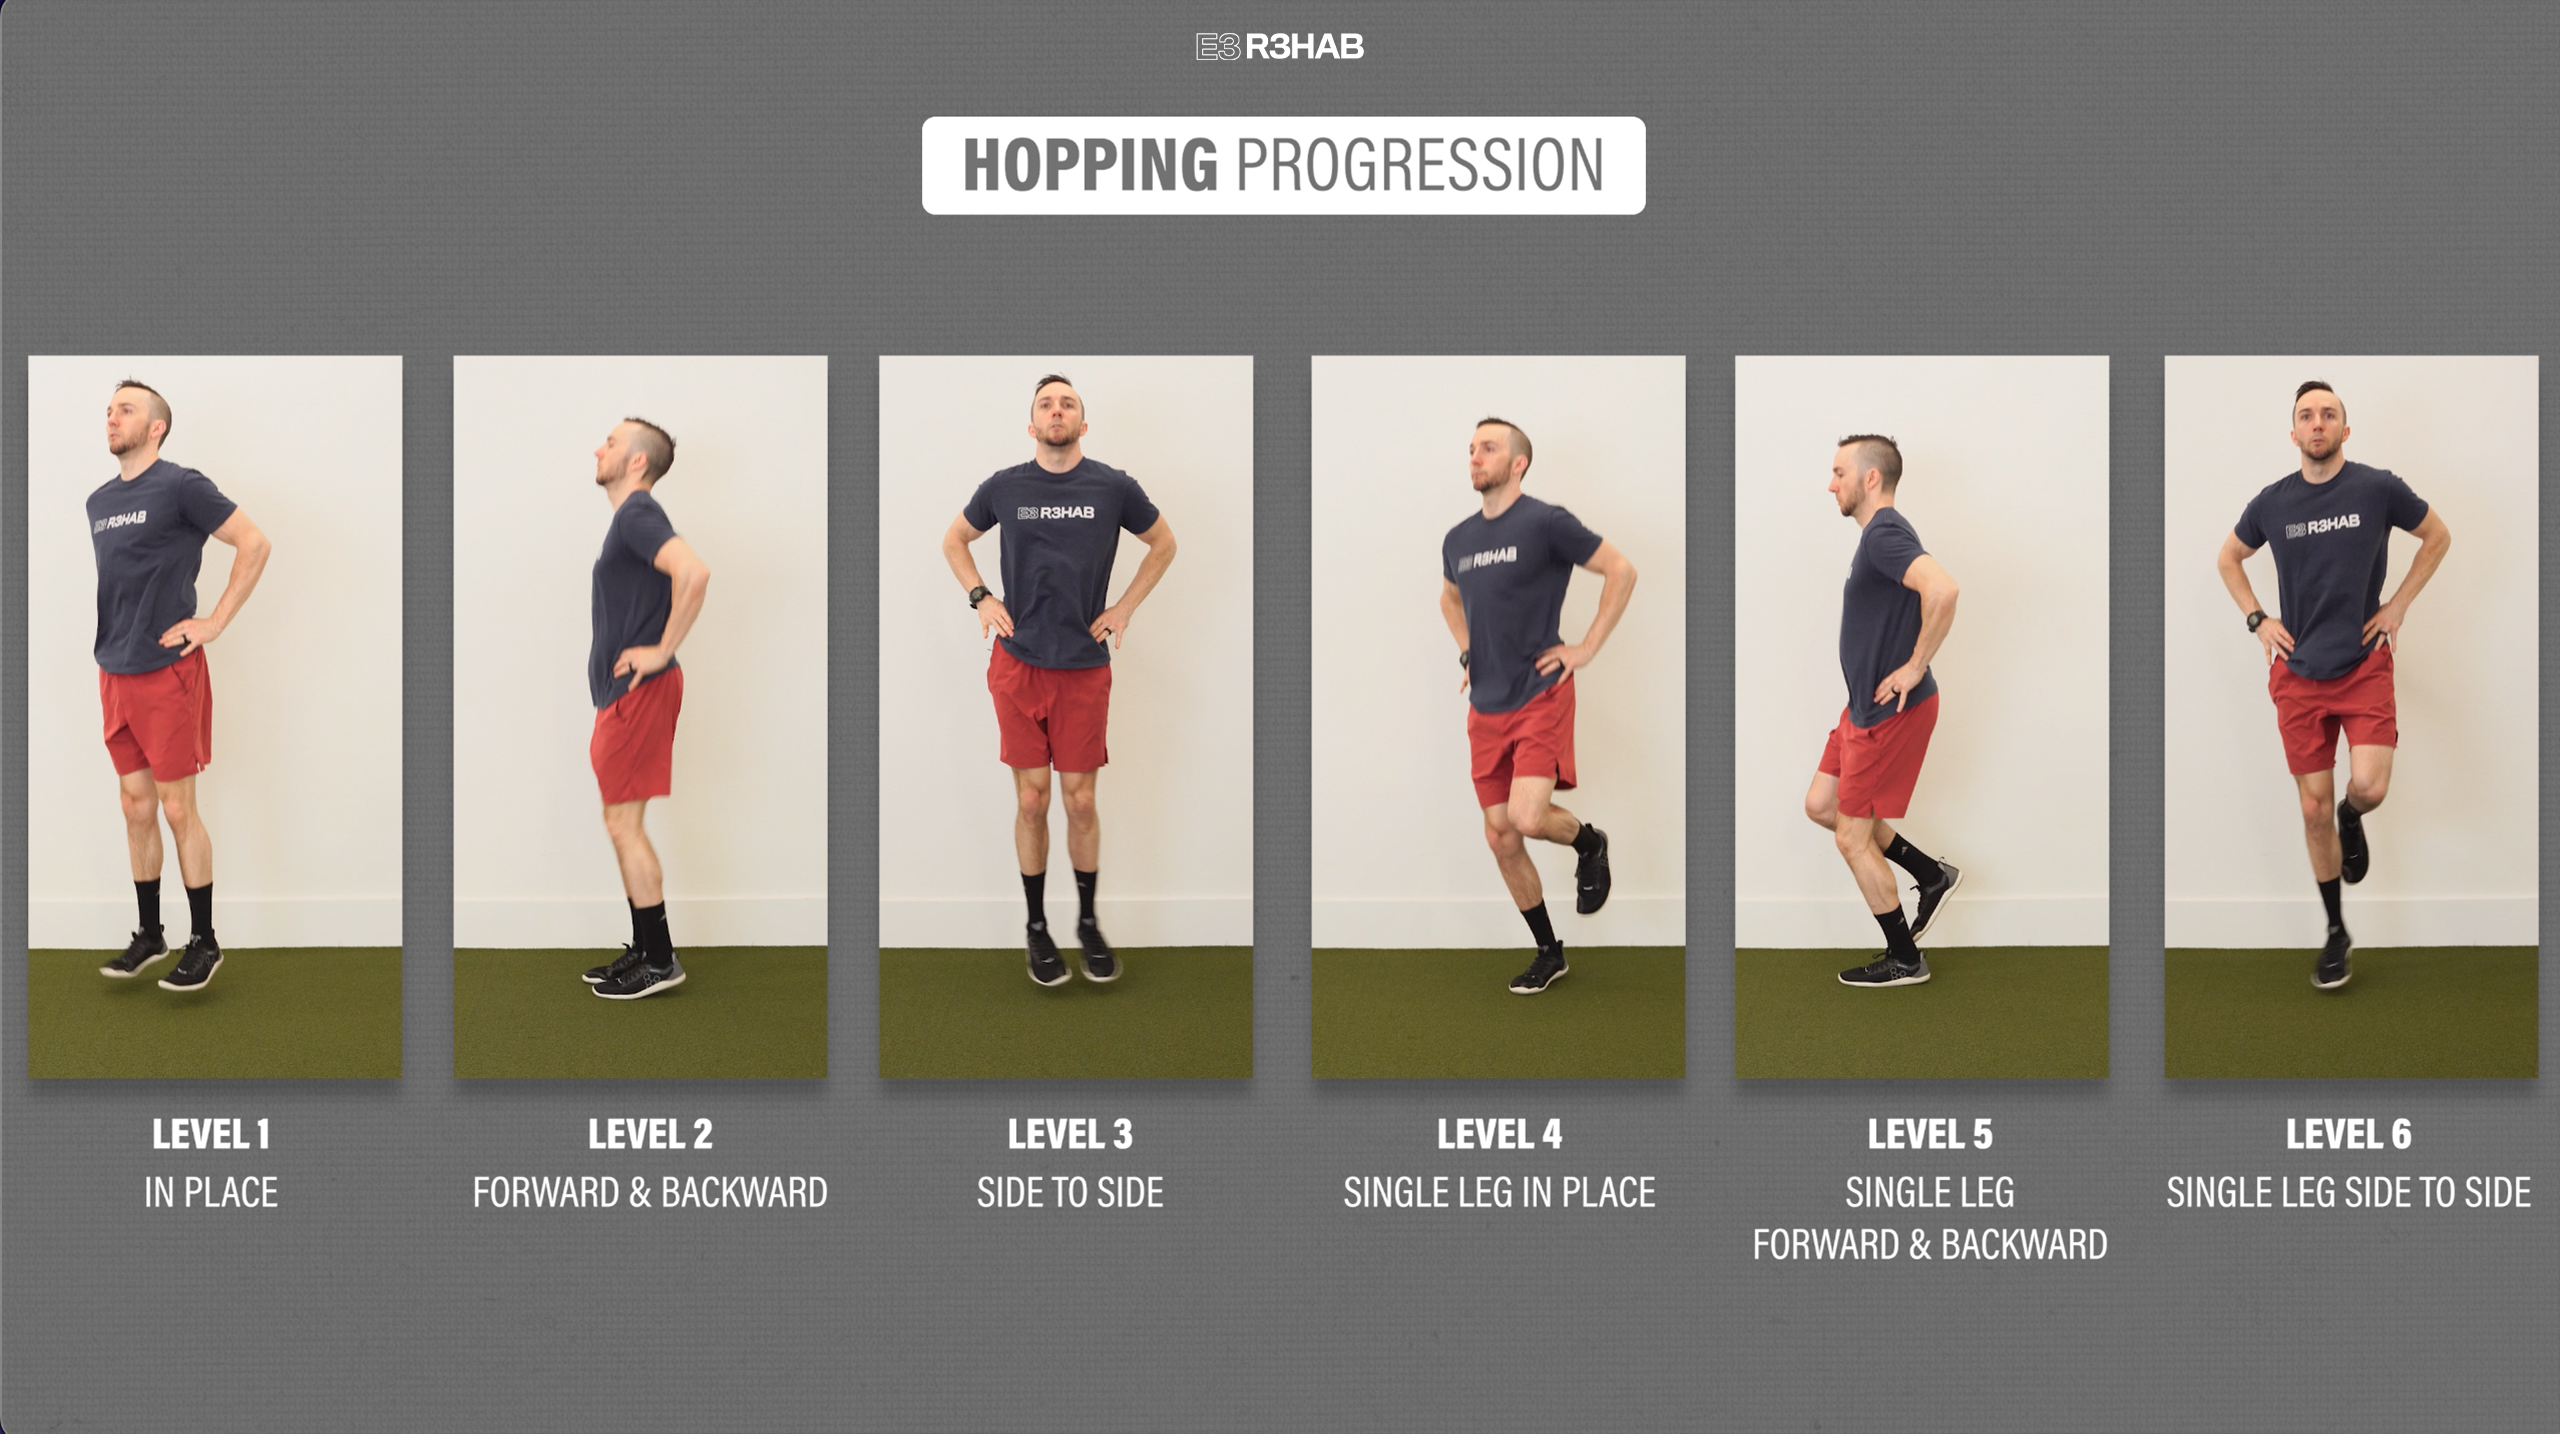
Another plyometric consideration is hopping which involves quick jumps while spending as little time on the ground as possible. While these can be performed for any lower-body injury, they are imperative for ankle and foot rehab.
Here is a 6-level progression:
- Level 1 – Double Leg In Place.
- Level 2 – Double Leg Forward and Backward.
- Level 3 – Double Leg Side to Side.
- Level 4 – Single Leg In Place.
- Level 5 – Single Leg Forward and Backward.
- Level 6 – Single Leg Side to Side.
You want a majority of the work to come from your feet and ankles, so place your hands on your hips and keep your knees relatively straight as you progress through each level.
A 2022 systematic review found that forward and lateral hopping on one leg places loads through the Achilles tendon that is comparable to running at faster speeds. Therefore, in conditions like Achilles Tendinopathy or rehab for an Achilles tendon repair, building up to these multidirectional single-leg hops will be crucial in preparation for high-speed running.
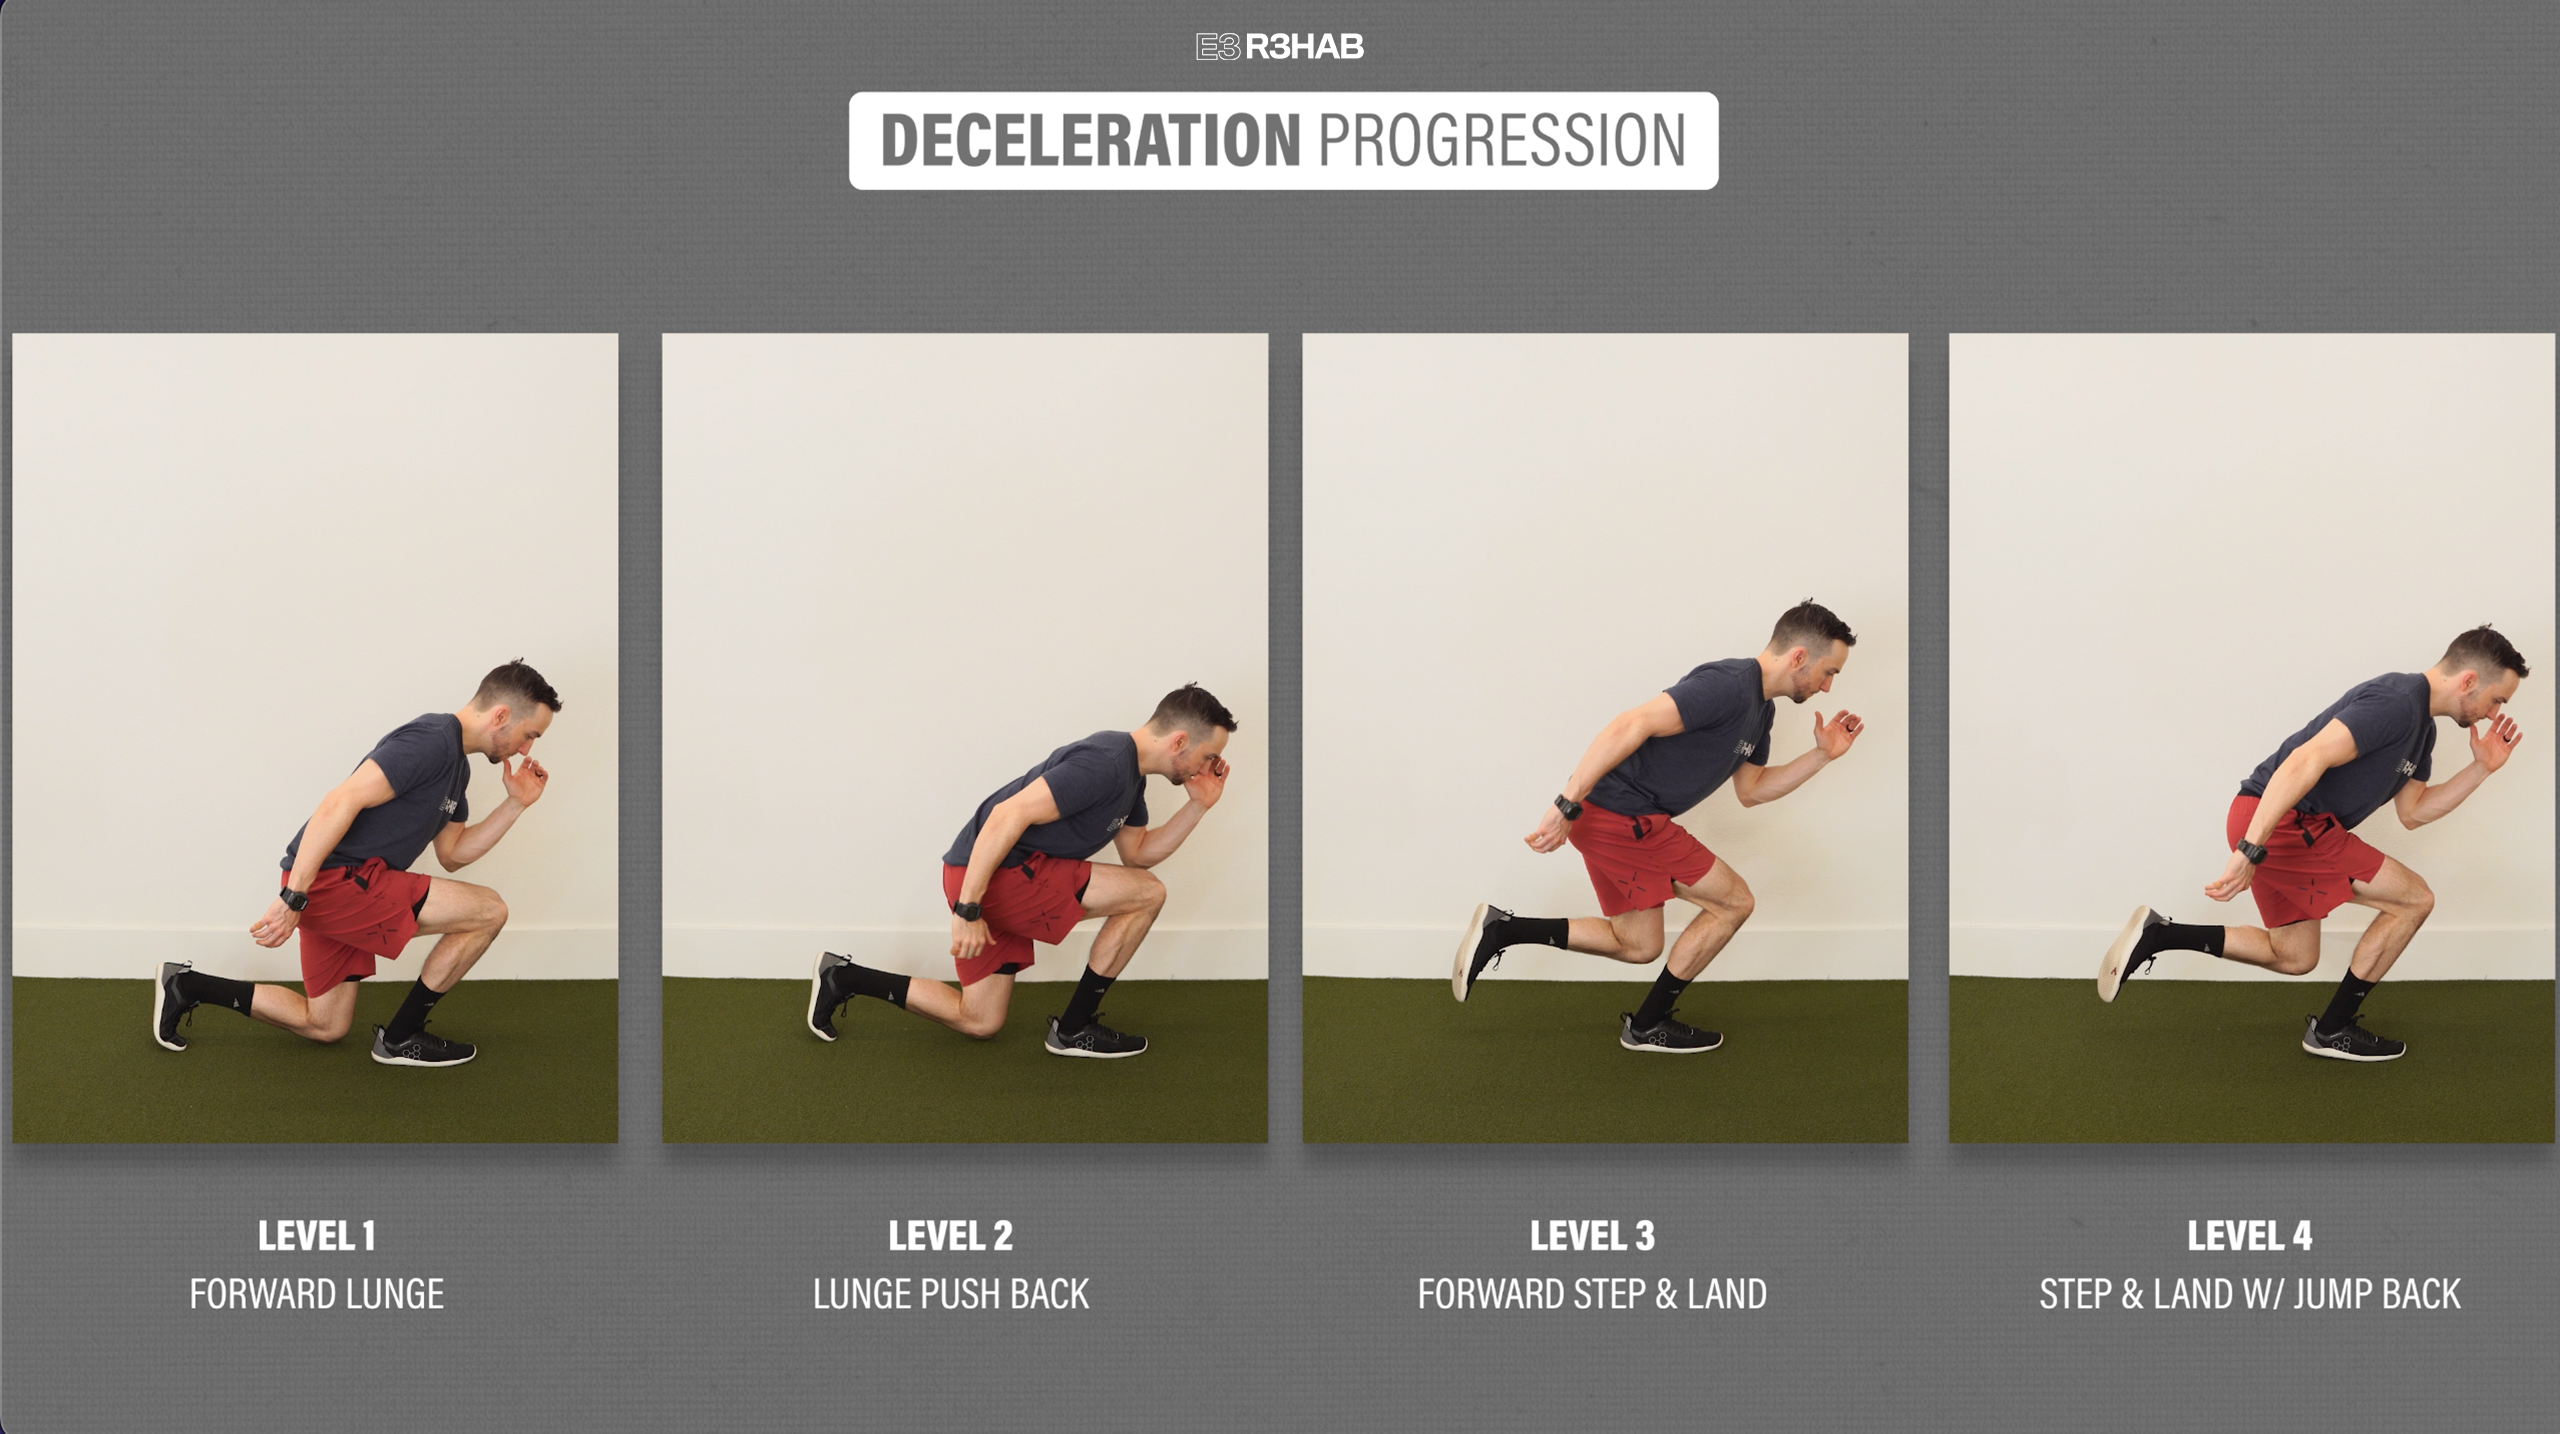
The last option in this category is deceleration exercises that emphasize single-leg landing and control. Here is a 4-step progression:
- Level 1 – Forward Lunge. Perform a slow and controlled lunge with an emphasis on driving the knee forward.
- Level 2 – Lunge Push Back. Same as previous, but after controlling the deceleration, you will push back to the start with power.
- Level 3 – Forward Step & Land. Jump forward off one leg and land on the other with control. Step back and repeat.
- Level 4 – Step & Land with a Jump Back. Jump forward, land on the other leg, then quickly jump back to the start.
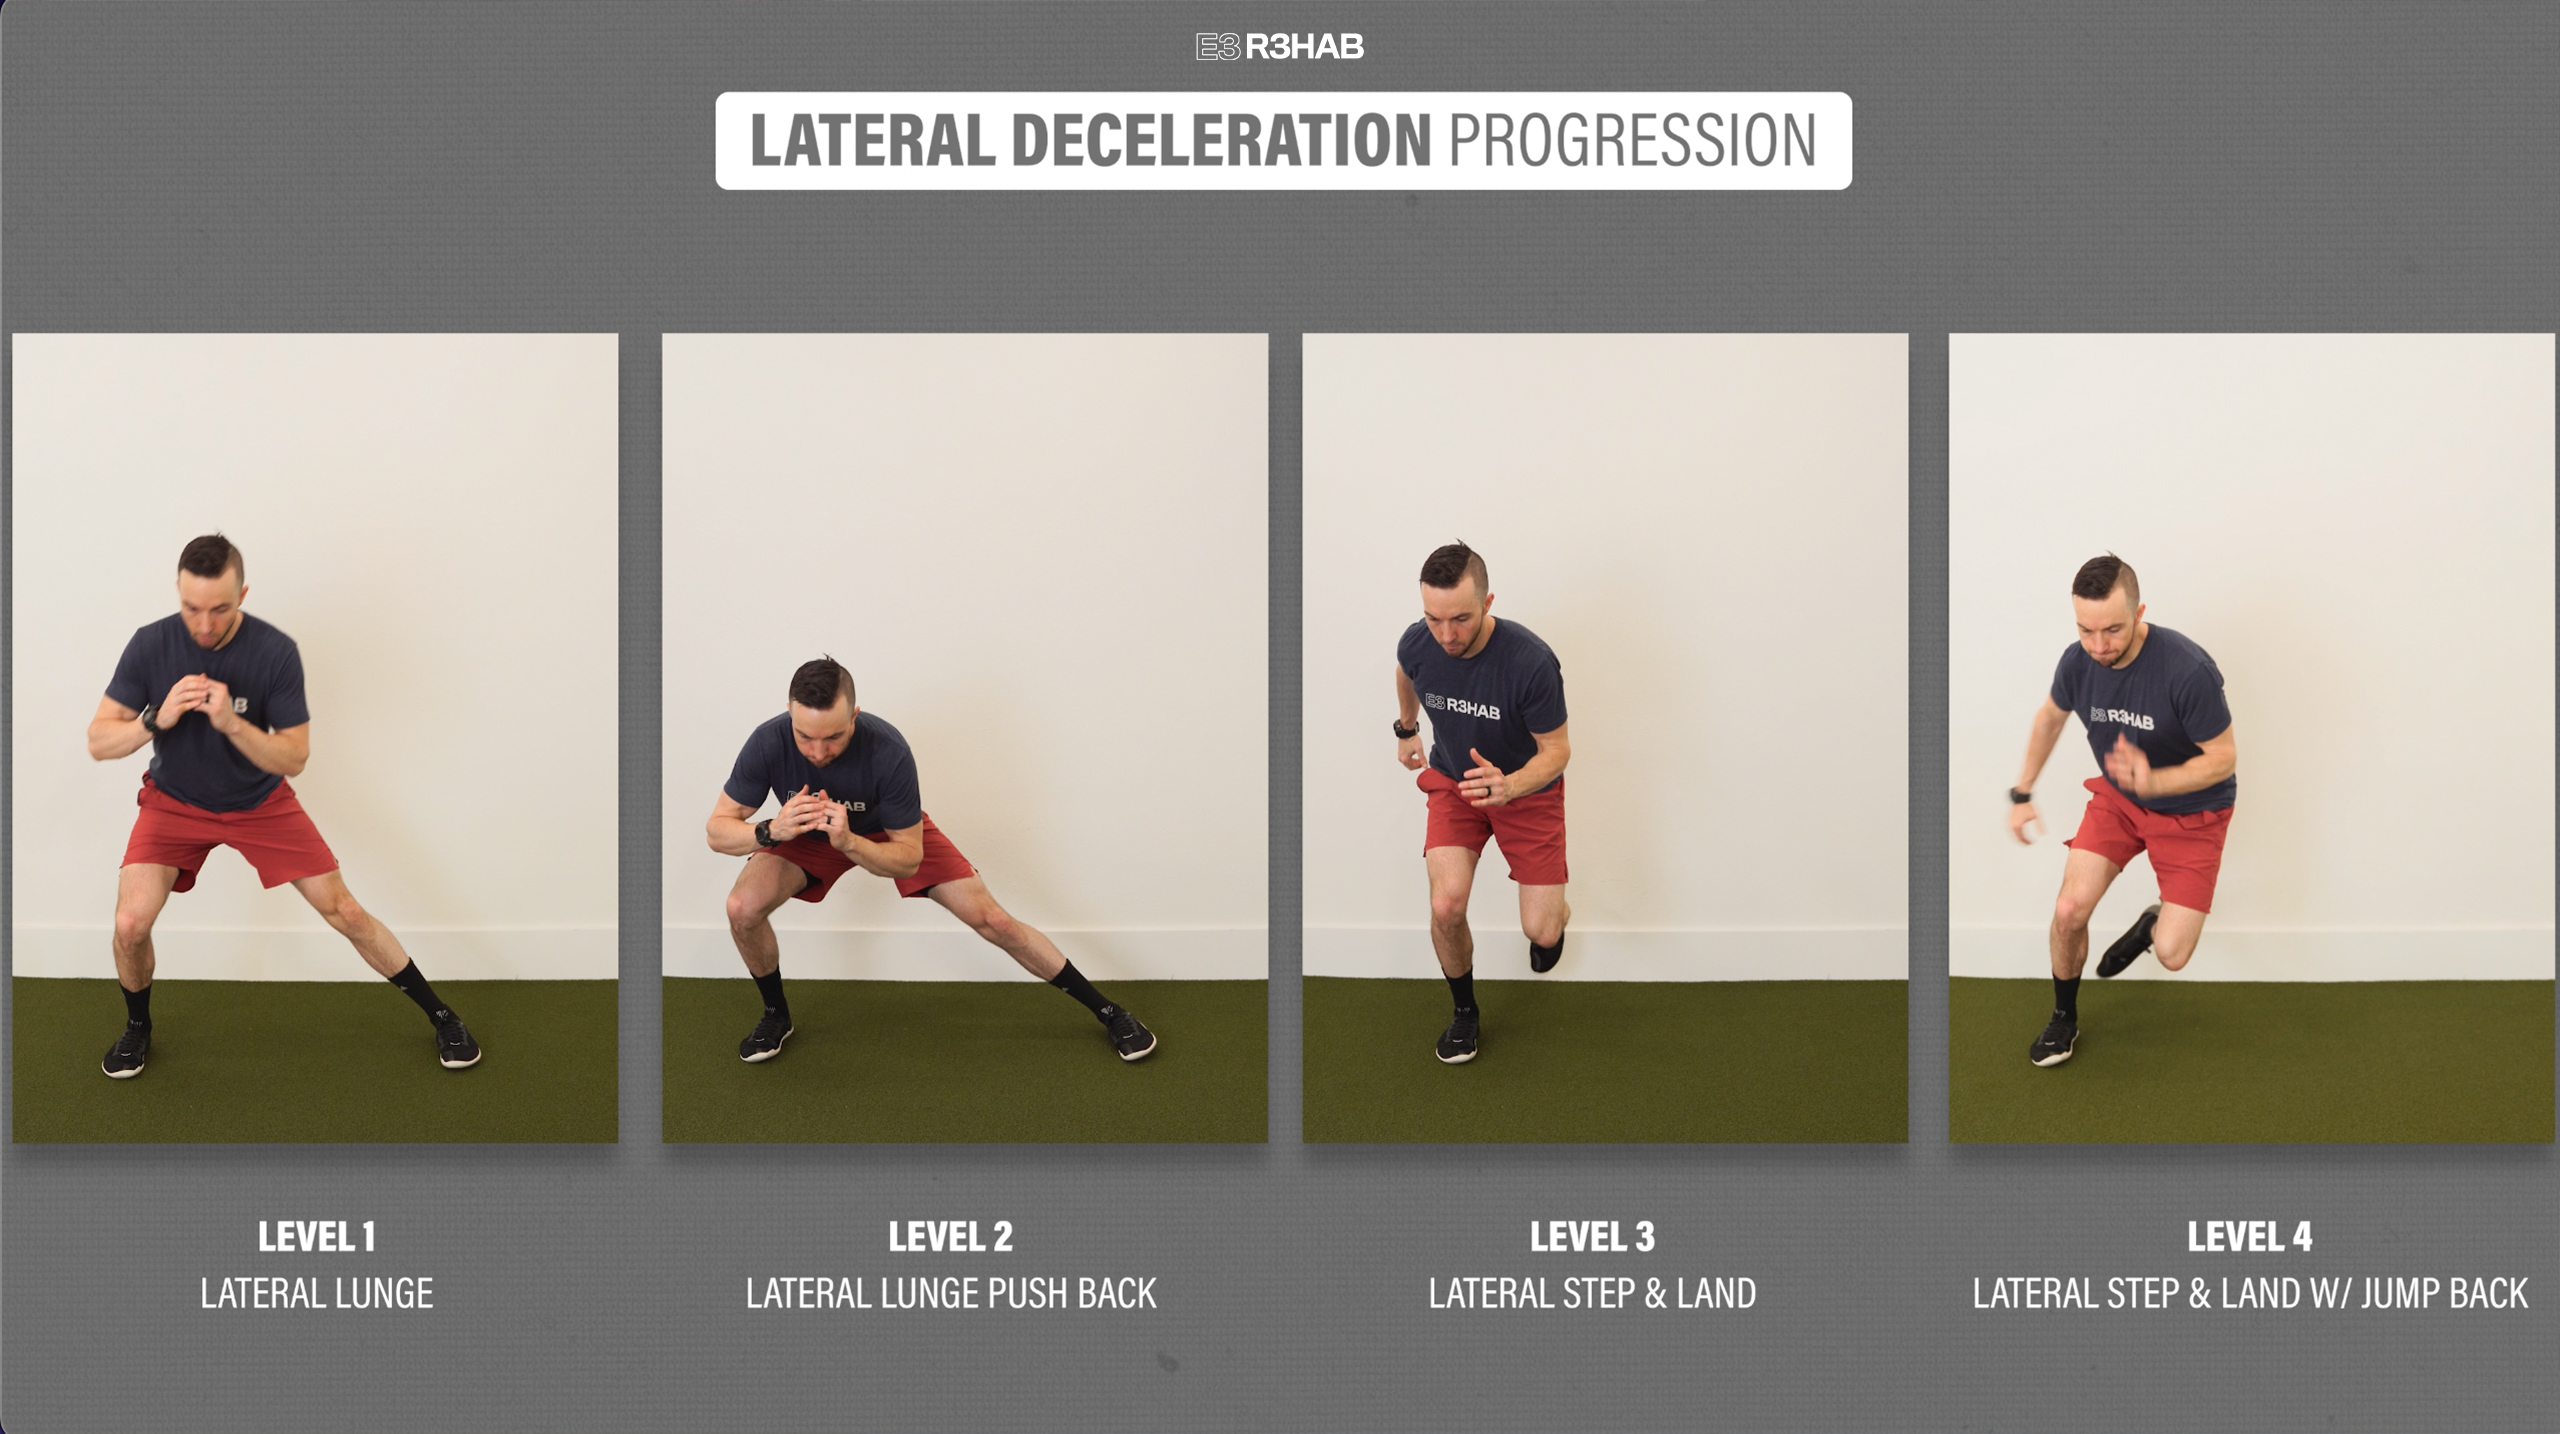
If you want to include a lateral, or side-to-side component, you can use this similar progression.
- Level 1 – Lateral Lunge.
- Level 2 – Lateral Lunge Push Back.
- Level 3 – Lateral Step & Land.
- Level 4 – Lateral Step & Land with a Jump Back.
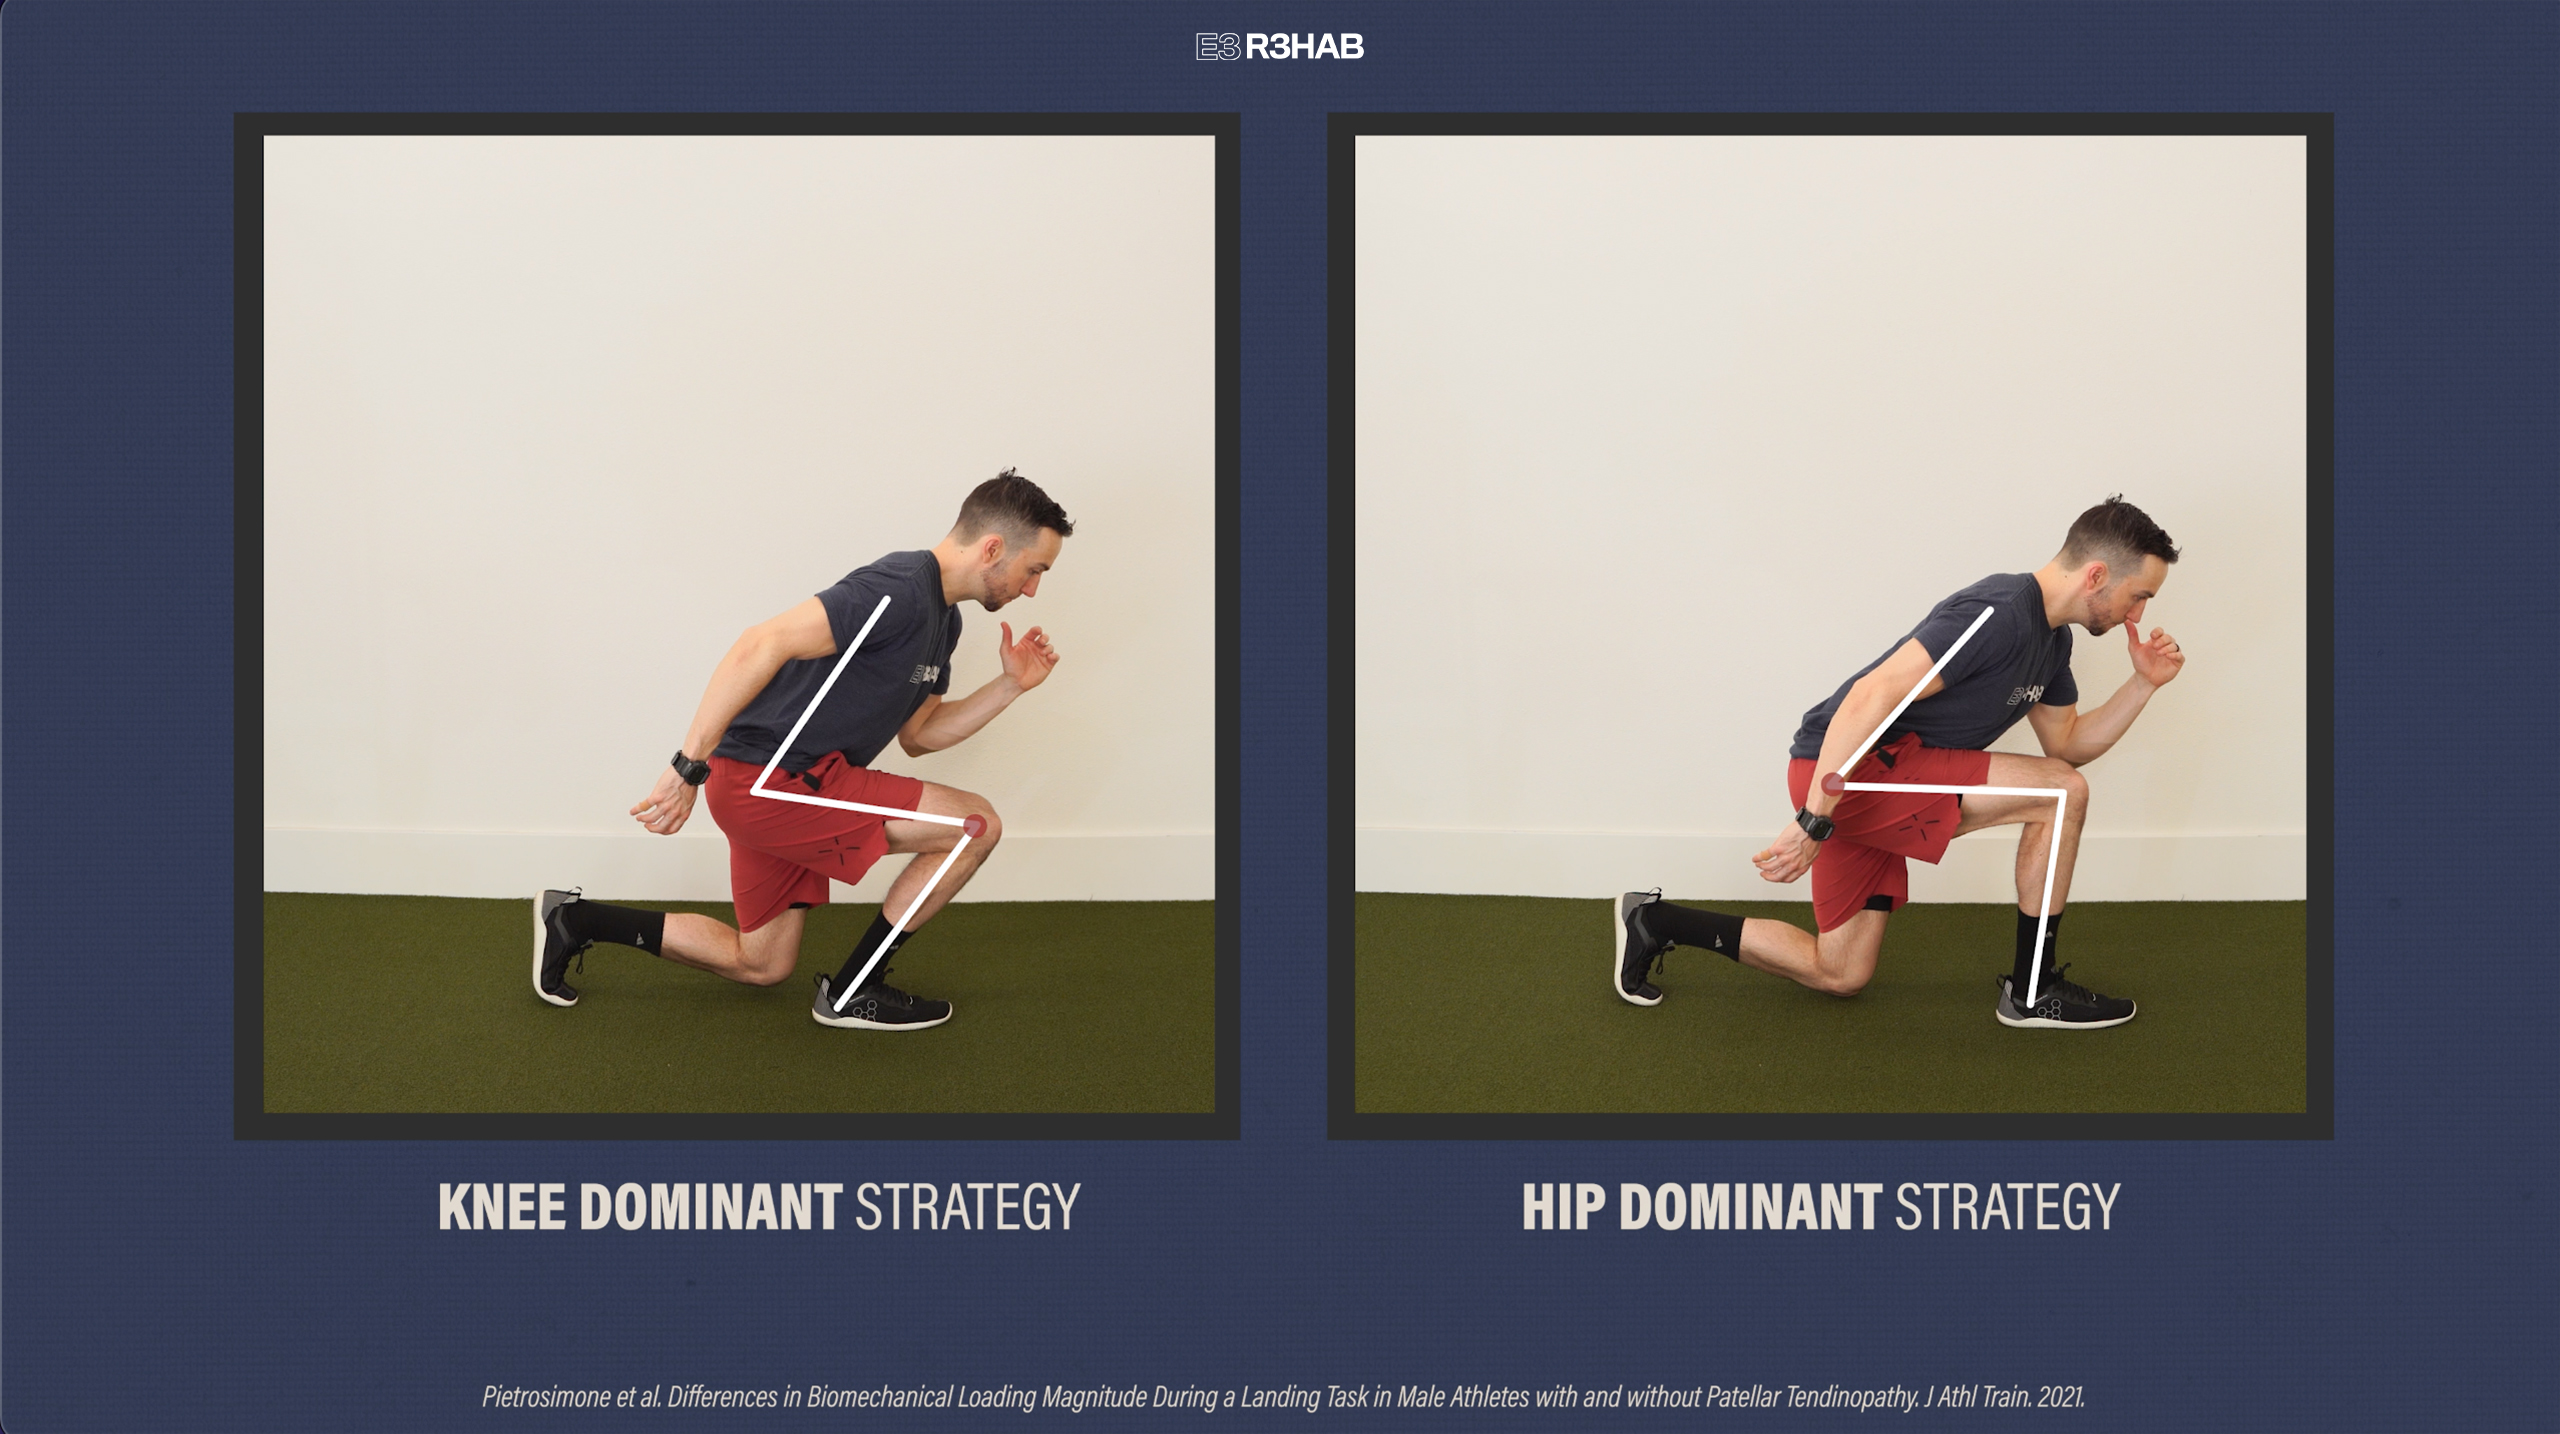
Similar to vertical jumps, deceleration exercises, particularly the forward progression, are important for improving quad function. Following ACL surgery or with conditions such as patellar tendinopathy, you may unknowingly offload your affected knee and perform a more “hip-dominant strategy”. Therefore, during these movements, it is important to purposefully load your knee and quadriceps muscles as much as tolerable.
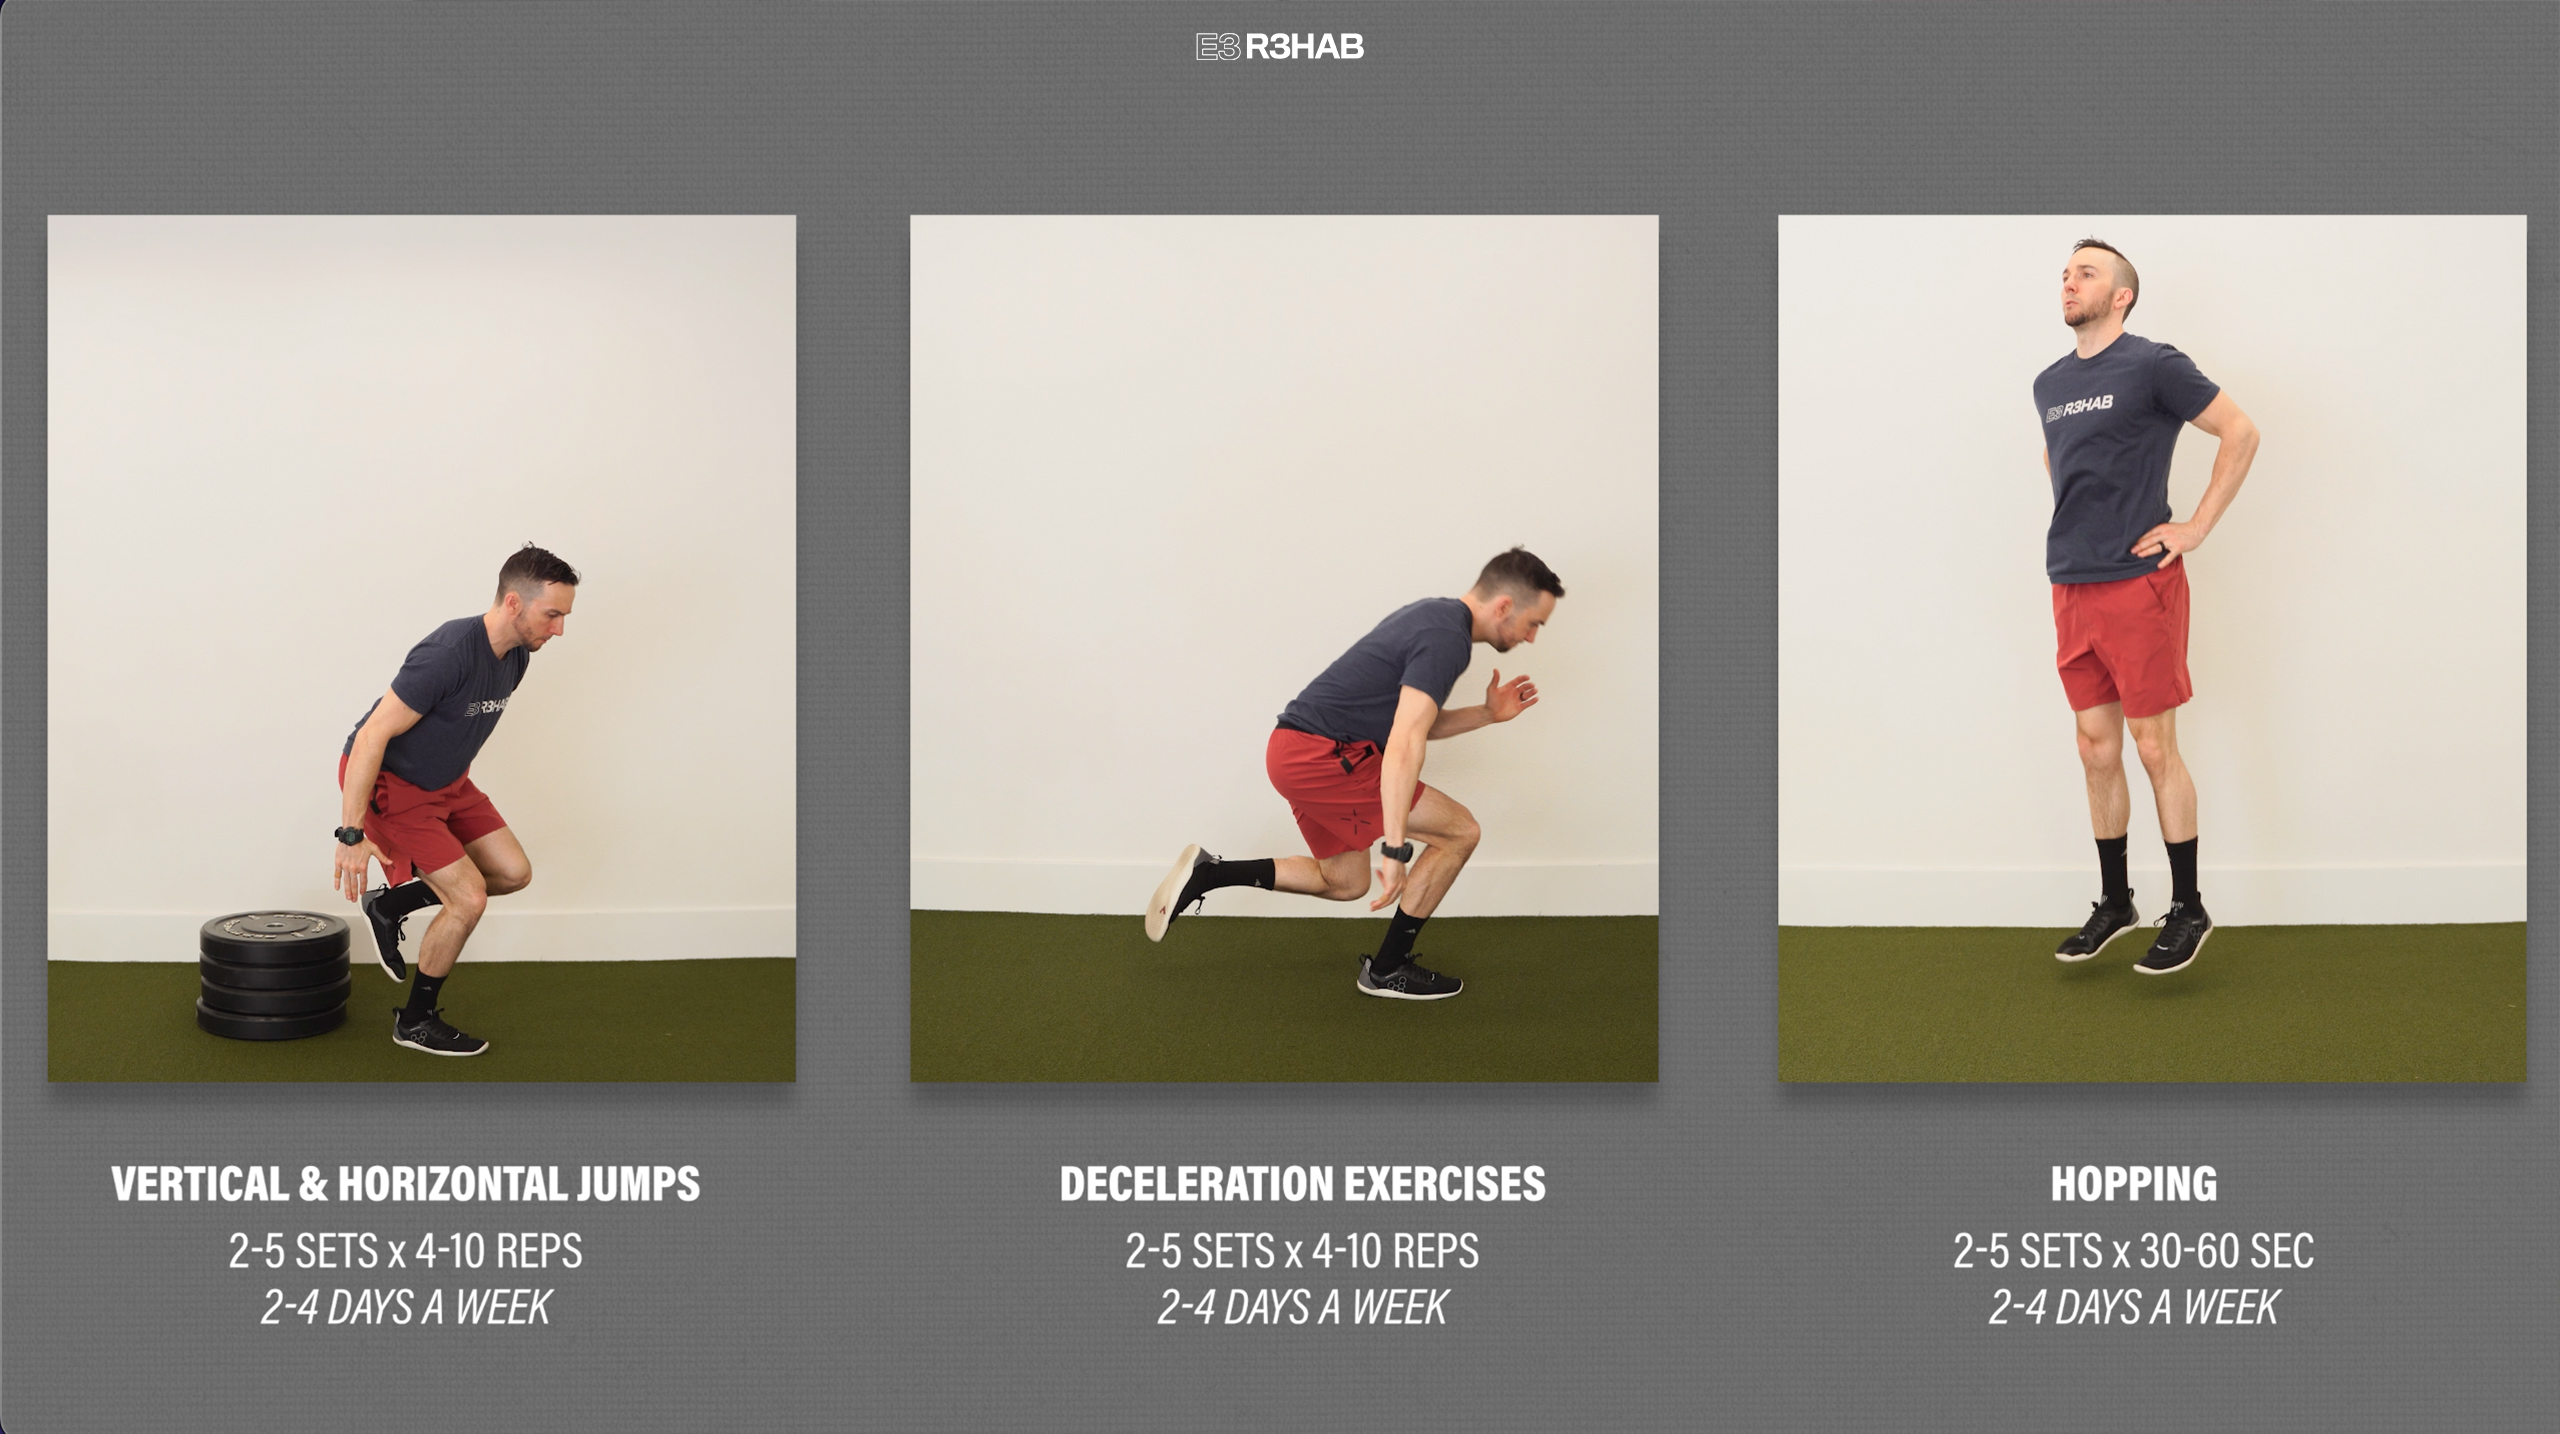
To program these exercises in the simplest way possible, you can aim for 2-5 sets of 4-10 repetitions for the plyometric and deceleration progressions and 2-5 sets of 30-60 seconds for the hopping exercises, 2-4 days per week. However, understand that programming will ultimately need to be customized based on your function, symptoms, tolerance, etc.
Category 2: High-Speed Linear Running
Following any lower body injury or surgery, being able to run at 100% maximal speed will be a necessity prior to returning to many sports, especially if you’ve had a hamstring injury.
There is no universally accepted protocol because your injury, sport, position, and even the space you have available to you will dictate how you implement these drills. However, we can create general guidelines using the research on hamstring strains from Hickey et al in 2022. This includes 3 primary factors.
First, gradually increase your speed. You will not sprint at 100% effort on day 1. For example, in their protocol, you will start at moderate speeds, which is about 50% effort. Once this becomes manageable, you will build up to an 80% intensity in subsequent sessions. Repeat this process until you are able to sprint with 100% effort. This might take weeks or months until you are able to run at full speed without symptoms.
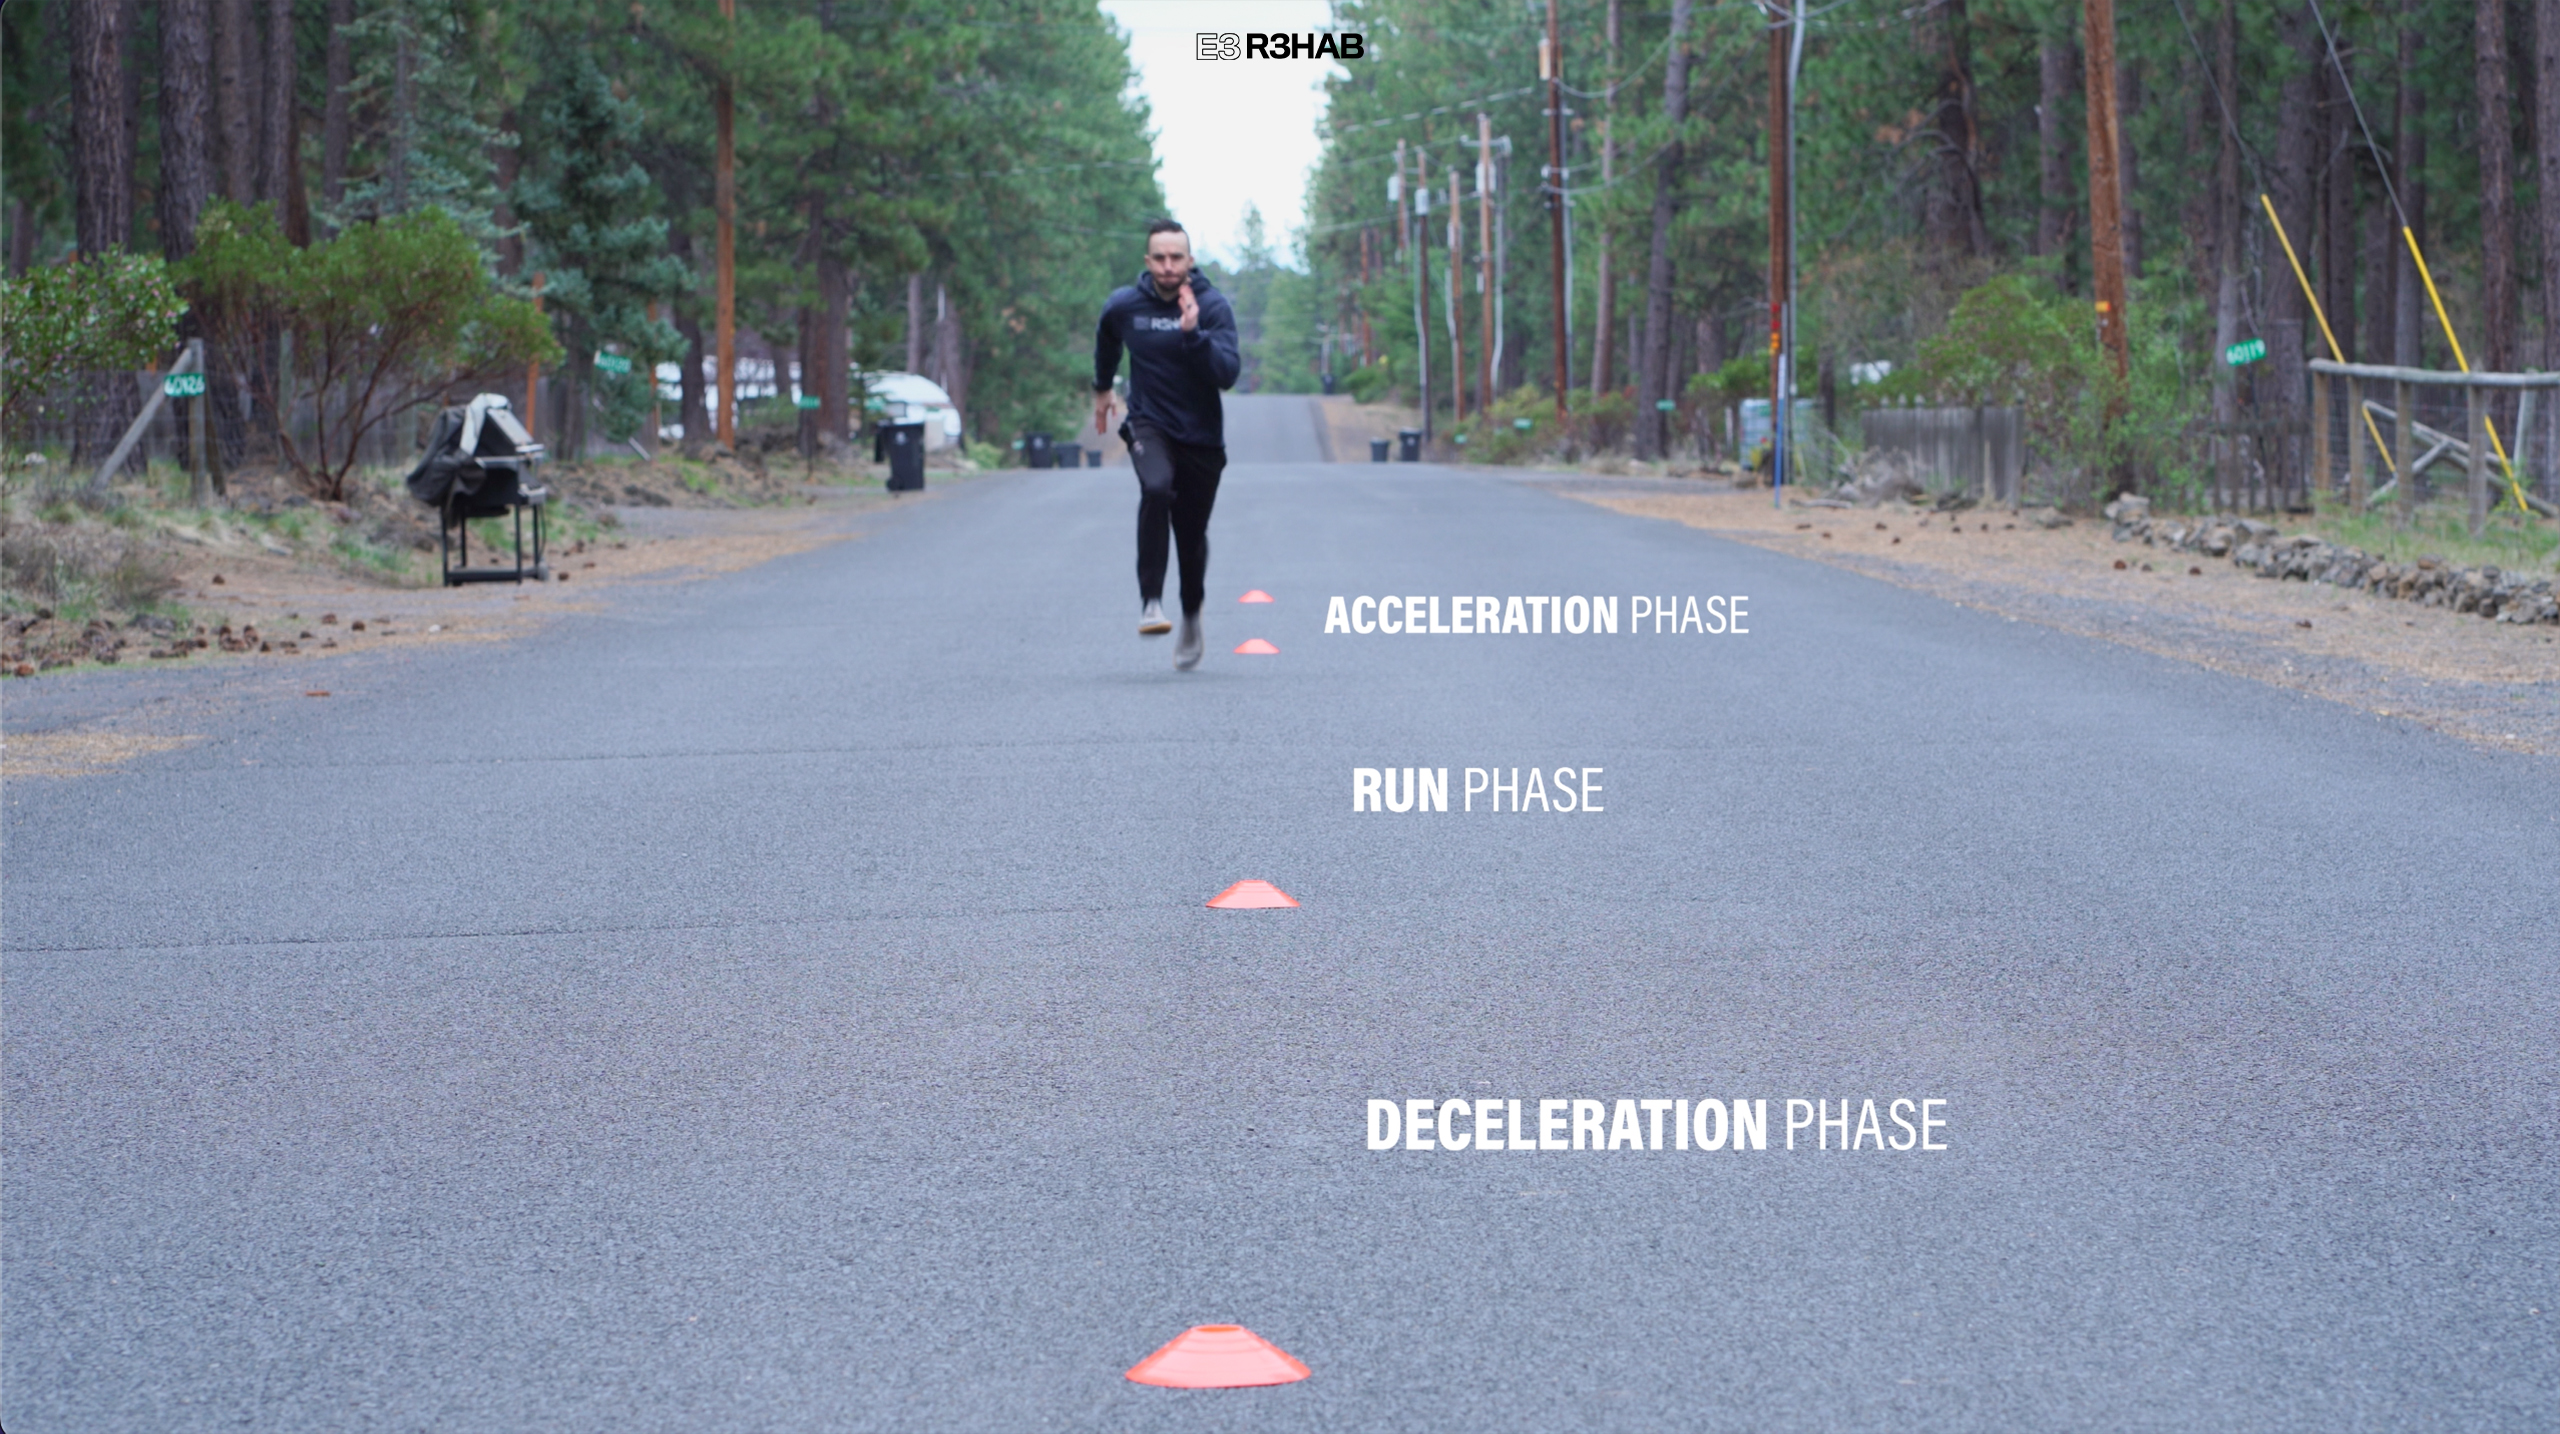
Second, consider including acceleration and/or deceleration phases. This allows you to ramp up to a desired speed for a set distance, before slowing back down, which can mimic sporting activity.
For instance, the acceleration phase will be more important for a hamstring injury and many aspects of performance, while if you want to reduce your risk of an ACL re-injury, you will want to make sure you include a deceleration component.
And third, run over shorter distances. Again, your sport, position, and available space will determine how far you run, but it is unlikely you will be able to (or need to) maintain sprinting speeds for very far. For reference, most research uses a distance of about 20-80 meters.
If you want to learn exactly how this protocol works in the context of hamstring strains, you should watch this video that I made on the topic.
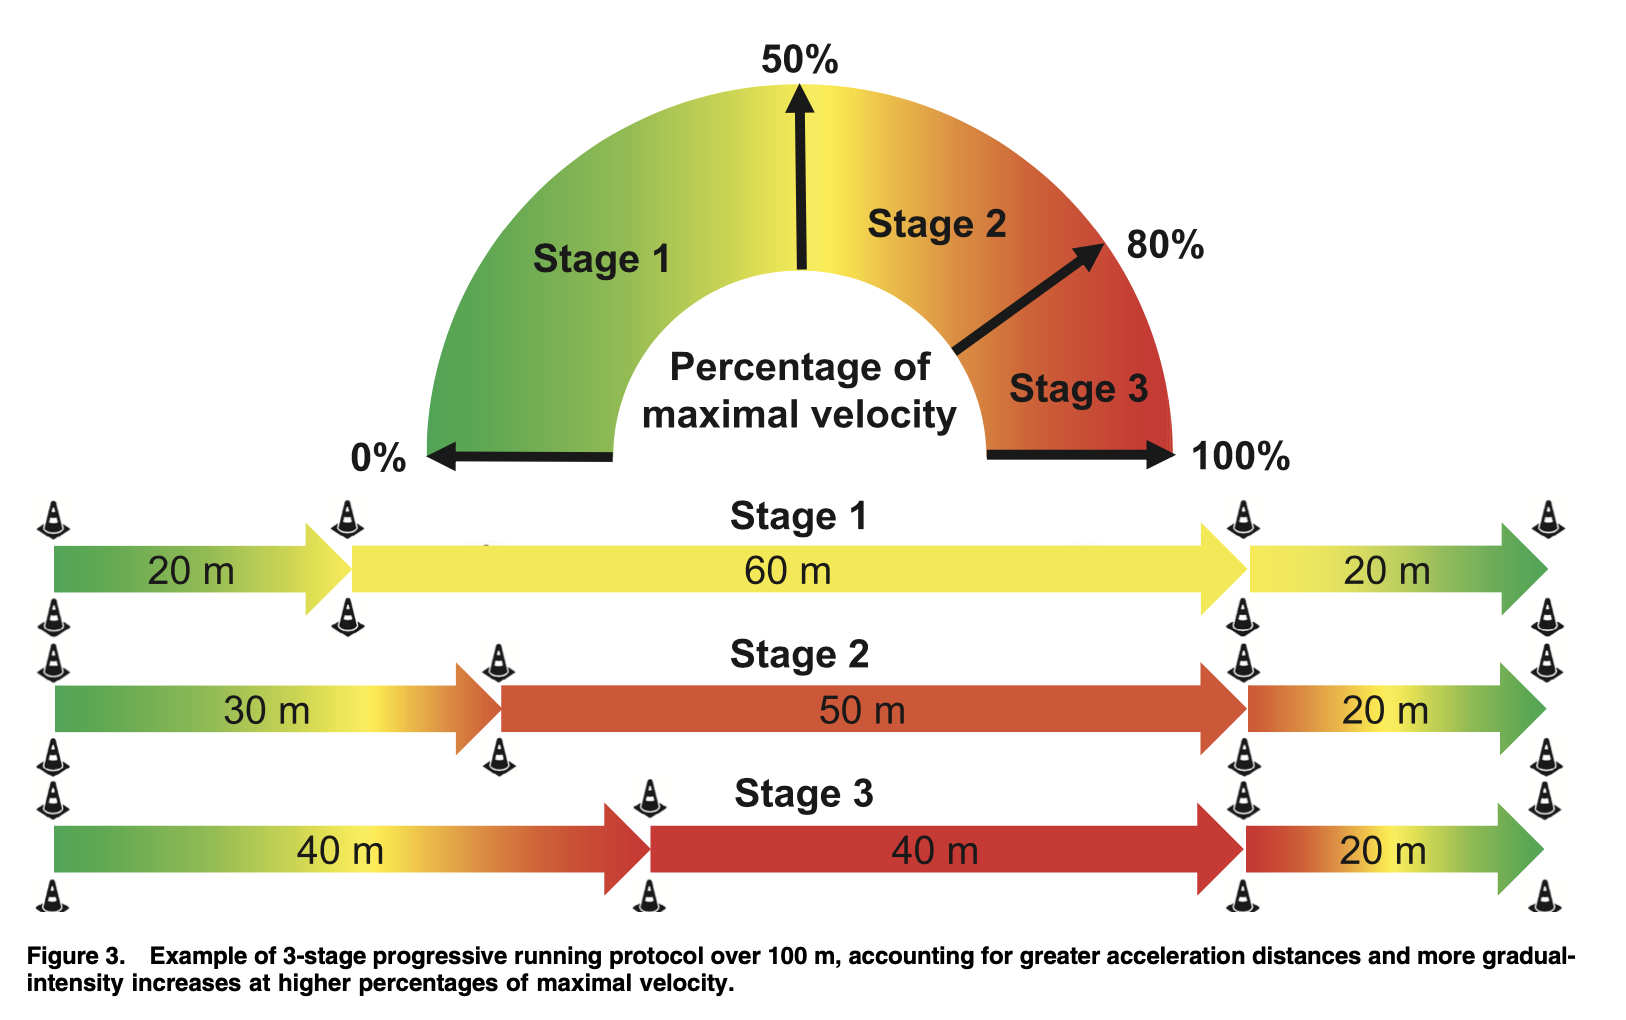
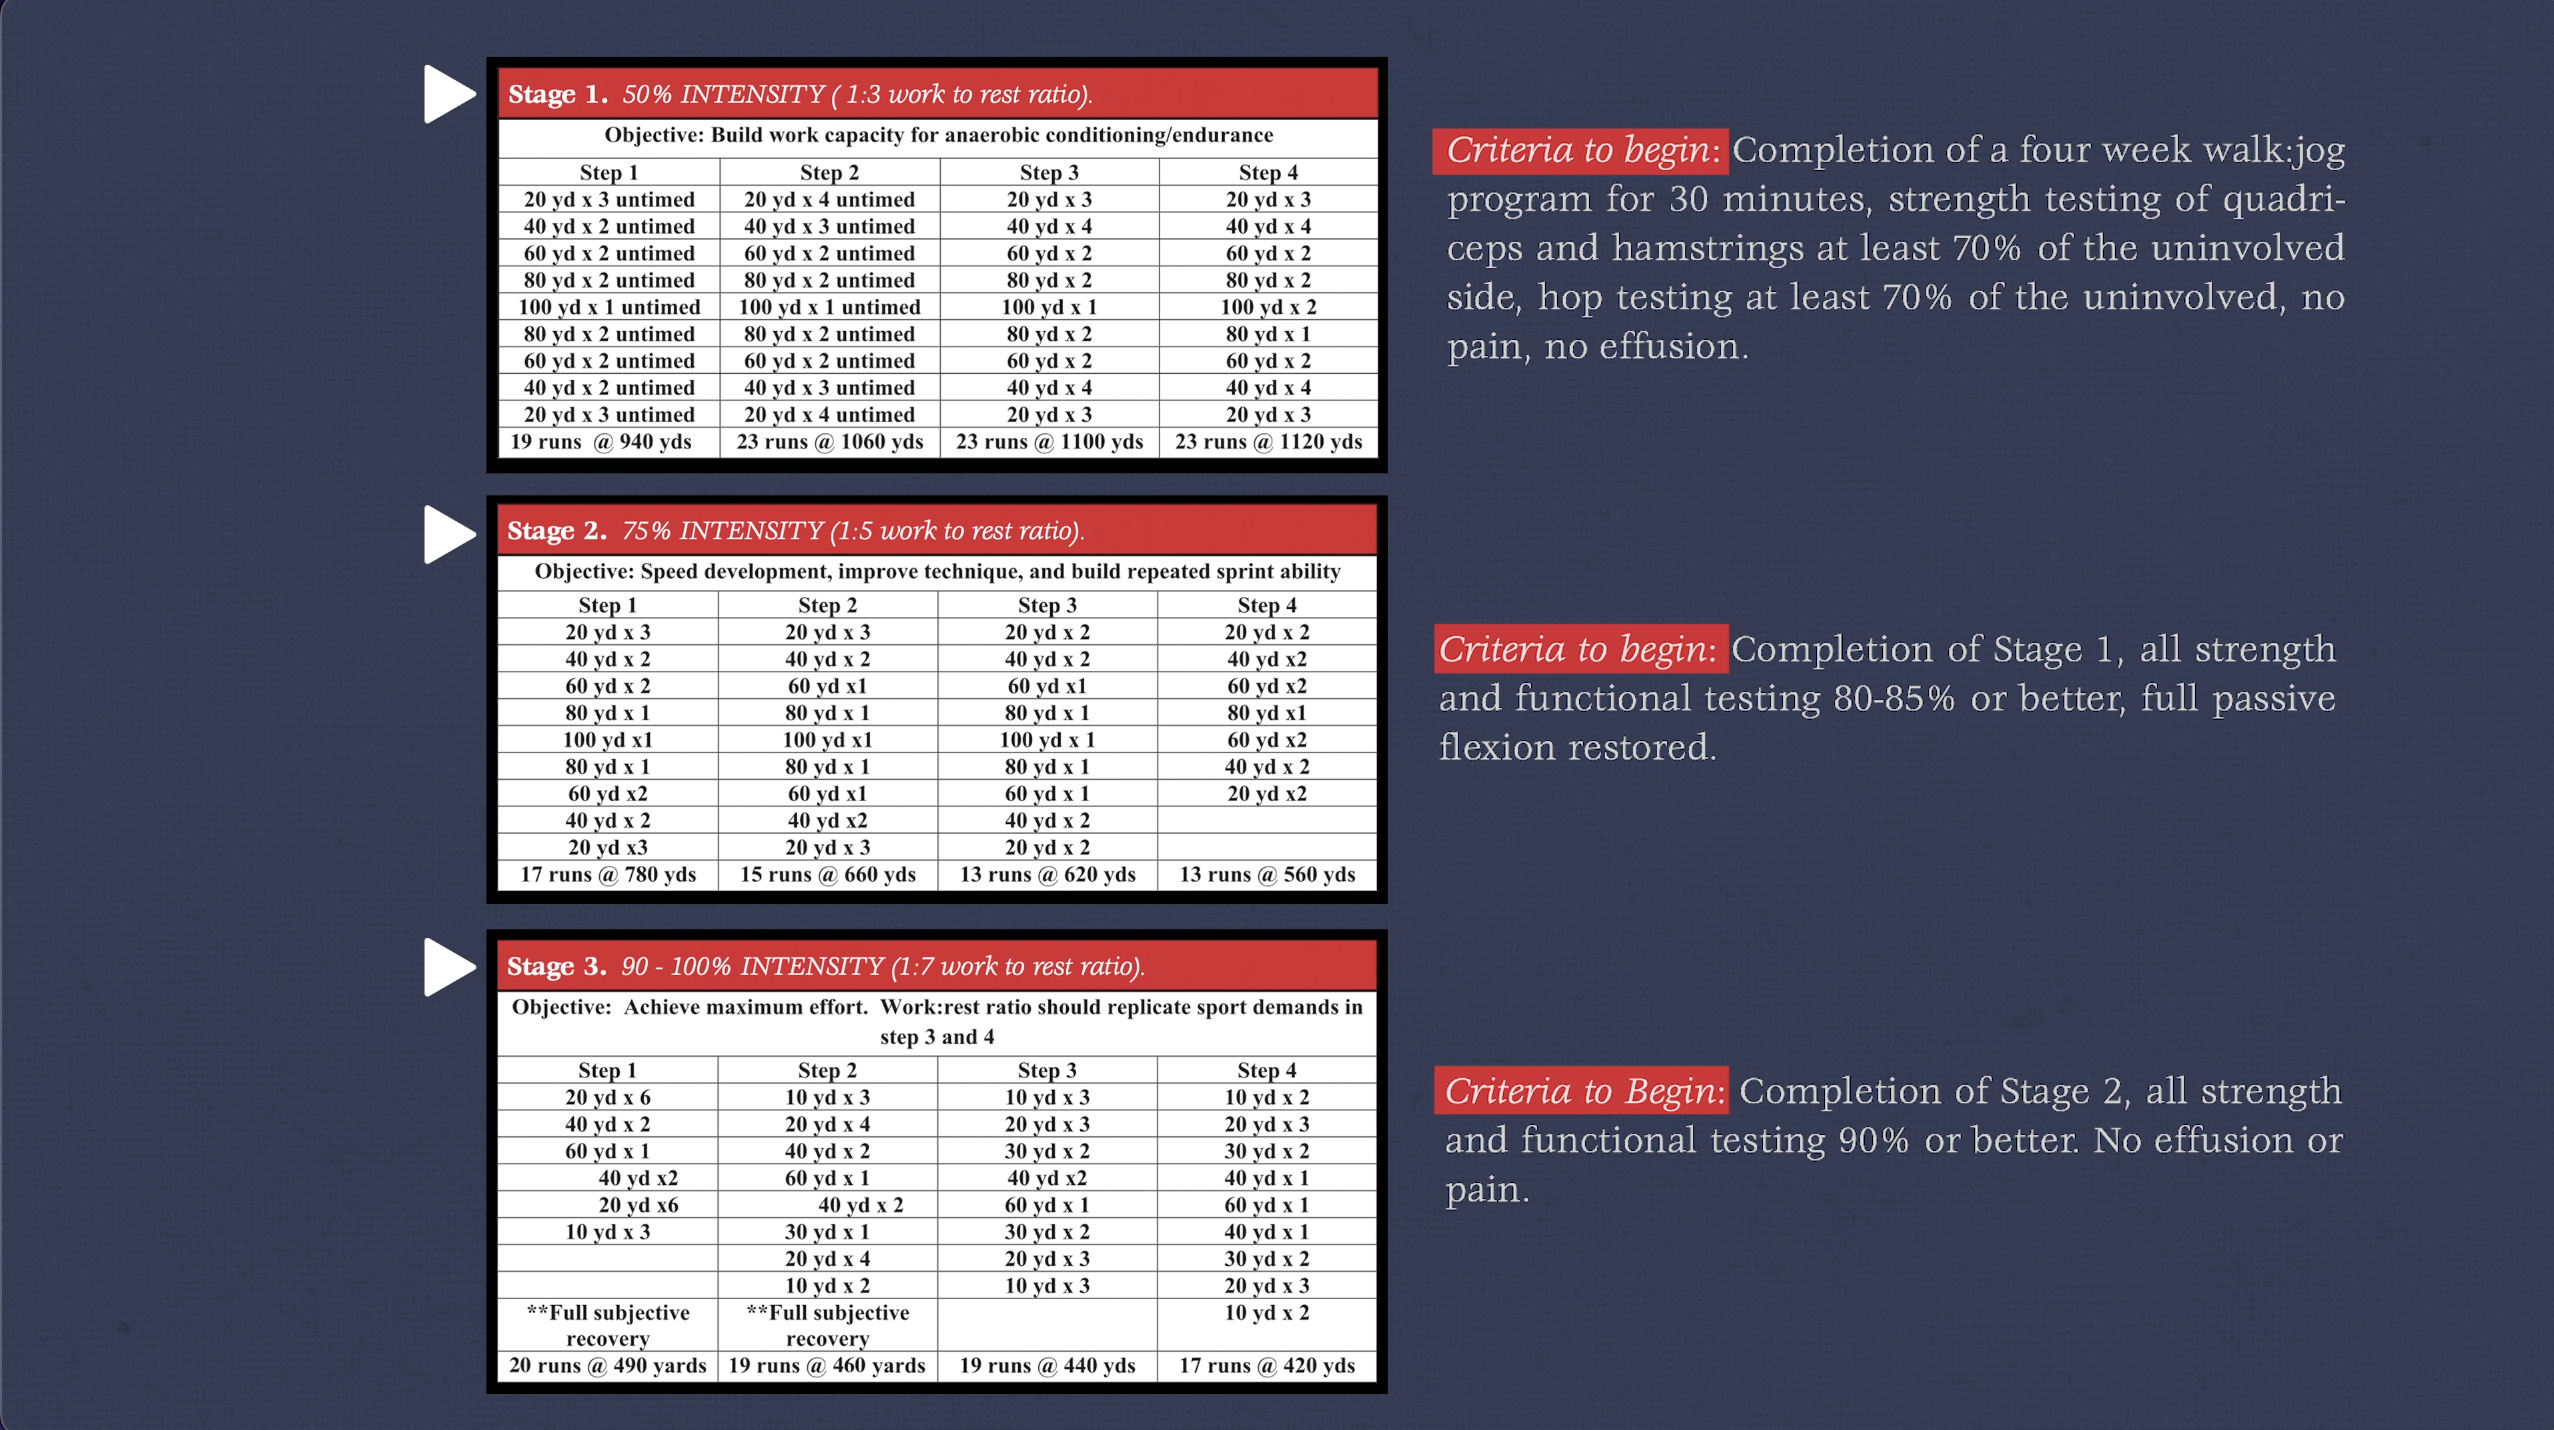
Finally, another option that might be worth checking out is this “criteria-based return to sprinting progression” from Lorenz and Domzalski in 2020. Although it does not include acceleration and deceleration phases, it does ramp up your running intensity over 3 stages, provides criteria on when you can begin each stage, includes a variety of running distances, as well as recommendations for rest times.
Category 3: Change of Direction
This includes cutting, pivoting, and multi-directional drills. There are infinite options available but in most cases, there are 3 main principles for progressing exercises:
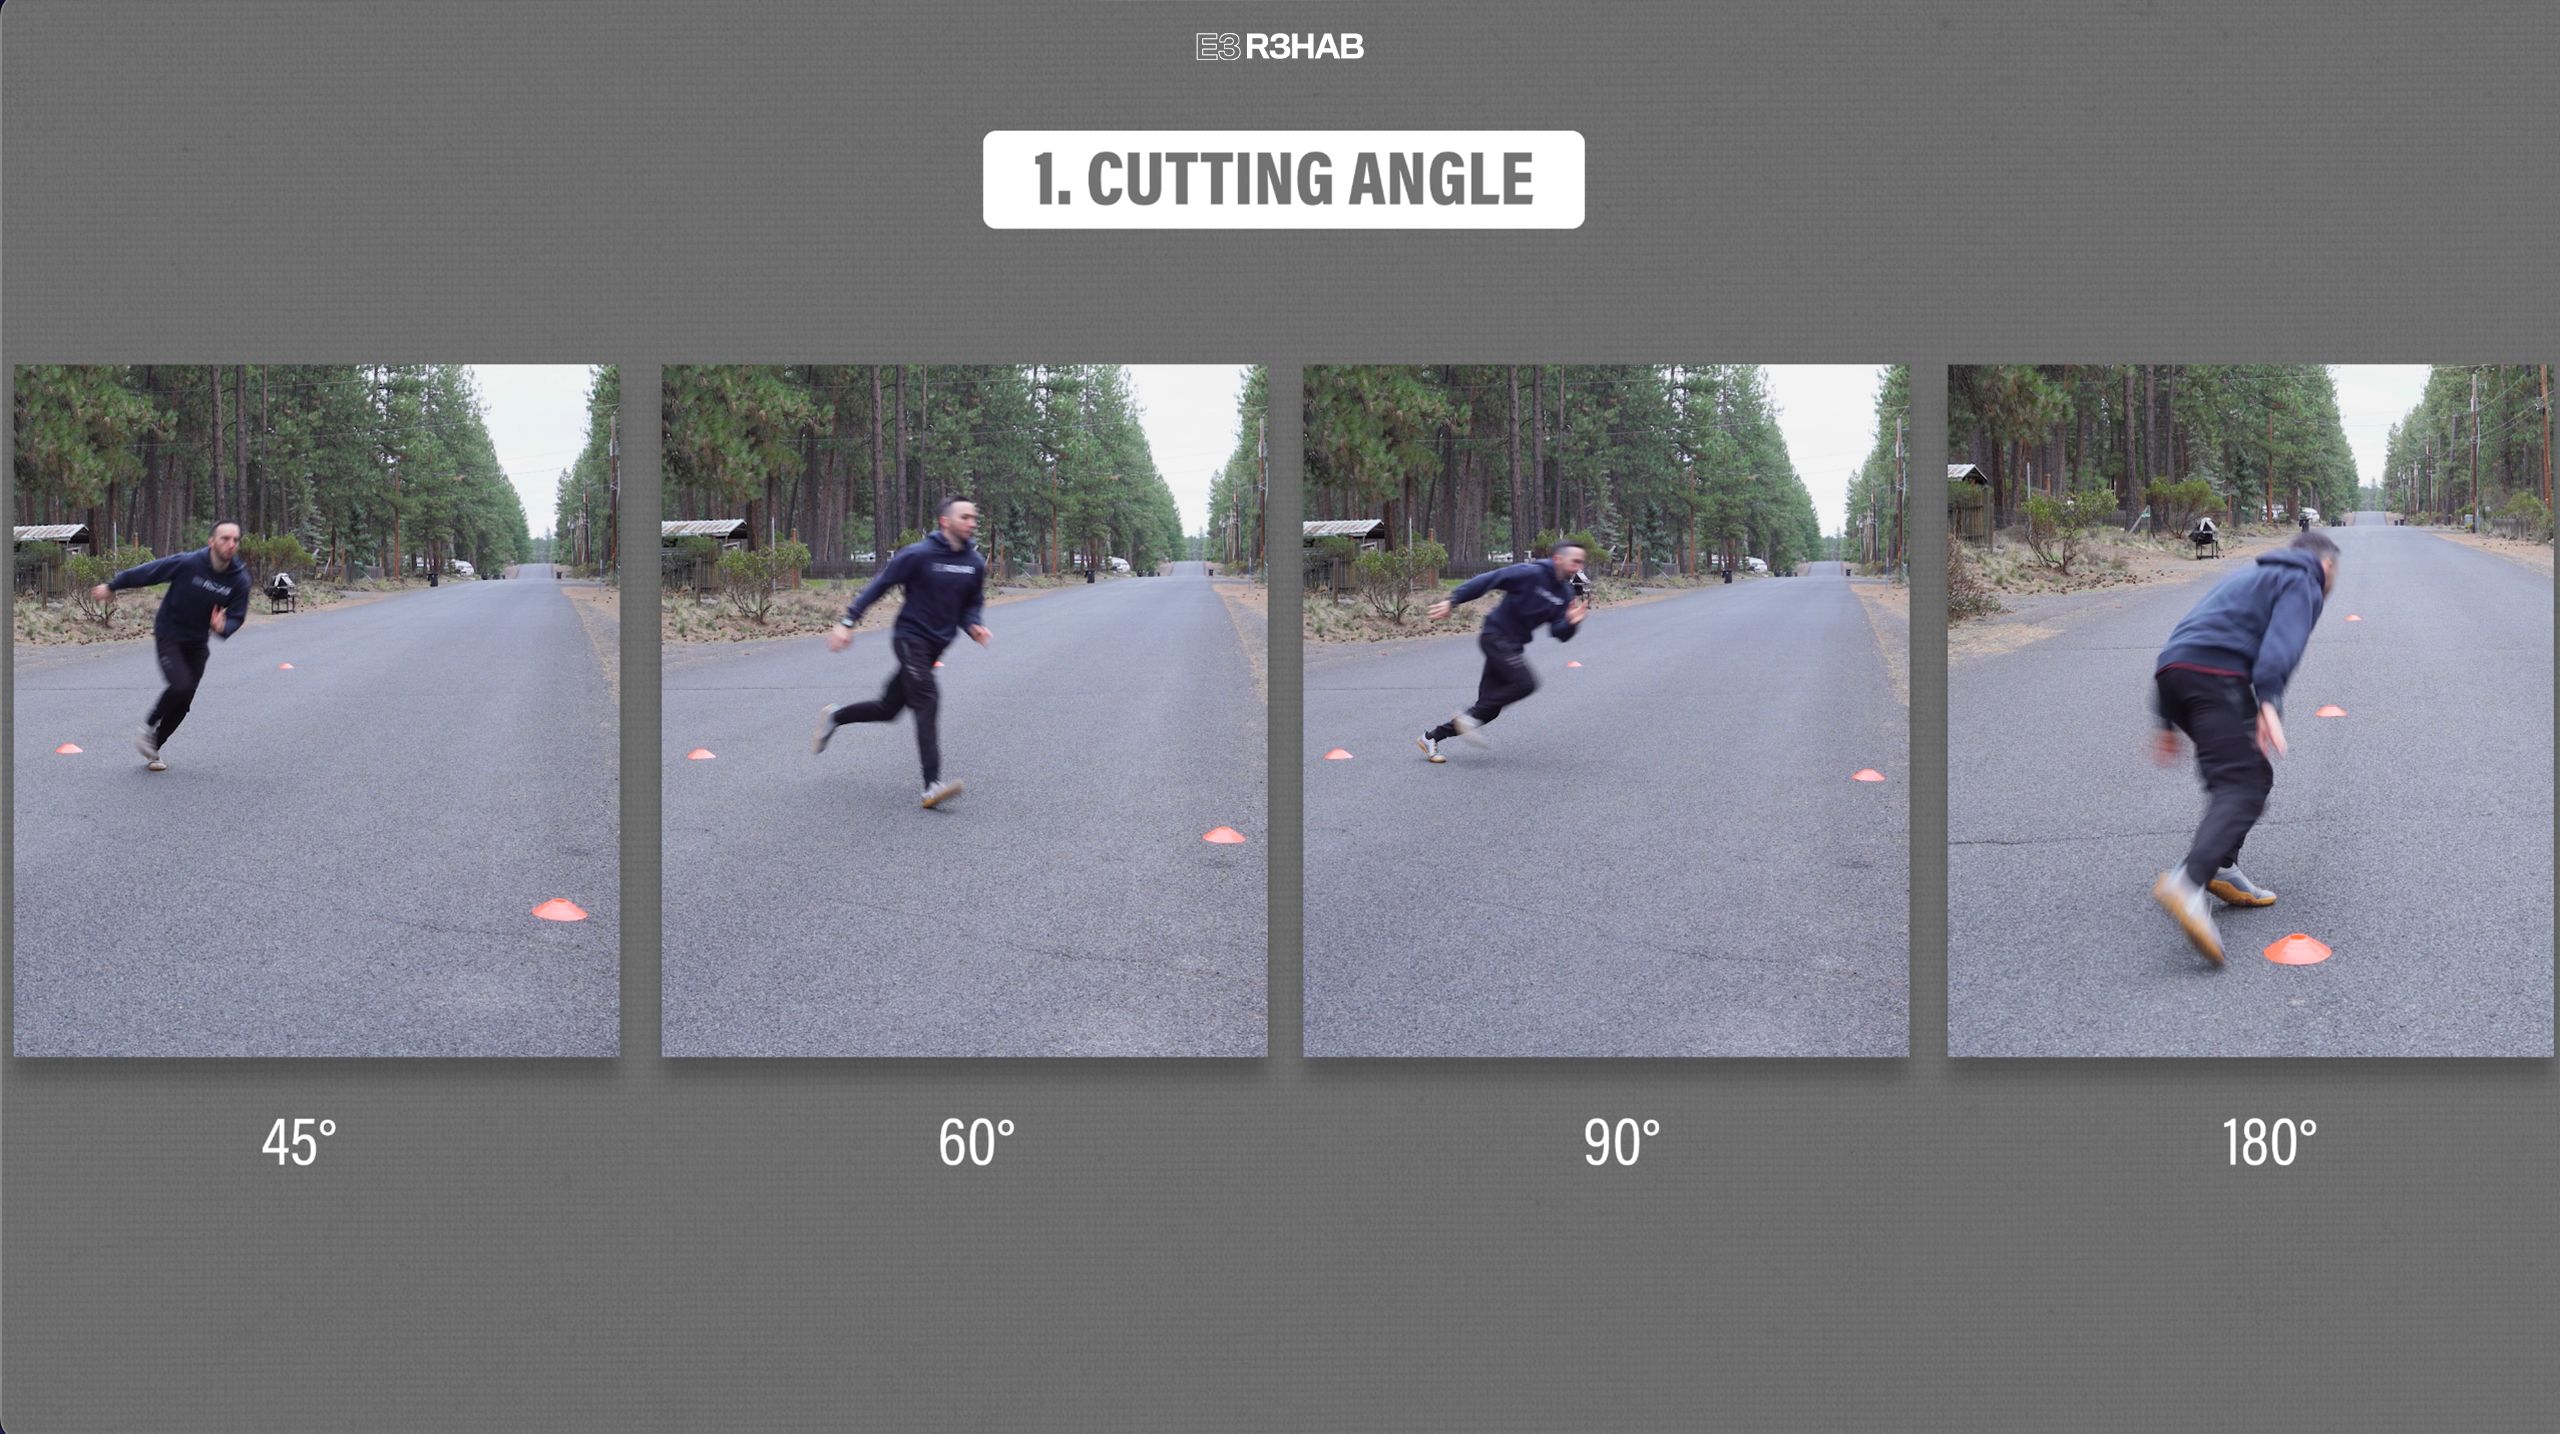
1. Cutting angle. Start with softer angles, about 45°, and progress up to 60°, 90°, and eventually 180°.
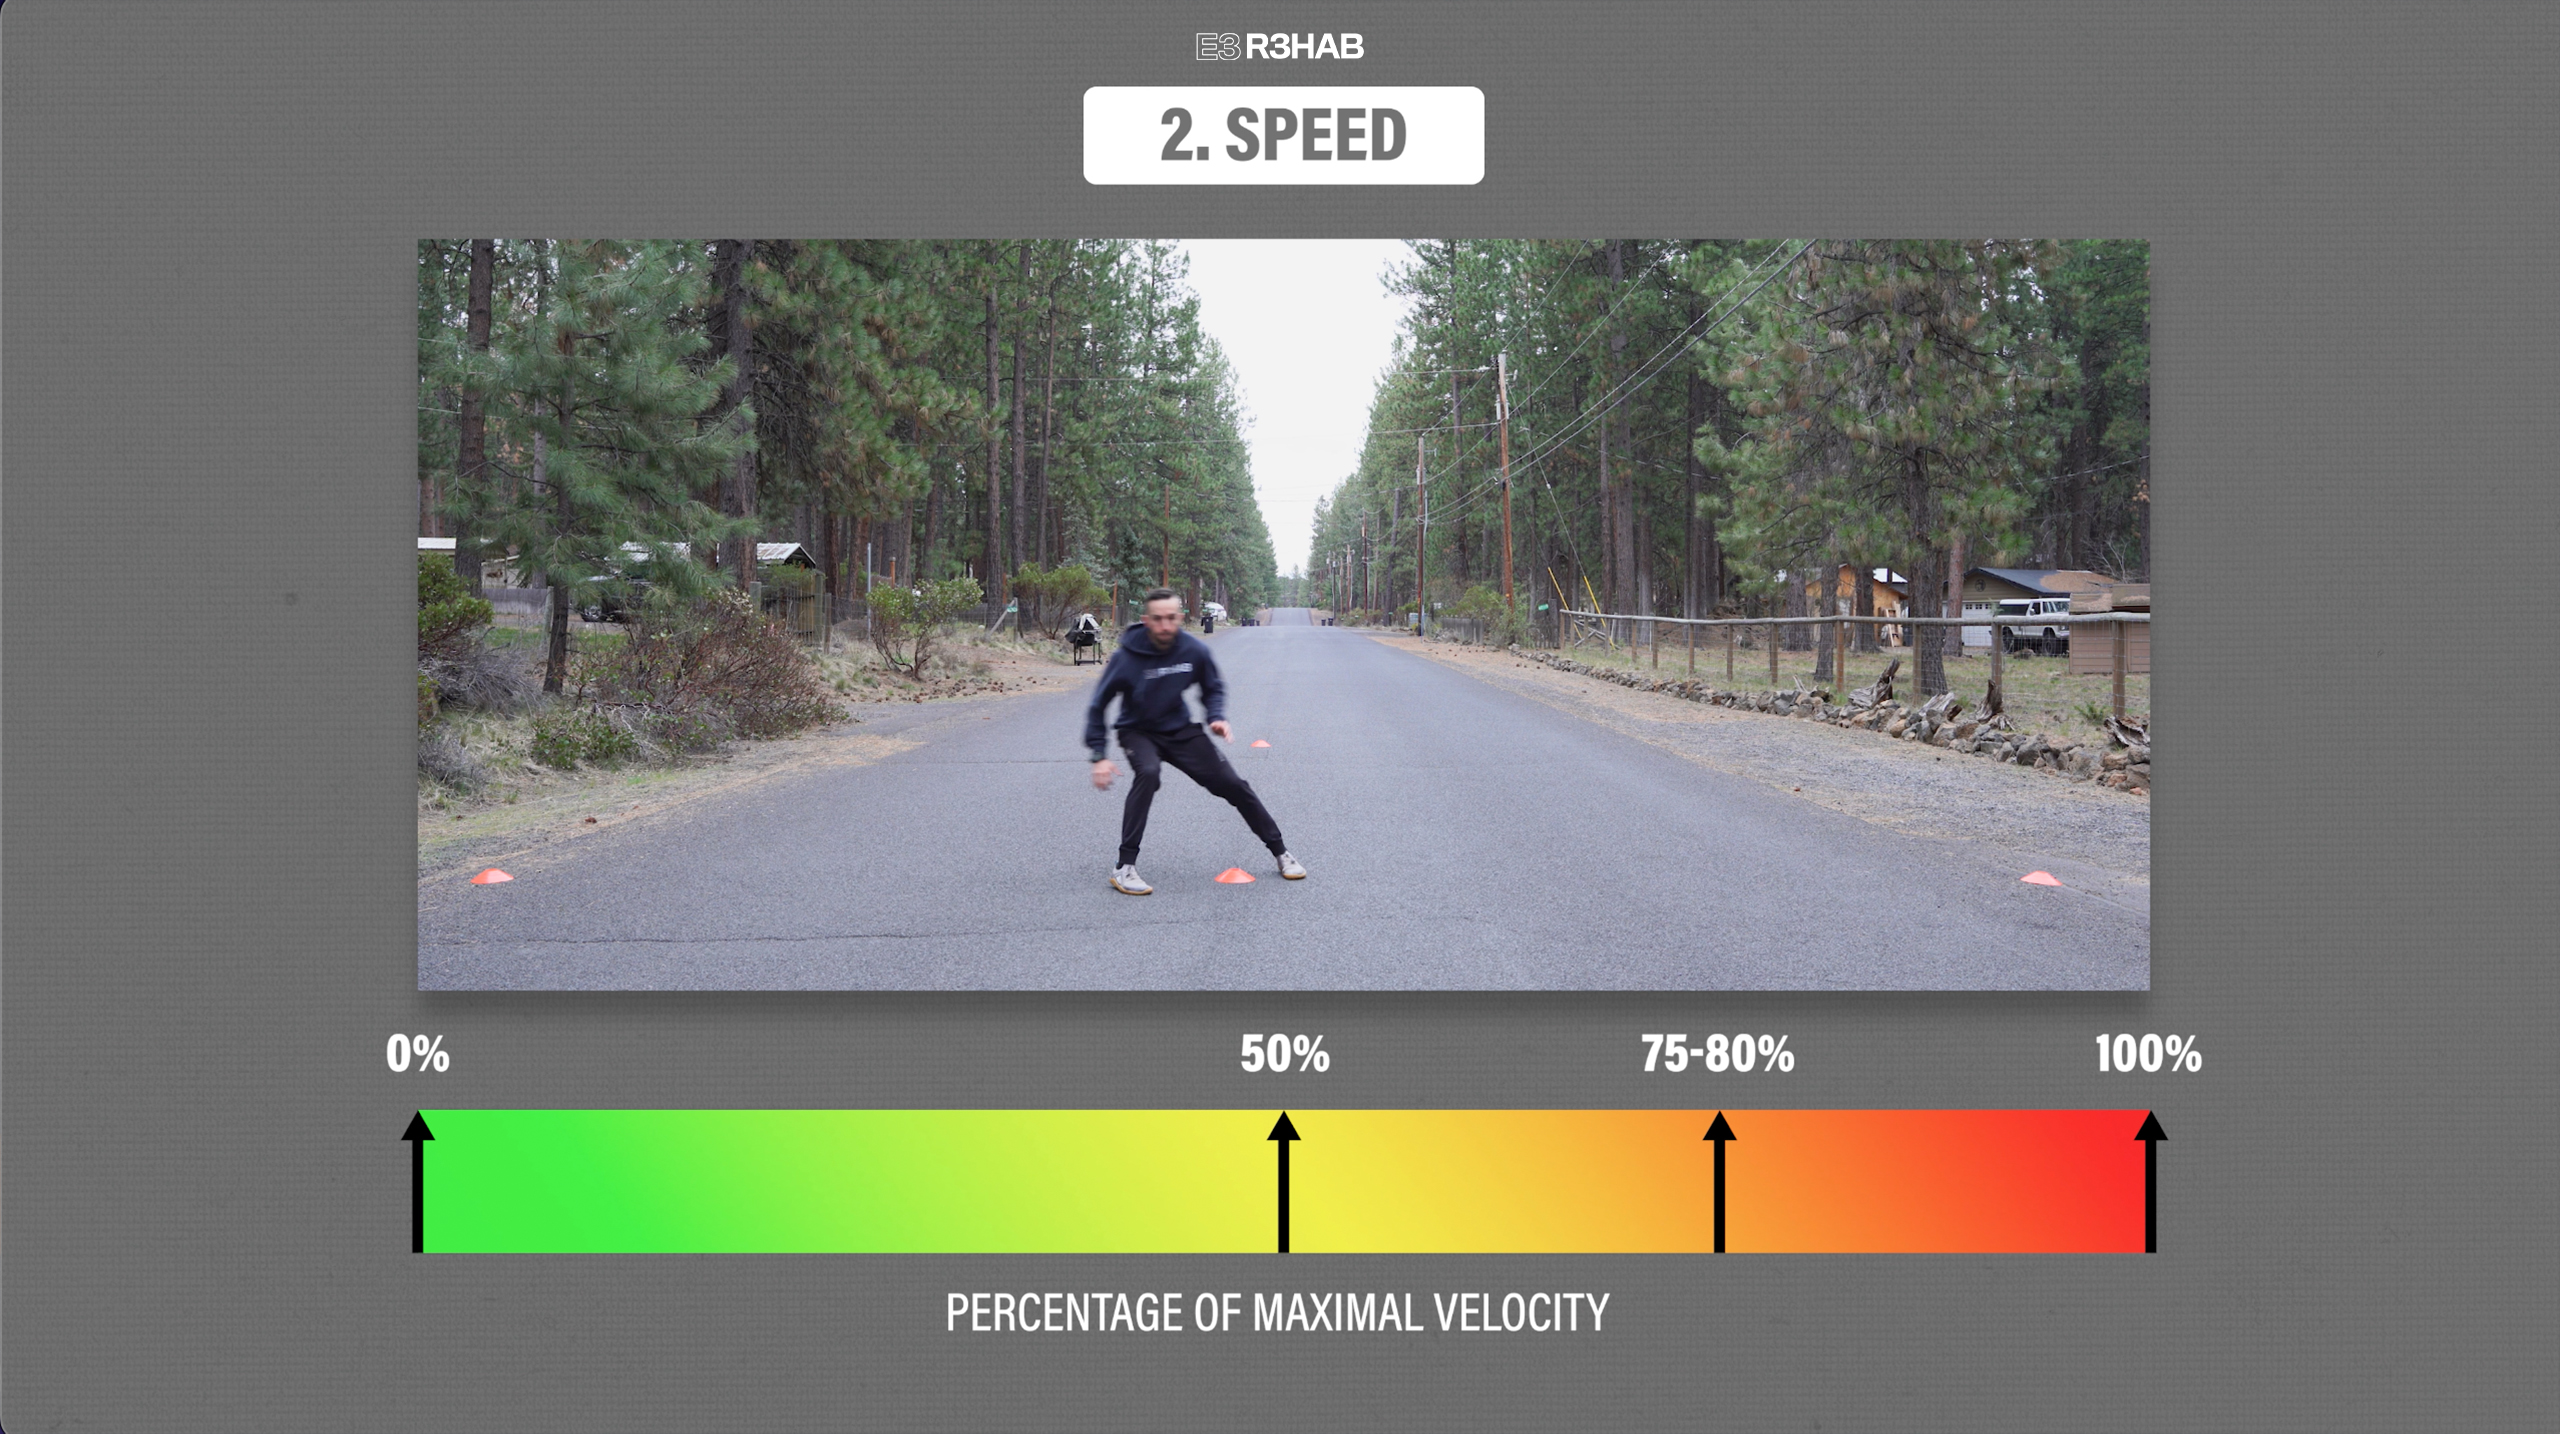
2. Speed. Like the linear running recommendations, once you can tolerate 50%, increase your effort up to 75-80% before finally working your way to 100% intensity.
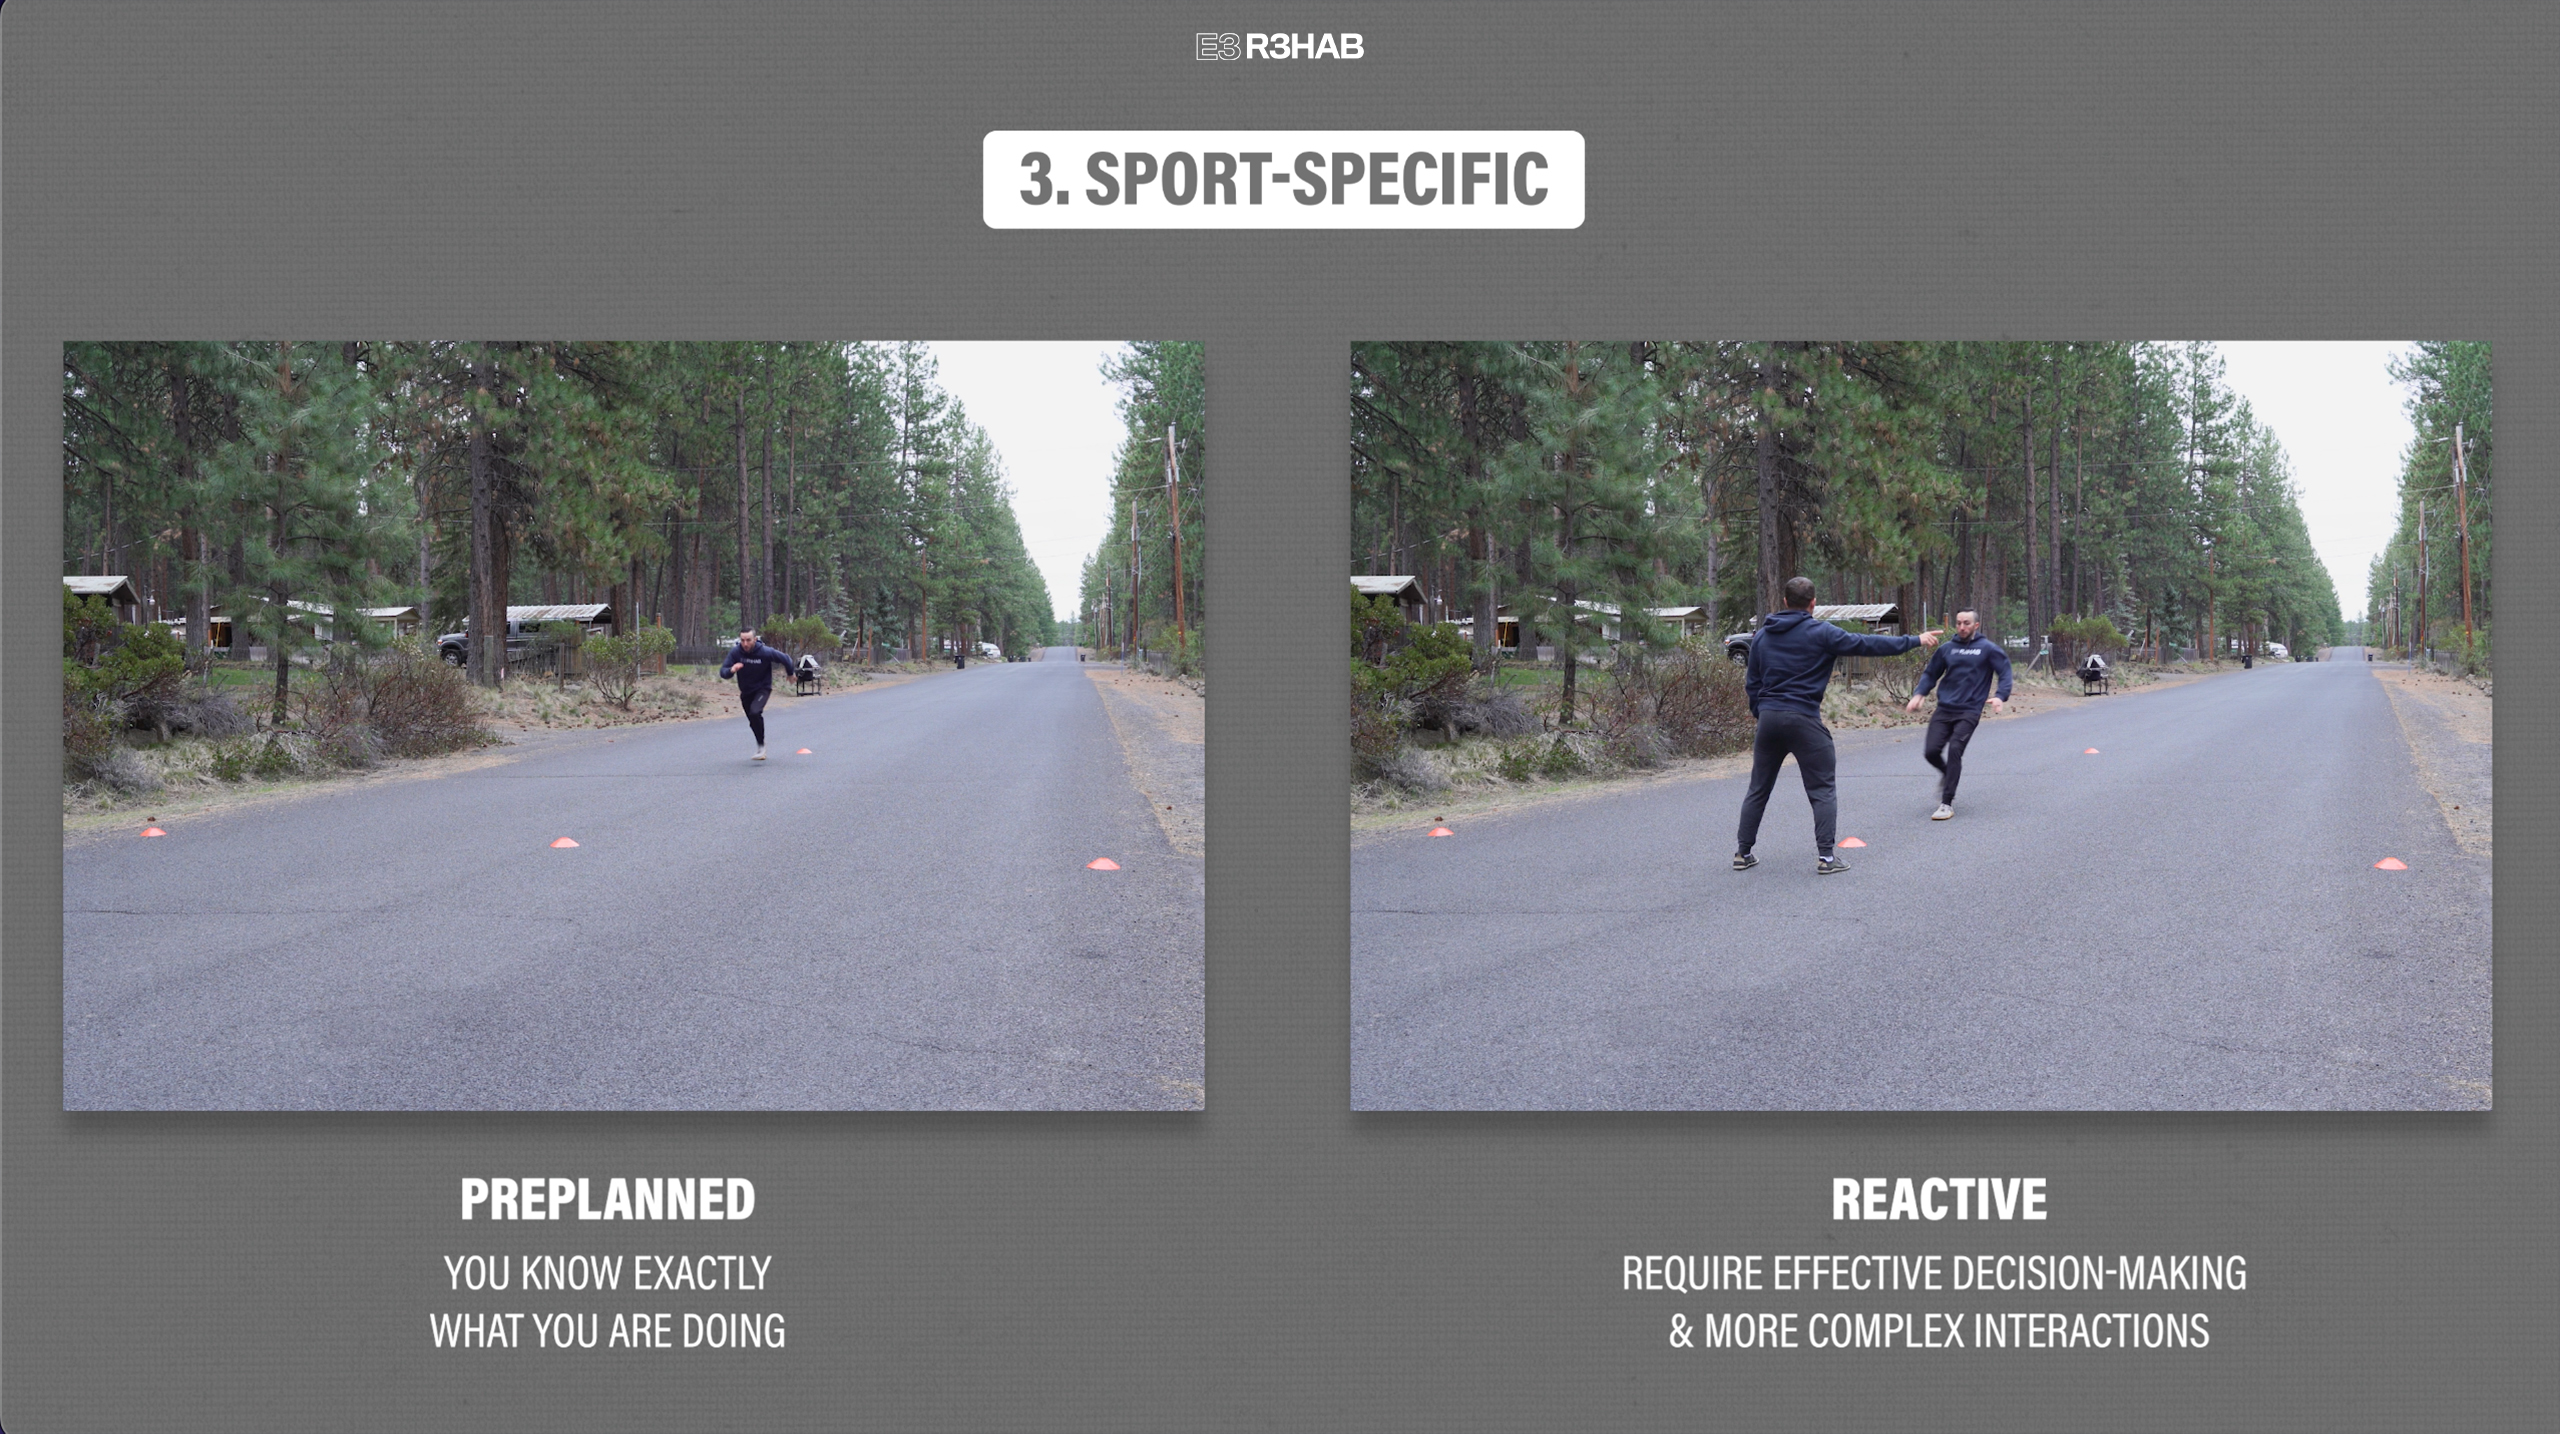
3. Sport-specific. Drills should start preplanned, or in other words, you know exactly what you are doing. However in order to emulate sporting demands, you must progress to reactive movements which will require effective decision-making and more complex interactions with the environment.
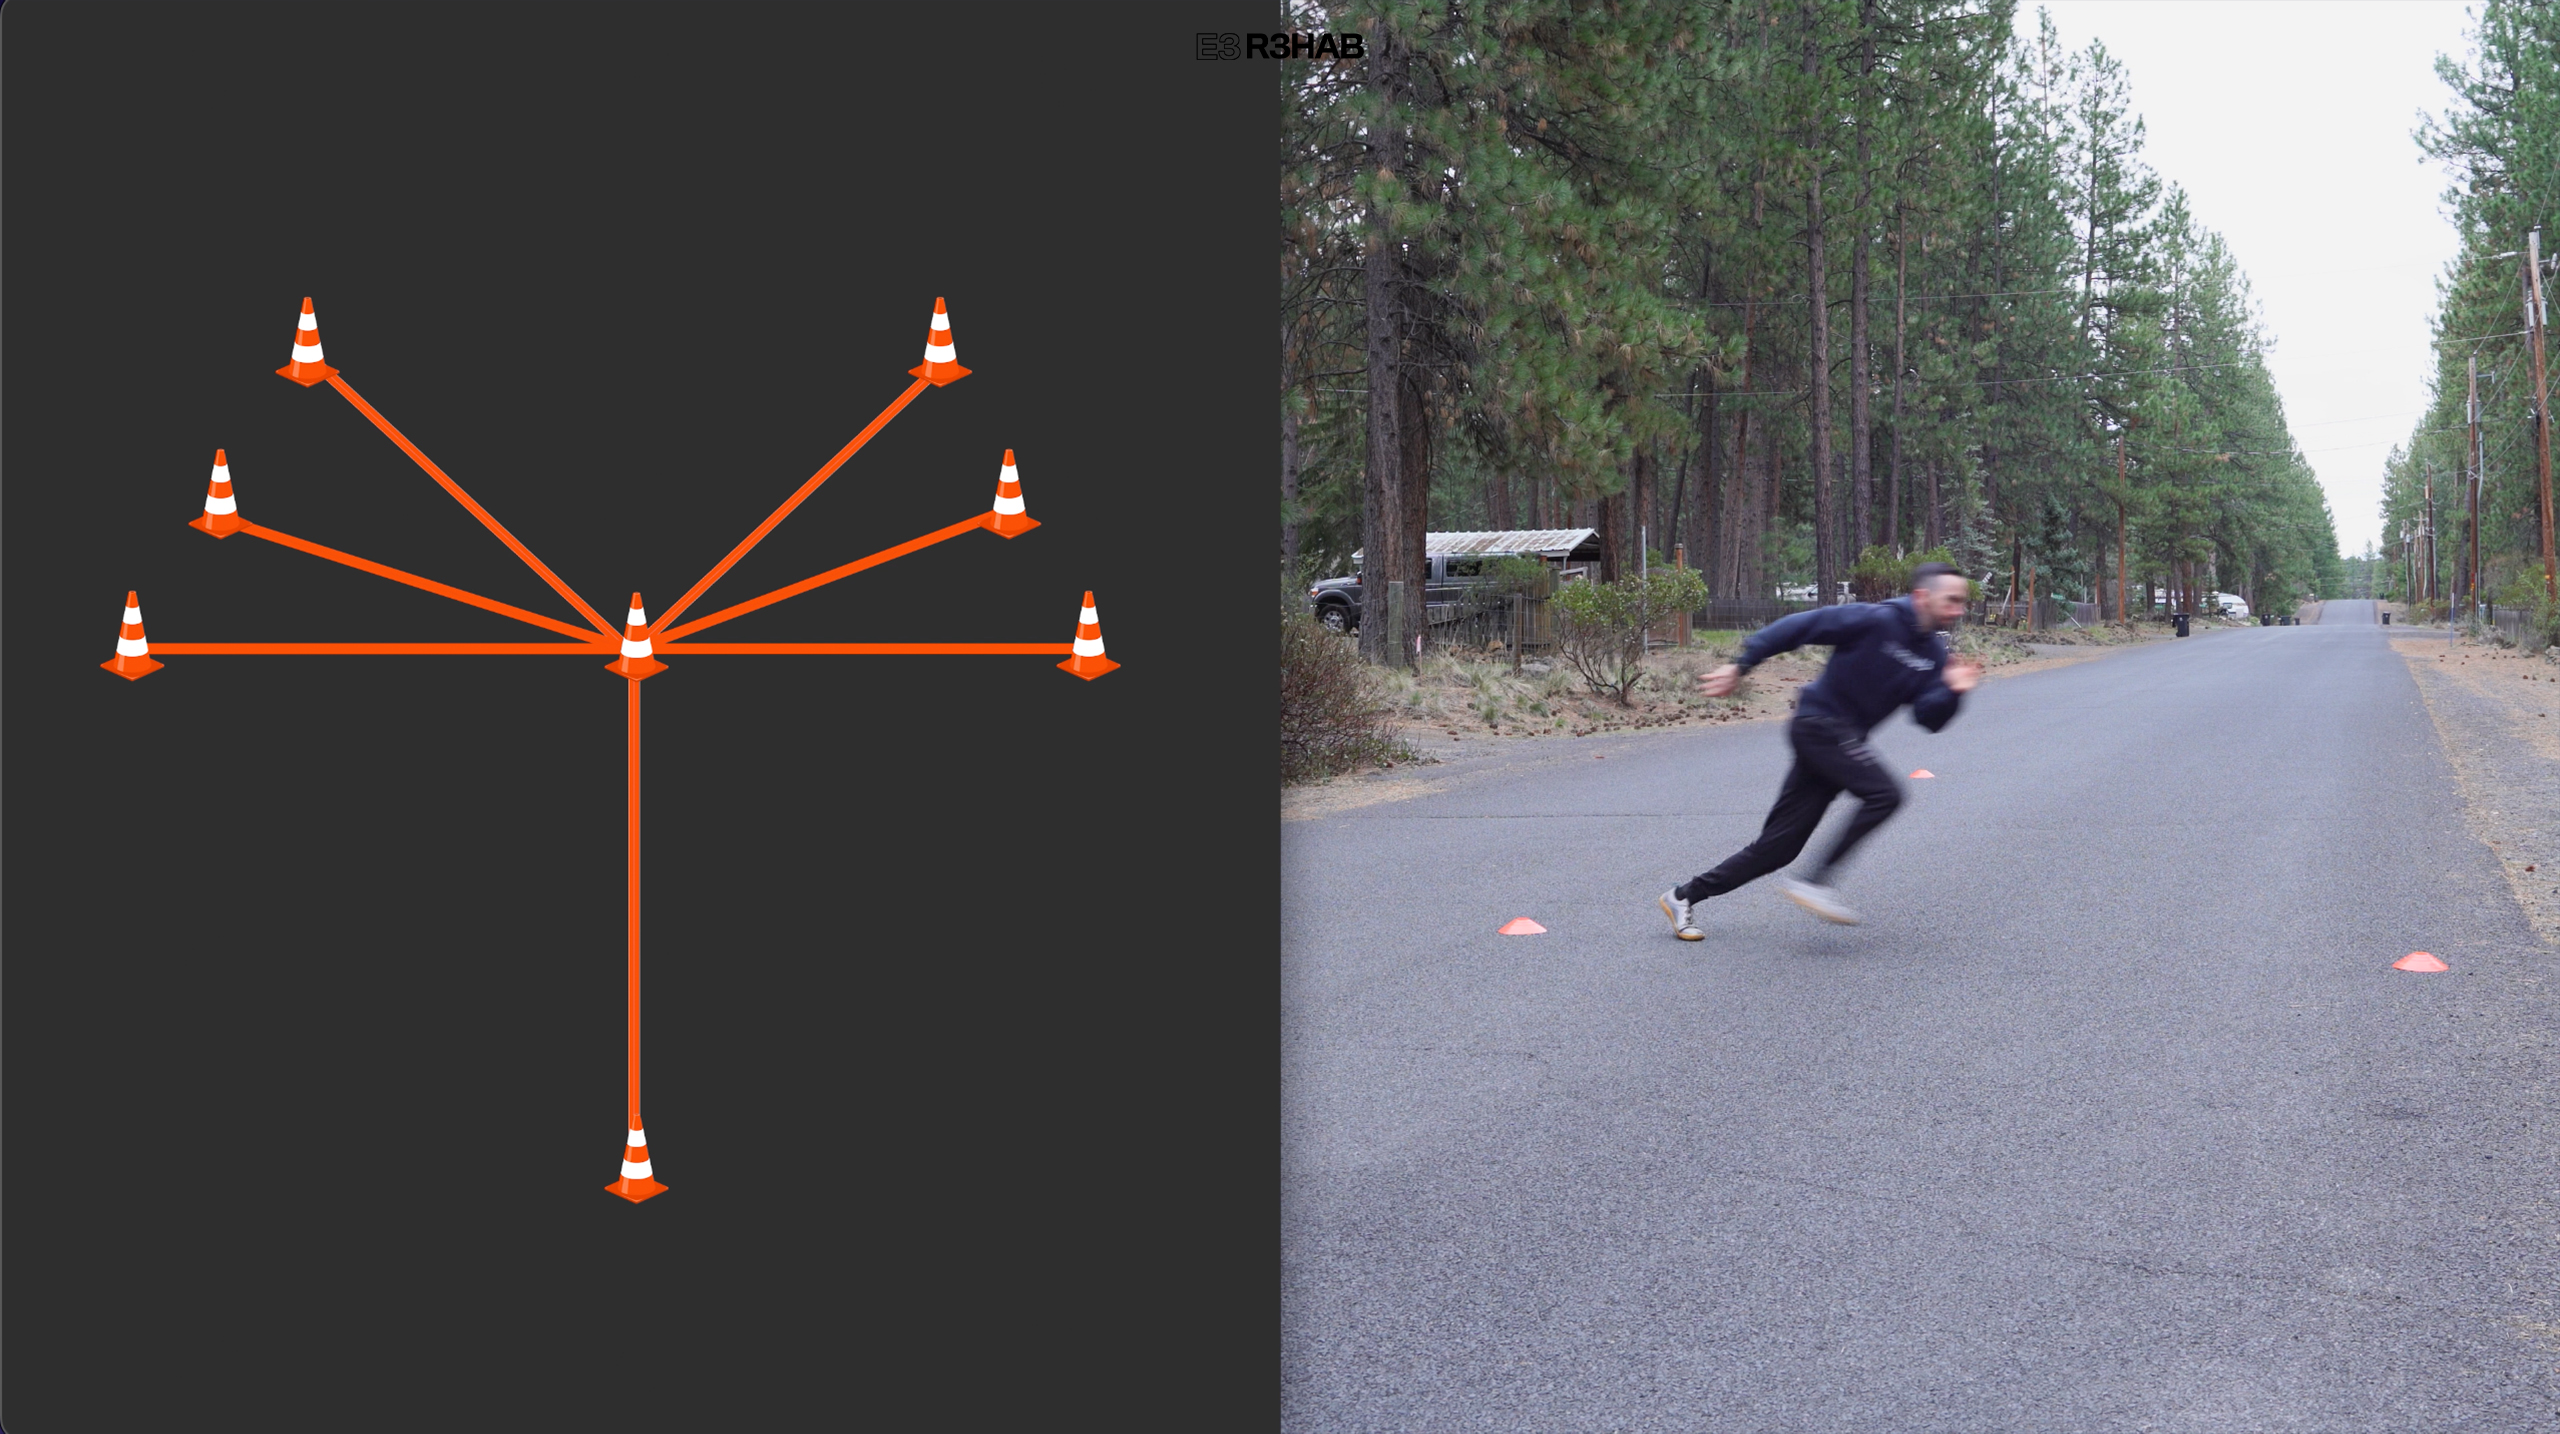
Let me show you an example of how to use these 3 principles using 4 cones or objects set up in a Y shape as shown.
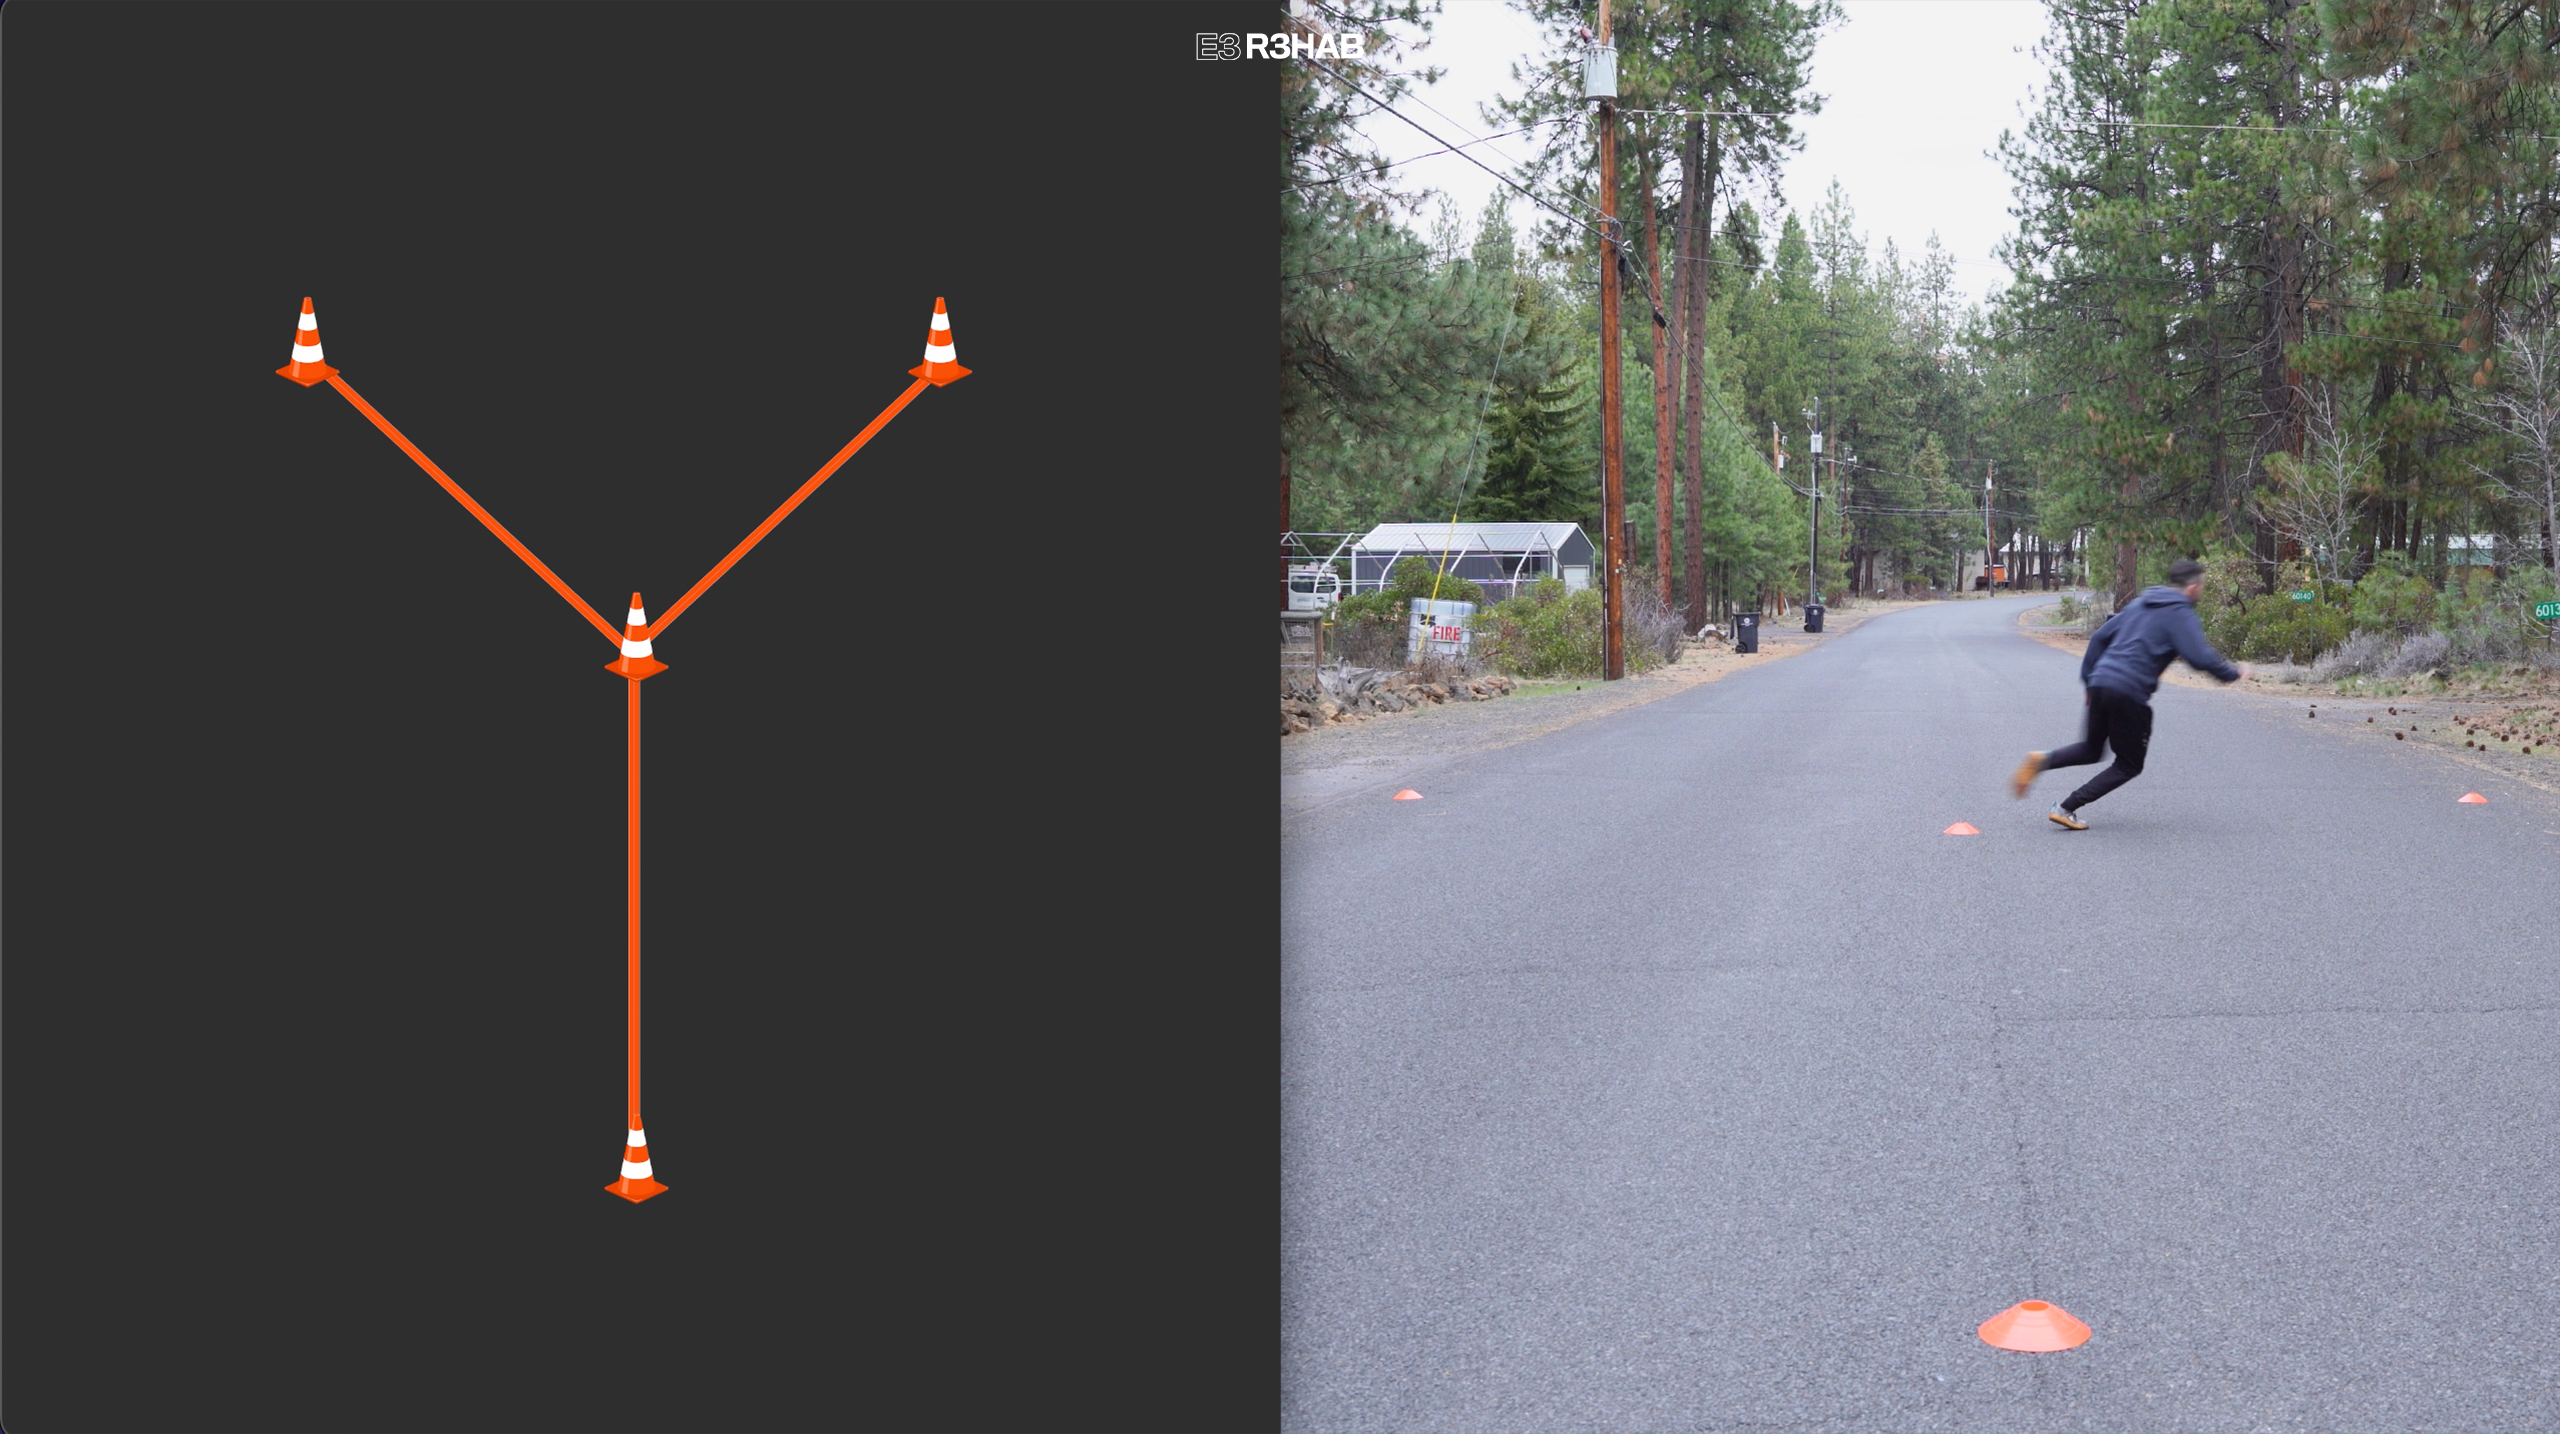
Start at the first cone, run forward to the second one, and then cut toward your right at a 45° angle. Jog back and repeat, but this time cut toward the left. Start at lower intensity speeds and increase as tolerated. You can also make it harder by changing the angle. Over time, progress to 60°, 90°, and 180°.
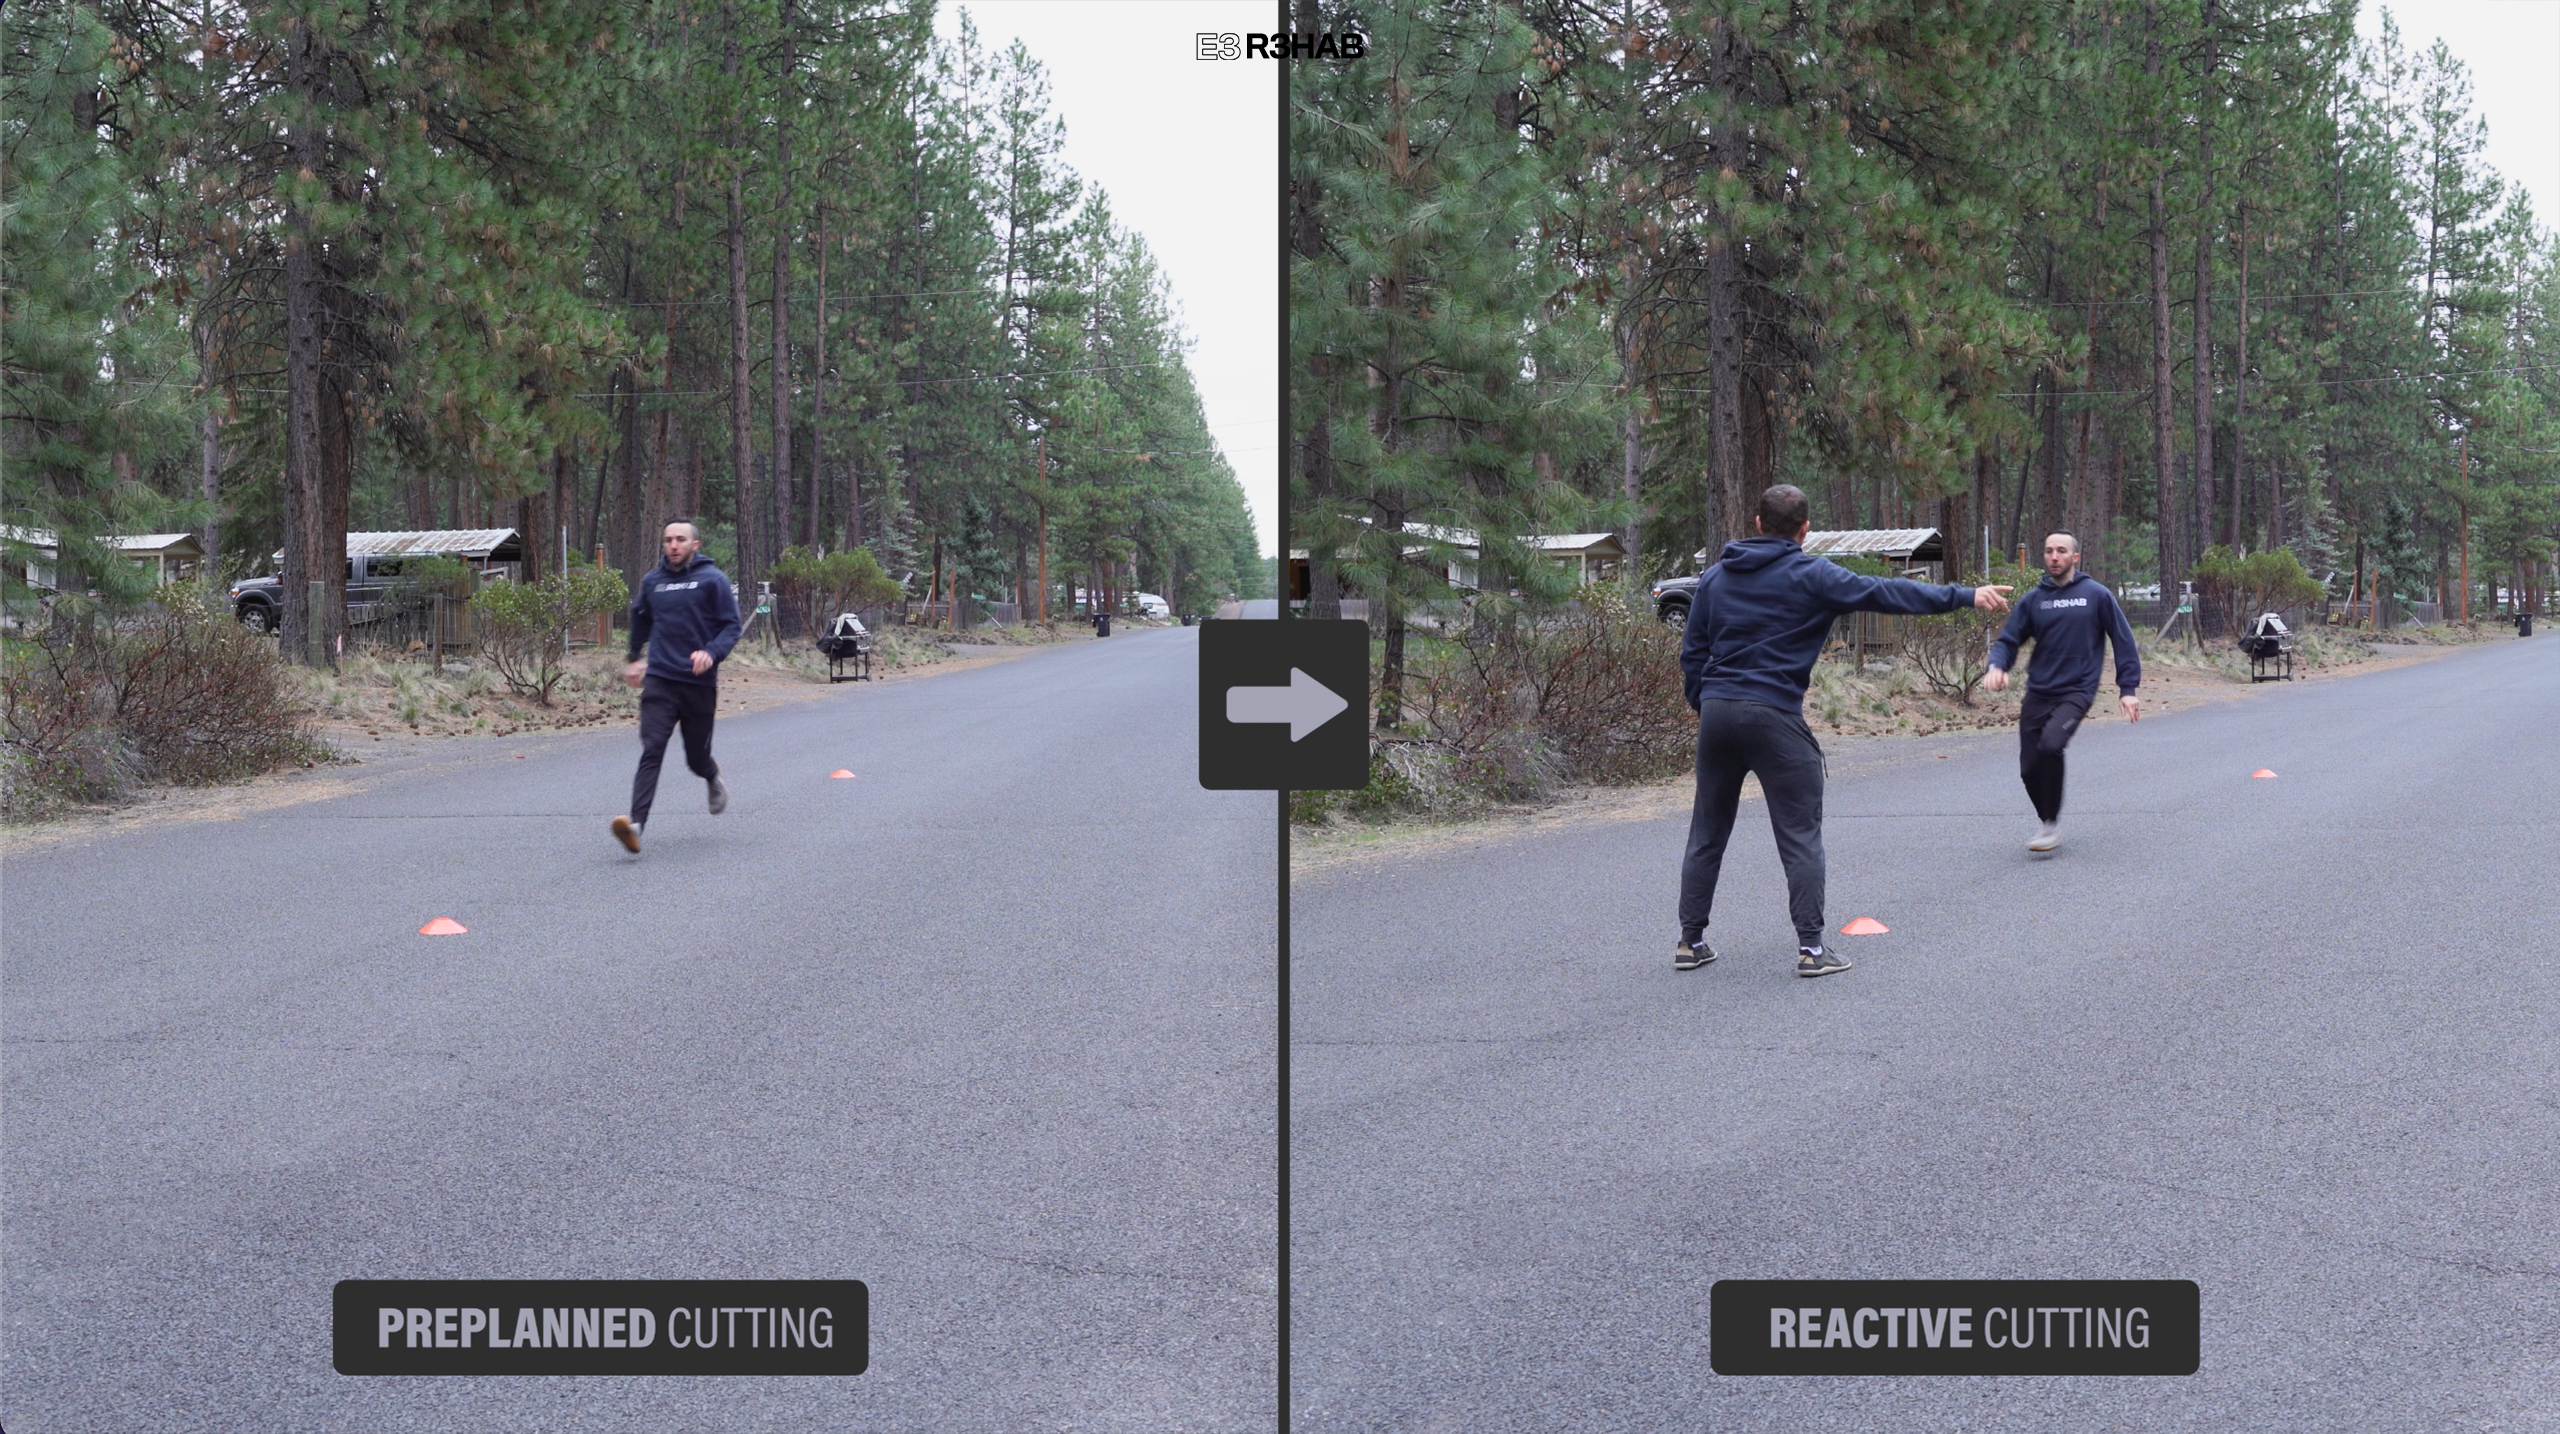
Finally, once you can perform these preplanned cuts at various angles and at full speed, progress to reactive movements. For example, you can run toward the middle cone, and then have someone point in the direction you should cut.
Here are 3 other drills that incorporate various cutting angles and multidirectional movements:
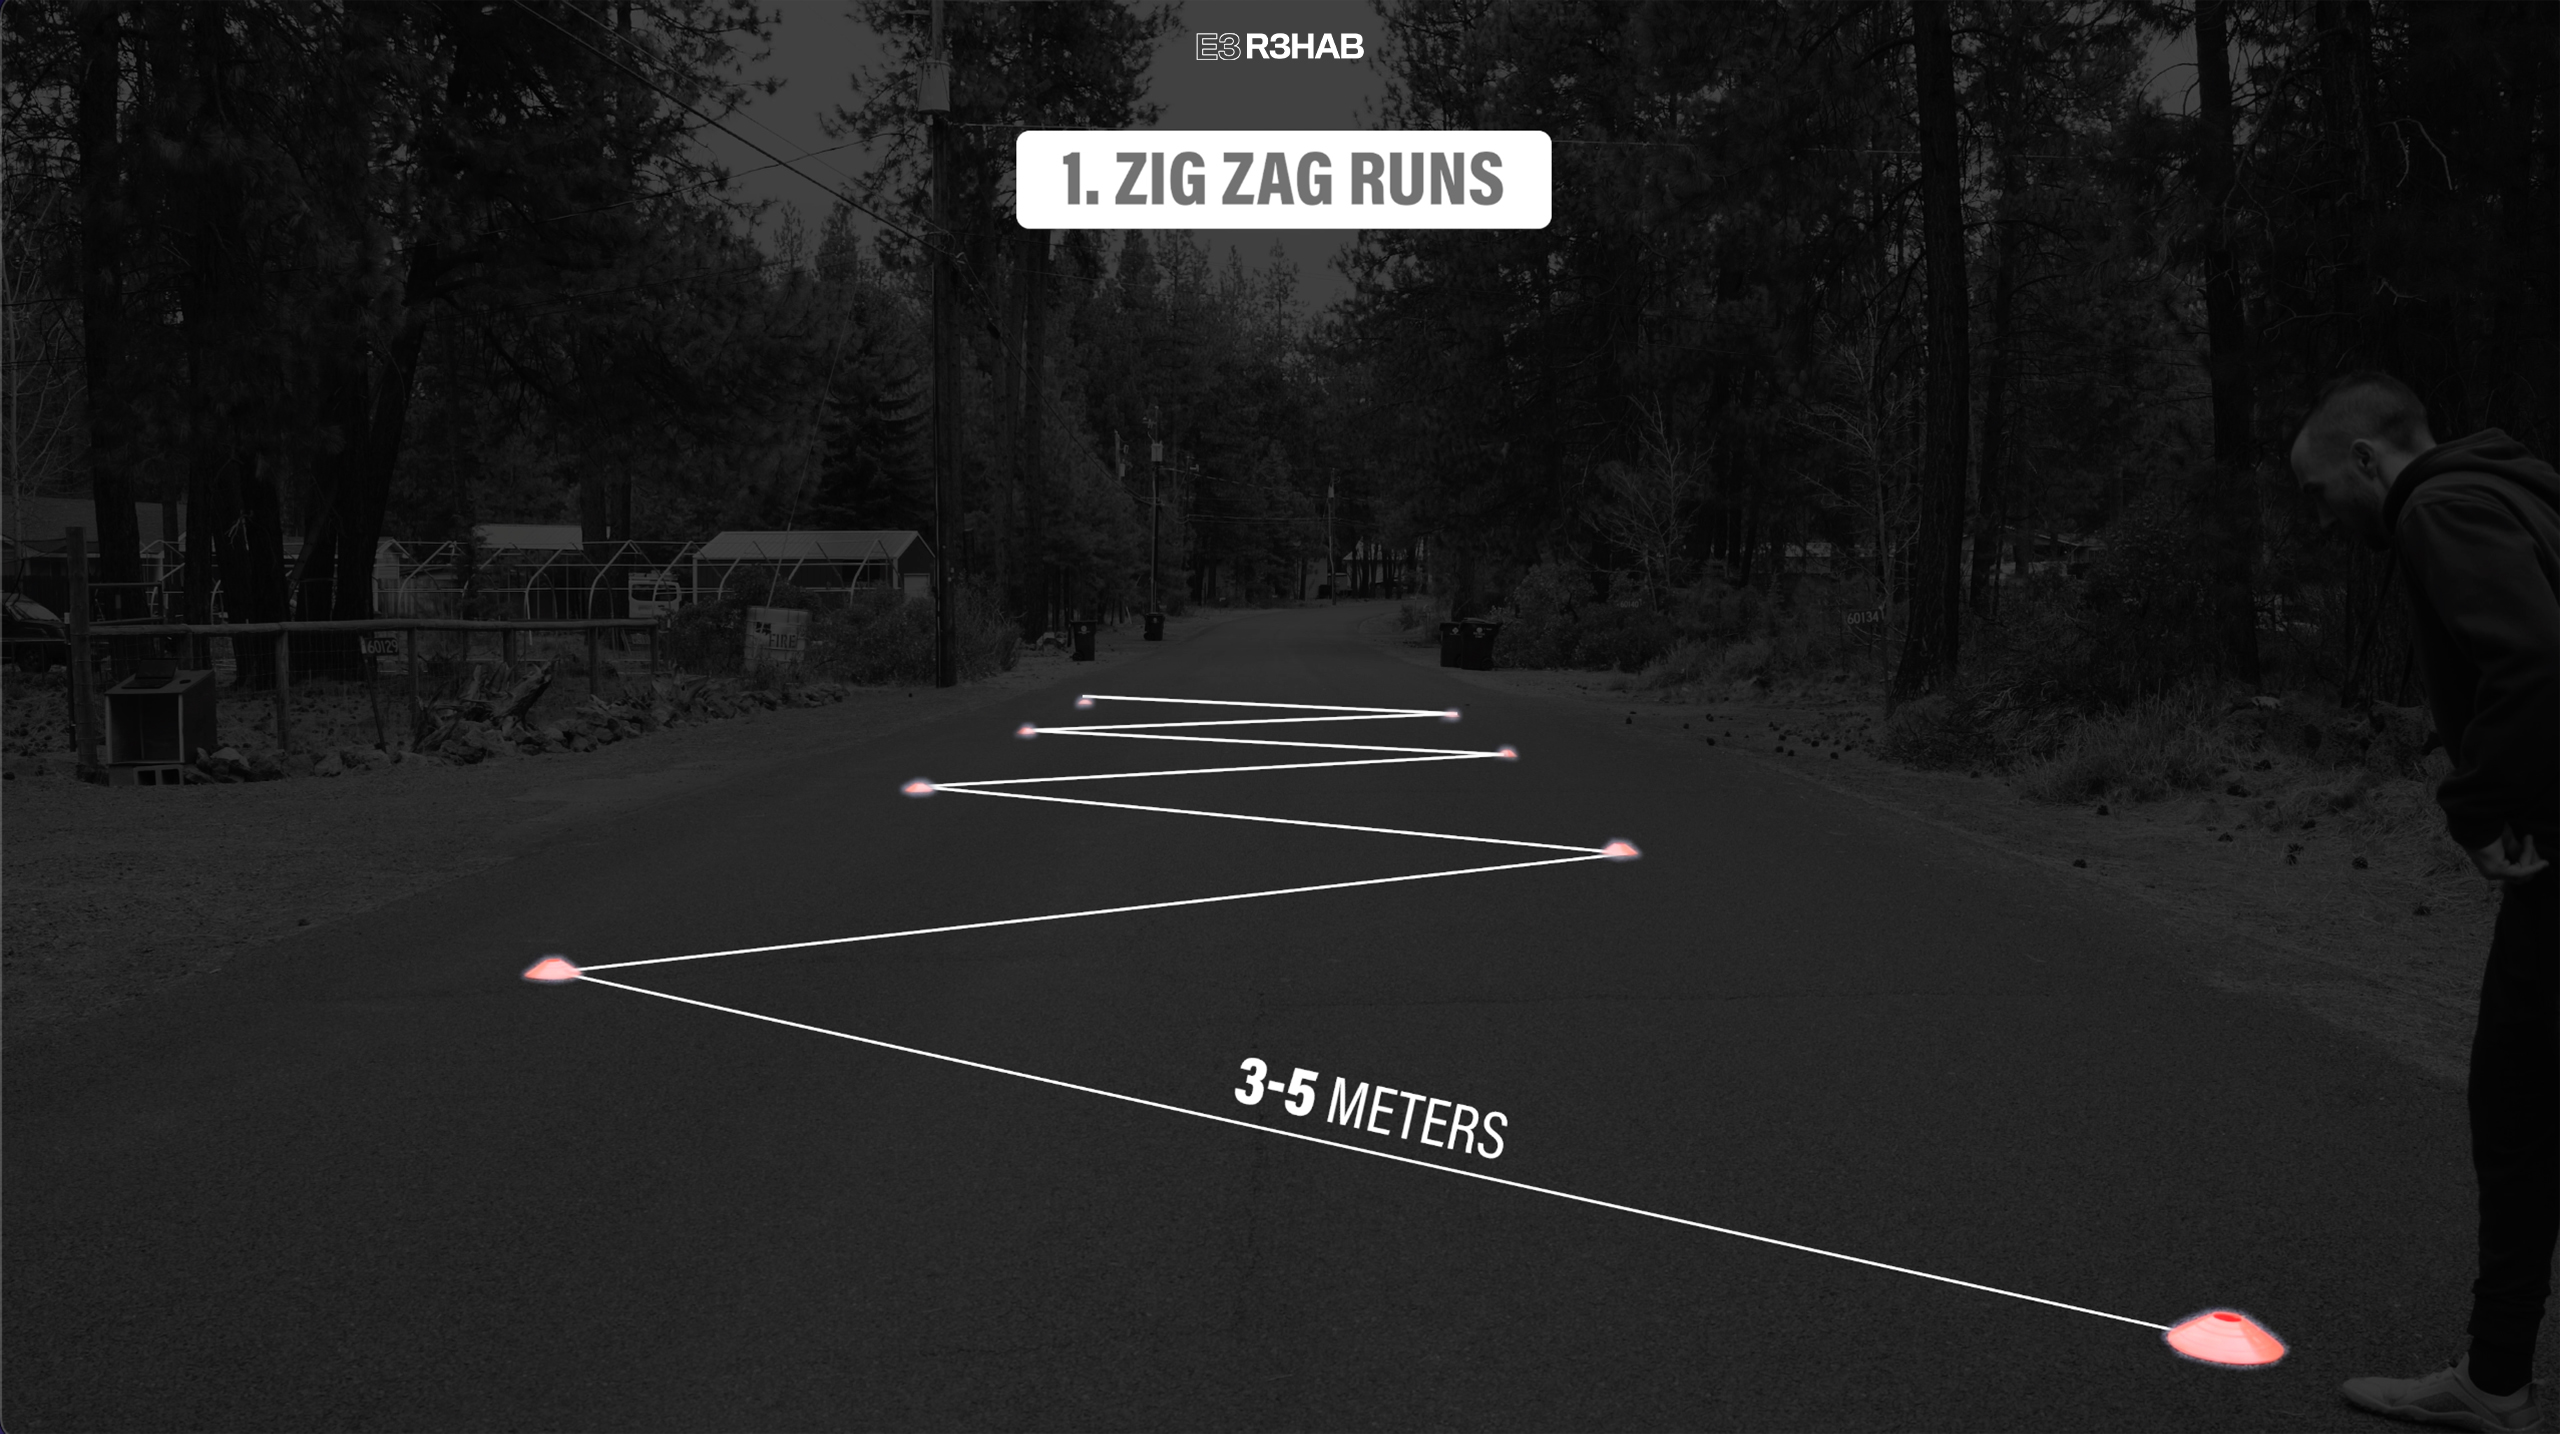
Option 1 – Zig Zag Runs.
Set up 8 cones staggered about 3-5 meters apart. Run to the first cone, then cut and change directions to the next one, repeating through all cones.
Progress toward max speed, as you work on performing multiple cuts at approximately 90°.
Option 2 – T Drill.
Set up cones in a T shape pattern as shown and then perform the following sequence: Sprint forward for 10 yards, shuffle to the left for 5 yards, then to the right for 10 yards, back to the left for 5 yards, and finally run backwards to the starting point. Rest, and then repeat, but start by shuffling to the right first.
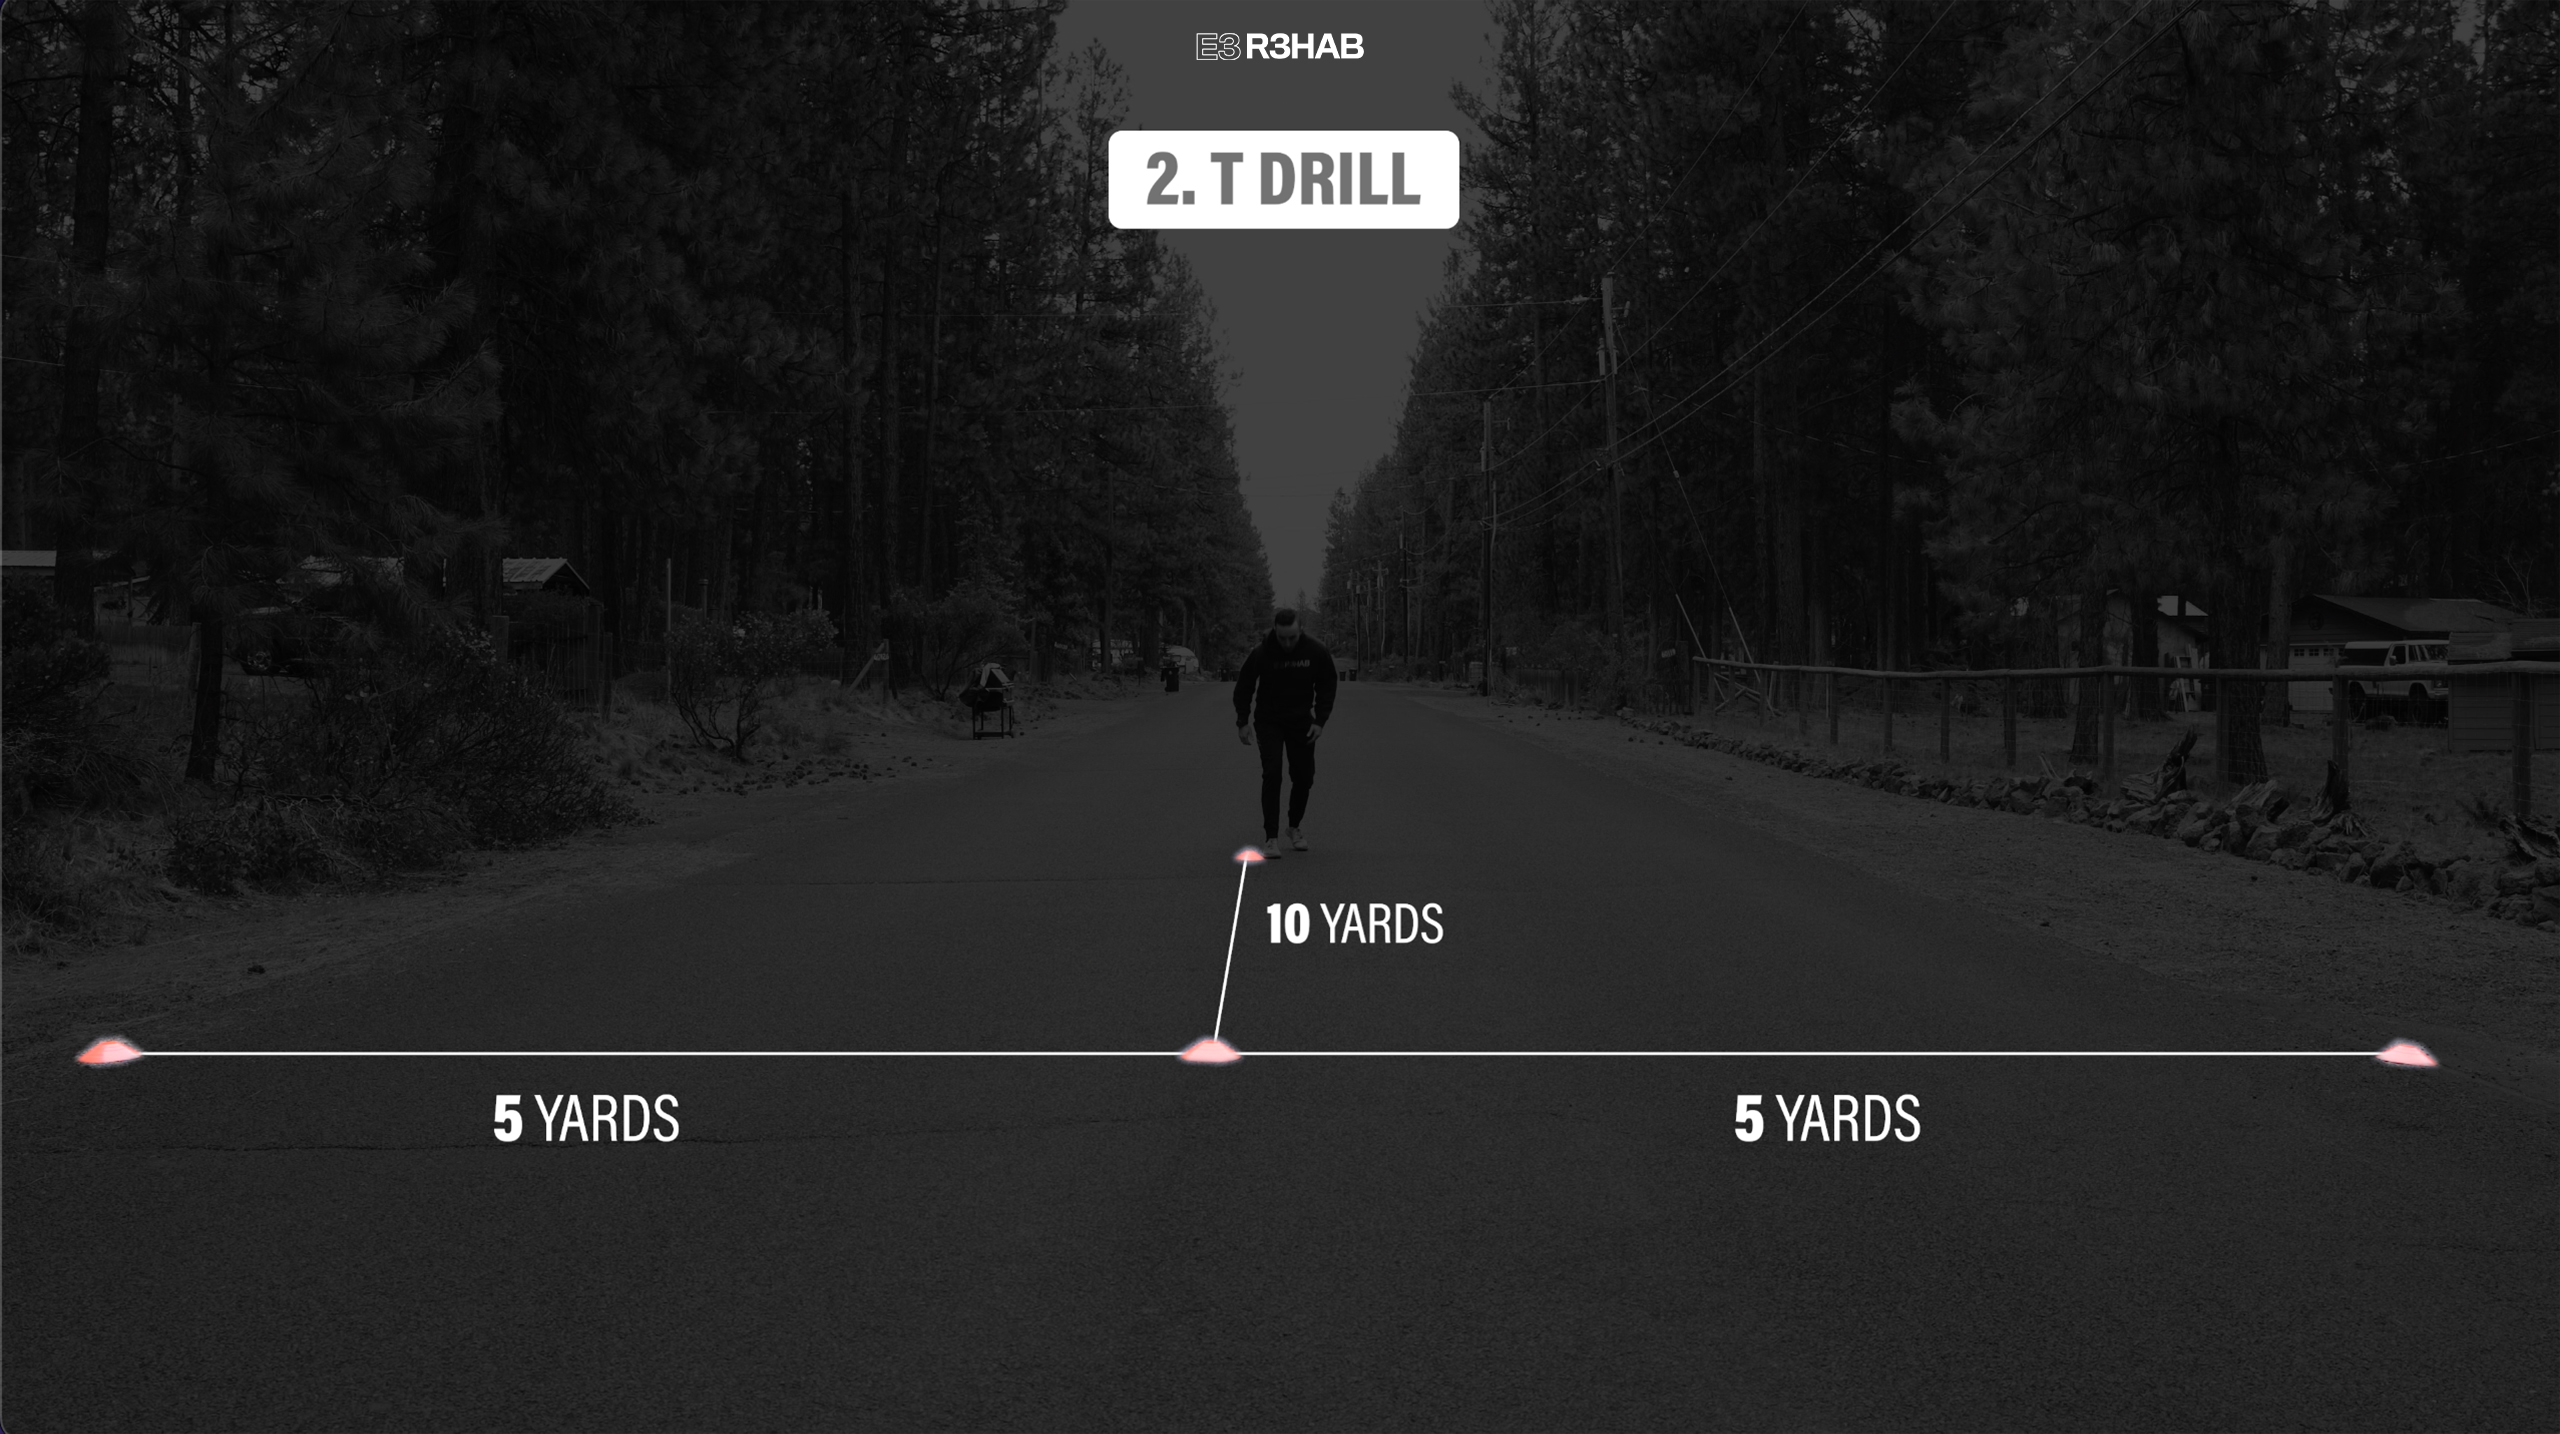
This is a pre-planned drill that will expose you to a change of direction forward, backward, and side to side. Start with slower speeds and then build up to 100% effort over time.
Option 3 – 5-0-5 Drill.
Run forward 15 meters, cut 180°, and run back 5 meters over the finish line. Repeat, but this time perform a 180° cut off your other leg.
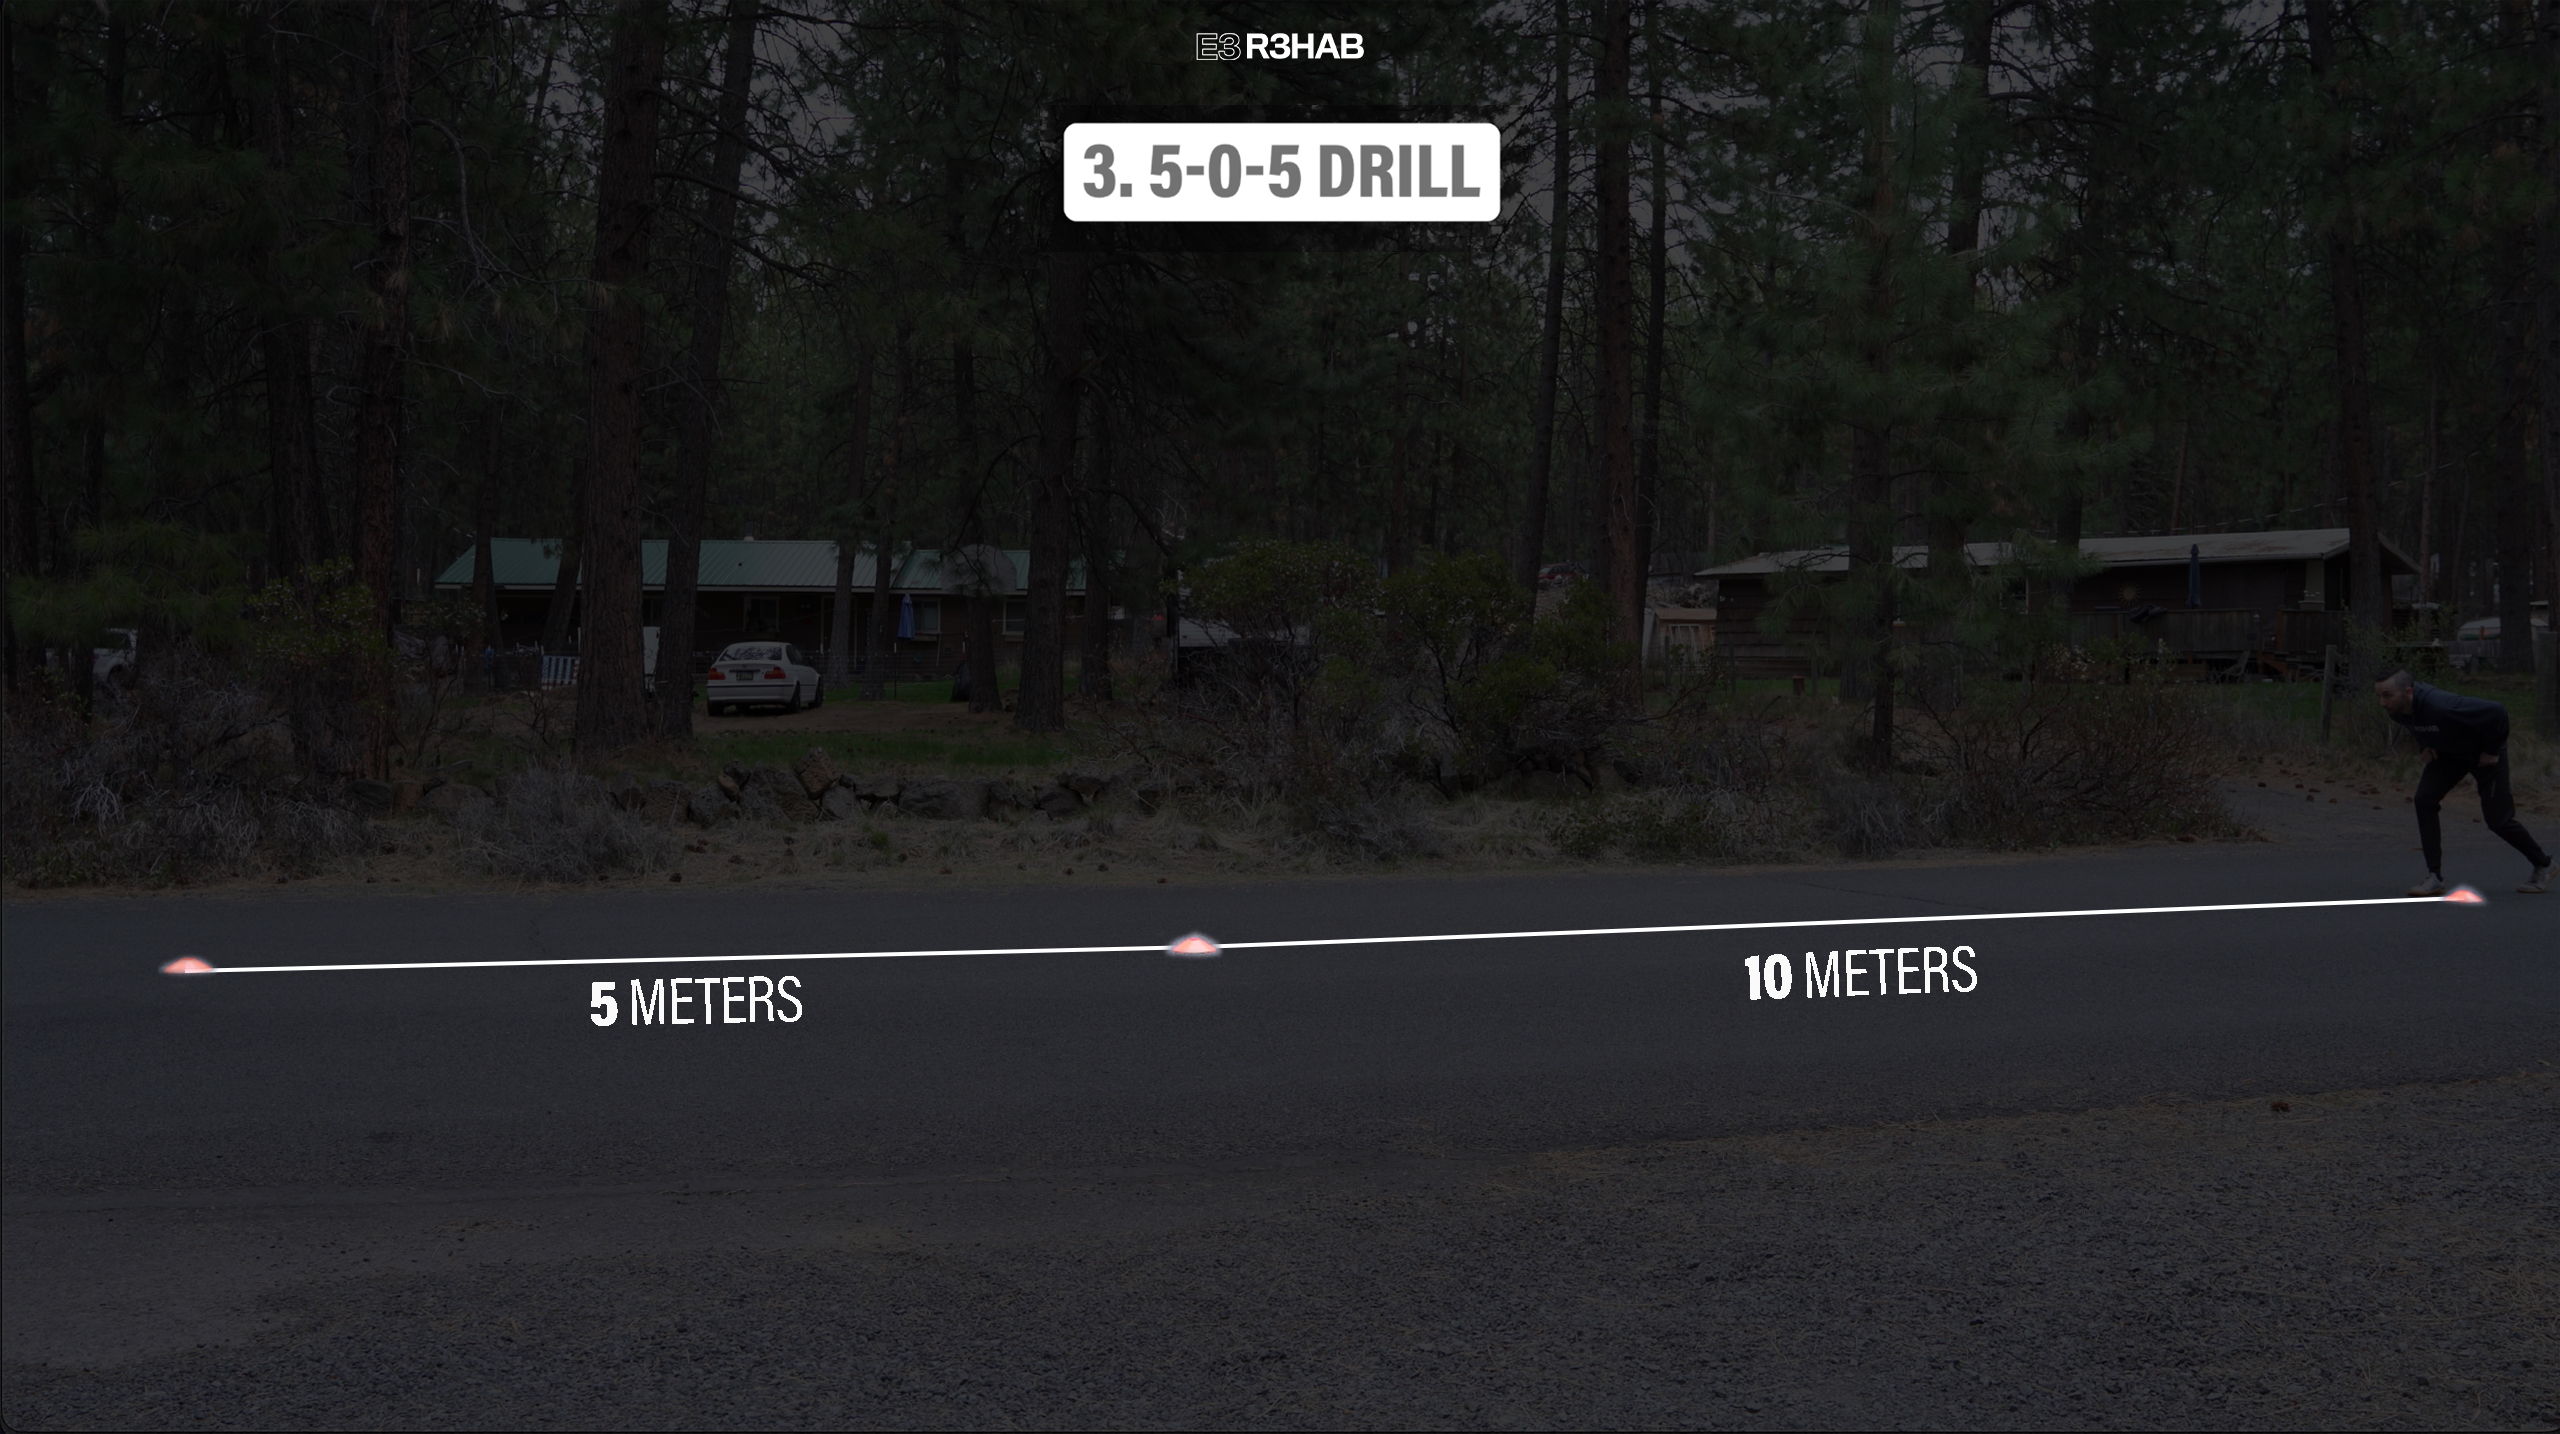
The goal of this drill is to improve your ability and confidence at performing a single 180° cut at gradually increasing speeds.
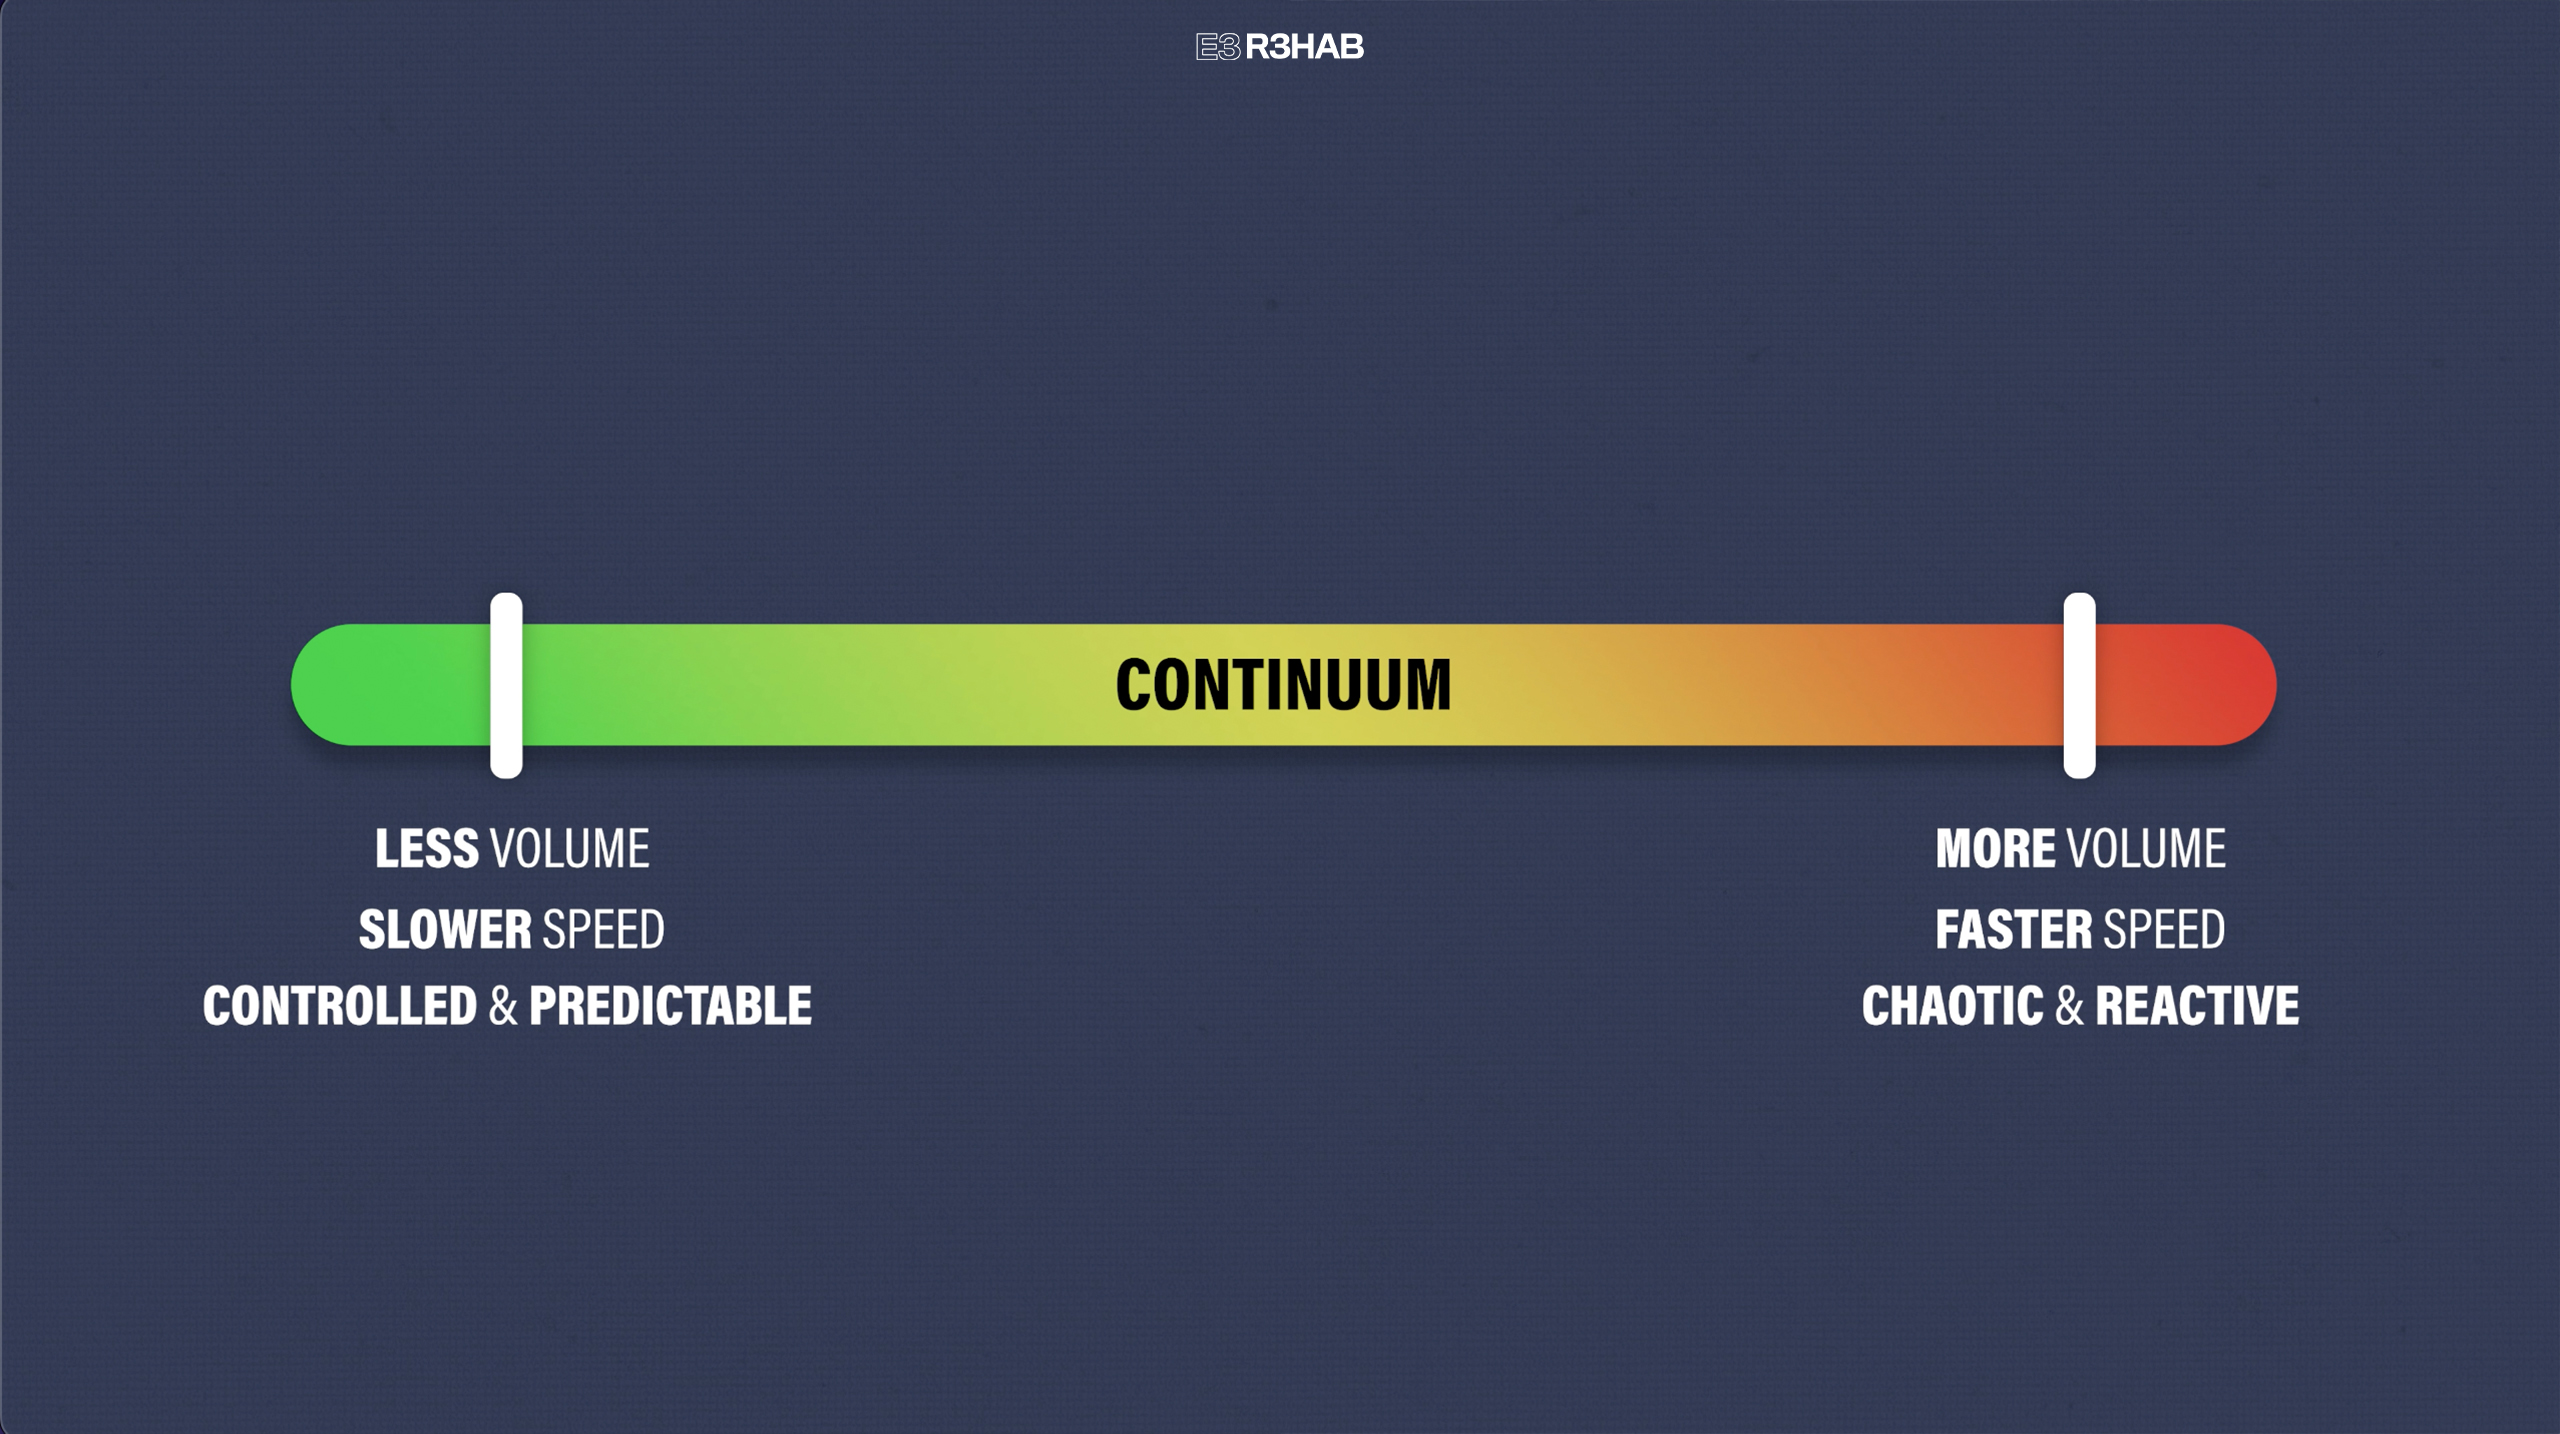
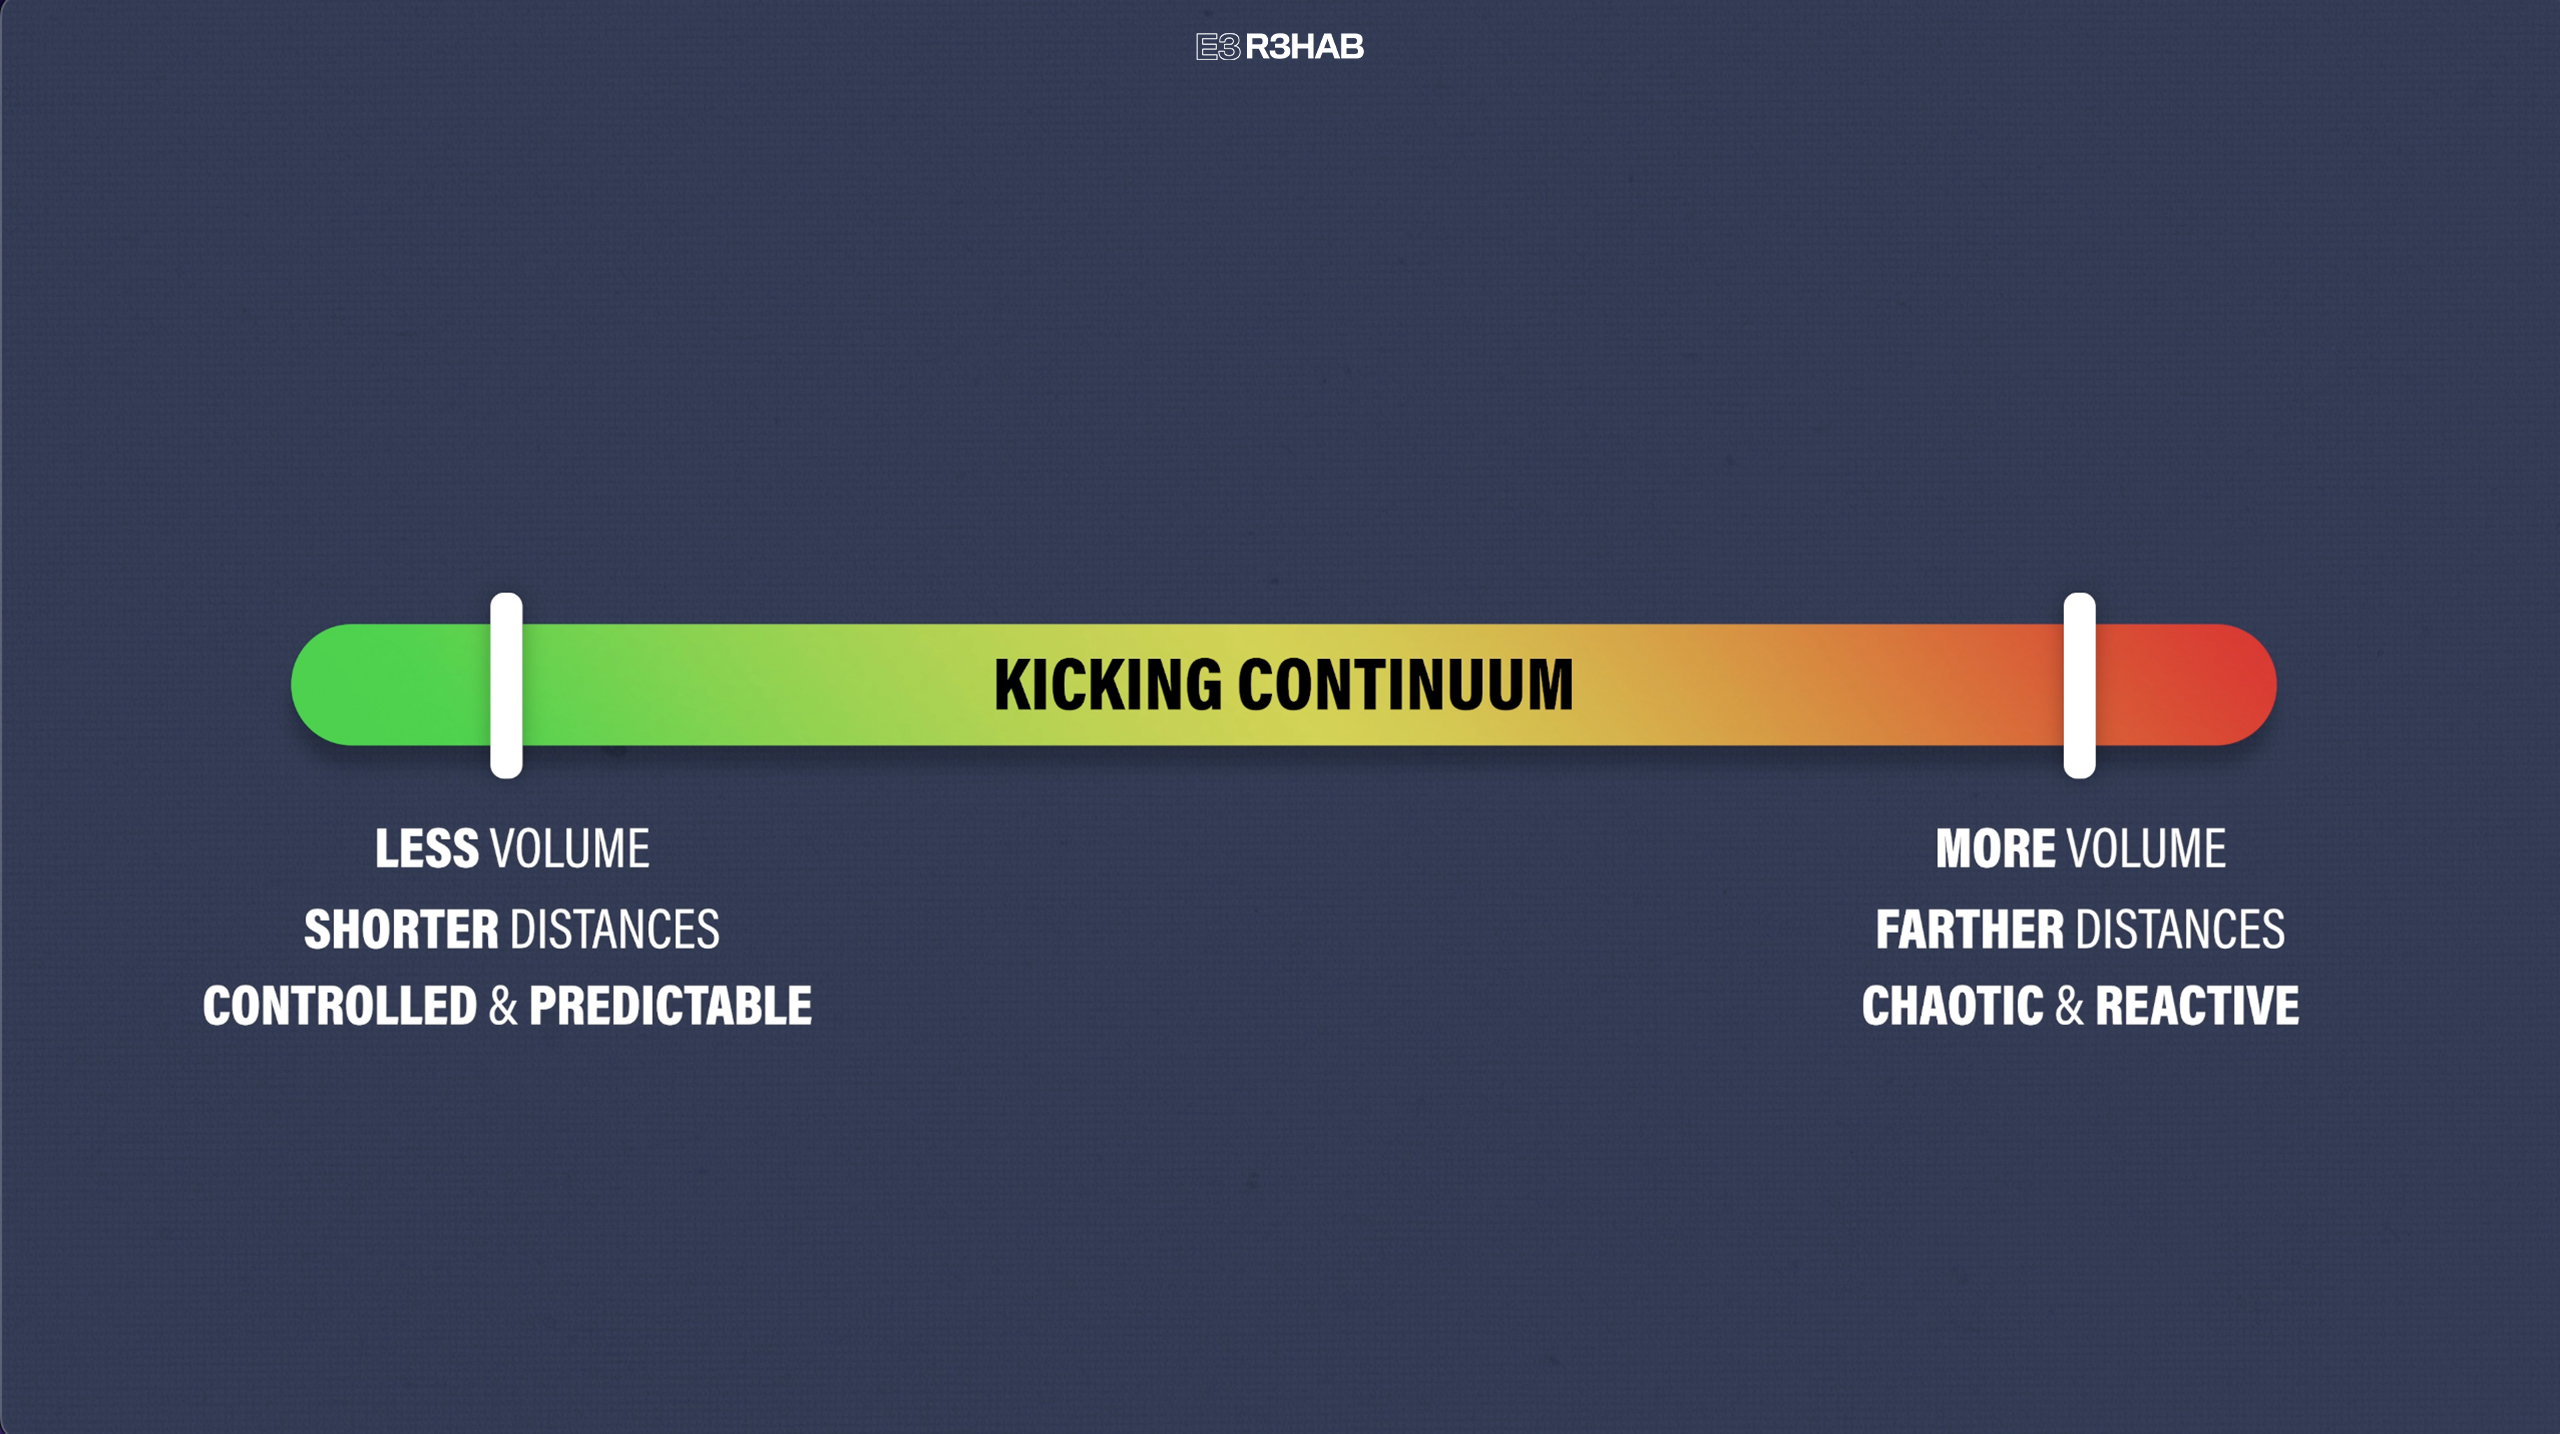
If it is easier, you can think of progressions in this category as following a continuum. You have less volume, slower speeds, and controlled and predictable movements on one end, and more volume, faster speeds, and highly chaotic and reactive sport-specific movements on the other.
Your timeline for progression and even what drills you include are highly dependent on your injury, surgery, sport, symptoms, etc.
As an example, if you are recovering from an ACL injury or a lateral ankle sprain and want to return to playing basketball, it is important you have no swelling, minimal to no pain, and are fully confident and psychologically ready before progressing to more complex exercises. You may also consider incorporating a ball into the more sport-specific movements.
Lastly, it is worth noting that if you are rehabbing a groin injury and want to return to a sport involving kicking, you must progressively increase your tolerance to this activity. Applying the same principles of the continuum, you would slowly build up the volume, intensity, and complexity of kicking movements as tolerated.
Do You Need To Perform All 3 Exercise Categories?
No, not necessarily. As I mentioned at the beginning of the article, your exercise selection will be determined by factors like your injury or surgery, sport, and symptoms.
For example, if you want to return to soccer after a hamstring strain, your primary emphasis should be on returning to high-speed linear running. In contrast, if you have a hip or knee injury and similar goals, in addition to including a sprinting progression, your rehab must also include plyometric exercises as well as change of direction drills.
You can ultimately perform any category regardless of your injury or surgery, but the ones just mentioned should be a priority. For instance, high-speed linear running is the most important category for hamstring injuries. However, you can still incorporate the plyometrics and change of direction exercises as a means of improving your overall athleticism, while trying to reduce the risk of other injuries.
Additionally, here are some other things you should keep in mind throughout the late stage of rehab:
1. When you are cleared to start these exercises will vary based on your injury or surgery, symptoms, function, and so on. If you are uncertain if these exercises are appropriate for you, talk to your doctor or physical therapist first.
2. Monitor your response to activity. For example, you should have no swelling and minimal to no pain when performing and progressing these movements.
3. You should also be including aerobic exercises, such as biking, swimming, or jogging in order to ensure your cardiovascular conditioning is adequate prior to returning to sport.
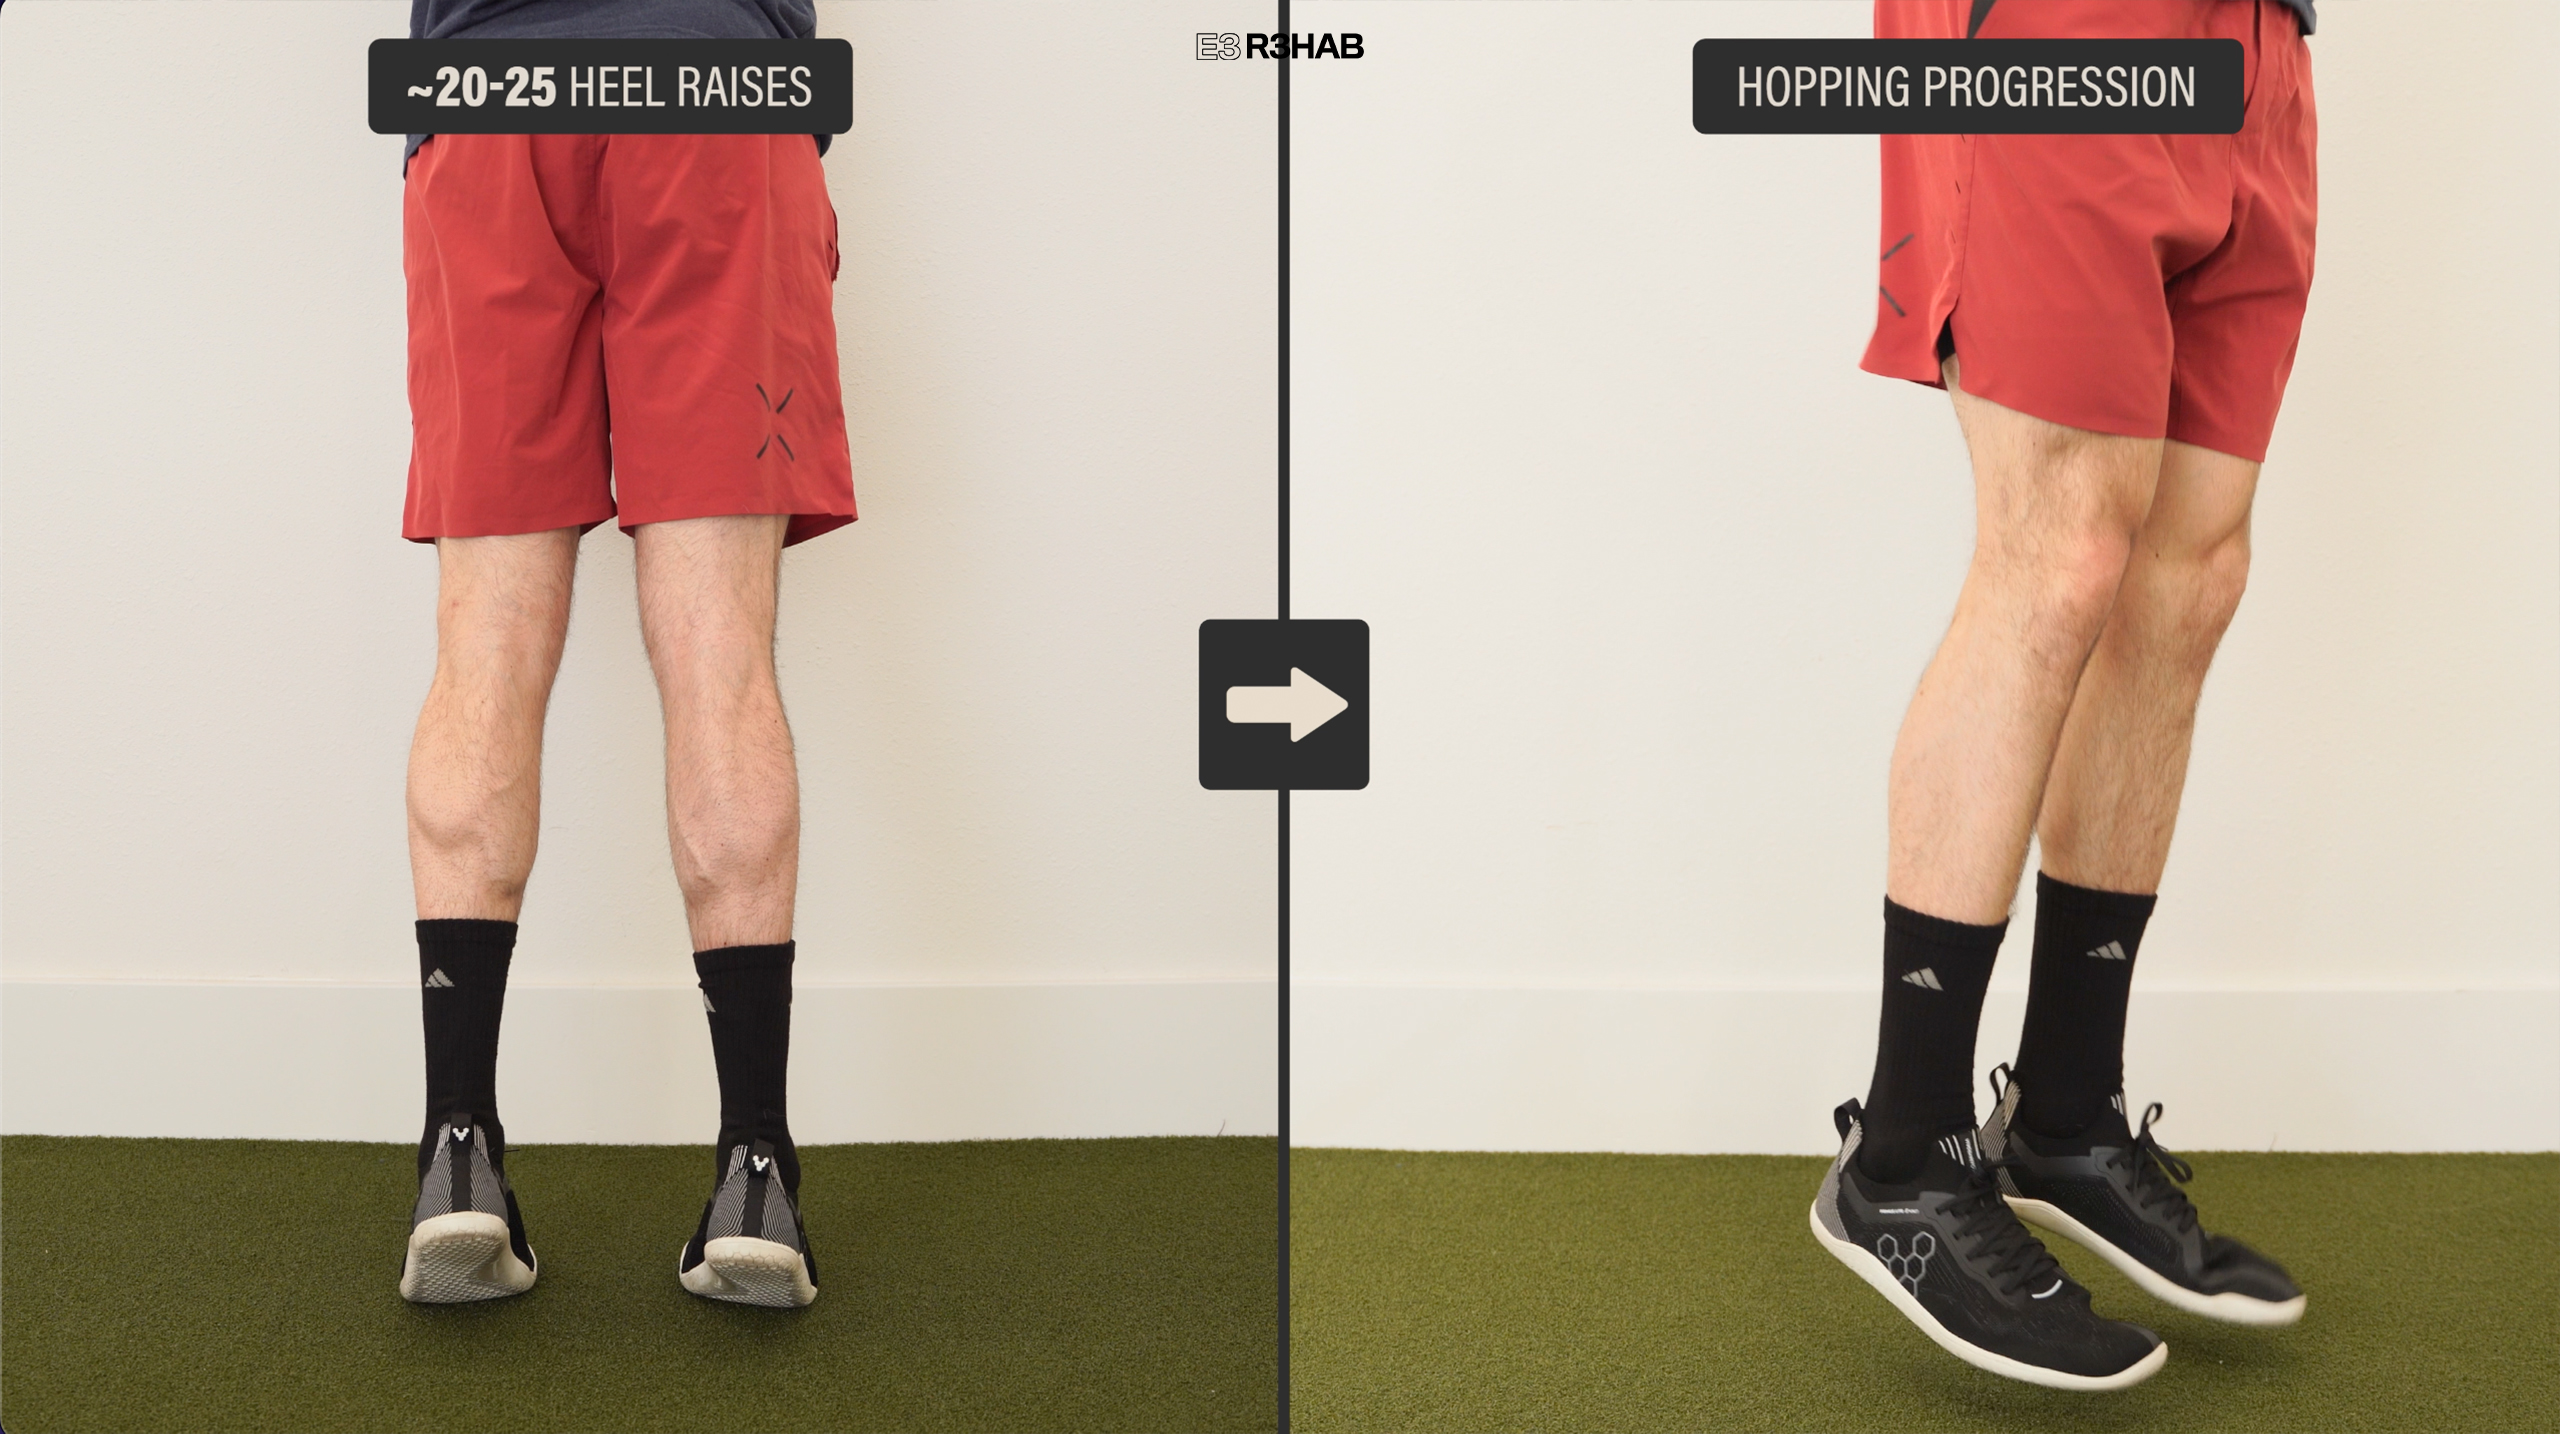
4. Remember, there is overlap with the mid-stage of rehab, so you will perform other movements simultaneously, such as resistance exercises. In fact, these are often essential for building the necessary prerequisites prior to starting the late-stage. To give you an idea, you should be able to perform about 20-25 double-leg heel raises without pain prior to starting the hopping progression.
5. There will be significant variations in programming due to the many possible lower body injuries and surgeries and the unique goals of each individual. As an example, if you are a pro athlete, you might choose to incorporate 2-a-days into your training. Alternatively, if you are a recreational athlete, you may find training 3 times a week to be sufficient. Play around with your weekly calendar based on your schedule, goals, and symptoms to find what works best for you.
When Can You Play Your Sport Again?
While the late stage of rehab will help prepare you for your desired activity, it is important to understand that you are not in the late stage one day, and playing your sport at a preinjury level the next. Return to sport follows a continuum that overlaps with the stages of rehabilitation and is made up of 3 elements.
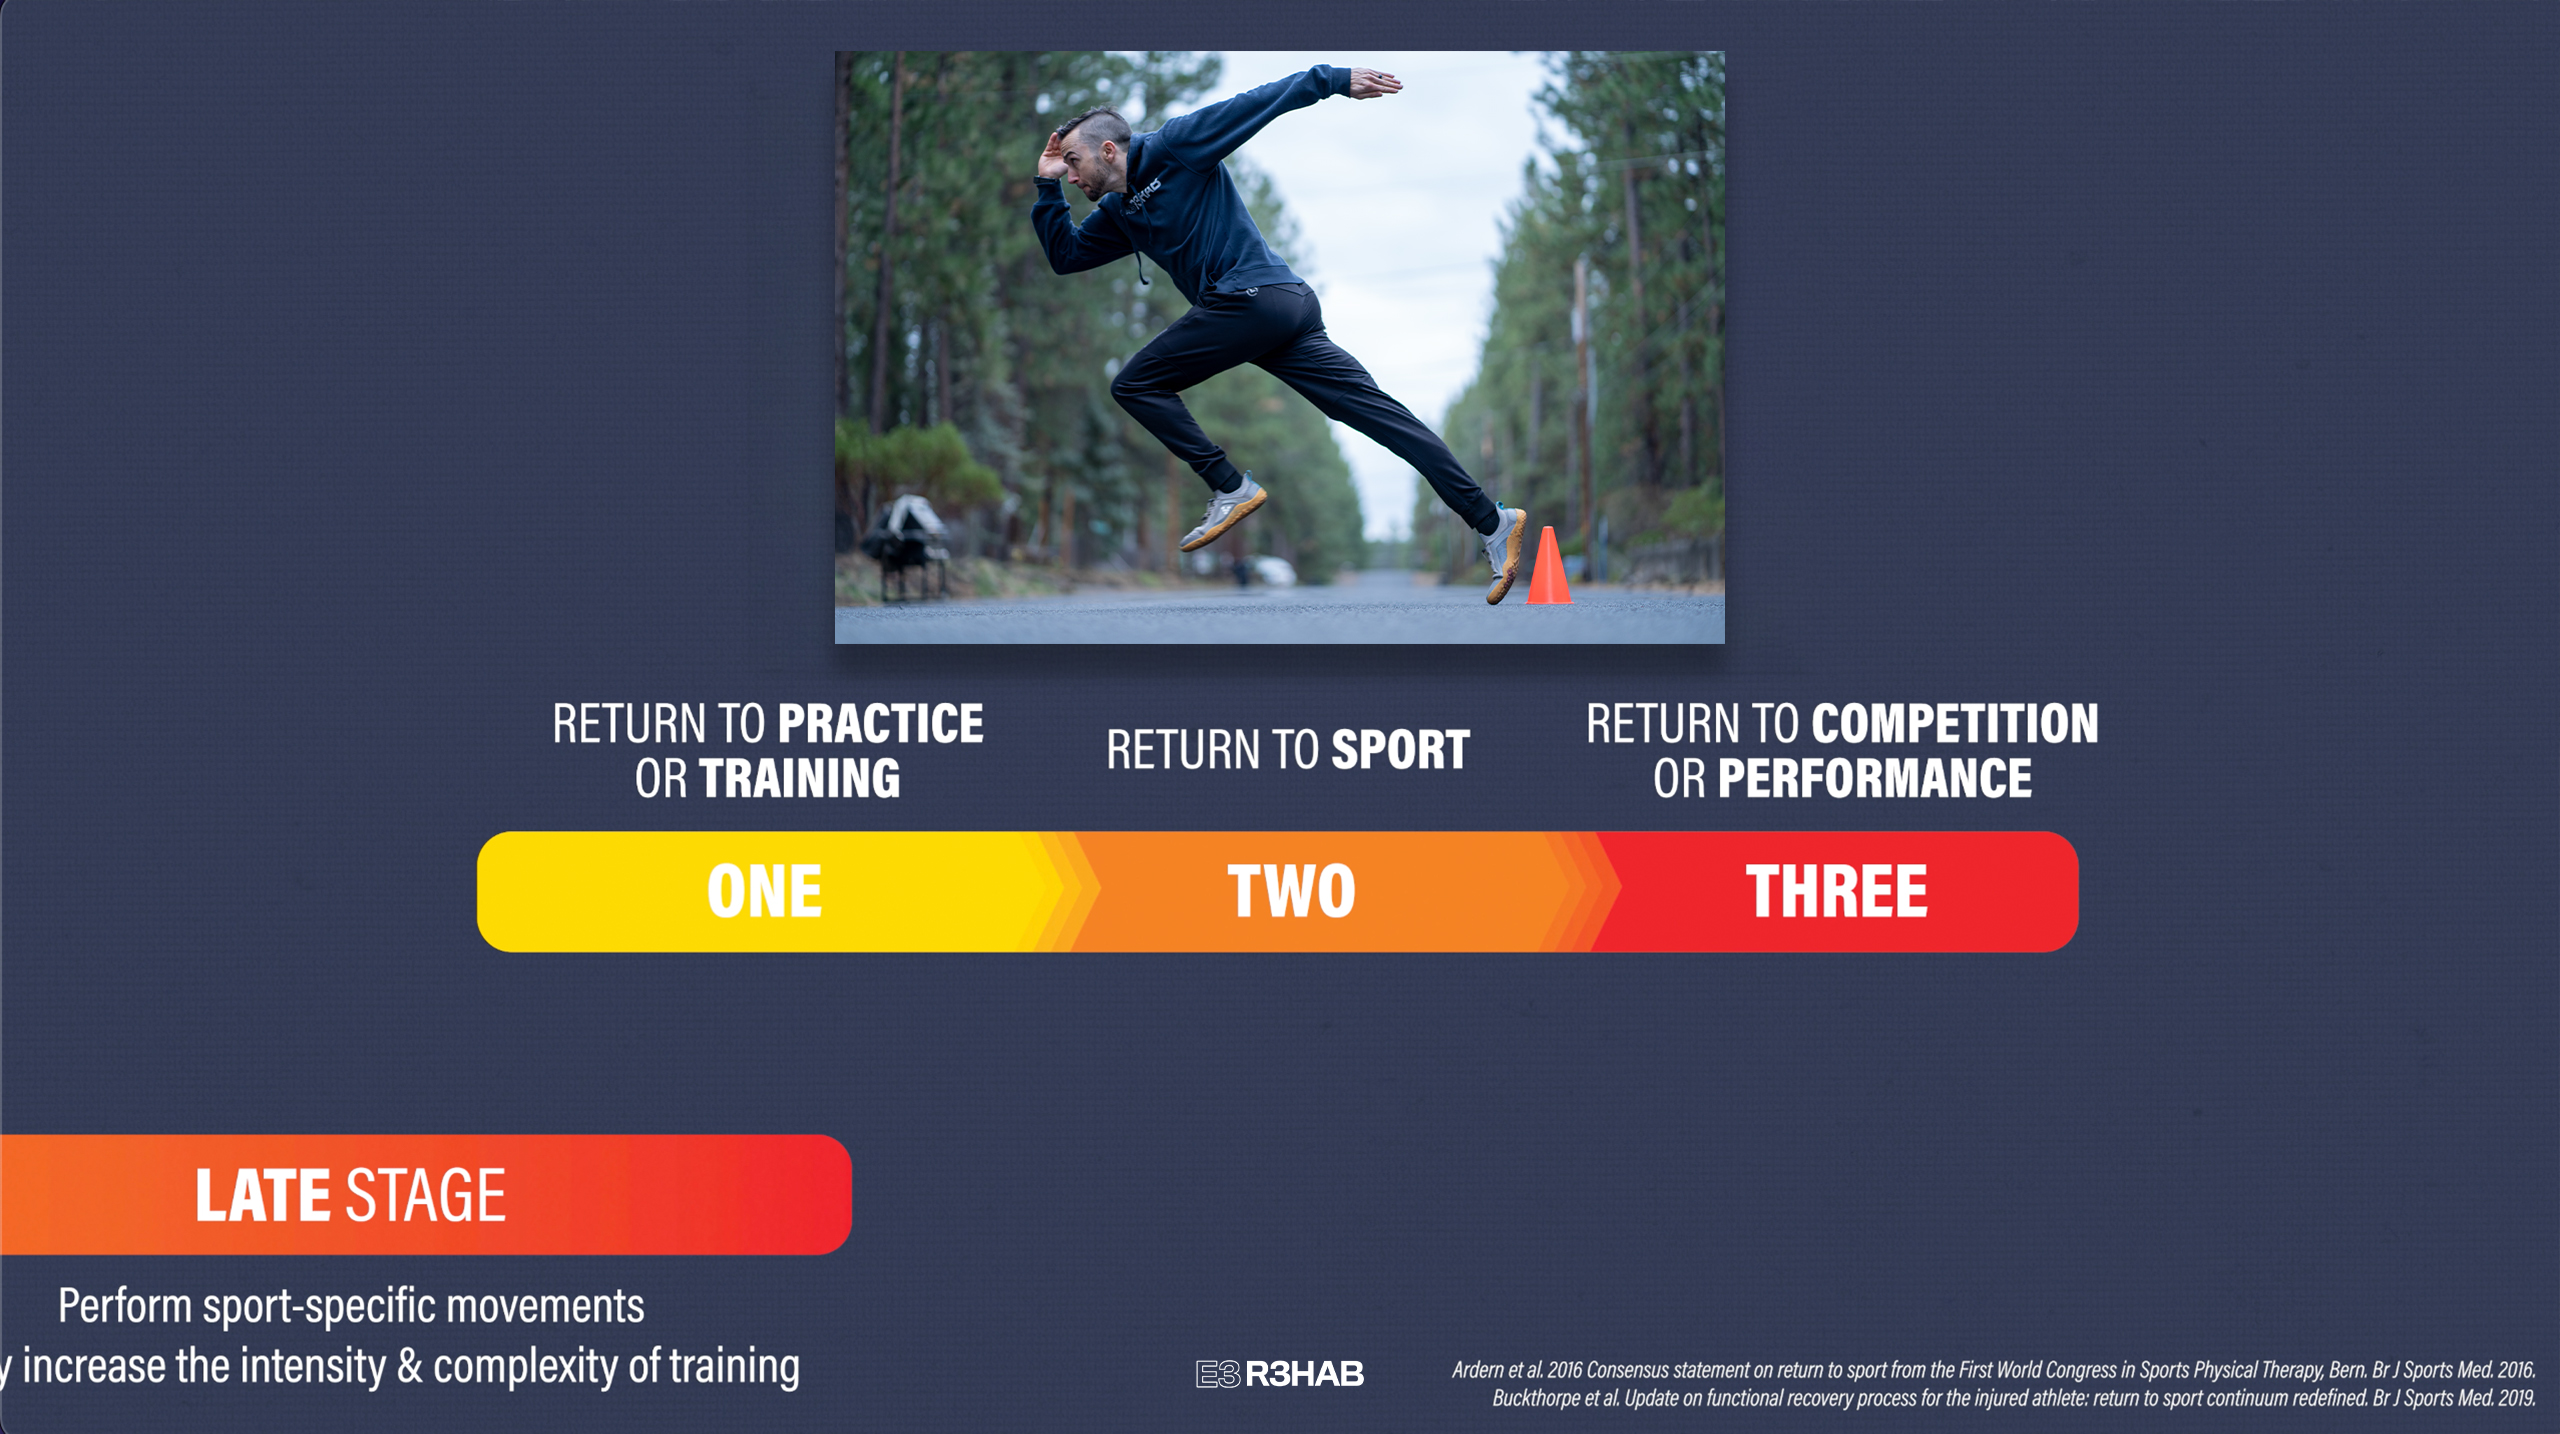
1. Return to Practice or Training. Here, you slowly return back to modified or full training sessions but are “not yet ready medically, physically, and/or psychologically to return to sport.” You also should still be performing your rehab program.
2. Return to Sport. You are fully participating in your defined sport, but you are not yet at your desired level. For example, you may play with restricted minutes or have yet to meet your performance goals.
3. Return to Competition or Performance. You are able to play without restriction and are finally performing at or above your preinjury level.
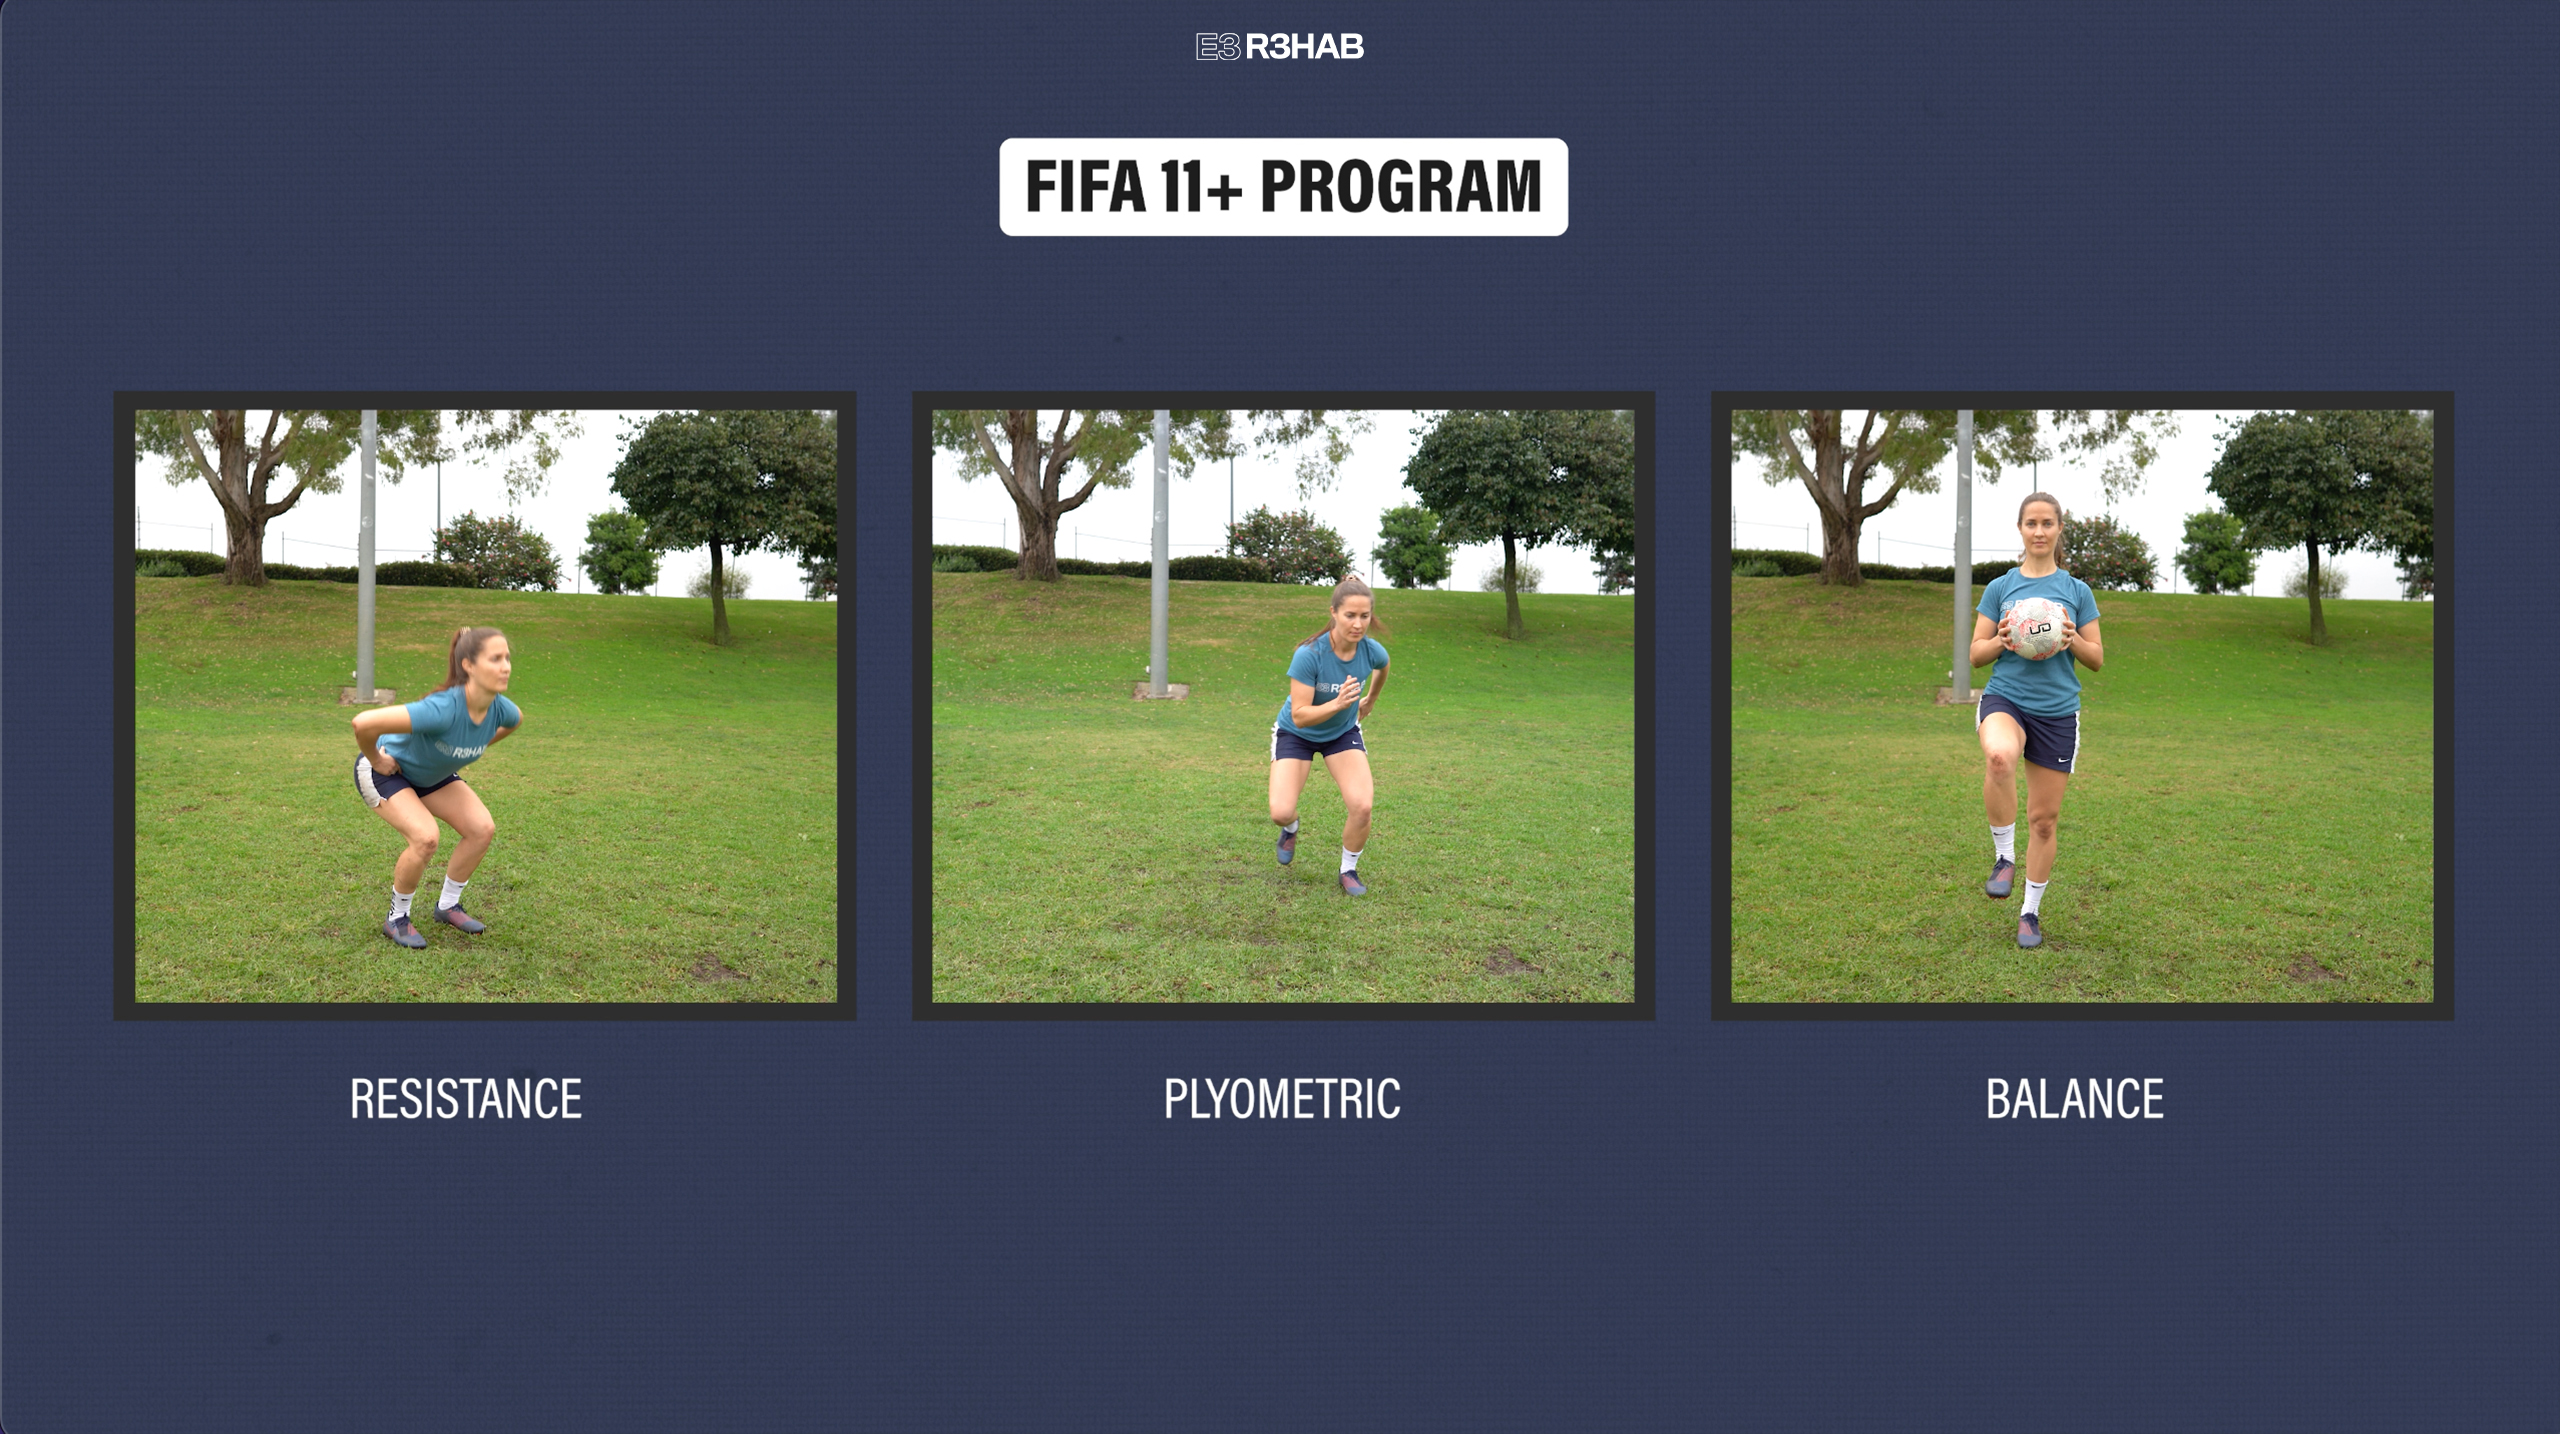
Also, just because you have returned to your sport, doesn’t mean you abruptly stop all other exercises. For example, Brinlee et al. in 2021 recommend that after your return to sport following an ACL reconstruction, you perform a secondary prevention program 2 times per week. Such a program is the FIFA 11+ which includes running drills, and resistance, plyometric, and balance exercises.
The specific criteria to determine when you are appropriate to return to your sport will depend on a number of factors such as your injury or surgery, what sport you play, and accompanying symptoms.
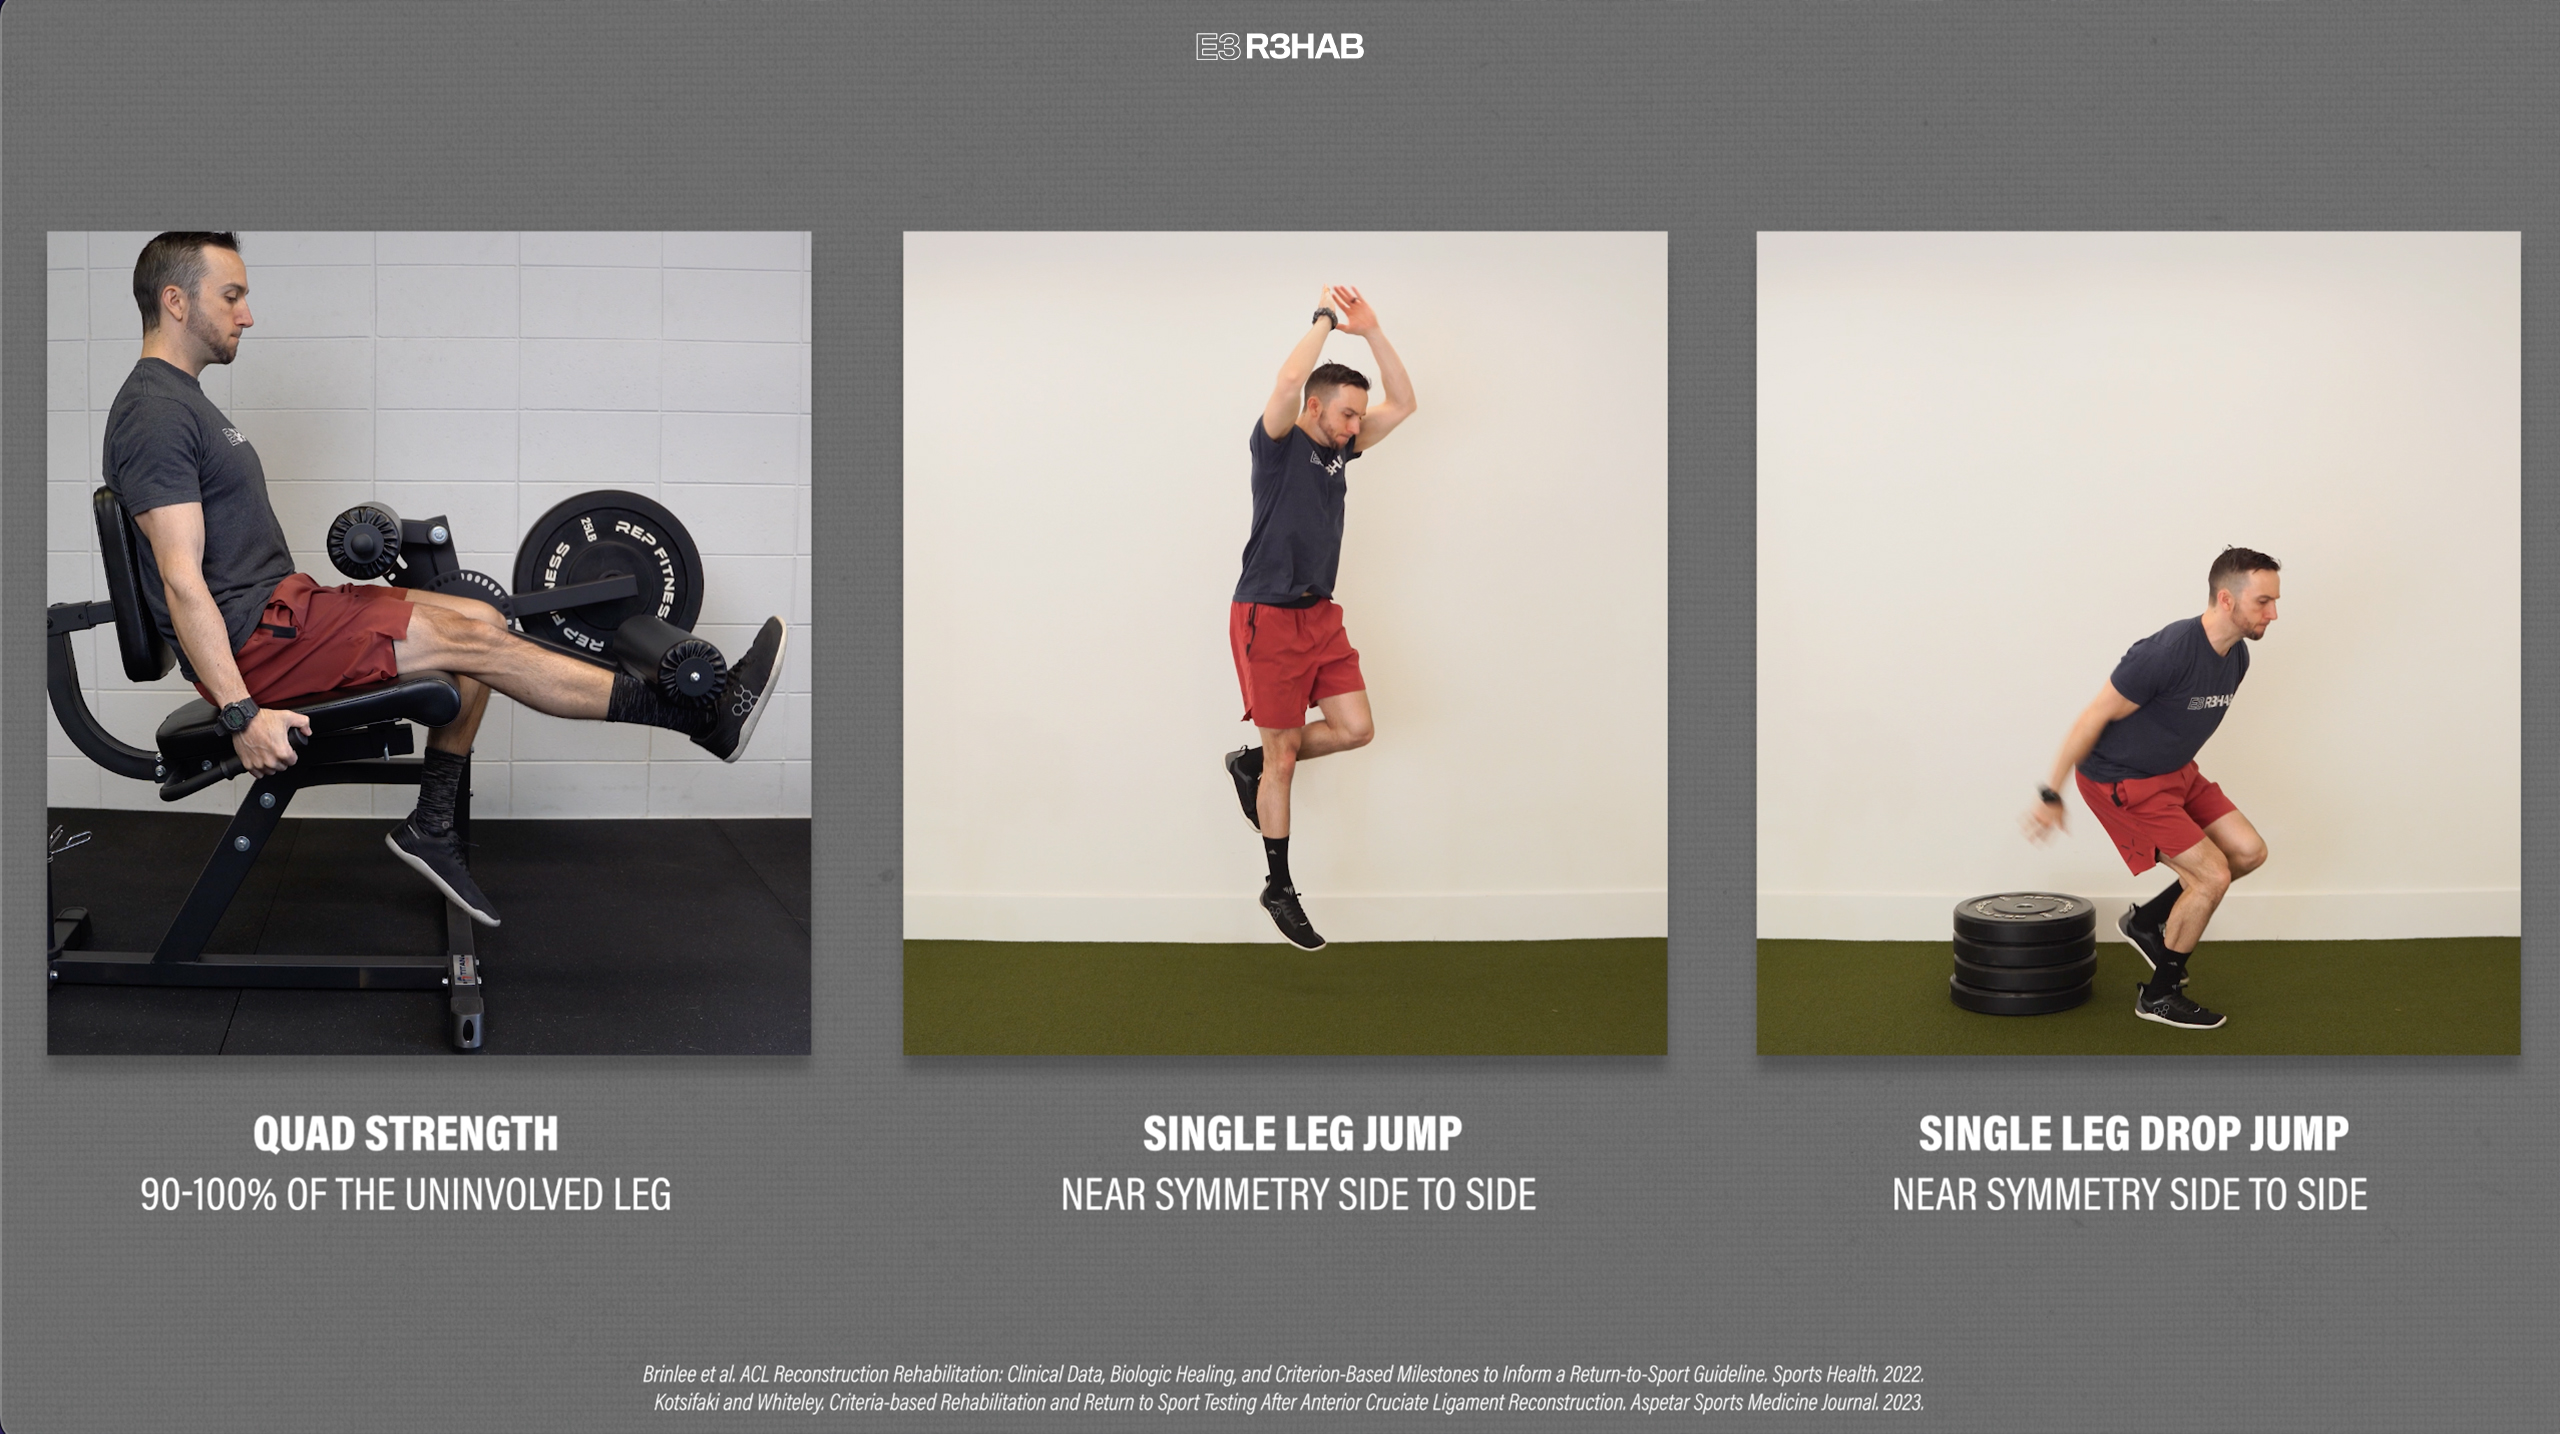
For instance, if you have a hamstring strain, being able to sprint at 100% effort without pain or apprehension will be one of the main criteria you must meet prior to returning to your sport. On the other hand, if you want to play soccer after an ACL reconstruction, you first must pass a battery of tests. A couple of examples include possessing quad strength that’s 90-100% of the uninvolved leg and demonstrating near symmetry in a single-leg jump and a single-leg drop jump.
Again, I cannot tell you exactly what criteria you need to meet prior to returning to your sport, but generally, there are 5 main categories that are taken into consideration:
1. Clinical. Do you have no pain, swelling, or instability?
2. Functional. How is your range of motion, strength, and power?
3. Biomechanical. Can you demonstrate good movement quality without compensation?
4. Psychological. Are you confident during full-effort movements?
5. Sport-specific. Have you built up the adequate volume & intensity of your training?
Hopefully, by this point, you understand that the late stage of rehab and the return to sport process is complex and multifaceted, therefore it is very challenging to provide explicit parameters and guidelines that cover all possible scenarios. If you need more guidance on your specific needs, you should have a discussion with your physical therapist, surgeon, or another healthcare professional.
Late Stage Rehab Summary
In summary, there are 3 categories of exercises that can be used during the late stage of rehab following a lower-body injury or surgery:
- Landing, Jumping, and Plyometrics
- High-Speed Linear Running
- Change of Direction
Performing these sport-specific movements and gradually increasing the intensity and complexity of your training will be critical prior to returning to your sport.
Looking for rehab or performance programs? Check out our store here!
Want to learn more? Check out some of our other similar blogs:
ACL Rehab, Meniscus Tear Rehab, Hamstring Strain Rehab, Achilles Tendinopathy, Calf Strain Rehab
Thanks for reading. Check out the video and please leave any questions or comments below.