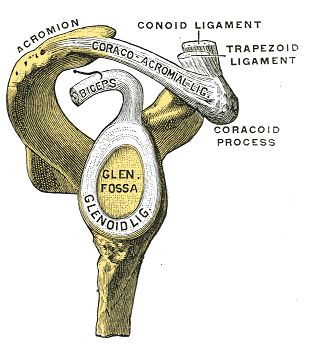
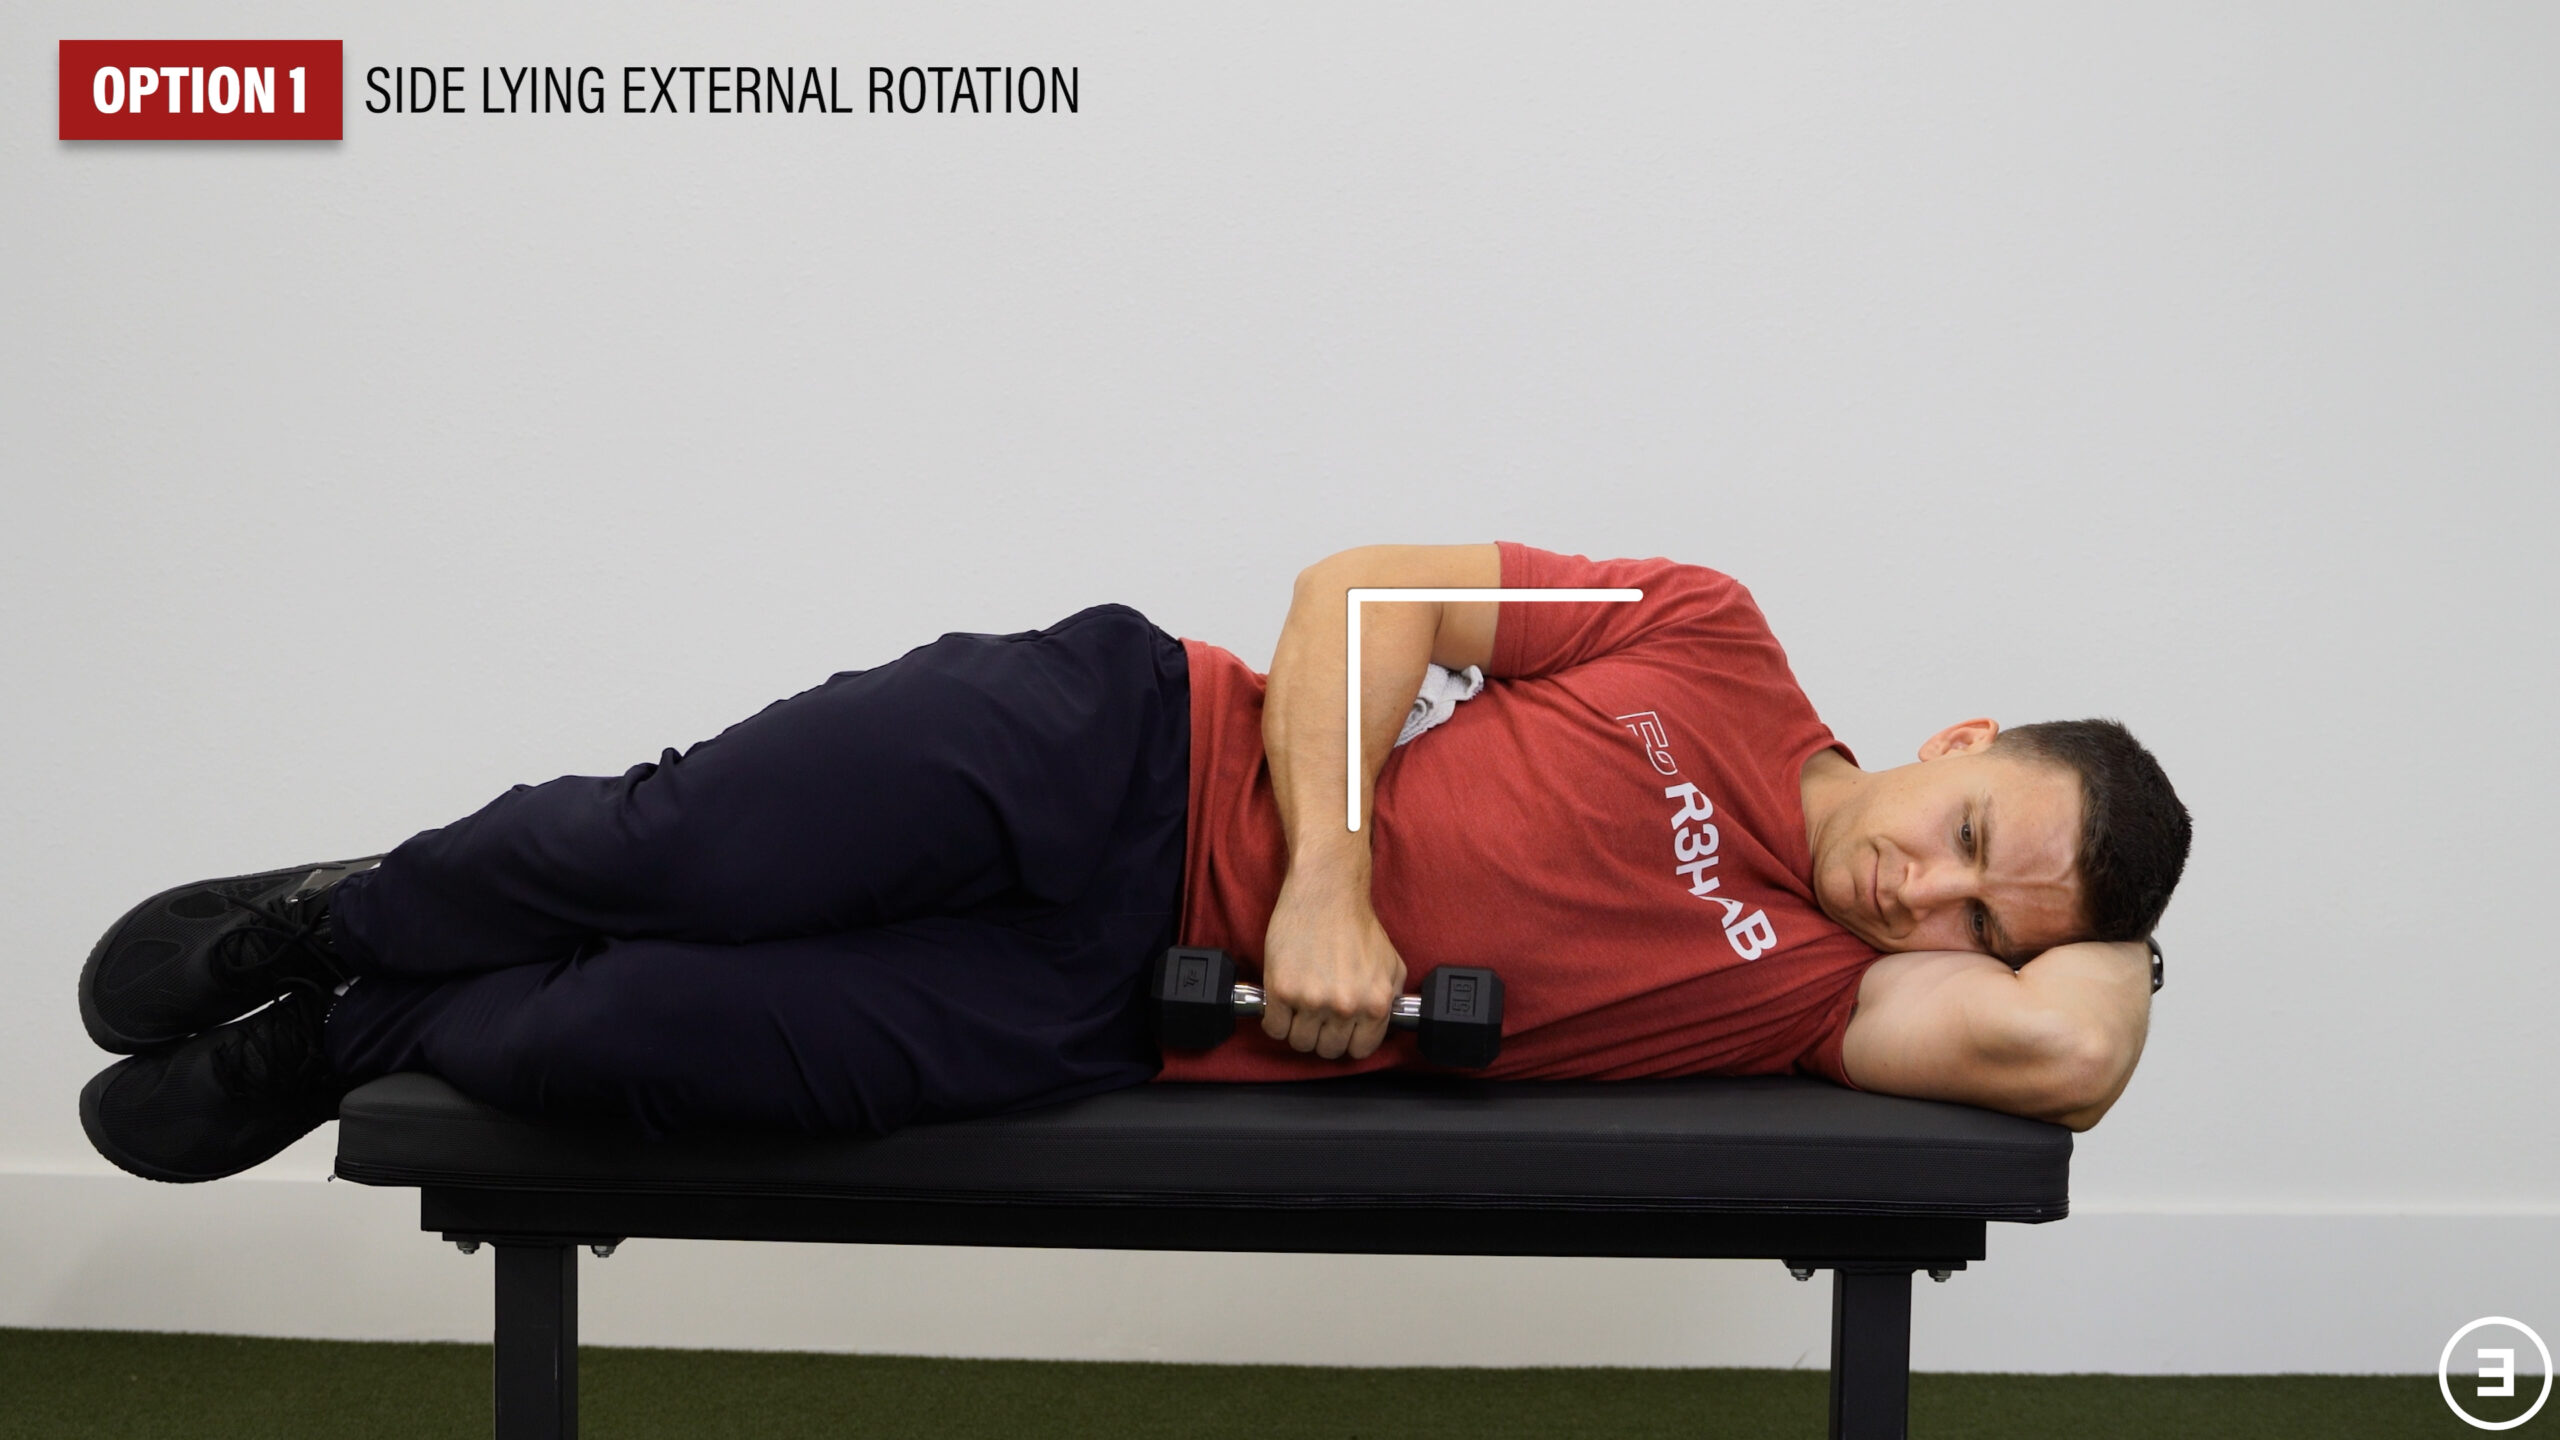
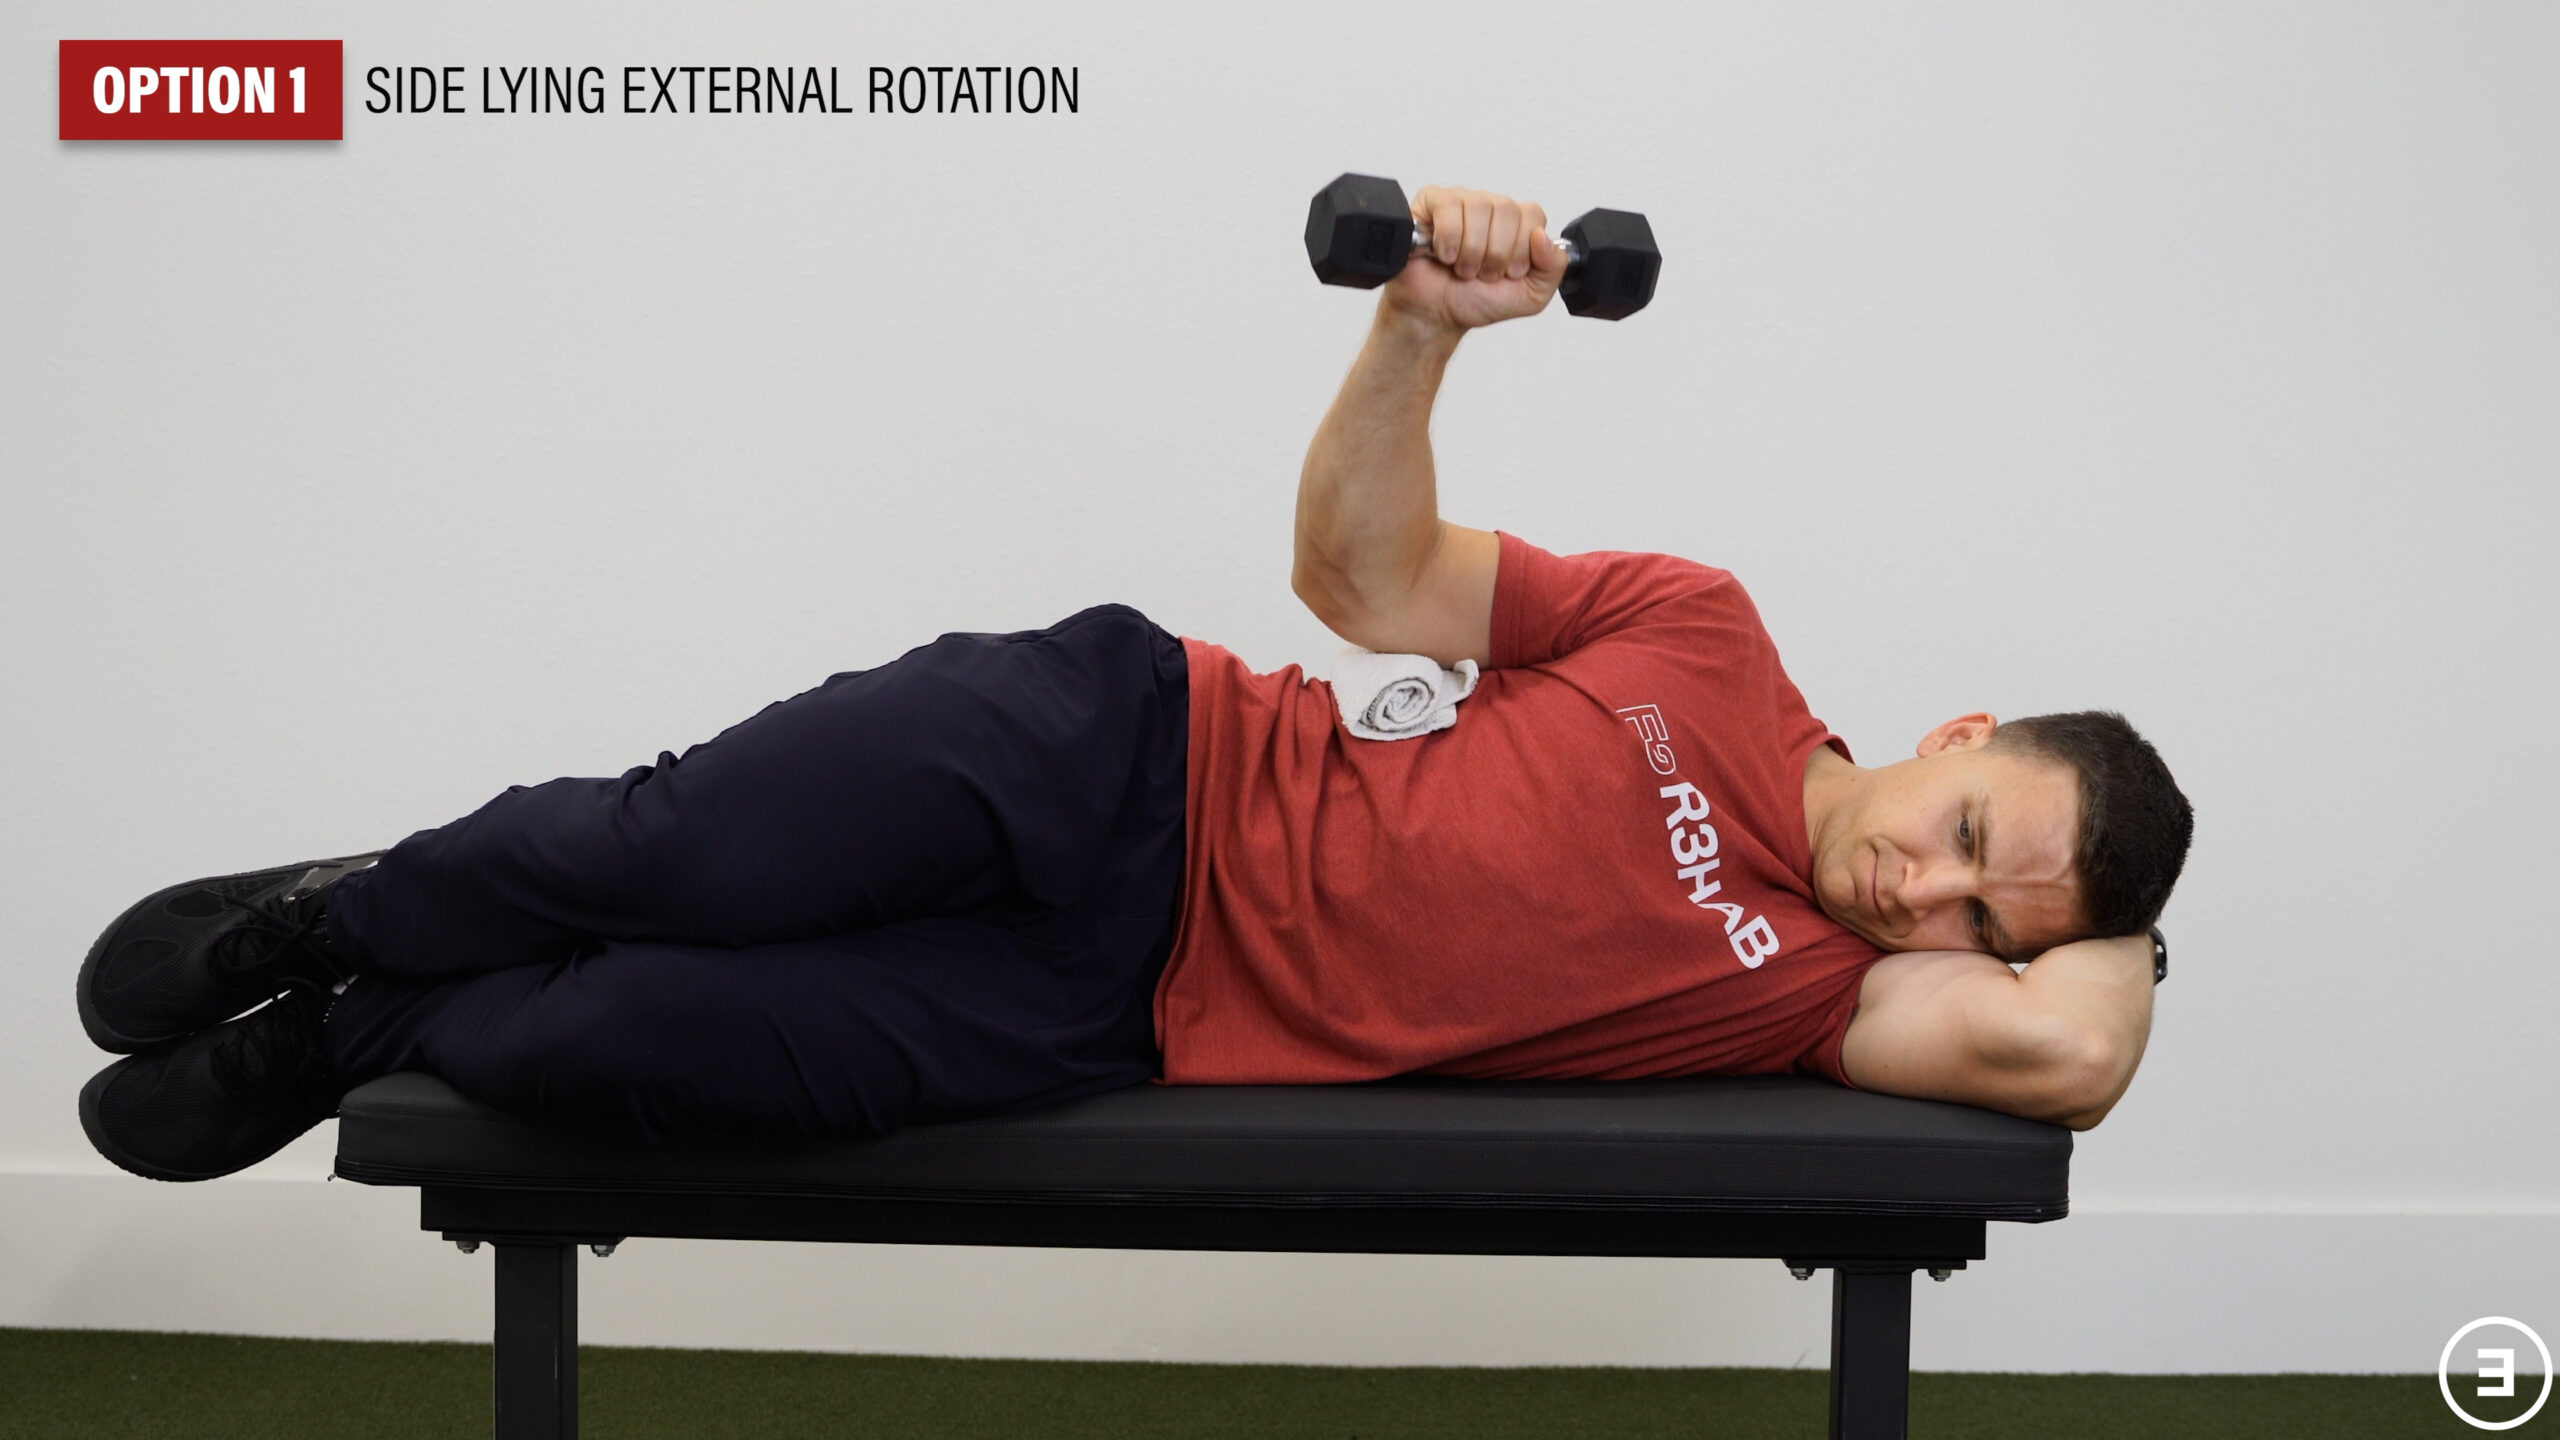
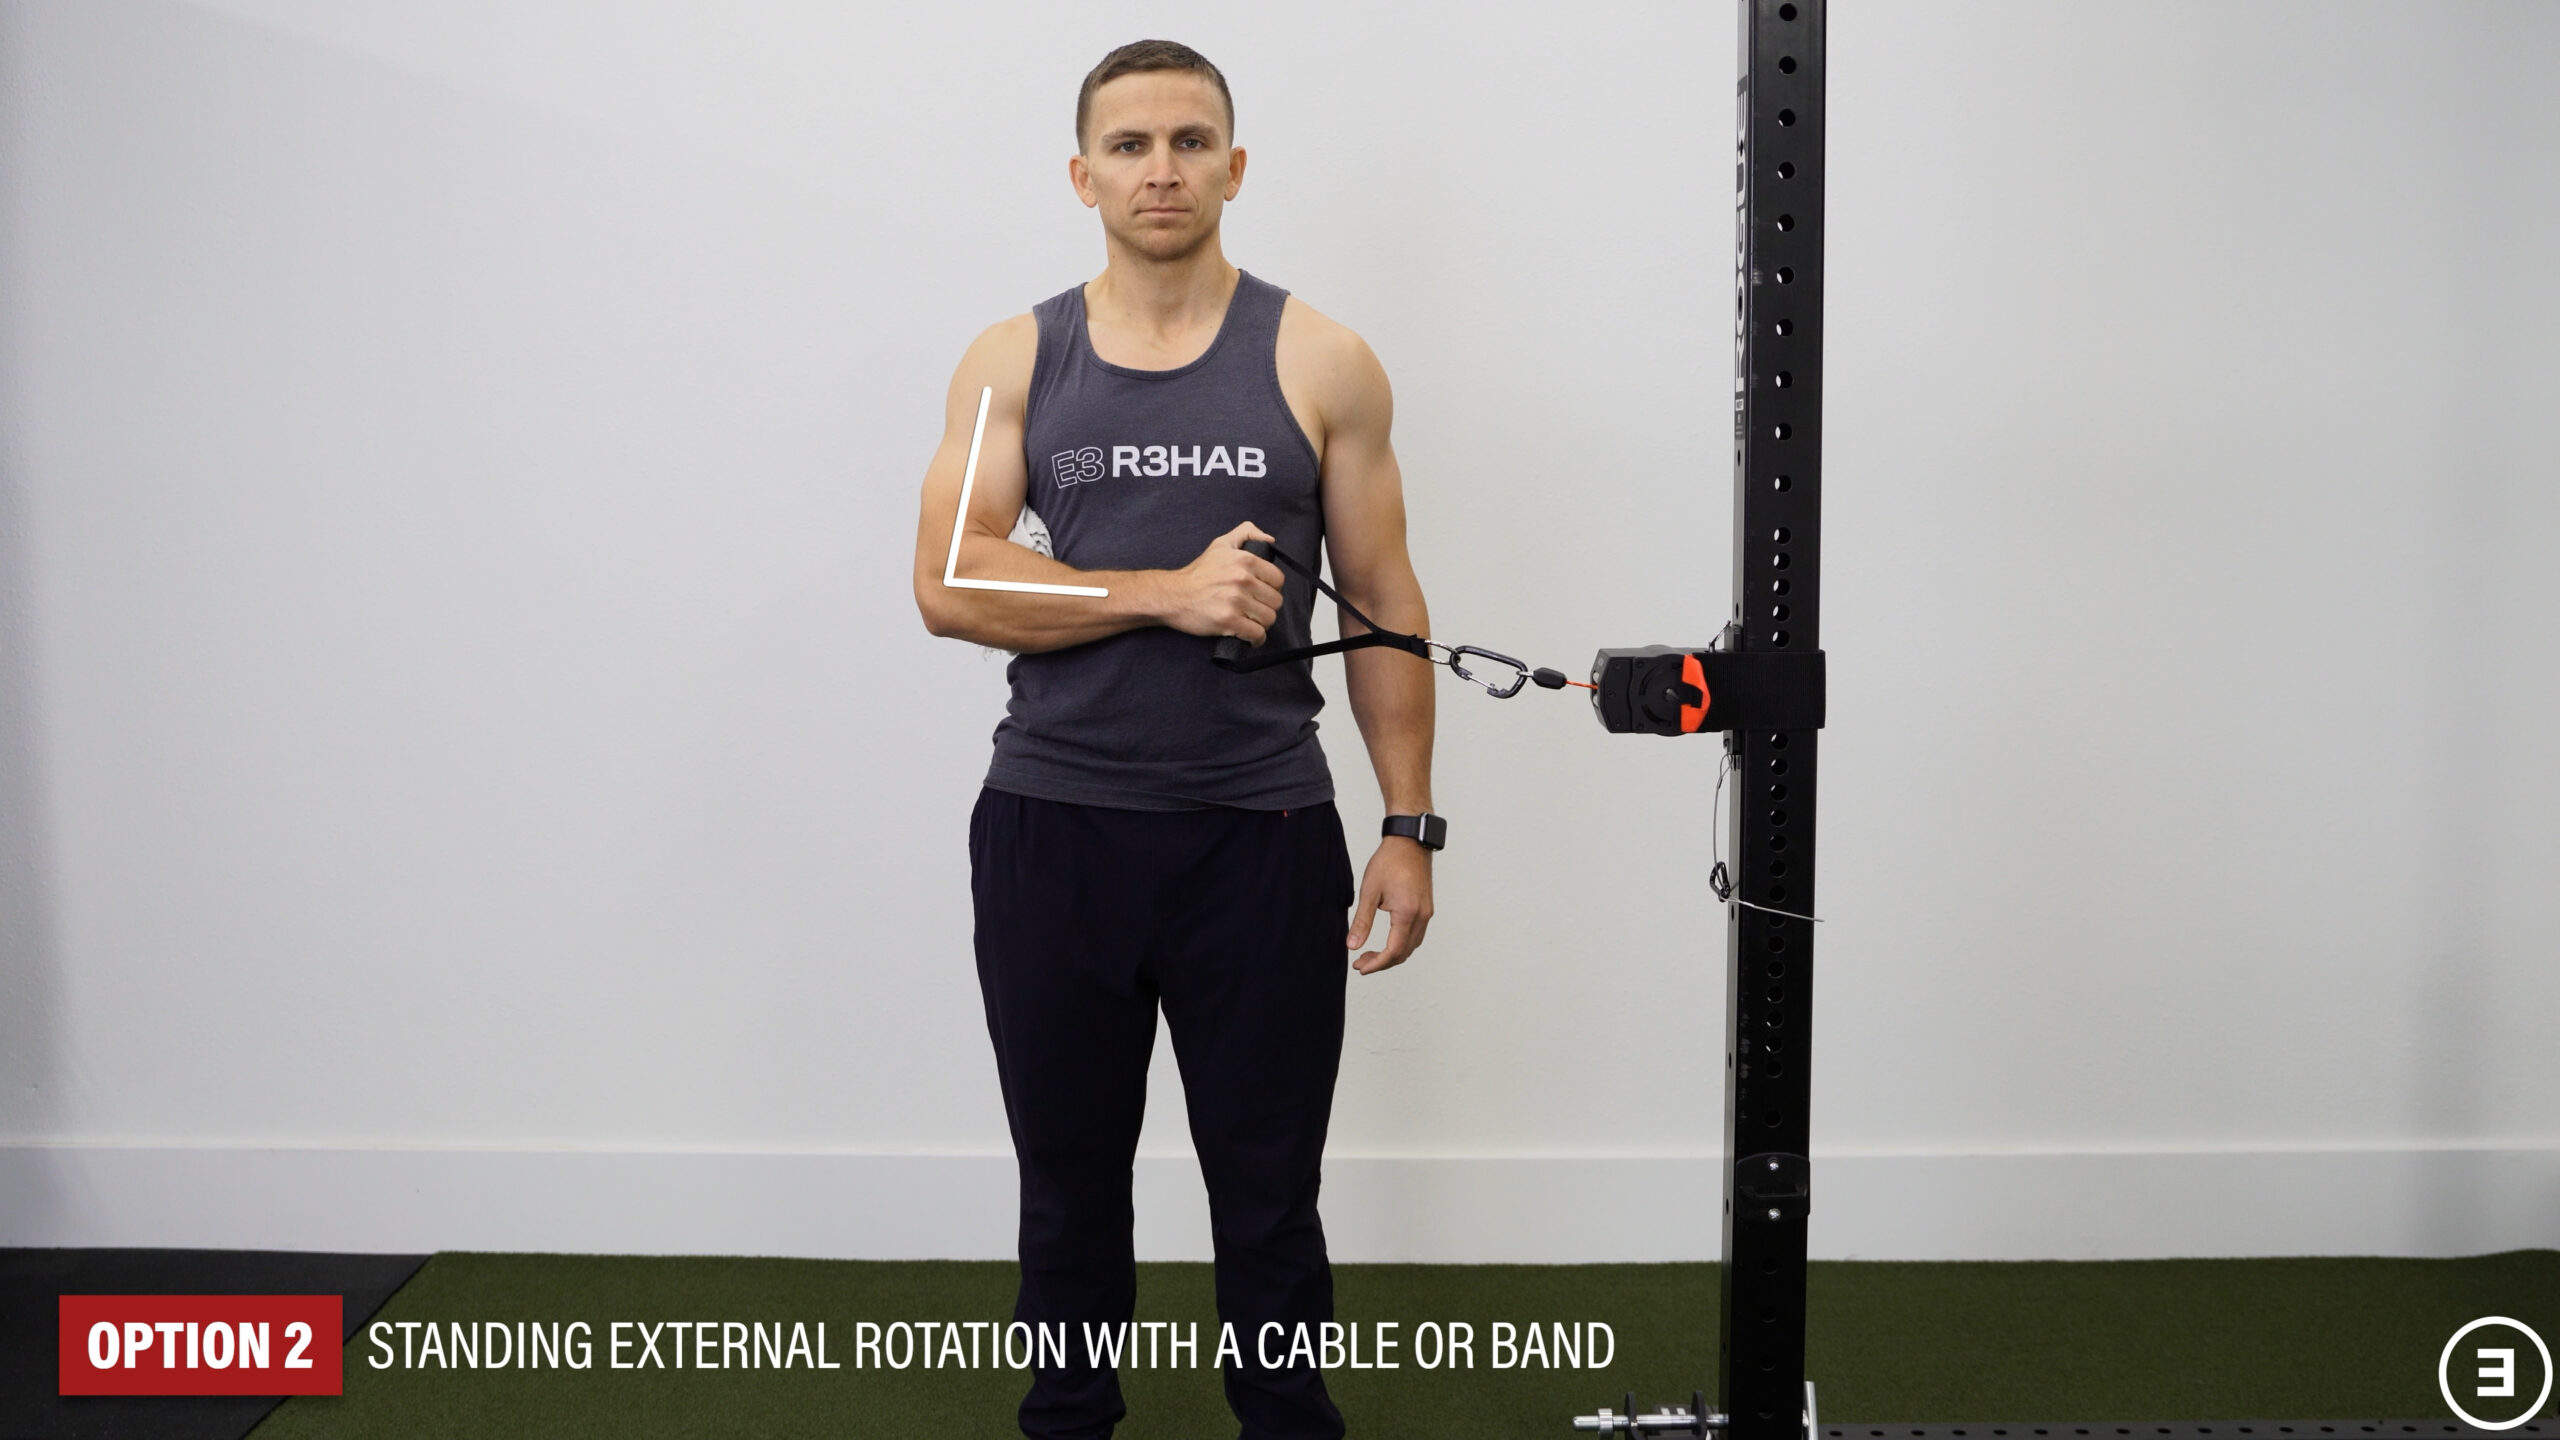
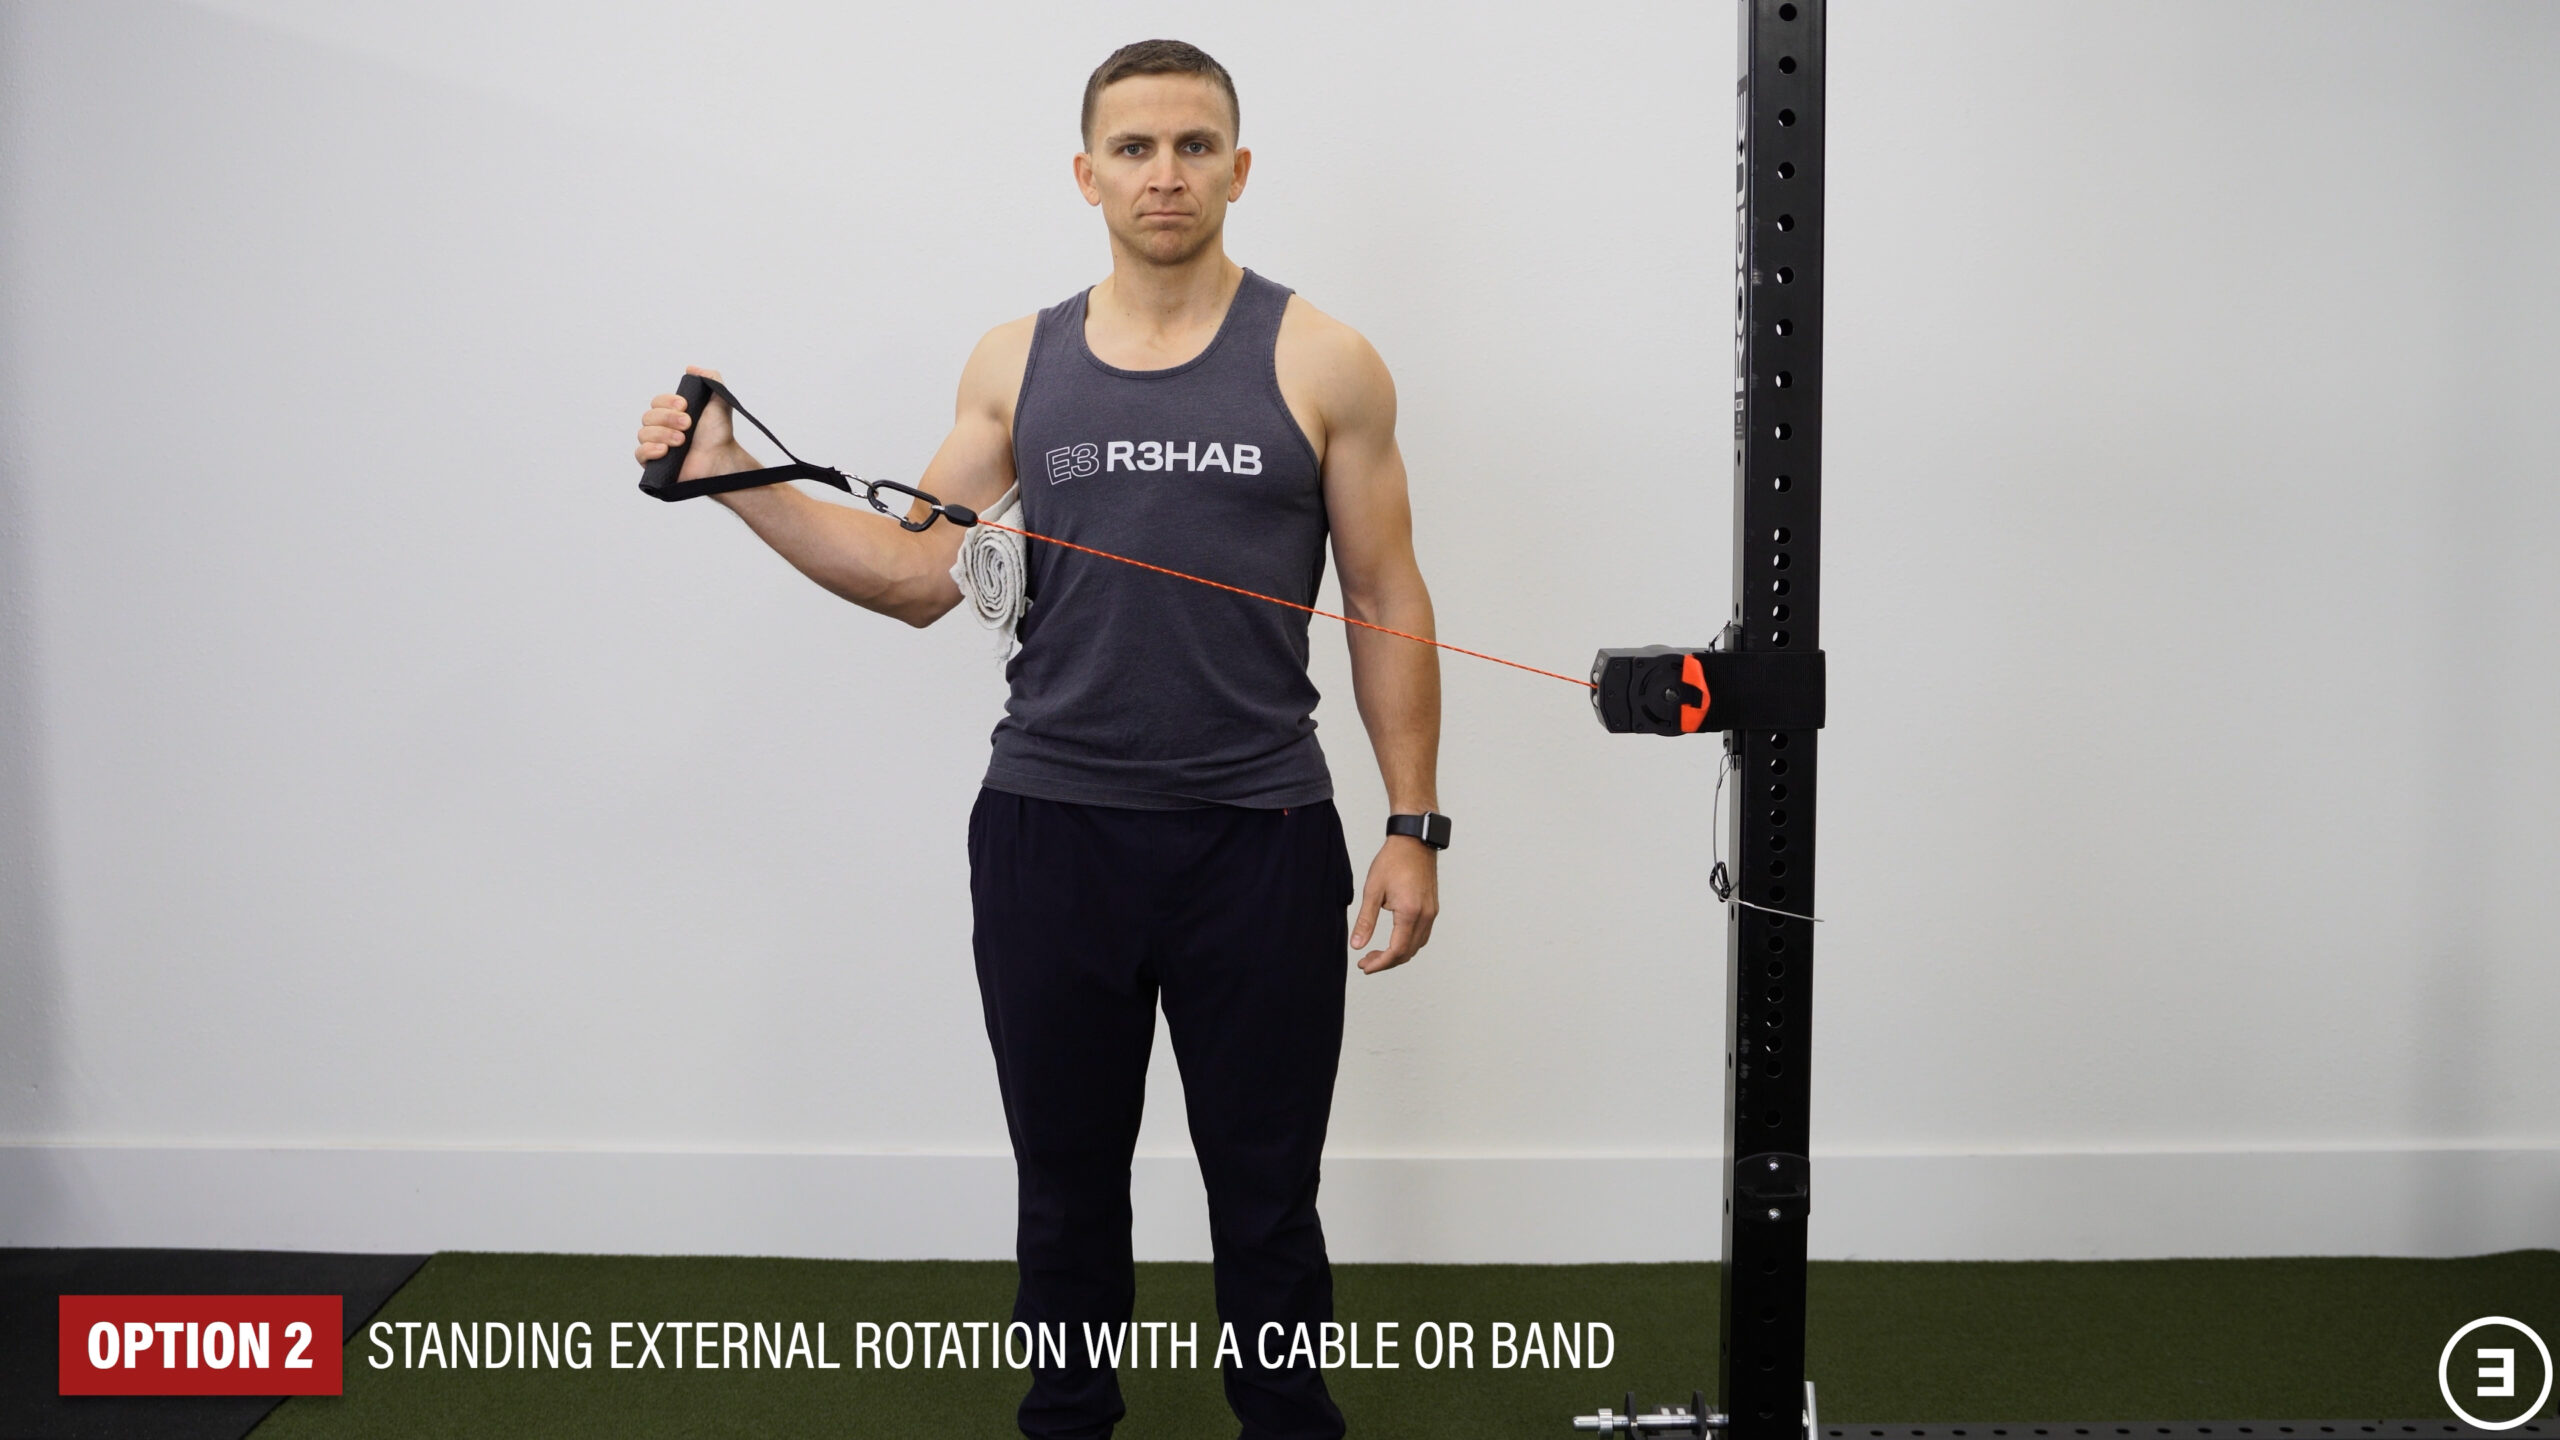
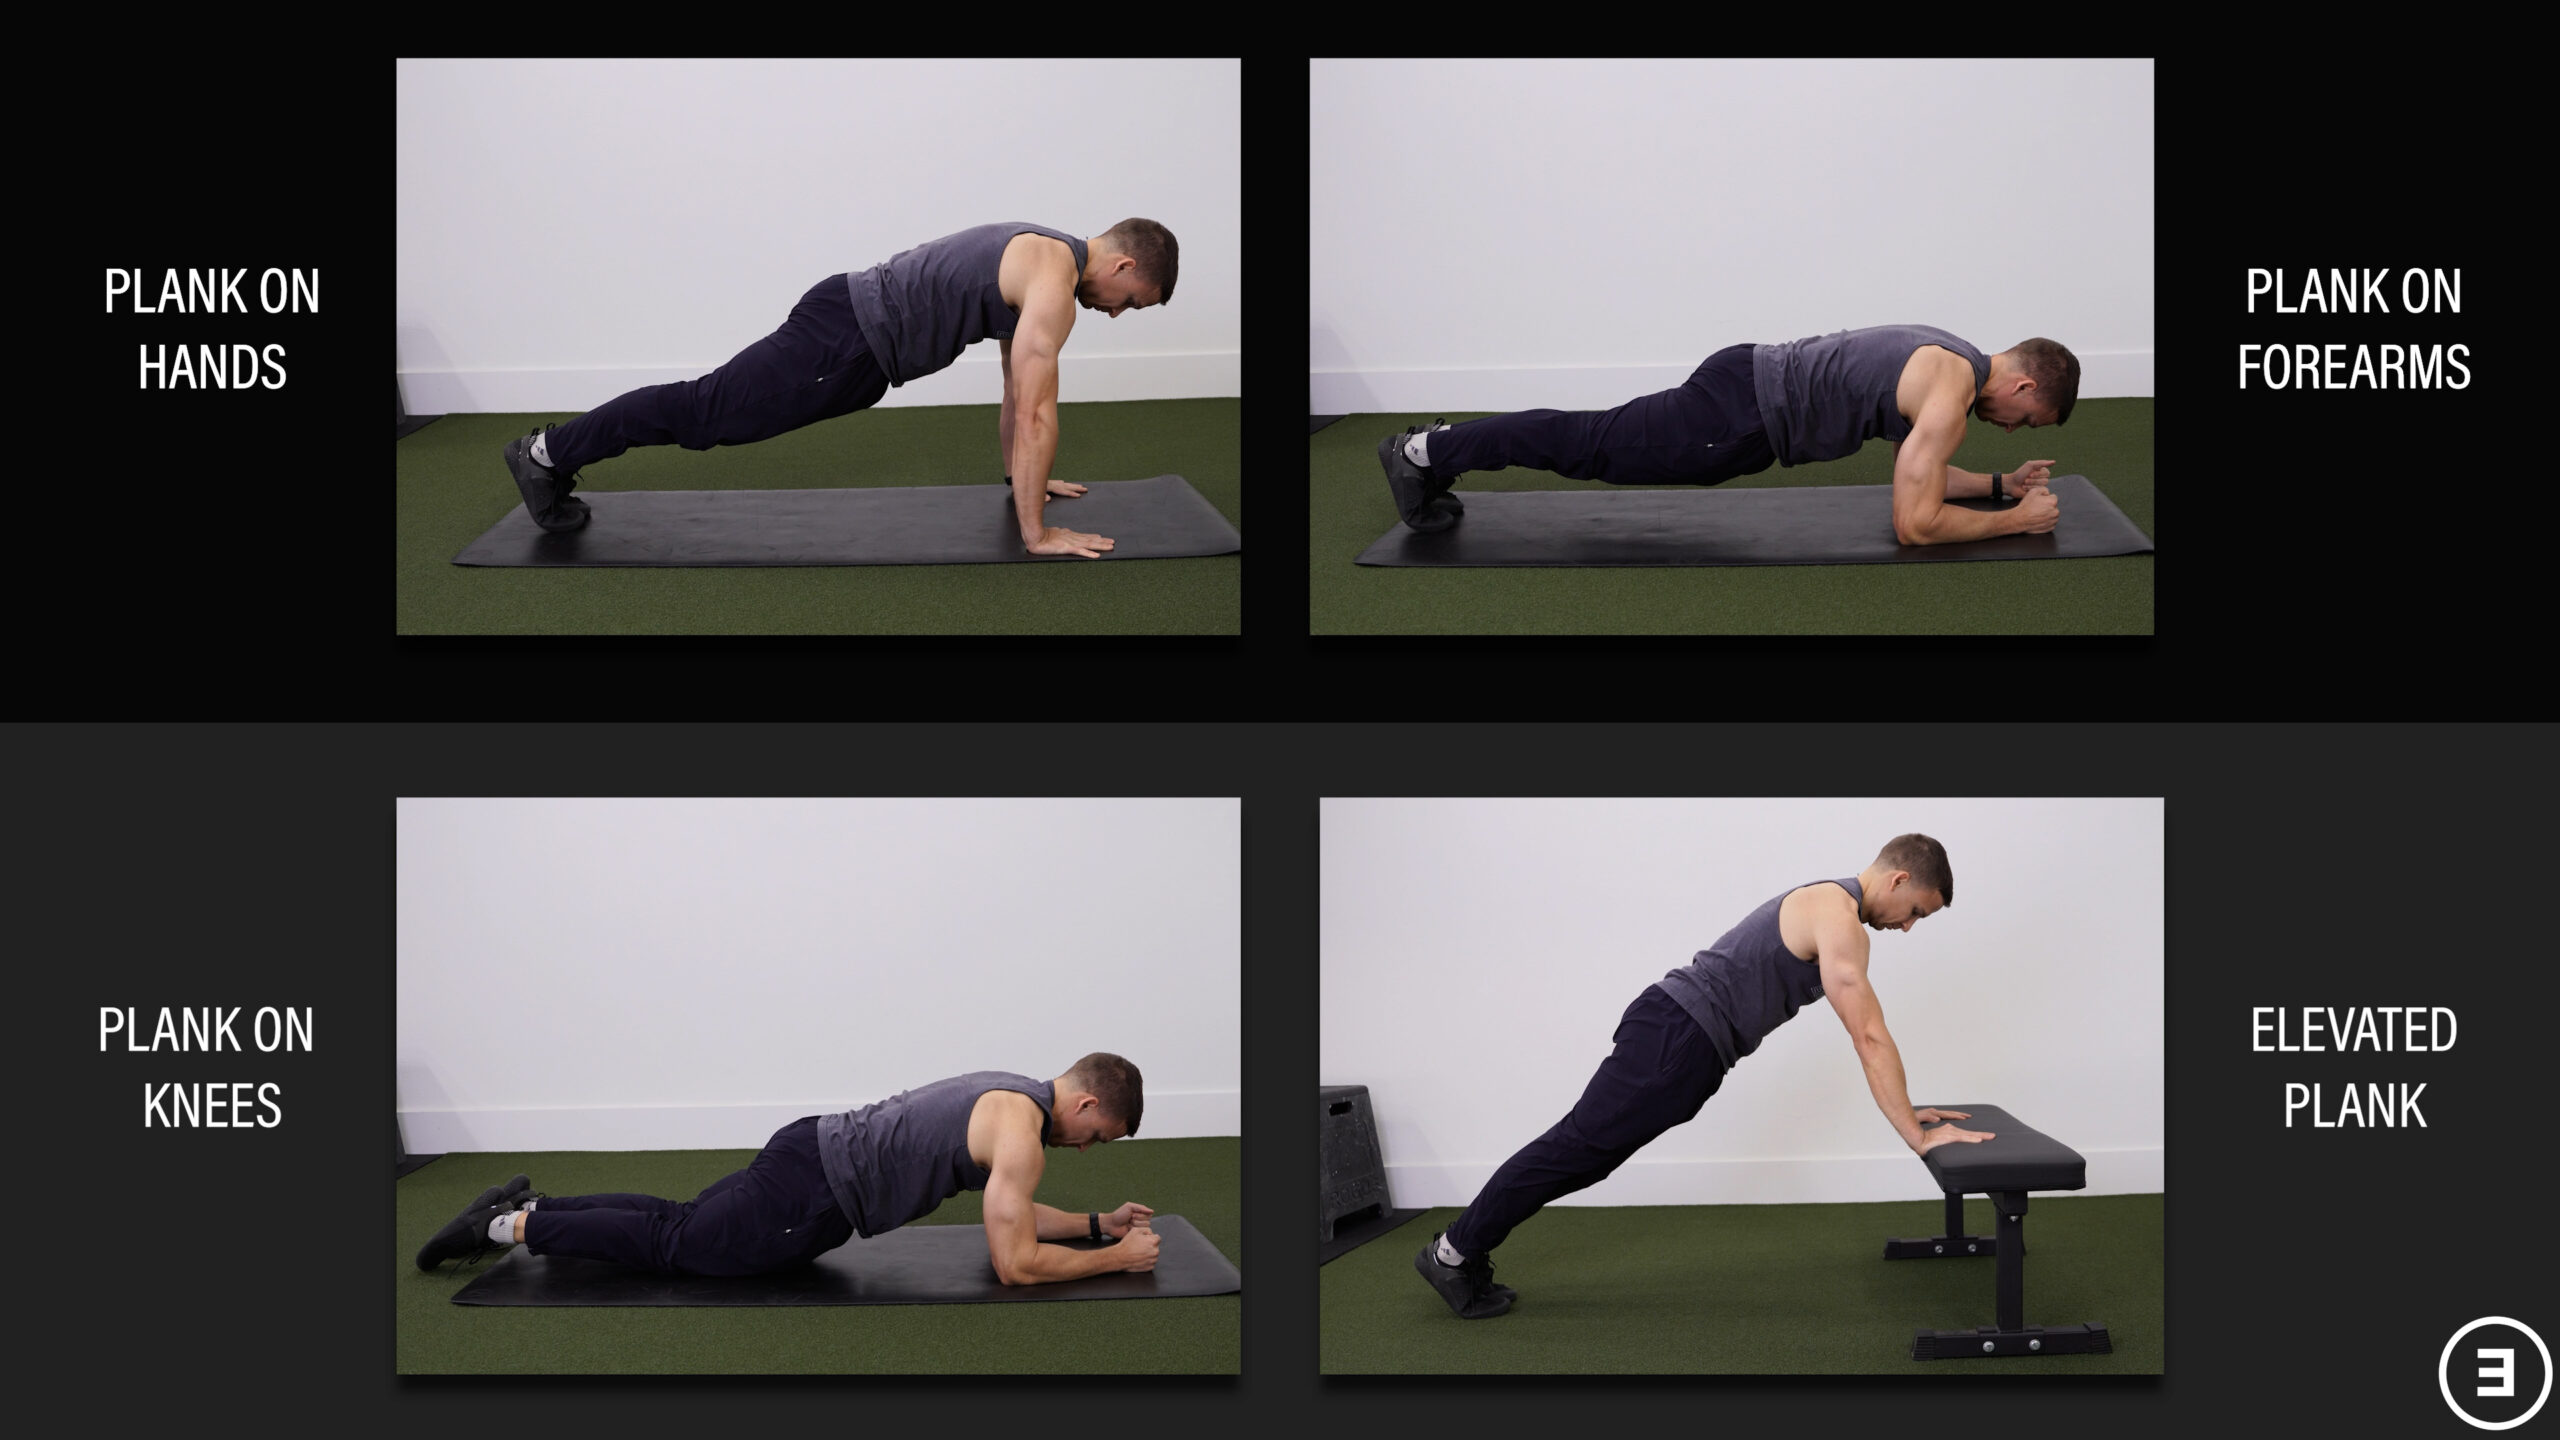
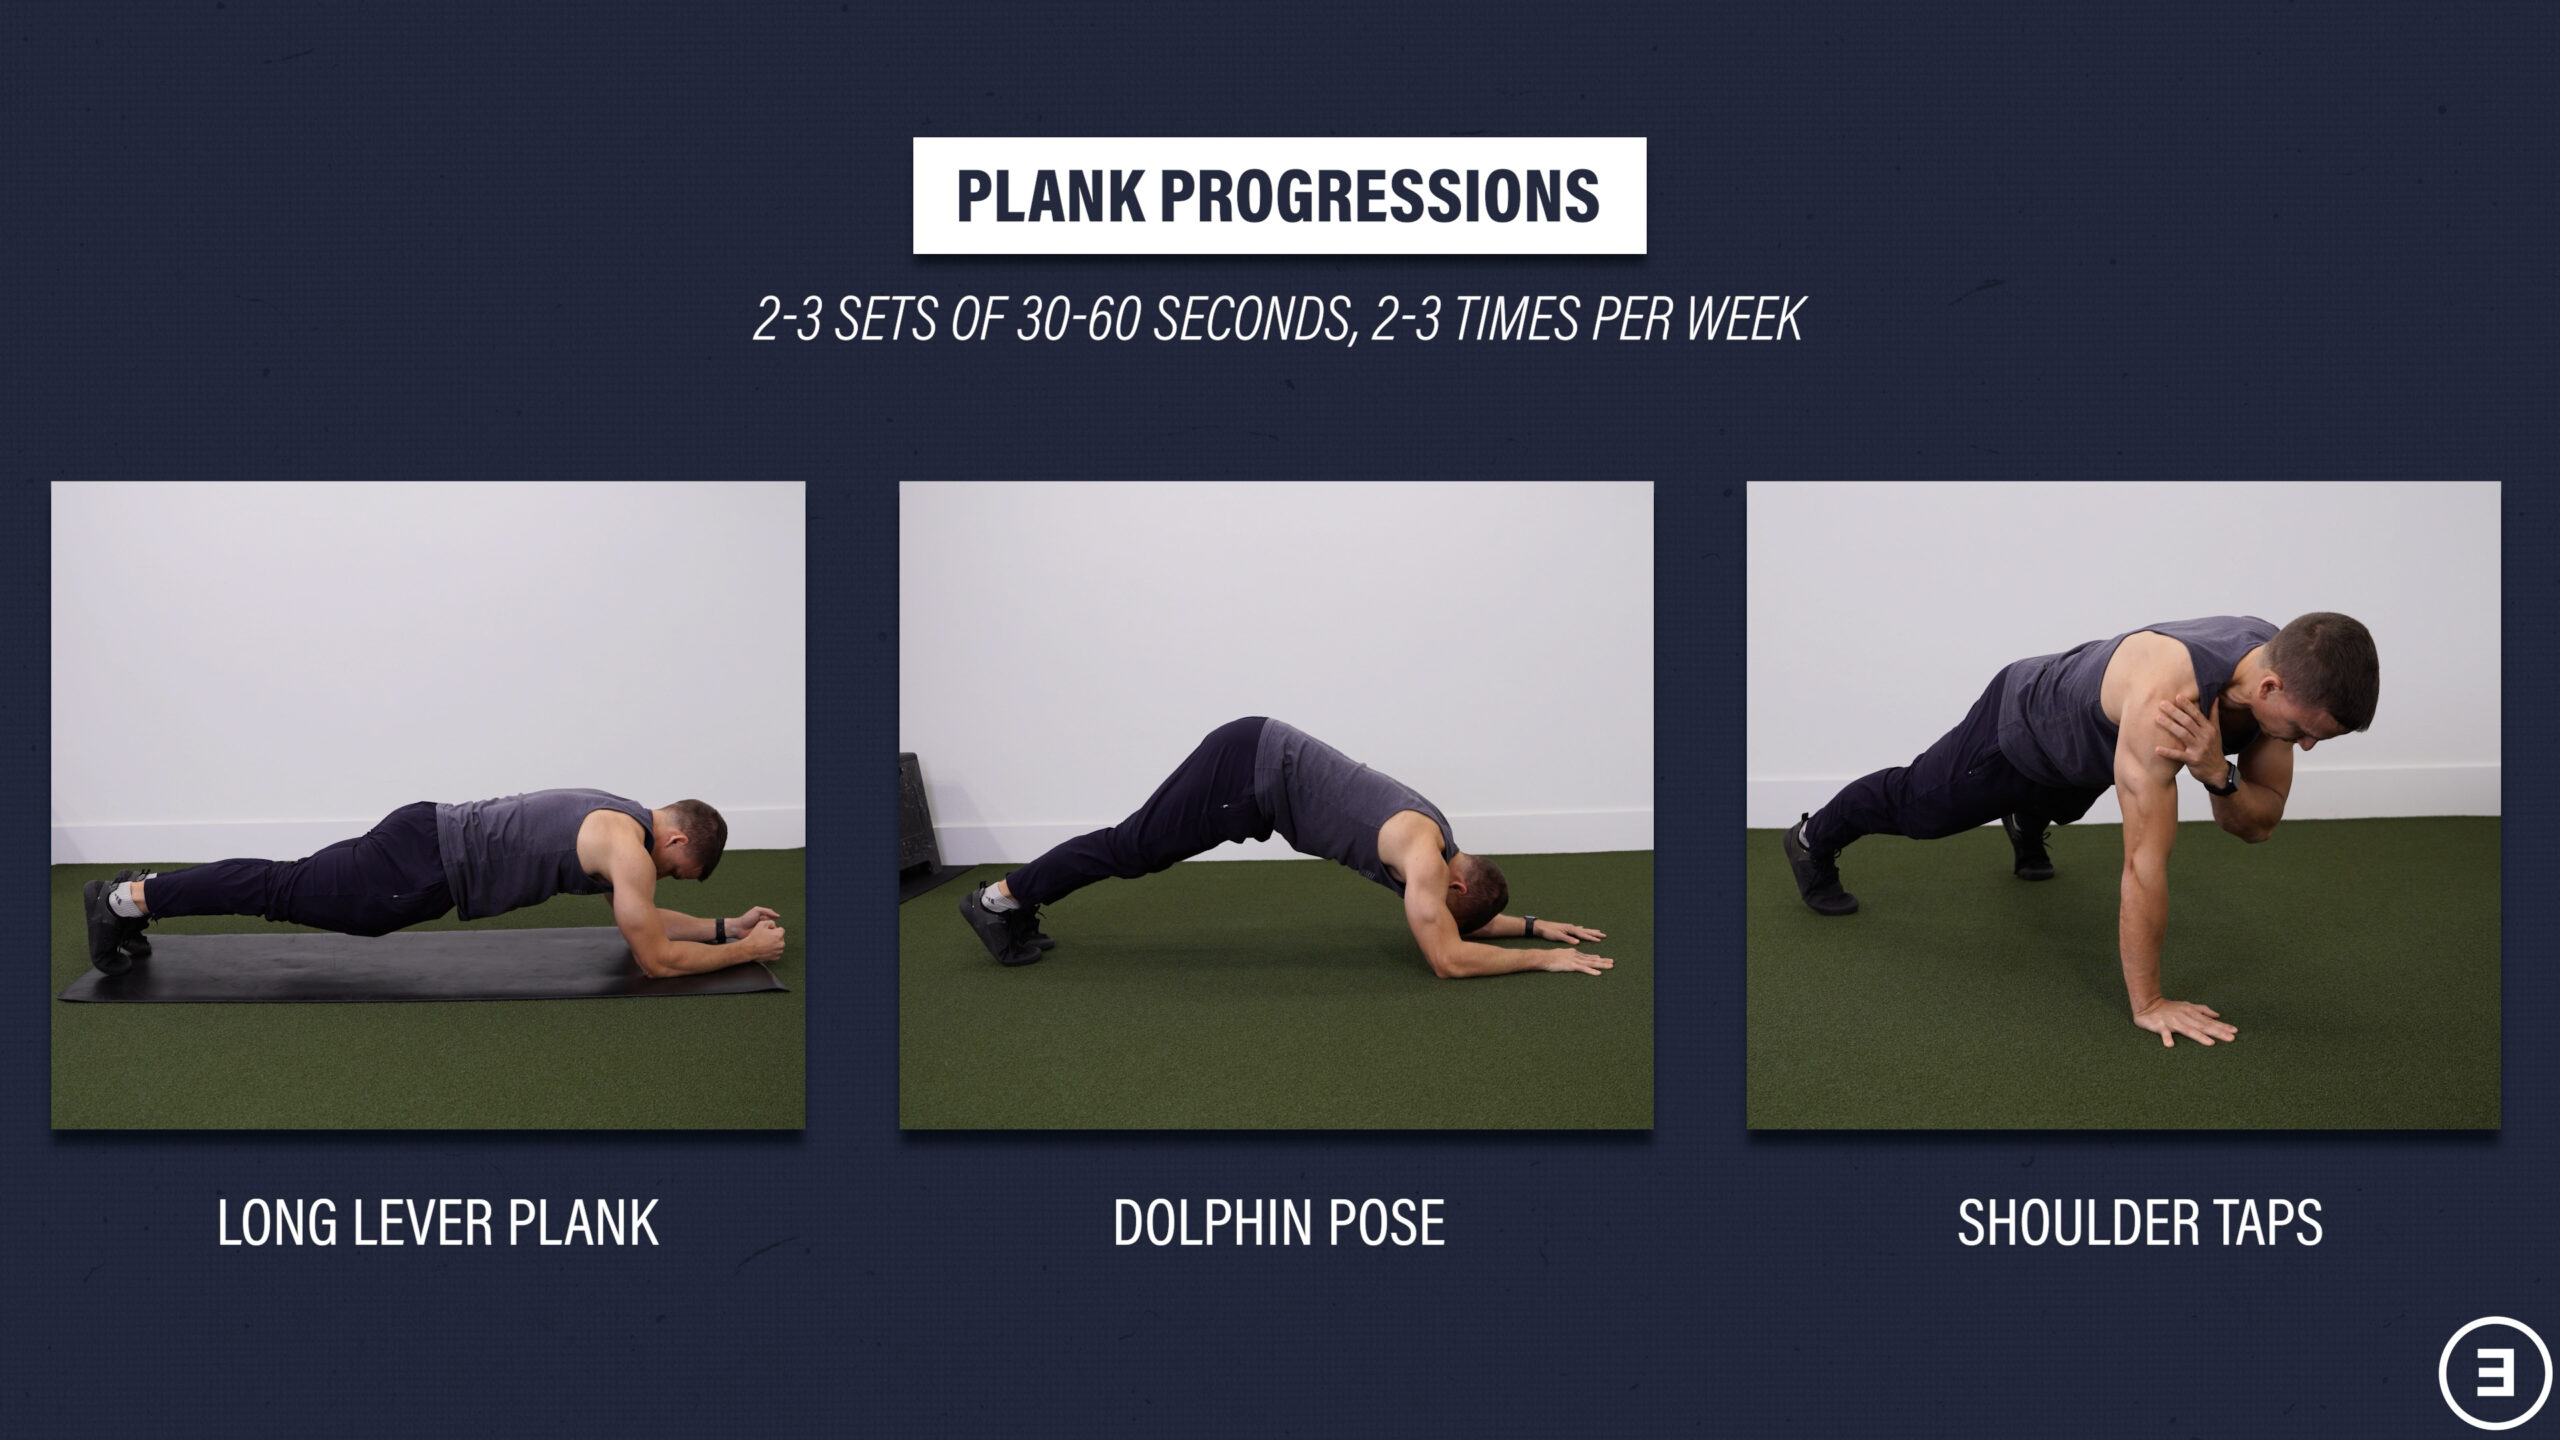
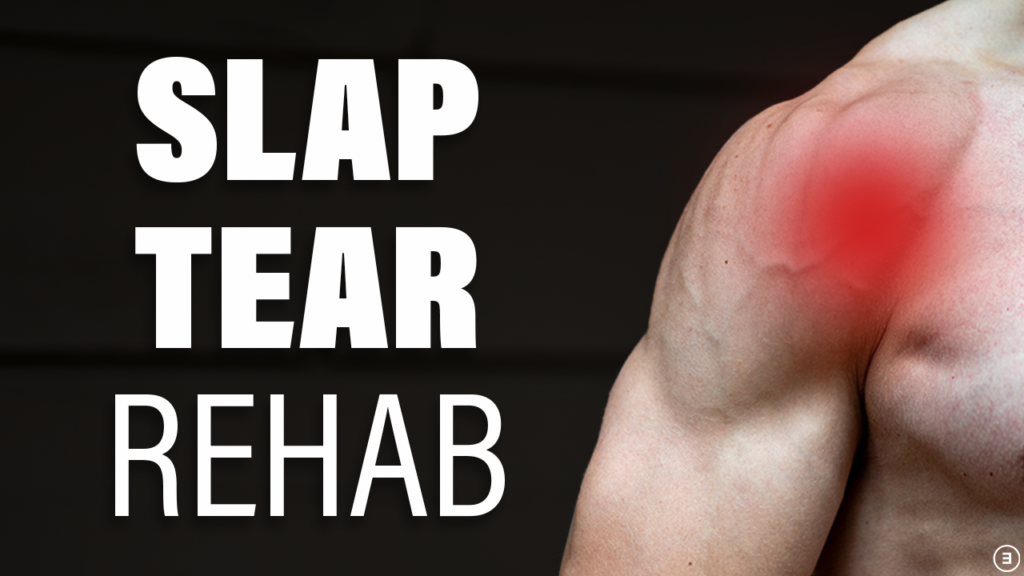
SLAP Tear Rehab

Picture of Marc Surdyka

Marc Surdyka

The purpose of this blog is to each you everything you need to know about SLAP tears, discuss whether or not surgery is always necessary, and provide you with a comprehensive SLAP tear rehab program.

Be sure to also check out our Shoulder Resilience Program!

Shoulder Anatomy & Function

To best understand SLAP tears, it’s important for me to briefly review some basic shoulder anatomy. 

The glenohumeral joint, often referred to as a ball-and-socket joint, is where the glenoid fossa of the scapula, or shoulder blade, meets the head of the humerus, or arm bone. The shallow socket of the shoulder allows it to be the most mobile joint in the body.

https://commons.m.wikimedia.org/wiki/File:Shoulder_anatomy

The labrum (labeled “glenoid lig” in the image below) is a fibrocartilaginous ring that increases the depth of that socket and improves the stability of the shoulder. The tendon of the long head of the biceps brachii blends with the top portion of the labrum. 

Gray's Anatomy Textbook (Public Domain)

SLAP Tears

SLAP stands for “Superior Labrum, Anterior and Posterior.” In other words, the top of the labrum, front and back. 

Snyder and colleagues, who introduced the term in 1990, described 4 types of SLAP tears:

  • Type 1 involves fraying or degeneration of the superior labrum. The labrum remains attached with the biceps tendon intact. 
  • Type 2 is characterized by detachment of the superior labrum and biceps tendon.
  • Type 3 is a bucket-handle tear of the superior labrum with the biceps tendon intact. 
  • Type 4 is a bucket-handle tear of the superior labrum that extends into the biceps tendon. 

Although additional types and subtypes have been presented, the original classification by Snyder continues to be the most recognized and referenced in research and practice.  

When SLAP tears result from acute trauma, they are often categorized as compression-type injuries or traction-type injuries. The most common compression-type injury involves falling on an outstretched hand (FOOSH). Traction-type injuries involve a sudden pull, such as when water skiing, grabbing something overhead to stop a fall, or losing hold of a heavy object.

Traumatic injuries can also involve motor vehicle accidents or a direct blow to the shoulder.

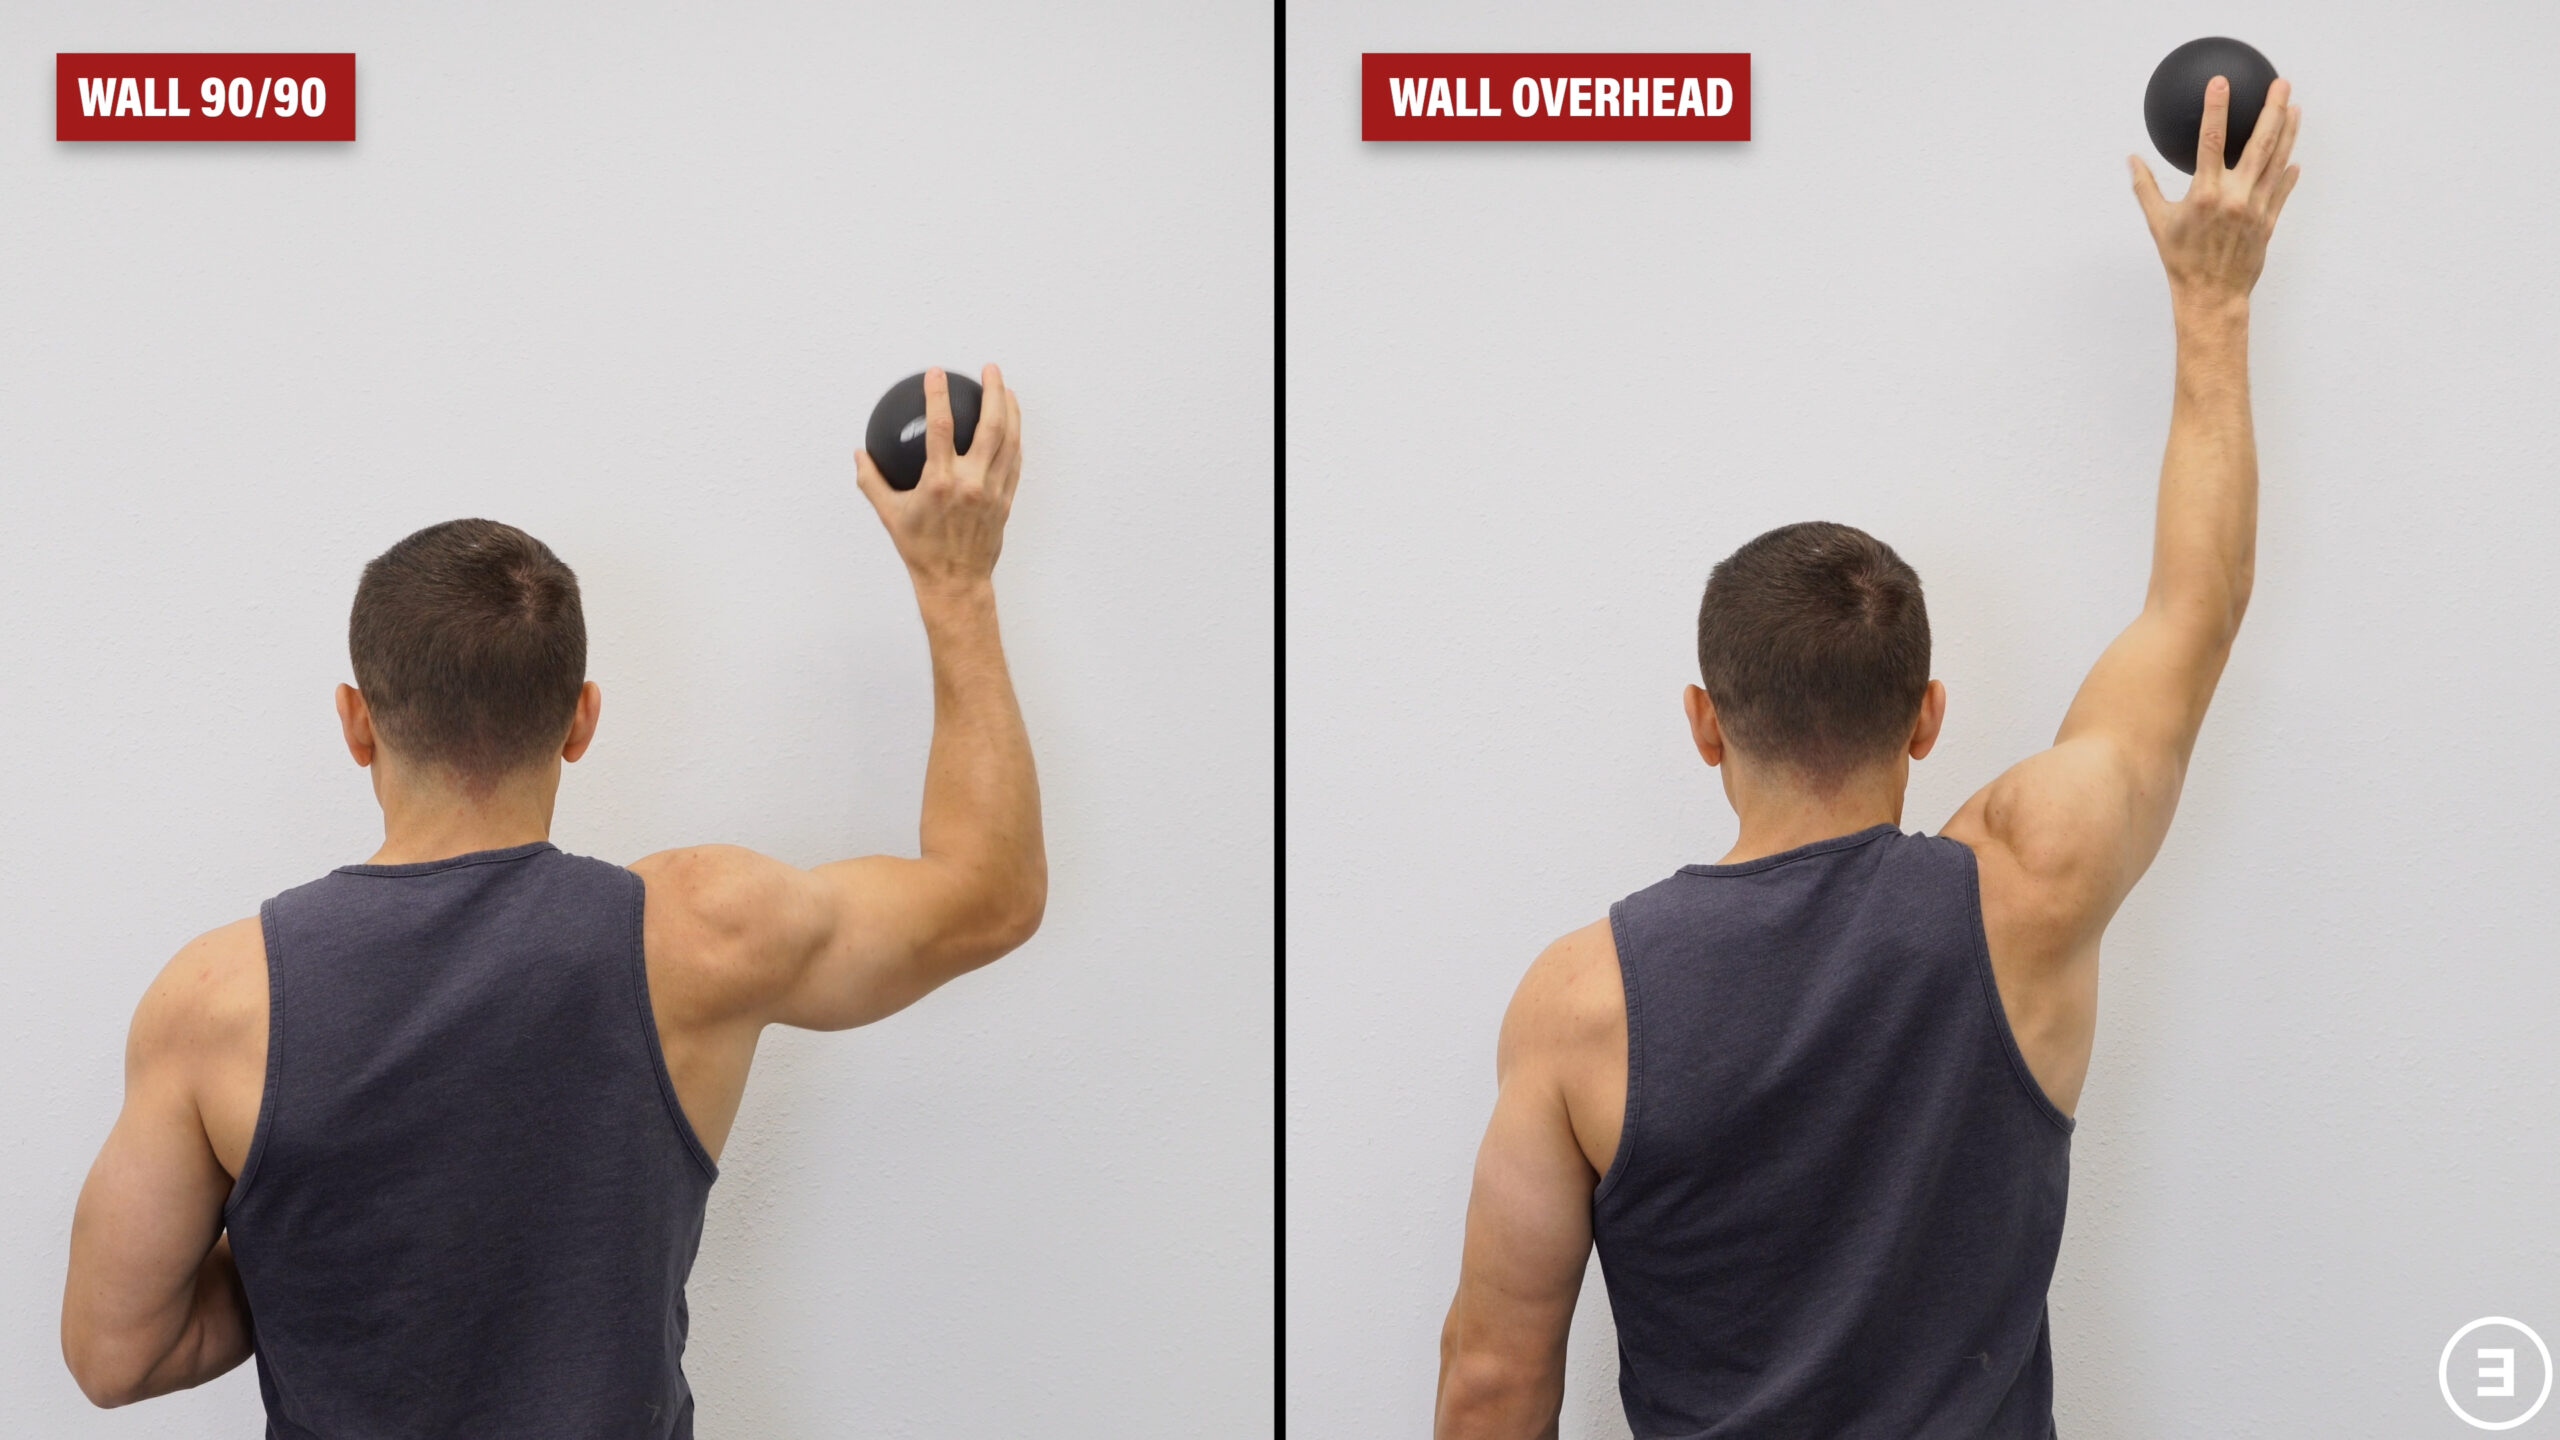
On the other hand, chronic injuries are typically attributed to throwing in sport or other repetitive overhead activities. 

However, not all SLAP tears need to be categorized as injuries because “abnormalities” of the labrum found on imaging are actually quite common in asymptomatic individuals. 

For example, a study by Schwartzberg et al in 2016 investigated 53 adults between the ages of 45 and 60 and discovered superior labral tears in 55% to 72% of these participants despite them having no symptoms. A study by Lansdown et al in 2018 suggests that SLAP tears become increasingly prevalent with aging. 

Tears of the labrum are also common in athletes, especially those involved in overhead sports, such as volleyball and baseball. Miniaci 2002, Lesniak 2013, Del Grande 2016, Pennock 2018, Hacken 2019

For instance, a study by Cooper et al in 2022 examined asymptomatic, elite-level rock climbers and reported that “Labral pathology was present in 69% of shoulders, with discrete labral tears identified in 56%.”

Do You NEED Surgery?

If tears of the labrum are often found in people without any symptoms, this begs the question – “Do you NEED surgery?”

Not necessarily.

Although research has demonstrated that individuals can have favorable outcomes with surgery, it does not guarantee success, especially for baseball players and other overhead athletes. Park 2008, Brockmeier 2009, Neri 2009, Neuman 2011, Park 2013, Erickson 2015, Abdul-Rassoul 2019, Frantz 2021

As of right now, there has only been one study comparing fake surgery to real surgery for type 2 SLAP tears. The study by Schrøder et al in 2017 concluded the following: “Neither labral repair nor biceps tenodesis had any significant clinical benefit over sham surgery for patients with SLAP II lesions in the population studied.” 

I like this statement from a paper by Dr. Cristin Mathew and Dr. David Lintner, who is an orthopedic surgeon, team medical director for the Houston Astros, and former president of Major League Baseball’s Team Physician Association:

“In most cases, an MRI diagnosis of a SLAP lesion is an incidental finding which can cause significant concern in patients leading to unnecessary and sometimes harmful surgical intervention. In order to avoid patient anxiety and overtreatment, it is important to educate patients about the prevalence of asymptomatic SLAP lesions in the general population before an MRI is performed. Once diagnosed, it is highly recommended that the patient understands that the labrum is only one of a number of issues in the shoulder and that a concerted non-operative protocol… has a high likelihood of success prior to considering any surgical intervention.”

This is reinforced by a recent systematic review by Steinmetz et al in 2022 that concluded that “Overall, nonoperative treatment of SLAP tears in athletes can be successful, especially in the subset of patients who are able to complete their rehabilitation program before attempting a return to play.”

I’ll discuss surgery more toward the end of this blog, but for now, let’s dive into the exercise section.

Exercise Overview

I’m going to provide a comprehensive rehab program that addresses shoulder strength, range of motion, and power in all directions.

This may seem overwhelming at first, but the purpose is to cover all possible deficits that may be associated with a shoulder injury. When I’m done presenting all of the exercises, I’ll discuss how you might individualize this information for yourself.

Each exercise category is going to be presented with varying levels of difficulty based on the range of motion, intensity, or complexity of the exercises.

These aren’t perfectly linear progressions, but they’re meant to provide you with options for increasing or decreasing the difficulty of an exercise as needed. Start with the options that match your current tolerance and function, and then gradually progress over time.

If you’ve had surgery, you’ll undoubtedly start with the easiest possible options, if not even easier than what I’m showing, and progress based on healing timeframes, symptoms, and functional measures. 

I also want to highlight that I am focusing on non-operative management. If you’ve had surgery or you’re going to get surgery, you’ll eventually perform most of these movements, but your timeline, precautions, and goals will differ. For example, the number one priority after surgery is to protect the surgical repair. Therefore, you’ll be immobilized in a sling, have range of motion restrictions, and be limited in how much you can lift for a period of time. 

Regardless, you should always receive clearance from your medical doctor and physical therapist prior to initiating any new exercises.

Shoulder External Rotation Strength

The first group of exercises relates to shoulder external rotation strengthening, which is often associated with rotator cuff strengthening.

Here are 3 options to choose from:

Option 1: Side Lying External Rotation – Place your top arm at your side with your elbow bent to 90° while holding a weight in your hand. Rotate your arm outward while keeping your arm at your side. Lower back to your stomach and repeat.

Option 2: Standing External Rotation with a Cable or Band – With your elbow bent to 90° and pinned at your side, rotate your arm outward. Slowly control the motion back to the start and repeat. 

Option 3: External Rotation with Elbow on Knee – Sit with your elbow supported on your knee and a weight in your hand. Slowly lower the weight, rotating your arm inward as far as possible without letting your shoulder roll forward. Then, rotate back to the starting position. 

If you want to progress these exercises, you can perform them in what’s known as the “90/90 position”, in which the shoulder and elbow are bent to 90 degree angles.

If you’re standing, use a cable or band. If you’re lying on your stomach, use a weight.

Any of these exercises can be done for 2-3 sets of 10-15 repetitions, 2-3 times per week.

If you need an easier external rotation strengthening option, try an isometric variation, which is just a static hold.

You can do this in side lying by holding your arm in place or while standing with a ribbon band, cable, or loop band.

The first option prescribed after surgery (when it’s appropriate to do so) typically involves rotating your hand outward into a wall or door frame because you get to control exactly how much force you’re using to make sure the exercise is safe and tolerable.

Any of these options can be done for 2-3 sets of 30-45 seconds. Since isometrics are less fatiguing when performed during the initial stages of rehab, they can be done daily if symptoms allow.

Shoulder Internal Rotation Strength

The second category involves shoulder internal rotation strengthening.

The primary option is standing internal rotation with a cable or band. With your elbow bent to 90° and pinned at your side, rotate your arm inward. Slowly control the motion back to the start and repeat.

If you want to make it more challenging, perform the movement in the 90/90 position.

Either exercise can be done for 2-3 sets of 10-15 repetitions, 2-3 times per week.

For the easier isometric variation, you can use a band or cable, or press into a wall or door frame while standing.

One of these options can be done for 2-3 sets of 30-45 seconds.

Shoulder Elevation Strength

The next group of strengthening exercises relates to shoulder elevation.

The main option is a lateral raise. Raise your arms up to about shoulder height using a band, cable, or weights.

Your arms can be directly out to your side or in what’s referred to as the scapular plane, which is about a 30-45 degree angle in front of you.

Your palms can be facing down or you can turn your thumbs up toward the ceiling. If you have your thumbs up toward the ceiling, you can raise your arms slightly above shoulder height.

If your range of motion allows and you want a slightly different challenge, you can turn either option into a butterfly lateral raise, in which you bring your arms all the way overhead. Your palms will face away from you at the top.

An isometric variation can be performed by spreading a loop band or pushing into a wall. 

Once again, exercises can be completed for 2-3 sets of 10-15 repetitions or 30-45 second holds, 2-3 times per week.

Posterior Shoulder Strength

The fourth category of exercises is all about strengthening the back of the shoulders and upper back. The goal is to begin with your arms down by your side and gradually progress overhead. You probably know these as As, Ts, and Ys.

There are 3 options:

Option 1 requires you to lie face down on an incline bench or elevated surface so your hands don’t hit the ground. Start with As, progress to Ts, and eventually try Ys. At the top of the Ts and Ys, your palms can be facing the ground or you can point your thumbs up toward the ceiling. Add resistance in the form of cuff weights, dumbbells, or weight plates when you’re ready.

Option 2 is performed in standing with cables or bands. For As, you’ll start high and pull low. For Ts, you’ll work at shoulder height. For Ys, you’ll start low and pull high. In addition to repetitions, you can perform isometrics at different ranges of motion. 

Option 3 is performed on the ground. Although you can perform repetitions, isometrics are probably preferred since you’re moving your shoulders through very little range of motion. You can also perform prone swimmers or angels in this position.

If you want to challenge your shoulder extension and internal rotation, you can start the prone angels with your hands behind your back.

Keeping things simple, exercises can be done for 2-3 sets of 10-15 repetitions or 30-45 second holds, 2-3 times per week. The prone angels are more time consuming, so you can use a timer or do less than 10 repetitions. 

Weight Bearing Strength

The second to last strengthening category involves weight bearing.

The standard option here is a plank on your hands or forearms. Squeeze your glutes, keep your low back relatively flat, and think about pushing the floor away from you to work on protraction of your shoulder blades. 

To make planks easier, perform them on your knees or elevate your hands on a bench, countertop, or even against the wall if needed.

There are an infinite number of ways to make planks harder, so here are 3 examples:

Long Lever Plank – While maintaining the same technique, perform a plank with your forearms higher up.

Dolphin Pose – Set up in your forearm plank, take a deep breath out, and press the floor away from you as you bring your hips toward the ceiling. Take a breath in, return to the starting position, and repeat.

Shoulder Taps – Set up in your tall plank, spread your feet, and tap your opposite shoulder in alternating fashion while minimizing movement from your trunk. Be sure to continue thinking about pushing the floor away from you with the hand that’s on the ground. 

These can be performed for 2-3 sets of 30-60 seconds, 2-3 times per week.

Elbow Flexion Strength

Since the long head of the biceps tendon attaches to the labrum, the last exercise category is going to focus on biceps strengthening.

The middle ground here is a seated or standing biceps curl with dumbbells.

To increase the demand on the biceps tendon by placing it on stretch, you can put your shoulder into an extended position while performing curls. These can be done on an incline bench with dumbbells or while standing with a cable column.

Isometrics can be performed with a band or dumbbell, your hand under an immovable object, or by using your opposite hand to offer resistance.

No surprises here: 2-3 sets of 10-15 repetitions or 30-45 second holds.

Shoulder Flexion Range of Motion

Moving on to range of motion, starting with shoulder flexion.

The primary option is supine shoulder flexion with a dowel. Lie on your back with your knees bent and slowly move your arms overhead as far as comfortable while holding onto a stick, PVC pipe, or broom with both hands. Use as much assistance from your uninvolved side as needed.

Your palms should be facing the floor when your arms are down by your side, but you can eventually try with your palms facing up as well.

To increase the intensity, add a light weight to help move the shoulder further overhead. 

To decrease the intensity, move through less range of motion. Another option is to gently rock in and out of shoulder flexion with your arms supported against the wall, on an elevated surface, or on the ground in child’s pose. 

More advanced choices include pullover variations, such as with a dumbbell on a flat bench or across an object to allow for more thoracic extension.

The number of repetitions may vary based on the speed at which you perform a particular movement. Therefore, it might be helpful to think about accumulating 30-60 seconds total per set. 

Also, depending on where you’re at with your rehab, these can be done for 2-3 sets, 1-3 times per day. This scenario is likely reserved for individuals after surgery who need to decrease postoperative stiffness when they’ve been given the green light to do so. 

Otherwise, 2-3 times per week for most people needing to work on shoulder flexion range of motion is plenty.

Shoulder External Rotation Range of Motion

For shoulder external rotation range of motion, the easiest option is to begin in sitting or supine with the assistance of a dowel. With the involved shoulder at your side, supported on a towel, and your elbow bent to 90°, use the unaffected side to move your shoulder in and out of external rotation. Use as much assistance from the uninvolved side as needed.

You can also do this without a dowel by actively rotating your arm outward and working your way up to shoulder height as your range of motion and tolerance improve. 

To increase the intensity, hold a light weight as you slowly lower your hand to the floor. 

If you need to increase the range of motion even more, place your arm on a pad, pillow, or towel.

The recommendations for parameters are similar, which means your frequency and repetitions will vary based on your surgical status, goals, tempo, etc. 2-3 sets of 30-60 seconds of total work, 2-3 times per week is a good baseline for most. 

Shoulder Internal Rotation Range of Motion

For shoulder internal rotation range of motion, you can lie on your back and actively rotate your hand toward your stomach while keeping your elbow bent to 90°.

Like the previous example, work your way up to shoulder height as your range of motion and tolerance improve, and then hold a light weight as you slowly lower your hand to the floor. 

It is unlikely your hand will ever reach the ground. Make sure your arm is supported and try not to let your shoulder come off the floor.

Another (sometimes uncomfortable) option is the sleeper stretch. Lie on your side with your head supported and shoulder and elbow bent to about 90°. Use your top hand to gently push your other hand down toward the ground.

If you decide to work on your shoulder internal rotation range of motion, aim for 2-3 sets of 30-60 seconds of total work, 2-3 times per week. Since the sleeper stretch can create an achy feeling in the shoulder, shorter hold times may be necessary.

Keep in mind that if you perform the external rotation strengthening exercise with your elbow on your knee that I mentioned earlier, it should also improve your internal rotation mobility if you move slowly through as much range of motion as tolerable. 

Compound Pulling Exercises

Okay. Three more, somewhat advanced categories, beginning with compound pulling exercises, like rows and pull-ups. A simple rule of thumb is that horizontal pulling movements are going to be less demanding on the shoulder than vertical pulling movements, especially ones that require hanging.

Three options that can be performed with a single arm if needed are seated rows, cable rows, and banded rows. Increasing or decreasing the difficulty is based on the resistance used. 

Inverted rows and TRX rows are good options because you can change your body position to make the exercise easier or harder. For example, being more upright will make the exercise less challenging while being more horizontal will make the exercise more challenging. 

For most horizontal rows, think about bringing your arms back until they’re in line with your trunk and elbows bent to about 90 degrees.

As you work toward vertical pulling movements, you can use angled options to gradually expose yourself to increasing amounts of arm elevation.

Prior to trying pull-ups, make sure you’ve built up your strength with other exercises, like different pulldown variations, since you can use as little weight as needed to make them tolerable. Single arm is preferred, at least initially. 

Whether you’ve had an injury or not, pull-ups are one of the hardest things to do in the gym, so it can be helpful to start with assisted versions using a machine, band, or your legs. You can also do isometric holds or eccentrics, in which you focus on the lowering portion of the exercise.

Additionally, it’s important to point out that it’s likely best to start with a neutral grip because it is less demanding on the biceps than a supinated grip, or chin-up, and requires less shoulder range of motion than a pronated grip, or pull-up.

There’s a wide range of possible rep schemes here, so I’m going to say you can do 2-3 sets of 5-20 repetitions, 2-3 times per week. Earlier phases of rehab will typically use higher rep ranges, while later phases may include lower rep ranges as goals change based on symptoms, strength, etc. 

Compound Pushing Exercises

Compound pushing exercises follow the same rationale – in general, horizontal movements are going to be less demanding than vertical movements although there might be some exceptions like dips.

Horizontal pressing can be done with bands, cables, or dumbbells. 

One of the best options to build up to would be a push-up, which can be made easier by elevating your hands and harder by elevating your feet or increasing the range of motion. 

A dip is technically a horizontal pressing exercise, but it’s an advanced variation that takes significant time and effort to build up the strength for, similar to a pull-up. 

As you work your way up to vertical pressing exercises, you can do angled movements like an incline dumbbell press or landmine press. 

The good thing about an overhead press is that you can use as little weight as you need, and you can choose the arm path that’s most comfortable for you.

Once again, you can do 2-3 sets of 5-20 repetitions, 2-3 times per week.

Reactive and Power Exercises

The last category of exercises relates to reducing the fatigability of your shoulder and improving its power, coordination, and reactivity. The goal is to be able to absorb and generate forces quickly, and do so for extended periods of time if necessary.

Like some of the other exercise categories, the number of options here is limitless, so I’m just going to provide some examples. Exercises can be made easier or harder by manipulating the range of motion, weight used, or the effort that you put into the exercise. Keep in mind that more weight or resistance is not always better.

With a medicine ball, you can do:

  • Chest passes against the floor, against the wall, or while lying on your back
  • Overhead slams or rainbow slams
  • And a ton of different throw and shot put variations

With a bouncy ball, you can perform dribbles against the wall at different angles and positions of your shoulder.

With a ball that you can comfortably hold in one hand, you can carry out different catches and throws with a partner or on your own in prone, supine, side lying, or standing.

Like I said, the possibilities are endless. 

Since you’re aiming for maximal power with the medicine ball options, aim for 2-3 sets of 4-8 repetitions. They’re not meant to be for endurance or cardio, at least in this context. The ball should be moving fast!

For the dribbles, catches, and throws, the repetitions may vary, so you can think about accumulating 30-60 seconds of total work per set for 2-3 sets.

Individualizing Your Program

How do you individualize all of this information into a program for yourself? Well, let me start by listing out four caveats:

  1. You don’t have to strictly adhere to the sets, reps, and frequency that I provided in this blog. Each person is going to have unique circumstances that will influence their choices.
  2. You don’t have to do every exercise or exercise category. For example, if you’re not struggling with your shoulder external rotation range of motion, there’s no need to do those exercises. Similarly, pull-ups, overhead presses, and medicine ball throws may not be relevant to your goals. 
  3. I didn’t list every possible exercise. For instance, I didn’t include a shoulder extension range of motion category because if you perform a variety of exercises like incline dumbbell curls, prone angels, push-ups, and dips, your mobility will improve. However, you certainly can include lift-offs with a dowel in standing or prone or dynamic stretches if they’re needed to accomplish your goals (pictured below).
  4. Where you’re at in your rehab will influence your emphasis. I discussed most of the strengthening exercises first, but if you’ve had surgery, restoring range of motion is going to be a bigger priority initially.

Here’s a sample program for someone working out twice per week who is training at a high level and trying to improve their shoulder flexion range of motion.

I want to emphasize that this example might not be suitable for you because your program will be dependent on your symptoms, work capacity, goals, etc. This will be way too challenging for some individuals and not enough training in a week for others. 

You can mix and match exercises any way that you want, but in general, it’s helpful to start with a dynamic warm-up, move on to power movements, work through compound strength exercises, and then finish with accessories. Average rest times should be 1-3 minutes in length. 

With any of the range of motion and strengthening exercises, focus on good technique, a slow and controlled tempo to start, and keep the exercises tolerable. 

It’s also important to set realistic expectations since non-operative management may require 3-6 months of dedicated effort, and ups and downs are likely to occur along the way.

Returning To Sport and Activities

The last thing I want to point out is that rehab doesn’t just start and end in the gym. 

If you’re a baseball player, you’ll have to work through a throwing program and gradually increase your exposure to throwing, catching, and hitting in practice and then games. 

Plus, you’ll have to consider lower body exercises, cardiorespiratory fitness, and other aspects of training. 

If you’re an Olympic weightlifter, you’ll have to slowly build up your strength, tolerance, and confidence for lifting heavy weights overhead. 

If you’re a swimmer, painter, or regular gym-goer, you’ll have to make other modifications to your training, work, or day-to-day activities.

When Is Surgery Indicated?

I’ll start by continuing the conclusion from the paper I quoted earlier: “If an adequate attempt at non-operative management fails, surgical intervention must be carefully weighed with care, with an understanding that the prior level of performance in overhead athletes may not be achieved.”

Surgery doesn’t guarantee long-term success and there are more inherent risks associated with it, which is why 3-6 months of conservative management is the preferred approach initially in most cases. 

Research has also demonstrated that some athletes can “fail” one attempt at rehabilitation, yet succeed on a second attempt. This at least partially highlights the importance of a thorough and well-structured rehab program. 

The surgical options are beyond the scope of this blog as trends have changed over the years and a surgeon’s preference will be influenced by your age, goals, symptoms, function, imaging findings, and other factors. Kim 2003, Weber 2012, Patterson 2014, Erickson 2015, Erickson 2016, Davis 2021, Frantz 2021 

The final decision should be based on a collaborative approach and discussions with your medical doctor, physical therapist, and anyone else who may play a significant role in your care or day-to-day decision making. 

When surgery is performed, please understand that a comprehensive rehab program is still critical to long-term success and a full recovery may take 9-12 months.

Summary

In summary, the labrum is a fibrocartilaginous ring that helps improve the stability of the shoulder. SLAP stands for “Superior Labrum, Anterior and Posterior.” In other words, SLAP tears refer to tears to the top of the labrum, front and back. 

Although SLAP tears can occur traumatically or gradually over time, not all SLAP tears need to be categorized as injuries because “abnormalities” of the labrum found on imaging are actually quite common in asymptomatic individuals. 

Regardless, 3-6 months of rehab, consisting of exercises addressing limitations in range of motion, strength, and/or power, is usually the preferred strategy for initial management. 

Surgery does not guarantee long-term success, but if it is indicated, the rehab process may take 9-12 months depending on the operation and goals of the individual.

Do you want a structured plan that’s going to provide you with the knowledge and tools to feel more confident, capable, and resilient than ever before? Check out our Shoulder Resilience Program!

Want to learn more? Check out some of our other similar blogs:

Shoulder Impingement, How to Improve Shoulder Range of Motion, Frozen Shoulder

Thanks for reading. Check out the video and please leave any questions or comments below. 

Newest Articles